
Searches for vulnerabilities require special knowledge, extensive experience, and a sixth sense. But what about novice security researchers? They have no experience and cannot gain it because don’t know where to start from. This is where automated vulnerability scanners come into play. In this article, I will present the main types of such programs and explain how to use them.
As you are well aware, IT specialists (and hackers as well) try to automate everything. They have even created automated vulnerability scanners that do all the dull work – while you can relax drinking coffee (or beer). All you have to do is specify the target address and push the Start button (or press Enter if you prefer the terminal mode).
Of course, the scanner will detect only the most typical vulnerabilities, and to continue the research, you must know not only how to push the button. But still, why don’t you save some time and effort by using automated vulnerability scanners? In many cases, their app is fully justified.
Categories and methods
In real life, there are no universal tools, and vulnerability scanners are not an exception. Normally, they search only for vulnerabilities of a certain type. In this article, I will address the following categories of scanners.
- Web vulnerability scanners (WVS). This is the largest category that includes both well-known and popular products (e.g. OWASP ZAP and sqlmap) and less known (but still useful) ones (e.g. Vega);
- Mobile app analyzers. The number of good products in this category is very small, and I will introduce the best ones;
- Semiuniversal scanners for local corporate or home networks. Such scanners are complex tools for analysis and enumeration of network equipment. Many of them can also search for vulnerabilities; and
- Highly specialized scanners designed to analyze the source code, Git/SVN repositories, and other data arrays too large or unsuitable for manual analysis.
All scanners are divided into free-license and commercial ones. Open-source utilities are free, while commercial products may cost significant sums of money. Too bad, neither the HackMag Editorial Board, nor myself are rich enough to buy commercial software for reviewing purposes. Therefore, if not specified otherwise, this article evaluates official trial versions of commercial products.
WARNING
This article is intended for educational purposes only. Neither the author nor Editorial Board can be held liable for any damages caused by improper usage of this publication. Remember that accessing any information without prior written consent of its owner is a criminally punishable offence.
The testing can be performed either in the Black-Box or White-Box mode. The first mode requires the pentester (and pentesting tools) to interact with the audited service only through the user interfaces. For instance, if you test a website in the Black-Box mode, you can test it only as a visitor (i.e. without access to the source code or privileged accounts). If you test an app, you don’t have access to its source code. In other words, the Black-Box mode implies that you have no advantages in comparison with an ordinary user.
In the White-Box mode, the pentester (or hacker) has access to the internal structure of the target object. If you test a website, you have its code; if you test a server, you know its OS version, know what software is installed on it, and have access to some files. In this case, your capacity is much greater, and you are able to identify a vulnerability whose exploitation requires advanced hacking skills.
This article addresses scanners operating in both modes; accordingly, consider it a universal guideline suitable for nearly any situation. Should I forget anything, don’t hesitate to tell me this in comments.
Sn1per
- Price: Community edition – free, Professional edition – starting from $150
Sn1per is a powerful framework for automated security analysis. Its developer is well-known 1N3, the founder of XeroSecurity. His other famous creations include Findsploit (a script for quick search for exploits to a vulnerability) and PrivEsc (a collection of privilege escalation scripts and exploits).

Sn1per is shipped in two versions. The Community edition is free, while the Professional edition costs $150 and up.
The free version of the scanner collects the basic information (IP address of the target, whois, DNS); runs Nmap (including NSE scripts) to search for open ports and identify services; searches for common vulnerabilities and exploits them automatically; tries to get access to all file shares (FTP, NFS, Samba); launches Nikto, WPScan, and Arachni for all found web apps, etc. The utility supports integration with Hunter.io, OpenVAS, Burp Suite, Shodan, Censys, and Metasploit.
The installation supports Docker and consists of just two commands:
docker pull xerosecurity/sn1per
docker run -it xerosecurity/sn1per /bin/bash
To run a scan, type:
sniper -t [TARGET]
To use Sn1per to its full capacity, use additional keys:
-o– use the OSINT engine;-re– recon;-fp– full port only scan mode;-m stealth– stealth mode; the target has no idea that it is scanned-m webscan– Sn1per operates as an ordinary WVS;-b– use brute-forcing if necessary;-f [FILE]– scan several targets listed in[FILE]at once;-m nuke– the nuke mode: brute-force enabled, full port scan enabled, OSINT enabled, recon enabled, workspace & loot enabled;-m massvulnscan– a very powerful function in combination with-f: the program scans all the specified targets for known vulnerabilities. This function is especially useful if the tested company has many hosts;-m discover– search for all hosts on the specified subnetwork and scan them all. This function is extremely useful if you don’t know all the potential targets.
A sample scan report is available in the author’s repository.
Wapiti3
- Price: free
Wapiti is an American deer a free web app vulnerability scanner. At the time of the writing, the last version was 3.0.3 (released on February 20, 2020), i.e. the project is alive. Despite its small size (2.3 MB after unpacking), the scanner features an impressive set of functions. According to the developers, it can detect the following bugs:
- File disclosure (local file inclusion), including backups and website source code;
- SQL injections and injection of PHP/ASP/JSP;
- XSS injection (reflected and permanent);
- Injections of OS commands;
- XXE Injection;
- Weak .htaccess configurations; and
- Open Redirect.
Wapiti3 supports proxy and authentication on the target site, reacts nicely to handmade SSL certificates (SSL is a cipher suite and technology to cryptographically protect HTTP web traffic (used in HTTPS)), and can insert any headers into requests (including custom User-Agent request headers).
The utility is easy-to-use. After the installation, enter the following command in the terminal (yes, this is a console app):
wapiti -u [URL]
Wapiti3 will scan the entire website and generate a report. To exclude unnecessary addresses (e.g. logout), add the -x [URL] parameters. Cookies are required for authorized scanning. To use them, you have to generate a JSON file using a special script available at bin/wapiti-getcookie. To run this script, type:
wapiti-getcookie -u [LOGIN_URL] -c cookies.json -d "username=[USER]&password=[PASS]"
where [LOGIN_URL] is the login page address, while [USER] and [PASS] are the login and password, respectively. Then scanner uses the generated file:
wapiti -u [URL] -x [EXCLUDE] -c cookies.json
That’s it. The report is generated in the HTML format and saved in /home/[USER]/.wapiti/generated_report/[TARGET_HOST]_[DATE]_[ID].html, where [USER] is your login, [TARGET_HOST] is the target host, [DATE] is the scan date, and [ID] is a four-digit number. You can open your favorite browser and review the report.
Nikto
- Price: free
Nikto is a popular web app scanner embedded in Kali Linux. The utility is very simple; it does not even hide from WAFs of other malicious programs running on the target site. Nikto can detect:
- weird and unusual headers;
- inode leaks via ETag headers;
- use of WAF; and
- interesting files that should not be in open access.
As you can see, the range of supported functions is limited; on the other hand, the scanner is fast and easy-to-use.
The program has zillions of parameters. The most important one is -h [HOST]: it specifies the target. If the target supports SSL, use the -ssl parameter. -Format sets the output format. Importantly, Nikto can be used in combination with Metasploit. Although the utility is slightly obsolete, it still can be used to collect intelligence and crack hopeless targets.
OWASP ZAP
- Price: free
The developer of this scanner is OWASP, an organization striving to make the Internet safer (without much success so far). The OWASP Top 10 report presents the 10 most common bugs plaguing web apps. ZAP (Zed Attack Proxy) is a free and open-source web app scanner. Its main features include:
- MITM proxy to intercept the browser traffic;
- passive and active vulnerability scanners;
- spider crawler that can even work with AJAX;
- fuzzer;
- plugin support; and
- WebSocket support.
The program features a handy GUI and offers a tutorial for novice security specialists. Every time you run it, OWASP ZAP displays useful tips.

Launching OWASP ZAP
To scan a website, all you have to do is specify its address. As simple as “press to hack”!

Press to hack
ZAP is really good in detecting bugs; I use it together with Vega and Acunetix. A must have for any ethical hacker.
Sqlmap
- Price: free
Sqlmap is likely the most popular SQL injection scanner in the world. Its developers are Miroslav Stampar from Croatia and Bernardo Damele from Italy. The key feature of Sqlmap is that the program exploits the discovered bugs automatically. Sqlmap supports MySQL, MS SQL, PostgreSQL, and Oracle database management systems.
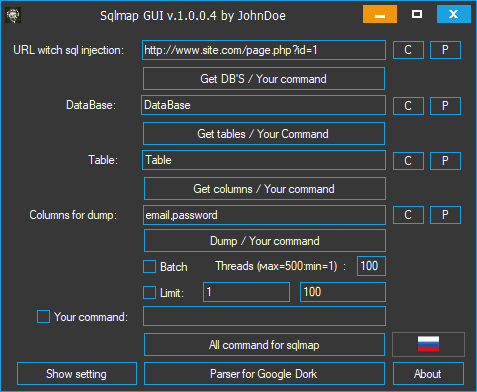
Sqlmap GUI
Acunetix WVS
- Price: Standard edition – starting from $4,495 per one website (the more sites you want to scan, the lower is the price per one site). Premium edition – starting from $6,995 per one website (but its capacity is much greater).
This commercial product has recently discovered a bug in Google; its developer is one of the leaders on the market.
The scanner itself is a web app that can be installed on a headless server (i.e. without a graphic shell). The program supports both Windows and Linux. Too bad, the scanner is not sold to every Tom, Dick, and Harry; and hackers have no choice but to use thematic sites. There is no crack to version 13 yet; so, they use version 12.
The installation follows a classical scheme for Windows apps. You specify the login and password to the web interface and, if necessary, can open remote access to the scanner (it is convenient to install it on a VPS.)
After the installation, you get on the main interface page. The GUI is simple and intuitive. Color risk indicators reflect the severity of detected bugs; a ready-to-use CVE rating is available. Overall, the scanner is very handy.
To scan a website, specify the target address on the Targets tab and press the Scan button. Optionally, you may set the scan start time. The program has several scanning profiles and can perform scans only during or outside working hours. The developers claim that Acunetix can detect nearly all known types of bugs, including:
- XSS, including DOM;
- SQL injections (except for blind ones);
- CSRF;
- path traversal;
- XXE injection;
- insecure serialization;
- problems with SSL certificates (expiration, weak encryption, etc.); and
- problems with cross-origin resource sharing (CORS).
The scanner is really fast and high-quality; an ideal tool for participation in the Bug Bounty Program. Even though the product is so expensive, I can’t help but recommend it: Acunetix is one of the best scanners currently available on the market.
Vega
- Price: free
The developer of this open-source scanner is Subgraph, the creator of a Java-based Tor client. Surprisingly, but free Vega is every bit as good as Acunetix.
According to the developers and my own experience, the scanner detects the following bugs:
- SQL injections;
- XSS;
- XXE injection;
- Integer overflow/underflow (by the way, Vega is the only scanner that effectively identifies such vulnerabilities);
- local file inclusion;
- code injection;
- path traversal;
- injection of HTTP headers; and
- CORS misconfiguration.
The scanner is written in Java and hence works everywhere where Java VMs are present, including Windows and Linux. Weak points: a JVM is required, and there is no web interface.
The scan launch procedure is pretty ordinary but, unlike other scanners, Vega has plenty of settings…

…which are hidden behind the Next button.

Furthermore, the program supports authorized scanning, and you don’t have to add cookies in the console mode.
Currently, Vega is the best choice for Windows users thanks to its handy GUI, effectiveness, and numerous features. In case you need something special, you can always write a custom module in JavaScript.
INFO
I cannot omit Nmap in this overview. It’s not a vulnerability scanner per se, but the utility has a powerful script engine. Even the out-of-the-box version can detect common bugs, and you can boost its capacity with scripts – either your own or available online. HackMag has already published an article explaining how to write such scripts; in addition, you can find a great selection of scripts on GitHub.
Nessus
- Price: free / $3,120
Nessus is a commercial vulnerability scanner developed by US-based Tenable, Inc. There is also a cloud scanner, Tenable.io, but its review goes beyond the scope of this article.
The scanner is available in three versions: Essentials (for everybody and free), Professional ($3,120 per year), and Tenable.io, which is a separate product with its own pricing. The only difference between the Essentials and Professional editions is the number of addresses available for scanning and e-mail support.
The installation file is over 120 MB in size; to download it, you have to register and get activation code by e-mail. After the activation, the program downloads numerous plugins.

Nessus downloads plugins
In my case, the initialization took almost twenty minutes.
Then the web panel becomes available. Nessus detects the following issues:
- OS version disclosure on hosts;
- active malware;
- vulnerability to brute-forcing;
- weak authentication methods;
- open data on target systems (enumeration of accounts and groups, remote registry, and network folders); and
- incorrect permissions and security policies.
The program may also be used as a crawler.
Personally, I was not very happy with Nessus, not least because of limitations restricting the capacity of the free version.
Kube-hunter
- Price: free
This is a specialized security scanner for Kubernetes clusters distributed under the free Apache license.
The program hunts for flaws in remote clusters and then breaches the defense. Use Kube-hunter cautiously because in pursuit of bugs, it may damage your infrastructure. To avoid problems, I suggest using the scanner in the ‘normal’ mode: it will find ‘security holes’ but won’t get into them. Use the Active Hunting mode only if you fully trust Kube-hunter.
The program is available on GitHub; it is written in Python and works smoothly on nearly all operating system. In addition, you can use the Docker container:
docker pull aquasec/kube-hunter
docker run --rm aquasec/kube-hunter [ARGUMENTS]
After downloading Kube-hunter and installing module dependencies, you can run the program. The following functions can be enabled using additional keys:
--remote [ADDRESS]– scan a cluster located at a certain address;--cidr [CIDR]– find and attack all clusters located within a certain address range;--active– the above-mentioned Active Hunting mode. Use it only if the pentesting permission stipulates that you cannot be held liable for any damages inflicted to the customer’s infrastructure. I warned you;--mapping– display all found Kubernetes nodes. This function is especially effective in combination with--cidr;--log [LEVEL]– display messages based on their importance level. The[LEVEL]can be set toDEBUG,INFO(by default), orWARNING;--report [TYPE]– sets the report format (json,yaml, orplain). This option can be combined with the next one;--dispatch [MODE]– specifies where to dispatch the report after the scan. By default, the report is dispatched tostdout, but it can also be transmitted via HTTP; in this case, type--dispatch http. Use environmental variables to explain Kube-hunter where to send the results:
KUBEHUNTER_HTTP_DISPATCH_URL  (defaults to: https://localhost)
KUBEHUNTER_HTTP_DISPATCH_METHOD (defaults to: POST)
A very useful function lacking in other scanners is the possibility to review the output using an online dashboard – even if the scanner runs behind NAT or is separated from the network in some other way. To use this feature, you have to register on the company’s website.
And last but not least, Kube-hunter can be used not only against remote targets. You can install it as a pod and scan from within (see the readme file for more detail).
Trivy
- Price: free
Another vulnerability scanner from the same developer, Aqua Security Software Ltd. Less suitable for bug bounty challenges than Kube-hunter, Trivy is still fast and accurate. Its main purpose is to scan Docker containers. The installation is more complicated in comparison with Kube-hunter. For Debian, Ubuntu, and Kali, use the following script:
sudo apt-get install wget apt-transport-https gnupg lsb-release
wget -qO - https://aquasecurity.github.io/trivy-repo/deb/public.key | sudo apt-key add -
echo deb https://aquasecurity.github.io/trivy-repo/deb $(lsb_release -sc) main | sudo tee -a /etc/apt/sources.list.d/trivy.list
sudo apt-get update
sudo apt-get install trivy
Then you can run a scan by typing trivy [IMAGE_NAME]. For instance,
trivy python:3.4-alpine
The scan results are shown below:
Total: 1 (UNKNOWN: 0, LOW: 0, MEDIUM: 1, HIGH: 0, CRITICAL: 0)
+---------+------------------+----------+-------------------+---------------+--------------------------------+
| LIBRARY | VULNERABILITY ID | SEVERITY | INSTALLED VERSION | FIXED VERSION | TITLE |
+---------+------------------+----------+-------------------+---------------+--------------------------------+
| openssl | CVE-2019-1543 | MEDIUM | 1.1.1a-r1 | 1.1.1b-r1 | openssl: ChaCha20-Poly1305 |
| | | | | | with long nonces |
+---------+------------------+----------+-------------------+---------------+--------------------------------+
Trivy can scan container images as well:
trivy --input image.tar
The -f key sets the output format (e.g. json). It can even be displayed using a custom-made template.
To display only certain vulnerability types, use the --severity key and list the categories you want to be displayed separated by commas (UNKNOWN, LOW, MEDIUM, HIGH, CRITICAL).
PVS-Studio
- Price: ~€5,250 with a possibility to get it for free (legally)
Sometimes, the product’s source code is provided to researchers in the framework of the Bug Bounty Program. However, the number of decent automation tools for source code analysis is very small, while the manual search for errors through millions of code strings is a thankless job, especially taking that in active projects, the code is continuously renewed.
To make lives of security researchers easier, Russian developers created PVS-Studio, a powerful commercial static analyzer.

PVS-Studio
PVS-Studio detects bugs in code written in C, C++, C#, and Java. You have to download the program from the official website and install it. PVS-Studio is available for Windows (as a Visual Studio plugin), Linux (deb and rpm packages), and macOS.
The scanner requires registration: you have to enter the key received from the developers. I contacted them, and their reaction was prompt and friendly.
PVS-Studio can be used for free by developers of open-source projects, public security experts, and Microsoft MVPs. I got my license using the second option, as an author of Xakep.ru and HackMag.
If you use the Visual Studio plugin, all the detected errors will be saved in the log during the compilation or during the forced scan.

PVS-Studio found an error
I used PVS-Studio to check the code in one of my own projects, and it found an error.

An error in my project
Overall, this is a powerful and fast scanner that under certain circumstances can be used for free. Too bad, its retail price is pretty high.
Gitleaks
- Price: free
As is known, the larger is the project scale, the more contractors are involved in it, and the more programmers directly interact with its code. If all operations are performed on virtual machines and all staff members are scanned before entering and leaving the office, everything is fine. However, if the project involves contractors working from home, problems are inevitable.
Tests carried out by QA specialists often involve privileged keys to the infrastructure, while security engineers sometimes forget private information in their public repositories storing backups. If a malefactor gets such a key, it would be a joke to hack the program; this attack vector must never be forgotten. Such sensitive data can be found on GitHub using requests in the format company.com pass and company.com private or with automated scripts.
One of such scripts is Gitleaks; it searches public repositories for passwords, keys, tokens, and other secrets. The program supports the following functions;
- scan for local changes prior to committing to avoid data leaks at the development stage;
- scan any GitHub/GitLab repositories, including private ones (the access key is required);
- scan all repositories of a certain user or organization;
- generate JSON reports for subsequent automated analysis; and
- integration with Git to prevent inadvertent data leaks.
Gitleaks can be installed with Docker.
docker pull zricethezav/gitleaks
docker run --rm --name=gitleaks zricethezav/gitleaks -v -r [REPO_URL]
The manual and descriptions of all keys are available in the Usage and Options section on GitHub. The most important commands are:
-v– show verbose output from Gitleaks audit;--repo=[REPO]– link to the repository to be scanned;--disk– clone the repository locally to avoid running out of the memory;--usename=[USER]and--password=[PASS]– login and password to the target private repository;--access-token=[TOKEN]– an alternative to the login/password authentication;--commit=[COMMIT]– SHA of the commit to be analyzed if the repository has to be audited at a given moment. By default, the current state is audited;--repo-path=[PATH]– path to the local repository to be analyzed;--branch=[BRANCH]– audit only a specific branch;--depth=[NUM]– analyze only[NUM]of the last commits. The alternatives are--commit-from=[COMMIT]and--commit-to=[COMMIT]: audit all commits between and including the specified ones; and--threads=[NUM]– scan in several threads.
To audit all repositories of a specific organization or user, use the following parameters:
--org=[ORG]– find and analyze all repositories of an organization[ORG];--user=[USER]-find and analyze all repositories of a user;--exclude-forks– exclude repository forks from the analysis. They rarely contain anything useful, and this option significantly expedites the scan.
To use this function, you have to specify the service you want to use. So far, Gitleaks supports two such services: GitHub and GitLab. To specify a service, use the command --host=[SERVICE] where [SERVICE] is either GitHub or GitLab.
Overall, the tool is very efficient and useful. I strongly recommend it for Big Bounty and pentesting purposes.
QARK
- Price: free
It is not a big deal to check Android and iOS apps for secret values in the code and analyze data stored in unsafe locations. However, it might be really difficult to identify certain types of bugs, including weak encryption (e.g. XOR), incorrect processing of external links, open activities that disclose private information, the android:debuggable=true flag, etc.
QARK (Quick App Review Kit) is a free tool created by LinkedIn engineers. It scans APK packages for the following vulnerabilities:
- incorrectly exported elements or incorrect access rights to exported objects;
- vulnerable intents;
- incorrect X.509 certificate validation;
- creation of files available to other apps and handling of such files;
- activities that may leak data;
- use of embedded private keys;
- weak ciphers;
- tapjacking; and
- app allows backup of its private folder or has the
android:debuggable=trueflag.
The utility is written in Python and runs both on Linux and Windows. It can be installed with pip or, alternatively, you can compile the program yourself. The first way:
pip install --user qark
The second way:
git clone https://github.com/linkedin/qark
cd qark
pip install -r requirements.txt
pip install . --user
After the installation, you can execute the command qark --help to view available options. A few tips:
Use the --apk FILE.APK argument to analyze the entire APK:
qark --apk ./my_app.apk
If you need to test decompiled code, use the --java argument:
qark --java ./my_app_src
It is also possible to scan a single file:
qark --java ./my_app_src/Main.java
The scanner can create exploits to some bugs, but this function is not very stable and applies not to all vulnerabilities; so, don’t rely on it too much.
Burp Suite
- Price: free / $400
Burp Suite is the ‘Swiss Army knife’ in the world of scanners. This software suite can be used as a proxy, security scanner, spider crawler, request repeater, and a platform for numerous plugins.
The program has been developed by PortSwigger и released in two versions: Community (free) и Professional ($400). The latter one includes a broad range of plugins for Burp Intruder and an automated scanner. In addition, owners of the Professional version have access to hundreds of plugins available in the BApp Store.
Burp Suite features a handy GUI with convenient tabs and automated modules that brute-force passwords and identifiers, perform fuzzing attacks, and encode/decode data in various formats. Plenty of Burp Suite reviews can be found online; so, I won’t repeat them here.
MobSF
- Price: free
This scanner is the last in this overview but not the least by its capacity and features. Furthermore, it’s a must have for any serious pentester. MobSF is a static analyzer of mobile apps; it is written in Python and works only on Windows.

The program can be run even on a headless server; after the launch, it opens port 8000 to the outer world. In a browser window, it looks like a typical web app.

MobSF main page
All you have to do is load there an APK or IPA (yes, it supports iOS apps as well) and wait until the analysis is completed. Then the program displays a bug report that includes exploitation possibilities. Color risk indicators are in place, and overall, the interface is very user-friendly.

Source: MobSF repository
The scanner analyzes the code, the app’s certificate, and its manifest (AndroidManifest.xml). In addition, MobSF allows to save the decompiled code for subsequent analysis involving other programs. The analysis is performed both statically (decompilation and analysis of the resultant code) and dynamically (in the virtual environment).

Dynamic analyzer
The utility can be either downloaded from GitHub or installed as described below.
First of all, you will need Python with pip. Next, install rsa using the command:
python -m pip install rsa
Download the installation script and execute it. Answer all questions of the interactive installer – and voila!
It is also possible to run the main part of the utility on one computer (it can be a Linux machine as well) and run the static analysis server on another computer (this one must be a Windows PC). To disable this function, edit MobSF/settings.py by specifying the address of your VM with the RPC server in WINDOWS_VM_IP.
Overall, the tool is efficient and handy, even though I had some problems during the installation due to faulty dependencies.
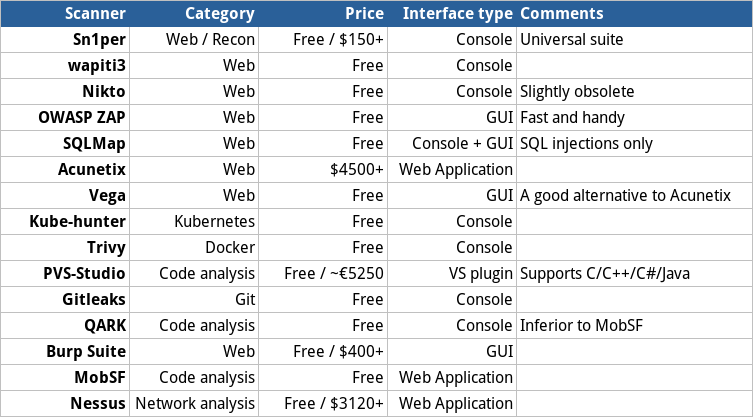
Summary chart
Conclusions
As you can see, there is no need to analyze sophisticated web apps with thousands of pages and other software manually. Instead, you can instruct an automated scanner to do this for you. A large portion of the bug hunter’s work has already been automated, and you can make some money without much hassle. Good luck!
Thank you for sharing those tools! I will surely give them a try.