
In many cases, the research of an app’s internal structure can be narrowed down to monitoring its traffic. Just a few years ago, a major share of the traffic was transmitted via the plain, easily interceptable HTTP protocol. By now, HTTPS has become the standard in most applications as a part of the defense mechanisms against eavesdropping. Today, I will try to explain what the different defense approaches have in common and whether their common component can be used to create a universal HTTPS interception technique.
HTTP and OpenSSL
HTTP(S) is a de facto standard not just in Web browsers, but also in mobile and desktop apps. Throughout its existence, the HTTP protocol gained numerous bells and whistles eliminating the shortcomings of the initial ‘web’ version. It got Cookies to negate Stateless, Keep-Alive and Long polling to imitate continuous connection, the REST concept, binary HTTP/2 with its built-in compression, and so on. Leaping ahead, I would like to note that HTTP/2 was developed for combined use with TLS 1.2+.
At some point, HTTP became a universal data exchange protocol in the client-server model. Developers accepted this fact and started embedding HTTP in their applications instead of wasting time and efforts reinventing the wheel.
SSL was developed around the same time as HTTP. The combination of SSL and HTTP formed HTTPS, resulting in a steady increase of its share in the global traffic. In late January 2017, this share has exceeded 50%. Today, it is close to 80%. Users have realized the need to encrypt their data; software companies, including browser developers, started pushing the community to adopt this security concept. Ultimately, it became commonly accepted and broadly used in various apps, including those based on HTTP.
WWW
Mozilla publishes statistics based on Firefox telemetry data; it shows the percentage of web pages loaded via HTTPS. Graphs built on the basis of these data are available on LetsEncrypt.
The development of SSL and, subsequently, TLS (SSL 3.0+) was largely determined by the progress of OpenSSL, an open-source project steadily incorporating new RFC specifications. Over time, OpenSSL has become a de facto standard in the implementation of protected HTTP transport. Currently, its traces can be seen in zillions of software projects.
Classic HTTPS: how it works
The use of HTTPS allows to protect users against classic MITM (Main In The Middle) attacks, but not from their own mistakes. The classic SSL protocol scheme clearly demonstrates that the user’s privacy is based exclusively on the server’s certificate.

TLS Handshake
The client receives the server’s certificate at the first step of the handshake procedure and decides whether to trust the server or not (i.e. whether its identity is true or false). This decision is made with external assistance, which significantly simplifies the traffic analysis.
Web sites are certified by root and intermediate certificate authorities (CAs). The number of public root certificate authorities is very small, and they are known to each SSL/TLS client. By contrast, the number of intermediate certificate authorities is large; their only difference from root CAs is that certificates issued by intermediate CAs are signed by private keys of their superior CAs. The screenshot below shows the google.com certificate chain: the root certificate is issued by GlobalSign, while the intermediate one is signed by Google Internet Authority.

Google certificate chain
After receiving a certificate from the server, the client can find out who has signed it and verify this based on the attached public keys. The verification process goes up to the root certificate authority. If no trusted certificates are found in the chain leading to the root certificate, the client terminates the handshake procedure without transferring any personal data to the server (because its identity is likely false). This process is called certificate chain verification.
As said above, developers try to conceal the traffic of their apps. However, they encounter difficulties when the client gets the possibility to add its own trusted certificates. By default, the source of such certificates is a folder (or group of folders depending on the OS) in the local file system where the OS developers have placed certificates of trusted authorities at the build stage. Let’s check this.
Researching OpenSSL with a test app
By default, the OpenSSL library ‘in vacuum’ doesn’t trust anyone; to initiate the trust process, you must tell the library whom you are going to trust. According to the classic TLS client example provided in wiki.openssl, trusted certificates are loaded right before making an HTTP request:
...
ctx = SSL_CTX_new(method);
if(!(ctx != NULL)) handleFailure();

SSL_CTX_set_verify(ctx, SSL_VERIFY_PEER, verify_callback);
SSL_CTX_set_verify_depth(ctx, 4);

const long flags = SSL_OP_NO_SSLv2 | SSL_OP_NO_SSLv3 | SSL_OP_NO_COMPRESSION;
SSL_CTX_set_options(ctx, flags);

// loading trusted certificates
res = SSL_CTX_load_verify_locations(ctx, "random-org-chain.pem", NULL);
if(!(1 == res)) handleFailure();
...
In addition to the function SSL_CTX_load_verify_locations, there are several other methods enabling to load verified certificates into OpenSSL. No doubt, developers of TLS clients broadly use such publicly available examples in their products.
I am going to test the behavior of the above classic TLS client using a real application as an example. Let’s take something simple to start with, for instance the OkHttp library used as an HTTP/S communication client in numerous Android apps.
It must be noted that OkHttp is written in Java and runs in a Java virtual machine (JVM); therefore, OkHttp is of no interest to you and me by itself as it is just a ‘wrap’ for the really important components: a low-level OpenSSL implementation for Android. Let’s examine this implementation.
Preparing the test app
First, I need an app that uses the OkHttp logic for secure requests. The easiest way is to create it from scratch using model code examples available on the Internet as the basis. After all, thousands of other developers do so.
I add two buttons to the test app interface; the following operations will be performed after pressing them:
// Button "Do just HTTPS!"
val okHttpClient = OkHttpClient.Builder().build()
val request = Request.Builder().url("https://google.com").get().build();
okHttpClient.newCall(request).execute()
...
// Button "Do Https with pin!"
val certificatePinner = CertificatePinner.Builder()
  .add("google.com","sha256/f8NnEFZxQ4ExFOhSN7EiFWtiudZQVD2oY60uauV/n78=")
  .build()
val okHttpClient = OkHttpClient.Builder()
  .certificatePinner(certificatePinner)
  .build()
val request = Request.Builder().url("https://google.com").get().build();
okHttpClient.newCall(request).execute()
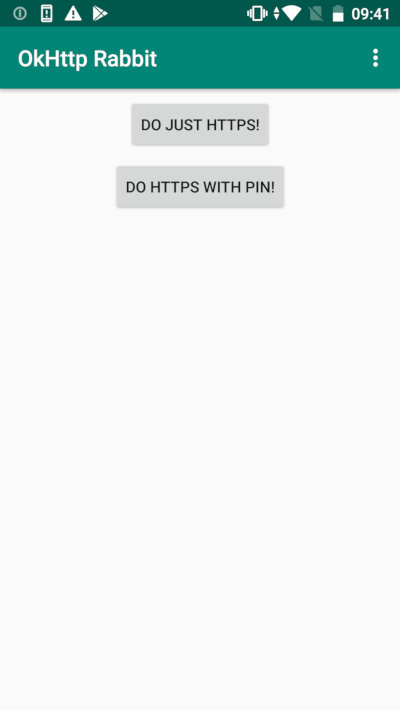
UI of the test Android app
This is a standard code copy-pasted from one project to another and sometimes undergoing slight modifications. I launch the newly created app and immediately examine its memory layout.

Looking for OpenSSL traces in Android apps
In search of truth
It becomes clear that Android includes a library leading to OpenSSL. But it has loaded not because HTTPS was initiated. Instead, this library was loaded long before the app appearance on the screen: namely, at the stage involving app process building (a fork from app_process) and authenticity verification. This is due to some specific features of Android app distribution that are beyond the scope of this article.
To make sure that the found library is linked with OpenSSL, you can look at its symbol table and compare it with the reference openssl primitives. The symbol table can be obtained, for instance, through the compilation of sources available in the official OpenSSL repository. Time to check whether the libssl.so routine is used when the user presses buttons in my app.
INFO
The libssl library for Android is not OpenSSL proper. This OS was created by Google that has forks for nearly everything. In case of OpenSSL, it is BoringSSL.
Finally, I can start unlocking the potential of the test app, i.e. detect lower-level traces of the ‘classic TLS client’ in the OkHttp library used in it.
After reviewing the functions exported by libssl, I can see all the functions used in the classic example provided above. Therefore, the easiest way to search for the traces is to create a stack of all the exported functions that are called when the user presses the first button of the test app. Below is the resultant fragment of the call stack prior to the handshake initiated by the button click:
TLS_server_method
SSLv23_client_method
SSLv23_method
TLS_method
TLS_client_method
SSLv23_server_method
(*) SSL_CTX_new
(*) SSL_CTX_set_options
SSL_CTX_set_mode
SSL_CTX_set_cert_verify_callback
SSL_CTX_set_info_callback
SSL_CTX_set_cert_cb
SSL_CTX_set_signing_algorithm_prefs
SSL_CTX_set_session_id_context
SSL_new
SSL_set_ex_data
(*) SSL_set_verify
SSL_set_renegotiate_mode
SSL_set_connect_state
SSL_enable_ocsp_stapling
SSL_get_ex_data
SSL_set_alpn_protos
SSL_set_options
SSL_clear_options
SSL_set_cipher_list
SSL_clear_options
SSL_set_tlsext_host_name
SSL_set_mode
SSL_set_fd
SSL_get_ex_data
SSL_do_handshake // рукопожатие
...
The full call stack is truly impressive, but it completely covers the single HTTPS request from OkHttp. If a proxy sniffer is enabled, the app crashes with the following error:
javax.net.ssl.SSLHandshakeException: java.security.cert.CertPathValidatorException: Trust anchor for certification path not found.
This is not surprising. The resultant stack fragment shows that some steps of the classic clients were made, while some were not. But most important is that the trusted certificates were not loaded prior to the handshake. As you are aware, a handshake cannot be successful without this.
So, the question is: where does the Android OpenSSL implementation (i.e. libssl) take its certificates from? The answer lies in callback functions. OpenSSL enables the client to redefine its behavior at almost every stage of the secure connection. For that purpose, OpenSSL offers several functions that can be used to set callbacks at various stages.
One of such functions, SSL_CTX_set_cert_verify_callback, is present in the call stack. According to the documentation, this callback function is very powerful. In fact, it completely delegates the verification of the server’s certificate to the app. Tracing this callback function may answer the question about the source of trusted certificates in Android.
Fortunately, OpenSSL is an open source product. Time to examine the SSL_CTX_set_cert_verify_callback function from inside. I search through the OpenSSL code available on GitHub and quickly locate the file ssl_lib.c:
...
void SSL_CTX_set_cert_verify_callback(SSL_CTX *ctx, int (*cb) (X509_STORE_CTX *, void *),void *arg)
{
  ctx->app_verify_callback = cb;
  ctx->app_verify_arg = arg;
}
...
The function does nothing that could be of interest to us; it just initializes fields on the structure SSL_CTX: an address is set on the callback function and an address is set on the argument that will be transferred to that function.
Logic suggests that if some fields are initialized, they should be used for something. Let’s check where the callback function represented in other parts of the project by the field app_verify_callback is used. The searches lead to the one and only place: ssl_cert.c:
...
if (s->ctx->app_verify_callback != NULL)
  i = s->ctx->app_verify_callback(ctx, s->ctx->app_verify_arg);
else
  i = X509_verify_cert(ctx);
...

Searching where the certificate verification delegate is used in OpenSSL
The delegate is a part of the function ssl_verify_cert_chain in OpenSSL. Exactly the same piece of code can be found in BoringSSL (which is incorporated in Android as libssl): it is located in the function ssl_crypto_x509_session_verify_cert_chain.
What is so special in this code? This is the only place where the control is transferred to a user’s callback function. More importantly, it becomes clear that in the absence of such a function (e.g. SSL_CTX_set_cert_verify_callback was not called), the control is transferred to the standard OpenSSL verification function: X509_verify_cert.
Now let’s find out what code would take the control if a callback function is set as a result of OkHttp client’s operations. To do so, I need a debugger; for instance, the one embedded in IDA Pro.
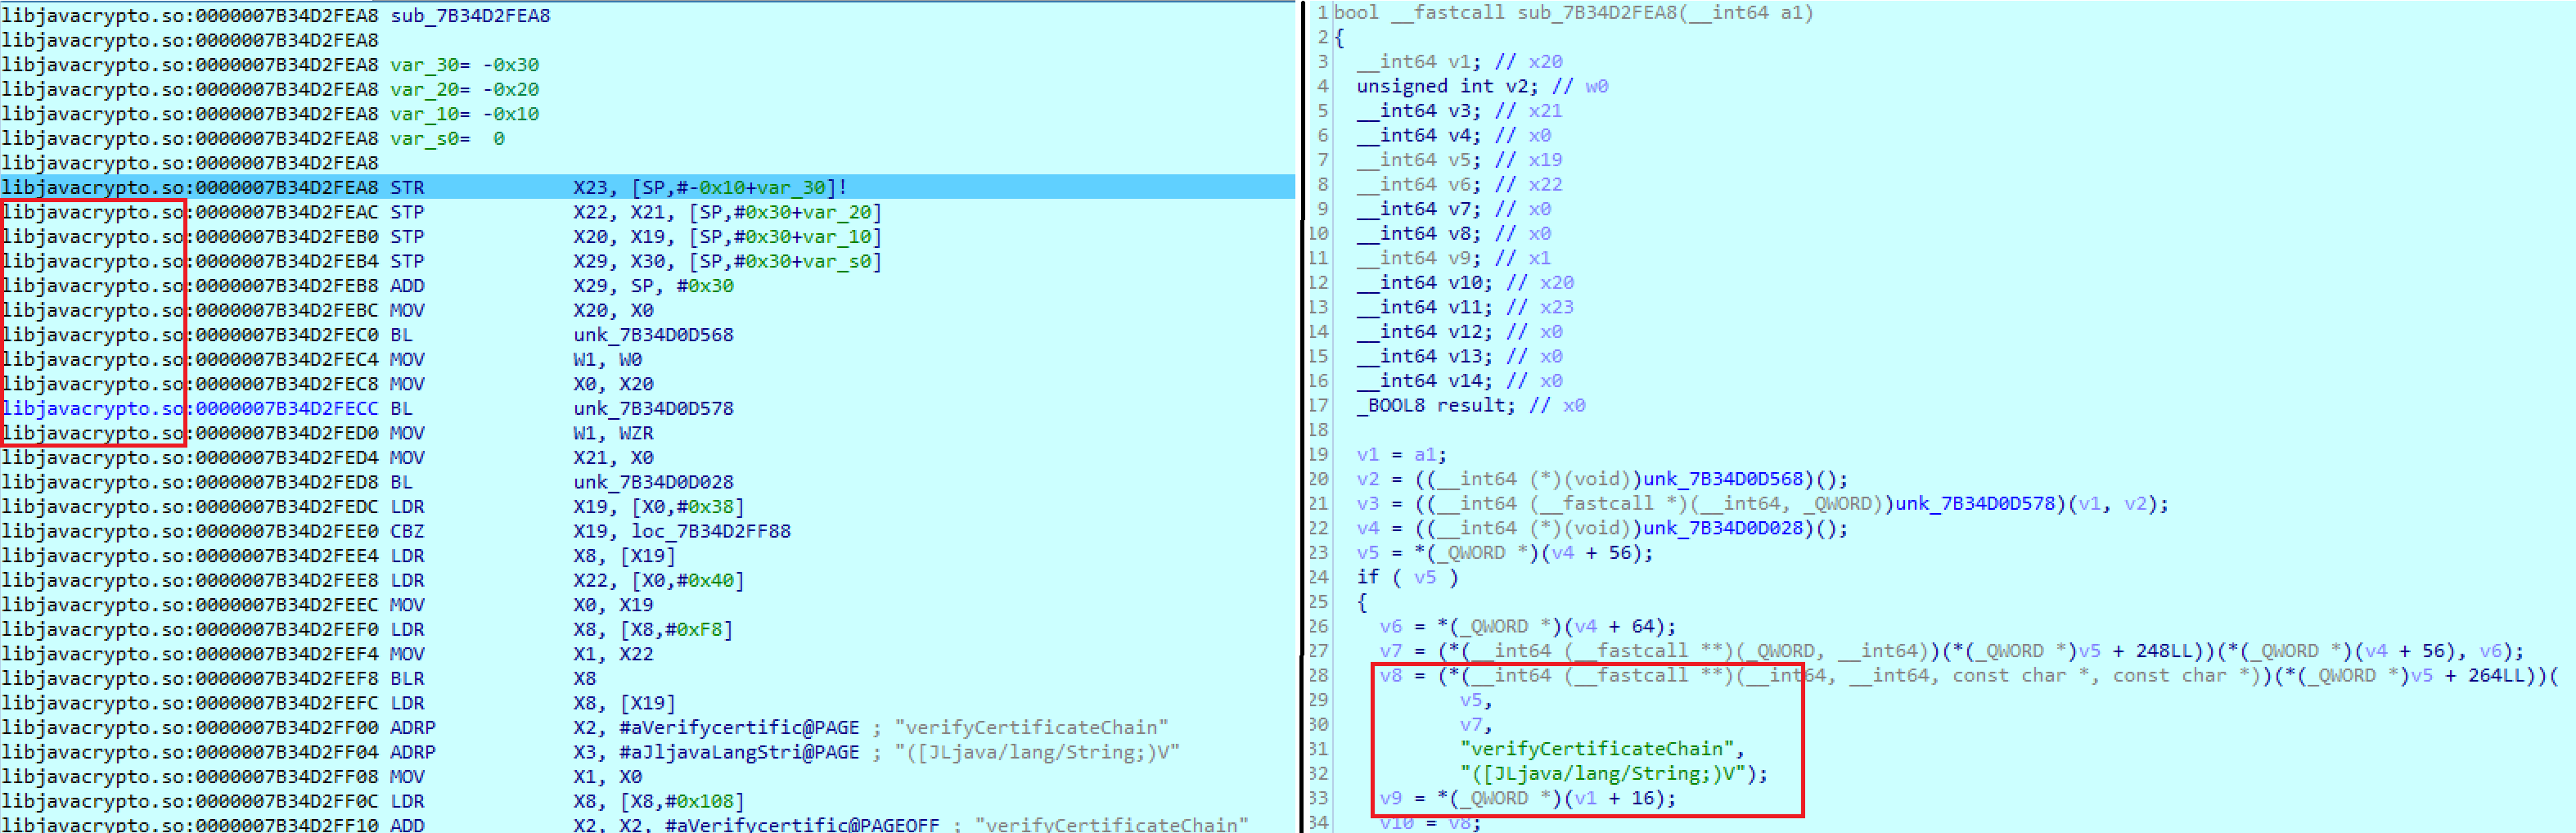
Callback function in Android that takes the control during the verification of the server’s certificate
The callback function is in the libjavacrypto library. Later, it turned out that this is an incarnation of Java Security Provider (JCP) for Android that is called Conscrypt and implements Java Cryptography Extension (JCE). Good news is that Conscrypt is an open source product!
Identifying certificate sources
As I did with OpenSSL, I am going to search for the Conscrypt source code in the AOSP and specifically for the place resembling the one found using the IDA Pro debugger. The searches lead me to the function cert_verify_callback` in the file native_crypto.cc.
The structure of this function is similar to the pseudocode generated by the Hex-Rays plugin:
static ssl_verify_result_t cert_verify_callback(SSL* ssl, CONSCRYPT_UNUSED uint8_t* out_alert) {
  AppData* appData = toAppData(ssl);
  JNIEnv* env = appData->env;
  if (env == nullptr) {
    return ssl_verify_invalid;
  }
  ScopedLocalRef<jobjectArray> array(env, CryptoBuffersToObjectArray(env, SSL_get0_peer_certificates(ssl)));
  if (array.get() == nullptr) {
    return ssl_verify_invalid;
  }
  jobject sslHandshakeCallbacks = appData->sslHandshakeCallbacks;
  jclass cls = env->GetObjectClass(sslHandshakeCallbacks);
  jmethodID methodID = env->GetMethodID(cls, "verifyCertificateChain", "([[BLjava/lang/String;)V");
  const SSL_CIPHER* cipher = SSL_get_pending_cipher(ssl);
  const char* authMethod = SSL_CIPHER_get_kx_name(cipher);
  jstring authMethodString = env->NewStringUTF(authMethod);
  env->CallVoidMethod(sslHandshakeCallbacks, methodID, array.get(), authMethodString);
  env->DeleteLocalRef(authMethodString);
  ssl_verify_result_t result = env->ExceptionCheck() ? ssl_verify_invalid : ssl_verify_ok;
  return result;
}
What is the purpose of the native function? It receives the link to an SSL object that indicates secure connection, retrieves the server’s certificate chain from it, and transfers this chain to a Java method with a self-explanatory name verifyCertificateChain.
If this Java method does not return exceptions, the verification result after the transfer of the control to the result callback function would be success (ssl_verify_ok). The verifyCertificateChain method has several implementations in Conscrypt, and all of them are pretty similar:
public void verifyCertificateChain(byte[][] certChain, String authMethod) throws CertificateException {
  try {
    if (certChain == null || certChain.length == 0) {
      throw new CertificateException("Peer sent no certificate");
    }
    X509Certificate[] peerCertChain = SSLUtils.decodeX509CertificateChain(certChain);

    X509TrustManager x509tm = sslParameters.getX509TrustManager();
    if (x509tm == null) {
      throw new CertificateException("No X.509 TrustManager");
    }

    activeSession.onPeerCertificatesReceived(getPeerHost(), getPeerPort(), peerCertChain);

    if (getUseClientMode()) {
      Platform.checkServerTrusted(x509tm, peerCertChain, authMethod, this);
    } else {
      String authType = peerCertChain[0].getPublicKey().getAlgorithm();
      Platform.checkClientTrusted(x509tm, peerCertChain, authType, this);
    }
  } catch (CertificateException e) {
    throw e;
  } catch (Exception e) {
    throw new CertificateException(e);
  }
}
So, I have finally found the source of trusted certificates in Android! As you can see, the certificate chain verification is based on an instance belonging to the class X509TrustManager. The default TrustManager is used natively. The sources of its trusted certificates can be traced at the Java level. Ultimately, the searches lead to the class TrustedCertificateStore containing the initialization logic for the trusted certificate sources:
...
String ANDROID_ROOT = System.getenv("ANDROID_ROOT");
String ANDROID_DATA = System.getenv("ANDROID_DATA");
CA_CERTS_DIR_SYSTEM = new File(ANDROID_ROOT + "/etc/security/cacerts");
CA_CERTS_DIR_ADDED = new File(ANDROID_DATA + "/misc/keychain/cacerts-added");
CA_CERTS_DIR_DELETED = new File(ANDROID_DATA + "/misc/keychain/cacerts-removed");
...
Interestingly, the trusted certificates are not loaded directly in OpenSSL. Instead, the certificate chain verification routine is performed by a Java callback function. The TrustManager loading certificates from the system folders uses this callback function by default.
So, I have established the source of trusted certificates received by OpenSSL when the OkHttp client is used. I also know the entire call chain implemented while the secure connection is established in a real OpenSSL environment (i.e. in Android).
HTTPS as protection against users
Most ‘classic’ HTTPS clients use the system certificate storage. The main disadvantage of this approach is the absolute trust in certificates stored in certain folders on the device. In other words, whatever certificates are present in the user’s storage, they will be successfully verified, and the connection will be established. Such certificates may include a certificate of a proxy server; as a result, the classic connection scheme may turn into a ‘double handshake’.
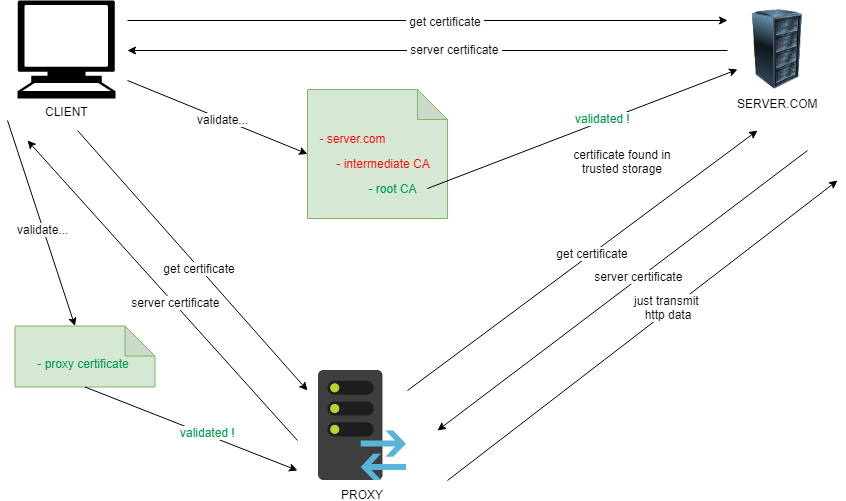
SSL connection via a ‘trusted’ proxy server
In theory, to protect themselves against MITM attacks, users must take good care of their system folders storing certificates. But what if the user wants to check the data exchanged between an app and the respective server? This is where the SSL Pinning technology comes into play.
The idea of the pinning is very simple: instead of trusting the system certificates kept in the device storage, the trust is granted to only one certificate, which is the certificate of the server you exchange data with.
This trust mechanism implies that some information about the server’s certificate has to be embedded in the verification code. Normally, this is the SHA certificate hash called “pin”. My test application uses the SHA-256 hash that is transferred after the OkHttp initialization.
There are several popular approaches to the SSL Pinning implementation in apps. As you know, one of them is based on the OkHttp library. For most of them, countermeasures have already been developed, including Frida scripts, system modules, and descriptions of bypass algorithms.
However, the problem is that developers may invent their own means of foolproofing. Only the laziness and unwillingness to dig into OpenSSL may prevent them from doing that. Bypassing their protection from scratch every time is a thankless job. So, how to make our lives easier?
Bypassing SSL Pinning
Time has come to put into practice the information about OpenSSL provided above and create a universal HTTPS traffic interception technique suitable for all apps using OpenSSL for networking interactions.
Technique #1. Killing OpenSSL checks
The first universal technique is based on the algorithm used for interaction with the OpenSSL library via callback functions (the one addressed earlier in this article). It is safe to assume that the easiest way to address OpenSSL is to use these functions.
As you remember, the extensive callback function enabling the user to redefine the certificate chain verification procedure is called SSL_CTX_set_cert_verify_callback; it is used in ssl_verify_cert_chain as follows:
if (s->ctx->app_verify_callback != NULL)
  i = s->ctx->app_verify_callback(ctx, s->ctx->app_verify_arg);
else
  i = X509_verify_cert(ctx);
How can this be exploited? The best way is to kill the user’s callback function. To do so, one has to break the condition s->ctx->app_verify_callback != NULL, i.e. set the app_verify_callback value to NULL. To achieve this, I have to cancel the effect of the call of SSL_CTX_set_cert_verify_callback, preferably, inside the function.
How can I test this theory? Of course, by modifying the library copies directly in the memory of the running process to make sure that the changes affect only it. The most convenient tool for this is Frida. Using Frida, I can destroy the callback (i.e. override the first argument with zero) as follows:
if(e.name == "SSL_CTX_set_cert_verify_callback"){
  Interceptor.attach(e.address, {
    // 0x0 == NULLptr
    onEnter: function(args){ args[1] = ptr("0x0") },
    onLeave: function(retval){}
  });
}
Then I have to decide what to do with the else section. When X509_verify_cert is called, the control is transferred to x509_vfy.c. This function performs numerous operations; some of them expect OpenSSL to be initialized by the certificate storage.
It would be difficult to pass the entire list of checks, so the easiest way is to kill this function, too. In the assembler equivalent of libssl (x64), the else section looks as follows:
.text:00000000000291C4   MOV   X0, SP
.text:00000000000291C8   BL    .X509_verify_cert
It turns out that in order to successfully pass the certificate chain verification, the return value of the function X509_verify_cert should be 1 (true). In ARM, the value is returned via registers R0-R3. In our case, this is just the register R0 because the return value type is simple. Let’s try to override this code with an imitation of successful X509_verify_cert execution (concurrently getting rid of the function argument):
.text:00000000000291C4   MOV   X0, #1
.text:00000000000291C8   MOV   X0, #1
To implement this, I have to directly write 8 bytes of code (twice 4 bytes because 4 bytes is the fixed ARM instruction size) into the memory. The machine code conversion will be performed using rasm library included in the Radare2 reverse engineering toolkit.
$ rasm2 -a arm -b 64 'MOV X0, 0x1'
200080d2
Using Frida to complete the ‘assassination operation’:
Memory.protect(libsslx64Module.base.add(0x291C4), 8, 'rwx');
Memory.writeByteArray(libsslx64Module.base.add(0x291C4), [0x20,0x00,0x80,0xd2,0x20,0x00,0x80,0xd2])
As a result, I can now successfully pass all low-level verifications in ssl_verify_cert_chain (by killing them). The two simple steps enabled me to monitor HTTPS operating in a ‘normal’ mode (i.e. without the SSL Pinning protection) and without importing certificates from the system storage. Pressing the first button of the test app does not cause an exception (SSLHandshakeException) anymore; see the screenshot below.
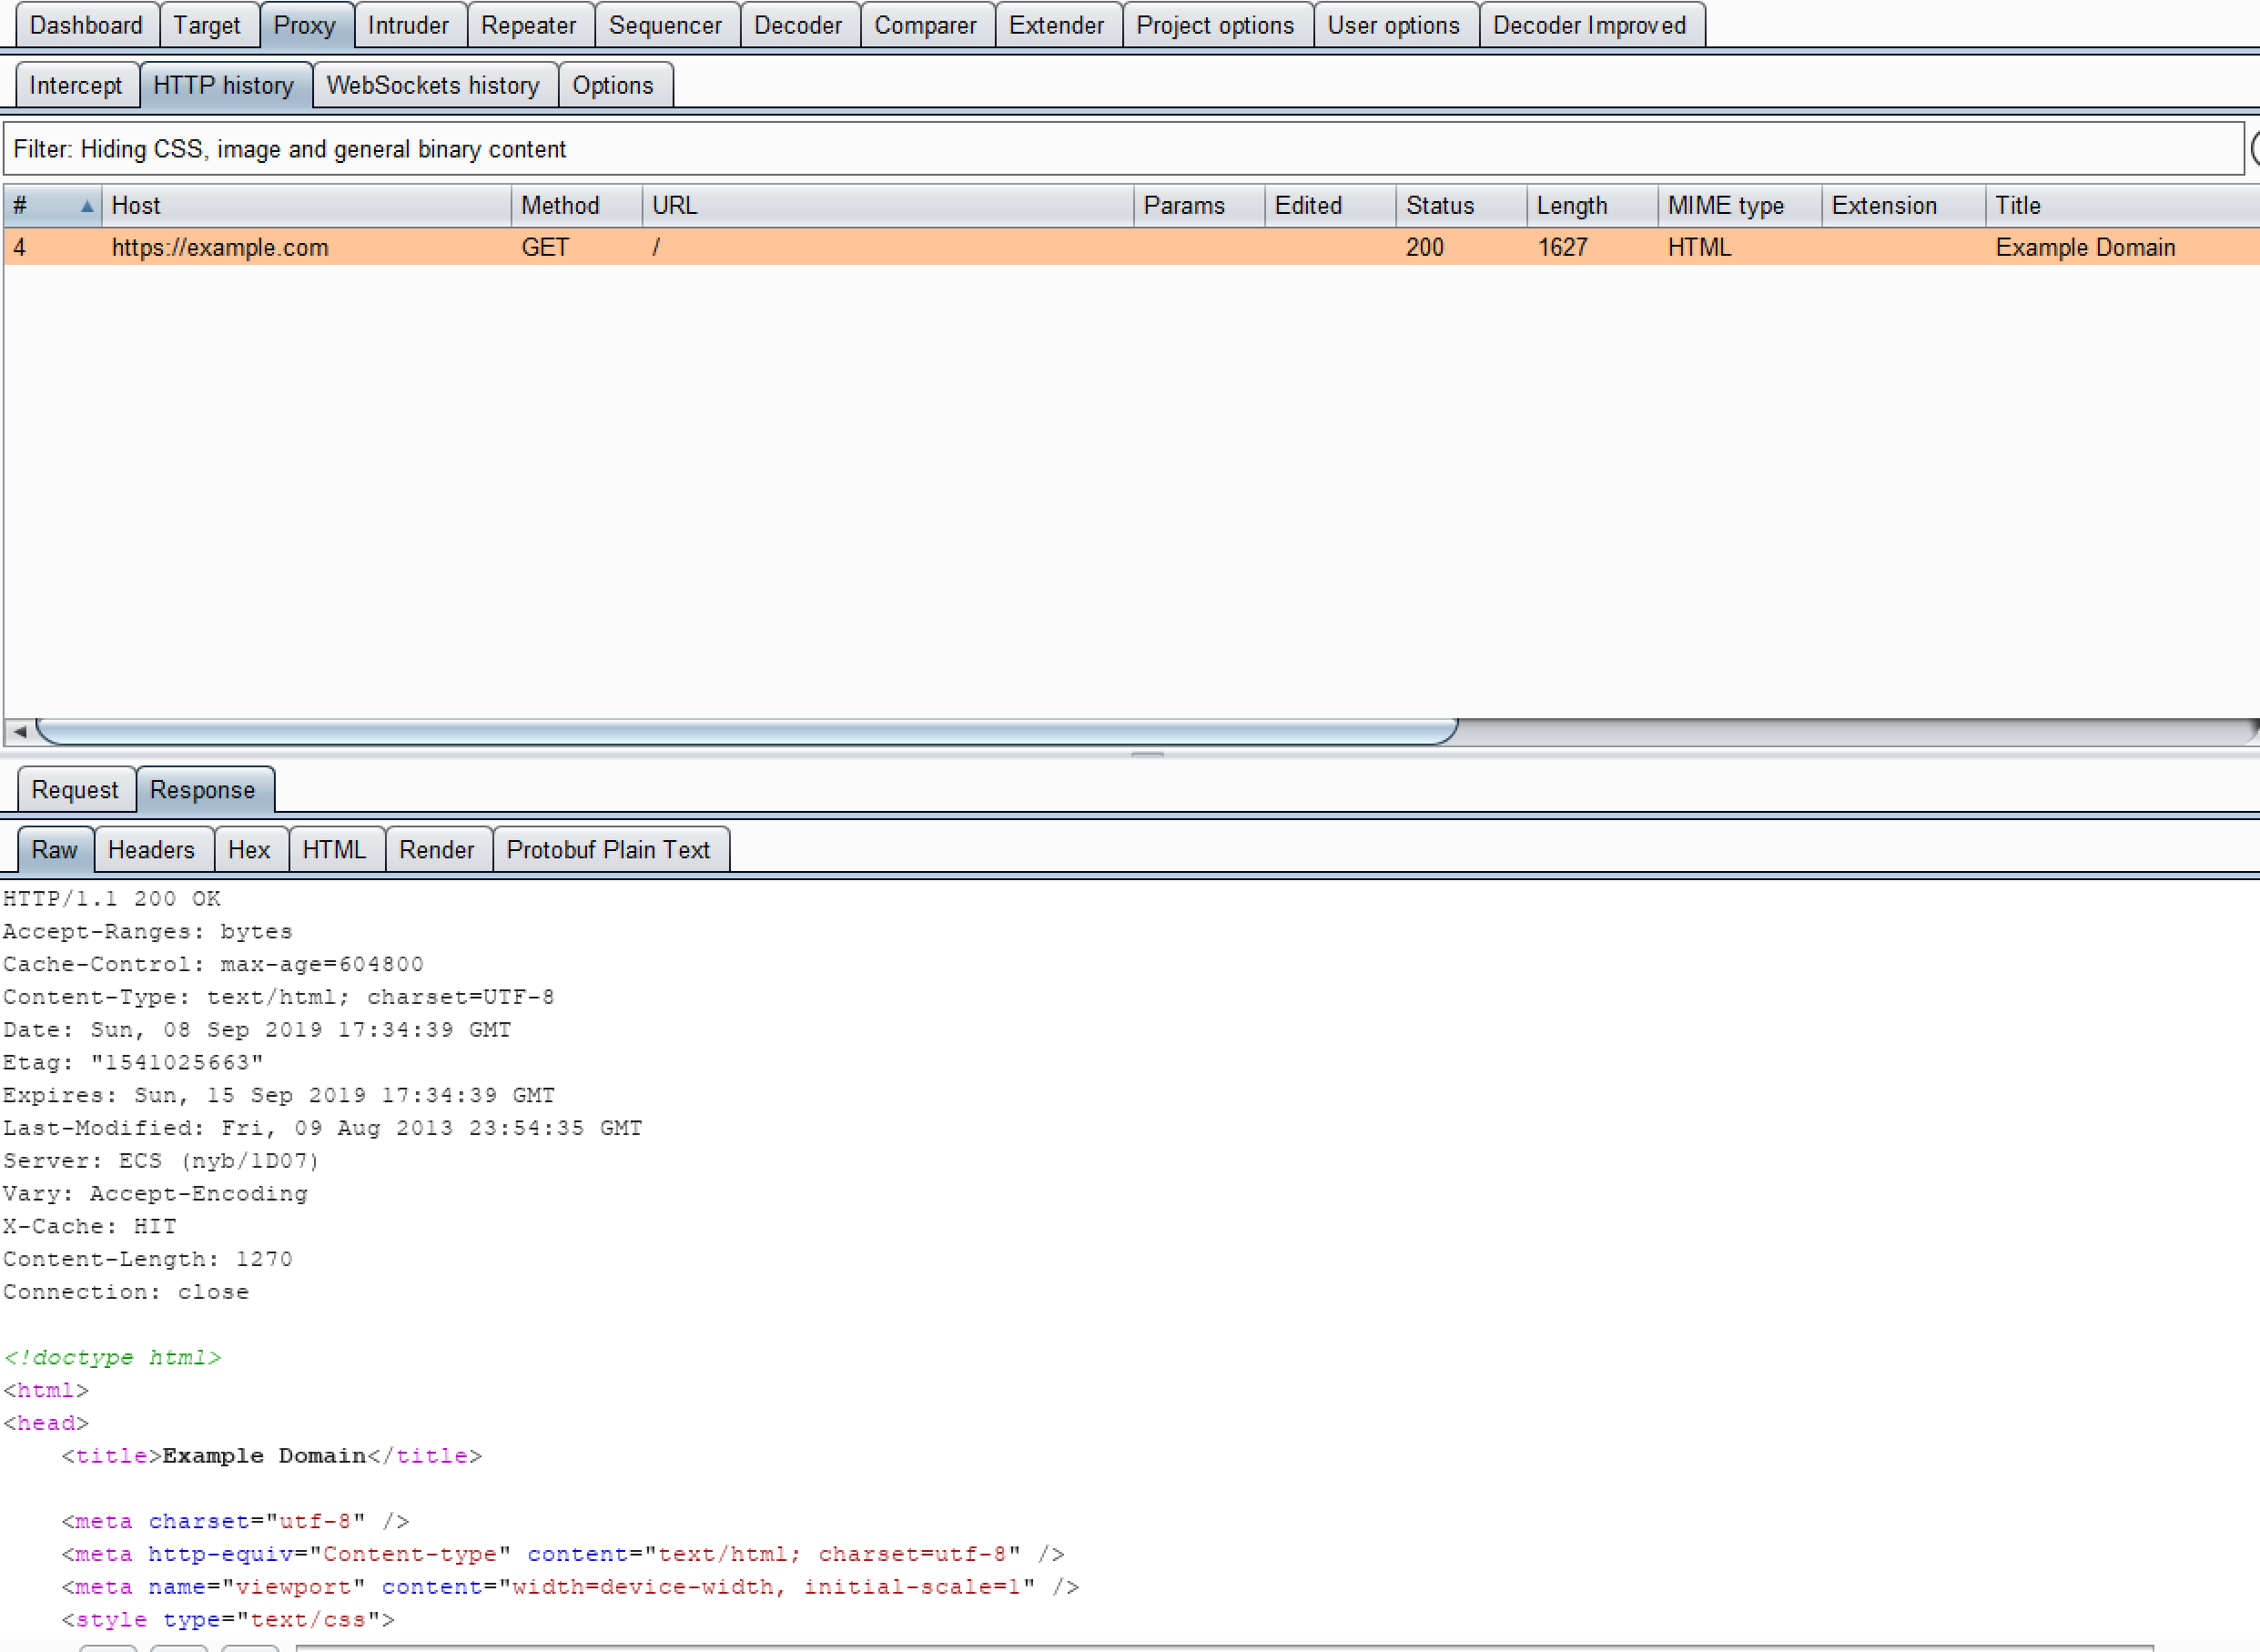
A couple of simple operations at the lower OpenSSL level have borne some fruits
However, pressing the second button of the test app (Do Https with pin!) does not enable traffic interception yet, which indicates the presence of additional checks. Let’s find out what these checks are.

A portion of the app does not trust me yet
Searching for additional certificate verification
If I continue dumping the OpenSSL function call stack after pressing the app button, it becomes clear that all verifications have been successfully passed at the libssl level. This triggers the subsequent chain of actions:
...
SSL_do_handshake
SSL_is_dtls
SSL_get_session
SSL_in_init
SSL_SESSION_dup
SSL_SESSION_free
SSL_get_ex_data
SSL_SESSION_free
SSL_get1_session
SSL_in_init
SSL_get_certificate
SSL_get_peer_full_cert_chain
...
The two last calls are of utmost interest. After the successfully faked handshake, something tries to receive the certificate chain sent by the server and… receives it. In other words, this ‘something’ can recheck the output of the native OpenSSL function that I have modified.
Apparently, OpenSSL stores certificates received from the server and can provide them at first request at any stage of the secure connection. This is unacceptable to me because the very idea of SSL Pinning is based on thorough scrutiny of certificates. I have to overcome this somehow. Let’s examine the source code of SSL_get_peer_full_cert_chain:
STACK_OF(X509) *SSL_get_peer_full_cert_chain(const SSL *ssl) {
  check_ssl_x509_method(ssl);
  SSL_SESSION *session = SSL_get_session(ssl);
  if (session == NULL) {
    return NULL;
  }
  return session->x509_chain;
}
The function returns a link to a custom data type: STACK_OF(X509). OpenSSL uses Stack API for interaction with collections of objects. As a matter of fact, the certificate chain constitutes a stack. I look how this data structure is represented in the memory and see that the pointer to the certificate stack is located in the second field of the structure (the pointer is 8 bytes in size).
0 1 2 3 4 5 6 7 8 9 A B C D E F 0123456789ABCDEF
00000000 02 00 00 00 00 00 00 00 80 55 cb 54 7f 00 00 00 .........U.T....
00000010 00 00 00 00 00 00 00 00 04 00 00 00 00 00 00 00 ................
00000020 00 00 00 00 00 00 00 00 00 00 00 00 00 00 00 00 ................
The pointer contains a reference to a sequence of pointers to instances of the structure X509 (there are two certificates in the chain):
0 1 2 3 4 5 6 7 8 9 A B C D E F 0123456789ABCDEF
00000000 00 fe fd 57 7f 00 00 00 00 b1 f8 57 7f 00 00 00 ...W.......W....
00000010 00 00 00 00 00 00 00 00 00 00 00 00 00 00 00 00 ................
In other words, to kill OpenSSL, I somehow have to substitute the received certificate chain with the one expected by the app. This requires a detailed research of the structure X509 in order to recreate the stack filled with its instances in the running process memory.
However, in the course of this study, I have discovered in OpenSSL an important feature that significantly simplifies the ‘chain forgery’. After the connection is made or disconnected, the data structure STACK_OF(X509) is not removed from the memory (i.e. the memory is not cleared, although the links may disappear). This makes it possible to reuse this structure for subsequent connections until the memory is allocated for something else.
I am going to repeatedly use the memory as follows: the first HTTPS connection will be established without a proxy sniffer, while the subsequent ones will go through the proxy. This enables me to receive a valid certificate chain at the first connection, remember the link to that certificate chain, and return this link at subsequent connections.
All the low-level routine, including the generation of session keys for traffic encryption (by a symmetric cipher), will occur deep inside OpenSSL. The real certificate received from the proxy will be used in that space, while at higher levels (where the additional certificate verification takes place), the forged trusted chain will be used.
Eliminating ‘excessive’ certificate reverifications
The function SSL_get_peer_full_cert_chain is not used deep inside OpenSSL; so, I can safely modify it. To do so, I have to monitor what chain is returned by the function; this requires reading the fields of X509 structures. The structure itself looks as follows.
struct x509_st
{
  X509_CINF *cert_info;
  X509_ALGOR *sig_alg;
  ASN1_BIT_STRING *signature;
  CRYPTO_refcount_t references;
  char *name;
  CRYPTO_EX_DATA ex_data;
  ...
} /* X509 */;
The simplest and most important field enabling me to distinguish bad certificate chains from good ones is name. It stores a text certificate identifier. For instance, when you address google.com, the contents of this field in the first certificate of the chain would be as follows for two different scenarios:
// Burp Suite proxy is active
/C=PortSwigger/O=PortSwigger/OU=PortSwigger CA/CN=google.com
// No proxy
/C=US/ST=California/L=Mountain View/O=Google LLC/CN=*.google.com
I have gathered enough information to implement my plan. I will use the Frida framework to modify the memory again. The code section below describes the final step required to kill OpenSSL:
// pointer to a remembered 'good' chain
VALID_CERT_CHAIN = 0;
if(e.name == "SSL_get_peer_full_cert_chain"){
  Interceptor.attach(e.address, {
    onEnter: function(args){},
    onLeave: function(retval){
      // link to the stack of X509 structures
      var stackDataPtr = Memory.readPointer(retval.add(8))
      // link to the first X509 certificate
      var firstX509StructPtr = Memory.readPointer(stackDataPtr.add(0))
      // link to the name field of the first certificate- the fifth field in the structure name
      var firstX509Struct_fieldNamePtr = Memory.readPointer(firstX509StructPtr.add(8*4));
      // value of the link field of the first certificate
      var firstX509Struct_fieldName = Memory.readCString(firstX509Struct_fieldNamePtr)
      // opening the way for Burp Suite!
      if(firstX509Struct_fieldName.indexOf("PortSwigger") > -1 && VALID_CERT_CHAIN != 0){
        retval.replace(VALID_CERT_CHAIN)
      }
      else{
        VALID_CERT_CHAIN = ptr(retval.toString())
      }
    }
  });
}
To see the result, I make the first request and turn Burp Suite on. The subsequent traffic can be monitored without any problem.

SSL Pinning bypassed!
INFO
Interestingly, SSL Pinning can be easily bypassed at the level of Network security configuration introduced in Android 7 without the certificate chain substitution; it is sufficient to kill the callback function.
Technique #2. Ignoring OpenSSL checks
Speaking of universal bypassing techniques, a logical question arises: is it necessary to bypass SSL Pinning at all? Without the intervention into the handshake process at the time of the connection, all subsequent payload transmissions will occur without any checks: the data will just flow to the SSL socket.
Of course, the data will be encrypted, but there must be a place in OpenSSL where I can detect the conversion of unencrypted bits of data into encrypted ones. Let’s try monitoring the traffic without a proxy sniffer.
Grabbing payload prior to transmission
I have no choice but to continue the research of the classic TLS client described in wiki.openssl. After the successful handshake with the server, the client starts sending the payload:
...
BIO_puts(web, "GET " HOST_RESOURCE " HTTP/1.1\r\n"
              "Host: " HOST_NAME "\r\n"
              "Connection: close\r\n\r\n");
BIO_puts(out, "\n");
...
The BIO_puts function seems to be self-explanatory, but it is not all that simple. This is a kind of an OpenSSL abstraction over the I/O. In fact, there is an entire group of such functions synonymous to functions written in C. One of them is BIO_write; it performs generally the same operations as BIO_puts does. In addition to the abstraction functions, OpenSSL has other I/O functions as well, including the pair SSL_write/SSL_read.
One might ask: why does OpenSSL include so many different functions? In fact, these two groups supplement each other. OpenSSL operates with buffers storing bytes that must be encrypted prior to sending them to the client’s socket; before the encryption, the bytes are stored in a special buffer. The function SSL_write saves the bytes in this special buffer, while their conversion into an encrypted buffer is performed using the function BIO_read.
The situation with the reading operation is symmetric: bytes read from the socket are written into a special buffer using BIO_write; after that, you get the unencrypted text with SSL_read. Therefore, the unencrypted text can be grabbed from the outgoing traffic at the SSL_write input and from the incoming traffic at the SSL_read output. The self-explanatory signatures SSL_write and SSL_read are shown below:
int SSL_write(SSL *ssl, const void *buf, int num)
int SSL_read(SSL *ssl, void *buf, int num)
Here is an example of a traffic dump in SSL_write after a successful handshake with google.com (via binary HTTP/2) under the protection of SSL Pinning.
0 1 2 3 4 5 6 7 8 9 A B C D E F 0123456789ABCDEF
00000000 50 52 49 20 2a 20 48 54 54 50 2f 32 2e 30 0d 0a PRI * HTTP/2.0..
00000010 0d 0a 53 4d 0d 0a 0d 0a 00 00 00 00 00 00 00 00 ..SM............
00000020 00 00 06 04 00 00 00 00 00 00 04 01 00 00 00 ................
And a response from SSL_read:
0 1 2 3 4 5 6 7 8 9 A B C D E F 0123456789ABCDEF
00000000 00 00 00 00 01 00 00 00 03 3c 48 54 4d 4c 3e 3c .........<HTML><
00000010 48 45 41 44 3e 3c 6d 65 74 61 20 68 74 74 70 2d HEAD><meta http-
00000020 65 71 75 69 76 3d 22 63 6f 6e 74 65 6e 74 2d 74 equiv="content-t
00000030 79 70 65 22 20 63 6f 6e 74 65 6e 74 3d 22 74 65 ype" content="te
00000040 78 74 2f 68 74 6d 6c 3b 63 68 61 72 73 65 74 3d xt/html;charset=
00000050 75 74 66 2d 38 22 3e 0a 3c 54 49 54 4c 45 3e 33 utf-8">.<TITLE>3
00000060 30 31 20 4d 6f 76 65 64 3c 2f 54 49 54 4c 45 3e 01 Moved</TITLE>
00000070 3c 2f 48 45 41 44 3e 3c 42 4f 44 59 3e 0a 3c 48 </HEAD><BODY>.<H
00000080 31 3e 33 30 31 20 4d 6f 76 65 64 3c 2f 48 31 3e 1>301 Moved</H1>
00000090 0a 54 68 65 20 64 6f 63 75 6d 65 6e 74 20 68 61 .The document ha
000000a0 73 20 6d 6f 76 65 64 0a 3c 41 20 48 52 45 46 3d s moved.<A HREF=
000000b0 22 68 74 74 70 73 3a 2f 2f 77 77 77 2e 67 6f 6f "https://www.goo
000000c0 67 6c 65 2e 63 6f 6d 2f 22 3e 68 65 72 65 3c 2f gle.com/">here</
000000d0 41 3e 2e 0d 0a 3c 2f 42 4f 44 59 3e 3c 2f 48 54 A>...</BODY></HT
000000e0 4d 4c 3e 0d 0a 00 00 00 00 00 00 00 00 00 00 00 ML>.............
It is also convenient to dump the traffic here because it can be divided between parallel connections. This can be done using the first parameter present in both functions: the connection pointer. For instance, it is possible to differentiate pointer values.
Grabbing payload prior to encryption
In reality, developers who embed OpenSSL into their apps (either by linking a static library or using OpenSSL source code) rarely rely upon SSL_write. This is because SSL_write implements an entire layer of ancillary logic that is often redefined when implementing a custom network stack.
As a result, the I/O class of functions from OpenSSL is present the in apps but these functions are either used minimally or not used at all. But there is good news as well: developers may avoid directly using the network logic implemented in SSL_write, but they still cannot avoid using the cryptographic OpenSSL component. The encryption algorithms remain the same even if a custom network stack is implemented. In addition, the development of a new cryptographic algorithm potentially introduces yet another source of vulnerabilities.
For a number of reasons, OpenSSL is broken into two large parts: (1) above-mentioned libssl implementing the routine for SSL/TLS protocols; and (2) libcrypto containing cryptographic algorithms. The first library depends on the second one, while the second one is fully autonomous. The symbol table of a nonstripped version of libcrypto contains plenty of interesting information.

Inside the OpenSSL cryptographic component
The library provides access to numerous cryptographic functions, including symmetric block encryption protocols. The TLS protocol has a nonevident feature: the asymmetric cryptography is used only at the stage of common key generation between the client and the server. Later, this key will be used for payload encryption with a symmetric cipher.
The symmetric encryption algorithm and common key generation method are determined at the handshake stage: the client and the server exchange the lists of their cryptographic capacities (СipherSuites). СipherSuites may be different; more information is available in the official OpenSSL documentation.
INFO
Normally, the selected СipherSuite can be identified through the interception of TCP packets, for instance, with Wireshark. However, some exotic suites cannot be identified automatically and the definition table is required.
Why do I need СipherSuite? Because the selected suite determines the assortment of libcrypto functions used in the app.
For instance, if the client and the server have agreed (the final word rests with the server) to use the AES in CBC mode for encryption, then the names of libcrypto functions will include combinations aes and cbc. In reality, the most common variant is AES in GCM mode with a 128-bit key (TLS_RSA_WITH_AES_128_GCM_SHA256). The following piece of code is responsible for the СipherSuite operation:
int CRYPTO_gcm128_encrypt_ctr32(GCM128_CONTEXT *ctx,
  const void *key, const uint8_t *in, uint8_t *out, size_t len,
  ctr128_f stream);
int CRYPTO_gcm128_decrypt_ctr32(GCM128_CONTEXT *ctx,
  const void *key, const uint8_t *in, uint8_t *out, size_t len,
  ctr128_f stream);
The interception of the in buffer in the first case and the out buffer in the second case allows to grab the same payload as the one intercepted earlier using SSL_write and SSL_read. The point is that the buffer remains unchanged after being placed into SSL_write/SSL_read and until its encryption/decryption in BIO_read/BIO_write.
In many other СipherSuites, a high-level interface of cryptographic OpenSSL functions EVP (EnVeloPe) is used for symmetric encryption inside libcrypto. It provides access to cryptography irrespective of the specific algorithm and its mode. In such a case, functions EVP_DecryptUpdate/EVP_EncryptUpdate will likely be called. Their interception brings the same result:
int EVP_EncryptUpdate(EVP_CIPHER_CTX *ctx, unsigned char *out,
  int *outl, const unsigned char *in, int inl);
int EVP_DecryptUpdate(EVP_CIPHER_CTX *ctx, unsigned char *out,
  int *outl, const unsigned char *in, int inl);
In pursuit of universality
Now that you are familiar with OpenSSL operation principles, you can capitalize on the laziness of developers who shamelessly incorporate elements of this library into their projects. As a result, your SSL Pinning bypassing capacity significantly raises! The most difficult part is to identify the required OpenSSL pieces in a specific program.
Looking up OpenSSL traces by strings and functions
The most primitive way is to identify the OpenSSL functions of interest by their names and used strings. The first variant is obvious: if the symbol table of the studied binary file includes a familiar function name, chances are high that this is what you are looking for.
Things get worse if the function names had been altered. Still, you can search for a function by its constants, e.g. strings. One of the most interesting functions mentioned in this article is ssl_verify_cert_chain. It includes the following piece of code:
...
X509_STORE_CTX_set_default(ctx,
  s->server ? "ssl_client" : "ssl_server");
...
Take, for instance, Chrome. Let’s search for ssl_client in its statically compiled library libmonochrome_base.so.
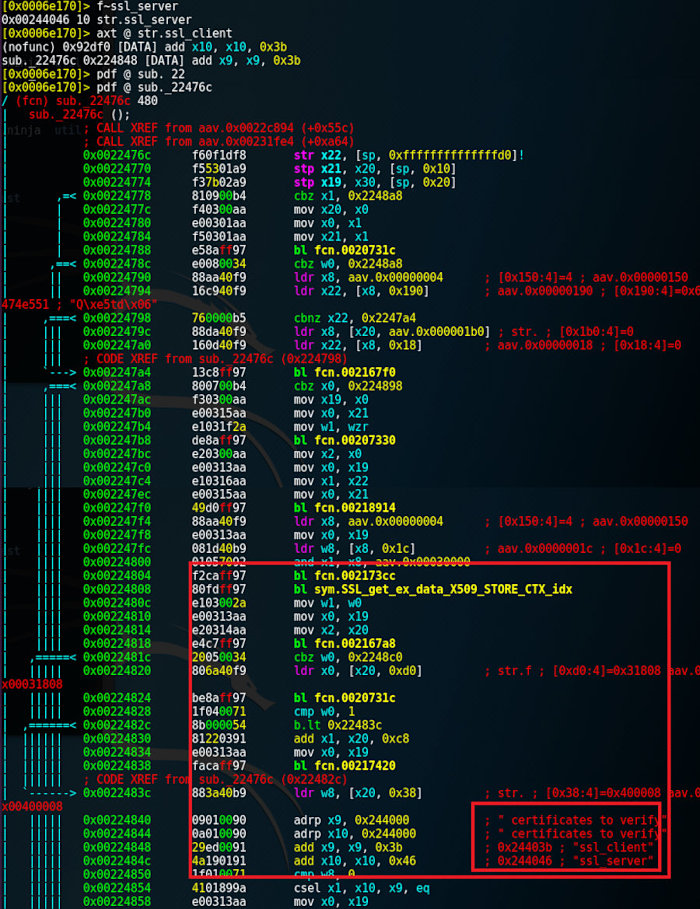
Looking up an OpenSSL function by a string using Radare2
Here is an example of a more complicated case: you have found some OpenSSL functions and successfully intercepted their calls, but the functions are not identified yet. In that situation, you can use the brute force method based on the following principle: the first parameter in the majority of OpenSSL functions is the link to an SSL instance SSL *s... that, in theory, can be equated with the connection identifier.
Therefore, if you intercept the connection ID in an unidentified function and then compare it with the first parameter value in all other functions, you can distinguish many anonymous functions and narrow down the search to them. This method requires significant resources because you have to intercept all functions of the studied binary file.
In many cases, you are unable to identify any function – neither by its name nor by the strings its uses. In such situations, function signatures come to help. The same compiler produces similar binary codes, which can be used for your purposes.
You can compile OpenSSL and BoringSSL libraries with all debug symbols, then apply any binary signature generator to these binary files, and look for the resultant signatures in the ‘closed’ binary file.
Searching for OpenSSL traces with signature analysis
Let’s take libliger, the native HTTP stack implementation by Facebook. Facebook does not make a secret that it uses ‘community developments’ that may include OpenSSL.
Use the Zignatures engine embedded in Radare2. First, compile all the necessary libraries (i.e. BoringSSL and OpenSSL) to make their architecture consistent with the tested one. Then check whether your files can be compared with the tested binary file using the signature analysis.
## here, the signatures will be scanned
$ file libliger.so
ELF 64-bit LSB pie executable ARM aarch64, version 1 (SYSV),
dynamically linked, stripped

## from here, the first portion of signatures will be taken
$ file bin/boringssl/arm64-v8a/libssl.so
ELF 64-bit LSB pie executable ARM aarch64, version 1 (SYSV),
dynamically linked, with debug_info, not stripped

## from here, the second portion of signatures will be taken
$ file bin/boringssl/arm64-v8a/libcrypto.so
ELF 64-bit LSB pie executable ARM aarch64, version 1 (SYSV),
dynamically linked, with debug_info, not stripped

## from here, the third portion of signatures will be taken
$ file bin/openssl/arm64-v8a/libssl.so
ELF 64-bit LSB pie executable ARM aarch64, version 1 (SYSV),
dynamically linked, not stripped

## from here, the fourth portion of signatures will be taken
$ file bin/openssl/arm64-v8a/libcrypto.so
ELF 64-bit LSB pie executable ARM aarch64, version 1 (SYSV),
dynamically linked, not stripped
Using Zignatures, generate signatures for each .so file and save them for further analysis:
$ r2 bin/boringssl/arm64-v8a/libssl.so
$ [0x0009e210]> aa
$ [0x0006e210]> zg
$ [0x0009e210]> zos sig/boringssl/arm64-v8a/libssl.z
Then launch the search procedure for signatures inside libliger:
$ r2 libliger.so
$ [0x0006e170]> aa
$ [0x0006e170]> zo sig/boringssl/arm64-v8a/libssl.z
$ [0x0006e170]> zo sig/boringssl/arm64-v8a/libcrypto.z
$ [0x0006e170]> zo sig/openssl/arm64-v8a/libssl.z
$ [0x0006e170]> zo sig/openssl/arm64-v8a/libcrypto.z
$ [0x0006e170]> z/ # launching the scan
[+] searching 0x003e3c38 - 0x00430c1c
[+] searching 0x003b2430 - 0x003e3c38
[+] searching 0x00000000 - 0x00395744
[+] searching metrics
hits: 2685
And after some time, you can review the search results:
$ [0x0006e170]> zi~EVP_Encrypt # searching for EVP_Encrypt*
0x001f20ac 56 sign.refs.sym.EVP_EncryptInit_77
0x001f20ac 56 sign.refs.sym.EVP_EncryptFinal_ex_83
0x000ba080 72 sign.refs.sym.EVP_EncryptInit_1030
0x000ba080 72 sign.refs.sym.EVP_EncryptFinal_ex_1036
0x000ba130 72 sign.refs.sym.EVP_EncryptInit_1099
0x000ba130 72 sign.refs.sym.EVP_EncryptFinal_ex_1105
0x000d5aa4 516 sign.bytes.sym.EVP_EncryptUpdate_0
0x000a6958 64 sign.refs.sym.EVP_EncryptInit_1783
0x000a6958 64 sign.refs.sym.EVP_EncryptFinal_ex_1789
$ [0x0006e170]> zi~verify_cert_chain # searching for *ssl_verify_cert_chain
$ [0x0006e170]> zi~gcm128 # looking up functions by interaction with AES GCM
0x000de3c4 240 sign.refs.sym.CRYPTO_gcm128_tag_9
0x001c1904 224 sign.refs.sym.CRYPTO_gcm128_tag_2107
Only one of the three functions that can be used for interception has been successfully identified. Still, this is enough for the above SSLUnPinning techniques! By the way, *ssl_verify_cert_chain was located in libliger using the previous method: looking up by the ssl_client string. Remember: you can combine various techniques depending on the case.
Those who do not like the Zignatures engine can use the FLIRT technology included in Hex-Rays.
Initially, FLIRT was supposed to become a tool to break apps into ‘known’ and ‘unknown’ parts. The ‘known’ part would be the one whose source code could be found on the Internet. The ‘unknown’ part would be unique code.
If you use FLIRT, there are two possible variants: either search for signatures required for FLIRT or create them. Many signature databases already include signatures for OpenSSL, for instance, databases for Ubuntu and Windows and for OpenSSL compiled in various MSVC versions.
In addition, you can generate FLIRT signatures from an unstripped binary file or .ar archive using pelf/sigmake utilities included in the FLARE toolkit, then upload these signatures to IDA Pro, run a scan, and check the number of matches.
Conclusions
Now you are familiar with the key concepts that can be employed to create a universal SSL Pinning bypassing technique. You can apply the above approaches to the research of any application that uses OpenSSL to protect its traffic from interception. Now you are armed and know what to do. Good luck!
This is probably the best fucking i ever read on SSL sniffing, well done and thank you.