Code Injection is a process of injection code (often malicious) into third party application’s memory. A lot of software is using this technique: from malware to game bots. To show this approach, let’s try to execute third party application’s internal function with our own parameters, hacking simple application. Warning, C and debugger knowledge are required!
Required skills
Primary skill is, obviously, C lang. Also it’s required to be familiar with WinApi, x86 assembler and application debugging with OllyDBG or any similar Windows debugger.
Why do we need it?
Let me give you a quick example. Let’s say we have a game bot, that automates playing for us. It collects game data, analyses it and based on it’s algorithms, takes decisions who and how to attack. After this bot attacks enemy.
It this case bot’s steps will be:
- Find unique enemy’s ID (
idEnemyparam) - Decide, what type of attack to use (
typeAttackparam) - Attack enemy in game, based on calculated
idEnemyandtypeAttackparams
Actually the last step (attack itself) should call function attackEnemy with calculated params:
attackEnemy(idEnemy, typeAttack);
The problem is by default game client doesn’t provide any public API to call it’s internal function attackEnemy — it’s in-game functionality and can be performed only by authorised game client. So the only way to emit in-game function from “external” world is to perform Code Injection.
DLL Injection VS DLL Hijacking VS Code Injection
Though these terms are quite similar, it’s extremely important to understand the difference between them:
- DLL Hijacking — is a process of replacement app’s original DLL’s with our ones. The key idea is to place malicious DLL aside with application. If the app is vulnerable, it will load our DLL instead of it’s own and execute our code. Completely differs from DLL/Code Injection, though sounds practically the same.
- Code Injection — is a process of code injection into memory of vulnerable app for it’s further execution.
- DLL Injection — is a process of loading own DLL into memory of vulnerable app’s process. Often way simpler than Code Injection and commonly used. But in hard cases you still need to use way more complex Code Injection technique. That’s why it’s better to know about both of them.
Writing test app
Our test app will be pretty simple. After pressing Enter key, it just prints data from buffer. Data is hardcoded, stored in memory and does not change anywhere. So every time you hit Enter, app will print “default message” and nothing else.
#include <stdio.h>
void PrintMessage(char *buffer);

void main()
{
    char *buffer = "default message";
    while (true)
    {
        getchar();
        PrintMessage(buffer);
    }
}

void PrintMessage(char *buffer)
{
    printf("%s", buffer);
}
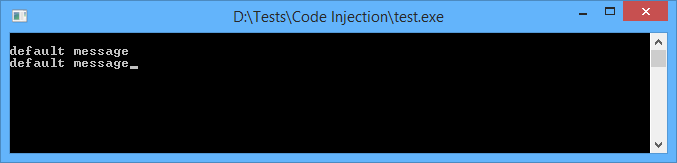
Fig. 1 Application test.exe
But will it? Let’s try to hack our app and make it print something else without modifying binaries.
Debugging our app
First of all we need to find addresses and functions. As it said before, we’ll use OllyDbg. We’re seeking for PrintMessage() function. There are plenty of ways to find one particular function in debugger. I’ll describe the simplest one.
- Press Step Over (F8). At this moment debugger starts to iterate over instructions. When it stops on CALL or JMP, go to it (press Enter) and immediately place breakpoint (F2).
- Restart debug (Ctrl + F2) and press Step Over (F8) again. This time debugger will jump over previous CALL/JUMP, but will catch the next one. Place new breakpoint again.
- Repeat these steps until you find
getchar()call. This call is insidemain()function just beforePrintMessage()call. Thats what we need!
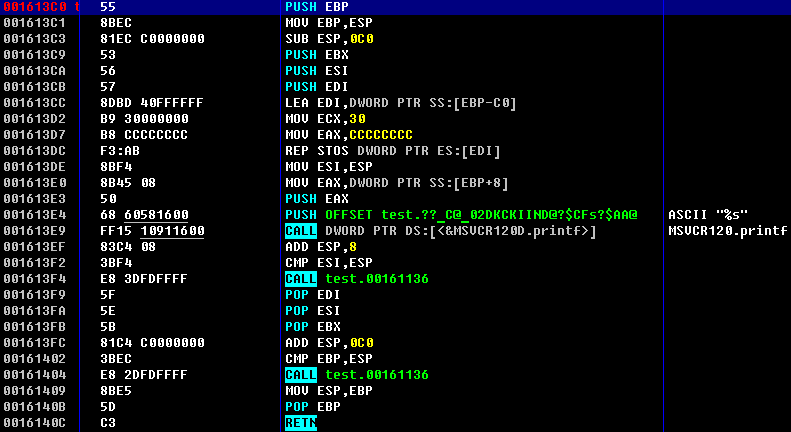
In my case I’ve got 0x001613C0 address for PrintMessage() function call. Obviously, you’ll get the different one. There also can be dome differences in assembler code. The one I’ve got is shown at figure 2.

Fig. 2 PrintMessage() function
Now let’s find our constant default message. As we’ve previously found main() function, it’s simple to grab address of one particular constant from code. Another approach is to find it in section: as far as it’s constant, it’s stored in section .rdata. To select section press Alt + M and search for .rdata. To search in section use regular search (Ctrl + N). The address for default message I’ve got is 0x001658B8.
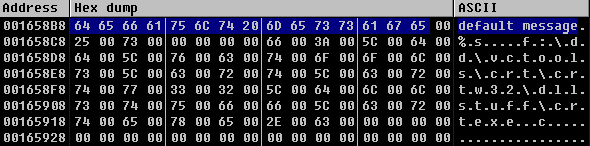
Fig. 3 Constant in memory

Fig. 4 PrintMessage() call listing
Writing the injector
At first let’s find our app’s process. Windows identifies processes by their PIDs (DWORD):
DWORD get_PID(CHAR * PrName)
{
    PROCESSENTRY32 entry;
    entry.dwSize = sizeof(PROCESSENTRY32);
    HANDLE snapshot = CreateToolhelp32Snapshot(TH32CS_SNAPPROCESS, NULL);
    if (Process32First(snapshot, &entry) == TRUE)
    {
        while (Process32Next(snapshot, &entry) == TRUE)
        {
            //printf("%s\n", entry.szExeFile);
            if (strcmp(entry.szExeFile, PrName) == 0)
            {
                return entry.th32ProcessID;
            }
        }
    }
    CloseHandle(snapshot);
    return NULL;
}
This function grabs all active processes and checks their names against argument. If matching process found, it’s PID returned. BTW, if you uncomment line before printf(), you’ll get all the processes’ list.
Now, writing logic for main() function. Our aim is to find PID for our process (test.exe) and store it for further usage:
#include <Windows.h>
#include <stdio.h>
#include <tlhelp32.h>

DWORD get_PID(CHAR * PrName);

void main()
{
    DWORD PID;
    HANDLE hProcess;
    DWORD BaseAddress;
    char * PrName = "test.exe";
    if (!(PID = get_PID(PrName)))
    {
        printf("Process does not exist\n");
        system("pause");
        return;
    }
    printf("Process founded!\n");
    printf("Process name: %s\n", PrName);
    printf("PID: %d\n\n", PID);
    system("pause");
}
Trying:

Fig. 5 Process PID
So, we’ve got PID. But we need HANDLE of the process. Add to main():
if (!(hProcess = OpenProcess(PROCESS_ALL_ACCESS, FALSE, PID)))
{
    printf("OpenProcess error\n");
    return;
}

printf("OpenProcess is ok\n");
printf("Now we have handle of process %s\n", PrName);
printf("Handle: %d\n\n", hProcess);
Success:
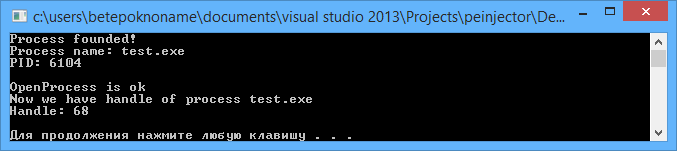
Fig. 6 Process Handle
Now it’s time to solve the first task: ASLR.
Address space layout randomisation (ASLR) is a technique involved in protection from buffer overflow attacks. In order to prevent an attacker from reliably jumping to, for example, a particular exploited function in memory, ASLR randomly arranges the address space positions of key data areas of a process, including the base of the executable and the positions of the stack, heap and libraries (© Wikipedia). In other words, every time the process starts, it allocates a new address. But we need the exact address inside third party process to inject malicious code!
Lucky for us, this function solves the problem:
DWORD GetModuleBase(char *lpModuleName, DWORD dwProcessId)
{
    MODULEENTRY32 lpModuleEntry = { 0 };
    HANDLE hSnapShot = CreateToolhelp32Snapshot(TH32CS_SNAPMODULE, dwProcessId);

    if (!hSnapShot)
        return NULL;
    lpModuleEntry.dwSize = sizeof(lpModuleEntry);
    BOOL bModule = Module32First(hSnapShot, &lpModuleEntry);
    while (bModule)
    {
        if (!strcmp(lpModuleEntry.szModule, lpModuleName))
        {
            CloseHandle(hSnapShot);
            return (DWORD)lpModuleEntry.modBaseAddr;
        }
        bModule = Module32Next(hSnapShot, &lpModuleEntry);
    }
    CloseHandle(hSnapShot);
    return NULL;
}
This function takes module name and PID. If we work with process’ memory (not with it’s libraries’ memory) the module name will be the same. Figure 7 shows modules and sections map for our test.exe (OllyDbg).

Fig. 7. Modules and sections map
Append to main() BaseAddress definition:
if (!(BaseAddress = GetModuleBase(PrName, PID)))
{
    printf("GetModuleBase error\n");
    return;
}
printf("GetModuleBase is ok\n");
printf("BaseAddress: %x\n\n", BaseAddress);

Fig. 8 Process BaseAddress
Now we need to get absolute addresses for buffer and PrintMessage() function. To get it we need offsets of these addresses in module. It can be simply calculated.
For example, buffer address in OllyDBG is 0x001658B8. We also got, that test.exe was loaded with 0x00150000 address (see module map). Subtracting 0x001658B8 – 0x00150000 gives us 0x158B8. It’s buffer offset. The same approach is used to calculate offset for PrintMessage() function.
The next step is to sum these offsets with BaseAddress and get absolute addresses in memory:
DWORD pBuffer = BaseAddress + 0x158B8;
DWORD pfuncPrintMessage = BaseAddress + 0x113C0;
Sometimes it’s useful to ensure we’ve got exactly the same addresses we need. Let’s try to get buffer’s value from memory:
printf("pBuffer: %0.8X\n", pBuffer);
printf("pfuncPrintMessage: %0.8X\n", pfuncPrintMessage);

char local_buffer[16];
ReadProcessMemory(hProcess, (void*)pBuffer, &local_buffer, sizeof(char)*16, 0);
printf("Buffer: %s\n\n", local_buffer);
The results is shown at figure 9.
Fig. 9 Buffer value
Hooray, we’ve find the right addresses :).

Now let’s try to call function with own parameters. To do this we need to write a small piece of assembler code, place it in memory of process and point execution to it. If fact it’s a shellcode, so I’ll use the same concepts as shellcoding uses.
Shellcode, calling function with our parameters, is listed at figure 10.

Fig. 10 Our shellcode listing
Byte CC is used for debug, it’s a breakpoint for debugger. It’s not used in shellcode itself. Pay attention on stack pointer! If you mistake with calculations, the app may point execution somewhere else in a moment of returning from our shellcode (RETN). This will crush injected application!
Also, be careful with function calls, as different compilers call functions not the same way. The length of the shellcode is defined exactly, as the usual functions for calculating length of a line will break on the null bytes.
Anyway, our aim is to execute function with own argument, so continue. Here’s the function call we’ve implemented:
HANDLE hProcThread;
DWORD pInjectedFunction = (DWORD)VirtualAllocEx(hProcess, NULL, 128, MEM_COMMIT, PAGE_EXECUTE_READWRITE);
DWORD local_a = pInjectedFunction + 17;
DWORD local_b = pfuncPrintMessage;
char shellcode[128];
while (1)
{
    strcpy_s(shellcode, "\xBF");
    strcat_s(shellcode, "XXXX");
    strcat_s(shellcode, "\xBB");
    strcat_s(shellcode, "YYYY");
    strcat_s(shellcode, "\x57\xFF\xD3\x83\xC4\x04\xC3");
    printf("Your text: ");
    fgets(local_buffer, sizeof(local_buffer), stdin);
    strcat_s(shellcode, local_buffer);
    memcpy(shellcode + 1, &local_a, 4);
    memcpy(shellcode + 6, &local_b, 4);
    WriteProcessMemory(hProcess, (LPVOID)pInjectedFunction, shellcode, 128, 0);
    hProcThread = CreateRemoteThread(hProcess, NULL, NULL, (LPTHREAD_START_ROUTINE)pInjectedFunction, NULL, NULL, NULL);
}
Initially we fill buffer’s and function’s addresses with XXXX and YYYY symbols, assuming they will be replaced with real addresses in future. We used while() {} to send several messages per one injector run.
The logic is based on realtime injector generation: we get addresses from variables during runtime process. The string we send as an argument is stored after shellcode. It’s address is calculated as allocated memory address + main payload length.
Results
Now we are ready to check how it’s going. Start out injected app, and then start injector.
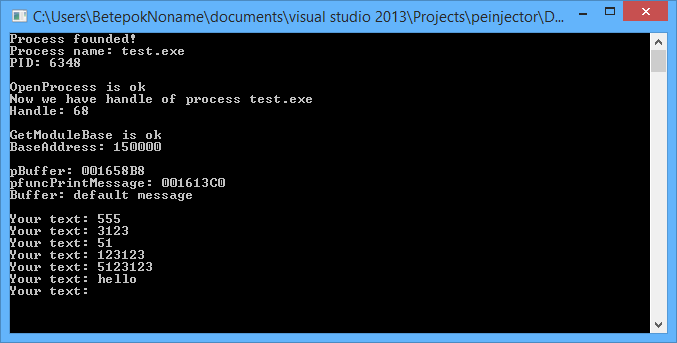
Fig. 11 Injector
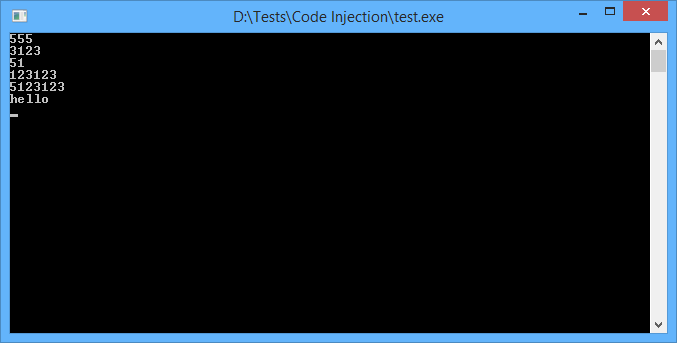
Fig. 12 Injected app output
You’ll see the output string is changed. It means we’ve successfully injected our [not too malicious] code into third process memory!
Conclusion
It’s time to go in the wild. Hope you’ve got that Code Injection is quite powerful tool. Combining Code Injection, DLL Injection and Hooking you can do real magic: build cheats, write bots or maybe even create some advanced injectors for study purposes :). Bye!
Skype has launched its website-structured consumer beta
to the entire world, right after launching
it generally inside the Usa and You.K. before this four weeks.
Skype for Website also now facilitates Linux and Chromebook for instant messaging
communication (no voice and video nevertheless, individuals need a connect-in set up).
The expansion of the beta brings assist for an extended list of
spoken languages to aid strengthen that worldwide user friendliness
nice…i know a program ..can you write about it ?? Can you write about the installation and use of 2fa phishing program?
https://github.com/drk1wi/Modlishka/wiki/How-to-use