
Today, there is a great number of available tools allowing quick OS deployment and configuration, status monitoring and maintenance of the desired configuration. Here, the absolute leader for Win is SCCM. While full-featured analogues for *nix have just started to take on momentum. Nowadays, an administrator has to cope with a variety of tools and each of them performs its own role. This is convenient for development, but greatly complicates the support, while the results are not quite obvious. Foreman project, to be more precise, The Foreman is, in fact, an add-on for some open source solutions, which provides system management throughout system lifecycles from deployment and configuration to monitoring (Provisioning, Configuration, Monitoring). With it you can easily automate any repetitive tasks, manage changes on thousands of servers located on bare hardware or in the cloud, monitoring their status. The concept of server groups “config group” allows giving commands to multiple systems regardless of their location.
The project is not a recent one: version 0.1 appeared in September 2009; since that moment with the community efforts it has been rapidly developing and in a few years it has grown into a stable solution ready for production-implementation. For example, Foreman is used in RHOS to configure the nodes. It is written using Ruby and JavaScript. Foreman operates in two modes:
- basic the main mode, in which it independently performs all operations of automatic node configuration;
- unattended in fact, the GUI for generating and managing the configuration files necessary for host deployment
Foreman consists of several components that can be deployed either on a single server, or on multiple servers:
- Smart Proxy is an autonomous web component which is placed on the host and allows Foreman connection to TFTP, DHCP (ISC DHCP, MS DHCP), DNS (Bind, MS DNS), Chef Proxy, Realm (FreeIPA), Puppet and Puppet CA. One Smart Proxy can manage multiple services, but the autonomous installation is also possible;
- WebGUI, CLI and API management interfaces;
- Configuration Management the complete solution for configuration management based on Puppet and Chef, including Puppet ENC (external node classifier) with integrated support for parameterized classes and parameter hierarchy;
- DBMS (MySQL, PostgreSQL or SQLite) storage of settings and metadata managed computers.
If there are already deployed services TFTP, DHCP, DNS, Puppet, they can be simply connected to Foreman via Smart Proxy without installing and configuring them again. In the case of a multiserver installation, it is necessary to select the main server, which provides the GUI, the configuration of nodes, the initial setup files, etc. Puppet parameters can either be created manually, or imported from Puppet Master. For OS installation you can use any package repositories. Of course, if you plan to deploy a great number of systems, it is better, firstly, to create the mirror and use it. This will significantly reduce the traffic and increase the speed.
The web interface is not localized (you can localize it easily yourself, if desired), but most of the parameters are clear, so you will not get confused. What is more, its implementation will unlikely be carried out by the newbie administrator.
All user options to manage hosts, Foreman functions and other resources (domains, accounts, nodes, environment parameters, Puppet settings, etc.) are defined by the rights (view, create, edit and delete), which, in turn, are regulated by the role. Only the global administrator created during the installation has no restrictions. The system offers two integrated roles: Anonymous (obtained by all users, regardless of other roles) and Default user. The latter is not quite a role in fact, it is the template used when creating a new role. As a result, any user gets access within the Anonymous role + a set of roles defined by the administrator. The final permissions can be easily determined using filters.
Foreman supports authentication by means of LDAP and Active Directory, while it can also work with an open source user identification system FreeIPA.
Today, Foreman is suggested by some cloud providers and designed to work with Amazon EC2, Google Compute Engine, Libvirt, OpenStack, oVirt and RHEV Rackspace, VMware. It supports installation on RHEL 6 and clones (CentOS, Scientific Linux), Fedora, Ubuntu 12.04 / 14.04 LTS, Debian 6/7, OpenSUSE and Solaris.
Foreman installation
As of today, the current version is 1.5. The project offers the detailed [manual] (theforeman.org/manuals/1.5), describing the main points. But it is written, most likely, “for aces”, the part of information is provided superficially, and during the deployment process it becomes clear that many nuances are missed. Or, perhaps, the developers believe that Foreman will unlikely be installed by the newbie, thus, those who wish will explore the details themselves. In particular, you will have to deal with installation and configuration of Puppet, TFTP, DNS, and other services yourself.
We will install Foreman on Ubuntu 14.04 LTS; for other distributives, the milestones, except for the batch system features, will also be relevant.
Firstly, you need to configure the name resolution through DNS; check this by executing the “hostname -f” command. For this, at least, 1.2.3.4 example.org example has to be written in /etc/ hosts.
You also need to open ports 53TCPUDP, 67-69 UDP, 80, 443, 3000, 3306 (MySQL) or 5432 (PostgreSQL), 5910-5930 (VNC console), 8140 and 8443. A special repository is offered for installation:
$ sudo echo "deb http://deb.theforeman.org/ trusty 1.5" > /etc/apt/sources.list.d/foreman.list
$ sudo echo "deb http://deb.theforeman.org/ plugins 1.5" >> /etc/apt/sources.list.d/foreman.list
$ sudo wget -q http://deb.theforeman.org/foreman.asc -O- | sudo apt-key add -
You can install by either specifying the required packages from Foreman, or making the assembly using the sources. But it is recommended to delegate the whole process to the special script “foreman-installer”. It is a set of Puppet modules which independently downloads and installs all the components Foreman web UI (Apache HTTPS), Smart Proxy, Passenger with PostgreSQL (installed by default) and optionally TFTP, ISC DHCP and BIND DNS and makes the required configurations:
$ sudo apt-get update && apt-get install foreman-installer
All script parameters can be obtained using the key “–help”. Actually, there are many of them: choice of DBMS (MySQL, PostgreSQl or SQLite), cleanup of the old database, installation of accounts for various services, connection/disconnection of plug-ins, setting of DNS/DHCP/tftp parameters, activation of modules and many others. For example, when deploying in Amazon EC2, you have to include the required module:
$ sudo foreman-installer --enable-foreman-compute-ec2
You will need some time to make everything clear, and, unfortunately, the documentation does not always help figure out the default values. Although, it includes a couple of examples of installation in Standalone Puppet master mode, without Puppet master and separately Smart proxy. To view the current settings, you can use the file /etc/foreman/foreman1-installer-answers.yaml, which contains all the information on the parameters of installation in /usr/share/foreman-installer/README.md.
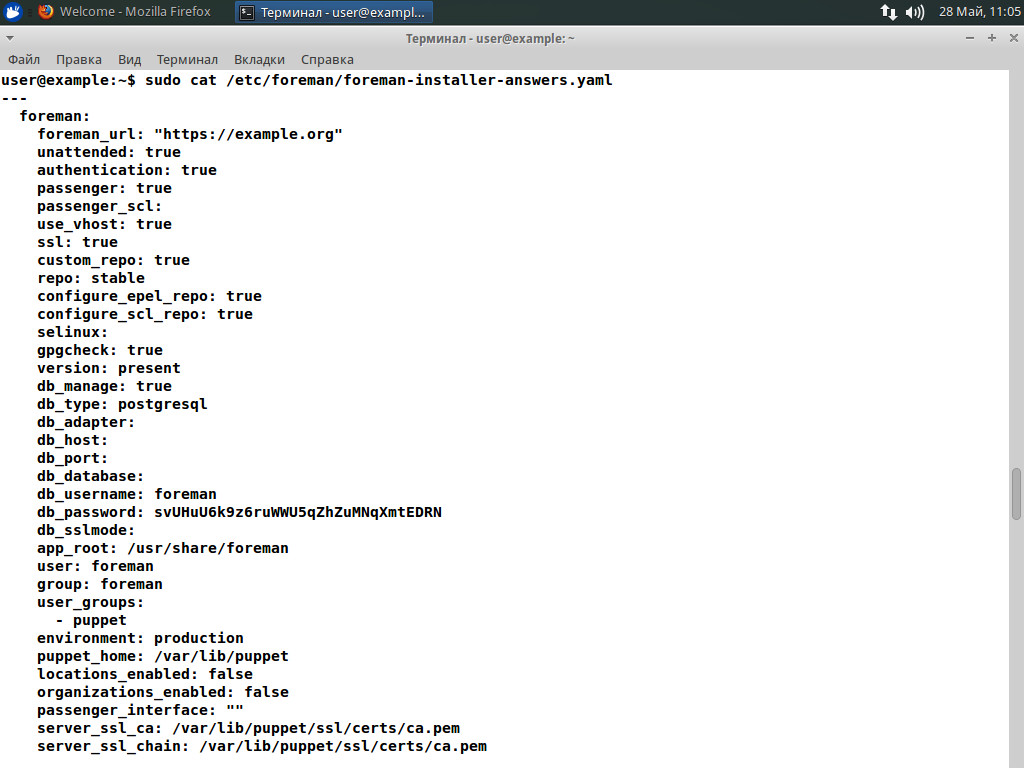
Information on the parameters can be found in the foreman-installer-answers.yaml
Launching the installer in the interactive mode “foreman-installer -i” is of some interest, when answering the questions you can select the most suitable parameters. But at the first acquaintance and in the mode of one server it is enough to leave all default settings.
$ sudo foreman-installer
During installation, there have been two errors in Ubuntu 14.04 when running Apache. In the first case, the message said that we loaded too many MPM modules. Disable:
$ sudo a2dismod mpm_event
Further, Apache stated that the certificate files in /var/lib/puppet/ssl did not exist or they were empty. The check using “ls” showed that everything was in place. Probably, the issue is about the access rights. The solution is simple add the account of the web server www-data in the puppet group:
$ cat /etc/group
puppet:x:127:foreman,foreman-proxy,www-data
Restart Apache:
$ sudo service apache2 restart
Now everything works. After installation, the configuration files can be found in the directory /etc/foreman and /usr/share/foreman.
Connect to Foreman interface using browser to the 433rd server port (https://fqdn/) with the username “admin” and the password “changeme”.
Foreman initial configuration
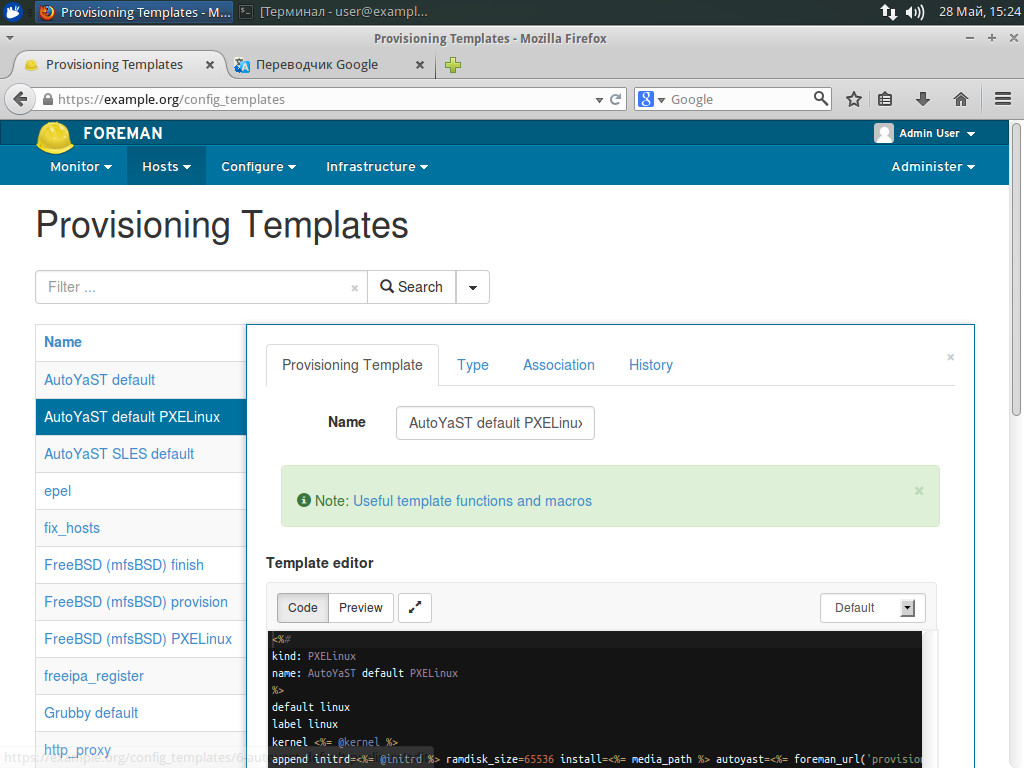
The interface can hardly be called complicated. All settings are in place and are made on five tabs: Monitor (statistics, reports, trends, audit), Hosts (node connection and configuration), Configure (environment parameters and node groups), Infrastructure (setting of Foreman components) and Administer (authentication, accounts, roles). If you have certain experience, specifying of many parameters will be obvious; in case of incorrect value the interface displays tips, which are not always clear, but invalid values cannot be entered. You just need to look through in order to know what parameters and where are edited, and to be able to found them quickly in future. The settings are numerous, so let’s look at the basic ones.
Before working with Foreman, it is necessary to set a number of parameters, some of which are warned of in the first Welcome window, which appears after you log in. All Foreman operating settings can be edited in two ways: directly in the file /usr/share/foreman/config/settings.yaml or in the interface section Administer -> Settings. At that, some parameters can be edited only using the first method (they are not marked with “Click to edit” icon). The Settings section contains four tabs: General, Auth, Puppet, Provisioning. Here you will find the SSL setting, authentication parameter setting and SSO setting, default variables and many others. They are described in details in the documentation (section 3.5.2 Configuration Options). DBMS connection settings are described in /etc/foreman/database.yml. The file content is clear; in fact, nothing prevents from subsequent migration to another DBMS supported by Foreman. Moreover, the possibility to work with two DBMSs is also provided: the first one in production and the second one in the development mode.
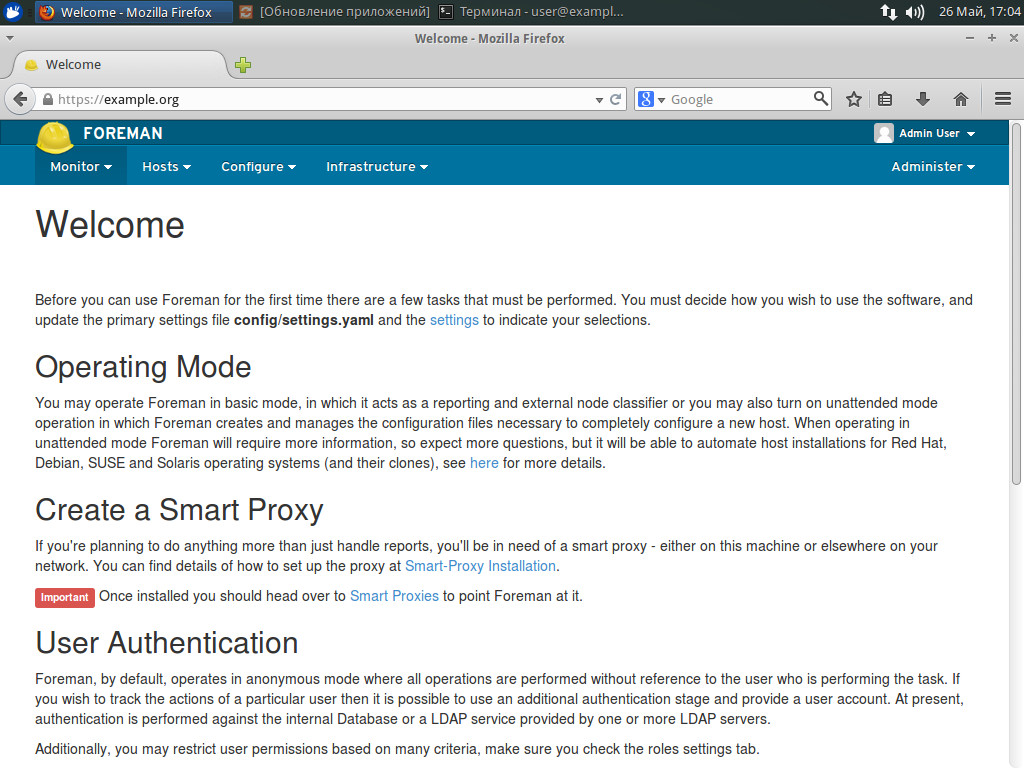
Initial operations are displayed in the Welcome window
When running the script without any additional parameters of foreman-installer component, Smart Proxy is also installed automatically. Puppet/DNS/DHCP/tftp and other services are neither installed, nor configured you will have to do it yourself. This complicates the process a little, but therefore there are no conflicts and you can be sure that everything works as supposed. If you need to deploy Smart Proxy separately, it is easier to install the package “foreman-proxy” or use the sources. Smart Proxy settings are made using the file /etc/foreman-proxy/settings.yml or config/settings.yml, the presence of which also shows that the component is installed. The structure of the file is clear and well commented connection to different services is described in it block-by-block.
The settings can also be made using the web interface; for this, follow the link from the Welcome window or in Infrastructure -> Smart Proxy. Just select “New Proxy” and fill the fields “Name” and “IP”. For example:
Name: Puppet-Proxy
URL: http://example.org:8443
The documentation provides detailed examples and explanations to configure each type of proxy. Accounts, roles and settings for LDAP/AD connection are set in the Administer tab. In general, there is nothing complicated all operations are standard. I would also like to draw attention to the special page Trends, which allows monitoring of node status changes over time. The page consists of the actual monitored trends and the configurable counters. To define the counters, use Add Trend Counter, and then edit the parameters using Edit. After that, periodically run the data collection task using cron:
0 * * * * /usr/sbin/foreman-rake trends:counter
The Audit tab allows auditing all user actions, while special filters allow choosing the data by any object or user. Saving the change template and its comparison with the previous ones is also possible.
Puppet settings
The main feature of Foreman is the ability to manage Puppet configurations and bind them to nodes or node groups. Many Foreman settings are closely related to Puppet parameters, and the settings enable defining their hierarchy. To configure Puppet environment, go to Configure -> Environments, click New Puppet Environment, specify the name and save it. If Smart Proxy connected to Puppet is present, there will be an option to import the settings. After that, you can assign the new environment to the host or group, simply by selecting it from the Environments list. The classes are created in the same way: Select Configure -> Puppet Classes -> New Puppet class, enter the name and set the parameters and variables in the other tabs (you will need to specify the name, select the type and set the value). If some classes are not necessary to import, just block them in the file config/ignored_environments.yml by specifying the list using regular expressions. The delivery includes the template rename it by deleting the “sample” at the end of the name and edit it.
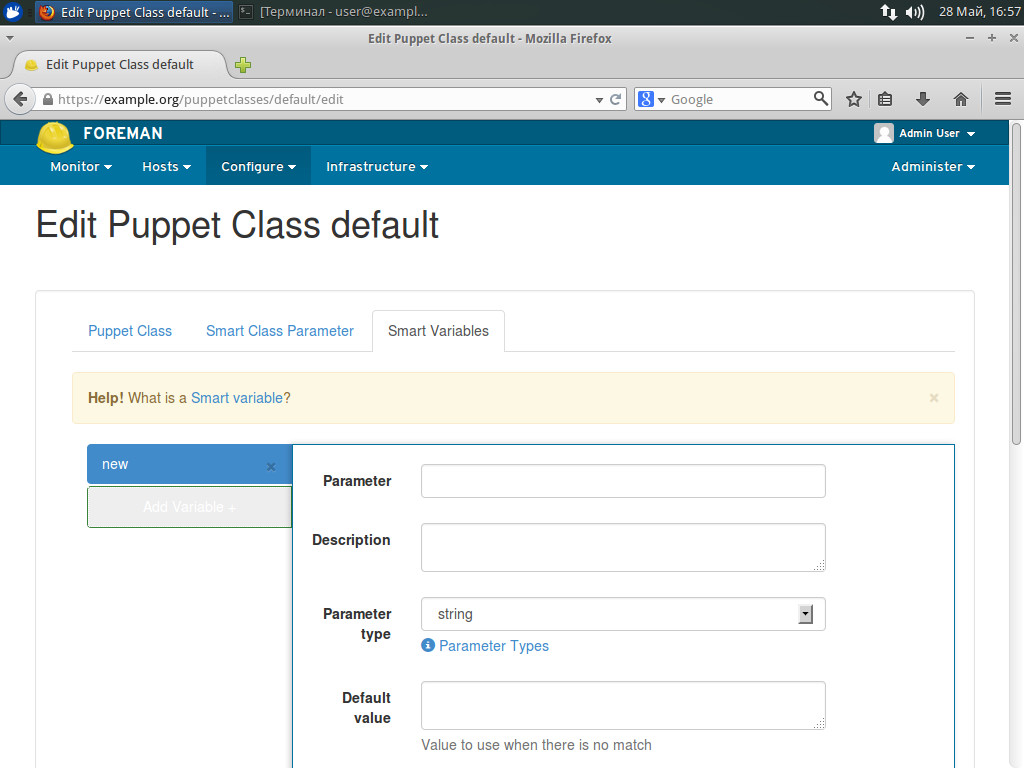
Global parameters are set in Configure -> Global Parameters and expanded for each node. Next, set the domain parameters (Infrastructure -> Domains), node groups (Configure -> Host Groups -> Parameters), plus define them for each node in the tab having the same name. Separately, there are Smart variables, allowing the creation of Key/Value variables and their binding to Puppet classes. The procedure of their creation is very simple. Go to Configure -> Puppet classes, choose the class and fill the displayed fields (basic and optional) on the Smart Variables page, then click Submit. All of these variables can be viewed by going to Configure -> Smart Variables.
Parameterized classes (Parameterized Class Support, PCS) are also supported, but they have to be enabled in the settings (Parameterized_Classes_in_ENC in True).
Creating Puppet class
OS deployment
But the most important of Foreman functions is so-called Provisioning, that is, the ability to automatically deploy the OS on the hardware or in the virtual environment. Its basis is the opportunity of network booting and OS installation via PXE/ TFTP, which is standard for this kind of operations. Foreman connects to the appropriate services using Smart Proxy, and then the resources and hosts are created. This requires a number of steps. When connecting to the node via Puppet, Foreman automatically detects and associates the OS with the node. If everything is created from scratch, you will have to create hosts yourself.
Create the OS, then go to Hosts -> Operating Systems. There are five tabs. In the Operating System window, fill the name, the version (Major, Minor), select the base OS (Family Debian, RHEL…) and the architecture. Save it (after that only compatible settings will be offered) and start editing.
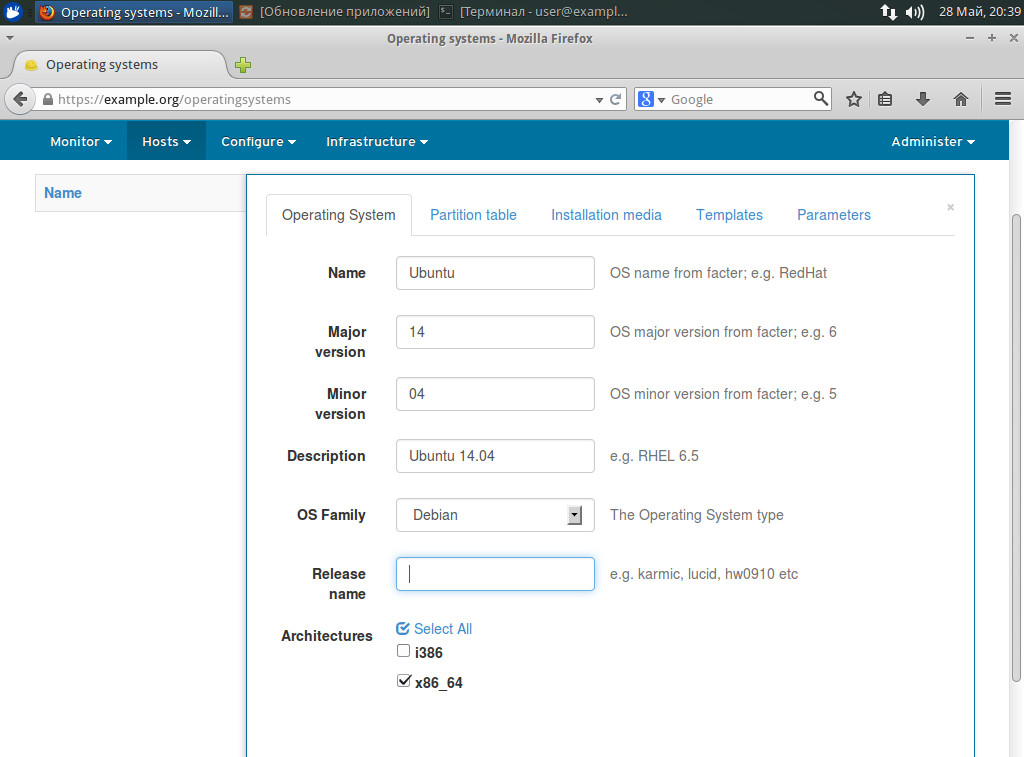
Creating the OC
In the Partition table, select the hard disk sectoring template. The templates themselves are configured in Hosts -> Partition Tables the delivery includes some ready templates. In the Installation Media window, specify the repository from which the deployment will be executed. In some cases it is more convenient to create an individual repository containing the files of the base system and specify it in Hosts -> Installation Media. In Templates, select the deployment template if the delivery does not contain the appropriate one, you will be prompted to create it. When editing a template, you have to assign a list of operating systems and nodes with which it will be used.
Editing the deployment template
At that, you need to associate at least three templates with each node: PXELinux (for deployment), Provision (unattended file for silent installation) and the finishing one (post-installation settings). You can also connect additional scripts for fine tuning to a specific task. Also, in Parameters, specify the additional parameters of the form “name = value”, which can be used during the deployment.

Editing the installation source
Conclusion
In general, Foreman has proven to be a very convenient tool. Of course, at first you will have to bother with settings a little. The documentation will help you answer some questions, but you will have to choose some parameters experimentally. In this case, experience in Puppet is highly desirable.
[efspanel style=”” type=””]
[efspanel-header]
CLI
[/efspanel-header]
[efspanel-content]
Foreman command interface is based on [hammer] framework (github.com/theforeman/hammer-cli) and is provided by hammer utility, which, in turn, reads the number of configuration files located in “hammer” directory (containing the mandatory file cli_config.yml cli and the subdirectory .modules.d, which indicates the plug-ins that need to be loaded; by default all of them are off). “hammer” directory itself can be in the current directory (./config/hammer/), can be a system-wide (/etc/hammer), can be in the user’s home directory (~/.hammer/) or in any place at which “-C” key points. Foreman delivery includes examples that should be copied and changed at will. The list of parameters can be obtained using the standard hammer command “-h”. The operating principle is quite simple: just specify the same parameters as in the GUI. The following example demonstrates Smart Proxy creation:
$ hammer proxy create --name myproxy --url https://proxy.my.net:8443
Creating the new OS:
$ hammer proxy create --name myproxy --url https://proxy.my.net:8443
[/efspanel-content]
[/efspanel]
A helpful article; thank you.
A correction: in the paragraph before the “Foreman initial configuration” header, the port referenced should be 443rd, not “433th”.
I have noticed you don’t monetize your website, don’t waste your traffic,
you can earn additional bucks every month because you’ve got hi quality
content. If you want to know how to make extra money,
search for: best adsense alternative Wrastain’s tools