
nezha
Nezha is a lightweight and elegant alternative to Zabbix, designed to present a summary of servers, their system resources, and other information through a web panel.

The setup is relatively complex: you’ll need a functioning Docker installation, a GitHub account, and a domain name.
To start, create an application on GitHub by heading to GitHub Developer and clicking on “New OAuth App.” When filling out the form, you’ll need to provide a homepage URL for the application, which requires having a domain name, and enter < in the Authorization callback URL field. Then, generate a Client ID and Client Secret on the application page and be sure to save them, as you won’t be able to view them again.
Now, execute the following command in the terminal:
curl -L https://raw.githubusercontent.com/naiba/nezha/master/script/install_en.sh -o nezha.sh && chmod +x nezha.sh && sudo ./nezha.sh
Once executed, a text menu will appear. Select the first option.

The installation script will prompt you with several questions, including ones about ports. By default, the HTTP server with the interface will be set up on port 8008, and the server for collecting data from agents will be on port 5555.
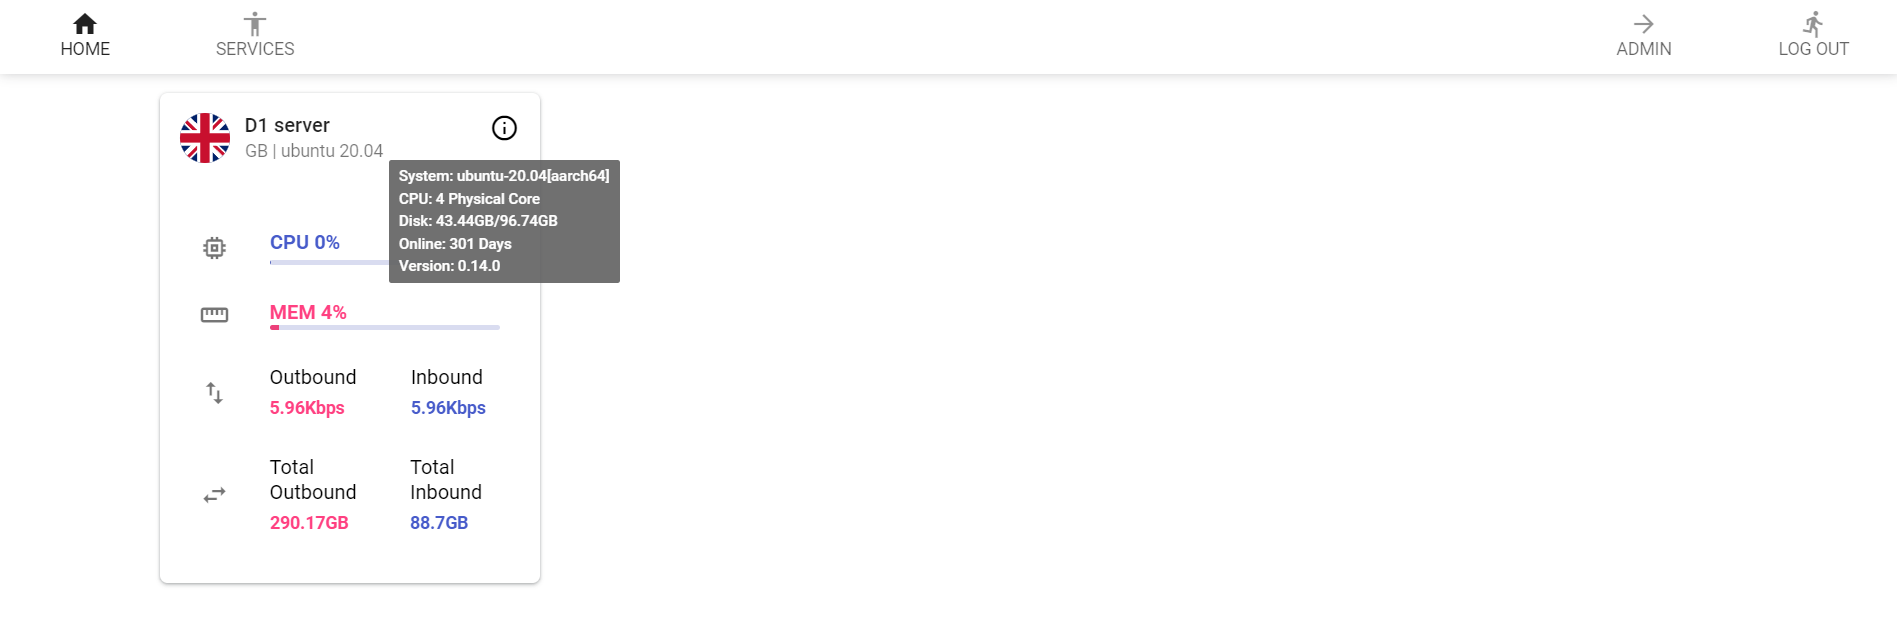
The panel is ready and has loaded successfully. You can now open it, log in through GitHub, and create a new server.

After creating the server, you’ll see its secret in the dashboard. This is what we need to install the agent.
Now it’s time to install the agent. You can use the same script that was used for the control panel, but this time, select option 8. During installation, you’ll be prompted to enter the panel’s address and the secret key that you created in the previous step. Once you’ve entered this information, the client will start working immediately, and no further configuration will be necessary.
Now, the homepage will feature a widget displaying server information, and you can open a web terminal from the dashboard. It’s fully functional: supports colors, updates in real-time, and responds to special key combinations.

In the panel settings, you can also change the theme. The screenshot below shows the Neko Mdui theme.
I really liked Nezha. I recommend at least trying out the demo.
AutoRegex
Regular expressions are an incredibly powerful tool for transforming text data. However, without experience, creating them can take more time than they save. Meet AutoRegex — an AI generator that creates regular expressions from simple, human-readable English descriptions.

This service is powered by OpenAI Codex, a public neural network that can write code based on verbal descriptions.
AutoRegex handles simple queries quite well and can save significant time.
The only downside is the small limits on free usage. However, even these should be sufficient: you get about ten requests without an account and another ten per month if you sign up. This is more than enough for three scripts a month, but if needed, you can either pay or just register another account and continue using the service.
hunt
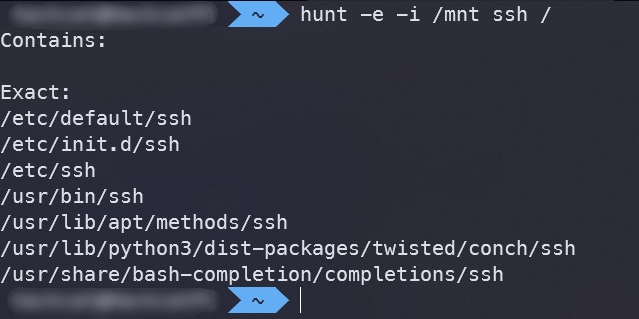
Hunt is a utility for local file search, serving as an alternative to the standard locate command. From my experience, Hunt operates faster than find, fd, and locate.
The program is written in Rust, which means it’s installed using Cargo.
cargo install hunt
There are several filters and basic settings available here, which are nonetheless sufficient for everyday use. Here are a few of them:
-
-e— search only for objects with exact name matches (e.g.,sshd_configwon’t be found with asshquery); -
-i /— exclude specific directories from the search;path1,/ path2 -
-h— include hidden directories in the search; -
-s— output only the list of found files, without explanations. Useful for scripts; -
-c— case-sensitive matching.
More details can be found in the program’s repository.
plow
Plow is designed for load testing HTTP servers. It’s built on the Go library fasthttp, which is up to ten times faster than the standard implementation. This makes Plow exceptionally fast, at least anecdotally.

Plow can provide real-time statistics not only in the terminal window but also in the browser (by default, the built-in server is accessible on port 18888).
The application can be launched either using Docker or by installing from source.
go install github.com/six-ddc/plow@latest
plow <args>
Alternative:
docker run --rm --net=host ghcr.io/six-ddc/plow <args>
The arguments are pretty standard for these types of programs: we have the usual settings for the number of threads (-c), the desired number of requests (-n), the test duration (-d or -d , for example), and the HTTP method (--method="GET"). You can read more about other parameters in the program’s help section (--help). The target is specified without any special parameters.
dooit
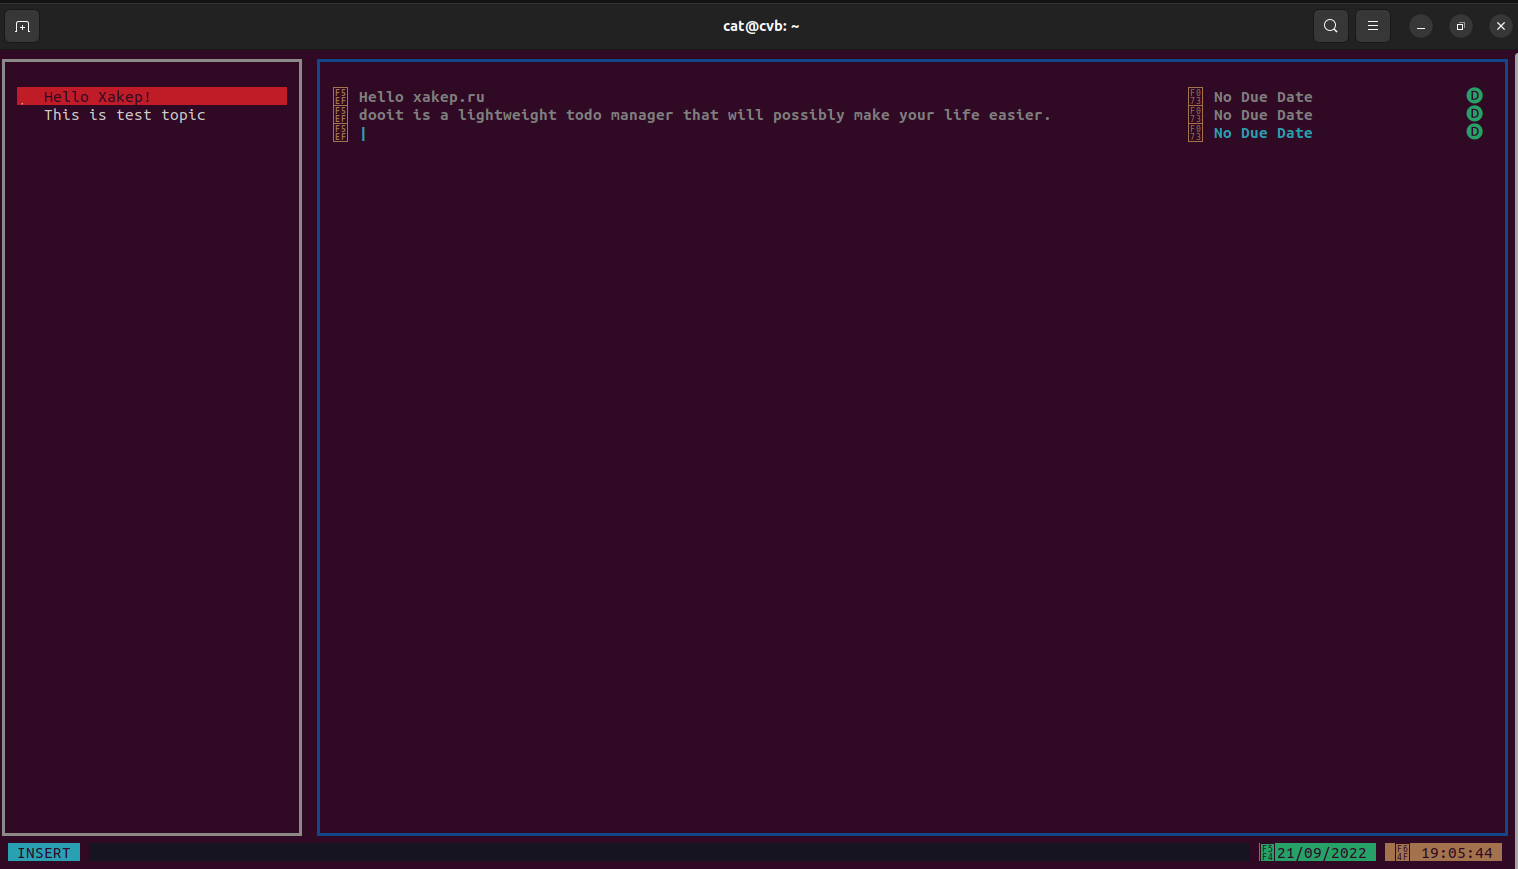
For managing a to-do list, everyone uses whatever suits them best. For instance, I set up a private Telegram channel just for myself, where I send all my tasks. If you live in the terminal and are not fond of graphical applications, and you prefer not to disclose your coffee purchasing plans to companies, you might want to use a local task manager like Dooit. It keeps everything on your hard drive, works solely from the terminal, and is reminiscent of Vim, with the only difference being that it doesn’t close with Ctrl-C.
To install this, you need Git and Python version 3.10 or higher, which can be problematic in some environments. For example, on my WSL, the latest available Python version is still 3.8, so I had to use a virtual machine with a more up-to-date system for this program.
If you have everything set up, you can install Dooit with just a single command:
python3 -m pip install git+https://github.com/kraanzu/dooit.git
It is executed by entering the command dooit in the terminal.
ContainerSSH
An intriguing discovery is ContainerSSH, which allows you to seamlessly direct SSH clients into isolated containers. These containers are created dynamically at the moment of connection.

The setup is straightforward and can be done with a single command using Docker or Kubernetes. Download the contents from the example folder, and if you have Docker, run the following command:
docker-compose up -dWhat about Kubernetes?
kubectl apply -f kubernetes.yaml
The test server will be launched on port 2222 of the local host and will accept the user foo with any password.
To resolve this issue, you can create your own authentication server. Essentially, it’s a standard HTTP server with two endpoints (/ and /) that send and receive JSON data. Here’s an example of a request and response for password-based authentication from the documentation:
{
    "username": "username",
    "remoteAddress": "127.0.0.1:1234",
    "connectionId": "An opaque ID for the SSH connection",
    "passwordBase64": "Base64-encoded password"
}
{
  "success": true
}
It appears to be an excellent solution for user isolation (for instance, guest sessions or sandboxes for untrusted users) and for hosting various competitions where participants (i.e., players) need to access identical environments using the same credentials, without having the ability to break anything or disrupt each other.
catp
Scripts often direct intermediate data to /. Catp is a tool that allows you to intercept this output and display it on the screen.
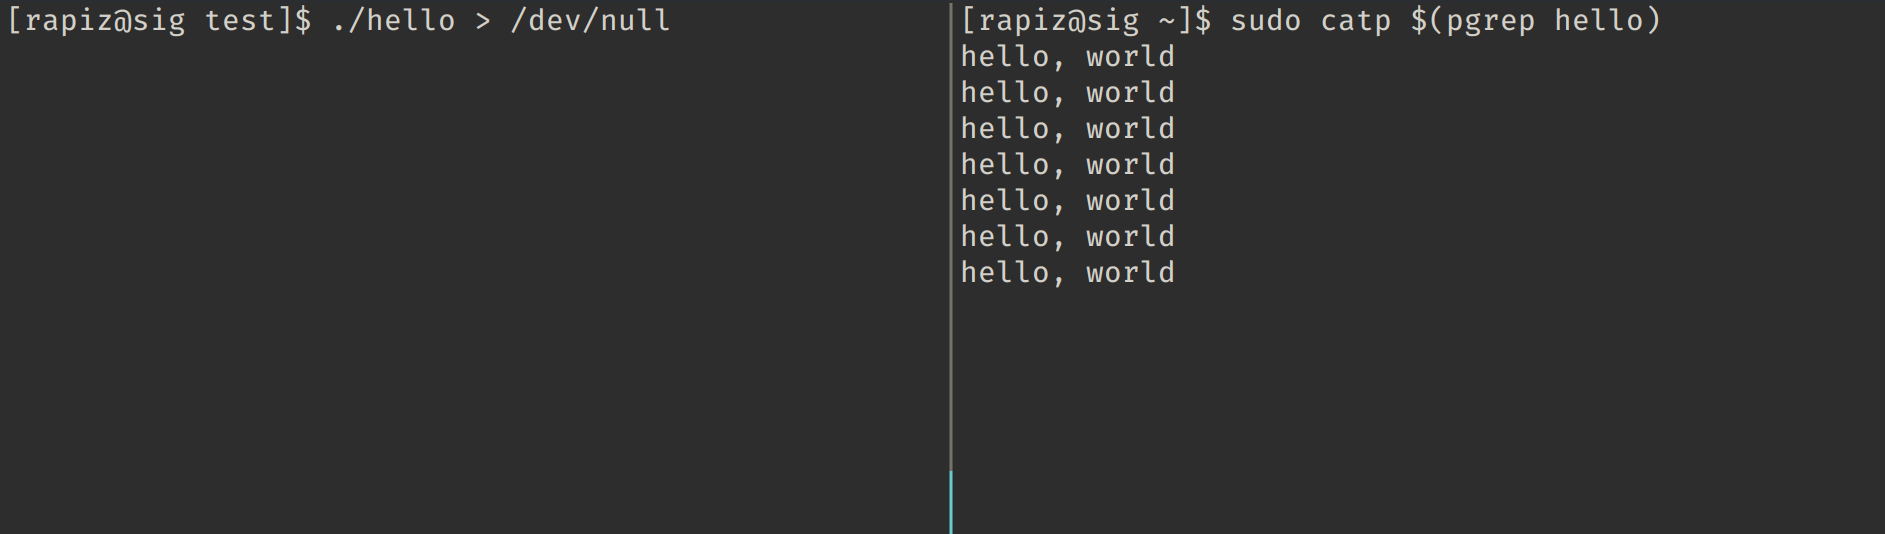
There’s no magic involved in how catp works: it uses ptrace to intercept the write system call. Unfortunately, this means that on most systems, root privileges are required for it to function.
No installation is required: simply download the latest release from GitHub and run the extracted file.
The utility has only one optional argument: the PID of the process you want to monitor. If you don’t specify it, catp will intercept the output of all processes on the system.
krunvm
Krunvm is a tool for creating simple virtual machines based on OCI images. If you need to quickly and easily set up virtual machines, it’s an indispensable tool.

Krunvm allows you to specify the number of CPU cores (--cpus) and the amount of memory (--mem) for a virtual machine. Additionally, you can configure the DNS settings (--dns), the working directory (--workdir), and map ports and directories (--port and --volume, respectively). Overall, it is a flexible and user-friendly tool, except for some challenges with installation.
Installing on a fresh Ubuntu 22 took a considerable amount of time due to a lack of instructions. Let me share my experience so you don’t waste your time.
To get started, you’ll need the Rust compiler, the Cargo package manager, and any dependencies required for building the project.
sudo apt install rustc cargo patchelf linux-source-5.15.0 libelf-dev bison flex curl git python3-pyelftools asciidoctor
Then you need to download, compile, and install libkrunfw:
git clone https://github.com/containers/libkrunfw.git
cd libkrunfw
make
sudo make install
Now install buildah:
sudo apt install buildah
After that, you can download and compile libkrun:
git clone https://github.com/containers/libkrun.git
cd libkrun
make
sudo make install
Final step — download and build krunvm:
git clone https://github.com/containers/krunvm.git
cd krunvm
cargo build --release
In the target/ directory, you’ll find the completed build—krunvm. It’s ready to use!
Zellij
Zellij is another intriguing terminal multiplexer. If you find yourself feeling limited by tmux, or simply want to experiment with something new, you might want to check out Zellij.

Layers, plugins, and the ability to predefine your environment are all supported. I can’t imagine what’s missing!
www
To install, you can use Cargo or simply download and unpack the binary release.
cargo install --locked zellij
USBGuard
If you’re not new to “Hacker,” you’ve probably already heard about BadUSB and similar attacks that rely on emulating legitimate input devices during offline attacks. While almost everyone is aware of BadUSB itself, the protection against it that’s built into the Linux kernel is far less well-known.
The USB Device Authorization mechanism was introduced into the kernel back in 2007, allowing for the creation of rules and whitelists/blacklists to control which USB devices can or cannot be connected to a specific machine.
Until recently, there was no convenient built-in way to configure this kind of protection. Now, we have USBGuard – an easy-to-use solution to prevent USB-based attacks on your Linux machine.
The installation process is relatively straightforward. First, install the dependencies:
sudo apt install --no-install-recommends -V \
    asciidoc autoconf automake bash-completion build-essential catch2 \
    docbook-xml docbook-xsl git ldap-utils libaudit-dev libcap-ng-dev \
    libdbus-glib-1-dev libldap-dev libpolkit-gobject-1-dev libprotobuf-dev \
    libqb-dev libseccomp-dev libsodium-dev libtool libxml2-utils \
    libumockdev-dev pkg-config protobuf-compiler sudo tao-pegtl-dev xsltproc
Next, download the source code from the repository, navigate to the directory where it was downloaded, and execute the following:
./configure
make
make check
sudo make install
Before the initial launch, some setup is necessary to avoid ending up without a keyboard in front of your computer. Generate a set of rules to allow for the already connected devices:
sudo sh -c 'usbguard generate-policy > /etc/usbguard/rules.conf'
Now you can start the daemon.
sudo systemctl start usbguard.service
If nothing has exploded and your keyboard is still functioning, set the service to load at startup:
sudo systemctl enable usbguard.service
curl-impersonate
It’s known that you can differentiate a browser from a download tool based on the traffic they generate. For instance, curl will be different from Chrome, even if you set the User-Agent header accordingly. This happens because of the unique mechanism used to establish an encrypted connection, which can be exploited for fingerprinting.
Someone shared the curl-impersonate project with me. It’s a customized version of curl that can mimic a regular web browser.
The utility can be useful, for example, when working with TLS fingerprinting or if you simply want a pre-configured version of curl to mimic a specific browser.
To install, simply download the release from the GitHub page. However, make sure to install some dependencies first:
sudo apt install libnss3 nss-plugin-pem ca-certificates
For each supported browser, there’s a wrapper script that launches curl-impersonate with the necessary parameters and headers. I took the table from the program’s repository.
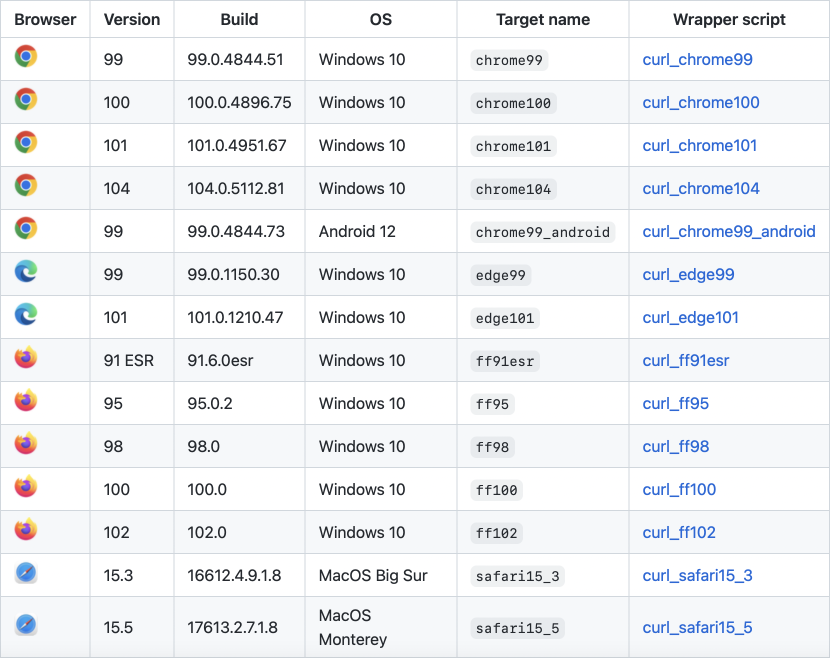
Launching Chrome 101:
curl_chrome101 https://xakep.ru
ntfy.sh
The service ntfy.sh offers a convenient way to send notifications to your phone and computer directly from scripts.
To send notifications, a basic curl command is sufficient. Example:
curl \ -H "Title: XAKEP.RU alert" \ -H "Priority: high" \ -H "Tags: heavy_check_mark" \ -d "A new article has been published!" \ ntfy.sh/<your_topic>

All headers are optional; only the data (-d) is required.
You can receive notifications on your computer via a browser by visiting the page ntfy..
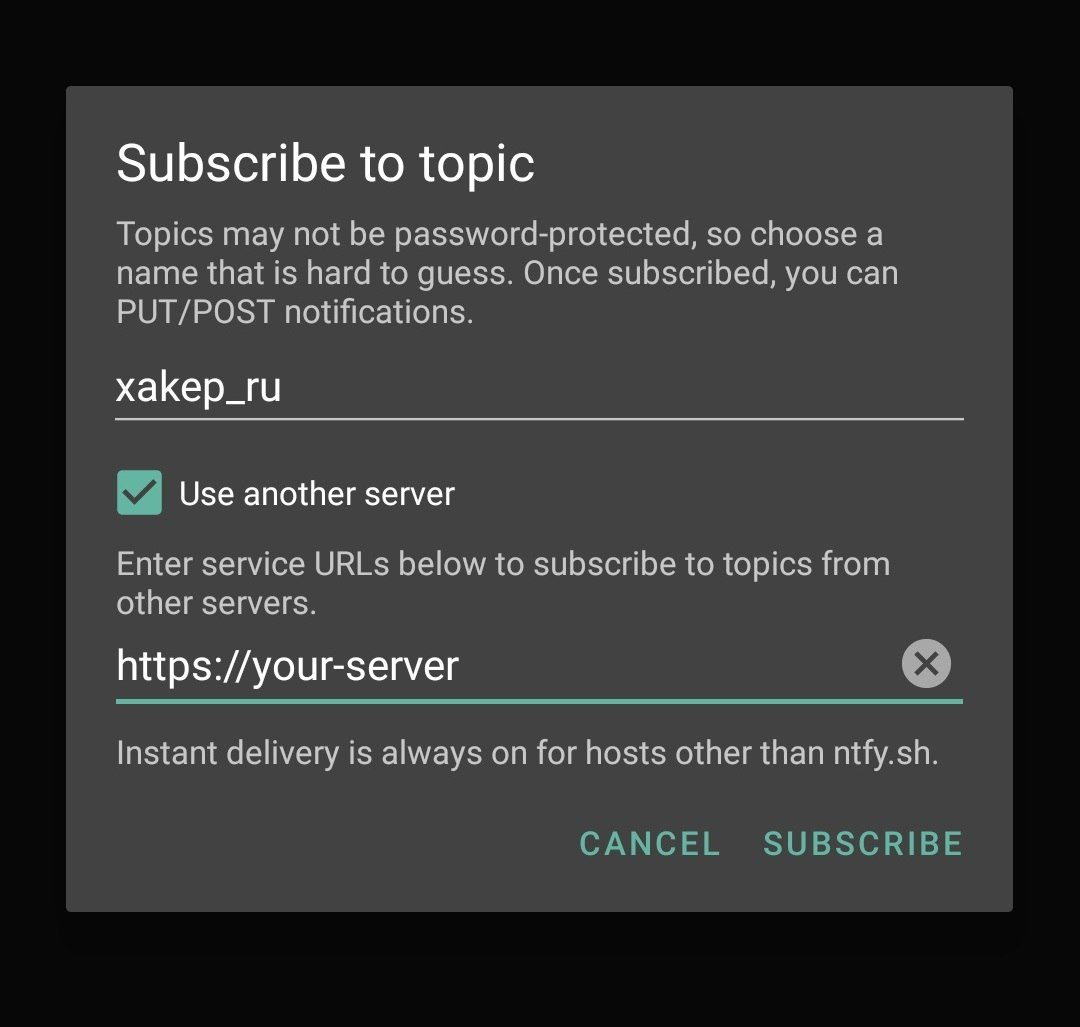
To receive notifications on your phone, you need to install the app. It’s available on Google Play, F-Droid, and the App Store. Once installed, subscribe to your topic.
The service is completely open, and the source code is available on GitHub. You can set up your own self-hosted instance if you plan to transmit any potentially sensitive data. To do this in the Android app, simply check the option “Use another server.”
jqp
The last tool we’ll cover today is jqp (short for jq playground) — a visually appealing TUI sandbox for learning how to use jq.
We’ve already covered jq in Hacker, so I won’t repeat myself. However, it’s worth delving into this excellent interface for it.
It supports input from a file (using the -f parameter) or from standard input (curl ). At the top of the console, there’s a field for entering your jq query; the left column displays the input data (JSON from a file or stdin), and the right column shows the jq output for the entered query. You can press Tab to switch between these fields and use the arrow keys to scroll up and down.

The program’s repository contains information about keyboard shortcuts, but knowing them isn’t necessary for a comfortable use of jqp.
To install jqp, simply download and extract the binary release. It’s convenient to place it in / afterwards:
mv ./jqp /usr/local/bin
Share Your Suggestions!
The more time passes, the more I understand the TUI enthusiasts who don’t need pretty interfaces and are perfectly content with just a terminal. If you’re one of them, you’ve probably amassed quite the collection of little-known tools that I haven’t covered yet. Feel free to share your favorite utilities in the comments under this article, and I’ll include them in the next roundup.