
This article was planned as a guided tour of the system and useful apps, aimed at power users. Maybe you’re thinking about switching to a Mac, or you’ve been living with macOS for a while and want to learn something new about how it works and how to make it more convenient. Either way, this guide should be useful.
Three quick tips for beginners
1. Set up Hot Corners
One of the first tweaks I recommend trying is Hot Corners. Go to System Settings → Mission Control → Hot Corners and assign at least two corners to Desktop and Application Windows. The first pushes windows aside to show the desktop; the second shows only the windows of the current app. Mission Control shows all apps, windows, and desktops (Spaces).

This is useful not only for quick navigation (you can cycle through a program’s windows with Cmd-` and Cmd-Shift-`), but also for drag-and-drop. You grab a file or object, pull it to a corner, then choose another window or app. You can drag onto folders (they’ll expand as you hover) and onto app icons in the Dock—if you hold a file over them, the app will launch. This mechanism is called spring-loading.
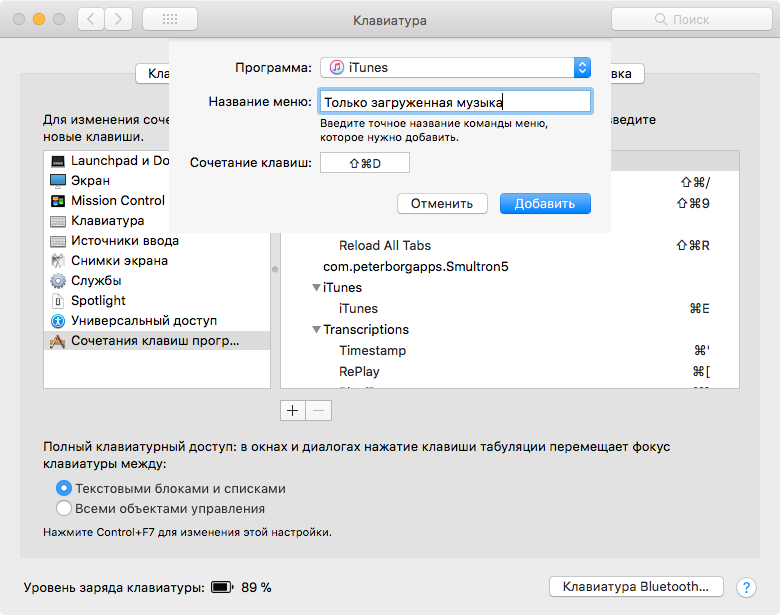
2. Learn and set keyboard shortcuts
When you open any app, take a moment to explore its menu—the full list of features and their shortcuts is usually there. You can also assign your own shortcut for any menu item in any app. Open System Settings → Keyboard → Shortcuts → App Shortcuts and click +. Then choose the app, enter the exact menu item name, and assign a shortcut.
3. Master the Option (Alt) key’s secrets
The Alt key—called Option on a Mac—unlocks plenty of handy tricks. Here are the most useful ones.
- When typing, Option and Option–Shift produce special characters.
- Hold Option and click the status icons in the menu bar to see extra info. For example, Option‑click the Wi‑Fi icon to see your MAC and IP addresses, router IP, signal details, and more. You can rearrange menu bar icons by dragging them with Command.
- Right‑click an app’s Dock icon while holding Option to change the context menu: you’ll see Force Quit instead of Quit, and Hide Others instead of Hide.
- Some function keys combined with Option open the corresponding settings. For example, Option–F1 and Option–F2 open Display settings (since F1/F2 adjust brightness), and Option–F3 opens Mission Control settings. The exact mapping can vary by Mac model.
warning
Rule number one when configuring a system: try it first, think it through, and only then do it your way. If you ignore this, you’re likely to miss something or break something that already works by clinging to old habits. Change whatever you want, but first make sure there’s a real need to do it.
A Tour of macOS: Where to Find All the Good Stuff
In Windows, as you know, OS and application settings are stored in the Registry or in INI files; in Unix, most settings live under / or in hidden files in the user’s home directory. Much of what Unix has is present in macOS as well—there’s an etc (more precisely, private/, with etc now being a symlink), and the usual hidden files in the home folder.
Settings for macOS applications and higher-level parts of the system are stored in two other directories — / and ~/ (specifically, /). The former contains system-wide settings for all users; the latter holds settings for the current user.

Getting into the user Library on a freshly installed system isn’t as straightforward anymore — you need to open Finder, choose Go → Go to Folder (or press Cmd-Shift-G), and paste the path there. To avoid doing this every time, you can open Terminal and run a command.
chflags nohidden ~/Library
Here’s our first hidden tweak already! By the way, it’s handy to add the drive’s root to the sidebar alongside your Home folder: in Finder Preferences, check Sidebar → Hard disks.
You won’t see Unix directories here — they’re hidden and, by default, only visible from the terminal, which is where you usually need them anyway. But if you ever need to, you can run this command in the terminal
defaults write com.apple.Finder AppleShowAllFiles YES
Now restart Finder (Apple menu → Force Quit → Finder → Relaunch), and you’ll see all hidden files and folders.
But let’s get back to exploring the Library. Beyond the Preferences folder, there’s plenty more worth checking out. For example, LaunchAgents and LaunchDaemons contain launchd job definitions for scheduled or automatic startup; Application Support holds databases, plug-ins, and other mutable app components; Services contains services used for data processing (see the “Services” item in the main menu of any app); Keychains stores encrypted databases with your logins and passwords; PreferencePanes (only in the top-level Library) holds System Settings plug-ins; and Caches is full of temporary files, and so on.

Also take a look in /. You probably won’t need to poke around here often, but it’s useful to see what macOS is made of. For example, open the Kernels folder to check out the kernel, or explore the system components in the CoreServices folder.
Good to know: every macOS app—even many system services—is actually a folder (an application bundle) that Finder displays as a single item. Double-clicking launches it, but if you want to look inside, right-click it and choose Show Package Contents. You’ll find plenty of interesting stuff in there!
How the defaults command works
Most hidden settings can be tweaked with the defaults command. But what exactly is this mysterious defaults? We already established that settings live in the Library folders—does macOS secretly have something like the Windows Registry? Not really. While the comparison is tempting, defaults is simply a convenient command-line interface for changing values in .plist (property list) files located in Library/—either the system Library (system-wide) or your user Library (per-user).
For example, when you ran the command from the previous section to make hidden files visible in Finder, all it did was change the AppleShowAllFiles value in ~/. If you have Xcode installed (which I recommend for any power user, whether or not you plan to write Mac apps), you can open that plist in a convenient editor and manually find and change any value.

Plist files come in several formats. Recent versions of macOS added support for JSON-based settings, but most are still stored as XML. In both cases, you can open and edit these plists in any text editor. There’s also a binary format, which you can view using an Xcode utility or decode with the plutil command.
As for the defaults utility, it lets you pull a few other neat tricks. For example, if you run defaults , the terminal will dump all preferences from the system folders. They’re organized into domains, and you can list them with defaults . Now pick a domain you’re interested in and run defaults if you want to see only its contents.

You can also use defaults to export domains to other files and import them back, as well as search across domains. For full details, check the man page.
Hidden Settings
Since the early days of macOS—back when it was still Mac OS X—enthusiasts have pored over Preferences in search of interesting keys and compiled lists of the gems they discovered.
The best collection I know of is distributed as a .macos file that you drop into your home directory and run for initial system setup (or to restore your favorite settings at any time).
I strongly advise against running this file blindly—you’ll end up disabling a lot of useful things without even realizing it. It’s better to download it, comment everything out, and enable only what you need, or pick options one by one and run them individually. Let’s go over the most interesting options.
Always expand the Save panel:
defaults write NSGlobalDomain NSNavPanelExpandedStateForSaveMode -bool true
defaults write NSGlobalDomain NSNavPanelExpandedStateForSaveMode2 -bool true
Disable the confirmation dialog when launching the application:
defaults write com.apple.LaunchServices LSQuarantine -bool false
Disable Notification Center (the panel that slides in from the right) and hide its icon:
launchctl unload -w /System/Library/LaunchAgents/com.apple.notificationcenterui.plist 2> /dev/null
Map the bottom-right corner of the trackpad to right-click:
defaults write com.apple.driver.AppleBluetoothMultitouch.trackpad TrackpadCornerSecondaryClick -int 2
defaults write com.apple.driver.AppleBluetoothMultitouch.trackpad TrackpadRightClick -bool true
defaults -currentHost write NSGlobalDomain com.apple.trackpad.trackpadCornerClickBehavior -int 1
defaults -currentHost write NSGlobalDomain com.apple.trackpad.enableSecondaryClick -bool true
Choose the folder where screenshots taken with Cmd-Shift-3 and Cmd-Shift-4 are saved:
defaults write com.apple.screencapture location -string "${HOME}/Desktop"
Set the screenshot format (you can change png to jpg):
defaults write com.apple.screencapture type -string "png"
Disable the shadow on screenshots:
defaults write com.apple.screencapture disable-shadow -bool true
For the changes to take effect, also run killall .
info
There’s a quick way to capture a window screenshot without the drop shadow: press Cmd–Shift–4, tap Space, then click the desired window while holding the Option key.
New Finder windows will open to the Desktop (for a different folder, set the PfLo preference and use a path like file:///):
defaults write com.apple.finder NewWindowTarget -string "PfDe"
defaults write com.apple.finder NewWindowTargetPath -string "file://${HOME}/Desktop/"
Always show file extensions in Finder:
defaults write NSGlobalDomain AppleShowAllExtensions -bool true
When sorting by filename, show folders first:
defaults write com.apple.finder _FXSortFoldersFirst -bool true
Disable the warning that appears when changing a file’s extension:
defaults write com.apple.finder FXEnableExtensionChangeWarning -bool false
Allow text selection in Quick Look windows (file preview when you press Space):
defaults write com.apple.finder QLEnableTextSelection -bool TRUE;killall Finder
Prevent macOS from creating the hidden .DS_Store file when working with network shares (first command) and USB/removable drives (second). This will also stop it from writing extended file attributes:
defaults write com.apple.desktopservices DSDontWriteNetworkStores -bool true
defaults write com.apple.desktopservices DSDontWriteUSBStores -bool true
Disable the warning when emptying the Recycle Bin:
defaults write com.apple.finder WarnOnEmptyTrash -bool false
Enable AirDrop over Ethernet:
defaults write com.apple.NetworkBrowser BrowseAllInterfaces -bool true
Remove the delay for the Dock’s auto-hide:
defaults write com.apple.dock autohide-delay -float 0
Disable the animation when hiding the Dock:
defaults write com.apple.dock autohide-time-modifier -float 0
Always display the full URL in Safari’s address bar:
defaults write com.apple.Safari ShowFullURLInSmartSearchField -bool true
In addition, the .macos file contains a bunch of settings—both truly hidden options and ones exposed in the UI. Here they’re included solely so they can be applied automatically after reinstalling the system.
There used to be a handy utility called Secrets, and its website archived a collection of all the settings. Unfortunately, the developer abandoned it and the site is gone, but the source code is on GitHub. There’s also the defaults-write blog — in my view, it’s far less convenient and comprehensive than the .macos file.
Either way, you won’t find anything on websites or in apps that isn’t already in the Preferences folders.
Choosing the Right Apps
Recommending software is tricky—everyone has their own interests and preferences. Still, you can usually find something you’ll like in someone else’s list, and even a single solid recommendation can be a real discovery that meaningfully helps your work. I’ve skipped most cross‑platform tools you might already know from other systems and focused on Mac‑native apps.
warning
In recent years, there have been cases where attackers managed to inject malicious code into the repositories of well-known open-source Mac apps. Some users of HandBrake and Transmission were affected. Stay vigilant and, if you can download an app from the App Store instead of a website, choose the App Store.
Alternatives to the built‑in apps
macOS comes with a solid set of built‑in apps, most of which are perfectly fine for everyday use. Over time you’ll find they offer more features than you might expect at first glance, but there are cases where it still makes sense to swap them out for something more advanced.
QuickTime → VLC. An obvious replacement: VLC is currently the best all‑purpose video player for macOS (and one of the best on other platforms, too). Still, don’t overlook QuickTime. It offers convenient audio and screen recording features.
Reminders → Things. For the Mac, there are tons of to‑do list and planning apps, including Wunderlist, Any.do, Clear, and many others. But I recommend checking out the brand‑new Things 3 — it’s fantastic.

Mail → Boxy. If, like me, you’re a Google Inbox fan, Boxy is a handy way to turn Inbox into a desktop app. But if Inbox isn’t your thing and you’d still like an alternative to Mail, check out Airmail and Spark.
Calendar → Fantastical. Honestly, I haven’t made this switch myself yet—Fantastical is paid, and I only use a calendar occasionally. Still, the rave reviews from people who meticulously plan their day make it an easy recommendation. By the way, the same developers recently released Cardhop—a similar replacement for your address book.
Notes → Bear. Apple’s built-in Notes app has gotten much better in recent years, but Bear surpasses it. It’s aimed less at the average user and more at power users familiar with Markdown. The app is free, but syncing with mobile devices costs $15 per year.

Terminal → iTerm2 + Oh My Zsh. iTerm2 used to be miles ahead of the stock Terminal, but those days are gone. Still, iTerm2 remains popular and offers some unique features. As for why you might switch from Bash to Zsh, see the article “Power up your terminal! Handy tips to make you a console guru” — everything there applies to macOS as well.
Calculator → Soulver. I’m firmly convinced a calculator app shouldn’t look like a pocket calculator. Soulver lets you type expressions inline, supports functions, and lets you reference results from one line in another. For even more complex calculations interleaved with explanatory text, check out Calca.
Finder → Commander One. I moved away from dual-pane file managers back in the Windows 95 days, but I totally get why some people refuse to give them up. Commander One fits that need perfectly—even in the free version.
System add‑ons
Let’s go over the most interesting utilities that add new features to the system or tweak the default UI behavior. Installing all of them at once is probably overkill, but you’ll surely find something to your liking.
Alfred — one of the most advanced launchers for macOS. Like the built‑in Spotlight, it lets you launch apps and search files, but unlike Spotlight it has tons of plugins and customization options. I covered it in more detail in “Best Launchers for OS X.”
FastScripts — a simple utility that pulls the contents of your user Scripts folder into the menu bar. You can assign hotkeys to scripts to quickly trigger apps and run commands. The free version has a very reasonable cap of up to 10 shortcuts.
BitBar — a handy tool that does two things: runs scripts on a schedule (so you don’t have to mess with launchd rules) and displays their output in the menu bar. Perfect when you need a quick menu bar widget.
Moom — a window management utility that works not just via shortcuts but also offers an intuitive GUI. Indispensable if you have a large monitor. Alternatives include Magnet, Divvy, and others from my older roundup.
Spacious — I used this for a while to switch between Spaces by rocking the mouse wheel. The mouse stayed at my old job, but it was convenient.
ORFO — the best Russian spellchecker I’ve found, with loads of options. It integrates seamlessly system‑wide. Downsides: it’s not cheap, and it has occasionally frozen a text editor. If you care about correct spelling, it’s a tradeoff you may accept.
Karabiner — a hardcore, low‑level key remapping tool. I used it to map Caps Lock to bring up Moom’s menu (by emulating the missing Pause key on Macs) and I’ve been thrilled with the setup.
Yoink — a neat utility that shows a “shelf” when you start dragging something. You can drop items there and pick them up elsewhere. It streamlines drag‑and‑drop and helps keep your desktop tidy.
Copied — one of the best clipboard managers. It not only stores and lets you retrieve everything you copy, but can also sync with iOS devices and file items into lists using rules.
Useful Scripts
Since we’re already talking about FastScripts, I’ll share a couple of scripts I set up once and use all the time. The first, and simplest, opens System Settings with Cmd-Shift-; — easy to remember, since plain Cmd-; opens the app’s preferences. In fact, it’s not even a script, just a simple shortcut.
My second-favorite keyboard shortcut opens a Terminal window in the folder that was open in Finder. You can find the script on the Red Sweater site (the developer of FastScripts); it’s called Terminal At Selection (there’s also a collection of other interesting scripts). I only added & to the end of the line that starts with do .
The third thing I want to share is a script that adds colored tags to files in Finder. It’s very handy to assign a couple of these to keyboard shortcuts and use them when you need to sort a large number of files.
property file_color : 2tell application "Finder" activate set selected to selection repeat with n_file in every item in selected set label index of n_file to file_color end repeatend tellYou can change the color number at the start: 0 — remove labels, 1 — orange, 2 — red, 3 — yellow, 5 — purple, 6 — green, 7 — blue.
For Mac scripting, you can also check out the article “How to Make Your Mac Work for You with Automator and AppleScript” and my “Automating OS X with Python.”
Security and Development
- GPG Suite — a toolkit for working with OpenPGP encryption and keys. Includes an Apple Mail plugin and macOS Services for quickly encrypting/decrypting selected text.
- 0xED — not the most feature-packed, but a convenient and free hex editor. Handy to have around.
- Tunnelblick — a GUI for OpenVPN. Quirky, but it gets the job done.
- Sequel Pro for MySQL, PSequel for PostgreSQL, and DB Browser for SQLite — free database GUI clients.
- Dash — a documentation browser that lets you download tons of docsets for languages and frameworks and search them quickly. Easily integrates with popular editors. The free version has an annoying quirk: it makes you wait now and then before showing what you need.
- Tower — hands down the best Git client for the Mac. Sadly, not cheap—80 bucks.
- Kaleidoscope — a diff front-end with a gorgeous UI—but for such a narrow function, it also comes with a hefty price tag: $70.

When it comes to choosing a code editor, you could argue about it forever and write more than one article. Besides the ubiquitous Sublime Text, VS Code, and Atom, as well as JetBrains products, you can also check out Brackets, BBEdit, Coda, and the lightweight cotEditor. If you’re on macOS and want to use Vim comfortably, there are plenty of guides and tutorials available online. And of course, you can always use Xcode, even if you’re not building software for macOS.
Handy tools
Cyberduck — a free, quite handy client for FTP, SFTP, S3, WebDAV, and other storage services. If you’ve got $45 to spare, you can grab Transmit instead—it’s faster and better-looking.
Name Mangler — a very powerful batch file renamer. You won’t need it often, and I still get by with the older but free version 2. Also, check out Many Tricks — besides Moom and Name Mangler, they make a few other neat utilities.
DaisyDisk — helps you figure out what’s eating your disk space. If you don’t want to spend ten bucks on that, go with GrandPerspective.
Ukelele — a keyboard layout editor. If the default Windows or macOS layouts aren’t your thing, you can remap the keyboard to your liking.
AppCleaner — an uninstaller that removes apps along with their settings and caches. Usually it’s enough to delete the app from Applications and its data from ~/Library/Application Support, but some cases are messier.
Just good apps
Great software was one of the reasons I switched to a Mac. You can’t list everything—every creative field has its own tools. For example, if you’re planning to write a book, check out Ulysses and Scrivener; and if you’ll be working with images and don’t want to pay for Photoshop, take a look at Pixelmator (by the way, the Pro version is coming soon), Acorn, and the Affinity suite.
For diagramming, there’s OmniGraffle, and other Omni Group products are also worth a look. For generally useful tools, I’d also recommend Reeder (an RSS reader) and Byword (an iA Writer clone with a more convenient character counter), both of which I use daily.
Bonus: awesome screen savers
Apple makes stunning Apple TV screensavers with slow-motion drone flyovers of cities and other scenic locations. Some enthusiasts intercepted the Apple TV’s network traffic, found the URLs for these videos, and then built a macOS screensaver that you can download and install.

And of course, we can’t fail to mention the colossal collection of screensavers built on XScreenSaver. It’s maintained as a hobby by Jamie Zawinski — one of the Netscape authors, also known for his blog. I’m particularly fond of the BSOD screensaver, which emulates the crash screens of various computers and operating systems. Beware: once you install it, you’ll forget it’s there, and then get a scare when an “error” message pops up on your screen.