
Since the beginning of dynamic Web development, а synchronization problem has emerged concerning a set of software programs, its versions and configurations in production and development environments. The developer of Vagrant has invented a new tool which is supposed to help solve the problem — Packer.
What distresses system administrators
Probably, everyone knows about LAMP for Windows software, distributed under the name Denwer. Some time ago, it has been the software that most developers used to emulate test environment for their projects. When the project had been completed and thoroughly tested on a local machine, it was time to move the created website to hosting. However, software configurations on a local host usually differed from those on a hosting server. It was at this moment that the crown phrase was pronounced: “Well, with Denwer, it all used to work!” There was also a slightly different phrase exclaimed by a customer/programmer when certain project components would not work after moving from one hosting server to another: “Well, with old hosting, it all used to work!” Both phrases have become a byword long ago. Many years have passed since the time when developers actively used Denwer, and currently they are using quite different tools to emulate environments on local machines. Still, the problem of different settings for development and production environments has survived until now. This article describes one of the new technologies which serves to eliminate the problem once and forever.
What’s the use of Packer adoption?
Mitchell Hashimoto, the developer of Vagrant, has invented and implemented a project named Packer. The key purpose of this project is automation of image assembly for systems including Amazon EC2, DigitalOcean, Docker, Google Compute Engine, OpenStack, Parallels, QEMU, VirtualBox, VMware. The above list of supported providers can be extended via plugins.
One of the key features of this technology is similarity of images created for different providers if using the same Packer template. That is, we can describe the settings used as basis for creating identical images, i.e., for Amazon EC2 and VirtualBox. What does it give us?
- For a developer, the time to create an instance from a ready image in Amazon or VirtualBox is significantly less than the time to prepare a virtual machine for operation from scratch. This is a rather critical aspect, as occasionally it is extremely important to put a new instance of required type into operation as soon as possible, in order to route traffic to it.
- In addition to having a ready-to-use image of a virtual machine, a developer is ensured that the image will always match settings used in production with respect to a set of software programs and their configurations. The importance of this fact can hardly be underestimated as it is highly desirable to have website operation successfully continued with new functionality upon deployment of a new code in production, instead of failure due to some error associated with a missing PHP module or unavailable software.
- Assembly automation of production and development environments saves time of a system administrator. In the eyes of an employer, this also must be an undoubtful advantage because it means that administrator could complete larger volume of work within the same time period.
- Time interval for testing a set of software programs, its versions and settings. When we prepare a new image in advance, we have an opportunity (and, what is the most important thing, time!) to analyze various mistakes which have emerged during the image assembly, without ruffle or excitement and fix them. There is also time to test application performance on the assembled image and introduce certain settings which would optimize applications. But if we are configuring an instance which should have been commissioned yesterday, all errors arising in the process are usually fixed upon their occurrence on a production system by this time — of course, this approach is not quite correct.
Therefore, we have, at least, four reasons to start studying Packer.
Starting to work
The main website with documentation on Packer in the process of its study will be www.packer.io. The official website contains plenty of documents on how to work with both Packer and every possible provider. Where necessary, official documentation refers to external sources with exhaustive information on relevant subject. All instructions on Packer installation can be also easily found on the same website.
So, we will examine now how to prepare an image for Amazon EC2 — AMI with Packer.
Packer offers three methods to assemble AMI for Amazon:
- amazon-ebs — creates EBS-backed AMI by creating initial instance, applying all required provisioning to it, with further AMI creation from this instance;
- amazon-instance — creates instance-store AMI by generating initial instance, configuring it, and further repacking it and uploading to S3;
- amazon-chroot — creates EBS-backed AMI from an existing instance by mounting the root section of this instance with further chroot to the mounting point for performing all necessary settings. The method is not recommended for beginners; what’s good — it does not require running additional instances to create AMI.
Let us take amazon-ebs creation method for our example.
AMI creation
So, let us proceed. If you do not yet have an account at aws.amazon.com, you must create it. The procedure is simple and any difficulties are unlikely. After you create an account and log in AWS control panel, you must go to IAM section. AWS Identity and Access Management (IAM) allows us to flexibly manage users and their privileges in the framework of the whole AWS. We begin with creating a user for ourselves, on whose behalf Packer will perform all the required actions with instances/snapshots/AMI. When creating a user, make sure to generate Access Key for it. In Fig. 1 you can see an example of how to do it.

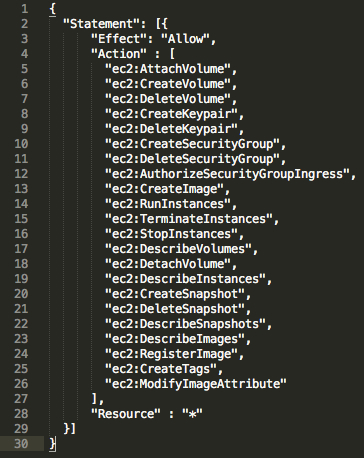
On a page following a user-creation page, very important data will be specified: Access Key ID and Secret Access Key. These data are to be saved immediately — afterwards you will be able to cast a look at them nowhere but regenerate them. Now, we must set necessary policies for our user. This can be done in User Policies under User Properties. We go to the properties of our created user, select Attach Policy -> Custom Policy, and then enter the user name and a set of required permissions. A list of permissions is shown in Fig. 2. You can take it in text format from Packer official documentation. The changes will be applied upon clicking Apply Policy. To make sure that we have access to image creation with current permission list, we can open IAM Policy Simulator, select the required user, policy, method, click Run Simulation, and then Amazon web interface will return a verdict to us — if the privileges of our user are sufficient to perform the functions we need.
The next stage is writing a JSON template, in compliance with which Packer will perform various actions related to AMI creation. In Fig. 3, you can see a sample configuration which I have used to create AMI as an example for this article. It should be specially noted that afterwards many parameters can be overwritten from a console by transferring relevant parameters when calling Packer, i.e.:
$ packer build -var ‘aws_access_key=some_key’ -var ‘aws_secret_key=some_key_2’ template.json
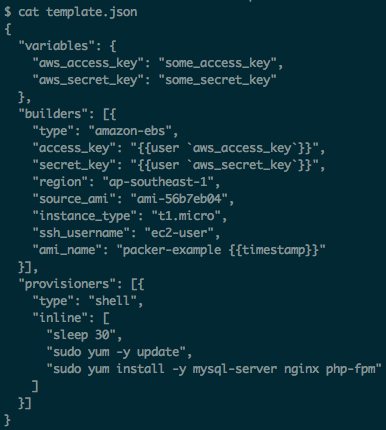
In our demonstration, we install a certain set of software programs, and we do it using bash. In crucial environments, provisioning is usually made with Chef or Puppet. On Packer website, there are appropriate instructions on connection of other deployment systems. We have selected t1.micro instance type — it is quite suitable for tests, especially if you take into account one year of free using offered by Amazon.
Then, the Packer template that we have created undergoes validation. The example shows that everything is all right with the template:
$ packer validate template.json
Template validated successfully.
The image assembly process is initiated by command
$ packer build template.json
and it looks like that shown in Fig. 4.
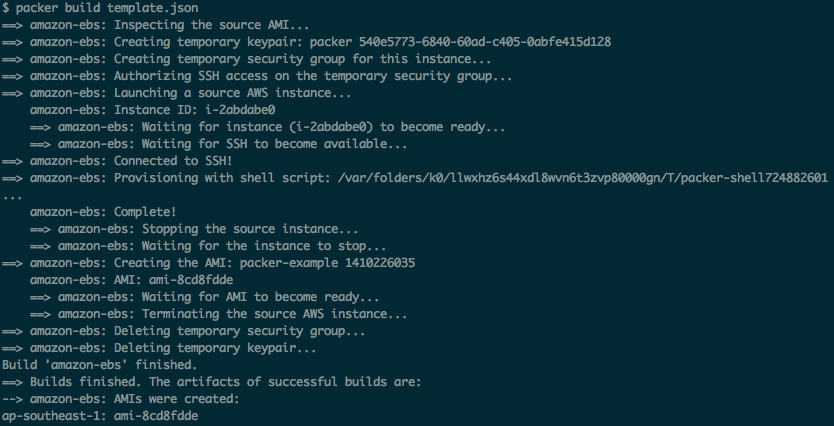
The resulting information can be seen in the very last row saying that assembled AMI has ID ami-8cd8fdde and it is available in region ap-southeast-1. After this, the image we have assembled will appear in EC2 control panel in AMI section, whereas in Snapshots section there will be a snapshot for root-EBS instances to be created from this image.
On the whole, the task is over — now we can create instances from this AMI and they will contain all the required software.
Conclusions
As we have seen, using Packer can make life of a web project developing company significantly easier. Packer itself is rather simple — I believe you’ve become assured of it after reading this article.
It is also worth noting that Packer shall not be considered as a replacement for above-mentioned Vagrant. Their missions differ. It is impossible to replace Vagrant if you need quickly-created test environments with the latest actual configurations — i.e., when Puppet manifests have been supplemented yesterday and today, whereas Packer-assembled images have been obtained yesterday, because it has not been planned to apply these configuration changes in production for a while.
And one more thing: If, for some reason, someone believes that using Packer cancels the need in Puppet/Chef for automation of infrastructure management, this decision will be incorrect as well. Packer is just a smooth supplement to these powerful systems; just in combination with them it ensures the highest efficiency of development and administration team.
If you have any questions or want to share your methods of solving similar tasks, write to email: abaranov@itsumma.ru