
The proposed method is suitable for:
- Yandex Station Mini2 (YNDX-00020/21);
- Yandex Station Lite (YNDX-00025);
- Yandex Station Max (YNDX-00053/0008); and
- other devices based on Amlogic S905X2 (G12) and A113X (AXG).
In my research, I used two interesting plugins for IDA: using Diaphor, you can borrow information from a similar open-source project; while FindCrypt helps to find cryptographic constants.
U-Boot login
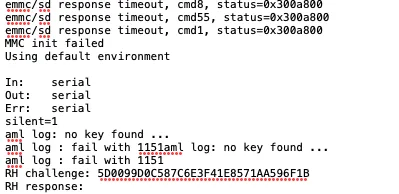
If you tried to connect to the UART interface of Yandex Stations, you probably saw such inscriptions as “RH challenge” and “RH response”. At that point, the station stops booting-up, and you have either to reboot it or enter a response. The request is always different, and it’s nothing more than authorization required when you attempt to log into the U-Boot console.
Login to the U-Boot console is initiated when you interrupt the autoboot using any key, for example Enter or Ctrl-C (classic variant). After that, authorization can be required (standard authorization types such as bootstopkeysha256 (by password hash)). An excellent description of these authorization methods can be found in the article I hack, U-Boot. Yandex went a little beyond the standard procedure and added its own authorization method: Rabbit Hole. Let’s see how it works.
First, you have to obtain the device firmware (i.e. read it using a programming device or any other technique). As an example, let’s examine Yandex Station Lite (YNDX-00025). To extract its firmware, I used the update utility developed by Amlogic to interact with its bootloaders via USB. It’s suitable for devices without a password. The bootloader consists of two parts, BL2 and TPL, which corresponds to the standard U-Boot structure.
If you build U-Boot for the A113X chip manually, you’ll get two files at the output: u-boot. and u-boot. (both unencrypted). Unfortunately, Yandex smart stations use encrypted versions.
However, they can be decrypted thanks to a known vulnerability.
The bug makes it possible to decrypt boot files when you connect via USB without a password. By default, the Lite, Mini2, and Max stations don’t have a password — but over time, Yandex began installing it remotely. I was lucky: boards I am dealing with aren’t protected yet. Accordingly, I can use this vulnerability to decrypt the TPL file; while BL2 isn’t required for analysis.
Bootloader structure
To protect the boot process, Trusted Firmware is used with additional elements that are mainly related to hardware features added by the processor manufacturer. The first to start is BL1 (Boot ROM); it’s hardcoded in the processor at the factory and cannot be replaced. Other components start after it in the following sequence:
- BL2 prepares the system for startup;
- BL31 and BL32 constitute the protected part to ensure security; and
- BL33 (U-Boot) is what I need.
For now, I am not interested in the fist-level bootloader BL2; what I need is TPL containing the remaining boot levels, including BL33 (U-Boot).
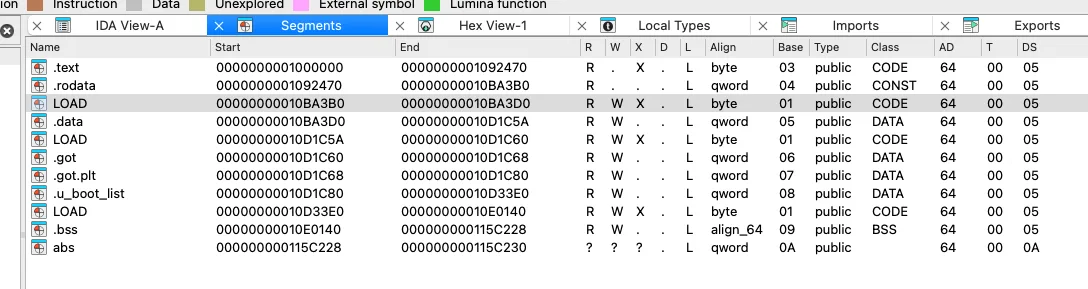
In Max systems equipped with the Amlogic S905X2 processor, the bootloader is represented by a single file, bootloader., which includes all boot stages: from initialization to U-Boot. In models based on A113X chips (e.g. Lite and Mini2), the bootloader is divided into two separate files whose extensions are .bl2 and .tpl.
info
Such a difference is determined by the partition layout on devices with eMMC memory. In Max, the bootloader is stored in the bootloader partition; while in Lite and Mini2 stations using NAND memory, these components are divided into two independent partitions: bootloader (that contains BL2) and TPL.
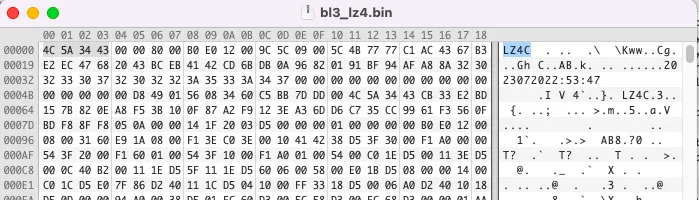
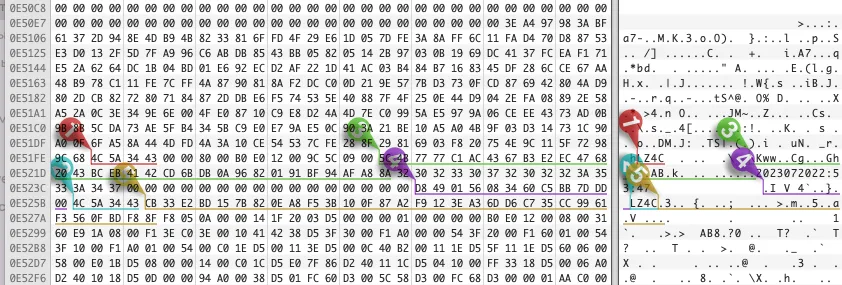
In the firmware, each boot stage is marked with the @AML signature followed by a header with service information. I examined several bootloader files and noticed that the last in order @AML signature corresponds to the BL33 component. Its distinctive feature is the presence of the LZ4C string, which indicates LZ4 compression. Another indirect signs of compression are ‘broken’ strings in the file body.


Additional confirmation of this assumption was found in an article by Frederic Basse who managed to compress U-Boot in accordance with the LZ4 algorithm using standard Amlogic tools.
aml_encrypt_g12a --bl3sig --input u-boot.bin --compress lz4 --output u-boot.enc --level v3 --type bl33
Attempt to extract U-Boot BL33
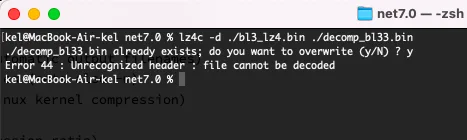
Let’s try to extract the BL33 component. No ready-made solutions could be found on the Internet, so, I had to figure it out myself. As a first step, I tried the easiest way: using the dd utility, cut off the desired file section and then unpack it using the LZ4 archiver.
Too bad, the data didn’t fit, and the archiver complained about a damaged header. Attempts to unpack using other utilities or add the header manually were unsuccessful as well. Alas, this method doesn’t work. But in the process, I checked the LZ4 source code in the hope to find suitable compression techniques and apply them to my data.
I examined the header trying to determine its format and get data that could be useful for unpacking. The Doc section of the repository contains descriptions of two formats:
- LZ4 Block Format — data blocks; and
- LZ4 Frame Format — data headers.
The found descriptions pertain mostly to the data structure before and after compression, but don’t provide information about the initial header. Still, something useful was discovered: LZ4 decompression can be applied not only to files, but also to buffers; to do so, you have to explicitly specify the buffer size before and after compression. Accordingly, these values must be stored somewhere.
I put on hold the research of the LZ4 source code and continued my searches. At some point, I came across a much-needed clue on one of the forums: a link to the amlogic-boot-fip project. Its repository, in turn, provides links to three other projects where reverse-engineered Amlogic utilities (exactly what I need!) can be found:
- meson-tools — GXBB, GXL, and GXM;
- gxlimg — GXBB, GXL, GXM, and AXG; and
- meson64-tools — designed for G12B and can potentially work with G12A and SM1.
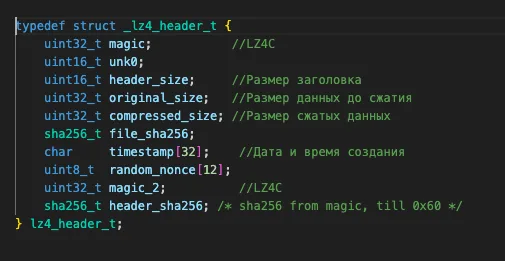
Ultimately, I settled on the meson64-tools repository. It contains the LZ4 library and the disassembled bl3sig. signature utility that provides everything I need: a header in the form of a C structure and a reference to the compression algorithm used (LZ4HC). Importantly, when you apply this structure to the available data, the byte order must be taken into account; in this particular case, the processor uses little-endian, and multibyte values should be read in reverse order.


LZ4 summary
Overall, I was able to establish that the LZ4C signature denotes the beginning of a header 0x80 bytes long followed by a compressed data buffer. The LZ4HC compression algorithm is used, and all parameters required for unpacking, including buffer size before and after compression, are contained in this header.
Extraction
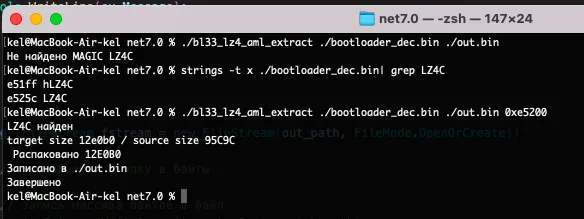
Now that you possess all information about the header and the algorithm, let’s try to unpack the bootloader. For this purpose, I wrote a utility in my favorite programming language, C#.
In addition to the standard libraries, it uses the K4os. package. The main part is provided below; while the full code can be found on my GitHub.
Console.WriteLine("LZ4C found");// Read data size prior to compressionfstream.Seek(0x8 + offset, SeekOrigin.Begin);fstream.Read(buffer, 0, 4);var target_size = BitConverter.ToUInt32(buffer, 0);target = new byte[target_size];fstream.Read(buffer, 0, 4);// Read data size after compressionsource = new byte[BitConverter.ToUInt32(buffer, 0)];fstream.Seek(0x80 + offset, SeekOrigin.Begin);// Read packed datafstream.Read(source, 0, source.Length);// Unpackvar decoded = LZ4Codec.Decode(source, 0, source.Length, target, 0, target.Length);if (decoded == -1){ throw new InvalidOperationException("Extraction error. Data are damaged");}Console.WriteLine("target size {0:x} / source size {1:X} \r\n Unpacked {2:X}", target.Length, source.Length, decoded);using (FileStream fstream = new FileStream(out_path, FileMode.OpenOrCreate)){// Convert string into bytes// Write byte array to fileawait fstream.WriteAsync(target, 0, target.Length);Console.WriteLine("File written to file");}The algorithm is simple: the program gets the data size before (original_size) and after (compressed_size) compression, reads the compressed data in one big chunk, and passes it for unpacking. After successful completion, the buffer containing the unpacked data is written to the file. Voila!
Moving on to the disassembler
As can be seen, the strings are no longer ‘broken’, and IDA/Ghydra can now analyze and ‘disassemble’ the extracted BL33.


Too bad, you cannot modify U-Boot and push it back (even if you have encryption keys). Yes, it can be packed into the firmware, but it won’t pass validation due to the changes you’ve made (that’s what Trusted Firmware is for). However, the performed exercises are still of benefit: now you can analyze nonstandard functions added by Yandex to its devices and finally find Rabbit Hole (and maybe even dive into it).
Researches and searches
To ensure that the disassembler processes the extracted firmware correctly, I select the ARM little-endian architecture. I take an easy way by accepting all default parameters. The entry point is at the very beginning of the firmware; I place the cursor to 0x00 and press C: IDA will automatically create a number of functions.
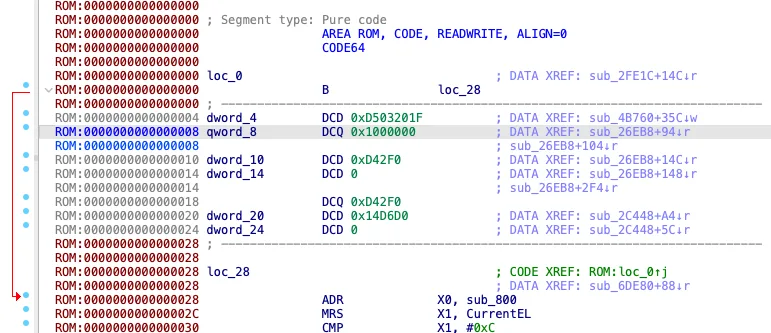
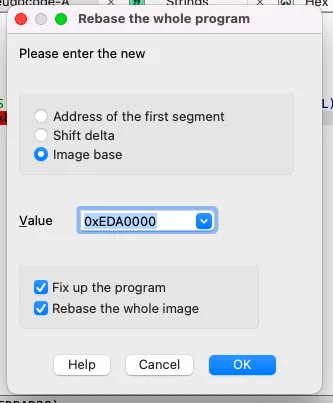
Not everything can be recognized automatically, and I go through the firmware manually to process undefined sections (mostly by pressing C). The next step is to place the image at the correct address (base address) to get the most correct cross references to functions and data. The station boot log helps to determine the correct address:
U-Boot 2015.01 (Sep 29 2023 - 16:13:15)
DRAM: 256 MiB
Relocation Offset is: 0eda0000
To make edits, I go to Edit and specify the desired value. After that, you can see the changes. Some of the cross references were previously incorrectly interpreted, but now everything should correspond to the U-Boot location in the device memory.

Searching for the hole
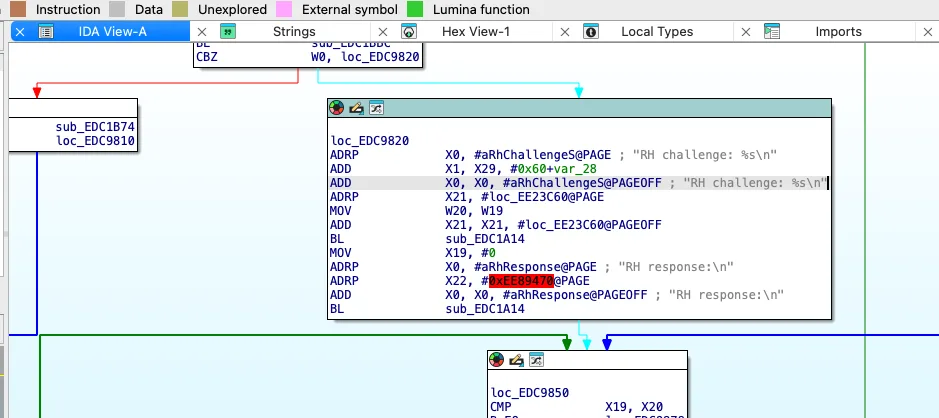
The firmware is ready for analysis, and I finally start searching for Rabbit Hole. From the boot log I know the text of the message: “RH challenge”; so, let’s cling to it. I review the list of string in the hope that it contains a reference.
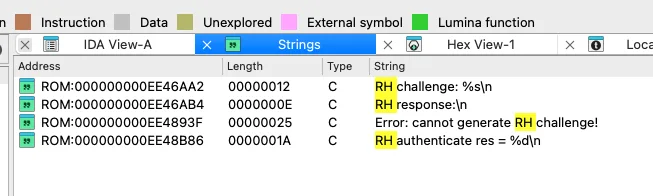
I am lucky, and the reference is there. I immediately name the function Rabbit Hole. The code looks simple (only 63 lines and 5 functions), but all functions have unknown names and must be distinguished somehow.
Functions can be identified in two ways:
- Get inside each function, analyze its logic, and give it a meaningful name; or
- Build a similar version of the software with debug information and use the Diaphora (or similar) plugin to search for standard functions (e.g.
printforsha256).
Normally, I use the first method at the beginning of the study, but if it’s possible to use the second one, I definitely use it. Since I am dealing with U-Boot, most of the functions can probably be identified using the second method.
U-Boot compilation environment
So, I have to compare functions with their analogs compiled from the source code of the closest version. To do this, I have to determine which compiler and software were used.
When U-Boot is built, strings containing the U-Boot version and the compiler used are added to the data section. I search for the strings U-Boot and GCC (for the compiler) and find the following:
-
aarch64-elf-gcc (;Linaro GCC 4. 9-2017. 01) 4. 9. 4 -
ld (; andLinaro_Binutils-2017. 01) 2. 24. 0. 20141017 Linaro 2014_11-3-git -
U-Boot— the same can be seen in the boot log.2015. 01 ( Sep 29 2023 - 19: 21: 39)


Build environment
Information about the version and compiler has been found; I search for the source code and download the compiler. I am going to use Ubuntu. The official documentation suggests the following sequence of actions for cross-compilation:
wget https://releases.linaro.org/archive/13.11/components/toolchain/binaries/gcc-linaro-aarch64-none-elf-4.8-2013.11_linux.tar.xz
wget https://releases.linaro.org/archive/13.11/components/toolchain/binaries/gcc-linaro-arm-none-eabi-4.8-2013.11_linux.tar.xz
tar xvfJ gcc-linaro-aarch64-none-elf-4.8-2013.11_linux.tar.xz
tar xvfJ gcc-linaro-arm-none-eabi-4.8-2013.11_linux.tar.xz
export PATH=$PWD/gcc-linaro-aarch64-none-elf-4.8-2013.11_linux/bin:$PWD/gcc-linaro-arm-none-eabi-4.8-2013.11_linux/bin:$PATHgit clone https://github.com/BayLibre/u-boot.git -b n-amlogic-openlinux-20170606 amlogic-u-boot
cd amlogic-u-boot
make axg_s400_v1_defconfig
make
export FIPDIR=$PWD/fip
But the compiler version in the documentation is different from the one I am dealing with; in addition, there are two of them. The version isn’t a problem (I just have to find the right one); while the presence of two compilers requires clarification:
-
gcc-linaro-arm-none-eabibuilds code running in 32-bit ARMv7 mode; and -
gcc-linaro-aarch64-none-elfbuilds code running in 64-bit AArhc64 mode.
In version 4.9, the notations have changed a bit; according to the Help, they should be as follows:
-
aarch64-none-elf—gcc-linaro-*x86_64_aarch64-elf.(Linux 64-bit binaries for the AArch64 bare-metal cross-toolchain);tar. xz -
arm-none-eabi—gcc-linaro-*x86_64_arm-eabi.(Linux 64-bit binaries for the ARMv7 bare-metal cross-toolchain).tar. xz
Why two architectures? Because the Amlogic A113X processor has two cores with different architectures: the main one is Cortex-A53 based on the 64-bit ARMv8-A (AArch64); while the auxiliary one is Cortex-M3 based on the 32-bit ARMv7-M. The first core is responsible for the main boot-up and OS execution; the second one is responsible for real-time tasks (e.g. power management or work with audio).
info
Due to problems with building, I had to use a different version of gcc-linaro-aarch64-none-elf, but in this particular case, it doesn’t affect anything.

To simplify routine actions during build iterations, I wrote a short script. Commented out strings were left to be able to change the U-Boot version or use a different version of the arm-none-eabi compiler. As a basis, I used the repository of Khadas: this manufacturer of debug boards actively maintains the U-Boot branch under investigation and updates it on a regular basis.
#/bin/bashmkdir ~/lite_uboot
cd ~/lite_uboot
wget https://github.com/khadas/u-boot/archive/refs/tags/khadas-vims-u-boot-v2015.01-v1.5.2-release.tar.gz
tar xvf khadas-vims-u-boot-v2015.01-v1.5.2-release.tar.gz
#git clone https://github.com/khadas/u-boot.git#cd ~/lite_uboot1/u-boot#git checkout  ff7d3af commit closest by datemkdir ~/cross_compile
cd ~/cross_compile
wget -c https://releases.linaro.org/components/toolchain/binaries/latest-4/aarch64-elf/gcc-linaro-4.9.4-2017.01-x86_64_aarch64-elf.tar.xz
tar xvfJ gcc-linaro-4.9.4-2017.01-x86_64_aarch64-elf.tar.xz
export PATH=$PWD/gcc-linaro-4.9.4-2017.01-x86_64_aarch64-elf/bin:$PATH#tar xvfJ gcc-linaro-4.9.4-2017.01-x86_64_arm-eabi.tar.xz#export PATH=$PWD/gcc-linaro-4.9.4-2017.01-x86_64_arm-eabi/bin:$PATHwget -c https://releases.linaro.org/archive/13.11/components/toolchain/binaries/gcc-linaro-arm-none-eabi-4.8-2013.11_linux.tar.xz
tar xvfJ gcc-linaro-arm-none-eabi-4.8-2013.11_linux.tar.xz
export PATH=$PWD/gcc-linaro-arm-none-eabi-4.8-2013.11_linux/bin:$PATHcd ~/lite_uboot/u-boot-khadas-vims-u-boot-v2015.01-v1.5.2-release
export ARCH=arm
export CROSS_COMPILE=aarch64-elf-
make axg_skt_v1_defconfig
make
info
I don’t provide a complete instruction on build environment setup; so, you might need additional packages and libraries.
The build results are stored in the build folder; I am interested in the u-boot file. I load it to IDA, and it automatically determines the ELF 64 bit type and performs full analysis. All functions have names, and information about segments is in place.

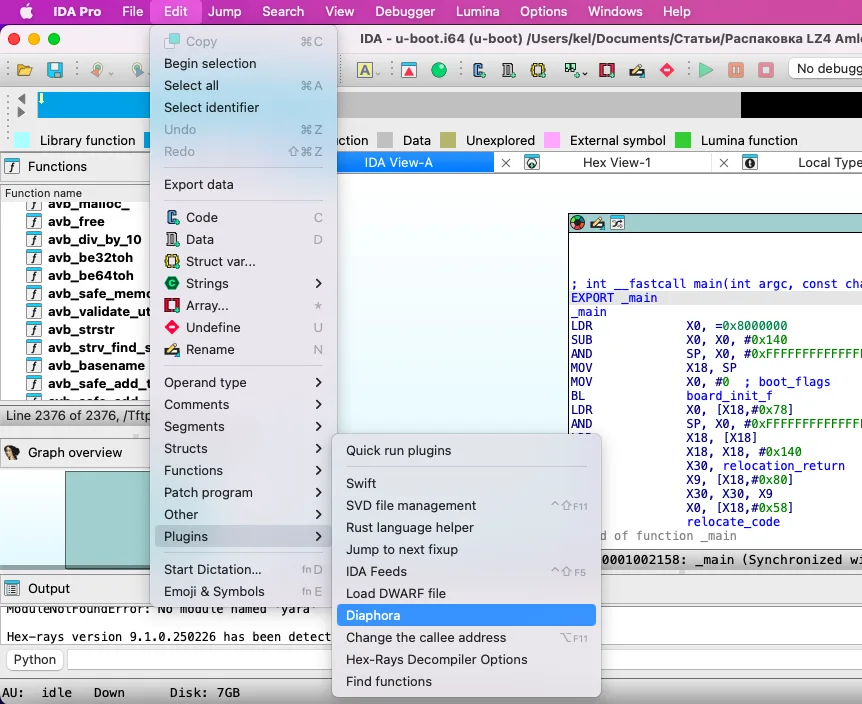
Starting Diaphora
Time to start the plugin that will identify signatures and strings and save all required information to its database (SQLite) to compare it with the U-Boot version used by Yandex.
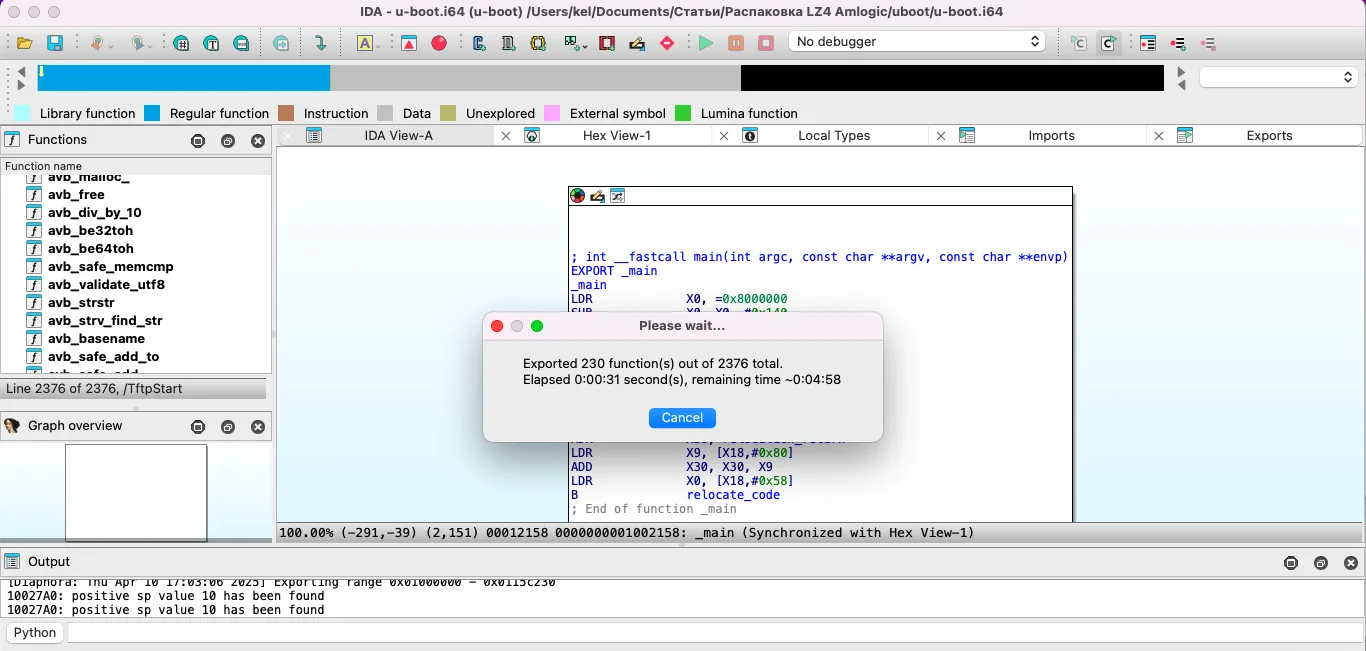
This process can take a while: my 10-year-old MacBook Air spent some 30 minutes on each firmware (the compiled one and the one used by Yandex).
When indexing is finished, you have to get back to the Yandex firmware and start the plugin again. This time, in the comparison database string, you should specify the SQLite database created during indexing of the compiled U-Boot. Important: don’t start re-indexing! If you do, the plugin will perform the same task again, and you’ll waste another half hour.


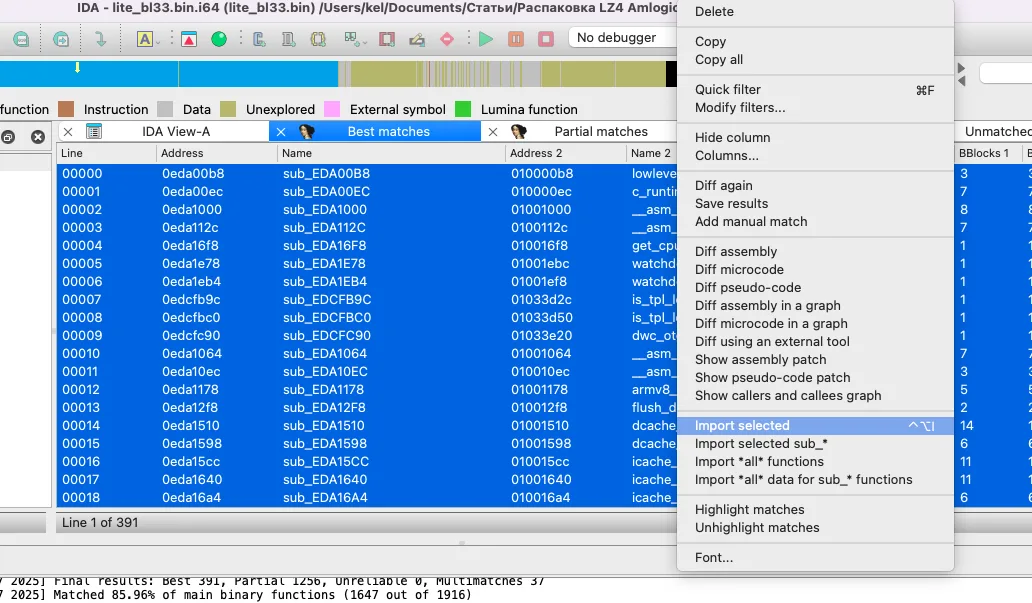
After the scan, the plugin will display its results in several tabs:
- Best matches — most accurately matching functions;
- Partial matches — more or less matching functions with minor differences (matching degree is indicated by color: bright green (high) or dark purple (low));
- Problematic matches — poorly matching results; and
- Unmatched — several tabs of completely unique functions.


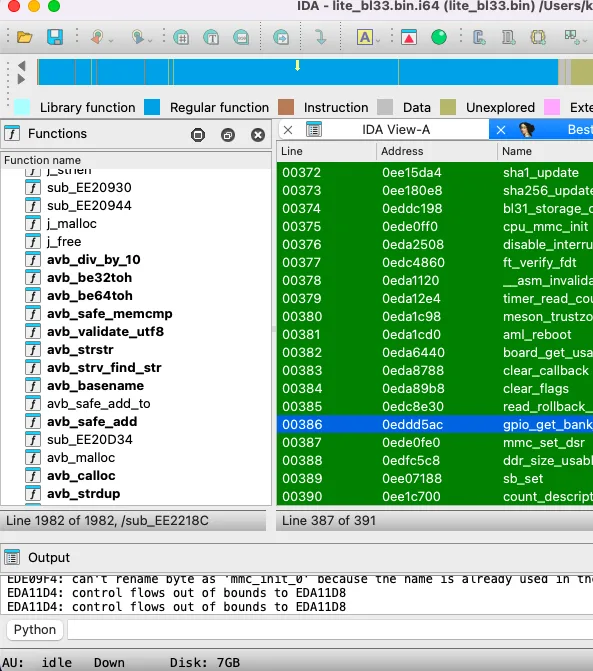
First, I go to the tab with completely matching functions, select them, and import them into the project: after that, the IDA database will be updated. Then I open the Partial tab and import some more functions (only those highlighted in green). It’s highly recommended to review the contents prior to importing, so that you don’t import unnecessary stuff. The remaining tabs can be ignored: they are of no interest to me.
After the import, meaningful names of functions and variables appear in the U-Boot under investigation.
To get a more comprehensive result, you can retrieve and index other U-Boot versions: each of them can potentially help process new functions. No guarantee, but sometimes this approach makes it possible to significantly expand the database.
I limited myself to one pass and moved on to the next plugin: FindCrypt. It searches for cryptographic constants that can be used to identify encryption algorithms. When the plugin finds some constants, it automatically renames them in accordance with their purpose.
Analysis per se
In total, Rabbit Hole contains five functions:
-
sub_EDC96CC; -
sub_EDC1BBC; -
sub_EDC1B74; -
sub_EDC1A14; and -
sub_EDC9734.
Unfortunately, the U-Boot version I built and above-described manipulations didn’t give names to these functions. Perhaps, I used an unsuitable version of the source code, or Yandex engineers wrote some parts of the code themselves. As a result, I had to study each function manually: analyze its behavior, examine strings used in it, and assign names based on the collected information:
-
sub_EDC96CC—challenge_gen; -
sub_EDC1BBC—print; -
sub_EDC1B74—getconsole; -
sub_EDC1A14—getc; and -
sub_EDC9734—challenge_chk.
Let’s go through the first one and the last one.
challenge_gen
bool __fastcall challenge_gen(unsigned __int64 a1){ int v2; // w20 int v3; // w21 int v4; // w22 int v5; // w0 v2 = sub_EE2218C(); v3 = sub_EE2218C(); v4 = sub_EE2218C(); v5 = sub_EE2218C(); return string_format(a1, "%08X%08X%08X%08X", v2, v3, v4, v5) == 32;}bool __fastcall challenge_chk(const uint8_t *a1, __int64 a2){ sha256_context ctx; sha256_starts(&ctx); sha256_update(&ctx, a1, 0x20u); sha256_finish(ctx.total, 0xEE89720); return sub_EE0EBA8(&dword_EE370C0, a2, 0x100u, 0xEE89720, &unk_EE593E0) == 0;}Analysis of the first function and the call to sub_EE2218C( showed that a challenge is generated in the a1 register (and I immediately renamed it accordingly). Each request is unique since it’s created using a hardware random number generator. The contents of the sub_EE2218C( function confirm this: its only string is return . According to the A113X documentation, this address indeed belongs to the RNG area.

I can be assumed that the challenge_gen function takes a pointer to a buffer where the request should be written as a string in a hexadecimal notation. As an output, the function returns the length of the generated string in bytes.
result = challenge_gen(challenge); if ( result ) { while ( get_console() ) getc(); print("RH challenge: %s\n", challenge);The satiation with challenge_chk is slightly easier: almost all functions in this area have already been assigned meaningful names. They clearly indicate that input data are hashed using SHA-256, and the generated hash is subsequently passed to sub_EE0EBA8. Let’s see what’s inside it.
bool __fastcall challenge_chk(const uint8_t *a1, __int64 a2){ sha256_context ctx; // [xsp+38h] [xbp+38h] BYREF sha256_starts(&ctx); sha256_update(&ctx, a1, 0x20u); sha256_finish(ctx.total, 0xEE89720); return sub_EE0EBA8(&dword_EE370C0, a2, 0x100u, 0xEE89720, &unk_EE593E0) == 0;}Some transformations can be seen in the code of this function, but still no names. Let’s dive into each numbered function and try to find out what it does.
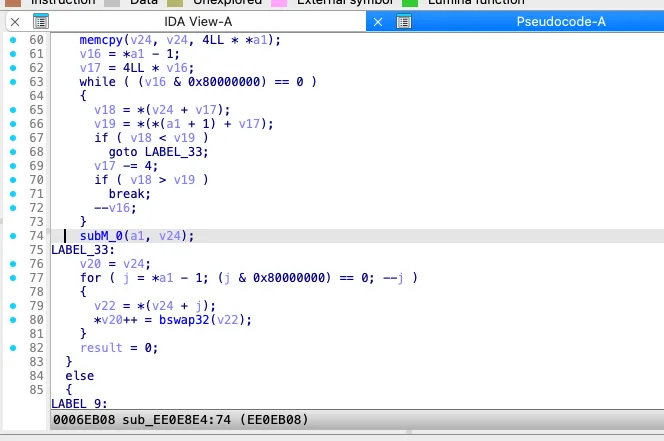
__int64 __fastcall sub_EE0EBA8(int *a1, const void *a2, unsigned int a3, const void *a4, __int64 a5){ v5 = *a1; v7 = *a1 - 2048; result = 0xFFFFFFF2LL; if ( v7 <= 0x800 ) { v9 = v5 >> 5; sub_EE0E8B0(&v14, *(a1 + 1), v9); sub_EE0E8B0(&v14, *(a1 + 2), v9); v15[0] = v9; v15[1] = a1[1]; v18 = *(a1 + 3); v16 = &v14; v17 = &v14; return sub_EE0E8E4(v15, a2, a3, a4, a5); } return result;}So, sub_EE0E8B0 ‘swaps’ bytes of the input array and places them to another array.
Let’s name it array_bswap32. If I come across it somewhere else, I won’t have to delve into it again.
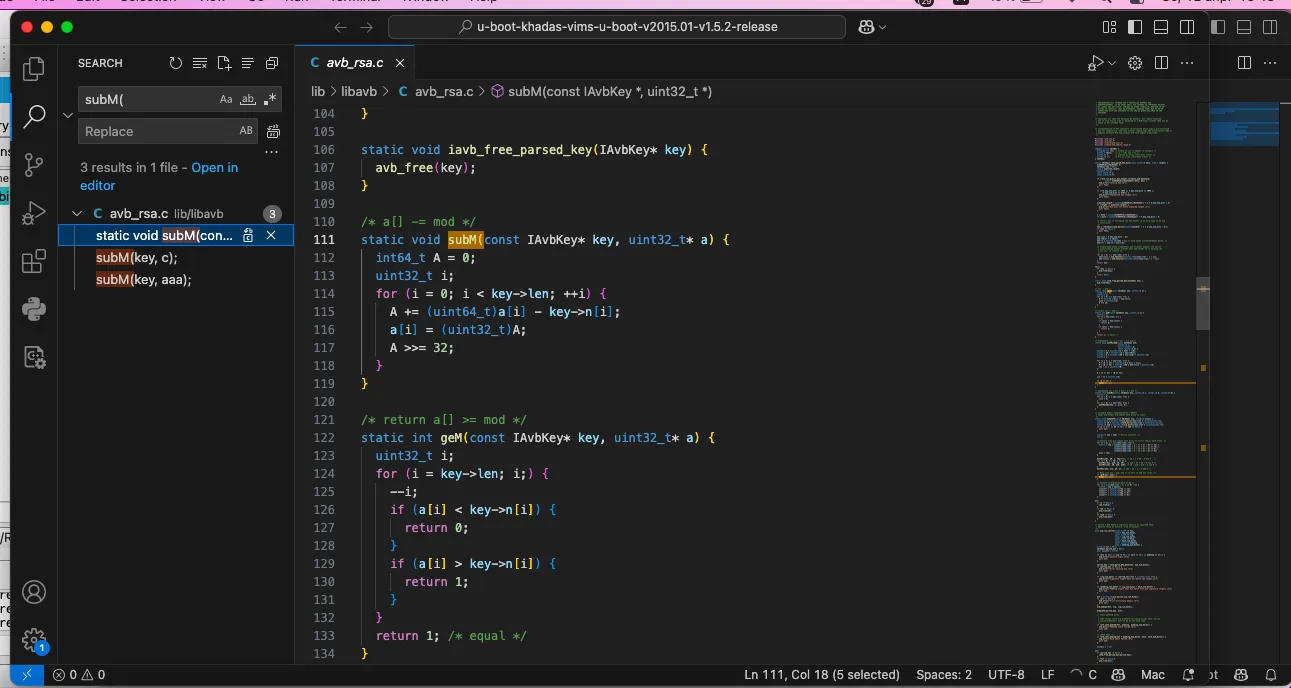
__int64 __fastcall sub_EE0E8B0(__int64 result, __int64 a2, int a3){ __int64 i; // x3 for ( i = 0; a3 > i; ++i ) *(result + 4 * i) = bswap32(*(a2 + 4LL * a3 - 4 * i - 4)); return result;}The situation with the sub_EE0E8E4 function is more complicated: it has a branched structure, and many data operations can be seen. I reviewed its listing and noticed the subM function: its name appeared in Diaphora’s output. Let’s try to find this name in the U-Boot source code from the Khadas repository that I’ve compiled.
As can be seen, this function occurs only in the avb_rsa. file, which is a lucky break!
I examined this file in detail and compared it with what I see in IDA. As a result, I came across a call to avb_rsa_verify. This function is very similar to the beginning of sub_EE0E8E4.
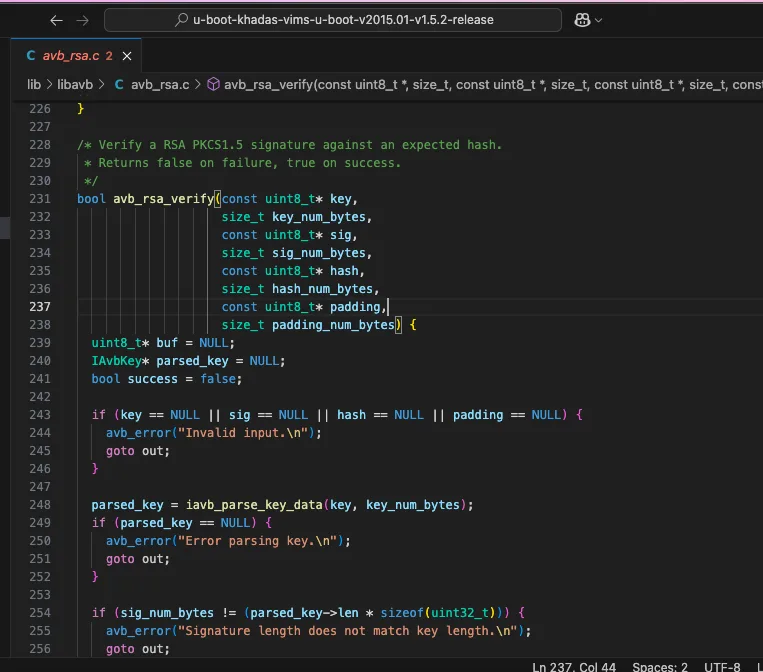
__int64 __fastcall sub_EE0E8E4(unsigned int *a1, const void *a2, unsigned int a3, const void *a4, __int64 a5){ // [COLLAPSED LOCAL DECLARATIONS. PRESS NUMPAD "+" TO EXPAND] if ( !a1 || !a2 || !a4 || !a5 ) return 0xFFFFFFFBLL; if ( 4LL * *a1 != a3 || a3 > 0x200 ) return 0xFFFFFFEALL;A very similar check at the beginning, but no test messages are output. Instead, only error codes are returned: everything that’s not equal to 0 is bad. I go further and find more similarities; accordingly, I go back a couple of levels up and give a name to the sub_EE0EBA8 function: rsa_yndx. Now the response check function looks as follows:
bool __fastcall challenge_chk(const uint8_t *a1, __int64 a2){ sha256_context ctx; // [xsp+38h] [xbp+38h] BYREF sha256_starts(&ctx); sha256_update(&ctx, a1, 0x20u); sha256_finish(ctx.total, 0xEE89720); return rsa_yndx(&dword_EE370C0, a2, 0x100u, 0xEE89720, &unk_EE593E0) == 0;}where:
-
dword_EE370C0contains the public part of the RSA key; -
a2is the answer (that you enter); -
0x100uis the size of the data being checked; -
0xEE89720is the memory cell containing SHA-256 from the challenge; and -
unk_EE593E0is probably padding.
Looking at the prototype of avb_rsa_verify, one can match the parameters of rsa_yndx: they don’t look identical, but analysis makes it possible to fully reconcile them.
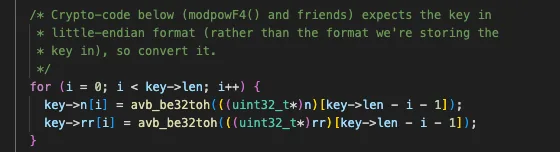
bool avb_rsa_verify(const uint8_t* key, size_t key_num_bytes, const uint8_t* sig, size_t sig_num_bytes, const uint8_t* hash, size_t hash_num_bytes, const uint8_t* padding, size_t padding_num_bytes)The same file contains a function with a self-explanatory name: array_bswap32. It converts little-endians into big-endians using the so-called swapping algorithm: byte-by-byte permutation in 32-bit words. Let’s find out where it’s called and what its role in data processing is.
To summarize. When a user tries to log into the U-Boot console, Rabbit Hole generates a text request (challenge). The user must sign this request with their private part of the RSA key and enter the resulting signature back into the console. Then the rsa_yndx function is called; it verifies the signature by analogy with avb_rsa_verify using the RSA-2048 algorithm. In case of successful verification, the function returns 0.
/* Verify a RSA PKCS1.5 signature against an expected hash.
 * Returns false on failure, true on success.
 */
Done with the basic Rabbit Hole mechanics. The rest of its parts are pretty simple; below is its listing with comments:
bool Rabbit Hole(){ result = challenge_gen(challendge); if ( result ) { while ( get_console() ) getc(); // Print request print("RH challenge: %s\n", challendge); v1 = 0; // Print challenge and wait for 344 characters of response print("RH response:\n"); while ( v1 != 344 ) { v2 = getc(); // If not space, then save to buffer if ( (ctype[v2] & 0x20) == 0 ) // Verify entered characters; if they are from the ASCII table, save to buffer 0xEE89470 *(0xEE89470 + v1++) = v2; } v3 = 0; v4 = 0; v5 = 0; // Go through each entered character while ( v3 != 344 ) // Compare with the Base64 table { v6 = 0; while ( 1 ) { v7 = v6; // Base64_table FindCrypt found if ( Base64_table[v6] == *(v3 + 0xEE89470) ) break; if ( ++v6 == 64 ) { v7 = 64; break; } } v8 = (v5 + 1); v12[v5 + 4048] = v7; // Continue converting Base64 to binary format if ( v8 == 4 ) { v9 = v13; v10 = v4 + 1; *(0xEE89740LL + v4) = 4 * (v12[4048] & 0x3F) + (v13 >> 4); v11 = v14; if ( v14 != 64 ) { *(0xEE89740LL + v10) = 16 * (v9 & 0xF) + (v14 >> 2); v10 = v4 + 2; } v4 = v10; if ( v15 != 64 ) { v4 = v10 + 1; *(0xEE89740LL + v10) = v15 + (v11 << 6); } v8 = 0; } ++v3; v5 = v8; } // Start signature validation return challenge_chk(challendge, 0xEE89740); } return result;}The complete authorization algorithm is as follows:
- During system autoboot, the user presses Enter or Ctrl-C, which provokes a call to Rabbit Hole;
- A random request is generated and displayed in the console;
- The user must sign the request with the private part of the RSA key and convert it to Base64;
- User’s response in Base64 is converted into binary format and checked by the challenge_chk function;
- If the verification result matches, then the user gets access to the U-Boot interactive mode.
The screenshot below was taken using Yandex Station Max.

I managed to get access to this console; some of my friends were able to access it, too. However, if the password has already been set, accessing the console becomes significantly more difficult.

Conclusions
Yandex engineers used a very secure algorithm to protect the U-Boot console: asymmetric RSA-2048 with random input data; it prevents access even if you’ve managed to decrypt the firmware. Brute-force is useless, and there is only one login attempt: an incorrect response reboots the device, and a new request is generated. In other words, there’s no way to bypass Rabbit Hole head-on.
But along the way, I created a tool that extracts BL33 and found out how this firmware is protected. Hopefully, the presented information will be useful for you, too.
I am not a professional reverse engineer — just an enthusiastic amateur. This is my first experience in this area, and if I did some nonsense, don’t hesitate to tell me about it in the comments!