warning
All information is provided for informational purposes only. Neither the editorial team nor the author shall be liable for any harm resulting from the use of the materials in this article.
Boosting Your Wi‑Fi Adapter’s Power
Signal strength has the biggest impact on how effective the attack will be. Your dongle needs to be sensitive enough to pick up the weak signals from the target access points and capture all the handshake packets. At the same time, it needs sufficient transmit power; otherwise, its deauthentication frames or WPS PIN brute‑force attempts won’t reach the target.
Receiver Sensitivity
“The quieter you are, the more you can hear” is the motto of Offensive Security, the team behind the popular Kali Linux distribution. In the context of wardriving, it means you should listen to the airwaves, detect Wi‑Fi access points (APs), and capture handshakes with the most sensitive receiver you can. In other words, use a wireless adapter with a high signal-to-noise ratio.
It’s naive to expect that from USB dongles with built‑in antennas—they have very weak receivers, and components packed too closely generate strong interference. So it’s important to choose a Wi‑Fi adapter not only with a suitable chipset, but also with solid RF design (ideally with good shielding).
Traditionally, Alfa Network leads by this metric. Even the newer cost-cut revisions without an RF shield perform remarkably. For example, the AWUS051NH v2 lacks shielding, yet it still uses the same RT3572 chipset and is solidly built.


It uses the “right” RT3572 chipset and has a solid RF/circuit design (though the older Alfa Network adapters are even better). In my test, two minutes of scanning picked up 70 access points with signal levels of 18 dBm and above.

Let’s compare this with the results from another adapter—the Netis WF2150. Same location and time, with the same two-minute scan.

Only 49 APs showed up, and for most of them the signal level dropped below 18 dBm. Despite using a perfectly good RT5572N chipset, the results are dismal because the adapter’s internal design is so basic. As I mentioned earlier, you can open it up and connect an external antenna to the tiny onboard socket. However, the external antenna’s gain is a double‑edged sword: along with the useful signal, the noise floor goes up too.
Before you swap antennas, look at the radiation pattern and try some semi-directional options. A narrow-beam Yagi is hard to aim, while panel antennas are very practical. They give you a wide sector of about 60 degrees, and in the chosen direction they can deliver roughly six times better performance than waving around a half‑meter dipole.
info
An antenna with higher gain can sometimes perform worse than the tiny stock 3 dBi one. So focus on the antenna type, the radio module’s placement, and its shielding, rather than comparing decibels head-on and just grabbing a longer stick. Only a combination of a chipset with monitor mode support and a highly sensitive receiver will let you capture clean handshakes that contain all the information needed to recover the connection password.
Transmit Power
Passive listening with a sensitive receiver is perfectly safe, but waiting for handshake captures can take hours. Advanced wireless attacks take minutes because you go on the offensive. For example, you can blast deauthentication frames to force legitimate clients of the target access point to continually reconnect. Or you can simply jam the real AP, replace it on the air with your own Evil Twin, and harvest credentials directly from unsuspecting client devices. All of this requires a high‑power transmitter—but where do you get one?
There are two approaches: get a high‑power unit right away, or boost the one you already have. The first route can be problematic, especially for overseas purchases. Devices rated above 100 mW are often held up at customs. And buying anything costs money, so we’ll look at the second option.
warning
At high transmit power the adapter overheats quickly (especially in packet injection mode), causes interference, and can pose some health risk. So don’t crank it straight to 33 dBm. Start around 22 and increase gradually. The scale is logarithmic, so adding just 2–3 dBm roughly doubles the output power.
By default, all Wi‑Fi radios start at the lowest transmit power. In this mode they initialize according to ISO 3166 country codes as represented in the wireless regulatory database. In Linux, that’s the wireless regulatory database: https://git.kernel.org/pub/scm/linux/kernel/git/sforshee/wireless-regdb.git. In Kali Linux (including NetHunter) it’s located at /lib/crda/regulatory.bin. The Central Regulatory Domain Agent (CRDA) reads this file and informs the kernel what transmit power is allowed for the region. As a result, the OS enforces a single system-wide transmit power setting for any Wi‑Fi adapters on a given wireless interface.
By default it’s usually set to some EMEA regulatory domain, which only allows a measly 100 mW (20 dBm). So when you plug in any dongle, you’ll be futilely blasting deauth packets and trying to jam the APs you’ve found. Few devices will even hear your 20 dBm, and most of those frames will be filtered by the targets as interference.
You can view the current regulatory domain, available channels, and allowed transmit power limits with the iw command, but its output is quite verbose and can span multiple screens.

To quickly check the MAC address and the configured transmit power, use the command iw <.

Back in the BackTrack days, you could just grab a beefier adapter (for example, from Alfa Network) and instantly get more transmit power. Those devices often shipped with a regulatory domain set to a region that allowed higher output. For instance, the “BO” code stands for Bolivia. At one time, Bolivia permitted transmit power for IEEE 802.11b/g/n up to 2000 mW (33 dBm), which is about twenty times the default in Russia. Today Bolivia caps it at 30 dBm (1000 mW), which is still an order of magnitude above typical default settings.
These days the regulatory settings have gotten stricter, and the same model now comes in a couple of hardware revisions. So every “Alfa” purchase has turned into a lottery. You might end up with a cost‑reduced revision or a crude counterfeit. The obvious takeaway: manually change the regulatory region, plug in an Alfa or another proven adapter, crank up the transmit power, and enjoy. In most pentesting distros this is straightforward. I specifically checked five: Kali, BugTraq II, BackBox, Cyborg, and Matriux. In all of them, changing the region and increasing power took literally about five lines.
The only quirks showed up in BackBox. There, the wireless interface name looks like wlxmac, where “mac” is the adapter’s MAC address in lowercase. The macchanger utility works correctly, but the interface name doesn’t change. Keep this in mind for the final command to bring the interface up (see below).

The basic idea behind increasing a transmitter’s power in software is simple, but the details matter. So let’s go through it step by step using Kali 2018.1 as an example.
info
Most commands must be run as the superuser. Open a root shell or prefix each command with sudo.
First, we use the iwconfig command to list the wireless interface names. Say we see wlan0 and wlan1—how do we know which one we need? Instead of the many tedious hacks described ad nauseam, there are quicker, foolproof ways.
First method: physically unplug the USB Wi‑Fi dongle, then run the iwconfig command again. The interface that disappears from the list is the one you’re looking for.

Second method: run wifite. It may be considered a simple script, but it immediately asks which interface to use and lists them more clearly — including the chipset and the drivers in use. If the wlan name includes a known chipset and ends with USB, that’s the one you want.

Once you’ve identified the wireless interface name, disable it.
ifconfig wlan1 down
At this stage, it’s recommended to change the network adapter’s MAC address.
macchanger -r wlan1
The -r option sets a random address, and if you want to specify a particular one, use the --mac option. For example:
macchanger --mac=2F:4B:D9:33:89:0B wlan1
Remember that the first three octets identify the vendor. You can find their list (the OUI vendor list) here or here. This comes in handy if you want to make a device appear to be from a different vendor or avoid making an attack obvious by using a completely random MAC address. Also, many APs today check the OUI and will simply refuse connections from clients whose MAC addresses belong to unknown vendors.
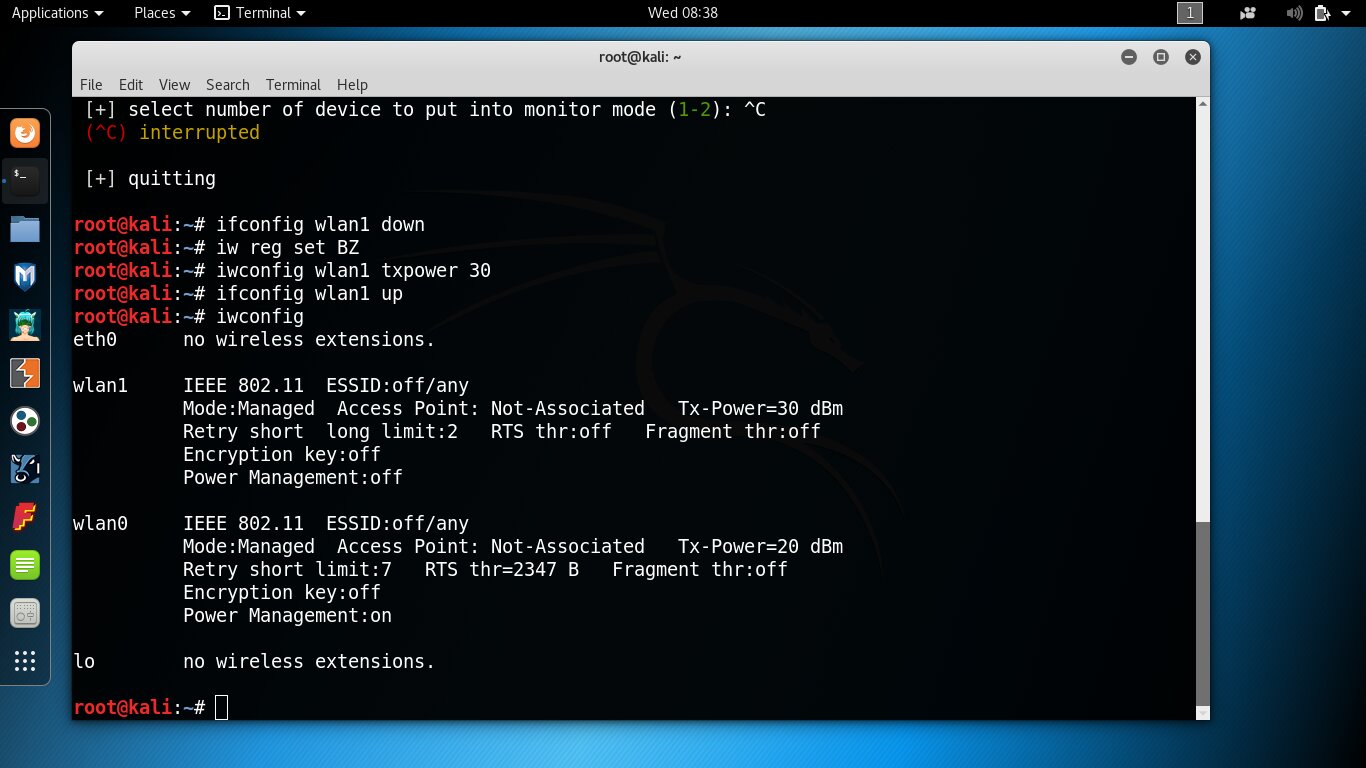
Now specify the name of the region where transmitters with an output power of 30 dBm or higher are permitted.
iw reg set BO
Besides BO, the AM, BZ, GR, GY, NZ, VE, and other regions are also successfully used to increase power (see the full list in db.txt; there’s a link to it in the callout further down). Optionally verify the new region setting:
iw reg get
Next, change the system setting for the allowed transmit power for the selected wireless interface:
iwconfig wlan1 txpower 30
Start it up:
ifconfig wlan1 up
and verify the result:
iwconfig
It should look roughly like the screenshot below.
If that didn’t work, carefully double-check the commands. Also note that the global setting iw can be ignored by the driver. In my experience, this happened with the ath9k driver and the Qualcomm Atheros AR9271 chip. The AWUS036NHA, in particular, is based on it. Try experimenting with other drivers, adapters, and Linux distributions.
info
The wireless regulatory database (regdb) settings are defined in the db.txt file inside the archive. You’ll see regions with higher permitted transmit power, but don’t get your hopes up. Even if you set 36 dBm, that doesn’t mean your dongle will suddenly have more range. Most USB adapters can’t even reach 30 dBm due to hardware design limits. Removing software caps beyond that won’t help.
After boosting transmit power, deauthentication attacks against an access point’s connected clients become much more effective. In the example below, the target AP is about 20 meters away with two brick walls in between. Without increasing transmitter power, its clients simply don’t receive the deauth frames. If you raise the dongle’s output from 20 to 30 dBm, forcing clients to disconnect and capturing the handshake takes under eight minutes.

If the password is dictionary-based, it’ll crack quickly on the same laptop. Otherwise, try brute-forcing it with GPUs (see an article on GPU-based brute forcing) or use an online service.


You may also find the online .cap → hashcat converter and .pcap file analyzer useful. You can convert .cap to .pcap using tshark:
tshark -F libpcap -w <pcap_filename> -r <cap_filename>
Earlier we wrote about hacking Wi‑Fi with a smartphone, but doing advanced attacks on it is really inconvenient (and some are technically impossible). You’d need to connect two external Wi‑Fi adapters at once and, ideally, an external battery pack, then spend ages trying to crank up their transmit power. This isn’t a five‑line script—it’s the seven circles of hell with make/install and chasing build errors. If you’re into high‑tech masochism, I can share that pain another time; for now, just grab a laptop and run desktop Kali.
Uncovering Hidden SSIDs
The wireless network name (SSID or ESSID) is sometimes deliberately hidden as a security measure. It does weed out novices and noticeably reduces the number of people trying to connect to the AP: if a target isn’t visible, many won’t attack it. However, finding the SSID is fairly easy: that information is continuously broadcast over the air.
During the handshake, every client includes the network name (SSID), its identifier (BSSID, typically the AP’s MAC address), and its own MAC address. That’s why a deauthentication attack is effective for uncovering the SSID of hidden networks. If you capture the handshake when a legitimate client connects to the chosen access point, you’ll learn the network name immediately. Just run a simple command and wait.
airodump-ng wlan1
It’s assumed that your dongle shows up as wlan1, its transmit power is already boosted, and it’s switched to monitor mode. If not, just bring it down (ifconfig ), and airodump-ng will put it into monitor mode automatically.
Waiting for a handshake can take indefinitely long, so let’s speed things up. Open a second terminal window and send a broadcast deauthentication command to force all clients of the selected AP to reconnect and loudly broadcast its SSID over the air.
aireplay-ng -0 5 -a D8:FE:E3:XX:XX:XX wlan1
With this command, we sent five deauth packets to all clients of the access point with the MAC address D8:FE:E3:… (as usual, I’m masking part of the address—paranoia and all that). The result was immediate: the network name popped up in the main airodump-ng window. While it was hidden, airodump-ng showed the SSID length instead of the name (six characters in this example).

Bypassing MAC Address Filtering
Additionally, admins create allowlists of wireless devices, permitting only clients with specific MAC addresses to connect. In MAC filtering mode, the access point will deny authentication to any unauthorized device, even if it supplies the correct password.
What matters for us is this: if the client device has associated with the chosen access point, then it’s definitely on that AP’s allowlist. The next step is to kick it off the target AP and spoof its (over‑the‑air, openly transmitted) MAC address onto your Wi‑Fi adapter. To beat the trusted device to the reconnect, it’s best to run the deauth command in parallel in another terminal window and send the frames from a second dongle. Here’s how that looks step by step on the AP from the example above.
- Increase the adapter’s transmit power, spoof its MAC address, and switch it to monitor mode (see part one of the article).
- Start sniffing the air.
- The table will show access points and the MAC addresses of clients connected to them (see the STATION column next to the target AP).
- Screenshot: Discovering client MAC addresses
- Set one of your dongles to use that MAC address.
- From the second adapter, send deauthentication frames.
- Connect with the first adapter as soon as the real client drops off the AP.
Conclusions
To perform a thorough pentest of wireless access points, get a couple of USB Wi‑Fi adapters with suitable chipsets and modify them. Replace the stock antennas with directional external ones and boost the transmit power by increasing the txpower setting.
Hiding the wireless network name and filtering clients by MAC address offer little protection against compromise. The SSID and allowed “whitelist” addresses are easy to discover by simply waiting for the next handshake or by immediately launching a deauthentication attack.