Getting Started
To run SDXL locally, you’ll need a relatively recent GPU with at least 6 GB of VRAM; a Mac with an M‑series chip will also do. I’ll be doing everything on Windows on a machine with an Nvidia card.
www
If you have an AMD GPU, check out the guide on Medium and this video tutorial.
The installer will download and install a number of modules totaling 10–15 GB. I recommend scrolling down and starting the process now so everything can download while you read the article.
You’ll need Python 3.10—no other version—as some required packages don’t work with the current Python 3.12 release. You can download it from the official site: https://www.python.org/downloads/.
After installing Python, download the Fooocus app from the project’s GitHub page. Extract the archive to the folder where you want the app installed, and launch the installer with one of the following commands:
-
run.— downloads a general‑purpose model;bat -
run-realistic.— downloads a photorealistic model;bat -
run-anime.— downloads a model that generates anime‑style images.bat
To reiterate, this will take a while—the project pulls in a little over a hundred packages, and it also needs to download the SDXL model, a 6.5 GB file. While that’s happening, let’s look at what Fooocus is and how it relates to Stable Diffusion.
Stable Diffusion XL in the Cloud
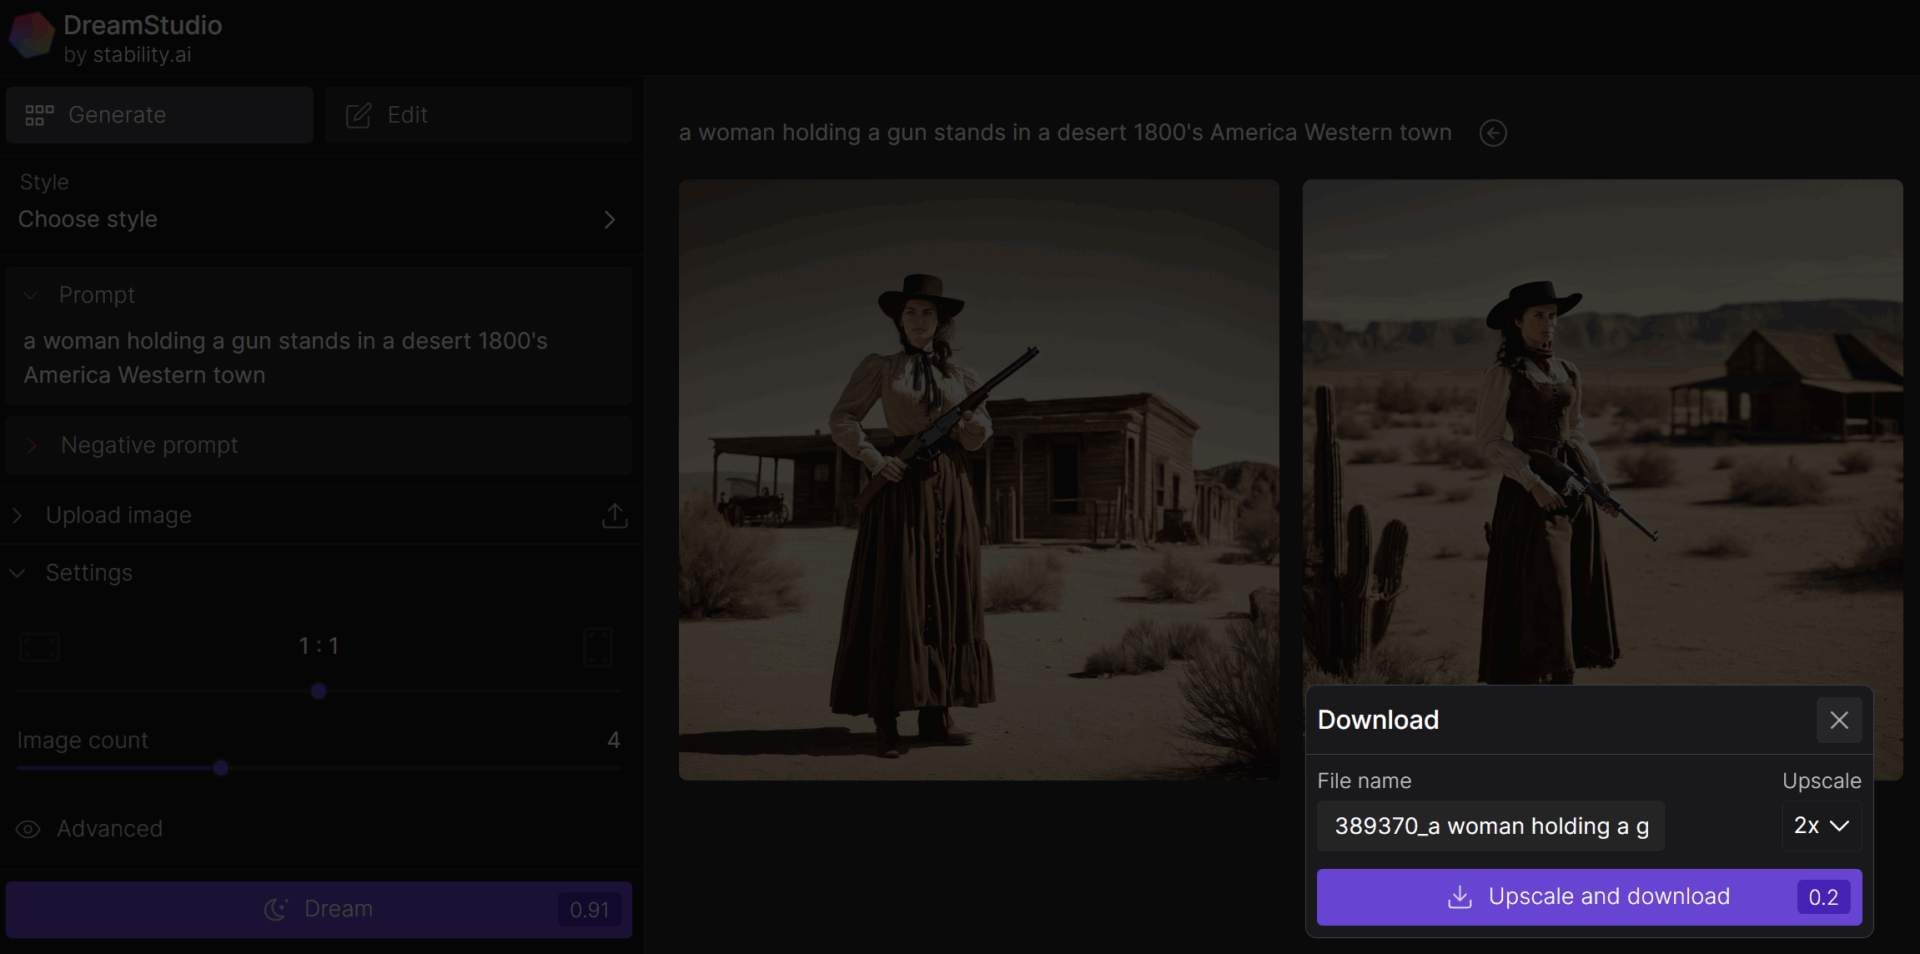
While Fooocus downloads its required files, you can quickly try out Stable Diffusion XL for free using DreamStudio, the official cloud service from Stability AI.
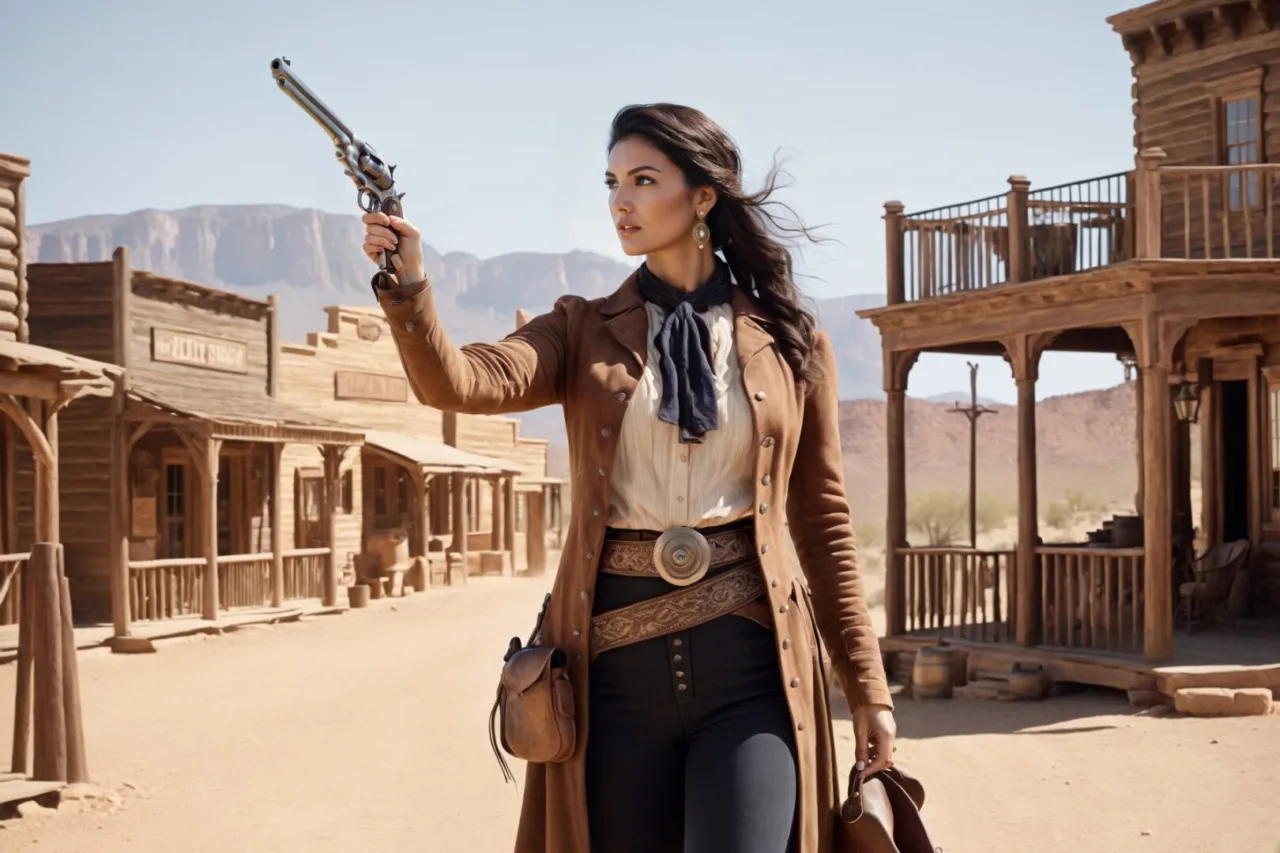
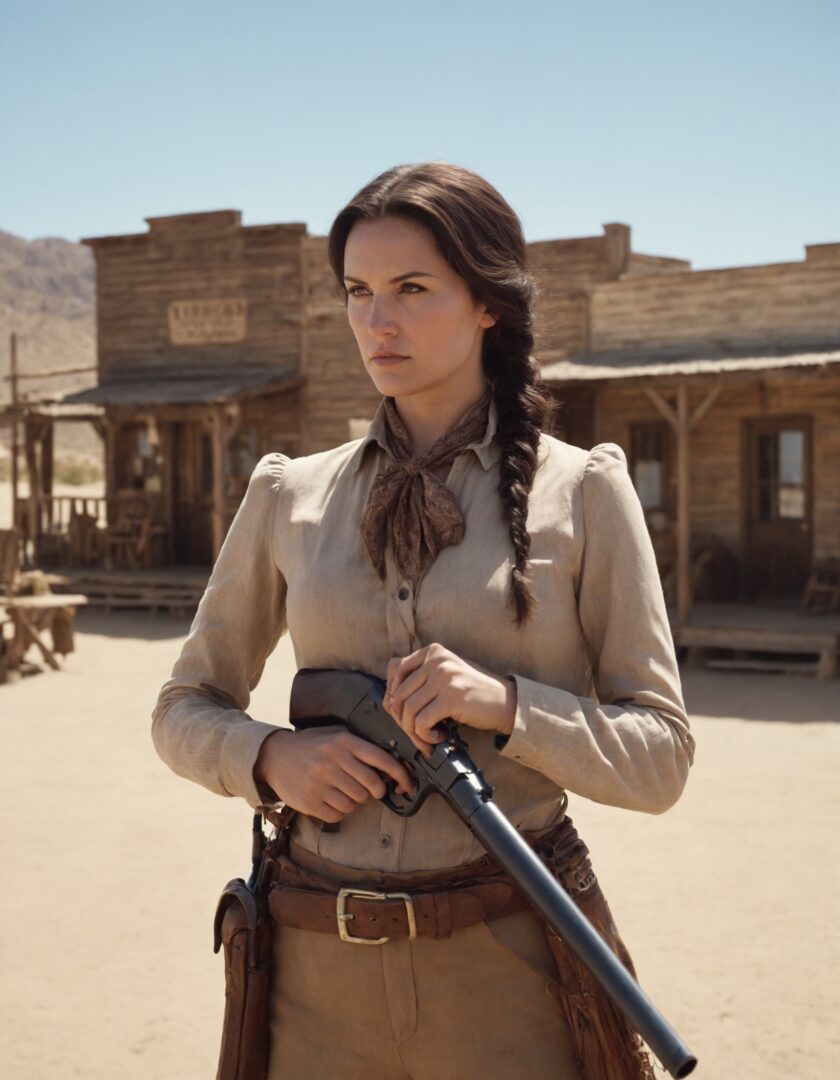
The interface is simple: an input field, aspect ratio selection, and the number of images to generate. The system will even suggest a random prompt — in my case, “a woman holding a gun stands in a desert 1800’s America Western town.” It’s as good as any, so we’ll use it as our baseline.
I hit the button, and a few seconds later the images are ready. You can download them as is at 1024×1024, or use the ESRGAN super‑resolution algorithm to upscale them.
At first glance, the images look nice, with a pleasing color palette reminiscent of vintage photos.
Still, the usual neural‑network ailments jump out right away: faces and limbs. Faces and hands have long been Stable Diffusion’s Achilles’ heel. And while hands are a tricky case (too flexible, too many possible poses), a model should render faces flawlessly—but only if it has enough space in the frame to work with.
The core problem is that images are generated at low resolution; as a result, the few pixels a small, distant face occupies within a 1024×1024 frame just aren’t enough to render it with detail. There’s a way around this, and we’ll address it a bit later using a local version of Stable Diffusion.
Local Stable Diffusion Builds
Out of the box, Stable Diffusion runs from the command line and takes some know-how to install and use. There’s no need to do it all manually, though: you can find plenty of prebuilt distributions online that add a local web interface to the model (and sometimes not even a web UI; some builds package it as a standalone application, usually for Windows). For newcomers, it can be hard to navigate all these builds and understand how they differ.
Arguably the most popular setup for Nvidia GPU owners is Stable Diffusion web UI, a.k.a. AUTOMATIC1111. However, getting to grips with all the generation settings from scratch isn’t trivial, and your initial results likely won’t be impressive. Worse, on a low-end GPU the generation process can be so slow that you might feel the whole thing isn’t worth the hassle. All of this is fixable, and AUTOMATIC1111 is the most popular setup for good reason. That said, I recommend starting with something simpler for your first steps with Stable Diffusion, and Fooocus is a perfect fit for that.
What kinds of builds are available?
There are plenty of Stable Diffusion builds out there; I’ll only mention the ones that stood out to me the most.
Fooocus — ideal for beginners: produces great images out of the box and runs well on both low‑end and high‑end GPUs. The trade‑off is that it’s quite restrictive/limited in flexibility.
AUTOMATIC1111 — one of the most popular projects. Offers huge extensibility via plugins, but has a fairly steep learning curve. Typically, when a new Stable Diffusion feature appears, it’s released first as an A1111 extension.
vladmandic’s fork of AUTOMATIC1111 — even more capable, but with an even steeper learning curve than the original. Many useful extensions that you’d have to find and install yourself in A1111 come bundled, but I only got it to run stably on the third attempt.
The three builds listed above use a unified prompt syntax. This is handy, for example, when you want to copy a prompt straight from the Civitai website.
- InvokeAI — another interesting option. Its syntax is different, and the UI diverges quite a bit.
- ComfyUI — a project with a unique interface, though the name is a bit of a misdirection: it’s not exactly comfy. To generate an image, you build node graphs and wire them together—very much like the old flowcharts from computer class.
- nod.ai SHARK — a project optimized for AMD GPUs. Other tools can run on AMD cards, but SHARK generally does it much better.
First Launch
Once Fooocus is installed, you can launch it. Depending on which file you run, the app will use preset configurations to generate images of one of the listed types. On the first run of the chosen file, the required model (about 6.5 GB) will be downloaded automatically. Your browser will open to a blank page with an input field and a large Generate button.
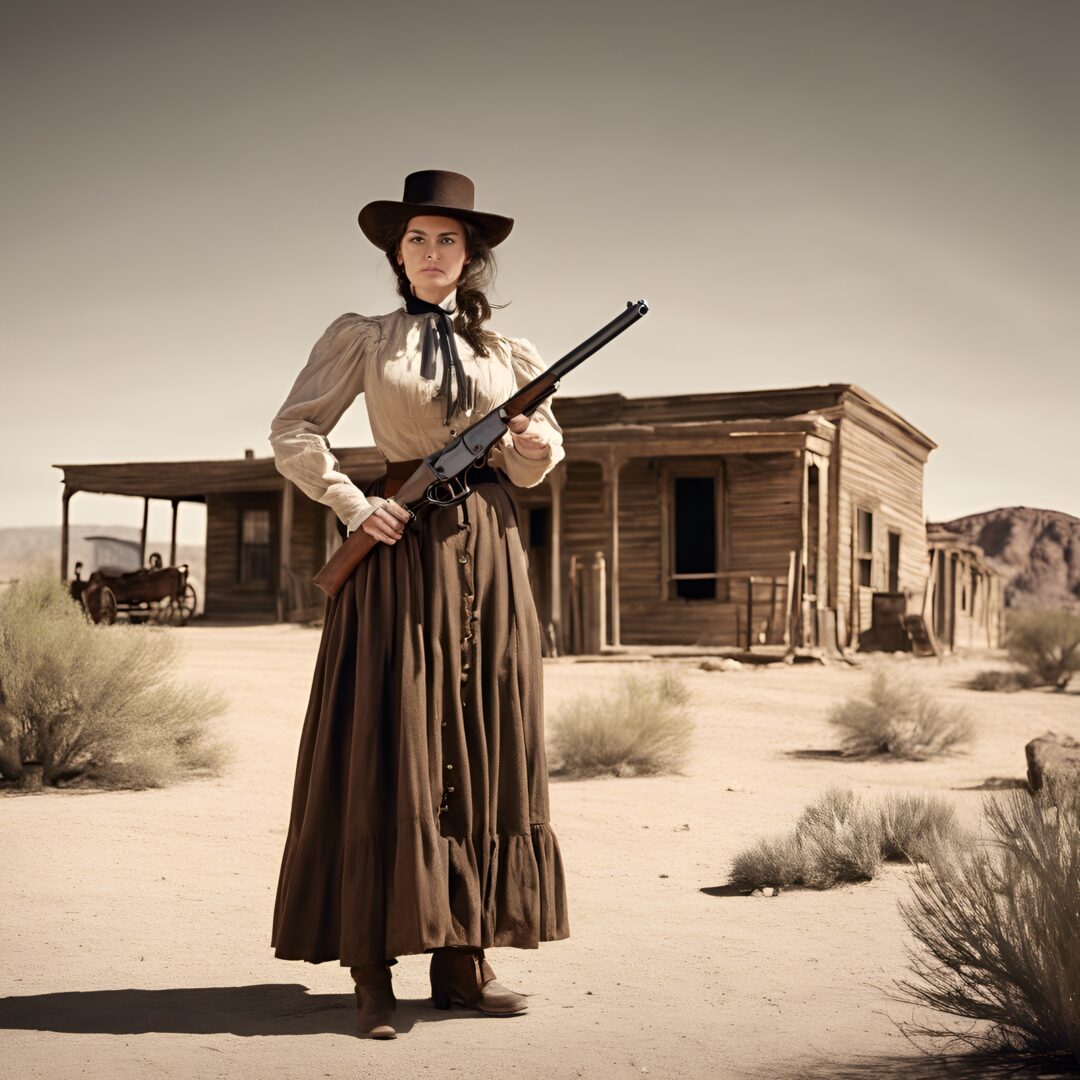
Enter the query:
a woman holding a gun stands in a desert 1800's America Western town
After a few seconds, we get a couple of images.
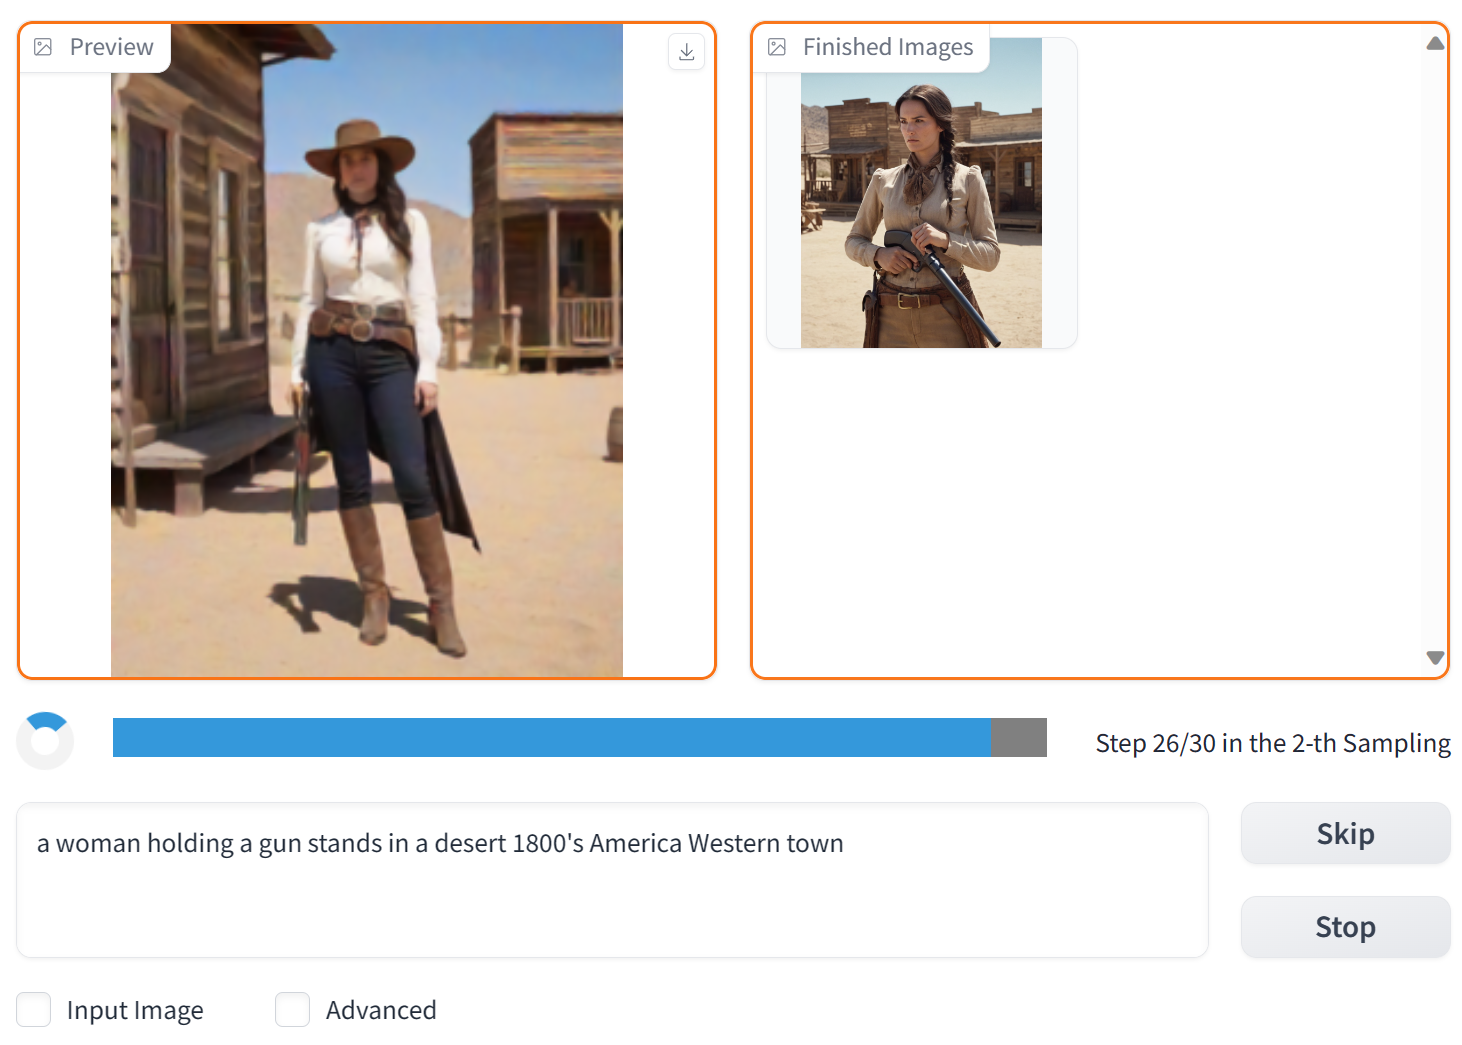
We’ll pick one of the generated images. Here it is at its original resolution.
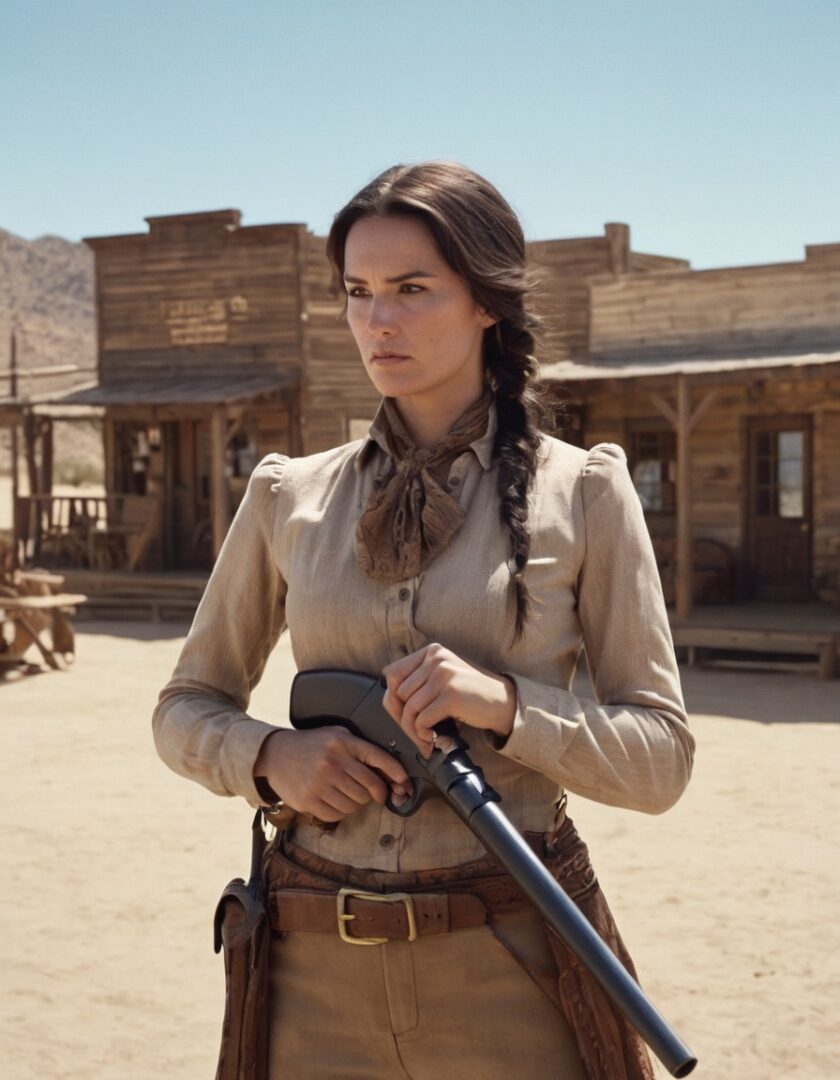
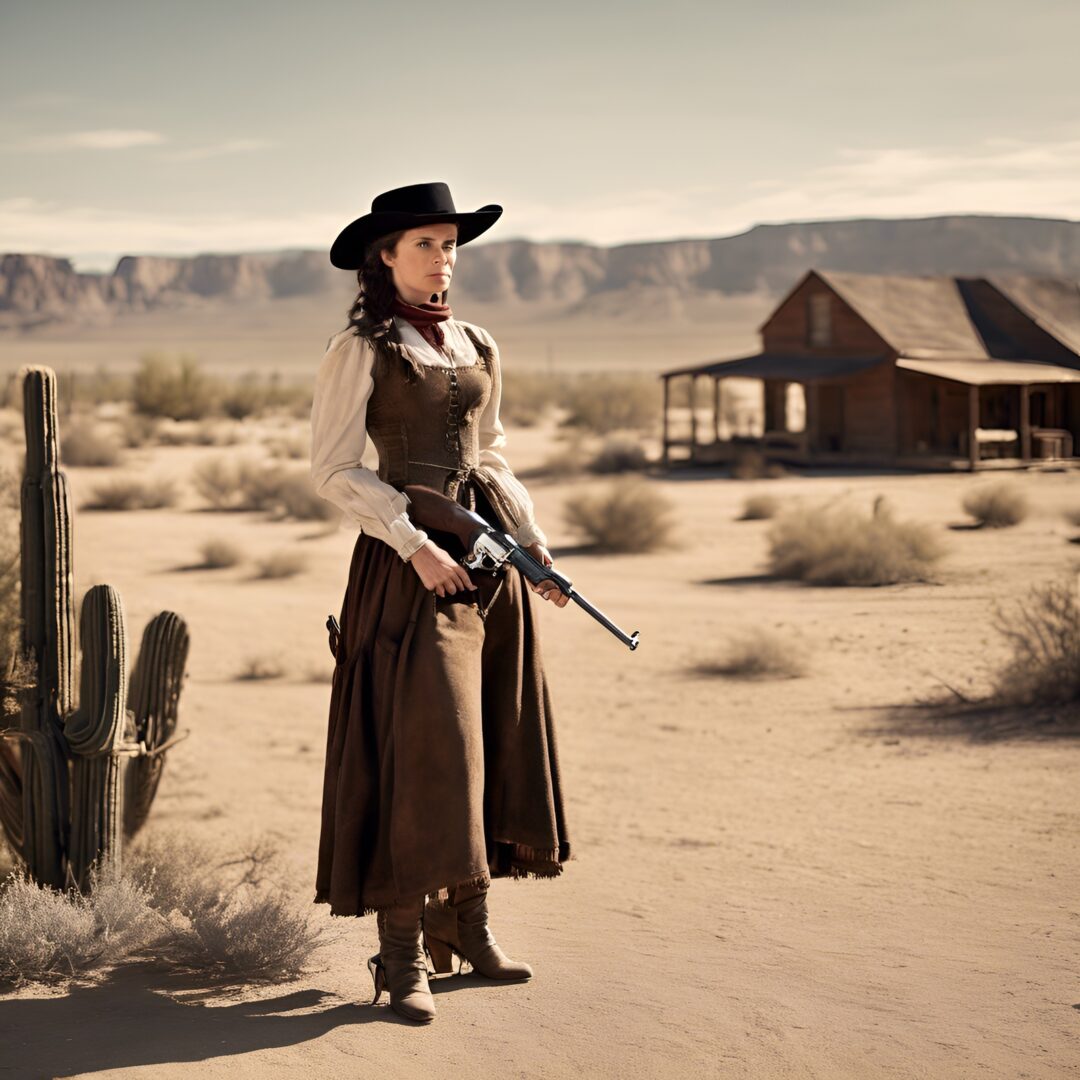
The hands look rough, and the face could use some work—let’s improve it. Post-processing options will appear once you check Input Image. First, increase the resolution: just drag the freshly generated image down into the area labeled “Drag above image to here.”
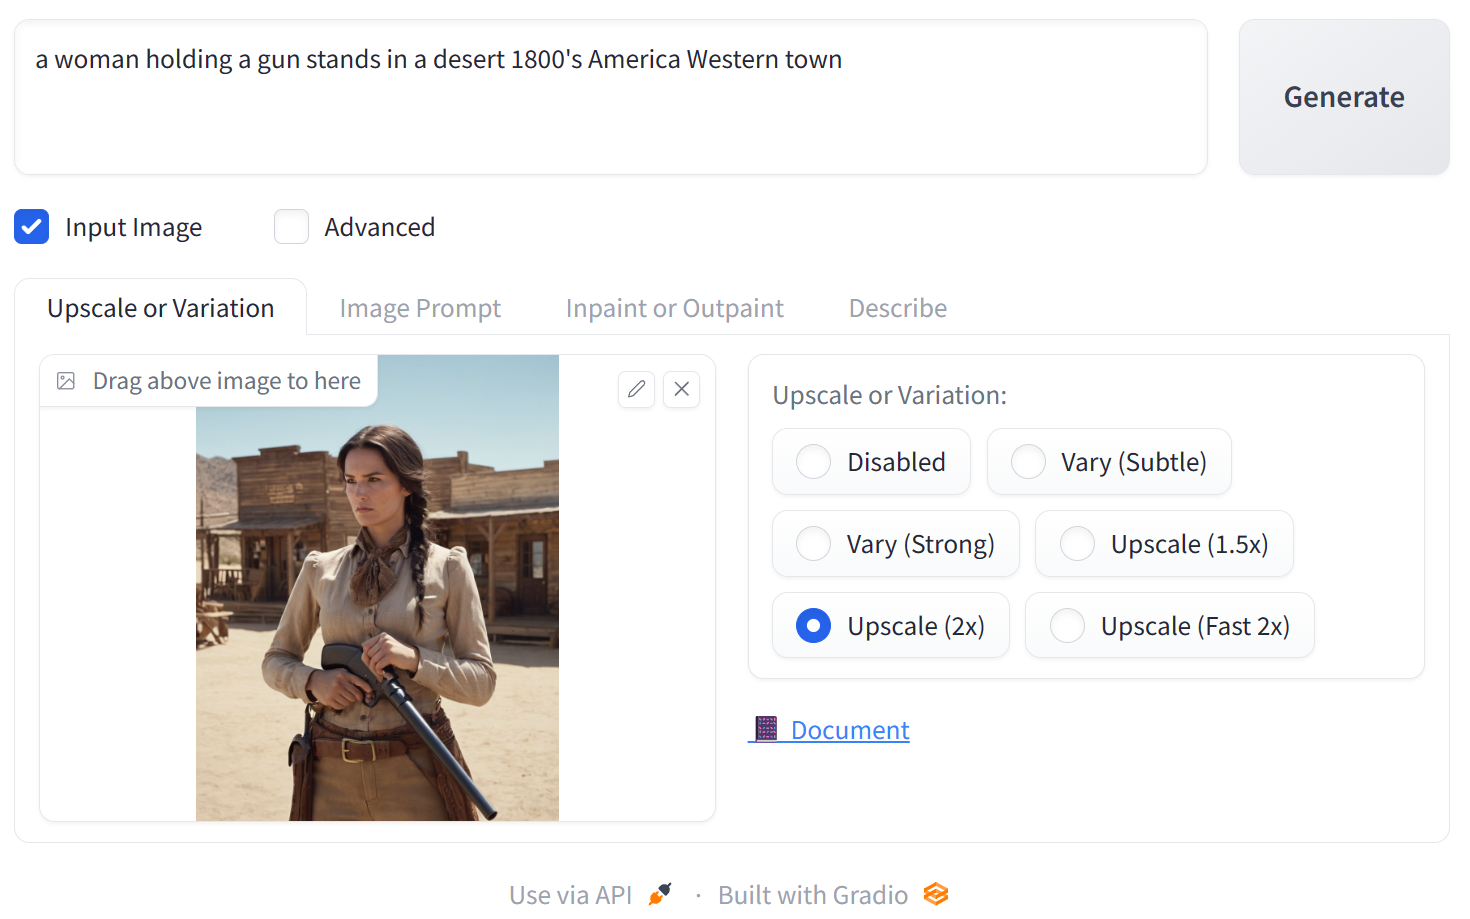
We’re interested in the option that doubles the resolution. After the function finishes, we’ll get an image like this.
Note that in the upscaled image, extra fine details appear out of nowhere. If you look closely, you’ll see that while the overall composition is preserved, the original and the upscaled images differ in the details. That’s exactly how intelligent super-resolution works: the upscaled image is synthesized by models and algorithms similar to those used to generate the original picture. In Fooocus you can’t control the degree of variability (though you can in AUTOMATIC1111).
Glossary
Inpaint — the process of adding, modifying, or removing objects within an image without changing its size or resolution.
Outpaint — changing an image’s size or aspect ratio by extending the canvas and filling in content around the edges. The missing areas are generated using the original model and the initial prompt. Ideally, the “expanded” image should blend seamlessly with the original.
In the 2x-upscaled image, the face already looks almost real. Let’s refine it further using Fooocus’s built-in Inpaint feature. Drag the freshly upscaled image into the Inpaint or Outpaint area, then use the brush to select the face.
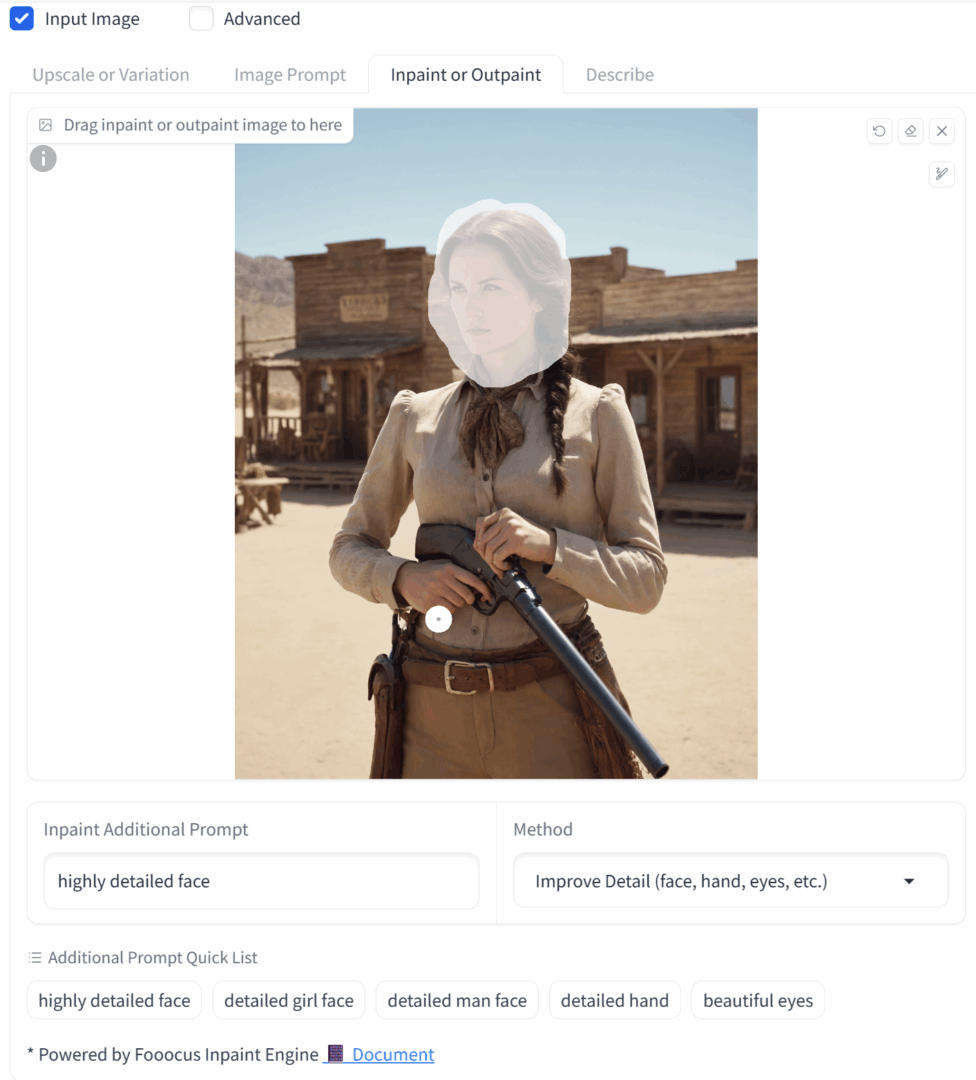
Optionally, you can add extra keywords in the Inpaint additional prompt field. For example, “highly detailed face” (or something else, like changing eye color or other features). Click Generate.
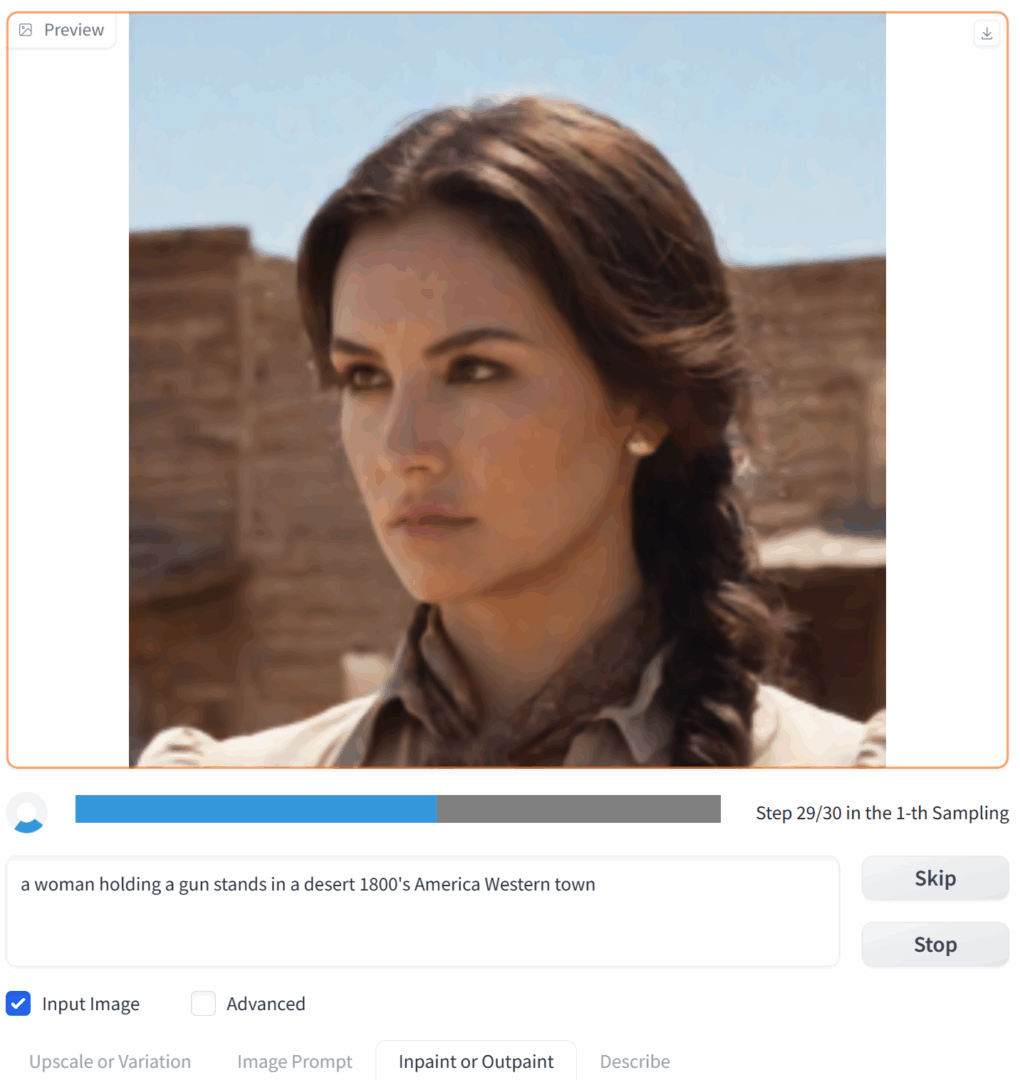
It looks something like this.
Whether it turned out better or worse than the original is up for debate, but the level of detail has definitely increased and the facial features look more accurate. Using another image, we can observe the process in detail.


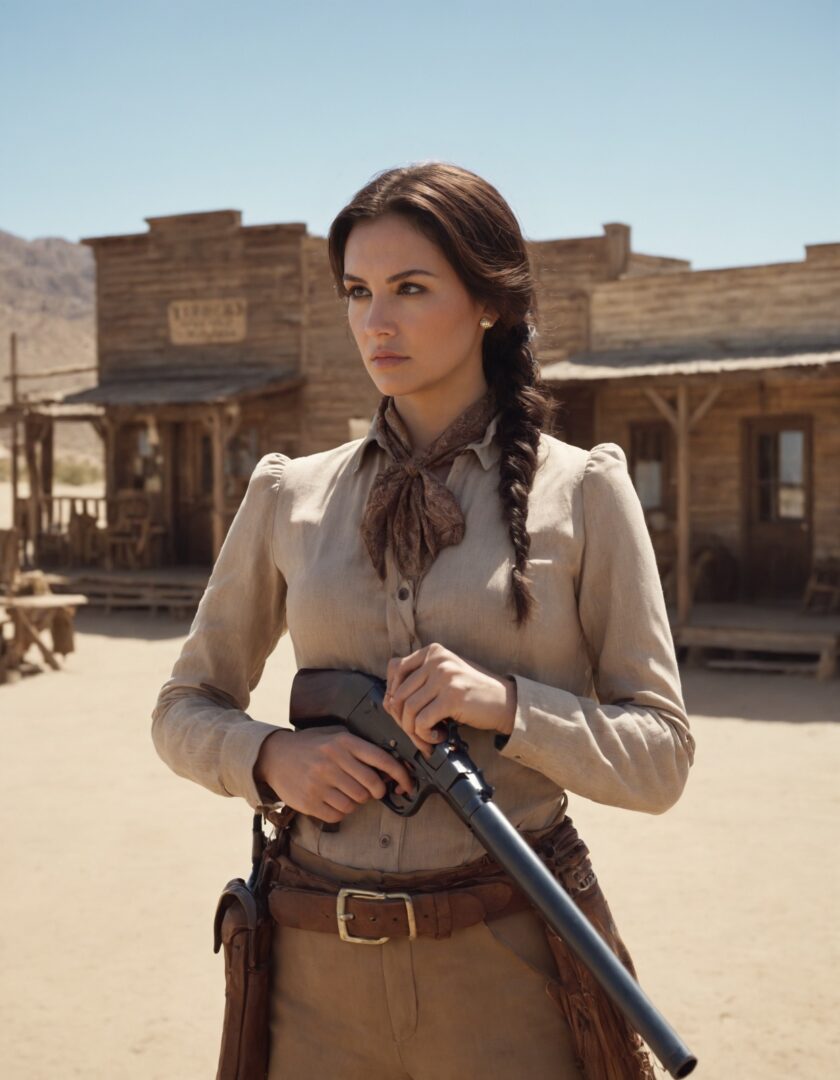
Now let’s do the same for the hands.
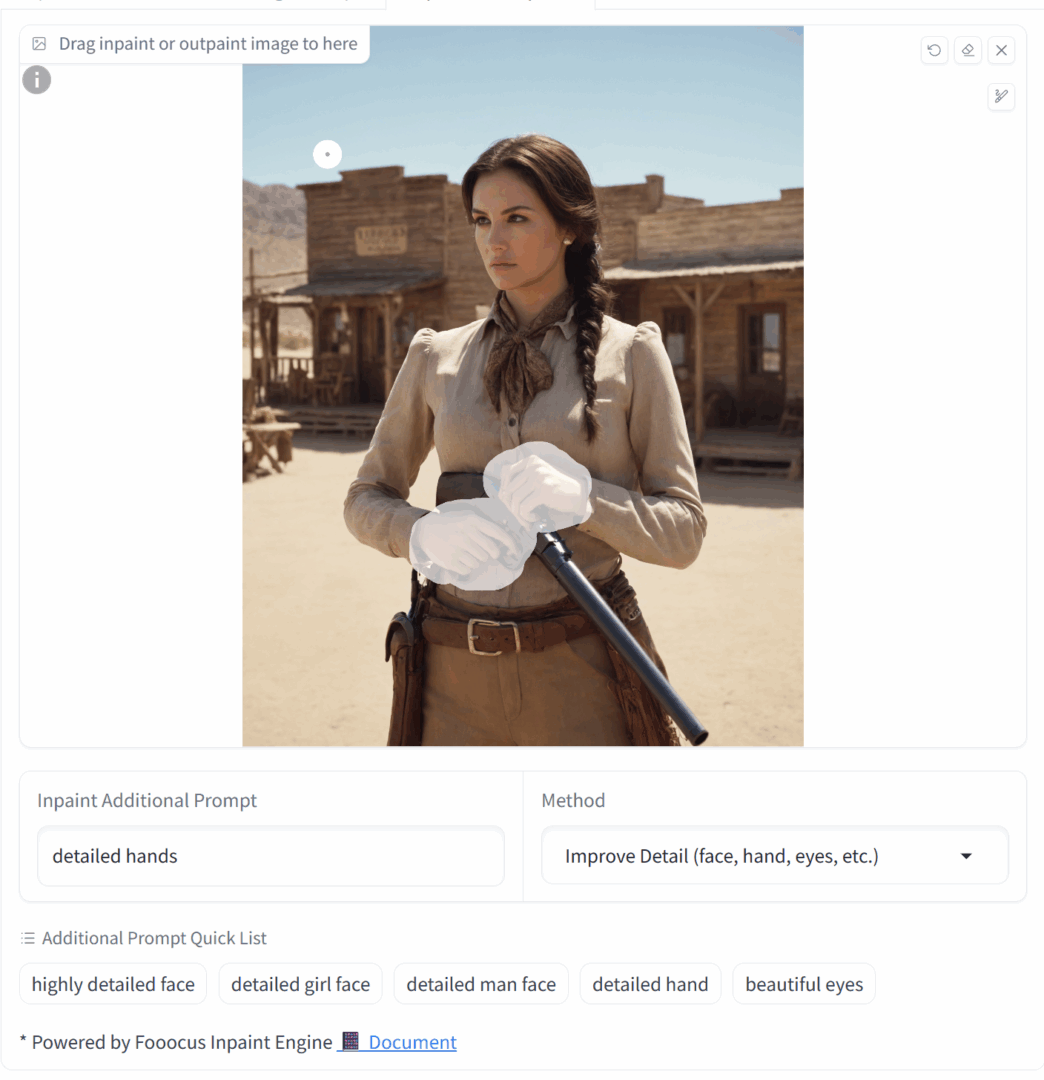
If the hands are a noticeable distance apart, it’s better to select and edit them separately. Otherwise, the inpainting area will be too large and you won’t get a meaningful result. In our example the hands are close together, so they can be handled in a single pass.

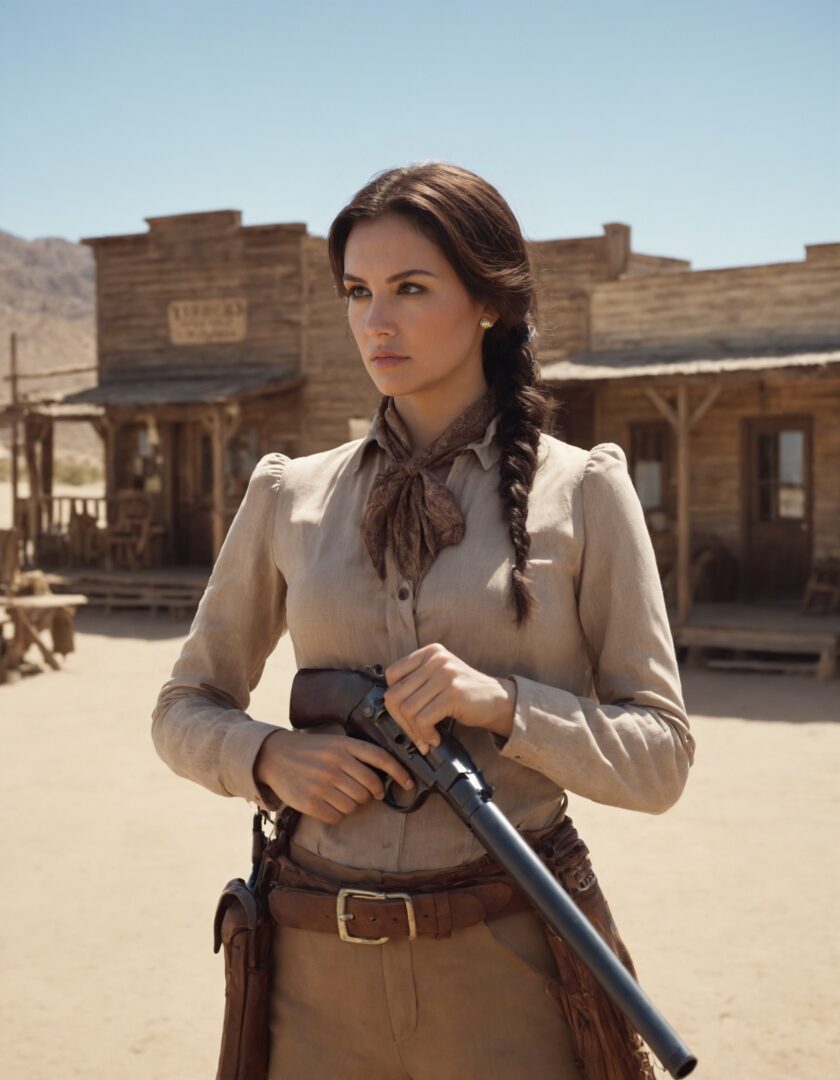
The end result looks like this.
www
Additional details on upscaling and inpainting are available in the GitHub discussions.
How to Write a Prompt
We’ll dive deeper into prompt crafting in later articles. Fooocus supports the standard emphasis syntax compatible with AUTOMATIC1111. Specifically, wrapping a token in single parentheses increases its weight by 1.1×; wrapping it in double parentheses increases it by 1.2×. You can also set an explicit weight, for example: (token:1.3).
However, you don’t need to set the weights manually: just select a keyword (or multiple keywords separated by commas) and press Ctrl+Up to increase the weight or Ctrl+Down to decrease it.
Stable Diffusion processes prompts in chunks of 75 tokens, and the tokens at the start of each chunk carry the most weight. If you use a long prompt or a style extension, the system may split it into multiple chunks at an unexpected point, and some insignificant modifier might end up with undue emphasis. I’ll cover how to handle this in a future article when we dive into AUTOMATIC1111 (Fooocus doesn’t have these capabilities yet).
One last important note: By default, Fooocus uses a local GPT‑style prompt expansion to produce nicer images (you can disable this in Advanced settings by unchecking the Fooocus V2 style). You can view the exact prompt sent for generation in the log. file (it’s created in the output folder; you can also open it from the Advanced → History Log tab).
Here’s what our actual request looked like, for example:
Original Prompt: a woman holding a gun stands in a desert 1800’s America Western town
Negative Prompt: unrealistic, saturated, high contrast, big nose, painting, drawing, sketch, cartoon, anime, manga, render, CG, 3d, watermark, signature, label
Fooocus V2 Expansion: a woman holding a gun stands in a desert 1800’s America Western town, highly detailed, magic mystical, dramatic light, cinematic, intricate, beautiful, sharp focus, extremely professional composition, elegant, very inspirational, special color, stunning, excellent, winning, modern, artistic, perfect, new classic, best, creative, positive, cute, spiritual, vibrant, iconic, rational
Styles: [‘Fooocus V2’, ‘Fooocus Photograph’, ‘Fooocus Negative’]
The model received the “Fooocus V2 Expansion” prompt along with negative keywords from the Negative Prompt. The next image, however, was generated with a different prompt:
Fooocus V2 Expansion: a woman holding a gun stands in a desert 1800’s America Western town, still, cinematic, dramatic ambient, intricate detailed, sharp focus, elegant, highly detail, polished, extremely scientific, magical, mystical, historic royal, full color, artistic, deep aesthetic, very inspirational, original, holy, scenic, fascinating, epic, great creative, thought, fancy, iconic
By default, Fooocus automatically rewrites your prompts using an algorithm similar to those used in commercial online AI services. If you don’t want that behavior, you can disable the “Fooocus V2” style in the Advanced → Styles tab.
Advanced Features
Fooocus also offers extra features that become available when you enable the Advanced checkbox.
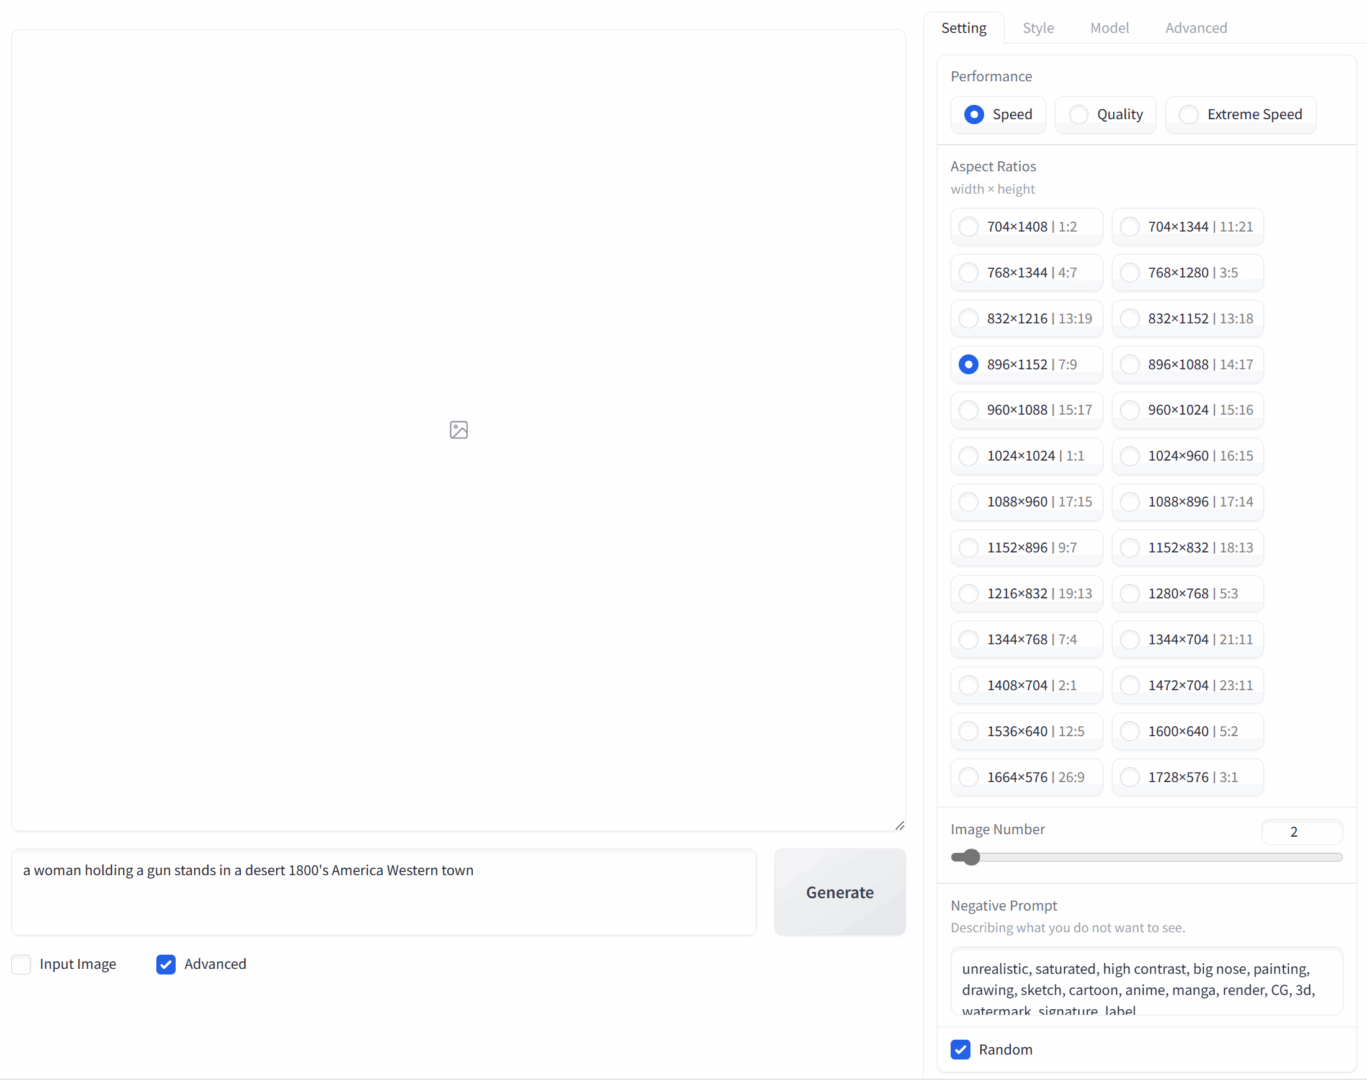
On the Settings tab, you can choose the desired aspect ratio and resolution (there’s also a list of recommended resolutions from the Stable Diffusion developers).
- Speed — the number of algorithm iterations. More steps can produce a more detailed image.
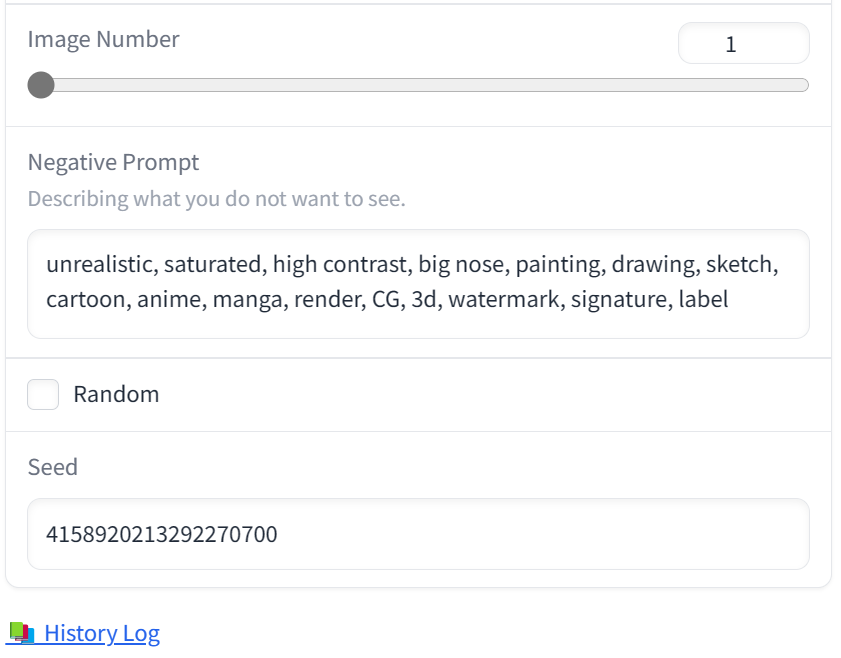
- Image Number — how many variants are generated per batch. By default, two images are produced; you can set it from 1 to 32.
- Negative Prompt — a prefilled field with negative keywords. Note that Fooocus fills this in for you. If you don’t open the Advanced tab, you probably wouldn’t even notice.
How to use negative prompts?
The value of negative prompts is undeniable, but they’re often misunderstood and misused—people clutter them with terms like “bad hands,” “bad anatomy,” “ugly,” “deformed.” Stable Diffusion has no incentive to deliberately produce “bad hands” or “bad anatomy,” and listing those tokens in most models is pointless: entries like that already carry negative weights inside the model. Yes, mentioning them can sometimes (by chance) fix an issue in a specific image, but (1) the same problem can pop up again in other renders, and (2) you can get an equally random improvement by slightly tweaking almost any other parameter.
Use negative keywords only when you’re clear on the goal. One use case is to further enforce the style specified in the main prompt (for example, with a photorealistic prompt, block terms like anime, cg, render). Another is to remove a specific detail or object that would otherwise appear. A simple example: with the Midjourney style, images often skew toward teal; you can easily suppress that by adding “teal” to the negative prompt.
At the same time, negative prompts undeniably influence the final image—especially when there are many of them or they’re particularly “strong.” If you get carried away, you might either nail a perfect result or end up with a “black square,” or a completely distorted, mushy image cobbled together from whatever wasn’t excluded by the negative keywords.
Finally, there’s a small checkbox labeled Random tucked under the Negative Prompt field. It’s enabled by default. If you clear it, you can choose a fixed seed instead of a random one. That’s useful in two cases: if you want to exactly reproduce a previously generated image (its seed is always stored in log.), and if you want to study how changing the text prompt affects the final image (in that case, don’t forget to disable the Fooocus V2 style: it’s dynamic and changes from prompt to prompt). When you’re done experimenting, switch the seed back to random.
We’ll wrap up our look at Fooocus’s advanced features for now, but there’s plenty more to cover—so stay tuned.
Fooocus Limitations
One of Fooocus’s main drawbacks is that it only offers a single upscaling algorithm, and you have to apply it manually.
Up to a certain point, the image doesn’t really exist; the entire “distillation” process happens in latent space. “Pulling” the image out means converting it from latent space into pixel space. Once the image is in pixel space, no new details will truly appear: you can only infer or invent them based on what’s already there—the image itself, the text prompt, and the model.
All “intelligent” super-resolution systems are based on this principle—such as the powerful chaiNNer or the illustration-focused (and even animation-capable!) Waifu2x Extension GUI. The upscaler in Fooocus works the same way: the already rendered raster image is fed into a post-processor (img2img), where further processing takes place.
There’s another approach: increasing resolution in the latent space, before the image is converted to pixels. With this method, the extra detail doesn’t appear out of nowhere—it’s produced by the same model that generated the original image. Obviously, this can only be done during generation, not afterward on a finished image. You can read more, with examples, in this article on Civitai.
For now, note that Fooocus doesn’t have this option. Where is it available? In other, more advanced tools—for example, AUTOMATIC1111—where you can choose from a range of upscalers, from standard to latent ones.
Next comes the face/limb “fixing” step. In Fooocus, this requires manual intervention and relies on an external (albeit very good) model. In AUTOMATIC1111, it can be done automatically—and often with better results: a dedicated extension automatically detects faces (and, if needed, limbs) and instructs the system to re-generate, at the highest available resolution, only the tile containing the face, using the same model and prompt as the main generation. The corrected tile is then seamlessly composited back into the main image. The benefits aren’t just automation; the output quality is typically higher as well.
Fooocus offers virtually no extensibility. Finally, its workflow—generate several drafts up front, then manually tweak one or two favorites—won’t suit everyone.
Pros
On the other hand, Fooocus is exceptionally easy to use, and its offline GPT-like prompt expansion algorithm (the Fooocus V2 style) is unique among similar projects and more than capable of competing with Midjourney.
Fooocus is spot-on for its niche: a simple tool that’s great for getting started with Stable Diffusion, lets you create one‑click “masterpieces,” and offers customization options that will satisfy most users. It’s well optimized (at least for NVIDIA cards) and doesn’t require any tweaks or workarounds to run stably, even on low‑end GPUs.
Once you’ve grasped how the base model differs from the refiner, what LoRAs are for and how they differ from styles, what a seed is, and what the CFG parameter controls, you can fire up AUTOMATIC1111 without getting lost in the sea of settings.
Is it legal?
For personal use, you can create any images as long as they don’t violate the laws of the country you’re in. Public use of generated images is a bit more complicated: your rights are limited by the licenses of all the products and models used in the process.
The Stable Diffusion license itself grants fairly broad rights, as do the licenses of many builds. Fooocus and AUTOMATIC1111 are licensed under GPL 3.0; for other products, check their licenses individually. Most SDXL models on Civitai use the CreativeML Open RAIL++-M license, which is also quite permissive. Some models have stricter terms, so you should verify on a case-by-case basis.
At the same time, the lawsuit against the developers of several AI models is gaining momentum. About a year ago, a group of artists filed suit against the creators of these systems, accusing them of unlawfully using their artwork to train the models.
Major stock photo platforms now let users generate images that are guaranteed rights-cleared, training their generative models only on content they definitively have rights to. Shutterstock states that photographers will be compensated for the use of their images. Getty Images has entered the market with a similar offering.
To Be Continued
When I set out to write about a program you install and launch via run.bat, with a single input field and a Generate button, I figured it would be a short write-up. But, as often happens, it quickly got out of hand. Generative AI is an enormous topic, and there was no way to cover everything I wanted in a single article.
In the next installment, I plan to cover what base models are, where to get them, and which ones to look at first; what the refiner and LoRA are for and how to use them; how styles work and how they differ from LoRA; and finally, what the Guidance Scale (aka CFG value) and Image Sharpness actually affect (and no, this isn’t about edge sharpening). Who knows—maybe later I’ll even write about the difference between an orange cat, a cat and an orange, a catorange, and a cat–orange. Don’t miss it!