When looking at a small device with a display where a virtual pet makes funny faces, it’s hard not to feel that Pwnagotchi is somewhat similar to Flipper Zero. There is indeed a certain connection between these projects: in an interview, Flipper’s creator, Pavel Zhovner, mentioned that the concept for his device was inspired by Pwnagotchi. The so-called “Tamagotchi for hackers” (the name Pwnagotchi is a blend of the slang term “pwn” and the name of the popular toy from Bandai) indeed came first: the first version of this device was announced in October 2019, while Flipper Zero launched on Kickstarter in July 2020.
These devices are fundamentally different. The “Flipper” is like a hacker’s or pentester’s Swiss Army knife, providing a wide array of tools through additional modules and applications. However, there’s a key limitation: it includes everything except Wi-Fi hacking capabilities. To access such features, a Flipper user must purchase a separate module. Conversely, Pwnagotchi is specifically designed for one practical purpose—Wi-Fi hacking. Another difference is in their operation. Flipper Zero uses two buttons for interaction, while Pwnagotchi has no controls whatsoever. You just turn it on… and it simply works. But how exactly?
How Does Pwnagotchi Operate?
When your phone, laptop, or another device establishes a wireless connection with an access point using the WPA2 protocol, they exchange four special data packets to create a secure communication channel. This process is known as the four-way handshake. During the handshake, EAPOL (Extensible Authentication Protocol Over LAN) messages are transmitted over the wireless network. In the second packet (EAPOL M2), the client informs the access point that it knows the PSK key. In the response message (EAPOL M3), the access point confirms that the key is valid. If the confirmation does not arrive, the device most likely attempted to connect with the wrong password.
Pwnagotchi intercepts and saves data from confirmed M2 packets. Subsequently, the device user can recover the wireless network password from the hash using a dictionary attack. There are specialized programs for this, such as hashcat, or online services like Onlinehashcrack.
Pwnagotchi uses the tool Bettercap, which is well-known to anyone familiar with Kali Linux, for hash collection. Bettercap is a specialized tool for intercepting traffic in wireless networks and conducting MITM attacks. Pwnagotchi scans the airwaves and captures the handshake when client devices connect to an access point, then saves this data onto an SD card as PCAP files for later analysis. Handshakes occur regularly, such as when mobile phones that have previously connected to the access point come within range again, or when wireless printers are turned on. Because this attack is entirely passive, it is very difficult to detect—Pwnagotchi operates silently and unobtrusively.
However, the device can “force” the collection of handshakes by employing more aggressive methods than mere scanning of the airwaves. The first method is deauthentication: Pwnagotchi sends special packets on behalf of the client and the access point to all devices connected to the network, causing them to disconnect. The disconnected clients then attempt to re-establish the interrupted connection, allowing Pwnagotchi to capture the password hashes being transmitted.
The second method involves sending special EAPOL packets to an access point in order to trigger the leakage of the PMKID. In this scenario, capturing the handshake is not necessary at all: the PMKID is transmitted in the first packet of the four-way handshake (M1) even before the authentication stage involving the password. This feature is used by routers in certain corporate networks to switch between access points with identical names, but not all devices are vulnerable to this issue.
Pwnagotchi uses artificial intelligence, specifically an AI model called Actor Advantage Critic (A2C). The A2C model evaluates the current state of a device and provides recommendations for its next actions to achieve the best possible outcome, essentially creating logical chains of “state — action — reward.” This allows Pwnagotchi to learn to hack wireless networks on the fly: the more successful hash interceptions the device achieves, the faster it will act in the future, selecting the most advantageous tactics in each specific case.
Alright, we have a general understanding of how Pwnagotchi works, so let’s take a look at how this gadget is put together.
The Pwnagotchi Device
The Pwnagotchi is very straightforward to build: all the components can be purchased on AliExpress and they are relatively inexpensive.

The device is built around a Raspberry Pi Zero WН single-board computer. It’s important to choose the WН version specifically, as it comes with built-in Wi-Fi and Bluetooth modules and includes a pre-soldered interface connector for the display. I purchased my board from a seller named adrol, but there are many shops on AliExpress that sell similar devices.
info
If you’re reading this article in the distant and glorious future, links to specific product pages on AliExpress might no longer work. Don’t worry—it’s still easy to find the right parts using search.

For a display, an e-ink module for the RPi0 is the best choice. According to the official project page, Pwnagotchi natively supports Waveshare V2 screens. However, this model (along with V3) is now considered outdated, and production has ceased, making it challenging to find one for sale. I purchased a 2.13″ Waveshare display. This model is a V4 version, and I encountered some issues setting it up, but I was able to resolve them successfully.

To operate Pwnagotchi autonomously, you can use any compact power bank with a Micro-USB cable, but it’s recommended to purchase a dedicated battery power module for the Raspberry Pi Zero, such as one from Waveshare. This module connects to the single-board computer from beneath using pin headers, ensuring a neat appearance without wires protruding from the sides. Power is delivered to the board via a switch, and the battery charges through a Micro-USB port mounted on the power module.

Finally, you will need a MicroSD memory card with a capacity of at least 32 GB. Generally, any card priced around a dollar will suffice.
Assembly and Setup
I believe that assembling a Pwnagotchi is easy enough for even a typical preschooler. Connect the battery to the appropriate socket on the power module board, insert threaded standoffs into the holes at the edges of the board, and attach the Raspberry Pi Zero WH on top — all necessary fasteners are included in the kit. It’s important to ensure that the battery board pins align perfectly with the contacts on the underside of the single-board computer. Next, firmly insert the display module into the Raspberry Pi’s interface connector from above. That’s it; assembly is complete, and you can enjoy a beer smoothie. Some people 3D print elegant cases for their devices (you can find STL models online), but we’ll skip those luxuries.


If we now power on the single-board computer, nothing will happen: the Raspberry Pi Zero only operates when a memory card with an operating system is inserted into the appropriate slot. Therefore, the operating system needs to be installed on the card.
Pwnagotchi uses a customized version of the Raspbian operating system, which includes a range of additional modules such as Bettercap and Python libraries that enable machine learning algorithms. The official project website provides instructions for downloading the firmware from GitHub. However, if you have purchased a Waveshare V4 display like I did, you’ll find the official firmware incompatible since it lacks support for this type of screen. After struggling with this issue for about half a day, I found a modified firmware that properly supports Waveshare V4, which I installed on my Pwnagotchi.
The easiest way to write the firmware file to an SD card is by using the program balenaEtcher or the dd utility, if you know how to use it properly. This will result in the card having two partitions: boot, which contains boot files and configuration files, and another partition with the operating system.
Now it’s necessary to change the basic settings of the device. Without removing the memory card from the computer, open the boot section in the file explorer and create a text file named config. with content similar to the following:
config.toml
main.name = "PwnagotchiName"
main.lang = "en"
main.whitelist = [
  "MyWi-Fi_1",
  "MyWi-Fi_2"
]
main.plugins.grid.enabled = true
main.plugins.grid.report = true
main.plugins.grid.exclude = [
    "MyWi-Fi_1",
    "MyWi-Fi_2"
]
ui.display.enabled = true
ui.display.type = "waveshare_3"
ui.display.color = "black"
Replace PwnagotchiName with any desired name for your device. In the main. and main. sections, list the SSIDs of wireless networks or the MAC addresses of devices that Pwnagotchi should ignore, meaning their handshakes will not be intercepted. These values should be entered in quotes and separated by commas. For example, you might want to include your home wireless network in this list.
Now, insert the SD card into the Raspberry Pi Zero slot, but it’s still too early to power on the Pwnagotchi. The single-board computer has two Micro-USB ports: one is exclusively for power, and the other is for both power and data transfer. Use the latter to connect the Pwnagotchi to your computer with a cable. Most likely, the device will be recognized as a USB serial interface (Com3) — indicating that Windows was unable to correctly select the drivers. Download the Ethernet RNDIS driver and install it using the Device Manager.

If you’ve done everything correctly, a new network adapter named USB Ethernet/RNDIS Gadget will appear in the system. In Windows, open the properties of this adapter’s connection and manually set the IP address to 10., the subnet mask to 255., the gateway to 10., and the DNS server address to 8.. Save these settings — you can now connect to Pwnagotchi via SSH using any suitable application, such as PuTTY.
Hurray, It Works!
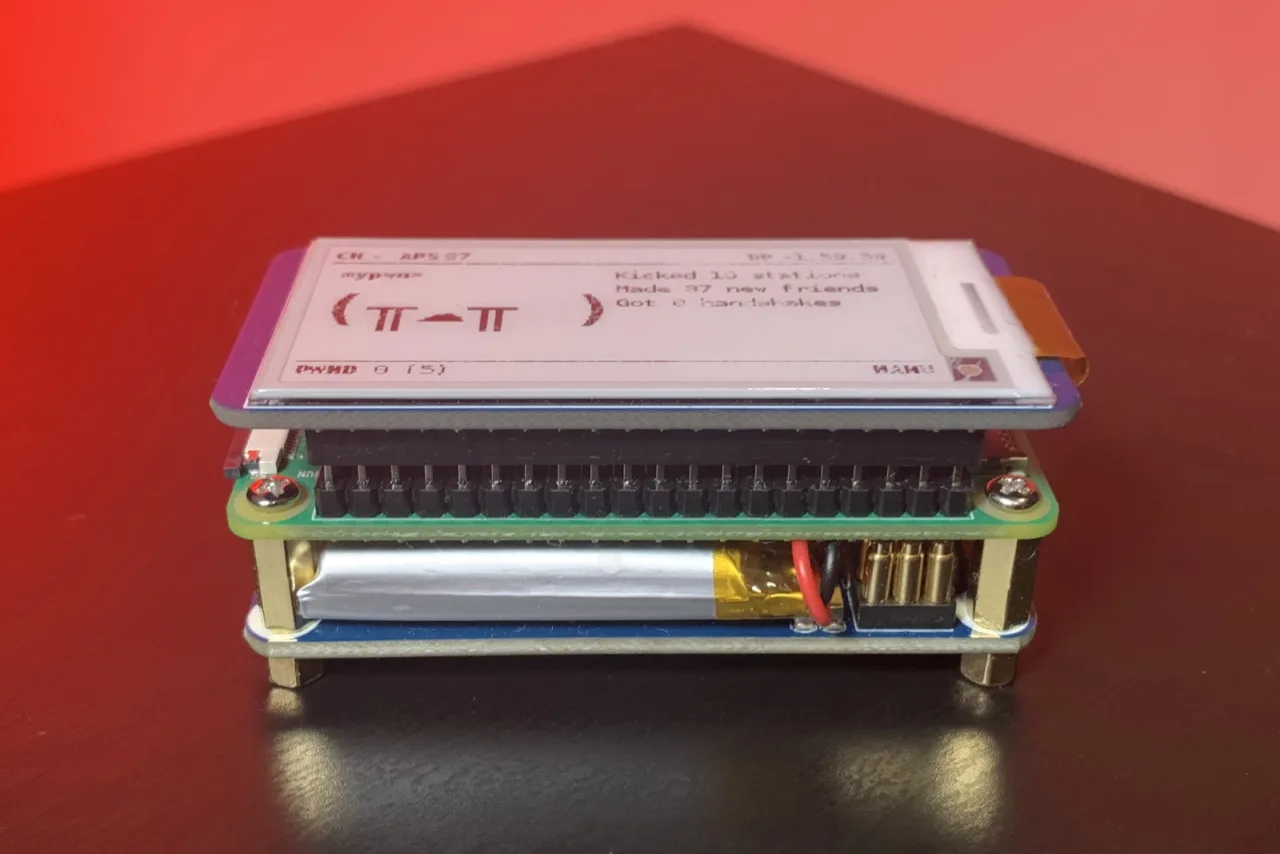
Your Pwnagotchi setup is now complete, and you can power on the device and have some fun with it. The boot process takes about 15–20 seconds, after which you will see your virtual pet’s name and its cute little face on the screen.

Pwnagotchi can display various facial expressions, the appearance and meanings of which are presented on the project’s website. In addition to these expressions, the device shows its current status (indicating what Pwnagotchi is doing at the moment), the number of captured packets, the SSID of the network where the last packet was captured, and other related information. Additionally, Pwnagotchi will display a message on the screen if it detects another Pwnagotchi nearby.

In the terminology of the creators of this amusing device, Pwnagotchi “feeds” on wireless network packets. If your virtual pet tells you it’s hungry, you should immediately take it to a place with many wireless networks available for scanning and hacking. The same goes for the pet’s mood: if it’s bored, the only way to entertain your Pwnagotchi is by feeding it some EAPOL packets.
Pwnagotchi operates automatically by default and does not require user intervention. However, there is an option to customize its firmware: you can change the language of messages, add new facial expressions and statuses, and connect additional plugins to enhance the device’s capabilities. All instructions are available on the developers’ website.
The effectiveness of using Pwnagotchi directly depends on the complexity of the password set for the network whose handshake you managed to capture. If the password follows standard security guidelines, you’ll likely need to acquire a used mining rig to crack it. However, if the network used a simple dictionary password, you’re in luck: it might take only a few hours to brute-force it.
How to Protect Yourself
I believe our readers are well aware of the risks associated with unauthorized access to a wireless network by hackers: they can gain access to shared resources and confidential files, intercept traffic, and use someone else’s internet connection. How can you protect yourself from attacks using devices like Pwnagotchi, especially since it operates discreetly? While it’s challenging to secure yourself against passive packet interception, you can take steps to prepare for the possibility that an attacker might recover the wireless network key from a hash.
Use a strong password for your Wi-Fi and monitor the devices connected to your network. If a new suspicious device appears, it’s time to change your password. The best protection, however, is to configure your router to allow connections only from devices with pre-approved MAC addresses on a whitelist.
For some, Pwnagotchi may seem like a quirky and interesting device that allows you to test the security of wireless networks simply by walking near offices. While Pwnagotchi certainly can’t compare to the Flipper Zero in terms of available features, the cost of a Flipper Zero could get you a whole zoo of Pwnagotchi devices. And you’d still have some money left over for treats.