I’ll state the obvious: information storage methods vary greatly across different types of devices. Furthermore, the methods for erasing recorded data also differ. Users who are accustomed to “traditional disks”—those with spinning magnetic platters and no encryption—often find the data deletion (and overwriting) processes on other types of media surprising and confusing. So, let’s start with magnetic disks.
How to Destroy Data on a Hard Drive
In this section, the term “hard disk” refers to the traditional device with spinning platters and moving read/write magnetic heads. The information recorded on the platter remains there until it is overwritten with new data.
The traditional method for erasing data from magnetic drives is formatting. Unfortunately, when using Windows, even a full disk format can produce various—and sometimes unexpected—results.
If you’re using an operating system like Windows XP (or an even older version of Windows), a full disk format doesn’t actually write zeros to every sector. Instead, the OS performs a check for bad sectors by reading data sequentially. So, if you’re planning to dispose of an old computer running Windows XP, you should format the disk using the command line with the parameter ++/. This way, the format command will overwrite the disk’s contents with zeros as many times as specified by the < parameter. Example:
$ format D: /fs:NTFS /p:1
Starting with Windows Vista, Microsoft developers changed the behavior of the full format command. Now, formatting a disk actually overwrites the data with zeros, making the / option redundant.
For the average user who’s not overly concerned with privacy, that’s usually where their worries end. However, those more security-conscious might recall methods from a couple of decades ago (which were quite expensive back then) that used specialized equipment to recover data by analyzing the residual magnetism on disk tracks. The theoretical concept behind these methods involves detecting traces of information previously recorded on the disk by analyzing weak residual magnetism (a variation of this is edge magnetism analysis, where attempts are made to read data from the gaps between tracks). This method worked well with storage devices the size of wardrobes and strong enough electromagnets to knock off military insignia. The results were notably worse with disk sizes in the tens of megabytes, and the method performed poorly with storage devices approaching a gigabyte—yes, you read that correctly, it’s referring to megabytes and gigabytes.

For modern high-density storage devices, with capacities measured in terabytes, there are no confirmed cases of successful application of this method. Furthermore, for drives using shingled magnetic recording (SMR) technology, this approach is fundamentally impossible.
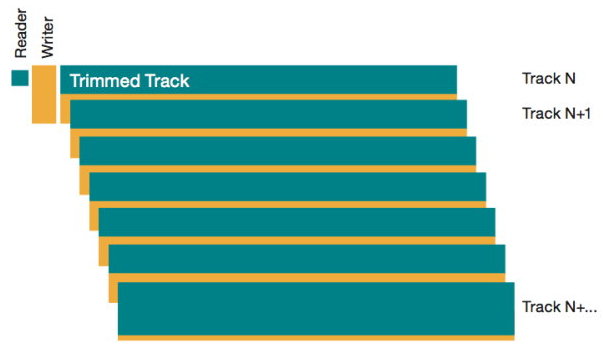
However, to eliminate even the theoretical possibility of its use, it’s enough to overwrite the disk not with zeros but with a specific data sequence—sometimes more than once.
Algorithms for Guaranteed Data Destruction
Many organizations have specific procedures for disposing of data storage devices, which often involve sanitization (irreversible data destruction). For truly confidential information, destructive methods are used, whereas for data that isn’t particularly valuable, software algorithms can be employed. There are numerous algorithms available for this purpose.
Let’s start with the widely known yet often misunderstood American standard, DoD 5220.22-M. Many free and commercial applications claiming to support this standard refer to its outdated version, used before 2006. Indeed, from 1995 to 2006, the “military” standard for data destruction allowed the use of the data overwrite method. This standard outlined a three-pass overwrite process for a disk. The first pass involved writing any character, the second referenced its XOR complement, and the last pass wrote a random sequence. For instance, like this:
01010101 > 10101010 > 11011010*
* random data
Currently, the military does not use this algorithm; instead, they deal with media by physically destroying or thoroughly degaussing them, akin to “in the crucible of a nuclear blast.” However, for the destruction of non-classified information, this algorithm is still employed by various U.S. government agencies.
The Canadian police use their proprietary DSX utility to destroy non-classified information. The utility overwrites the data with zeros first, then ones, and finally writes a sequence to the disk that encodes information about the utility version and the date and time of the data destruction. Classified information continues to be destroyed along with the physical storage media.
Something like this:
00000000 > 11111111 > 10110101*
* predefined encoded sequence
Renowned cryptography expert Bruce Schneier has proposed a similar method for destroying information. His algorithm differs from the Canadian development in that, instead of writing a predefined sequence of data in the third pass, it writes a pseudorandom one. At the time of publication, this algorithm, which used a random number generator for overwriting data, was criticized for being slower than those algorithms that used predefined data sequences. Today (and even yesterday and the day before), it’s hard to imagine a processor struggling with such a simple task. However, when Schneier’s algorithm was published in 1993, the common processors were i486 models, operating at clock speeds of around 20-66 MHz…
Something like this:
00000000 > 11111111 > 10110101*
* pseudo-random data
In Germany, a somewhat different approach is used for erasing non-classified data. The BSI IT Security Guidelines (VSITR) standard allows for two to six passes (depending on the information’s classification), sequentially writing a pseudorandom sequence and its XOR complement. The final pass involves writing a sequence of 01010101.
Something like this:
01101101* > 10010010** > 01010101
* pseudo-random sequence 1
** XOR complement of pseudo-random sequence 1
As a technical curiosity, let’s consider Peter Gutmann’s algorithm, which suggests a 35-pass overwrite. When it was published in 1996, the algorithm was based on the theoretical assumption of a 5% residual magnetism level, and even at the time, it appeared to be a theoretical novelty. Nonetheless, many data destruction applications still support this algorithm. In reality, using it is excessive and entirely pointless; even a triple overwrite using any of the aforementioned algorithms would yield the same result.
Which algorithm should be used? For modern hard drives (not older than 10–15 years), a single overwrite with a pseudo-random sequence is more than sufficient for securely erasing data. Anything beyond this is merely to appease internal paranoia and does not actually reduce the likelihood of successful data recovery.
Applications for Secure Data Erasure from Magnetic Storage Devices
As we have determined, securely deleting data from a hard drive ideally involves overwriting its contents with a random sequence of bits. However, you can also use one of the existing data destruction algorithms. The easiest way to do this is with one of the available utilities. The challenge lies in choosing a reliable, yet free application, as numerous file repositories are packed with Secure Erase utilities.
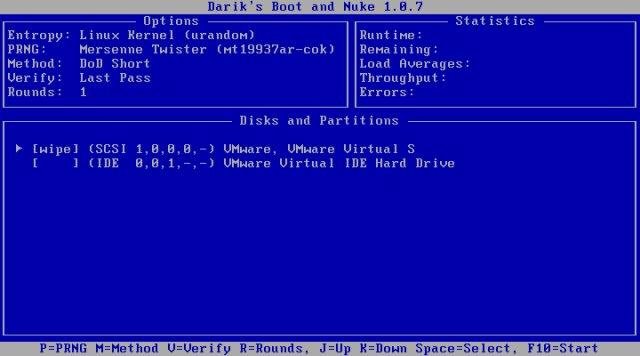
The program DBAN has established a good reputation. This application operates exclusively in a boot mode (it is distributed as a bootable image, or more precisely, a self-extracting archive that prompts you to create this image upon execution) and supports most data destruction standards. Its open-source nature allows users to verify not only that the program performs as promised but also that it uses a correct random number generator for producing pseudo-random sequences.
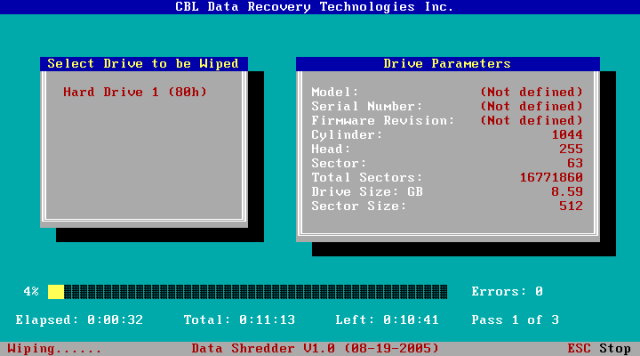
An alternative option is the free yet proprietary application CBL Data Shredder. This application, developed by data recovery experts, supports most of the existing data destruction standards. CBL also offers the ability to create a bootable USB drive that can be used to completely wipe a disk.
Drives with Hardware Encryption
Sometimes information needs to be erased quickly, almost instantaneously. It’s clear that doing this on a logical level for a magnetic disk is impossible: to fully erase all data, you’d have to overwrite it entirely, which could take several hours. However, there has been a solution for quite some time: hard drives with hardware-based encryption. There are several standards for hardware encryption, with the most common being Opal and eDrive. What these standards share is that when encryption is enabled, all data on such a hard drive will be automatically encrypted when written and decrypted when read.
What we’re focusing on now is another feature of such drives: the immediate and irreversible destruction of data. This is achieved through the standard ATA Secure Erase command, which can be executed using the hdparm utility. For magnetic drives that use hardware encryption, the Secure Erase command instantly destroys the encryption key, making it impossible to decrypt the data stored on the drive. If the drive uses strong encryption with a key length of 128 bits or more, decoding the data becomes entirely impossible.
By the way, you can use hdparm on regular, unencrypted disks as well. However, the time it takes for the command to run won’t be much different from a standard sector-by-sector rewrite of the disk’s contents—simply because that’s exactly what it does.
However, hdparm is not a cure-all. Hardware encryption is mainly found in hard drives meant for specific environments, like corporations, hosting, and cloud services companies. Even if you install such a hard drive in your home computer and enable hardware encryption, there is a chance that the Secure Erase command may not work properly due to BIOS limitations. Relying solely on hardware encryption at home, without support from the operating system, is neither the best nor the most reliable solution.
It might be worth mentioning that there is a whole class of hard drives that come with full-disk encryption already enabled. Any information written to such a drive is automatically encrypted using a cryptographic key. If the user doesn’t set a password, the cryptographic key remains unencrypted, and all data will be accessible immediately after initializing the drive.
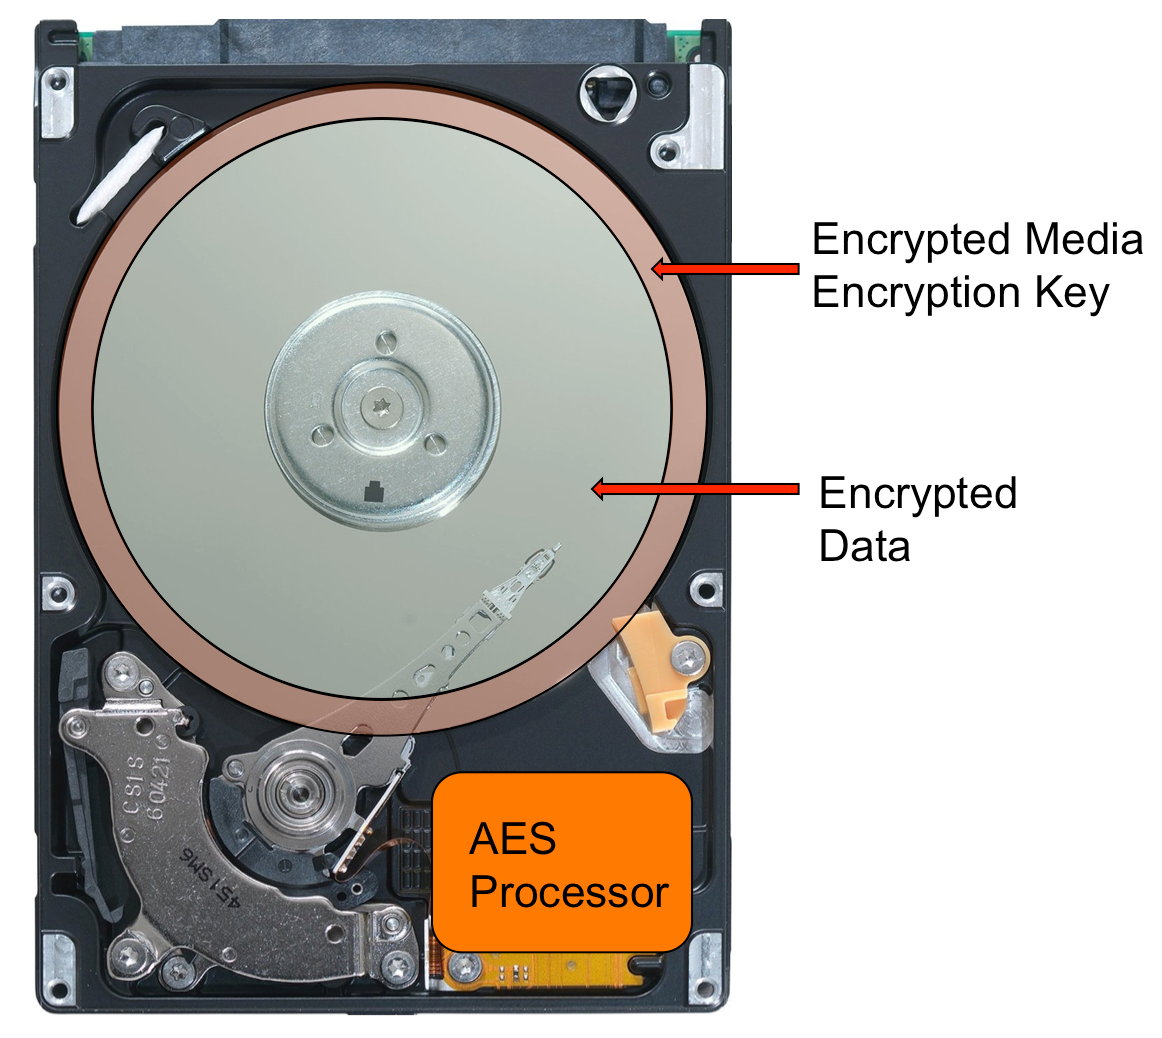
If a user sets a password for their drive, then during the drive’s initialization (only when it is fully powered off and then back on, not during sleep or hibernation—this distinction is the basis for several attacks on such drives), the cryptographic key will be encrypted with the password. As a result, access to the data will be impossible until the correct password is entered.
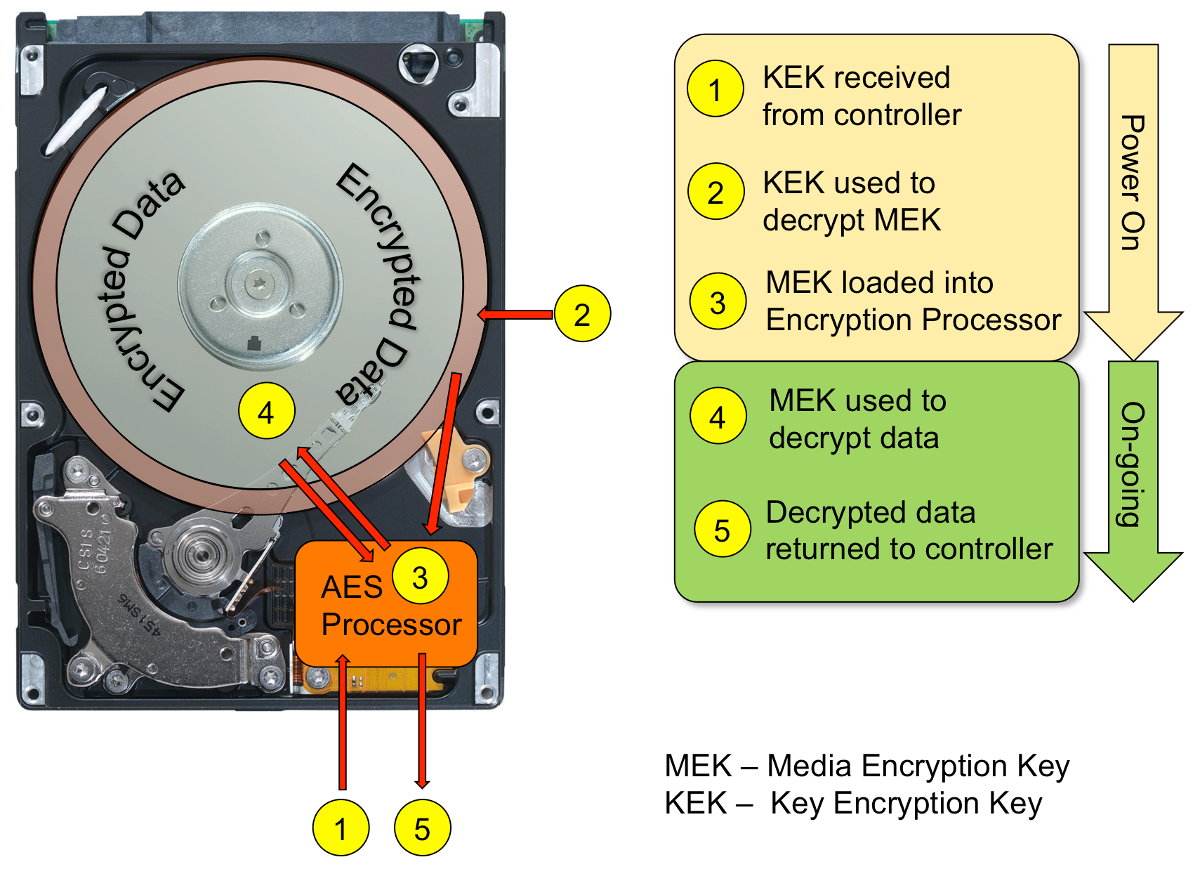
It’s easy to understand that destroying a cryptographic key makes accessing the data impossible. Sure, you might be able to read the information from the disk, but decrypting it will be out of the question. On drives like these, the ATA Secure Erase command first destroys the cryptographic key, and only then does it proceed to wipe the data.
These disks are used in almost all hosting and cloud companies. It is clear that this type of encryption does not protect against attacks on a live system. Its main purpose is to prevent unauthorized access to data when the disk is physically removed, such as in the event of a server theft.
The Most Secure Data Erasure Techniques
The method discussed above using the hdparm utility requires that the drive supports hardware encryption, which is not often the case for regular consumer drives. At home, the fastest and most reliable way to destroy information on encrypted partitions is to simply erase the cryptographic key.
If your data is stored on a BitLocker-encrypted drive, you can instantly destroy it by performing a “quick” format of the drive. The format command in Windows correctly identifies BitLocker volumes in both the command line and GUI versions. When you format BitLocker volumes, even with a “quick” format, the cryptographic key is erased, making further access to the information impossible.
Features of BitLocker
Did you know that turning off encryption on an already encrypted BitLocker drive doesn’t decrypt the data? If you disable encryption on a drive protected by BitLocker, Windows simply retains a plain-text cryptographic key to access the data (rather than encrypting it with a password or information from the TPM module). New writes will be unencrypted, but existing data will remain as is—though it will be automatically decrypted with the plain-text cryptographic key. If you re-enable encryption on the drive, the cryptographic key will be immediately encrypted, and any data that was previously written in an unencrypted format will be gradually encrypted in the background.
But there’s a catch here as well. Even if the encryption key for a BitLocker volume is destroyed immediately, a copy of it might be stored elsewhere. There’s no need to look far for examples: when BitLocker Device Protection is automatically activated, the recovery key is automatically uploaded to OneDrive cloud storage. Therefore, even destroying the encryption key won’t help.
Are you using BitLocker? Log into your Microsoft account and check to see if there are any unnecessary encryption keys stored there.
Solid-State Drives
Permanently deleting data from a solid-state drive (SSD) is both easier and more complicated than doing so from a magnetic hard disk drive (HDD). Let’s take a closer look at what happens inside an SSD when data is deleted.
You’re probably aware that the memory chips used in SSDs allow for fast data reading, moderately fast writing to a clean block, and much slower writing to an area already occupied by other data. It’s this last characteristic of SSDs that interests us right now. To write data to a cell, the drive’s controller must first erase any existing data in that cell before writing can occur. Since the process of initializing the cell is quite slow, manufacturers have developed a range of algorithms to ensure the controller always has enough empty cells available for use.
What happens when an operating system tries to write data to a specific memory cell address, but that address already holds data? In this case, the SSD controller performs an instant address swap: the desired address is allocated to another empty cell, while the occupied block is either reassigned a different address or moved to an unaddressable pool for later background cleaning.
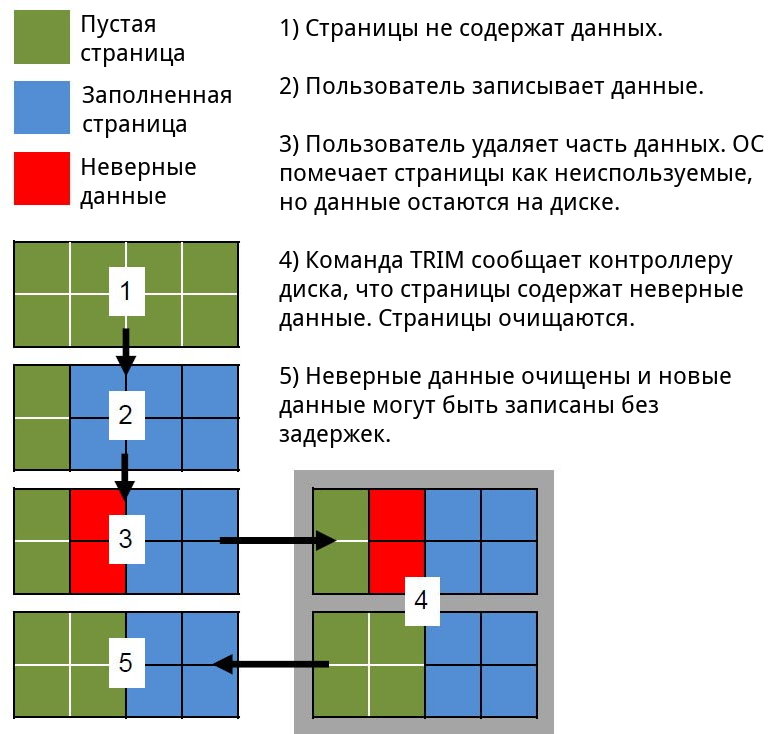
When using a disk in the usual way, a significantly larger amount of data is written to it than it can actually hold. Over time, the pool of free cells decreases, and eventually, the controller is left with only the “spare” capacity from unaddressable space. Manufacturers address this issue with a feature called Trim, which works in conjunction with the operating system. When a user deletes a file, formats a disk, or creates a new partition, the system informs the SSD controller that certain cells do not contain useful data and can be cleared.
Note: When the Trim command is executed, the operating system itself does not overwrite these blocks or erase the information. Instead, it provides the controller with a list of addresses of memory cells that no longer contain useful data. From that point on, the controller can begin a background process to delete data from these cells.
What happens if an SSD contains a large volume of information and the controller receives a Trim command for the entire disk? Subsequent actions do not depend on the user or the operating system: the controller’s algorithms will begin clearing unnecessary cells. But what if a user (or an attacker) tries to read data from cells that have already received the Trim command but have not yet been physically cleared?
This is where things get interesting. Modern SSDs offer three capabilities:
- Non-deterministic Trim: Indeterminate state. The controller may return actual data, zeros, or something else, and results may vary between attempts (SATA Word 169 bit 0).
- Deterministic Trim (DRAT): The controller consistently returns the same value (most commonly, but not necessarily zeros) for all cells after a Trim command (SATA Word 69 bit 14).
- Deterministic Read Zero after Trim (DZAT): Guaranteed return of zeros after a Trim command (SATA Word 69 bit 5).
You can determine the type of your SSD using the hdparm command.
$ sudo hdparm -I /dev/sda | grep -i trim
    * Data Set Management TRIM supported (limit 1 block)
    * Deterministic read data after TRIM
First-type SSDs are now almost never seen (although eMMC standards still exhibit similar behavior). Typically, manufacturers offer second-type drives for general use, while SSDs with DZAT support are intended for use in multi-drive arrays.
From a practical standpoint, this means only one thing: immediately after data is deleted—whether by file deletion, reformatting, or repartitioning—the information becomes unreadable both on the computer and on specialized recovery equipment.
It might seem straightforward, right? But there are some major pitfalls, and more than just one.
First off, are you sure Trim is functioning correctly on your system? Trim support is built into the operating system starting from Windows 7, but only under certain conditions. All conditions, in fact! First, the drive must be directly connected via SATA or NVMe; Trim is not supported for most external USB drives (though there are exceptions). Secondly, Windows only supports Trim for NTFS volumes. Finally, Trim must be supported by both the drivers and the computer’s BIOS. You can check if Trim is working in Windows using the command
$ fsutil behavior query DisableDeleteNotify
Result:
-
0— Trim is enabled and functioning correctly; -
1— Trim is inactive.
Please note: For USB drives (external SSDs), Trim is likely to be inactive, even though it might be supported at the controller level built into the drive.
Another point to consider is that it’s impossible to stop the background garbage collection process on an SSD. As long as the drive is powered, the controller will keep erasing data after a Trim command, regardless of anything else. However, by physically removing the memory chips from the SSD, it is possible to recover the data using a simple setup. Although researchers will face significant challenges due to the physical fragmentation of cells caused by block reallocation and, additionally, the logical fragmentation of data, this issue can still be resolved.
This brings us to the final point. A notable portion of the drive’s capacity (in some models, up to 10%) is allocated to a reserved, non-addressable pool. In theory, the cells in this pool should be cleared; however, in practice, due to various implementation quirks and firmware bugs, this doesn’t always work as intended. As a result, data can physically remain even after the clearing process is supposed to be completed.
Here’s the situation with data deletion from SSDs.
- You can instantly erase data from an internal SSD by simply reformatting the partition (use NTFS as the new file system). Trim will mark the blocks as unused, and the controller will gradually delete the information from those cells.
- If everything is done correctly, accessing the information through non-destructive methods will be impossible. Furthermore, if a malicious actor connects the drive to another computer or specialized equipment, the SSD controller will continue systematically erasing the cells.
- However, if the chips are removed from the SSD, it may be possible to read any remaining data. Moreover, even if the cleaning process seems complete, there may still be cells in the non-addressable spare pool containing “deleted” data.
How can you completely and securely erase the contents of an SSD? Unfortunately, these are two different questions. You can fully erase an SSD’s contents with the well-known ATA Secure Erase command, which can be executed using hdparm. However, ensuring it’s done “securely” is a matter of trusting that the Secure Erase functionality is correctly implemented by the drive’s controller developers. In practice, Secure Erase sometimes fails to fully wipe cells from the spare pool due to firmware errors. The only way to assure complete security is through the use of an encrypted container: once the cryptographic key is removed, decrypting any remaining data becomes nearly impossible. Nonetheless, this too has drawbacks, such as concerns over stored keys. Organizations handling classified information often don’t accept any SSD erasure methods other than physically destroying the drive.
Conclusion
Permanently deleting data is not an easy task, and doing it quickly is even more challenging. While it’s possible to completely wipe a magnetic hard drive if you have the time, the situation is much more complex with SSDs. We hope this article will help you find the best strategy for securely erasing your information.
