
The latest Nexus devices are normally the first to receive the newest Android versions. When a new firmware version is ready for release to general public, its full image is located at developers.google.com/android/nexus/images. Shortly after that, firmware starts to be distributed over the air. According to one of Google developers, Dan Morrill, (goo.gl/L85mSS), the first few OTA updates are sent to 1 % of devices. It happens at random, regardless of the location or point of sale of a phone/tablet. During this time, bugs are identified allowing the updating process to be put on hold if any critical errors are registered with a large number of users.
After that over a couple of weeks, updating is provided to 25, 50, 100 % of users, i.e. at the initial stage only one device out of a hundred stands a chance of getting an upgrade. If the update is not received, the device drops from the list, and subsequent repeated clicking on the button ‘check for updates’ automatically sends the device to the bottom of the list. When a new stage of distribution starts, clicking on the button get a 25 % chance of receiving the update. Since the device checks for updates on its own once a day (upon reboot), clicking on the button might ‘jump the gun’ before it may run its course. But whatever the outcome, only one check will be made. Subsequent clicking will not help matters. This is not a situation where ‘first press, first receive’ (first come first serve). In any case, the over the air update will be available to everyone within a couple of weeks. The most impatient user could update their devices manually (some more details on that aspect are given below).
Force-marching the update
The updating process can be accelerated in two ways. The first one – clean data from the Google Services Framework and then reboot the device. This method is the one to be avoided [frown upon even by Google engineers] (goo.gl/ugSshF). It causes many negative effects, the worst one being is the change of GCM identity (Google Cloud Messenger). This identifier is required in all Google and many other applications using the push notification feature. And while in some programs those effects can be remedied fairly easily, while in many others implications may be far more serious. All applications will just be unavailable for GCM-based push notifications until they have been provided with a new identifier. Some applications performs checks often, some don’t. For some applications data cleaning will help. And worst affected can be those applications that use GCM ID as an identifier on their servers.
The second is manual updating through the recovery console. Shortly after the launch of OTA files like hash.signed-hammerhead-LRX21O-from-KTU84P.c1a33561.zip appear in profiles at XDA and 4PDA with the file names featuring file hash, device brand and firmware versions involved in updating (original and updated ones). In their computers, the user has to keep a folder containing ADB and fastboot utility apps. I, for one, use the latest versions of Android SDK. The archive set the OTA-update should be placed in the same folder. Also, the user should have available properly installed drivers for devices that may conflict with previously installed drivers for other devices.
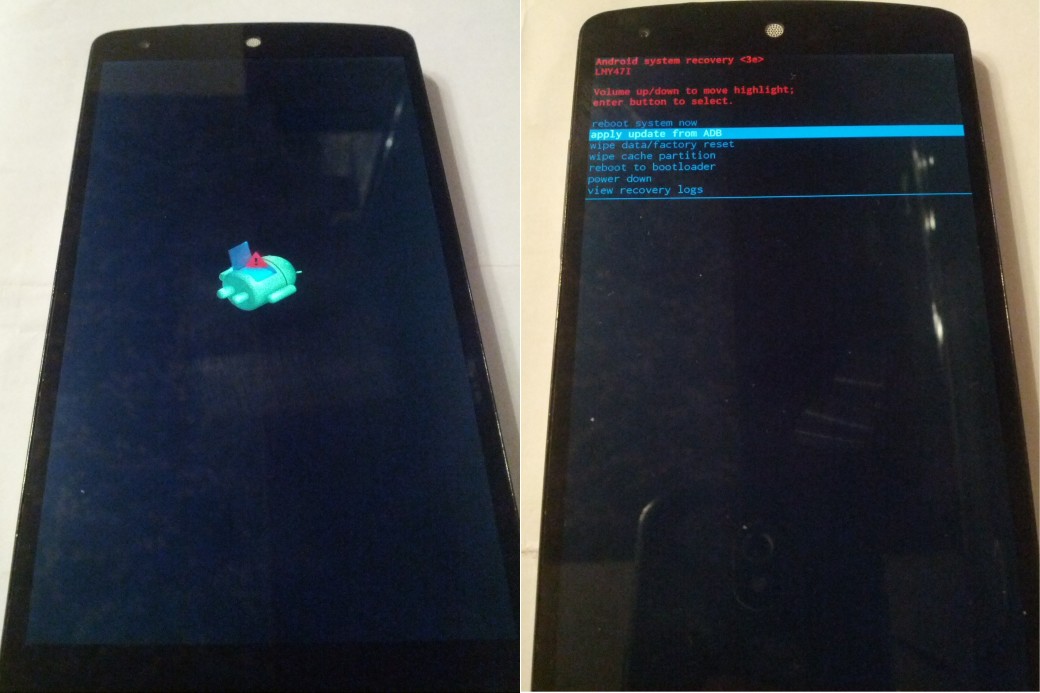
The device itself should be put in the recovery mode (recovery). To do that, you press the < Power + VolDown > buttons together on your deactivated device and get access into the boot loader selecting the Recovery mode with the volume button and get into it with the Power button. The Inactive Android sign followed by the exclamation mark will show up. Don’t be afraid, it is not a bug. Short-push < Power + VolUp > on the screen to download stock recovery. There you should select the ‘apply update from ADB’ on the menu list using the Volume buttons and validate using the Power button. Next, you hook up your phone/tablet with the computer. Let’s start the console, move over to the folder with ADB and the update archive and enter the following command (for the file above):
$ adb sideload hash.signed-hammerhead-LRX21O-from-KTU84P.c1a33561.zipThis will cause OTA to be installed on your phone and get it restarted.
[panel]
How to download the update over the mobile network
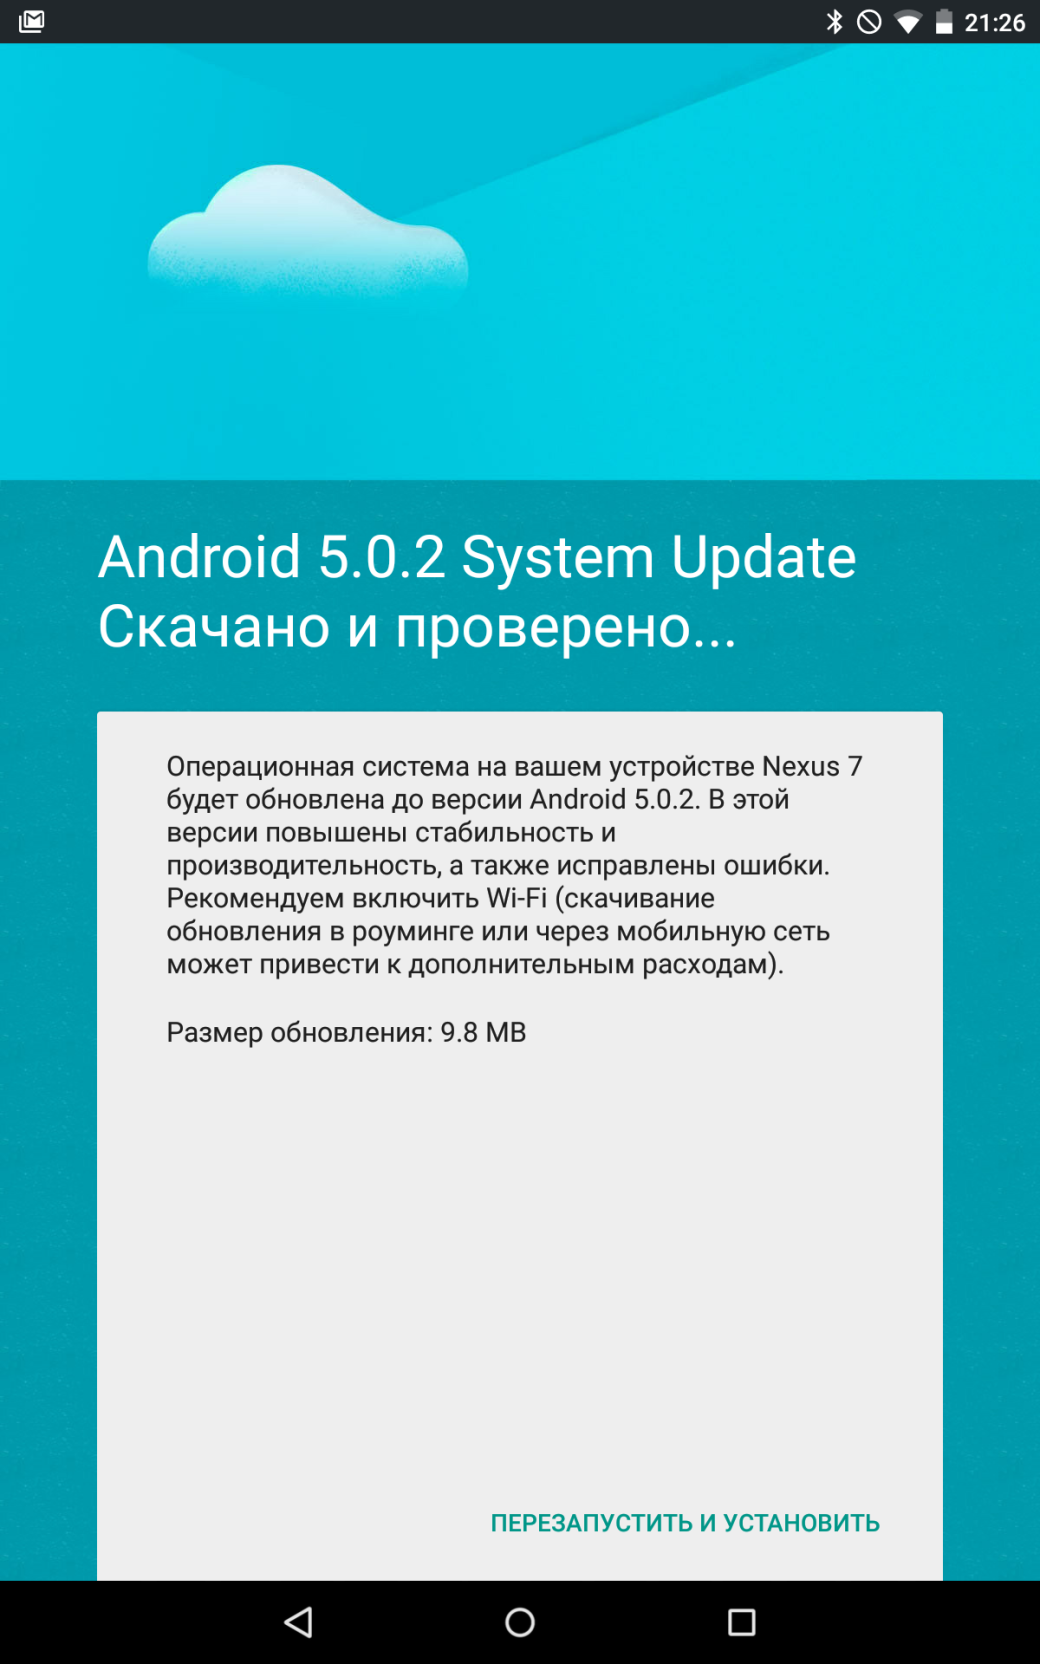
Update notification can arrive when your device is not connected to Wi-Fi. In this case, the mark will appear that the file is available for download via Wi-Fi for a specified period (about a week), while the “Download” button itself will be disabled. It is all done to save the user’s money. If you are not going to connect to Wi-Fi in the near future, then you can deceive you handset by downloading the update via 3G/4G, putting back the date in your gadget in relation to the date indicated in the notification and restarting the device.
[/panel]
Modified firmware
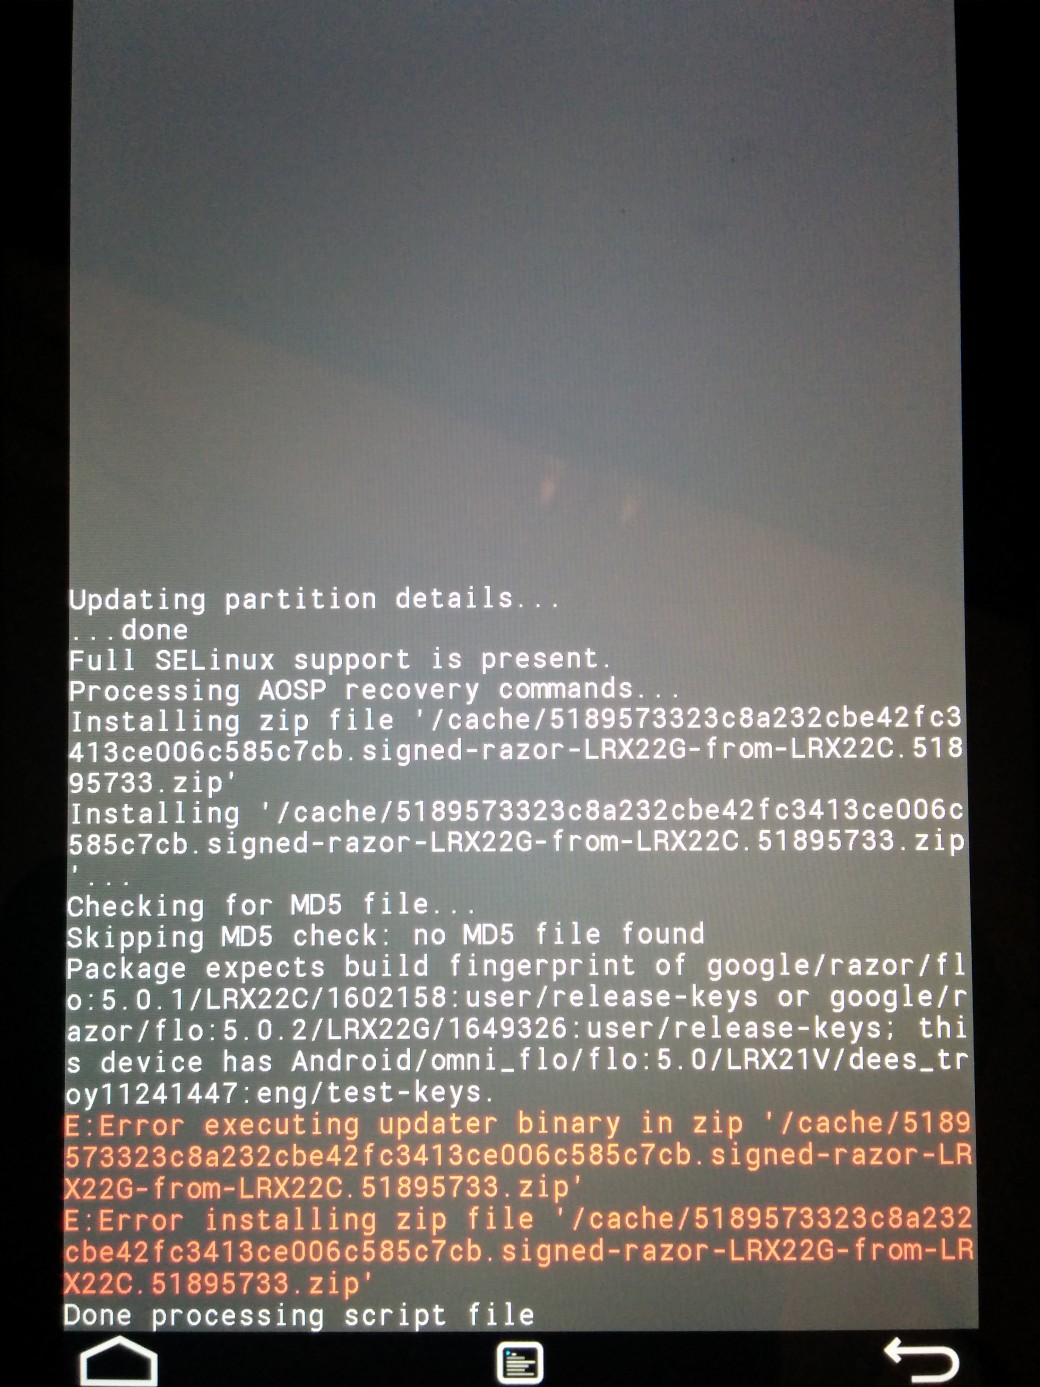
If your boot loader is unlocked, you have customized recovery and root that actively uses various applications and various modifications have been made, then the likelihood of you failing get an update is 99 %. Even upon return of stock recovery, the Status 7 error will be flashed if the firmware is upgraded via ADB. Customized recovery will also signal an error rejecting modified files. This problem can be resolved by recovering the factory firmware in your Smartphone, but it is not our method. Let’s deal with it by picking at the update file, pinpointing and removing the stumbling block, using the largest Nexus 5 update from version 4.4.4 (KTU84P) to 5.0 (LRX21O) as an example.
Operation procedures
So, the update from 4.4.4 to 5.0 was the largest one with the archive weight reaching 491 MB. Nearly the entire code had been modified while Dalvik was replaced with ART. So what does the archive contain? As you can see in the ‘Archive Files updated to 5.0’ screen shot, the archive contains boot loader images (various sections) and META-INF directory, patch and system catalogs.
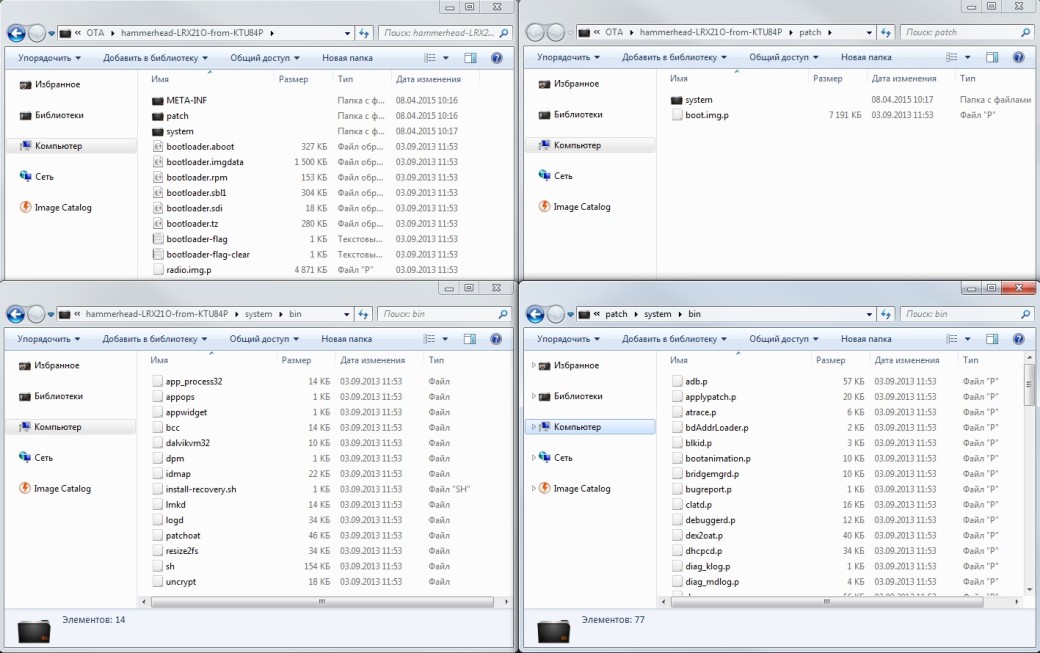
In order to minimize the amount of traffic and reduce the load on servers, as well as to cut the end-user costs the update is designed in such a fashion that files with massive changes or written from scratch are located in the system catalog and changed from the ground up. While files with a low percentage of changes by Google’s standards, rather than replaced, are patched, i.e. only parts of the code inside the file are modified. These files are located in the patch catalog and have r extension. This is clearly visible when you compare files in/system/bin and/patch/system/bin. In this case, the patch is created by bsdiff well known to UNIX geeks, allowing two binaries to be converted to delta (a file with a difference between files).
The magic is initiated by the updater script located in/META-INF/com/google/android. We’ll get a detailed view of it. The file weighs 463 Kb and contains code lines responsible for the OTA updating process (as a matter of fact, it is the scripting language Edify who interpreter is located in the same catalog and is named ‘update-binary’. – Editor’s note.). In our case, it has the following content. First, we install the section/system (fairly standard line for Linux, similar to those located in /etc/fstab):
mount("ext4", "EMMC", "/dev/block/platform/msm_sdcc.1/by-name/system", "/system", "max_batch_time=0,commit=1,data=ordered,barrier=1,errors=panic,nodelalloc");Next, the script checks the device model and firmware version using the system variable ro.build.fingerprint read (please note that it does not take it from the file/system/build.prop file, and requests ‘recovery’ itself, therefore updates cannot be made through a customized recovery console, although it was possible to prior to 5.0). Here and further on ellipsis denote abbreviated lines:
getprop("ro.build.fingerprint") == "google/hammerhead/hammerhead:4.4.4/KTU84P/1227136:user/release-keys" ||
getprop("ro.build.fingerprint") ==  "google/hammerhead/hammerhead:5.0/LRX21O/1570415:user/release-keys" ||
abort("Package expects build fingerprint of google/hammerhead/hammerhead:4.4.4 ...");
getprop("ro.product.device") == "hammerhead" || abort("This package is for \"hammerhead\" devices ...");
As you can see above, the update will not be successfully installed onto a non-proprietary device, but it can be reloaded onto version 5.0. The script checks to see whether the firmware is authenticated by Google’s official keys (release-keys). This is what causes many users troubles. Next, we start checking for the availability and integrity of individual files using SHA-1 hash verification. For this purpose we need two features: sha1_check() that accepts the file name and hash as arguments and apply_patch_check() that accepts three arguments: file name and two hashes. The first one is simply used to verify file integrity, while the second one checks if the file is already patched. For simplicity’s sake, coded long hashes below have been replaced with ellipses:
sha1_check(read_file ("system/app/Drive/Drive.apk"), ...) ||
apply_patch_check("/system/app/Drive.apk", ...) || abort("\"/system/app/Drive.apk\" has unexpected contents.");
sha1_check(read_file("system/app/Drive/lib/arm/libdocsimageutils.so"), ...) ||
apply_patch_check("/system/lib/libdocsimageutils.so", ...) || abort ("\"/system/lib/libdocsimageutils.so\" has unexpected contents.");
Only two checks have been illustrated by way of example. In reality all files to be replaced or patched-change are checked. The code shows that the update will produce an error if, for example, the file/system/app/Drive.apk has been modified or extracted. Toward the end of the check, the script examines the kernel and available space in/system and radio:
[xakepcut]
apply_patch_check("EMMC:/dev/block/platform/msm_sdcc.1/by-name/boot:8908800:...") || abort("...");
apply_patch_space(23999236) || abort("Not enough free space on /system to apply patches.");
apply_patch_check("EMMC:/dev/block/platform/msm_sdcc.1/by-name/modem:46499328:...") || abort("...");
It means that it won’t be successfully installed if there is a custom kernel or a modified radio. The next step includes removal of old files from the device to be replaced with new ones and deletion of files that are redundant on the new firmware
delete("/system/app/BasicDreams/", "/system/app/BasicDreams/arm/", ...);Next, all required files are patched together with a preliminary check of SHA-1 hash. The patching process is performed by apply_patch() that accepts names of filed to be patched and several hash types: original hash, patch hash and result hash. The last argument is patch file name. As above, all hashes in the code are abbreviated to ellipses:
sha1_check(read_file("system/app/Drive/Drive.apk"), ...) ||
apply_patch("/system/app/Drive.apk", "-", ..., package_extract_file("patch/system/app/Drive.apk.p"));
Kernel and RAM-disk are the last items to be patched:
apply_patch("EMMC:/dev/block/platform/msm_sdcc.1/by-name/boot:..., package_extract_file("patch/boot.img.p"));The next unit transfers to the device those files that are not to be patched and are to be replaced entirely. Some of them will be subsequently relocated:
package_extract_dir("system", "/system");
rename("system/app/KoreanIME.apk", "system/app/KoreanIME/KoreanIME.apk");
rename("system/framework/wm.odex", "system/framework/arm/wm.odex");
...
Redundant files are removed and symbol links, access rights, and flags are placed (here it is rights of access and flags that are substituted for ellipses):
delete("/system/etc/firmware/wcd9320/wcd9320_mbhc.bin", ...);
symlink("/data/misc/audio/mbhc.bin", "/system/etc/firmware/wcd9320/wcd9320_mbhc.bin");
symlink("/data/misc/audio/wcd9320_anc.bin", "/system/etc/firmware/wcd9320/wcd9320_anc.bin");
...
set_metadata_recursive("/system/bin", ...);
set_metadata("/system/bin/app_process32", ...);
Boot loader and associated sections are upgraded:
package_extract_file("bootloader-flag.txt", "/dev/block/platform/msm_sdcc.1/by-name/misc");
package_extract_file("bootloader.aboot.img", "/dev/block/platform/msm_sdcc.1/by-name/aboot");
package_extract_file("bootloader.rpm.img", "/dev/block/platform/msm_sdcc.1/by-name/rpm");
...
Radio /modem are patched:
apply_patch("EMMC:/dev/block/platform/msm_sdcc.1/by-name/modem:..., package_extract_file("radio.img.p")); The last thing to be replaced is build.prop where the new firmware version is written. It is done in this way so that when an error occurs at the very last stage, when nearly all files are moved, the upgrading process could interrupted saving the number of the current firmware version in the device file. At that point, you can restart by clicking ‘check for update’.
apply_patch("/system/build.prop", "-", ..., package_extract_file("patch/system/build.prop.p"));
set_metadata("/system/build.prop", ...);
At the end of the script, the section/system is re-installed, initiating a check of update application and verification of SHA-1 hash in new files and /system is dismantled:
unmount("/system");
mount("ext4", "EMMC", "/dev/block/platform/msm_sdcc.1/by-name/system", "/system", "");
assert(sha1_check(read_file("/system/app/CalendarGooglePrebuilt/CalendarGooglePrebuilt.apk"), ...));
assert(sha1_check(read_file("/system/app/CaptivePortalLogin/CaptivePortalLogin.apk"), ...));
...
unmount("/system");
After that, the device is reloaded into a new system.

[panel]
Custom-made recovery
Until recently, in most cases it was possible to link the OTA-update archive (unless recovery had not been checked for replacement) from custom-made recovery, just by entering the file onto the device and selecting ‘install zip’. But starting from the script to update to 5.0, the script has changed. The previous versions used to check the file /system/build.prop:
file_getprop("/system/build.prop", "ro.build.fingerprint") Rather than the file, current scripts directly check the value of the system variable by requesting it from recovery:
getprop("ro.build.fingerprint")And if you expand custom-made recovery (as applicable to TWRP version 2.8.0.0), you will see the following lines:
ro.build.description=omni_hammerhead-eng 4.4.4 KTU84P eng.dees_troy.20140910.125240 test-keys
ro.build.fingerprint=Android/omni_hammerhead/hammerhead:4.4.4/KTU84P/eng.dees_troy.20140910.125240:eng/test-keys
Version TWRP 2.8.6.1 has the following lines in the code (please note the word omni in the second row, the TWRP developer nick-named Dees Troy and also one of the active developers of OmniROM)
ro.build.id=LRX22G
ro.build.display.id=omni_hammerhead-eng 5.0.2 LRX22G eng.dees_troy.20150403.145211 test-keys
ro.build.version.incremental=eng.dees_troy.20150403.145211
While the latest versions of CWM Touch and Philz written as follows:
ro.build.description=hammerhead-user 4.4 KRT16M 893803 release-keys
ro.build.fingerprint=google/hammerhead/hammerhead:4.4/KRT16M/893803:user/release-keys
It is those values that are returned by the validation script, interrupting the update at the very early stage and issuing an error showing the mismatch of the Android version on the device.
[/panel]
Updates 4.4.3-4.4.4
For comparative purposes, previous version updates of KTU84M to KTU84P can be provided. This update is small-size weighing as little 2.5 Mb. The update is primarily focused on improving security. If you open the archive, you will see that that only a small amount of system and radio files are patched and the script only checks them. This updated was normally installed with root, custom kernel and running Xposed Framework, as all that stuff is not checked for changes.
Updates for Nexus 6 and Nexus 9
The latest Google devices have a fundamentally different script structure. For these and (likely) future devices from Nexus Google added a unit-by-unit update to the OTA update assembly script. Rather than individual files, this update checks and updates units blocks in the file system/system. Further on in example ’66,…,524256′ – these are long lists of unit addresses:
if range_sha1("/dev/block/platform/msm_sdcc.1/by-name/system", "66,...,524256") == "..." then
block_image_update("/dev/block/platform/msm_sdcc.1/by-name/system", package_extract_file("system.transfer.list"), "system.new.dat", "system.patch.dat");
This allowed Google engineers significantly simplify and speed up the OTA-update application for end devices and now the updater script weighs only 5 Kb. However, it has proved to be a headache for advanced users. At present, any changes to the system section will result in failure, including the presence of redundant files. Even the installation of the system as R/W will result in changing the hash in the superblock FS.
Conclusion
Summarizing the article, you can draw the following conclusions:
- The super-user’s privileges have no impact on the success of an update. What does have an impact are changes made by users and applications that have these rights. These changes cannot be frequently tracked and reversed.
- Whether root and changes made to the system could have an effect upon the success of an update every time depends on what is specifically changed in the system and what files are checked by the script. If the system has been changed or frozen/redundant system applications have been disabled through Titanium Backup kernel, custom recovery has been installed, Xposed Framework, Lucky Patcher, freedom, franco. Kernel updater, fashion statements for phones and all kinds of sound improvements and other boot animations, system fonts, and so on. All those things can influence the update.
- If you modify the system always leave the original files for backup provided that you plan to update via OTA. Copy them back to the cloud and rename in any way you like. You can make a Nandroid-backup of the section/system (read in the previous issue about Nandroid).
- If you remember what exactly you changed in the system, you can roll back nearly any time. Recovery always writes an error highlighted by an update. Having searched on Google the file name in the error you can sometime find which application is to be used to replace it. For example, /system/bin/thermal-engine-hh – /system/lib/power.msm8974.so replaces franco.Kernel updater and does not get it back even with firmware etched into the stock kernel and the application itself de-installed.
- For successful OTA application it is necessary to get back original files into the system. The most reliable way is to link the firmware to system.img, stock kernel and recovery before the application of the update (data and applications will not be lost).
- Well, here is the bottom line. If you are root and a lot of modifications, spare yourself any trouble and make at once a complete image of the new firmware, removing the key-w in flash-all.bat to save the data. Starting from the update to version 5.0, there remains a very slight possibility of tricking the script. Well and the next update might have a ‘block’ structure requiring only full stock for application.
[panel]
A couple of the Editor’s remarks
Until recently, OTA updates in custom-made firmware (CyanogenMod, Paranoid) has always been made in the form of a zip with a full firmware version and it didn’t matter at all what changes had been made to the system before. Firmware has always been installed anew (while, of course, preserving user data and gapps). However CyanogenMod 11 introduced an Incremental Update feature which is a way simpler than the one used by Google. The update simply checks the integrity of firmware and replaces those files that was changed from the last version (normally, of nightly build) without any patches. And if you happen to miss one of updates, the following one will be traditionally available to you a full format. Simple and easy
A more exciting method is used in OmniROM. For an update it makes use of binary patches, but in the way done by Google. The first OTA update is always downloaded in full, after which it is stored on the memory card, stitched and not deleted from the card. The first OTA update is always downloaded in full, after which it is stored on the memory card, stitched and not deleted from the card. The following OTA-update comes as a binary patch, and after which the patch is superimposed on and linked to the update last saved on the memory card. The upside of this method is that the patch is not superimposed on the system, and the last update file and smartphone are linked together into firmware each time from the ground up (while retaining the data and settings). It is a nearly perfect method – saving traffic and any worries about conflicts with a modified system.

[/panel]