Let’s start with the fact that you’ll need Linux. On Windows, you can only unpack a firmware, but due to technical reasons, you won’t be able to reassemble it. Now about the firmware. These are typically distributed as ZIP archives that are flashed through custom recoveries. You’ll need one of these for experimenting. I recommend beginning your journey into ROM development with a custom firmware that is as close to AOSP as possible, because it’s often easier to understand than stock firmware.
You can find the necessary ZIP file on XDA Developers or 4PDA. However, keep in mind that you need firmware specifically for your device model — for instance, the Galaxy S7 has several variations for different markets, which are not always compatible with each other.
Firmware ZIP File Structure
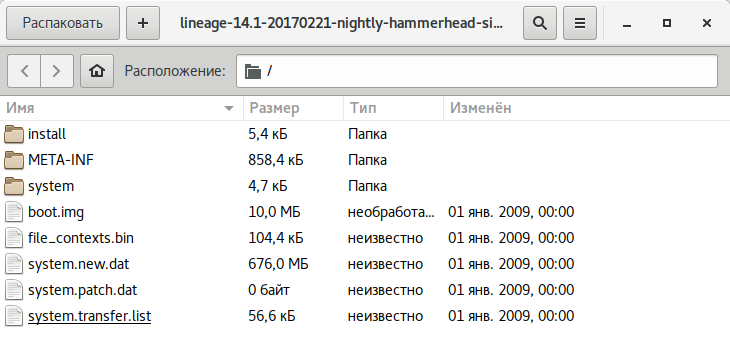
After downloading, extract the archive using any file archiver. Inside, you will find the following set of files and folders:
- META-INF — This folder contains metadata about the firmware, such as the author’s certificate, a manifest listing files and their checksums, an update script (updater-script), and an installer (update-binary) that executes the script commands for partition mounting, file copying, and other actions involving NAND memory.
- boot.img — An image containing the kernel and RAM disk, which is flashed into the boot partition.
- system.new.dat — Essentially the firmware itself, it is the image of the system partition containing the Android operating system minus the kernel.
- system.transfer.list — It holds the list of commands needed to block-copy the content of system.new.dat into the system partition during firmware installation.
- system.patch.dat — Used for OTA (Over-The-Air) updates to selectively apply changes to the firmware; if the firmware is “full,” this file will have a zero size.
Unpacking system.new.dat
The system. and system. files are of particular interest to us. Specifically, we’re interested in the system contained within them. However, accessing it is not that straightforward.
Script
For those who prefer a more straightforward approach, you can analyze the firmware using the System_Extractor-Linux script.
- Extract the firmware archive to any folder.
- Download the script from this link and extract it to any folder.
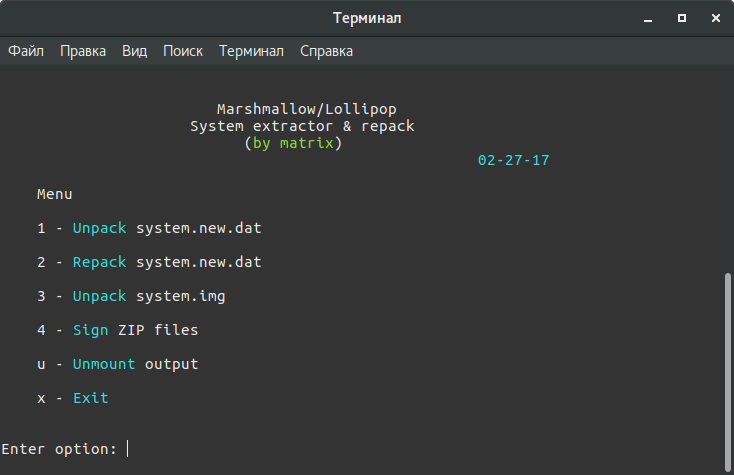
- Run the
extfile (if it complains about missing Java, just skip it by pressingy; Java is only needed for packaging). - Select the extraction option by pressing key 1, then hit Enter.
- A new folder named
extract_*will appear next to theextfile and thetoolsfolder. Copy the filessystem.andnew. dat system.into this folder.transfer. list - After copying the files, press Enter and wait. You’ll need to press Enter again, enter the administrator password, and press Enter one more time.
- Done. The system content is located in the
extract_*/folder.output
Manual Method
Extract the firmware archive into any folder (for example, into rom):
$ mkdir ~/rom
$ unzip path_to_archive -d ~/rom/
Download the necessary tools into this folder:
$ cd ~/rom
$ wget https://github.com/xpirt/sdat2img/raw/master/sdat2img.py
Running the script:
$ chmod +x sdat2img.py
$ ./sdat2img.py system.transfer.list system.new.dat system.img
It converts the system. file into a raw image named system.. Next, we mount the image to the subfolder mnt:
$ mkdir mnt
$ sudo mount -t ext4 -o loop system.img ~/rom/mnt
Android Directory Structure
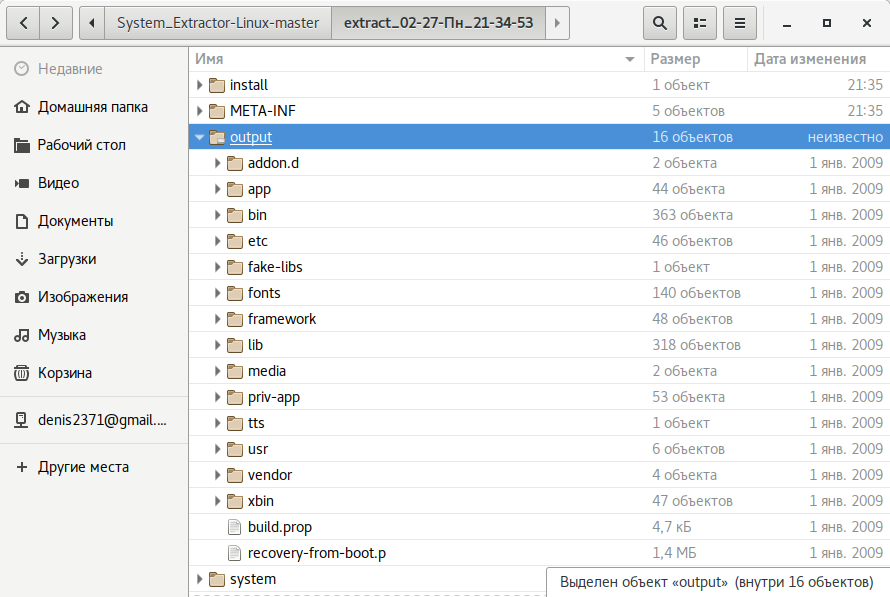
After unpacking the system, the following directory structure will appear:
- app — pre-installed applications with standard privileges.
- priv-app — pre-installed applications with elevated privileges, including certain system components.
-
bin — ELF format binary files, similar to
/andbin /directories in Linux. Contains various system components used by higher-level system components.usr/ bin -
etc — configuration files. It is equivalent to
/in Linux but used only by system components. Android applications store individual settings inetc /directories.data/ data/ - fonts — fonts. By default, contains only the proprietary Roboto fonts.
-
framework — Java class libraries used by the system and applications. Also contains the
framework-res.file, which includes the complete description of the operating system’s interface, including all graphical files.apk -
lib and lib64 — Linux libraries used by low-level system components. Equivalent to
/andlib /directories in Linux, including standard libraries like libc, libz, and libssl. The lib64 directory is absent on devices with ARMv7 architecture and below.usr/ lib - media — media files: ringtones, notification sounds, interface sounds, and OS boot animation.
- tts — files required by the text-to-speech engine.
-
usr — directory usually containing files necessary for the applications in the bin directory to function. Essentially equivalent to
/.usr/ share - vendor — files provided by the device manufacturer. Typically contains binary firmware for various hardware components, such as the Wi-Fi module.
- xbin — optional directory; custom ROMs use it to store items like the bash interpreter, SSH, PowerTOP, BusyBox, and other useful tools.
- build.prop — file containing build information and various low-level settings.
- addon.d — contains scripts that run after the installation of a ROM. GApps also place their script here to ensure they survive a ROM reinstallation.
Let’s begin making changes now that we’re familiar with the basic structure of Android.
Removing and Adding Applications
All pre-installed programs can be found in two folders:
- /system/app/;
- /system/priv-app/.
The primary difference between them lies in access privileges. Programs in the app directory have the same permissions as third-party apps (such as those installed from the Play Store), whereas applications in the priv-app directory can use privileged APIs.
To pre-install an app in the firmware, simply place its APK file in the / directory. While you could create a separate folder, in our case it’s unnecessary because the folder is primarily used for storing libraries and odex files, which we don’t have. To remove the app, just delete the folder containing it.
You can take things further by replacing the stock apps with alternatives. For example, to replace the calendar, delete the Calendar folder and copy your favorite com. to /. Alternatively, you can choose not to copy anything, and the firmware will simply not have a calendar.
The important thing to remember is that stock programs can be interconnected. Therefore, removing one app can potentially render another one completely non-functional (for example, CalendarProvider and Calendar: removing the former will disable not only the stock calendar but any other calendar as well). Fortunately, in pure AOSP firmware, there aren’t as many interdependencies.
Changing the Boot Animation
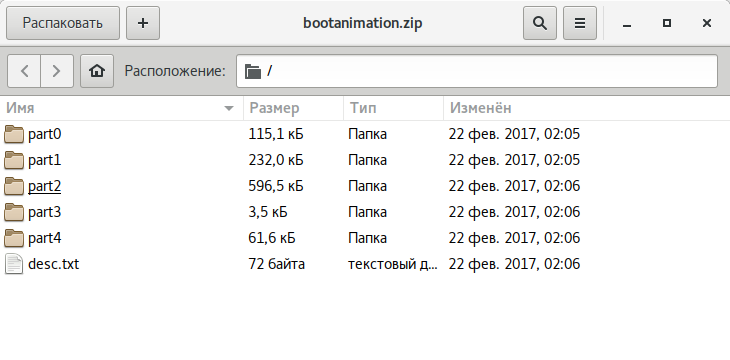
The animation is stored as PNG images packaged in the / archive without compression. Inside this archive, you’ll find:
- desc.txt — a file that describes the animation;
- part0 — a folder containing animation files that are played first;
- part1 — a folder with animation files that are played second;
- …
- part? — the final folder, containing images played at the end.
The file desc. might contain something like
1920 1080 60
p 1 0 part0
p 0 0 part1
The purpose of these lines is intuitive: 1920 × 1080 indicates the image resolution, and 60 refers to the number of frames per second. Part0 and part1 indicate the folders from which the animation will be played and the sequence in which it will be displayed. There can be just one part or several (three or more).
Images in the “part” folders are numbered sequentially with five digits like 00000., 00001., 00002., and so on. You can replace these images with your own to create a custom animation. Alternatively, you can delete the bootanimation. file, and the device will display the default Android animation. You can also use a pre-made collection of animations available on 4PDA.
Customizing System Sounds
All the sounds played by the system are stored in the / directory. Inside, you will find the following folders:
- alarms — alarm tones
- notifications — notification sounds
- ringtones — ringtones
- ui — system sounds, such as low battery alerts, camera focus, interface selection sounds
In the categories of alarms, notifications, and ringtones, you can add as many melodies as you like. You can find them, for example, here:
- Standard Melodies from Various Nokia Phones and Smartphones
- Famous Standard Ringtones
- A Collection of Various Ringtones
- Tunes from Different Phones
Here’s a little life hack: deleting files from the ui folder won’t cause crashes or errors; instead, it will result in the disappearance of system sounds. So, you can easily disable the camera shutter sound or the screenshot sound by removing the files that contain these sounds (their names are intuitively recognizable).
Adding Fonts
Fonts are stored in the fonts directory. You can find archives with font files on 4PDA and XDA. To install them, simply copy and replace the ttf files from the archive into the fonts folder.
Modifying System Settings (build.prop)
Within the system image, there is an interesting file named build., which contains a wealth of information about the device’s hardware and the default settings for various stock applications. However, it’s important to note that this isn’t always the case. For instance, in the Gigaset ME and ME Pro, the build. file is split into two sections. One section includes settings for the Gigaset ME, while for the ME Pro, some lines are duplicated but have different keys (like the smartphone’s name and so on). This approach ensures that the same firmware functions reasonably well across different devices.
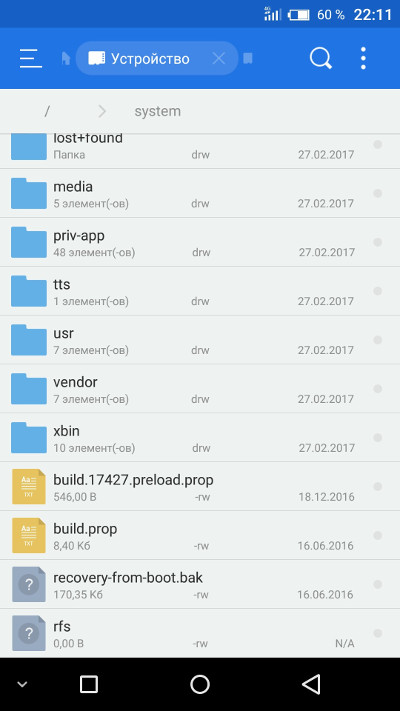
The build.prop file contains (or can contain) a vast number of settings. Some of them don’t change anything, others improve one aspect at the expense of another, but there are some that are genuinely useful:
- ro.product.model and ro.product.manufacturer — These denote the smartphone model and manufacturer name. By modifying these entries, you can trick the Play Store into thinking you have a different device, potentially unlocking access to a wider range of software. This can be particularly useful for less-known Chinese smartphone brands.
- hw.qemu.mainkeys — Accepts two values: 0 to show on-screen navigation keys, and 1 to hide them. If this line is absent, it defaults to 0 (show keys).
- debug.sf.nobootanimation — Setting this to 1 disables the boot animation, slightly speeding up startup. Setting it to 0 or removing the line re-enables the animation.
- ro.telephony.default_network — Instructs the system on which mobile network mode to switch to upon startup.
- ro.sf.lcd_density — Defines the DPI (dots per inch) of the display. The most accurate value can be calculated using this handy website. However, you can set this value higher or lower according to your preference: higher values make interface elements larger, while lower values make them smaller.
- ro.config.vc_call_vol_steps — Indicates the number of volume steps during a call (default is 8).
- ro.config.media_vol_steps — Indicates the number of volume steps for media (default is 15).
Integrating Google Apps into Firmware
Custom firmware is almost always provided without Google services and the app store. Developers usually suggest installing them separately using a GApps package. However, it’s possible to integrate it directly into the firmware.
To start, you need to download a GApps package. I recommend using the archives from Open GApps. You choose the Android version, processor architecture, and the package variant (Pico, Nano, Stock…), which determines how many different Google applications are included. I recommend downloading the Pico version. It only contains the Play Store and the essential libraries required for it to function.
Integration of GApps into the firmware is performed as follows:
- Unpack the GApps ZIP archive using any archive tool.
- Navigate to the Core folder.
- You’ll see multiple archives with the
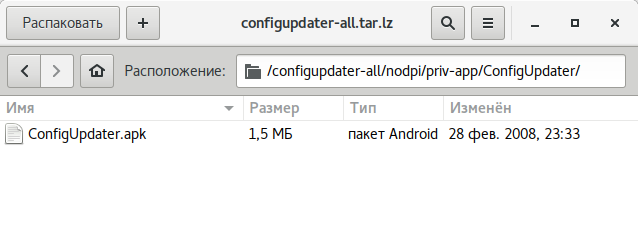
.extension; extract them using lzip.tar. lz - After extraction, copy the files from the folders into the corresponding directories within the system. The directory structure in the archive will guide you on where to place each file. For example, the configupdater (as shown in the screenshot) should be placed in the
priv-appfolder. - Go to the GApps folder (located next to Core) and repeat steps 3 and 4 for the files within it.
- That’s it, we have successfully integrated GApps into our firmware!
Available Space
It’s important to understand that there is limited space available for installing firmware. You cannot install firmware that exceeds the size of the device’s system partition. You can check its size using ADB:
$ adb shell df /system
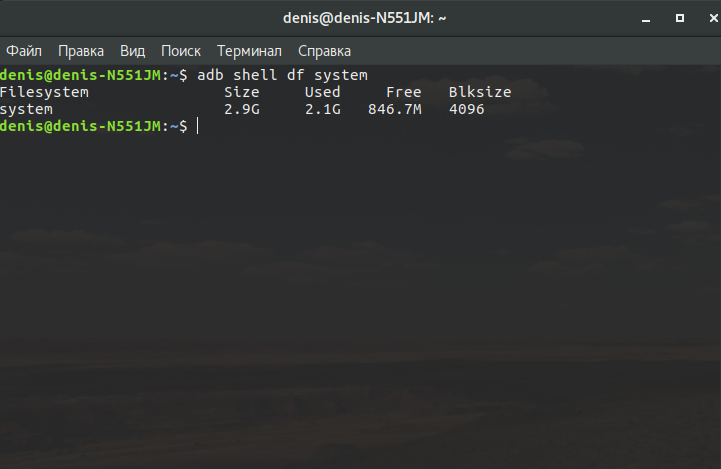
The second option is to install a terminal app on your device and enter the command.
$ df /system
You can find out the size of a partition in bytes by installing BusyBox on your smartphone and executing the following command in the terminal.
$ busybox df -B 1 /system
Alternatively, you can do the same using ADB:
$ adb shell busybox df -B 1 /system
The space occupied by the firmware is approximately equivalent to the size of the system when unpacked. Generally, when creating firmware, it’s essential to consider that users may also want to flash various modifications (such as SuperSU or Xposed) on top of it, or move applications into the system partition. For instance, the smallest Google app package (Pico) requires at least 150 MB of additional space for installation.
If necessary, the size of the firmware file can be reduced by removing not only unnecessary programs from / (/) and ringtones from system/ and bootanimation., but also:
- /system/tts/lang_pico — languages for the basic Pico TTS voice engine; this will not affect the Google voice engine.
- /system/usr/srec/config/ — offline languages. These can be downloaded online later if needed.
Assembly
After making the changes, we need to reassemble everything. First, we’ll pack the system partition into system.. Download the necessary tools:
$ wget https://github.com/xpirt/img2sdat/raw/master/img2sdat.py
$ wget https://github.com/xpirt/img2sdat/raw/master/blockimgdiff.py
$ wget https://github.com/xpirt/img2sdat/raw/master/common.py
$ wget https://github.com/xpirt/img2sdat/raw/master/rangelib.py
$ wget https://github.com/xpirt/img2sdat/raw/master/sparse_img.py
$ sudo apt-get install android-tools-fsutils
Convert the folder back into a RAW image. Let’s call it system_new.:
$ sudo make_ext4fs -T 0 -S file_contexts -l 1073741824 -a system system_new.img output/
Change 1073741824 to the size of the system partition in bytes. It’s advisable to make it slightly smaller. Convert the RAW image into a sparse image:
$ img2simg system_new.img system_snew.img
We convert our image into system. and system. files, which need to be placed in the firmware archive. But first, let’s delete the old files:
$ rm -rf system.transfer.list
$ rm -rf system.new.dat
$ rm -rf system.patch.dat
$ chmod +x img2sdat.py
$ ./img2sdat.py system_snew.img
Separate the firmware files from unnecessary clutter (files that were downloaded during the process). To do this, it’s convenient to use an archive with the firmware. Once you’ve removed the extraneous files, you need to compress the firmware into a ZIP archive using any archiving tool.
The final step is to sign the archive. This can be done directly on Android using ZipSigner, or on a PC (Java must be installed).
$ wget https://github.com/appium/sign/raw/master/dist/sign.jar
$ java -jar file.zip
Potential Pitfalls
When assembling system., you might encounter several issues due to the constant changes in the mechanisms of Android firmware creation. The method described above should work well for firmware based on Android 5.1. However, with newer versions, complications may arise, and you might need to use different versions of build tools. Unfortunately, we can’t cover all the nuances of the build process, so you might need to do some online research.
Installation
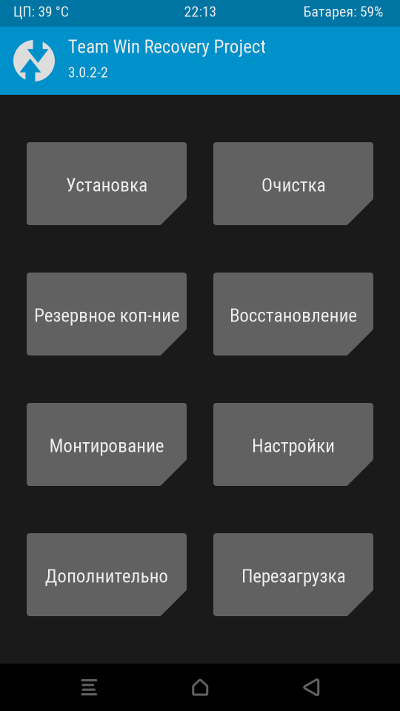
To install a custom firmware, you’ll need the TWRP custom recovery, which allows the installation of unsigned or test key-signed firmware (like the one we created). We have detailed the installation process multiple times, and forums dedicated to your device usually contain sufficient information to help you accomplish this.
Conclusions
This article touches only the tip of the massive iceberg known as “firmware modification.” “Serious” firmware not only enhances the core and firmware with stock applications by adding numerous features (often extracted from other kernels and firmware), organizing, or even changing the principles of their interaction, but can also significantly alter the operating system’s functionality. Such a modification can practically become a distinct operating system, even if you manage to install Play services on it (which, by the way, is not encouraged by Google). And let’s not forget: all manufacturer interfaces—like TouchWiz, ZenUI, HTC Sense, and so on—are essentially custom skins, closely tied to the device hardware and each other.