Saying we hit the jackpot would be an understatement. Let’s dive deep into the tool!
Farewell VK, hello Firebase
In my previous articles, I looked at the VK API as a free backend for mobile apps. It has a number of advantages. Hosting is unlimited, it supports many content types, and even a school student can manage it once you explain the app’s content structure…
But one flaw is fatal—the server is inflexible. You can’t edit a wall post after some time, and there’s no way to push an update notification to the app. You have to fetch the entire wall every time and track all changes by exhaustively iterating through posts. Serious projects don’t work like that—enough is enough! ©
Fortunately, Google acquired Firebase and opened it up for anyone to use.
A closer look at what’s inside
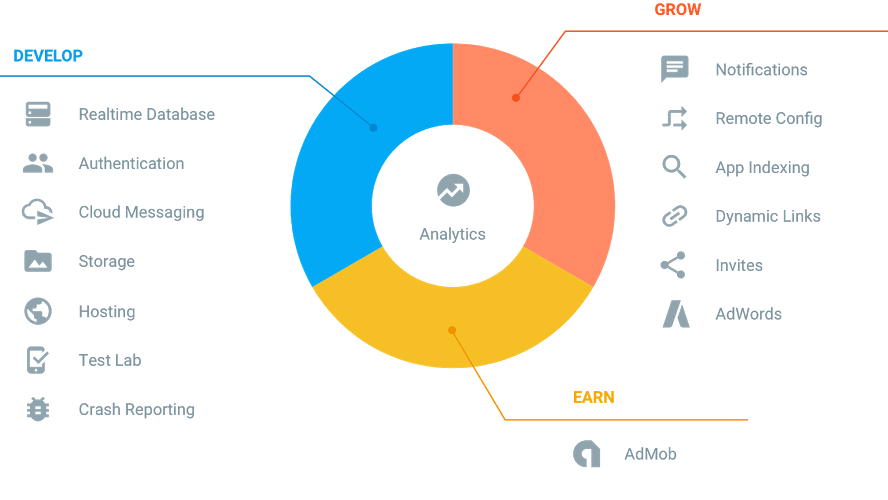
We have the following at our disposal:
- Analytics — app analytics: audience size, user info, in‑app events, and more.
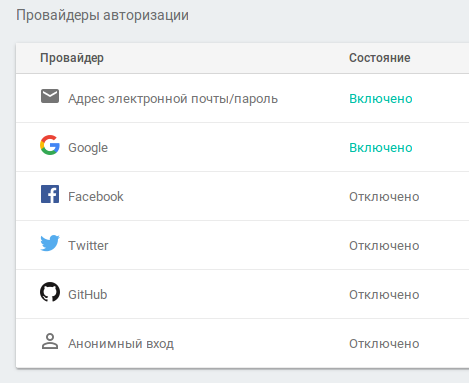
- Authentication — users can link their accounts to the app, and we can associate any data with those accounts. Out of the box it supports Google, Facebook, Twitter (X), GitHub, anonymous sign‑in, and email‑password registration. The only thing missing is VK (VKontakte) login.
- Realtime Database — a true database with live, real-time updates.
- Storage — user file storage; easy to build personal vaults or enable file sharing.
- Hosting — instant deployment of web and mobile apps via a secure global content delivery network.
- Test Lab for Android — test your Android apps on a wide range of devices.
- App Indexing — connect website content to in‑app pages; you can also index app data and surface it in on‑device search results.
- Crash Reporting — collects crash data (early versions even caused crashes themselves, but that seems to be fixed).
- Notifications — push notifications, the successor to the old Google Cloud Messaging.
- Remote Config — change app behavior from your server by tweaking parameters.
- Dynamic Links — a handy way to pass context into the app (e.g., a user reads about aspirin on your site, goes to the store, installs the app, and the app opens directly to the aspirin page).
- AdMob — an ad network with many formats; a recognized leader in mobile ads. It has strong fill and active moderation.
What will we be charged for?
It’ll be fair to charge us if our business really takes off. Once we hit the free-tier limits, we’ll have the means to pay.
Available to us for free:
Realtime Database:
– 100 simultaneous connections
– 1 GB of storage
– 10 GB of data transfer per month
Storage:
- 5 GB of storage
- 1 GB/day of data transfer
- 20,000 upload operations per day
- 50,000 download operations per day
Hosting:
- 1 GB of storage
- 10 GB monthly bandwidth
- Custom domain hosting & SSL
Test Lab:
- Run up to 15 tests per day (10 on virtual and 5 on physical devices)
Learn more here.

In-App Authentication
To let users save app settings on the server, you need user accounts. Firebase makes this easy: you can create standard email-and-password accounts, just like on any website. You can also link Google, Facebook, Twitter, or GitHub accounts. In my apps, I use Firebase and Google accounts.
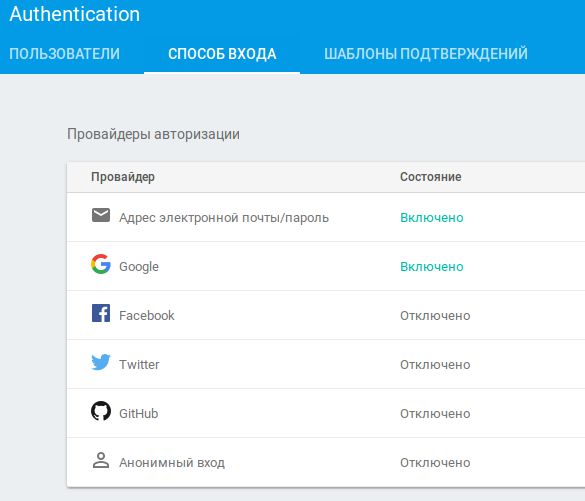
You can find a solid example project for inspiration here. And a clear walkthrough on implementing your own registration flow is described here.
To link a Google account to the app, I do the following: in the target Activity’s onCreate() method, I instantiate a GoogleApiClient, a FirebaseAuth instance, and a FirebaseAuth.AuthStateListener (authentication state listener).
// [START config_signin]
// Configure Google Sign In
GoogleSignInOptions gso = new GoogleSignInOptions.Builder(GoogleSignInOptions.DEFAULT_SIGN_IN)
    .requestIdToken(getString(R.string.default_web_client_id))
    .requestEmail()
    .build();
// [END config_signin]
mGoogleApiClient = new GoogleApiClient.Builder(this)
    .enableAutoManage(this /* FragmentActivity */, this /* OnConnectionFailedListener */)
    .addApi(Auth.GOOGLE_SIGN_IN_API, gso)
    .build();
// [START initialize_auth]
mAuth = FirebaseAuth.getInstance();
// [END initialize_auth]
// [START auth_state_listener]
mAuthListener = new FirebaseAuth.AuthStateListener() {
    @Override
    public void onAuthStateChanged(@NonNull FirebaseAuth firebaseAuth) {
        FirebaseUser user = firebaseAuth.getCurrentUser();
        if (user != null) {
            // User is signed in
            Log.d(TAG, "onAuthStateChanged:signed_in:" + user.getUid());
        } else {
            // User is signed out
            Log.d(TAG, "onAuthStateChanged:signed_out");
        }
        // [START_EXCLUDE]
        updateUI(user);
        // [END_EXCLUDE]
    }
};
// [END auth_state_listener]
To start the authentication process, we’ll use a simple method:
private void signIn() {
    Intent signInIntent = Auth.GoogleSignInApi.getSignInIntent(mGoogleApiClient);
    startActivityForResult(signInIntent, RC_SIGN_IN);
}
The activity we launch will prompt the user to choose a Google account from those stored on the device. After the selection, handle the result in the onActivityResult method:
@Override
public void onActivityResult(int requestCode, int resultCode, Intent data) {
    super.onActivityResult(requestCode, resultCode, data);
    // Result returned from launching the Intent from GoogleSignInApi.getSignInIntent(...);
    if (requestCode == RC_SIGN_IN) {
        GoogleSignInResult result = Auth.GoogleSignInApi.getSignInResultFromIntent(data);
        if (result.isSuccess()) {
            // Google Sign In was successful, authenticate with Firebase
            GoogleSignInAccount account = result.getSignInAccount();
            firebaseAuthWithGoogle(account);
        } else {
            // Google Sign In failed, update UI appropriately
            // [START_EXCLUDE]
            Toast.makeText(SettingsActivity.this, R.string.auth_failed,
            Toast.LENGTH_SHORT).show();
            flipCard();
            updateUI(null);
            // [END_EXCLUDE]
        }
    }
}
Once firebaseAuthWithGoogle completes, our mAuthListener authentication listener will be triggered.
private void firebaseAuthWithGoogle(GoogleSignInAccount acct) {
    Log.d(TAG, "firebaseAuthWithGoogle:" + acct.getId());
    // [START_EXCLUDE silent]
    showProgressDialog();
    // [END_EXCLUDE]
    AuthCredential credential = GoogleAuthProvider.getCredential(acct.getIdToken(), null);
    mAuth.signInWithCredential(credential)
        .addOnCompleteListener(this, new OnCompleteListener<AuthResult>() {
        @Override
        public void onComplete(@NonNull Task<AuthResult> task) {
            Log.d(TAG, "signInWithCredential:onComplete:" + task.isSuccessful());
            // If sign in fails, display a message to the user.
            // If sign in succeeds the auth state listener
            // will be notified and logic to handle the signed in
            // user can be handled in the listener.
            if (!task.isSuccessful()) {
                Log.w(TAG, "signInWithCredential", task.getException());
                Toast.makeText(SettingsActivity.this, R.string.auth_failed,
                Toast.LENGTH_SHORT).show();
            }
            // [START_EXCLUDE]
            hideProgressDialog();
            flipCard();
            // [END_EXCLUDE]
        }
    });
}
You can disconnect the app from the account using the revokeAccess( method; in its callback, update the app’s UI.
private void revokeAccess() {
    // Firebase sign out
    mAuth.signOut();
    if (mGoogleApiClient.isConnected())
        // Google revoke access
        Auth.GoogleSignInApi.revokeAccess(mGoogleApiClient).setResultCallback(new ResultCallback<Status>(){
            @Override
            public void onResult(@NonNull Status status) {
                updateUI(null);
            }
        });
}
User Data
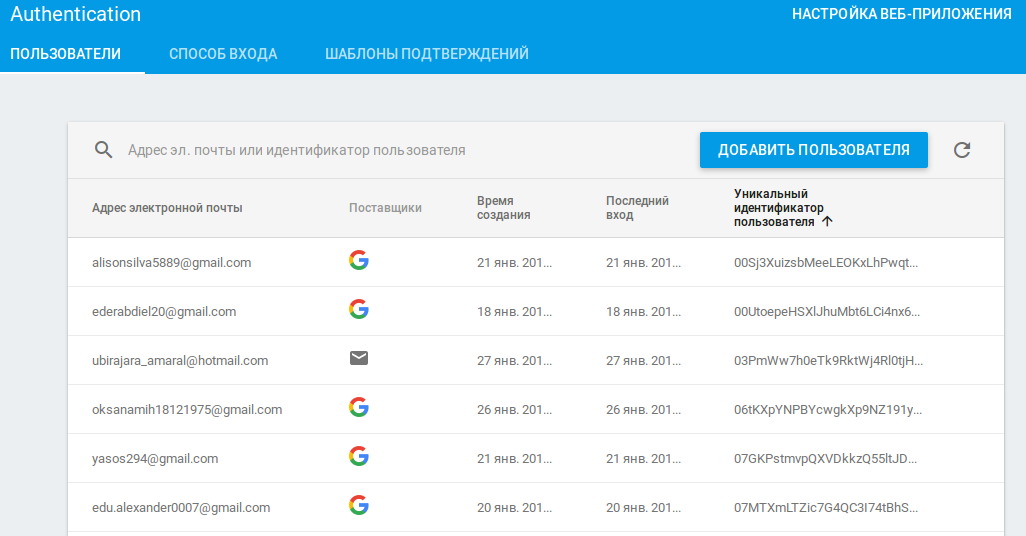
We retrieve information about the currently signed-in user from the FirebaseUser object:
-
getPhotoUrl(— returns null or a URL to the user’s profile photo;) -
getEmail(— the email address;) -
getUid(— the user’s unique ID in the system;) -
getDisplayName(— the user’s display name;) -
getProviderData().— tells you which provider the user authenticated with (check equals(“password”) for email/password).get( 1). getProviderId( )
With a link to a user’s avatar, you can fetch and display it in your app with a single line of code. There are plenty of third-party libraries for this: Glide, Fresco, Picasso. But if every kilobyte counts, you can use your own AsyncTask. Invoke the load like this:
ImageView iv_header = (ImageView) mDrawerHeader.findViewById(R.id.iv_header);
if (user.getPhotoUrl() != null) {
    String img = user.getPhotoUrl().toString();
    DownloadImageTask imgTask = new DownloadImageTask(iv_header);
    imgTask.execute(img);
}
DownloadImageTask downloads the image in the background and, on the UI thread, sets it into the target ImageView:`
public class DownloadImageTask extends AsyncTask<String, Void, Bitmap> {
    private ImageView ivImageView;
    private Context context;
    public DownloadImageTask(ImageView ivImageView) {
        this.ivImageView = ivImageView;
        this.context = ivImageView.getContext();
    }
    @Override
    protected Bitmap doInBackground(String... params) {
        String imageUrl = params[0];
        Bitmap resultImage = null;
        File f = new File(context.getCacheDir(), String.valueOf(imageUrl.hashCode()));
        if (f.exists()) {
            resultImage = BitmapFactory.decodeFile(f.getAbsolutePath());
            // Log.d("DownloadImageTask", "f.exists()");
        } else {
            try {
                URL url = new URL(imageUrl);
                HttpURLConnection ucon = (HttpURLConnection) url.openConnection();
                Bitmap image = BitmapFactory.decodeStream(ucon.getInputStream());
                FileOutputStream fos = new FileOutputStream(f);
                image.compress(Bitmap.CompressFormat.PNG, 100, fos);
                fos.close();
                fos.flush();
                resultImage = BitmapFactory.decodeFile(f.getAbsolutePath());
                // Log.d("DownloadImageTask", "file downloaded");
            } catch (Exception e) {
                Log.e("getImage", e.toString());
            }
        }
        return resultImage;
    }
    @Override
    protected void onPostExecute(Bitmap result) {
        super.onPostExecute(result);
        if (ivImageView != null) {
            ivImageView.setImageBitmap(result);
        }
    }
}
Working with the Realtime Database
You can read data from the Realtime Database without authenticating; access levels are governed by security rules. These rules are defined in a tree structure, and you can set distinct rules for each branch.
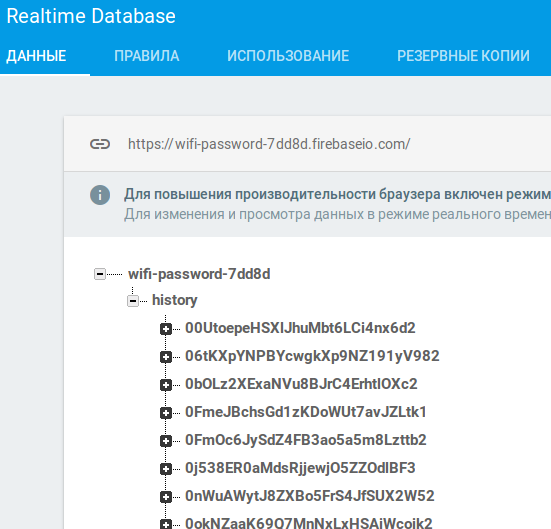
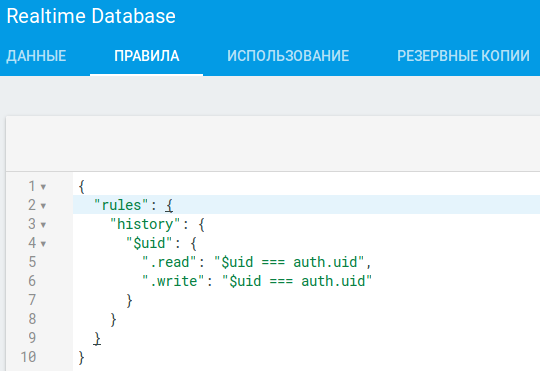
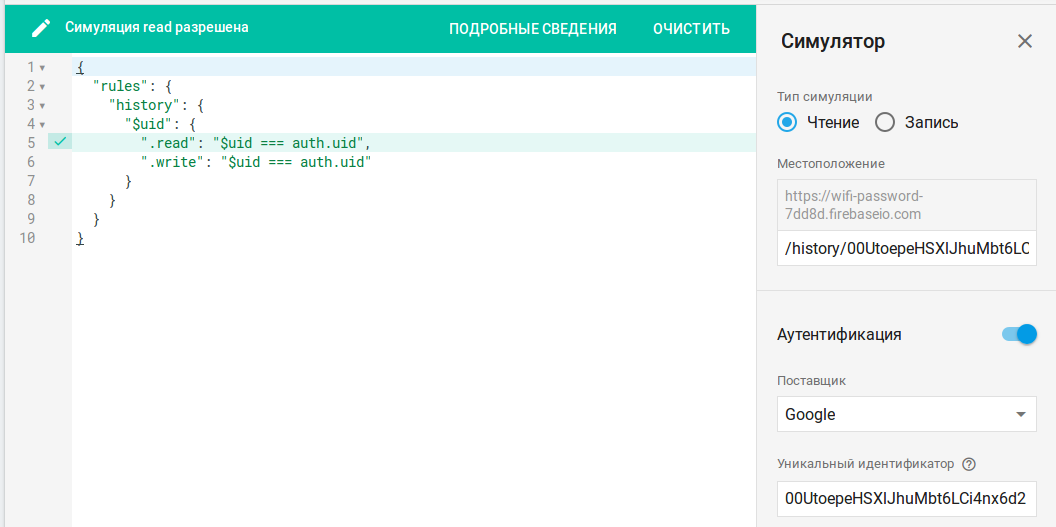
In my project, user settings are stored under the history branch. A user can read only their own branch, and only if they’re authenticated. There’s a simulator for testing the access-control rules.
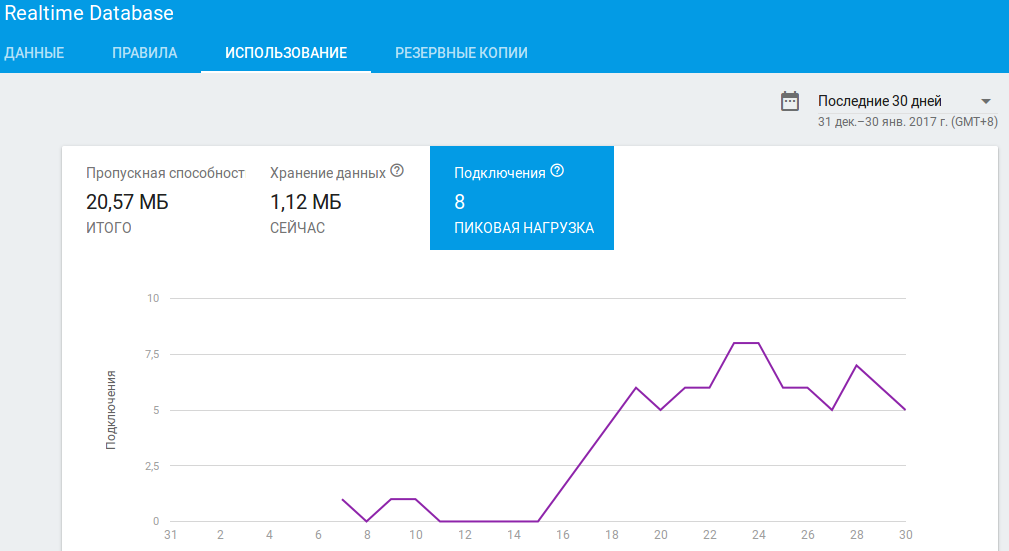
In the same section you can view load statistics; in my case, with 2,000 authenticated users, the peak load was eight concurrent connections (still a long way to go before hitting 100).
Backups aren’t included in our current plan, but as the business grows we’ll definitely add them and get everything configured.
Read and Write Data on Android
It’s worth noting that everything will work offline, and once the device connects to the network, all changes will be synced to the Firebase server. When you read the documentation page, you might have a few initial questions—in practice, you’ll likely have even more.
Let’s start with writes. We need to obtain a DatabaseReference and navigate to the child path where we’ll write the value. The variable types available to us are:
-
String; -
Long; -
Double; -
Boolean; -
Map<;String, Object> -
List<.Object>
Here’s how easily a User object is written to the users node:
private void writeNewUser(String userId, String name, String email) {
    User user = new User(name, email);
    mDatabase.child("users").child(userId).setValue(user);
}
Getting a user’s unique userId after authentication is straightforward: user.. To update data, just call setValue( with the new data. The push( and getKey( methods let you generate a unique key for each object. In the example below, I request a key for a record that hasn’t been added yet, then create a child node with that key and save the object there:
String key = mDatabase.child(mUserId).push().getKey();
wi.ID = key;
Map<String, Object> postValues = wi.toMap();
mDatabase.child(mUserId).child(key).setValue(postValues);
To read data, use ValueEventListener and attach it to the nodes you care about with addValueEventListener. The callback will fire on every server-side update, on the initial connection to the database, and, for good measure, possibly a couple of extra times. So be prepared for that both mentally and in your code. If you only need to read the data once and be done with it, use addListenerForSingleValueEvent.
Here’s an example of a one-time fetch of the list of objects for the current user from the history branch.
private void syncMainList() {
    // Fetching data
    FirebaseDatabase database = FirebaseDatabase.getInstance();
    DatabaseReference myRef = database.getReference("history");
    myRef.child(mUserId).addListenerForSingleValueEvent(new ValueEventListener() {
        @Override
        public void onDataChange(DataSnapshot dataSnapshot) {
            for (DataSnapshot ds : dataSnapshot.getChildren()) {
                WifiInfo wi = ds.getValue(WifiInfo.class);
                addToList(wi);
            }
            // Set up a listener for the list
            setUpListener();
        }
        @Override
        public void onCancelled(DatabaseError error) {
            // Failed to read value
            Log.w(TAG, "Failed to read value.", error.toException());
        }
    });
}
And if we need to continuously track a list that changes over time, a ChildEventListener is the right tool—it listens not to a single item, but to the entire child branch.
private void setUpListener() {
    FirebaseDatabase database = FirebaseDatabase.getInstance();
    DatabaseReference myRef = database.getReference("history");
    myRef.child(mUserId)
        .addChildEventListener(new ChildEventListener() {
        @Override
        public void onChildAdded(DataSnapshot dataSnapshot, String s) {
            WifiInfo wi = dataSnapshot.getValue(WifiInfo.class);
            addToList(wi);
        }
        @Override
        public void onChildChanged(DataSnapshot dataSnapshot, String s) {
            WifiInfo wi = dataSnapshot.getValue(WifiInfo.class);
            updateList(wi); // For now, only moving from active to history
        }
        @Override
        public void onChildRemoved(DataSnapshot dataSnapshot) {
            WifiInfo wi = dataSnapshot.getValue(WifiInfo.class);
            removeFromList(wi);
        }
        @Override
        public void onChildMoved(DataSnapshot dataSnapshot, String s) {
        }
        @Override
        public void onCancelled(DatabaseError databaseError) {
        }
    });
}
There are five events, and their logic is pretty self-explanatory. Be prepared for them to fire—potentially multiple times. In my experience, when manually adding an item from the app, the onChildAdded event for that item fired three times.
Understand Your Users with Analytics
The original Google Analytics was built for the web. It was later retrofitted for mobile, but with significant limitations. Google Analytics for Firebase collects much richer data. For example, it can capture app uninstalls, device OS updates, and app cache clears. Many events are tracked automatically and don’t require any developer intervention.
If we want to collect in‑app events, the FirebaseAnalytics class is what we need. In my projects, to be able to call analytics methods from anywhere, I keep a reference to the analytics object in the Application class. I initialize it once when the app is created.
public class App extends Application {
    private static FirebaseAnalytics mFirebaseAnalytics;
    public void onCreate() {
        super.onCreate();
        mFirebaseAnalytics = FirebaseAnalytics.getInstance(this);
    }
    public static void selectContent(String type, String id) {
        Bundle bundle = new Bundle();
        bundle.putString(FirebaseAnalytics.Param.ITEM_ID, id);
        bundle.putString(FirebaseAnalytics.Param.CONTENT_TYPE, type);
        mFirebaseAnalytics.logEvent(FirebaseAnalytics.Event.SELECT_CONTENT, bundle);
    }
}
You can call the select_content method in a single line. For example, let’s collect data on menu item usage: App. or App..
Once you set up event tracking in the app, you’ll see what users are most interested in. The data sent with the logEvent method can be found in the project console on the Events tab.
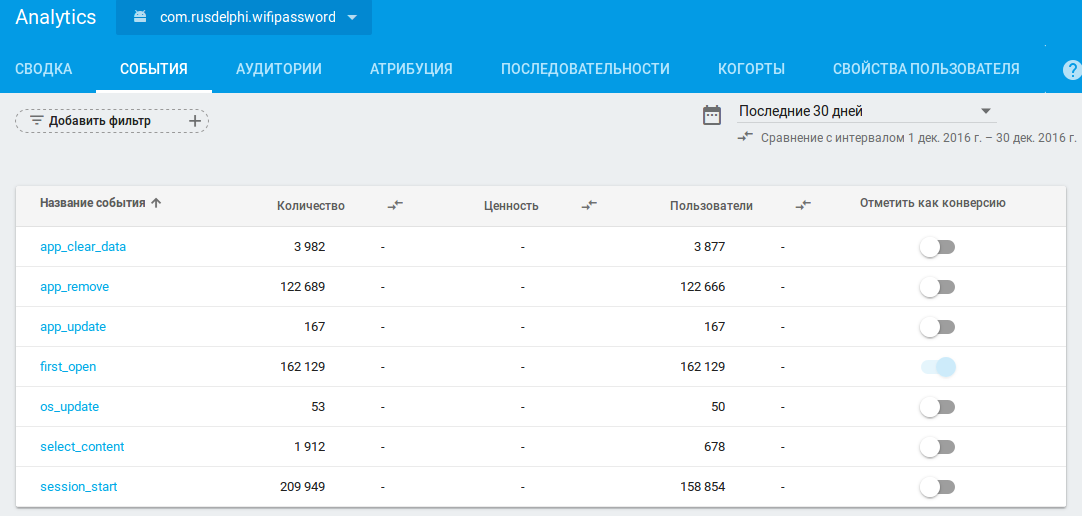
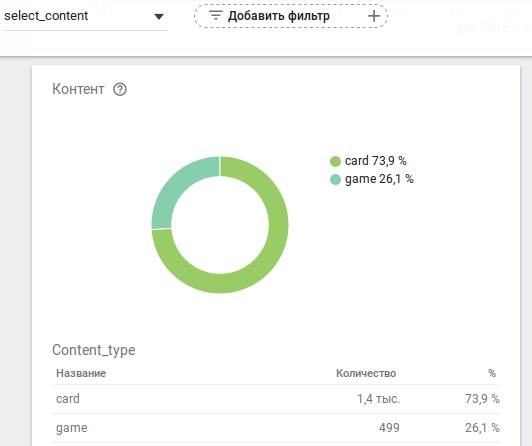
All events in the figure are collected automatically by the system, except for select_content (its implementation is described above). Here are the details for this method (you can clearly see where the CONTENT_TYPE and ITEM_ID parameters went):
The complete list of Firebase Analytics events is available here.
Integration — and a few closing notes
After you’ve set up all the required Firebase modules in the console, download the project configuration file google-services.. In the same place, you can add SHA certificate fingerprints (you can do this via the assistant directly from Android Studio: Tools → Firebase). I add two certificates: one from the debug key and one for release. Place the google-services. file in the app module folder. In the project-level Gradle file, don’t forget to add the necessary dependencies, for example:
// Firebase Authentication
compile 'com.google.firebase:firebase-auth:10.0.1'
// Firebase Data Base
compile 'com.google.firebase:firebase-database:10.0.1'
// Google Sign In SDK (only required for Google Sign In)
compile 'com.google.android.gms:play-services-auth:10.0.1'
// Firebase Analytics
compile 'com.google.firebase:firebase-core:10.0.1'
And at the end, add apply ; this plugin will process the google-services. file.
This article is just a first pass at a heavyweight like Firebase. It recently got even heavier, which means there’s plenty for us to learn and put to use.
I expect hackers will put such a powerful, free technology to good use in the future :).
