App or Browser?
Mobile apps are the natural evolution of websites. They generally make better use of device resources and offer more ways to work with data. Web developers often run into inherent mobile limitations—no Flash support, sluggish pages when they’re overloaded, and so on. And few would argue that using maps or email is more convenient in native apps than in a browser.
Using a database lets you store all the data a user needs, which is great. All the app’s features will remain available even if the user heads into the wilderness where there’s no Internet at all. A while back—about a year and a half ago—our magazine reviewed ways to persist data on Android, but databases deserve a dedicated article.
Cache Everything
Android ships with SQLite out of the box—you don’t need to add a dependency or ask the user for any special permission to use it. To see how useful it is, we’ll build a full-fledged app that fetches data from the internet, caches it, and serves it under any conditions—rain, freezing cold, or when you’re offline.
SQLite is a lightweight embedded database engine that, on the one hand, lets you make full use of SQL and, on the other, is gentle on device resources. Its drawbacks are mostly negligible for mobile development: for example, there are no indexes for LIKE queries, and there are limits on database size.
Serialization and JSON
Time to talk about content: in principle, it doesn’t really matter what you cache. That said, you shouldn’t dump everything into the database. If it’s one-off records or flags about an Activity’s state, use SharedPreferences instead. As in full-fledged systems, a database is meant for storing large volumes of structured data: product catalogs, task lists, news feeds, and so on.
Competent engineers serialize data before sending it over the network—that is, they convert it into a byte stream. There are several serialization methods, each with its own advantages. A few years ago XML was popular, but at large scales XML parsers/serializers are quite CPU-intensive, which is a problem for mobile devices.
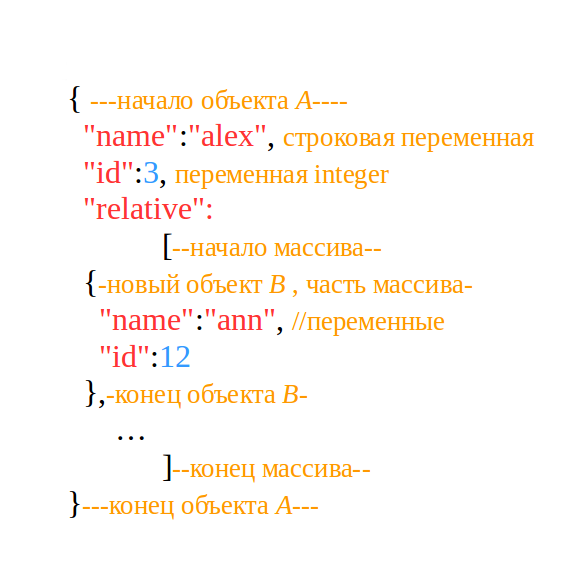
JSON has replaced XML and has essentially become the de facto standard. It’s not only easy to parse but also convenient for web developers—for example, JavaScript handles it natively. JSON is straightforward and readable both by applications and by humans. As an example, I used a list of users with several fields: name, description, unique identifier, and avatar image.

{ "name":"John", "description":"desc #1", "id":3137, "image":"link_to_image.url"}This kind of data array can be easily mapped to a Java object. You can define the class manually, or use converters you can find by searching for “json to java.” Such a converter will parse the fields for you and add annotations that specify the field mappings.
@SerializedName("id")
@Expose
public Integer id;
@SerializedName("name")
@Expose
public String name;
@SerializedName("description")
@Expose
public String description;
@SerializedName("image")
@Expose
public String urlImage;
...
Once you’ve loaded JSON into the app, you’ll need to map it into a pre-defined Java object. There are ready-made solutions for this. I recommend the Retrofit library along with the Gson converter, which we’ve written about many times. Unless you have some exotic networking requirements, Retrofit is a solid choice.
CRUD and the DAO Pattern
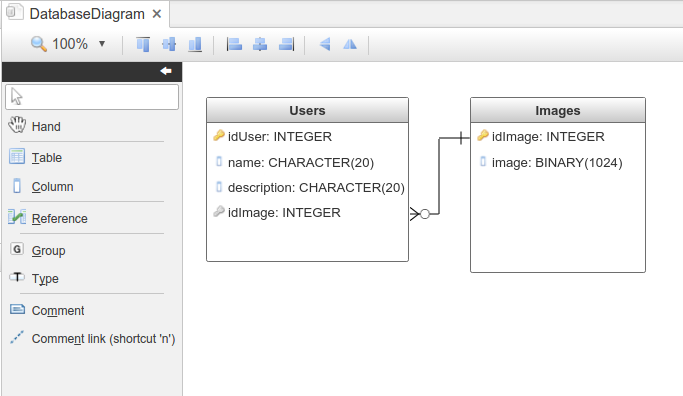
The way you design tables and their relationships is no different from classic SQL. For the JSON format I defined, I chose to split the data into two tables: one for all textual information and another for the set of images. Putting images in a separate table makes sense to save storage space—multiple users might share the same avatars, so you don’t have to store duplicates.

When working with databases, it’s useful to rely on a few patterns that save you from reinventing the wheel while still covering all the essentials. The basic set of operations is captured by the acronym CRUD . OOP also has its own design patterns, and they exist for good reasons. It’s generally recommended to implement CRUD through the DAO pattern. This involves defining an interface that declares the required methods.
public interface DAO {
    void insertPerson(ContactJson json);
    ContactJson selectPerson(int id);
    void updatePerson(ContactJson json, int id);
    void deletePerson(int id);
}
Admittedly, in our current code this interface feels redundant, but it could pay off later: abstract classes and interfaces help make the required functionality explicit so it’s not forgotten.
SQLiteOpenHelper
The SQL query language is closer to procedural programming than OOP, so Android provides a dedicated SQLiteOpenHelper class for database work. It lets you interact with the database using methods and classes that are familiar to Java developers. As usual, you create your own helper instance and supply the essentials—the database name and version.
public class DummySQLite extends SQLiteOpenHelper {
    public DummySQLite(Context context, ...) {
    super(context, DATABASE_NAME, null, DATABASE_VERSION);
}
When generating SQL queries, you’ll be repeatedly referencing table and column names. To minimize the risk of typos, it’s convenient to use string constants—turn the column names into variables.
private static final int DATABASE_VERSION=1;
private static final String DATABASE_NAME="DummyDB";
private static final String TABLE_USERS="users";
private static final String USER_ID="idUser";
private static final String USER_NAME="name";
...
Even though working with the database is very close to OOP-style development, you still can’t avoid SQL syntax. If you have gaps in your knowledge, read a beginner’s guide—basic familiarity is usually enough.
The SQLiteOpenHelper class requires you to override the lifecycle methods used during initialization—specifically, the methods for creating, opening, and upgrading the database. In onCreate, you must define the SQL statements that create your tables; this method is called automatically by the system the first time the database is initialized.
@Override
public void onCreate(SQLiteDatabase sqLiteDatabase) {
    String CREATE_USERS_TABLE = "CREATE TABLE " + TABLE_USERS + " (" +
        USER_ID + " INTEGER PRIMARY KEY," + USER_NAME + " TEXT," +
        USER_DESCR + " TEXT, " + sqLiteDatabase.execSQL(CREATE_USERS_TABLE);
    ...
}
Since the database schema can change, you should implement the onUpgrade() method to remove what was created previously (e.g., drop the existing tables/data).
@Override
public void onUpgrade(SQLiteDatabase sqLiteDatabase, int i, int i1) {
    sqLiteDatabase.execSQL("DROP TABLE IF EXISTS " + TABLE_IMAGES);
    ...
}
Building Queries
As you’ve probably noticed, all the queries were written using explicit SQL syntax and executed via the execSQL method. It lets you run any SQL command except those that return values. In practice, though, it’s mostly used for basic database initialization; for everything else there are more convenient APIs. The most common way to retrieve data is the rawQuery method, which lets you query the database directly by passing a plain SQL statement as an argument.
Сursor cursor=db.rawQuery("Select *" + " FROM "+ TABLE_USERS + " WHERE " + USER_ID + " = "+number, null);
The output will be a result set in the Cursor format, which is designed specifically for database access. It’s essentially an array-like structure that can be read in various ways; I prefer iterating over it in a loop.
while (cursor.moveToNext()) {
    result.setId(cursor.getInt(0));
    result.setName(cursor.getString(1));
    result.setDescription(cursor.getString(2));
}
The official documentation advises not to forget to release resources after reading all the required data; otherwise, you’ll leak memory. On the other hand, if you might need the data again, it can make sense to leave the Cursor as is—it’s faster to read from memory than to query the database again.
cursor.close();
As you can see, pulling data from the database is easy—but first you have to get it in there. There’s a dedicated method for adding data to the database. It works like an SQL UPDATE that doesn’t perform any checks and simply writes new data into the table.
db.insert(TABLE_USERS, null,getUsersData(contactJson));
Before inserting, you need to prepare the data—specify which fields the values should go into. This is a field-name–to–value mapping, represented by the ContentValues class.
ContentValues values = new ContentValues();
values.put(USER_ID, json.getId());
values.put(USER_NAME, json.getName());
...
You don’t need to pass field values when calling the method, which certainly makes building the query easier.
Inserting Images
There are several ways to store files on Android. If the files aren’t too large, you can even keep them inside SQLite. The BLOB column type lets you store a byte array; to do that, use ByteArrayOutputStream as an intermediate buffer.
ByteArrayOutputStream bmpStream = new ByteArrayOutputStream();
Bitmap bmp = null;
try {
    URL url = new URL(contactJson.getUrlImage());
    bmp = BitmapFactory.decodeStream(url.openConnection().getInputStream());
    bmp.compress(Bitmap.CompressFormat.PNG, 100, bmpStream);
}
Android has built-in ways to fetch data from the network—you don’t have to use Retrofit.
With BitmapFactory, you can load data over the network to get a Bitmap image, and then store its byte array in the database using the familiar ContentValues.
ContentValues values = new ContentValues();
values.put(IMAGE, bmpStream.toByteArray());
Secure SELECT
All the queries we’ve just built go straight to the database without any prior validation. That’s a perfect setup for SQL injection—an attacker can easily slip in crafted parameters and make the database execute a completely different statement. This is a common attack, and you’ll find plenty of coverage of it in our magazine. Sure, you could write your own parser to hunt for “bad” characters and aggressively filter inputs. But that’s a questionable band‑aid at best, and there’s no guarantee it will help.
Fortunately, there’s a built-in way to solve this. Android provides SQLiteQueryBuilder, which will generate the query for you and validate the incoming parameters.
SQLiteQueryBuilder builder = new SQLiteQueryBuilder();
With it, you can easily build both simple single-table queries and more complex ones with filtering and joins. That’s exactly what we’ll look at: the database has two tables, and to get all the data for a user, we need to combine them first. The LEFT is a good fit here—it lets you join tables by matching on common columns.
The builder ingests data in batches, allowing the system to validate it as it comes in. The setTables method specifies the set of tables the query will be built from—it can be a single table or a join of multiple tables.
 builder.setTables(TABLE_USERS+ " LEFT OUTER JOIN " +
    TABLE_IMAGES + " ON ( " + TABLE_IMAGES + "."+ IMAGE_ID +
    " = " + TABLE_IMAGES + "."+ IMAGE_ID + ")");
The query itself is built using buildQuery: you pass in the selection parameters, and the builder constructs the SELECT statement for you. Using parameterized queries like this greatly reduces the risk of SQL injection.
builder.buildQuery(new String[]{USER_NAME, USER_DESCR, IMAGE}, USER_ID + " = "+id,null,null,null,null);
Being able to handle any kind of request is another advantage of this approach. The query builder lets you plug in arbitrary criteria on the fly, shaping the result set to the user’s needs. That’s very hard to achieve with rawQuery.
Robolectric
I’ll be honest: I don’t always get my SQL queries right on the first try. Sure, if you work with large databases every day, that’s less of an issue—but people like that rarely write Android apps. You’ve probably wondered how to validate all those SELECTs, UPDATEs, and complex table joins. If you’ve never written tests before, you’re about to see how useful they can be: tests let you compare the expected result with what your SQL query actually returns.
In the Android ecosystem, there are plenty of tools for testing Java code. Here we’ll use the Robolectric framework—it lets you run tests right on your workstation without using emulators or physical devices. You add it like any other library via Gradle.
testCompile 'org.robolectric:robolectric:3.1.4'
All tests must reside in the src/ folder; there are no additional restrictions. To test the database, I created a separate file named DBTesting. You need to tell the system what should execute the test, which is done via annotations.
@RunWith(RobolectricTestRunner.class)
@Config(constants = BuildConfig.class)
public class DBTesting  { ... }
Typically, before running a test you need to prepare the input data and initialize any dependent code. You do this in the setUp method, using the Before annotation.
DummySQLite sqLite;
ContactJson json;
...
@Before
public void setUp() { ... }
Testing begins with initializing objects—in particular, the DummySQLite class creates a database instance. The default constructor requires an application context, which won’t actually be available—the app only starts up partially, so the context has to be emulated. Robolectric provides the ShadowApplication class for this.
ShadowApplication context = Shadows.shadowOf(RuntimeEnvironment.application);
sqLite = new DummySQLite(context.getApplicationContext(), "",null, 0);
In the setUp method, you can prepare a ContactJson instance that will be loaded into the database. Since we’re not testing Retrofit, we’ll instantiate the object manually.
json = new ContactJson();
json.setId(1);
json.setDescription("description #1");
json.setName("first");
...
The dataset is ready, so we can start writing the tests themselves. First, it’s a good idea to check that the database accepts input data. Each test is a regular method, but with a special Test annotation.
@Test
public void createItem() {
    sqLite.insertPerson(json);
}
A method that inserts data doesn’t return anything, so it will only fail if there’s a SQL syntax error. Such a test isn’t very informative; it’s more useful to test methods that use SELECT queries.
ContactJson json = sqLite.selectPerson(1);
You’ve probably written your own tests before, but had to verify the results by eye, comparing the actual output to what you expected. Here, that level of manual scrutiny isn’t necessary—use the Assert class, which is designed to compare expected and actual results.
Assert.assertEquals("first", json.getName());
There are plenty of comparison options. For example, we may know an image should be present, but not its exact byte size. In that case, it’s enough to verify that the image being exported is larger than a reference value.
Assert.assertTrue(json.getImage().length>1);
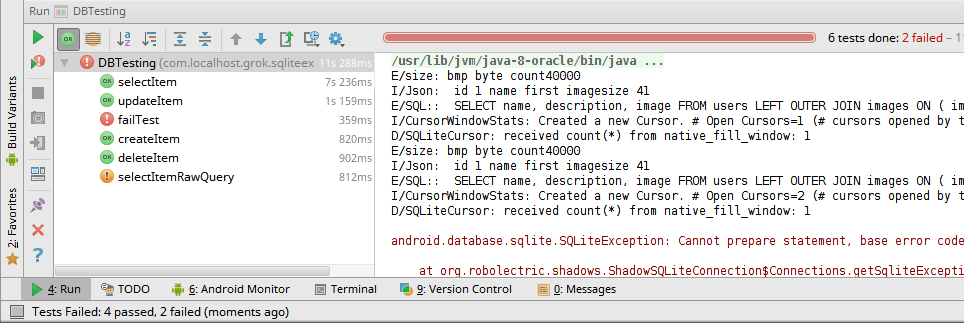
Each test can include multiple checks—there’s no limit. The outcome is easy to read: a fully passed test is shown in green; a partial pass is shown in orange. Red indicates an error thrown by the code under test.

Developers often rely on log messages that would normally appear in Logcat. Here, they don’t show up by default, but you can capture them with ShadowLog.
ShadowLog.stream = System.out;
Covering your methods with tests helps catch issues that might otherwise slip into production. Some developers even write the tests first and only then implement the methods—this approach is called TDD (test-driven development). Tests are especially valuable when working with databases: they’re logically isolated, so you can insert data without worry—it will never end up in the “real” tables.
Outro
We’ve all run into apps that ignore caching and keep pulling data from the network over and over. I’m sure you won’t write apps like that anymore 🙂
One more thing: it’s best to access the database on a background thread; RxJava or even a simple AsyncTask will help with that. The project we built today can be extended however you like—use this code as a template for your own projects. To better understand the SQLite workflow, download the full source for the classes and the Robolectric tests from our website. If you still have questions, leave a comment—I’ll do my best to answer. Good luck!
