Initially, I was only asked to set up a VNC server to provide quick remote support to clients without relying on TeamViewer or Ammyy Admin. But, as often happens, once we got started the scope kept growing. The client quickly came up with a whole list of additional things they wanted brought online. And, as always: minimal cost, as simple as possible, and ideally convenient. Zentyal ticks all those boxes!
Theory and facts, in brief
Zentyal 5.0 is based on Ubuntu 16.04. The distribution includes the SOGo 3.2.1 groupware suite, and uses Samba 4.5.1 to integrate with Microsoft services. Zentyal can serve as a network gateway, a centralized network security hub, an Office Server, a unified communications server, or any combination of these roles. It also includes a framework that streamlines the development of new UNIX services.
A curious fact: the higher the version, the fewer management modules for various services. For example, in the 2.x release of Zentyal you could set up virtualization, there was FTP support, and multiple VPN options (now only OpenVPN remains). However, its domain services for working alongside AD—up to and including Windows Server 2008 R2—were significantly weaker. That’s because the Zentyal team has been shaping the product into a full-fledged alternative to Windows Server 2012 with AD, Group Policy, mail services, and more. And they’ve succeeded.
And if you’re missing certain services or daemons, you can install and configure them just like on a regular Ubuntu Server. That said, Microsoft has already moved on to the Windows Server 2012 R2 Active Directory functional level—which is a different story altogether. Important: Zentyal does not support the Windows Server 2012 R2 AD functional level.
So, let’s break the task down step by step. Here’s what I needed to spin up.
- Act as an additional Windows Server 2008 R2 domain controller, with the current primary domain controller to be decommissioned afterward.
- Private cloud storage based on ownCloud/Nextcloud; requires a web server with MySQL and PHP.
- Shared folders over SMB and NFS for backups and document exchange.
- Resilio Sync Server (formerly BitTorrent Sync) to enable BitTorrent-based synchronization.
- OpenVPN server to provide remote access to corporate network resources.
- Set up an FTP server; required by internal 1C server applications and handheld/mobile devices.
- Network services (DNS, DHCP).
- Jabber (XMPP) server for messaging.
- NTP server for time synchronization.
Additionally—configure the firewall. Security should be secure!
System Installation
Installing Zentyal from an ISO image is much like doing a text-mode Ubuntu install. It’s thoroughly documented online, so we won’t spend time on it. Instead, let’s focus on what to configure and how. There’s another way to install Zentyal on Ubuntu Server or Debian—via the Zentyal repositories. For version 5.0, use:
$ deb http://archive.zentyal.org/zentyal 5.0 main
And the key:
$ wget -q http://keys.zentyal.org/zentyal-5.0-archive.asc -O- | sudo apt-key add -
Next:
$ sudo apt update
And finally:
$ sudo apt install zentyal
Done!
Starting point
Zentyal Server 5.0 is installed, with an admin account plus SSH and web UI access. Let’s begin. If needed, change the language settings first: go to System → Language selection. Choose Russian—Zentyal will prompt you to run a command to install additional language packs from the console. Just copy the command, paste it into the console, and run it.
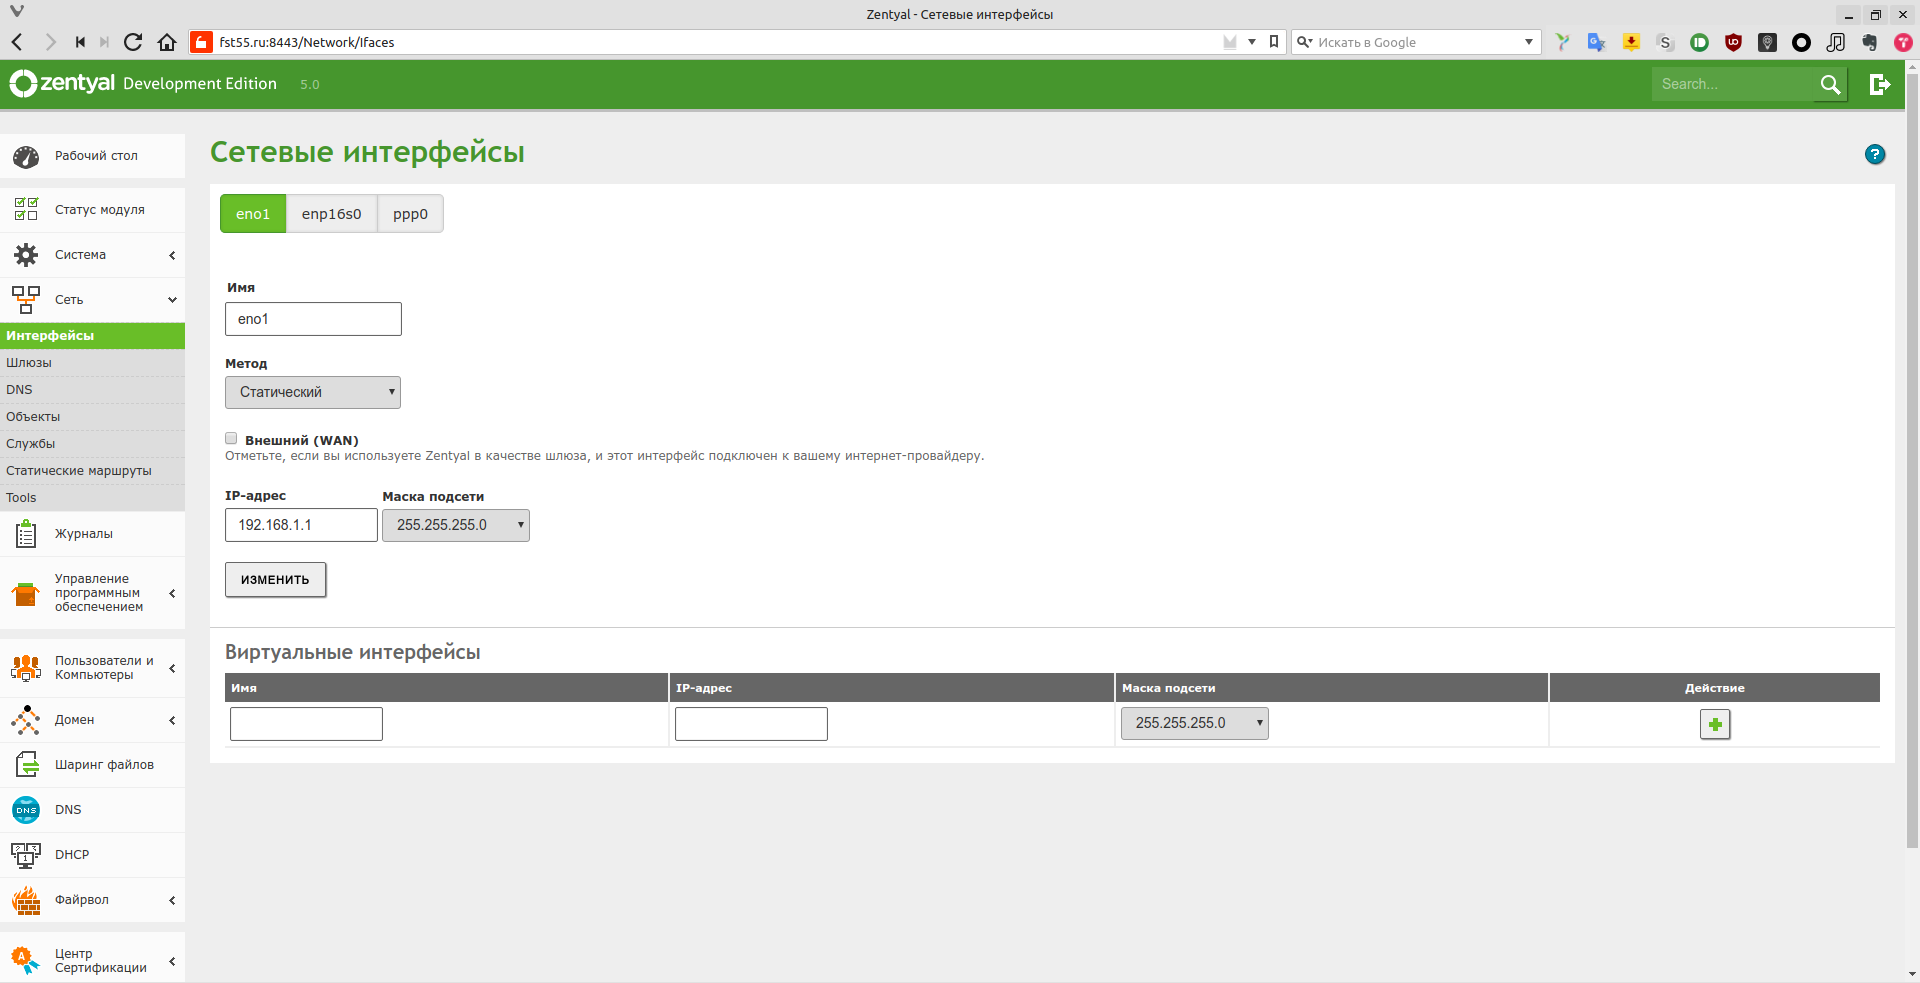
First, you need to set up the network. You can do this under Network → Interfaces. Zentyal supports all modern network configuration methods. If the default options aren’t enough, you can unlock individual virtual interfaces to manage them through the Zentyal web UI. This is done from the console by editing /etc/zentyal/network.conf. In that file, the line we care about is
ifaces_to_ignore = sit,tun,tap,lo,irda,virbr,vboxnet,vnet
This lists all interfaces that Zentyal ignores. Find the one you need, remove it, save the file, and reboot. After that, your network interface will appear under Interfaces. If something goes wrong during network setup, the UI includes ping, traceroute, and nslookup for troubleshooting under Network → Tools. Don’t forget to mark which interface is external for Internet access. If you have a complex topology with multiple networks behind gateways, add static routes under Network → Static routes so everything works correctly. Note that Zentyal strongly discourages manual edits to services it manages (via the console) and will continually regenerate configuration files from its own templates, which are located at: /usr/share/zentyal/stubs.
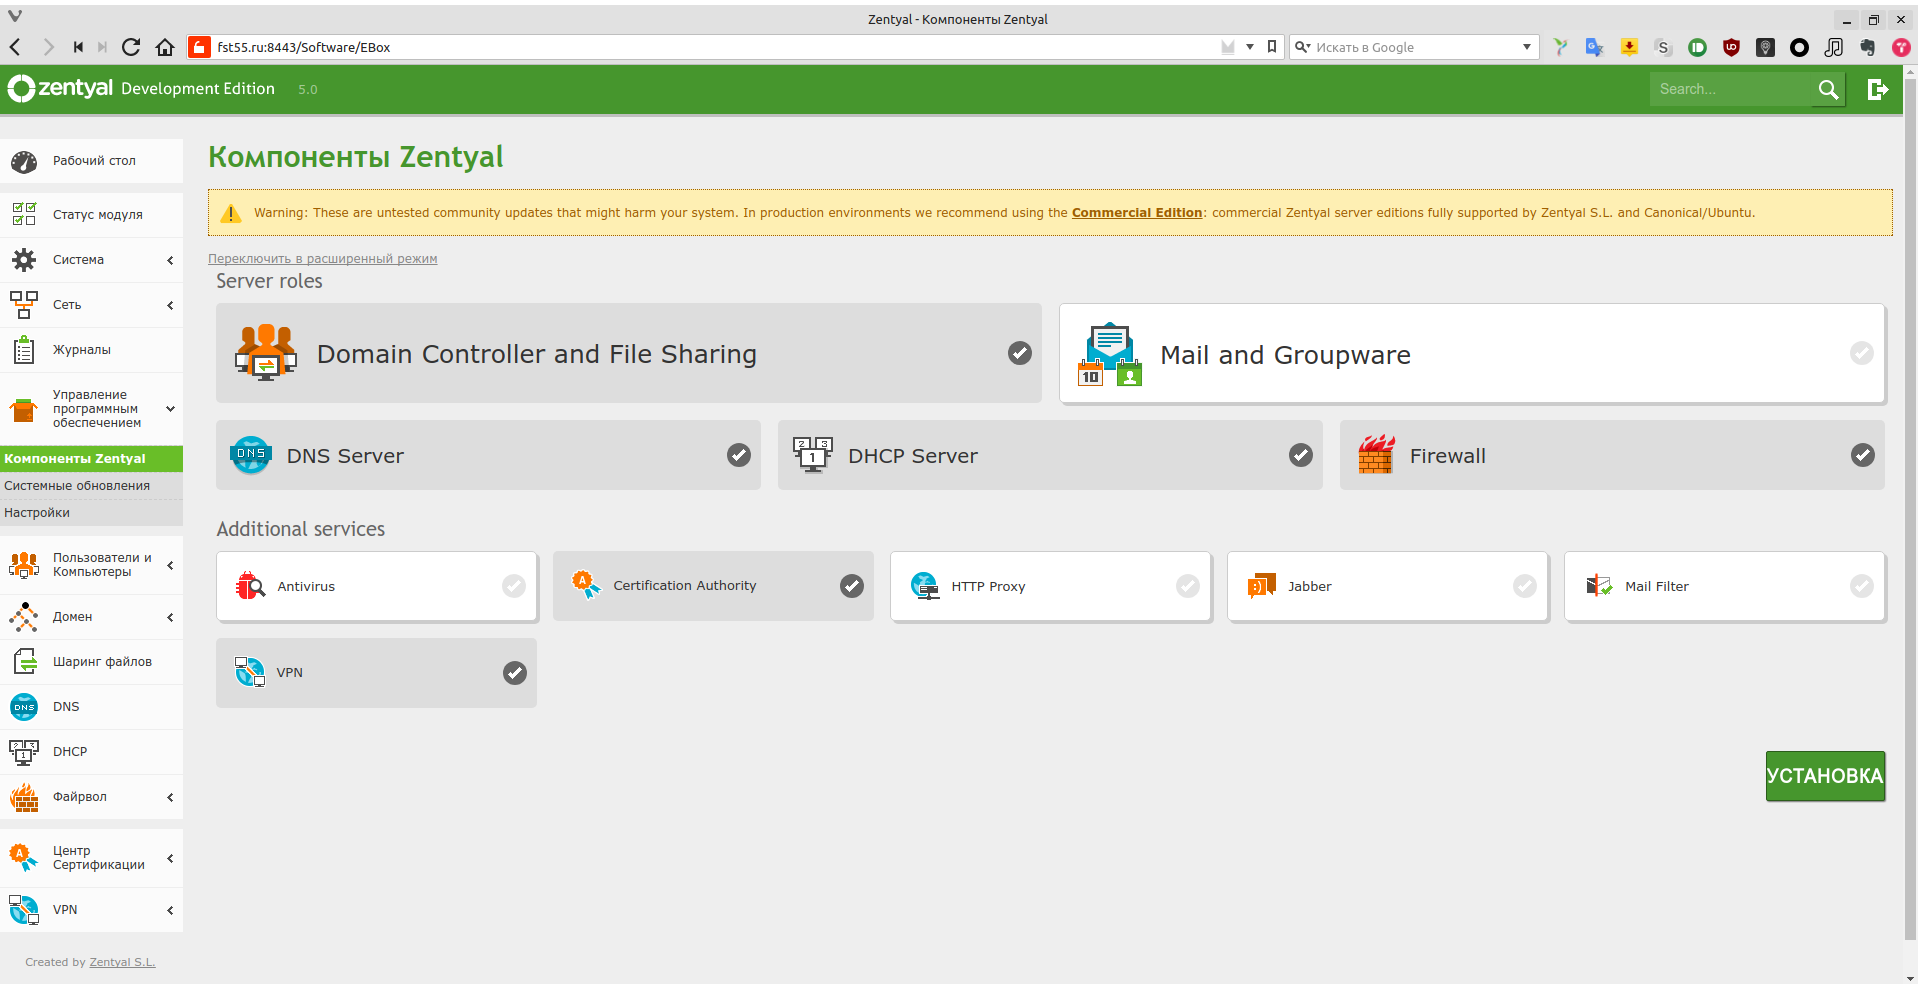
Verify network operation, Internet connectivity, and so on. If everything looks good, go to “Software Management → Zentyal Components” and select the modules you need. In our case that’s almost all of them, except http-proxy, since we’re not restricting Internet access. We’ll install Jabber separately, although you could enable Zentyal’s Jabber component, in which case all configuration would be handled in the Zentyal web UI. Do not install Mail and Groupware or Mail Filter either, because mail is handled by a separate server. After the components are installed, enable the modules under “Module Status.”
Configuring Services
Let’s start with the basics: configuring DHCP.
Configuring the DHCP service in Zentyal is simple. The key thing to remember is that Zentyal treats every network object as a host—PCs, laptops, printers, switches, and so on—basically any piece of hardware. Also, in Zentyal, “services” are defined by their network ports.
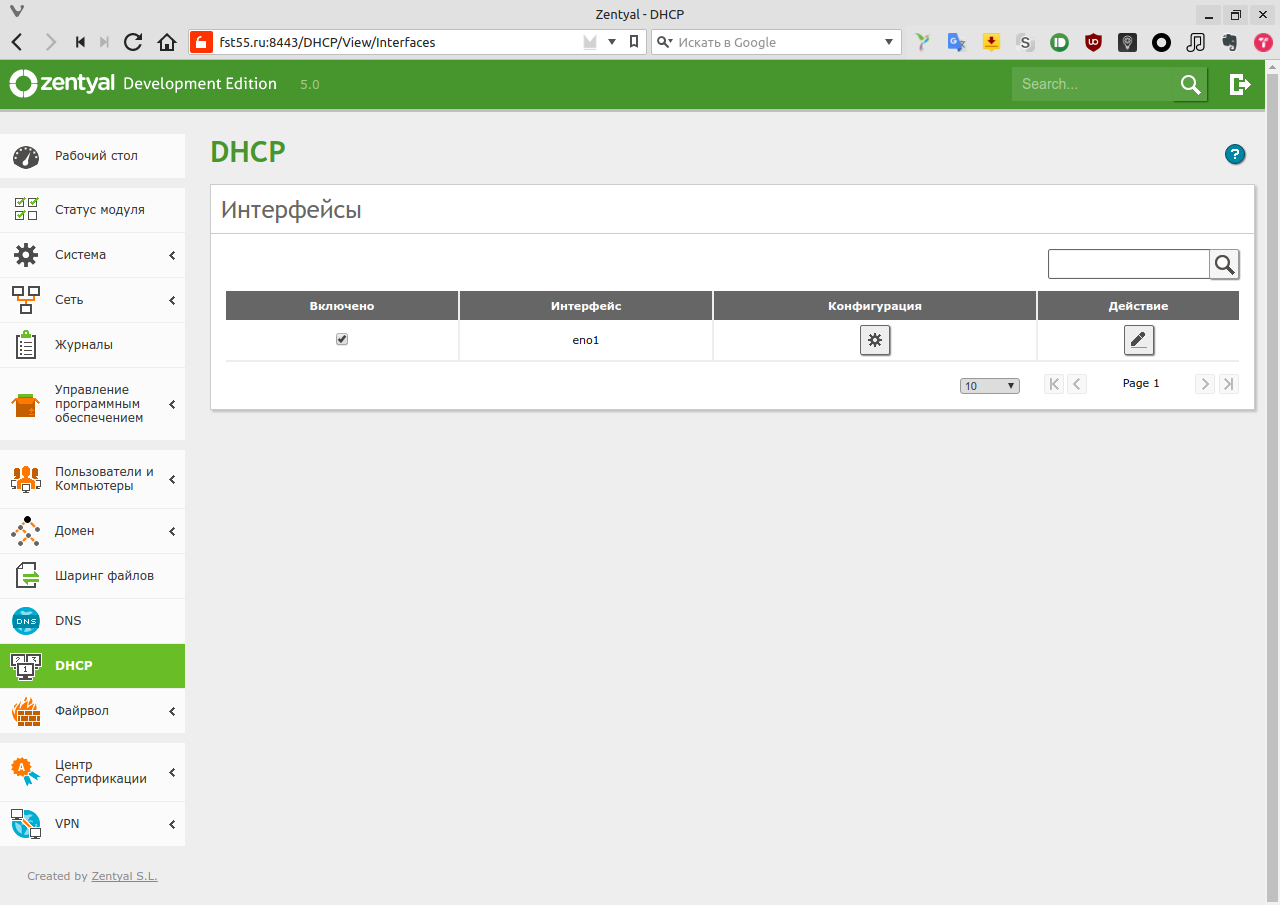
After covering these nuances (we’ll mainly need them when configuring the firewall), go to the DHCP section. Select the appropriate interface—our internal and external are separate. External interfaces, as you’d expect, aren’t available for DHCP configuration. If you have multiple internal interfaces, they’ll all be available for DHCP setup. For example, you can assign different subnets to different interfaces. In the window that opens, click Configuration.
In the General Options section, specify parameters such as the default gateway for DHCP clients, the search domain, the primary and secondary DNS servers, as well as the NTP (time) server and the WINS server. If you set Zentyal as the default gateway, the server’s internal IP address will be advertised to DHCP clients as the default gateway; the same applies to the DNS, NTP, and WINS servers. If the default gateway is provided by another network node, choose “Custom IP address” and enter the gateway’s IP. Configure the other services in the same way.
Scroll down. “Ranges” — this is where you define the required IP address pools and their sizes. You can set a pool name and its start and end addresses. “Fixed addresses” — here you can add pre-created host groups for reservations. You can prepare these groups under “Network → Objects.” Create a new object, for example “office.” Click “Members” and then “Add.” You’ll see the host entry form. You need to enter the host’s NetBIOS name, its IP address, and MAC address. This lets you group, for example, printers, switches, or rooms. However, it’s very important that addresses from the fixed list do not fall within any DHCP address range.
Go to the “Dynamic DNS Options” subsection under “DHCP.” This is straightforward: choose the dynamic domain and its state (enabled or disabled). Next, “Additional Options.” Here you can set the default lease time for IP addresses and the maximum lease time. Just below is a pretty interesting section — thin client configuration. In one of the earlier articles we covered PXE network boot. This is exactly where you enter the main boot parameters: which server hosts the bootloader and which file to load.
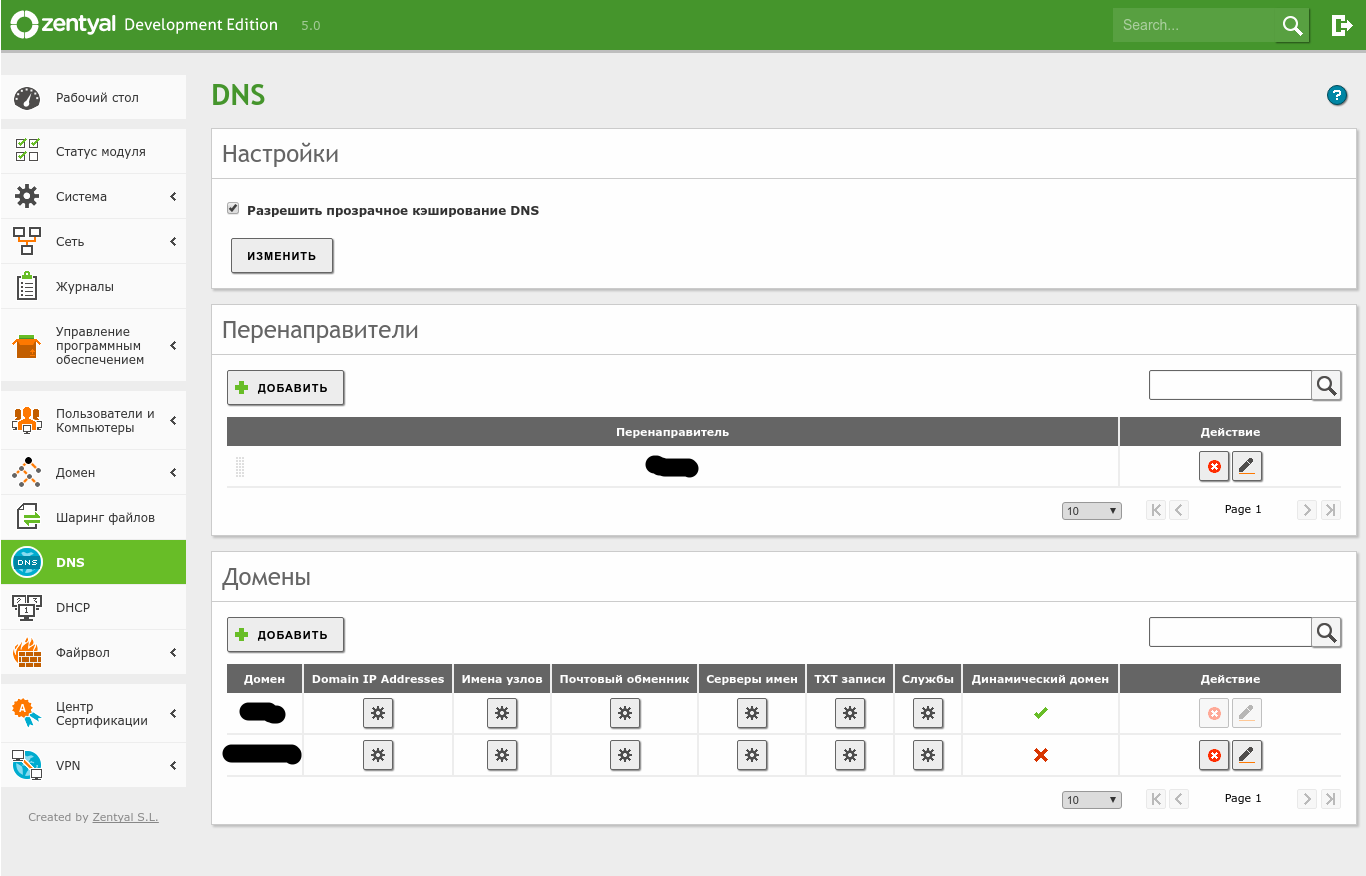
Next, move on to DNS configuration by opening the DNS section. Enable DNS caching (“Allow transparent DNS caching”). Add a forwarder—an upstream DNS server that Zentyal will query if it doesn’t have a record locally. Then add the zones that the DNS server will serve. For LDAP domain services, you don’t need to create the domain zone here; it’s created in the domain services section during setup.
When creating a domain:
– “Domain IP Addresses” are the IP addresses for that domain.
– “Host names” is where you add subdomain hosts (e.g., other servers or switches).
– “Mail exchanger” is where you create MX records for mail services.
– “Name servers” is where you create the domain’s NS records.
– “TXT records” is where you add the domain’s TXT records.
– “Services” is where you add integrations with external user management servers.
Next, proceed to the VPN setup—but first, you need to issue a root certificate in the Certification Authority. Go to the Certification Authority section and fill out the simple form. Then generate a user certificate, which is required for the VPN client. Set the name and validity period. Important: the client certificate’s validity cannot exceed the root certificate’s validity. Click Issue. Done—now move on to configuring the VPN.
Zentyal’s VPN is based on OpenVPN and supports the same modes: server–client and server–server (site-to-site). Go to “VPN → Servers” and click “Add.” Enter a server name and click “Add” again. Then click “Server configuration.” Specify the port, choose the protocol and port (typically UDP on the default OpenVPN port 1194). Set the VPN subnet and select the server certificate, which is usually generated automatically when you create the VPN server. You can switch to name-based client authentication, but I strongly advise against it. You can also configure options such as using a TUN interface (disable it to use a TAP interface), NAT, allowing client-to-client connections, and allowing Zentyal-to-Zentyal tunnels. You may disable pushing routes to VPN clients. Choose the network interface(s) the VPN service will bind to—you can select both. You can also enable “redirect-gateway,” which makes the server the client’s default gateway.
Now let’s move on to configuring the domain and Group Policy. Open Active Directory Users and Computers.
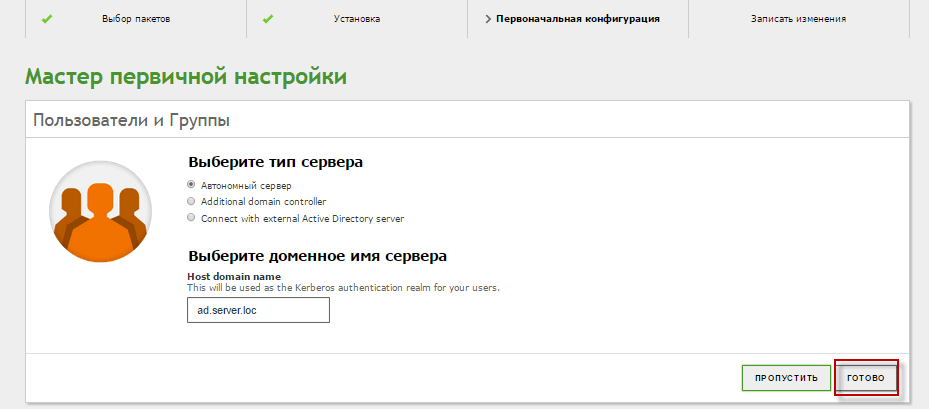
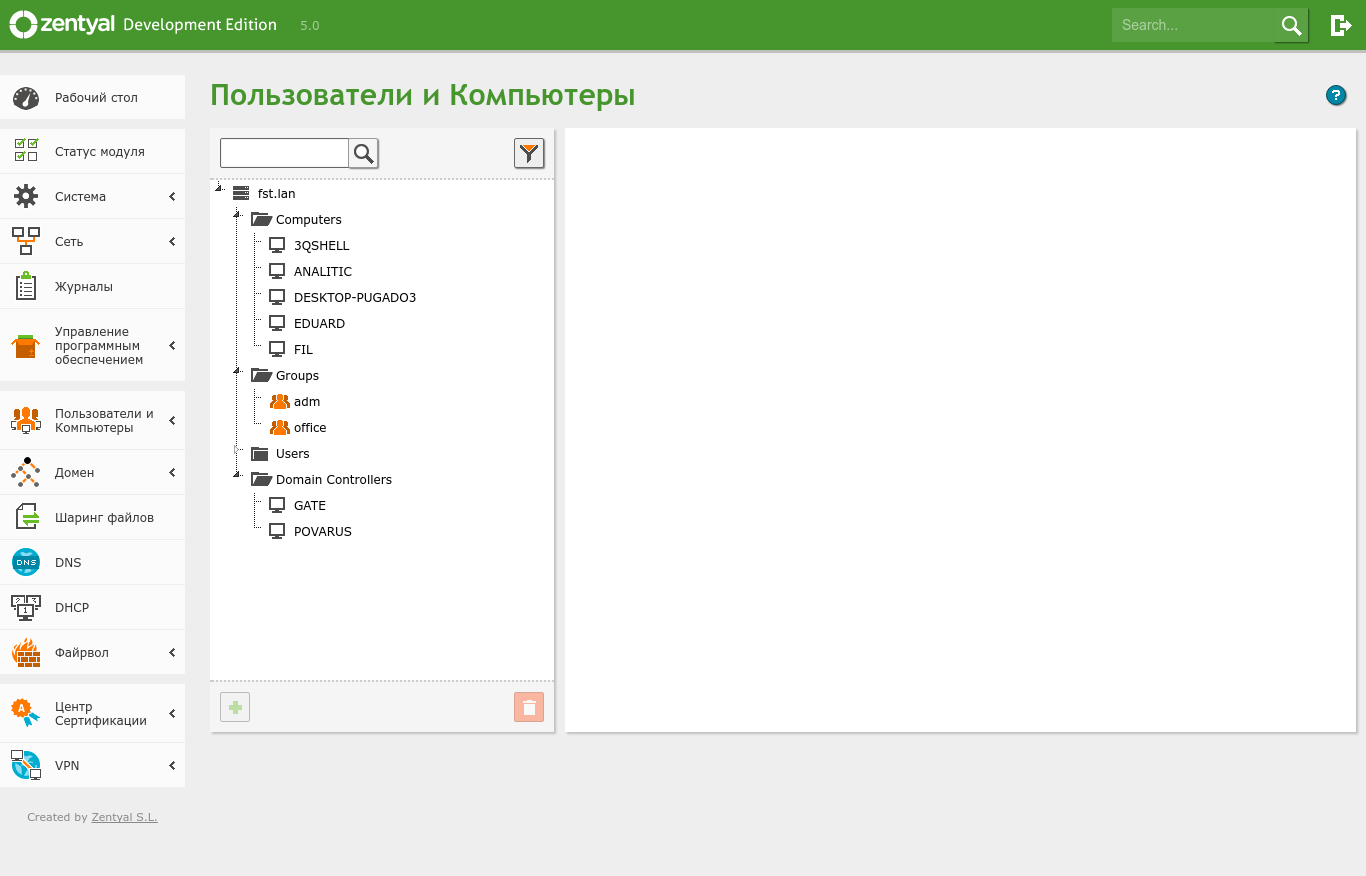
Select the server type and the server’s domain name. Done! If you need to change settings afterwards, go to Domain → Settings. The File Sharing section will then become available. This is essentially the shared folders service. Here you’ll see a structured domain tree showing domain users, domain computers, and domain controllers. Note that Zentyal supports AD services up to the Windows Server 2012 functional level and can act as an additional domain controller. For redundancy, you can deploy another Zentyal server or a Windows Server with AD.
www
- – Installing Zentyal as the Primary Domain Controller: http://www.tecmint.com/install-zentyal-as-primary-domain-controller-and-integrate-windows-system/
- – How-To: Installing Zentyal as an Additional Domain Controller: http://www.ewgenik.tomsk.ru/page/zentyal-v-kachestve-dopolnitelnogo-kontrol
- – Creating Organizational Units and Enabling Group Policy in Zentyal: http://www.tecmint.com/creating-organizational-units-and-enableing-group-policy-in-zentyal/
- – Video guide: Installing Zentyal as an Additional Domain Controller: https://www.youtube.com/watch?v=81Yzy7qA2e4
If you previously had a Windows domain controller, you can deploy Zentyal as an additional domain controller and later decommission the Windows DC. Go to Domain → Settings. Change the server role to Additional domain controller and fill out the form as follows:
Domain controller FQDN = example.lan (our domain)
Domain DNS server IP = 192.168.1.2 (IP of our primary domain controller)
Administrator account = adadmin (account with domain administrator rights)
Administrator password = *********** (user password)
NetBIOS domain name = example
Open “Module Status.” Enable “File Sharing and Domain Services.” Save your changes.
Next, open Active Directory Users and Computers and confirm that everything is working and has synchronized.
Overall, Active Directory services run without major issues. Administrators used to managing AD from a Windows environment can install the Remote Server Administration Tools (RSAT) to manage domain services from Windows. You can download it from the official Microsoft website.
Zentyal’s capabilities aren’t limited to what’s available in its built-in package manager. Since Zentyal is based on Ubuntu, you can add any repositories and install additional software. Just note that you’ll need to configure it the usual way, using standard Linux tools. 🙂
Let’s move on to configuring the firewall: getting a service up is one thing, protecting it from adversaries is another. Since Zentyal is based on Ubuntu, the Firewall section is essentially a web front end for Ubuntu’s built-in firewall—the legendary iptables. If iptables syntax isn’t your thing, the web UI makes creating and tweaking rules dead simple.
So, this section offers four main subsections for configuring firewall rules.
- Filter rules for traffic from internal networks to the Zentyal server
- Filter rules for traffic from external networks to the Zentyal server
- Filter rules for outbound traffic
- Filter rules between Zentyal’s internal networks
The section titles make it clear what each one is for.
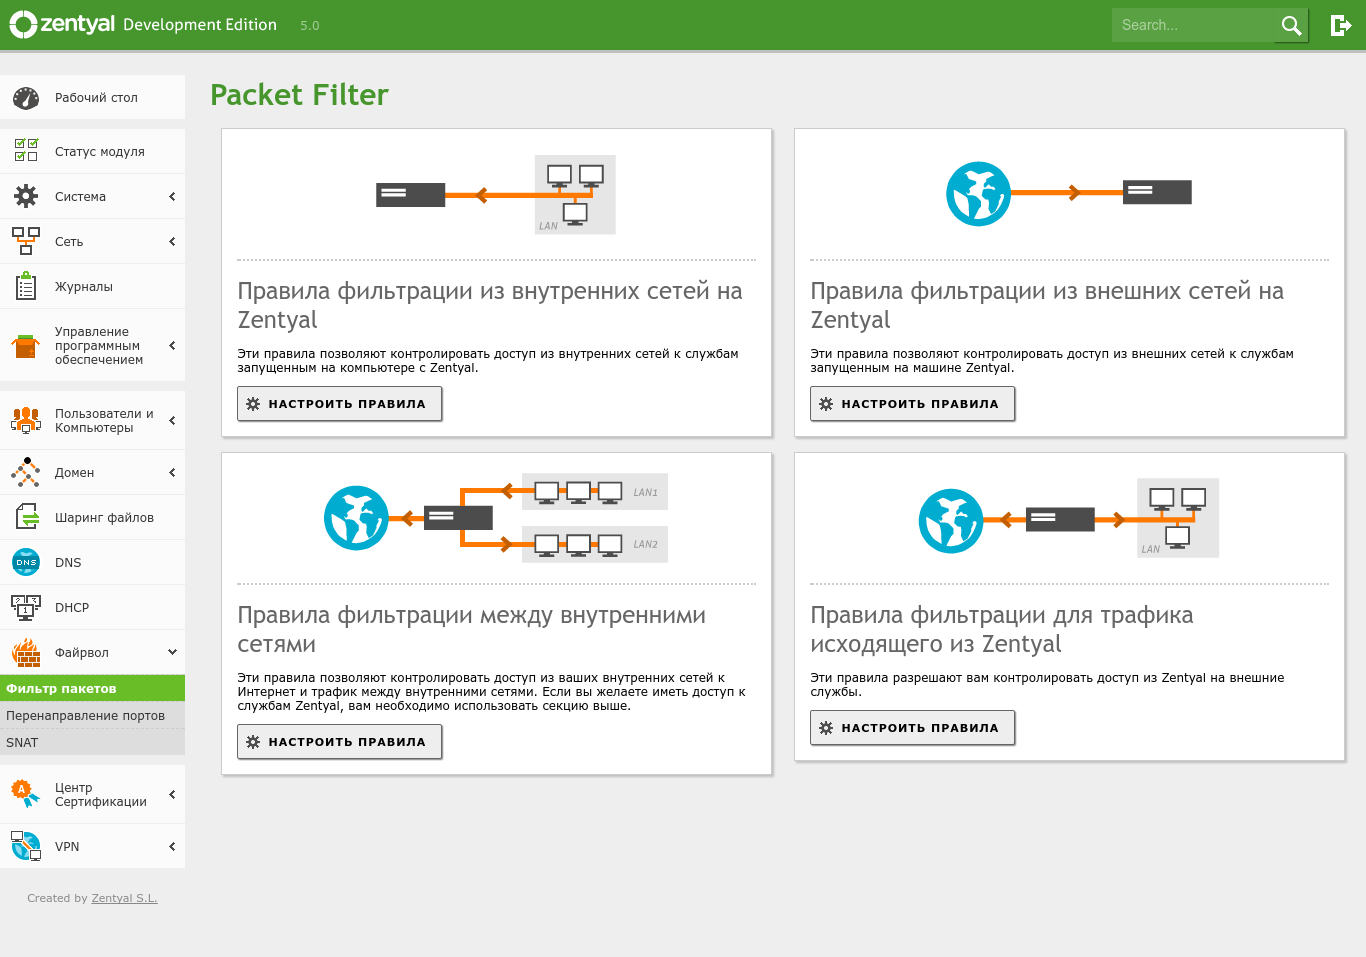
Let’s use the “…from external networks to Zentyal” section as an example. When adding a rule, the main fields are: policy (allow/deny), source, service, description, and action. By default, all installed services are already available for use in rules. If you need a nonstandard rule or want to expose a service installed from the repositories that isn’t managed directly by Zentyal, go to Network → Services, define the service and its ports, and then add the firewall rule. Alternatively, in the relevant firewall section click Add, select Add in the Services list, and a form will open to create a new service and its ports.
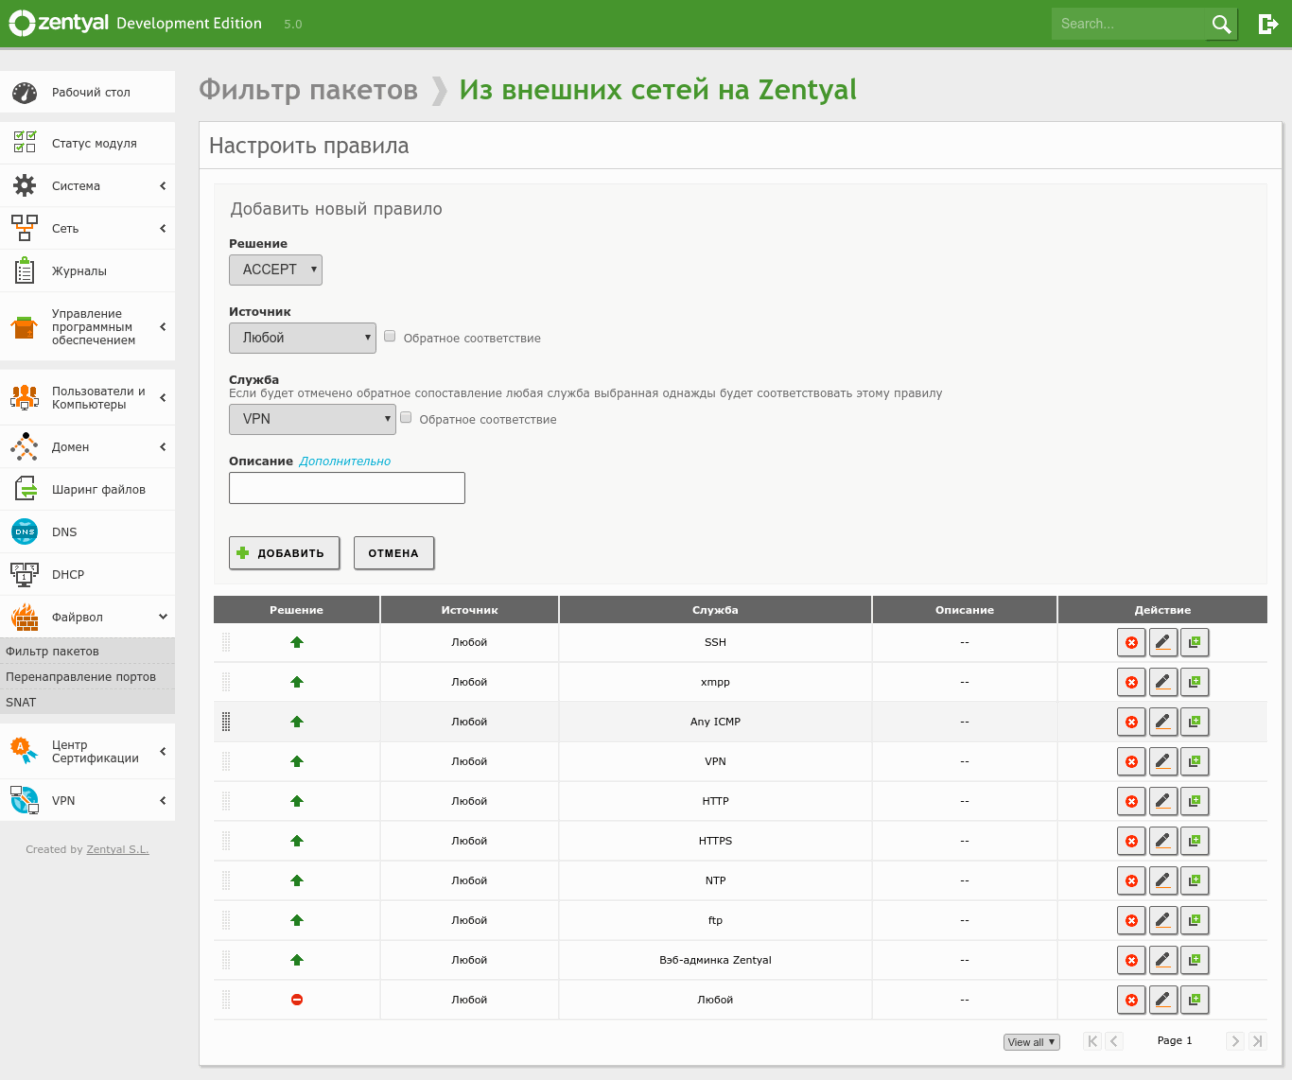
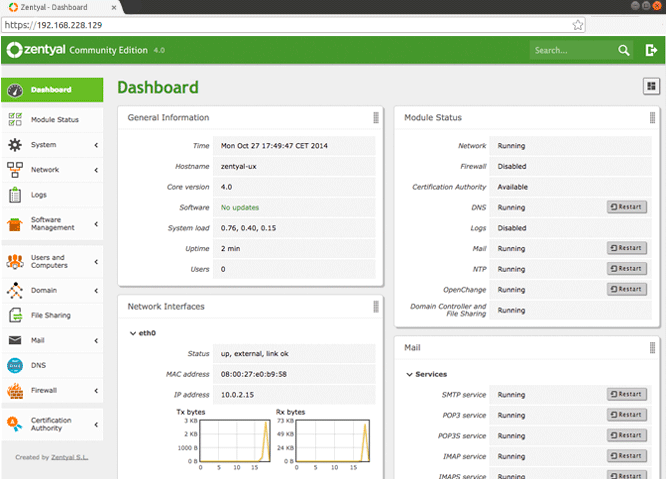
Remember: deny rules should always come after allow rules. Also, when configuring the firewall over the network, make sure you first add allow rules for SSH and the Zentyal web administration panel so you don’t lock yourself out of the server. After completing the configuration, you can go to the Zentyal Dashboard and add the information you want to display.
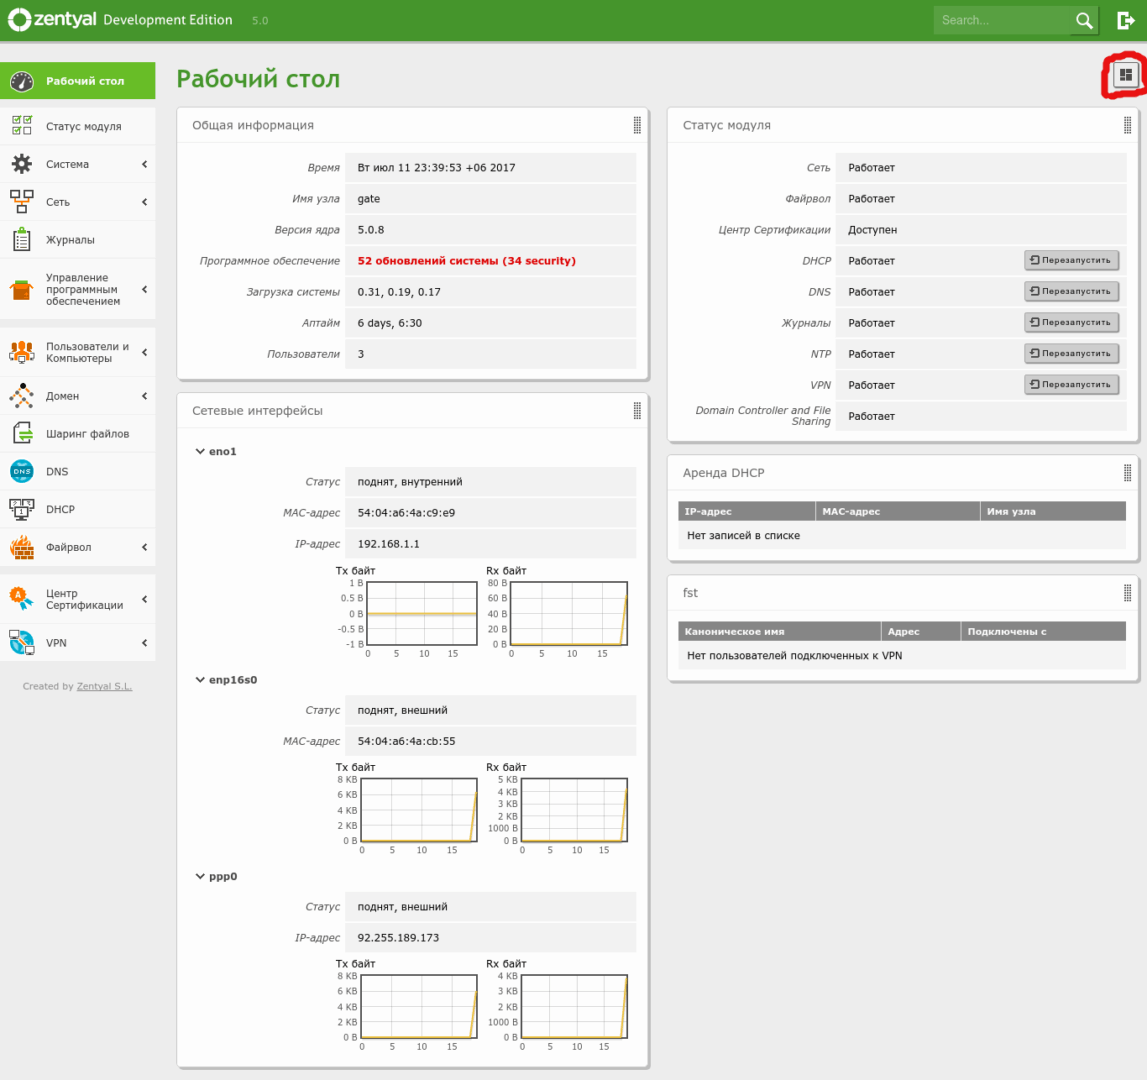
The button highlighted in the screenshot lets you add the datasets you want to display.
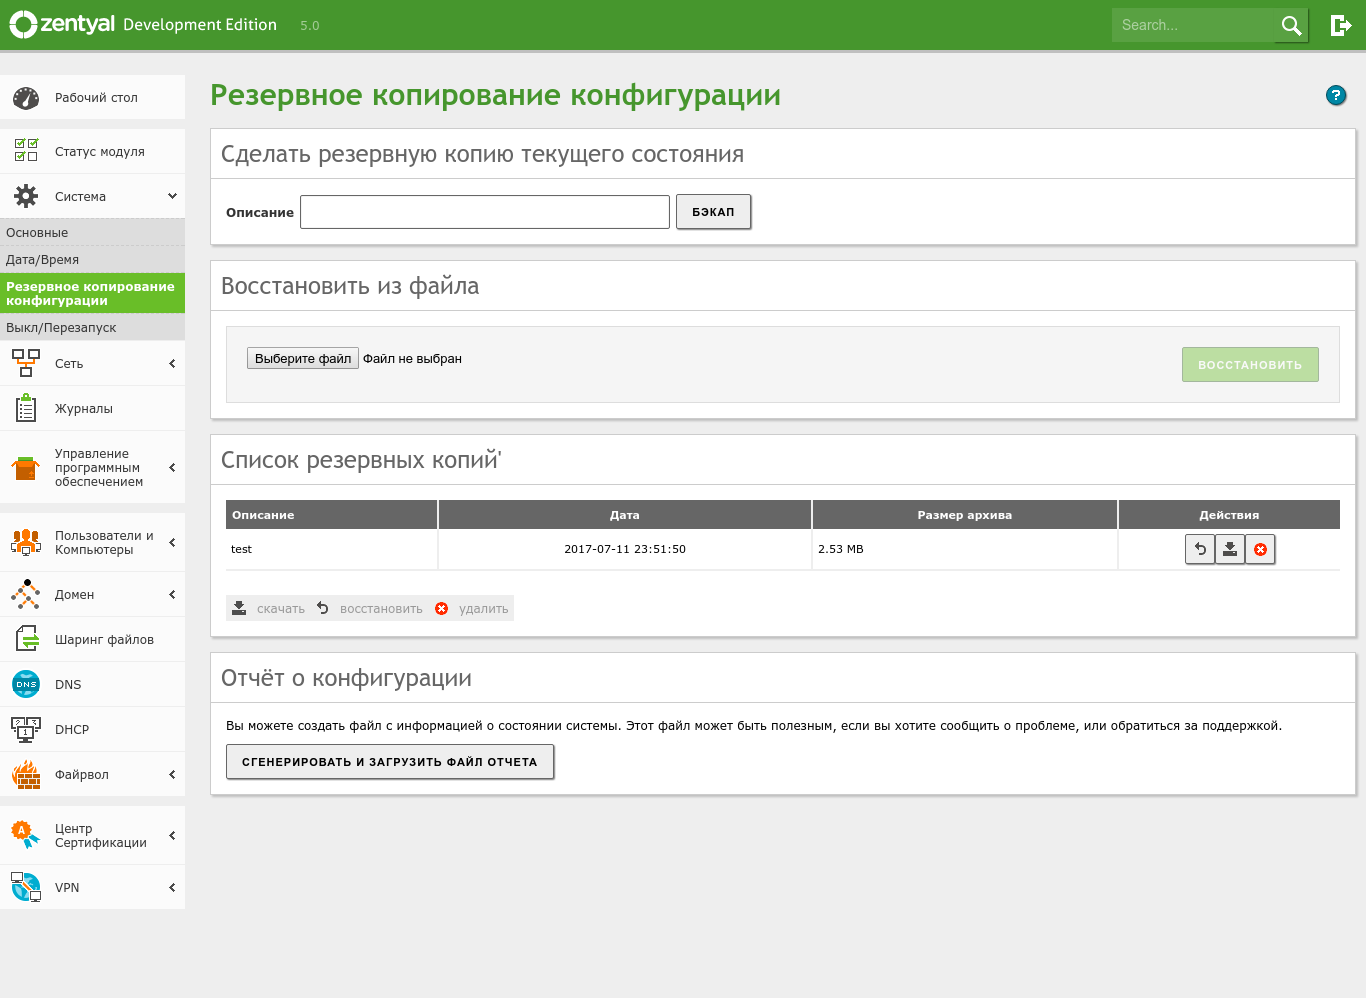
Once the server is set up, it’s a good idea to plan for backups and fast recovery in case of failures. In Zentyal, this is handled under System → Configuration Backup. There you’ll see how straightforward configuration backups are: you can create a snapshot of the current state by giving it a name, restore from a previously created configuration archive, and generate a backup report. Since the configuration isn’t tied to specific hardware, you can easily migrate it to another server.
Conclusion
Zentyal is an excellent product that lets you manage virtually every aspect of the distro through a web interface that brings together roughly forty modules for networking, network services, office server roles, and enterprise infrastructure components. It’s also worth noting that the admin UI’s design has improved significantly compared to the earlier 2.x and 3.x branches. The system is based on Ubuntu 16.04 LTS, which means long-term support for the underlying distro—an important consideration. Overall, it’s a solid choice, especially for admins just getting their feet wet in the Linux world. 🙂
If anyone’s interested in this solution—including setting up a Zentyal-based AD domain with all the bells and whistles like GPOs—I’ll post a link in the comments to resources on preparing scripts for Group Policy. I’ll also add some materials on administering an AD domain on Zentyal.
Thank you, everyone!
