The hallmark of Unix-like systems—the idea that everything is treated as a file—has long been a staple in discussions of their internals. The countless articles about Linux attest to that. Hardware is no exception. A graphics card, a sound card, a USB-attached peripheral—in Linux, they’re all just files.
It’s striking that, of all operating systems, only Plan 9 (aside from a couple of spin-offs with a similar fate) takes this approach to its logical extreme and can effortlessly discover a remote machine’s hardware and control it as if it were its own.
In Plan 9, device passthrough is handled by the 9P RPC protocol. It provides access to virtually any files and devices, both local and networked. Unfortunately, Linux can’t boast anything quite that universal. Still, there are a few tools—some would call them hacks—that enable access to hardware on a remote machine.
USB
When people talk about passing through local hardware to another computer, the first examples that often come to mind are a home laptop’s webcam or a smartphone connected to it—devices you need to make accessible from a remote desktop. For example, from an office across town (or in another city, or even another country).
In this situation, the USB/IP utility can help. The project hasn’t seen active development for quite some time, but that hasn’t affected its functionality — it’s still packaged in the repositories of most popular distributions.
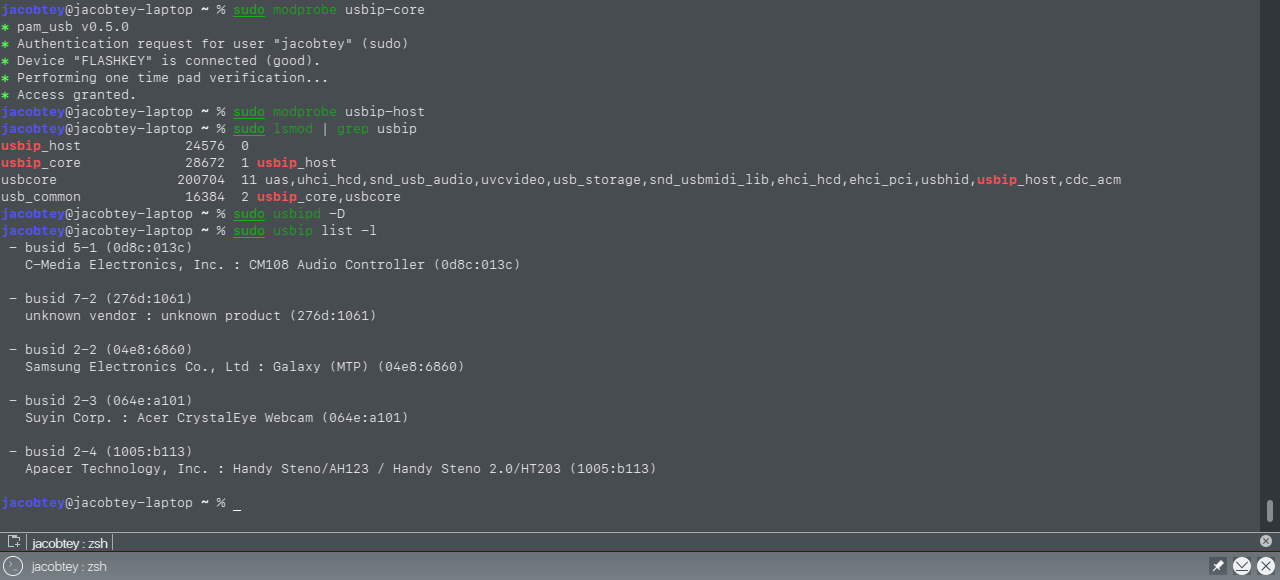
First, install the USB/IP package on the machine whose devices you want to make accessible from outside. Next, load the required modules:
$ sudo modprobe usbip-core
$ sudo modprobe usbip-host
Verify that everything has loaded correctly:
$ sudo lsmod | grep usbip
Now start the server:
$ sudo usbipd -D
Because USB/IP uses its own addressing scheme, independent of the native one, device discovery is performed with the command
$ sudo usbip list -l
It will display a list of all devices currently connected to the USB bus.

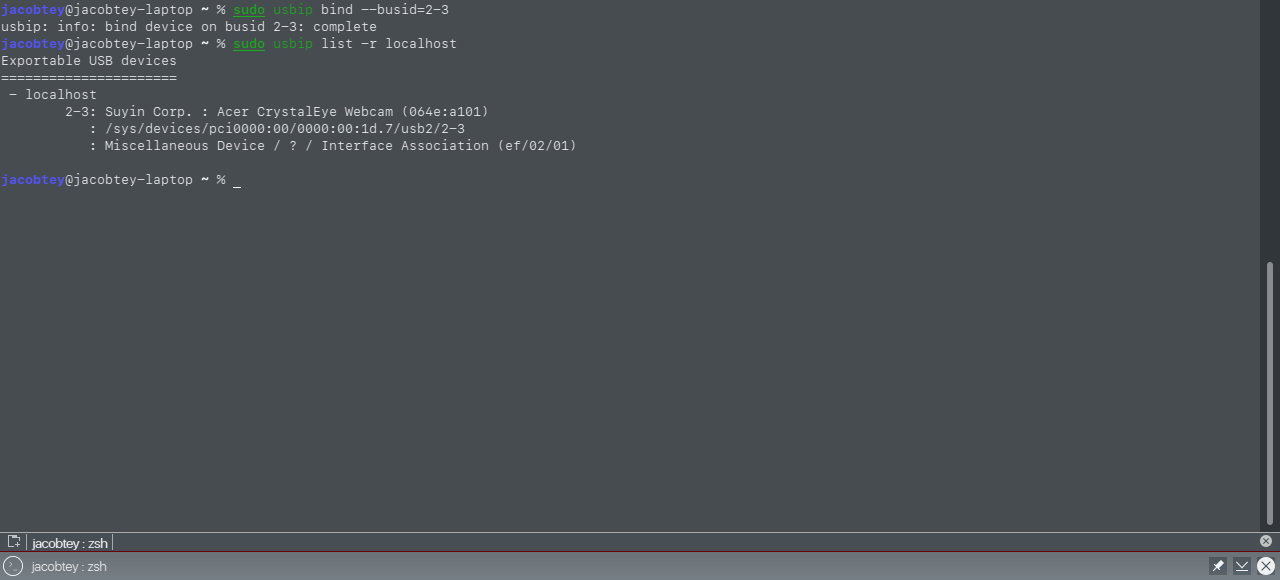
Now we can move on to sharing the device itself (let’s assume it’s the webcam with index 2-3 from the list we obtained):
$ sudo usbip bind --busid=2-3
Another check to verify the steps you’ve taken are correct:
$ sudo usbip list -r localhost
We’re done with the source computer. Next, set up the one that will use the first machine’s peripherals.
Now, on the client machine, install USB/IP and run:
$ sudo modprobe usbip-core
$ sudo modprobe vhci-hcd
Check the availability of the shared hardware on the server from the list:
$ sudo usbip --list SERVER_ADDRESS
Now, let’s connect our camera:
$ sudo usbip --attach SERVER_ADDRESS 2-3
Checking the result:
$ sudo usbip --port
The remote USB device should now appear among your local devices, and you can use it like any other. To verify that it’s connected correctly, run the command: lsusb.
$ lsusb
info
There is a USB/IP client for Windows. However, due to a protocol version bug in its executable, it doesn’t work correctly out of the box. You need to do some extra tweaking—modify the relevant constants in the source code and rebuild.
RS232
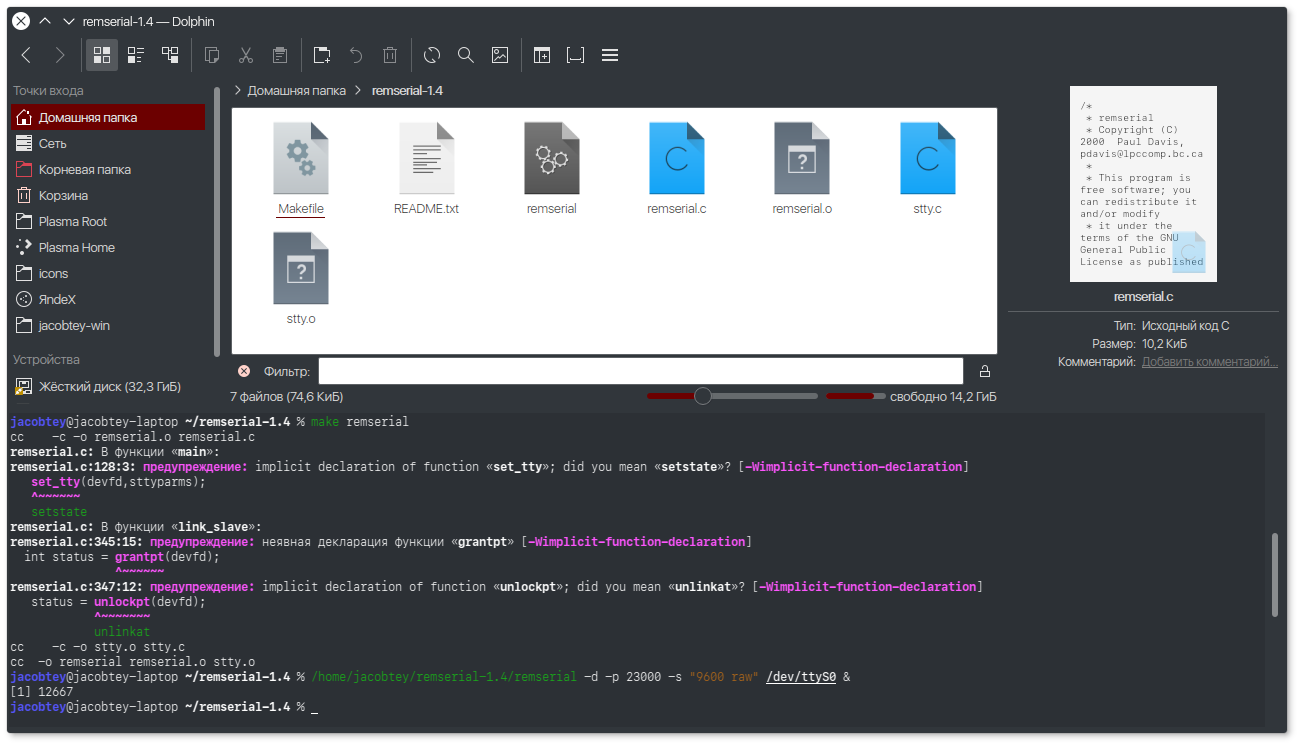
The most straightforward way to do two-way sharing in Linux is via serial (COM) ports. No extra drivers are needed. A small utility called remserial, available in source form, handles everything. It lets you access RS-232 equipment attached to a remote machine from Linux, and it can also bridge two serial devices connected to different hosts over a network.
You can expose an RS‑232 port over the network by specifying the network port (-p), the baud rate, the stty mode (-s), and the port name (here /dev/ttyS0), like this:
$ remserial -d -p 23000 -s "9600 raw" /dev/ttyS0 &
To connect to a COM device on a remote machine (server), do the following:
$ remserial -d -r server_address -p 23000 -s "9600 raw" /dev/ttyS0 &
You can run multiple instances of the application, each using different ports and connected device addresses.

Graphics Card
Before you go setting up desktop sharing, it’s worth asking: why do you need it? There’s no shortage of ready-made proprietary options. You’ve got TeamViewer, which only recently rolled out a Linux client, and cloud solutions that run right in the browser. Still, it’s not always that simple.
In modern laptops, hybrid graphics have become the norm: there are two GPUs on board. The first is a powerful, headless discrete GPU that kicks in for heavy workloads and renders frames, which are then piped through the second GPU — a modest integrated one that stays on all the time.
Scale this scenario up to the network: the powerful GPU lives on a remote machine, while the user only has an aging netbook—one that sometimes can’t even afford to run a modern browser. You arrive at essentially the same solution as with hybrid graphics, and the tooling is the same too: VirtualGL.
info
In fact, it’s the other way around: VirtualGL was originally designed for networked/remote setups, and the hybrid‑graphics hint came later.
The VirtualGL package is available in most popular distributions, so all you need to do is install it with the standard package manager on both systems and, depending on which directory it was installed to, run the configurator on the server. In Arch Linux and its derivatives, this is done with the command
$ sudo vglserver_config -config +s +f -t
If the package is installed in / on your system, you’ll need to specify the full path:
$ /opt/VirtualGL/bin/vglserver_config -config +s +f -t
Next, restart the display manager, and you can leave the server alone.

On the client machine, after installing VirtualGL, there’s nothing to configure in VirtualGL itself. We’ll only need vglconnect and vglclient. However, you do need to install and configure SSH. Open the SSH server config file at /etc/ssh/sshd_config and add the following line:
X11Forwarding yes
Restart the sshd service. On systemd-based systems, you can do it like this:
$ systemctl start sshd
You can grab a screenshot of the program running on the server—and thus verify that the whole setup works—using the command
$ ssh -X username@server PROGRAM_NAME
You can now use vglconnect to connect to the server, encrypting the X11 traffic and the VGL image stream along the way:
$ vglconnect -s username@server
and try launching any application:
$ vglrun -q 40 -fps 25 PROGRAM_NAME
You can adjust the -q (JPEG quality) and -fps (frame rate) values, choosing the highest settings your connection can sustain. JPEG compression is used by default for remote access.
To revert the system to its original state, use the command
$ sudo vglserver_config -unconfig
Sound Card
Before sound arrived in cinema, movies stayed silent for just under thirty years. We’ve got less time than that, so after video let’s move on to audio forwarding. This is even easier if you leverage the ubiquitous PulseAudio.
On both the client and the server, open the configuration file ~/. or / and uncomment the line load-module . On the server, also add one of the following lines:
auth-ip-acl=127.0.0.1 # To allow client access from a specific IP
auth-anonymous=true   # To allow access from any IP
Also on the client machine, open the config ~/. or / (depending on whether you want these settings for a single user or system-wide) and add:
default-server = адрес_сервера
Instead of editing client.conf to send output to a remote server, you can use the pax11publish utility:
$ pax11publish -e -S server_address
Disabling output to a remote host:
$ pax11publish -e -r
For the changes to take effect for a specific application using PulseAudio, you need to restart that application.
Alternative approach
Buried in the depths of the internet in a somewhat neglected state is TRX, a network audio streaming project built on ALSA, the Opus codec, and the oRTP library. It’s as easy to use as an AK‑47, but far less reliable—the source hasn’t been updated since 2014. There’s reason to suspect that caveat applies only to the publicly available code, though, since the same author’s Cleanfeed online audio service built on it looks fairly up to date.
Drives
For many, the term “sharing” is practically synonymous with exposing disk drives, their partitions, and the data on them to the network. Even casual users can drop the word Samba—and won’t hesitate to punch it into a search engine to find a quick setup guide, inevitably running into news about yet another vulnerability and the latest large-scale outbreaks driven by sneaky malware.
If you like finding unconventional solutions, you’ll probably appreciate exporting a block device in a way that aligns with industry standards. On Linux, this can be done with DRBD, which has been part of the kernel since 2009. The name says it all—Distributed Replicated Block Device. It provides real-time synchronization between local and remote block devices.
The preparatory step is to install the drbd-utils package. You can configure it step by step using drbdsetup, but it’s simpler to edit the configuration file / on both nodes.
global { usage-count no; }
common { resync-rate 100M; }
resource r0 {
  protocol C;
  startup {
    wfc-timeout  15;
    degr-wfc-timeout 60;
  }
  net {
    cram-hmac-alg sha1;
    shared-secret "PASSWORD";
  }
  on hostname1 {
    device /dev/drbd0;
    disk /dev/sda5;
    address 192.168.0.1:7788;
    meta-disk internal;
  }
  on hostname2 {
    device /dev/drbd0;
    disk /dev/sda7;
    address 192.168.0.2:7788;
    meta-disk internal;
  }
}
The cram-hmac-alg option selects the encryption algorithm that must be supported on both machines. The available algorithms are listed in /. The shared-secret password can be up to 64 characters long.
Hostnames are obtained with the uname command, run individually on each machine. Set the disk options to the device names of the drives or their partitions for the corresponding host. Then specify the IP addresses and the ports in use. The sizes you assign should be proportional to the capacity of the underlying device.
Also initialize the storage on both machines:
$ sudo drbdadm create-md drbd0
Then start the DRBD daemon:
$ sudo systemctl enable drbd
$ sudo systemctl start drbd
Next, switch to the node that will handle the data (only one of them can access the storage at a time) and promote it to master:
$ sudo drbdadm primary all
Next, create and mount the storage filesystem:
$ sudo mkfs.ext4 /dev/drbd0
$ sudo mount /dev/drbd0 /mnt
In the end, we effectively got a network-backed RAID array with single-writer access: only one of the participating hosts can use it at a time. You can still access the data from another machine—just unmount the filesystem on the current master, promote the second machine to master, and mount the storage there. Three simple commands are all it takes: bind one to a hotkey and put the other two into a script.
Conclusions
Linux isn’t perfect and at times can lag behind other systems in terms of features—like Plan 9 when it comes to remote access to a computer’s hardware resources. Even so, when you need to tackle a specific task, the chances of finding a suitable set of tools are almost guaranteed.
