Vulnerability scanning is performed after we’ve discovered, collected, and enumerated details about the target system’s infrastructure. The results of a vulnerability scan could be used to compromise the target, undermining its integrity and confidentiality.
In this chapter, we’ll discuss two broad categories of vulnerabilities and introduce various standards for classifying them. We’ll also look at several well-known vulnerability assessment tools available in the Kali Linux operating system. This chapter covers the following topics.
- Two broad categories of vulnerabilities: local and remote.
- A vulnerability classification that maps to an industry standard and can be used to organize any vulnerability by specific attributes.
- An overview of several tools for discovering and analyzing vulnerabilities in the target environment, grouped by their primary security assessment functions. These include tools such as Nessus, Cisco tooling, SMB, SNMP, and web application analysis tools.
Note that whether we’re assessing an external or internal network, manual and automated vulnerability assessment methods should be used in equal measure. Relying solely on automation can yield many false positives and false negatives. Equally important is the penetration tester’s theoretical grounding and familiarity with the tools they plan to use. An auditor must continually refine their knowledge and skills.
One more crucial point: automated vulnerability assessment isn’t a complete solution. There are cases where automated tools can’t detect logical flaws, hidden issues, unpublished (zero‑day) vulnerabilities, or human factors that impact security. That’s why a comprehensive approach is recommended—combining both automated and manual assessment methods. This increases the effectiveness of penetration testing and provides the most objective input for remediation.
System Requirements
A laptop or desktop with at least 6 GB of RAM, a quad‑core processor, and 500 GB of free space on the hard drive. For the operating system, we use Kali Linux 2018.2 or 2018.3 (either as a virtual machine or installed on a hard drive, SD card, or USB flash drive).
Types of Vulnerabilities
There are three main categories of vulnerabilities, each of which can be further divided into local and remote: vulnerabilities introduced during software development, implementation errors, and vulnerabilities identified during system operation.
- Design/requirements vulnerabilities — caused by flaws in the software requirements and specifications.
- Implementation vulnerabilities — security defects found in the system’s code.
- Operational vulnerabilities — issues that can arise from misconfiguration or improper deployment in the target environment.
Across these three classes, we distinguish two broad types of vulnerabilities—local and remote—both of which can appear in any of the categories described.
Local vulnerabilities
When an attacker needs to run code on the system to gain access, it’s called a local vulnerability. By exploiting it, the attacker can escalate privileges and gain unrestricted access to the machine.
Consider a scenario where an attacker, Bob, has local access to a system running Windows Server 2008 (32-bit x86). The administrator enforced a security policy that restricted Bob’s access to a specific application. Under pressure, Bob discovered that by using a malicious code fragment he could gain system- or kernel-level access to the machine. By exploiting a well-known vulnerability (for example, CVE-2013-0232, the GP Trap Handler nt!KiTrap0D), he escalated his privileges, allowing him to perform all administrative tasks and gain unrestricted access to the application. This clearly illustrates how an attacker can leverage a vulnerability to obtain unauthorized access to a system.
Remote Vulnerability
A remote vulnerability is a condition where an attacker doesn’t yet have access but can obtain it by executing malicious code over the network. This type of flaw allows an attacker to gain remote access to a computer without any physical presence or local interaction.
For example, Bob and Alice are on the Internet from different devices with different IP addresses, and they live in different places. Suppose Alice’s computer runs Windows XP and contains sensitive biotech information, and Bob knows the IP address of her machine and which OS it’s running. Bob looks for a way to gain remote access to Alice’s computer. Over time he learns that the Windows Server service vulnerability MS08-067 can be easily exploited remotely on Windows XP. He then runs an exploit against Alice’s machine and gains full control.
Vulnerability Taxonomy
With the growing number of available technologies over the past few years, various attempts have been made to devise a convenient classification that would cover all possible vulnerabilities. Nevertheless, not all common coding mistakes that can affect a system’s security fit neatly into such taxonomies. This is because any given vulnerability may belong to several categories or classes. In addition, each platform tends to have its own pluggable vulnerability database, faces challenges with extensibility, and, as a result, runs into interoperability issues with external systems.
The table below lists taxonomy standards (for classification and organization) that can help you identify most common security issues. Note: nearly all of these standards are already implemented in a range of security assessment tools. These tools enable real‑time analysis of software security problems.
www
- – Seven Pernicious Kingdoms (Seven Pernicious Kingdoms, PDF)
- – Common Weakness Enumeration (Common Weakness Enumeration)
- – OWASP Top 10
- – Klocwork (Clockwork)
- – WASC Threat Classification (WASC Threat Classification)
The main purpose of each of these security standards (taxonomies) is to organize categories and classes of vulnerabilities that security professionals and software developers can use to identify specific flaws. Note: no such security standard can be considered fully precise or complete.
Automated Vulnerability Scanning
Penetration testers tend to be wary of automated vulnerability scanning, and some even dismiss it as snake oil. That said, when time is tight, automated vulnerability scanners can help quickly gather a large amount of information about the target network.
Nessus 7
Tenable’s Nessus was developed two decades ago and remains a very popular vulnerability assessment tool. Nessus is available with an annual subscription. The good folks at Tenable have released Nessus Professional version 7 and offer a trial for anyone interested in trying it out.
Before you begin, determine which version of Kali Linux is installed on your system. This ensures you download the Nessus build that’s fully compatible and runs without issues on your OS.
In the terminal, run the command uname (see Fig. 6.1).

As shown in Figure 6.1, I’m running the 64-bit (amd64) Debian-based Kali Linux. Therefore, I need to download the 64-bit Debian build of Nessus.
Installing the Nessus vulnerability scanner. To install Nessus on Kali Linux, open your browser and go to the Nessus page.
The trial version includes all the features of the full version, with the only limitation being a 16‑IP cap.
To get a trial, you’ll need to register with Tenable. You’ll receive a verification code by email. Once you have the code, you can download the appropriate Nessus build for Kali Linux (see Fig. 6.2).
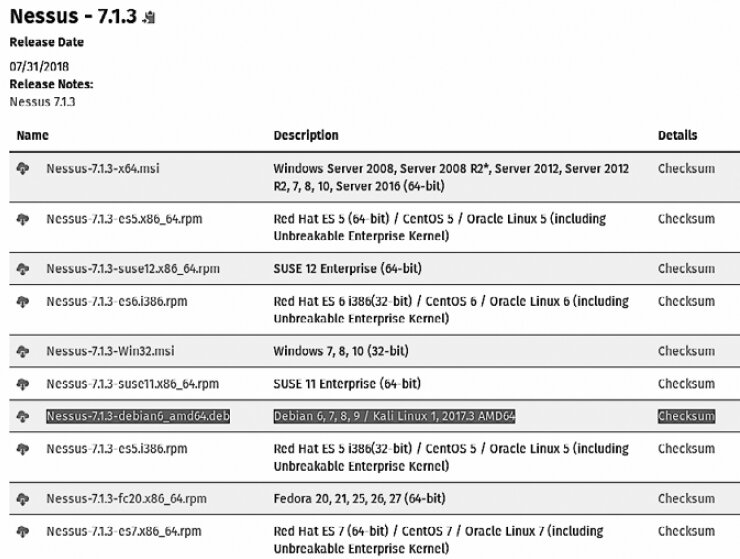
Select the Nessus build that matches your operating system. To accept the terms of use, click Accept. In the dialog that appears, click Save File. The file will be saved to your Downloads folder. For this example, we downloaded the 64-bit Nessus package (Nessus-7.).
Once the download is complete, open a new terminal and switch to the Downloads directory by typing cd . Then list the directory contents with ls. This lets you verify the file was saved to the target folder, and you can copy the installer’s filename to paste into the next command. To install Nessus, run dpkg , as shown in Figure 6.3.

info
If newer Nessus releases are available, copy/paste the downloaded package name (including its version) when running the dpkg command.
While still in the Downloads directory, start the Nessus service by running: service nessusd start. When prompted, enter your Kali Linux password (see Figure 6.4).

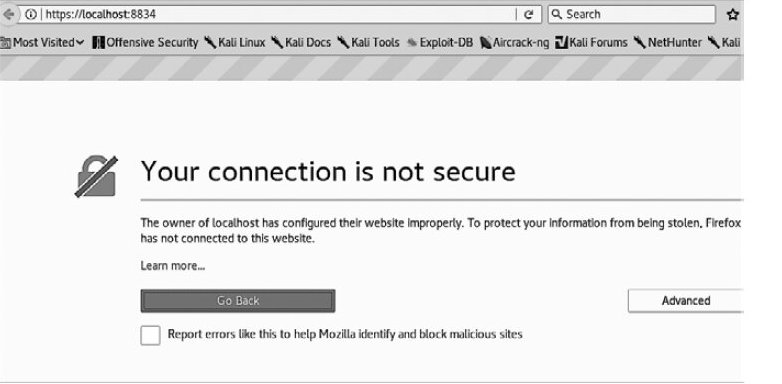
To work with Nessus, open your browser, enter https:// in the address bar, and press Enter. When a security warning banner appears, click Advanced, then click Add Exception, and finally click Confirm Security Exception (Fig. 6.5).
To proceed with starting the service, follow these steps.
- First, create an account by entering a username and your account information, then click the Continue button.
2. Leave the default settings for Home, Professional, or Manager, enter the activation code received by email in the Activation Code field, and click Continue.
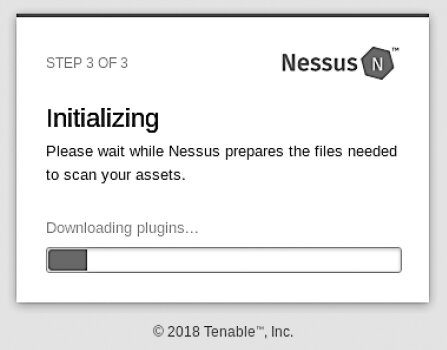
If everything goes smoothly, Nessus will begin initialization and will download and compile the necessary plugins (see Figure 6.6).
info
Depending on your Internet connection speed, this process may take a while. While the installation runs, you can visit www.packtpub.com to check out more Packt Publishing books on Kali Linux and penetration testing.
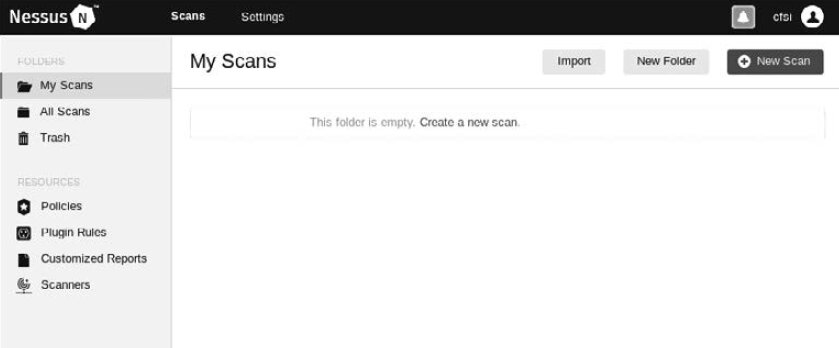
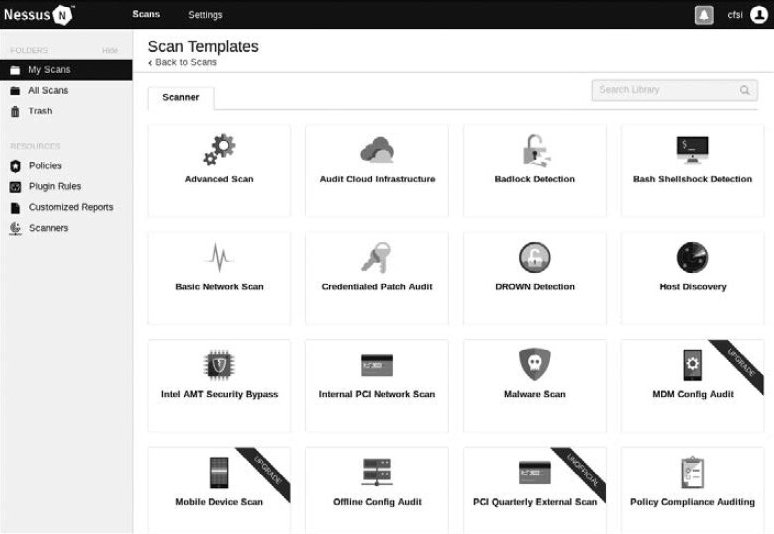
After all updates complete, the Nessus interface will load. Click the New Scan button in the top-right corner to view all available scan types (see Figure 6.7).
A wide range of scan templates is available here. Some templates are only accessible with a paid subscription. Beyond host discovery and advanced scanning, Nessus also performs advanced vulnerability scanning, including the following types.
- Cloud infrastructure scanning
- Local and remote scanning of detected compromised web shells
- Internal PCI network scanning (PCI DSS)
- Linux and Windows malware scanning
- Meltdown and Spectre vulnerability scanning
- WannaCry ransomware scanning
- Web application vulnerability scanning
Some of them are shown in Figure 6.8.
To demonstrate vulnerability discovery, we’ll use a deliberately vulnerable Linux-based web server. In Chapter 2, we covered how to set up Metasploitable 2, Metasploitable 3, a highly vulnerable Linux system, and BadStore.
In the scanner window, click the Advanced Scan template and fill in the fields under BASIC. In the Targets field, enter the IP address of the target machine or a range of IP addresses for the machines that should be scanned using the advanced scan template (see Fig. 6.9).
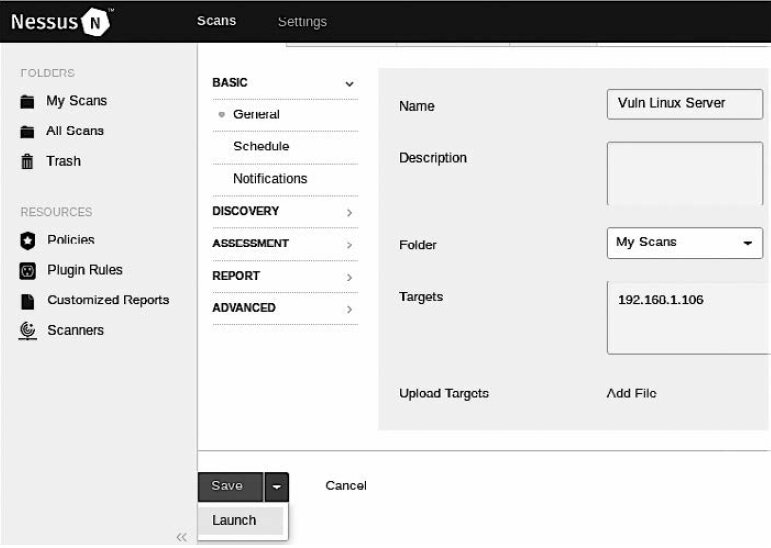
Since multiple settings are available, explore the other sections in the left sidebar. Each section lets you tailor the scan to your specific requirements.
- DISCOVERY. Nessus uses several methods to find active hosts. Here you can configure specific host discovery parameters.
- ASSESSMENT. Define the scan type and depth here.
- REPORTING. Detailed vulnerability assessment data is crucial for a penetration test report. This section lets you configure report options.
- ADVANCED. Adjust not only the number of hosts scanned but also other timing/synchronization parameters.
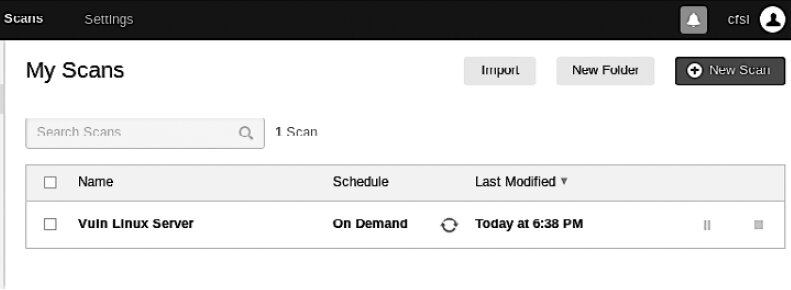
After configuring the scan, select Save or Launch. You’ll see the My Scan list.
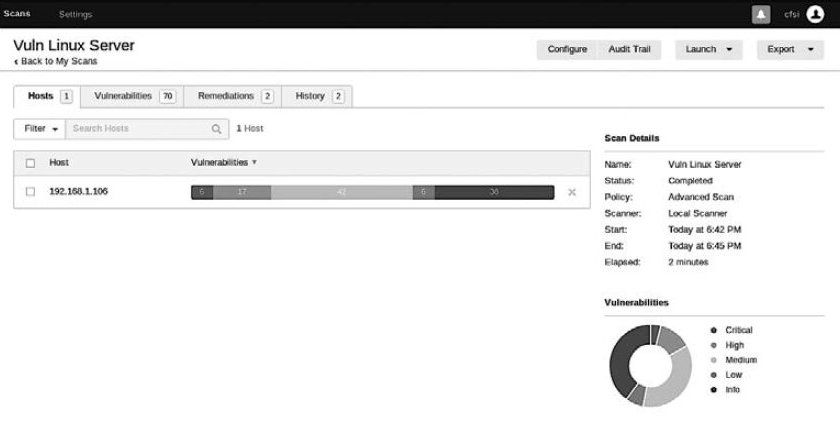
Click the Play (Start) icon to the right of the scan template name to launch the scan. If you click the template name while the scan is running, the screen will show an overview of the target host being scanned and the vulnerability details (see Figure 6.10).
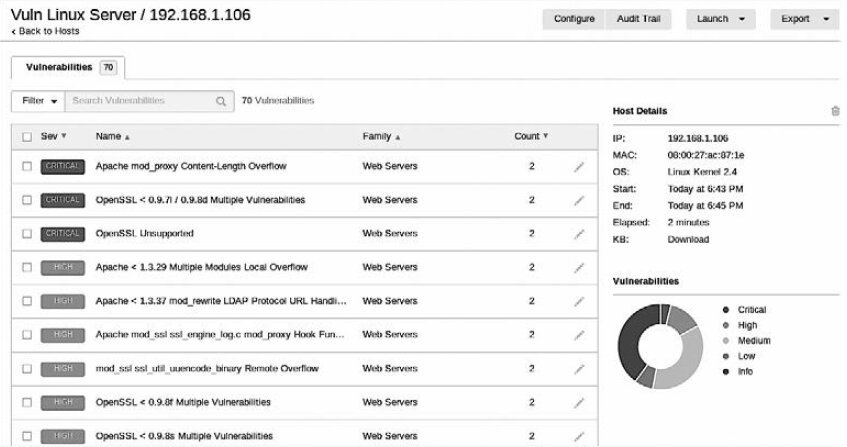
If you click the target system being scanned, you’ll see a more detailed list of detected vulnerabilities. Vulnerabilities are color-coded:
- Red — Critical severity
- Orange — High
- Yellow — Medium
- Green — Low
- Blue — Informational
As shown in Figure 6.11, the scan identified a total of 70 vulnerabilities, including six critical and 17 high-severity issues. This indicates the system is highly vulnerable.
Clicking the colored vulnerability categories will display the findings sorted from highest severity (critical) to lowest (informational) (see Fig. 6.12).
The information obtained covers not only the vulnerabilities themselves but also the available exploits. This allows the tester to plan and execute additional attacks against those vulnerabilities (see fig. 6.13).
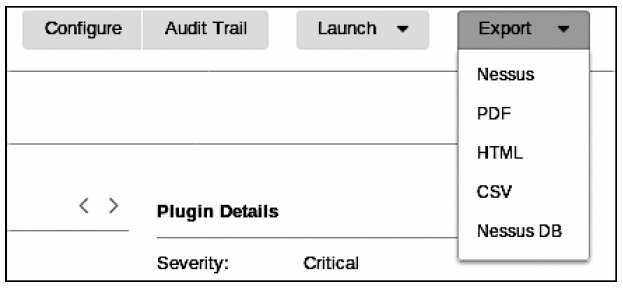
Nessus is a powerful, feature-rich tool you can use during penetration testing. It provides a lot of actionable information. We can’t cover the entire product here, so we recommend spending some time exploring its capabilities on your own. Note that Tenable offers both a free trial and a Home/Essentials edition. If you want to scan external IP addresses or use Nessus for client work, you’ll need a paid license.
OpenVAS
Open Vulnerability Assessment System (OpenVAS) is a framework composed of multiple services and utilities. OpenVAS is an open-source vulnerability scanner. It’s easy to install and offers a user-friendly interface for active monitoring (i.e., active network scanning). According to http://www.openvas.org/about.html, OpenVAS uses a vulnerability feed comprising about 50,000 Network Vulnerability Tests (NVTs). OpenVAS is the foundation of the Greenbone Security Manager line of professional appliances.
To install OpenVAS, open a terminal and run the command apt-get install openvas (see Figure 6.14).
Once the OpenVAS installation is complete, start the configuration by entering the command openvas-setup at the terminal prompt. The configuration process may take some time, depending on network load and your Internet connection speed (see Fig. 6.15).


At the end of the installation and configuration process, OpenVAS will generate a password that you’ll need when starting OpenVAS (see Figure 6.16).

To start the OpenVAS service, run the command openvas-start. Then open your browser and enter https:// or https:// in the address bar.
info
For subsequent runs of OpenVAS, open a terminal and execute the command openvas-start. Do not reinstall it.
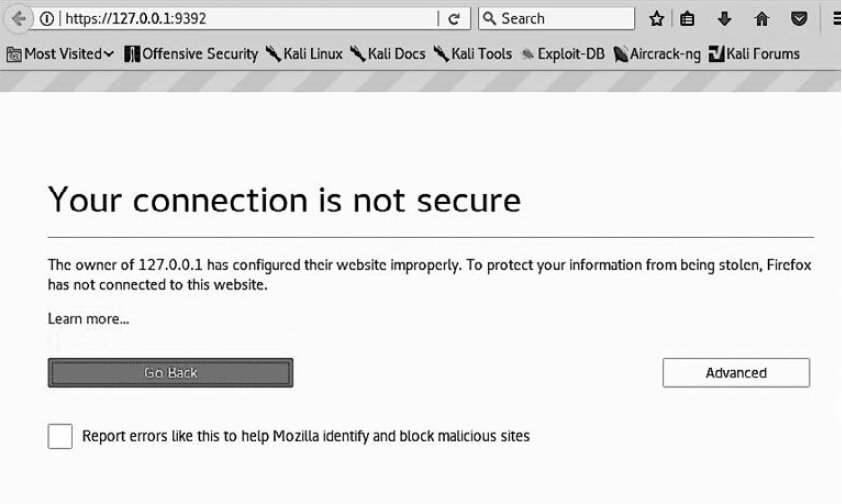
After navigating to the previous URL, you’ll need to add the security exception again. Click Advanced, then Add Exception, and finally Confirm Security Exception (see Fig. 6.17).
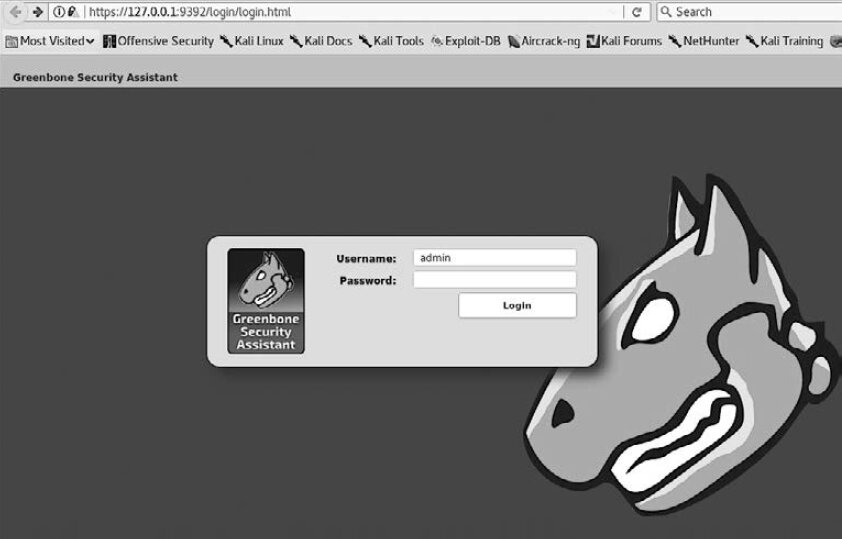
When prompted, sign in with the username admin and the password generated during installation. Make sure you store these credentials securely, as you’ll need to log in to OpenVAS multiple times during regular use (see Fig. 6.18).
To start a scan, click the Scans tab, then click Tasks. An information window will open; select the Task Wizard. It’s represented by a purple icon in the upper-left corner of the screen (see Fig. 6.19).
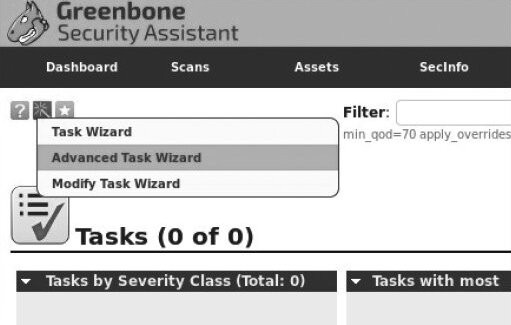
In the menu that opens, click Advanced Task Wizard. In the dialog that appears, fill in the required fields (see Figure 6.20). Note: the Scan Config field offers several scan profiles, including Discovery, Full and fast, Full and fast ultimate, and Full and very deep ultimate (the most resource-intensive and time-consuming option).
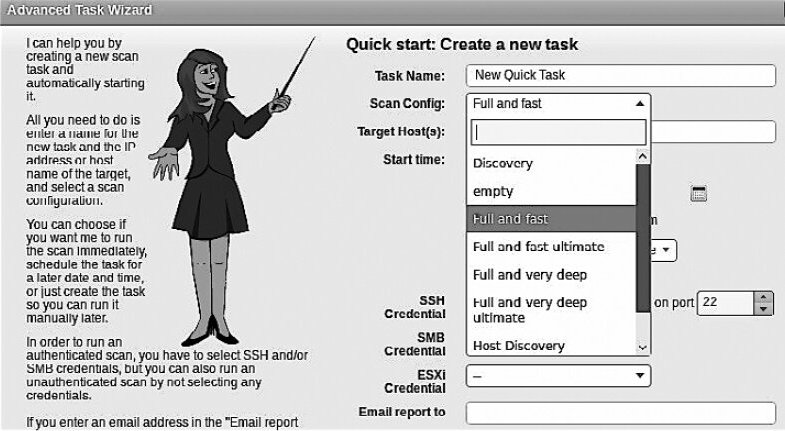
The Start time parameter lets a penetration tester schedule a scan. This is a very useful feature. Scanning can disrupt network operations, so it’s best to run it when the network is lightly loaded—during off-hours or on weekends.
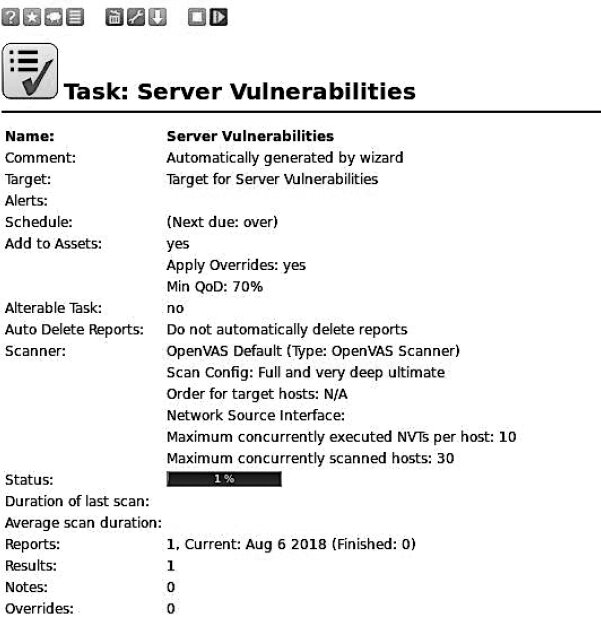
Once all fields are filled in, scroll down and click the Create button. This will start the scan, and a summary of the scan and its status will appear on the screen (Figure 6.21).

To view more details about a task, in the Name field click the task name (see Figure 6.22).
When the scan is complete, click Done. A report will be generated listing the detected vulnerabilities along with a severity rating for each one (see Figure 6.23).
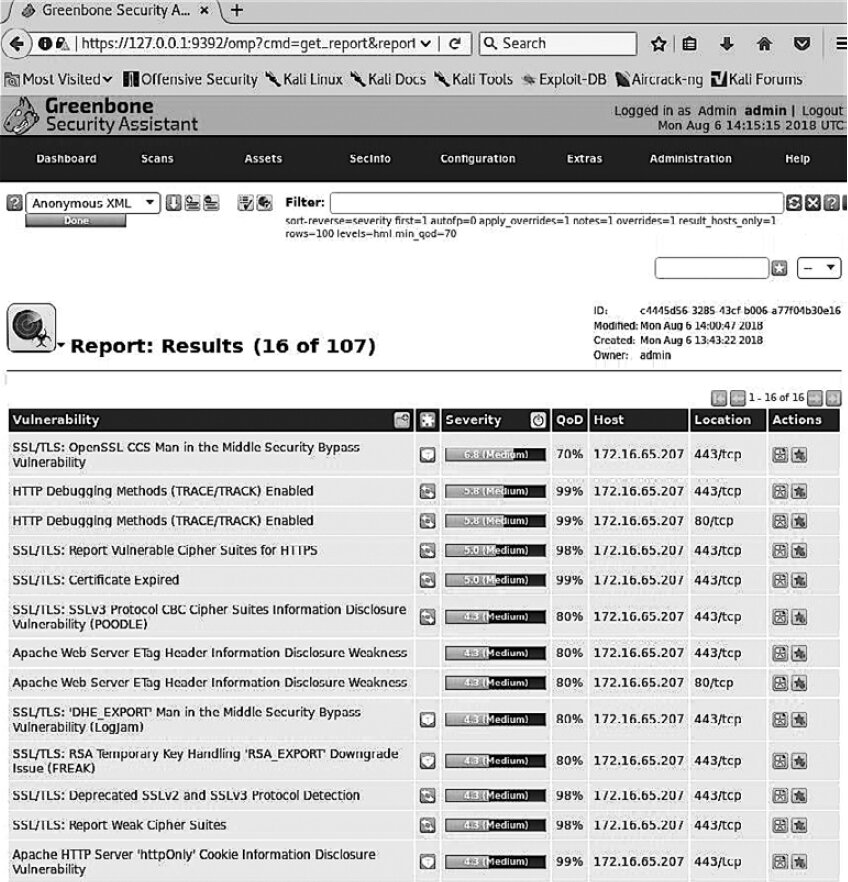
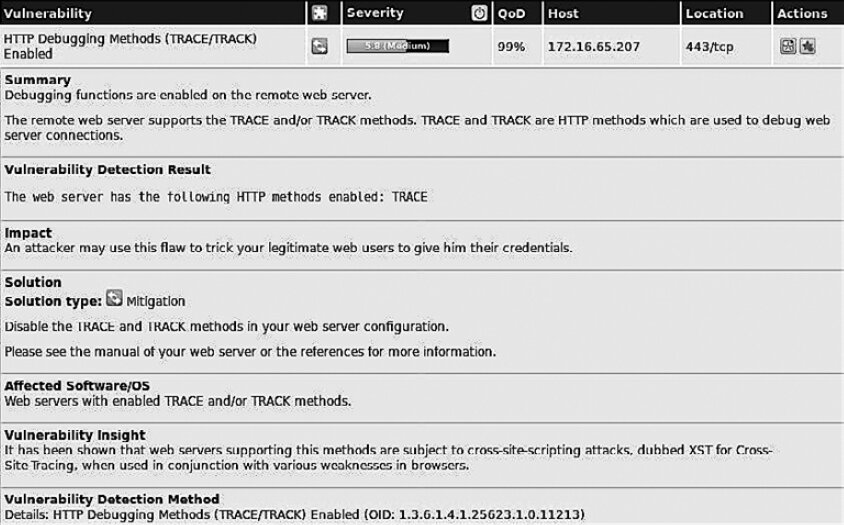
If you click any of the listed vulnerabilities, additional details will appear—such as Summary, Impact, Solution, Affected Software/OS, and more (see Figure 6.24).
Linux Vulnerability Scanning with Lynis
Developed by Cisofy (www.cisofy.com), the Lynis application is a security auditing tool operated from the Kali Linux command line. It’s free software, with an enterprise edition also available. Lynis is used for automated security assessments and vulnerability scanning across various versions of Linux, macOS X, and Unix.
Unlike many tools in this category, Lynis focuses on security auditing for regulatory frameworks such as HIPAA (healthcare data protection), PCI DSS (payment card security), SOX (internal controls under Sarbanes–Oxley), and GLBA (financial data privacy). It helps organizations operating under these standards secure and harden their systems.
You can download and install Lynis yourself. Installing it directly on the target system will save bandwidth compared to setting it up on a remote machine.
www
Lynis is included with Kali Linux, but it can also be cloned from GitHub or downloaded from the official website.
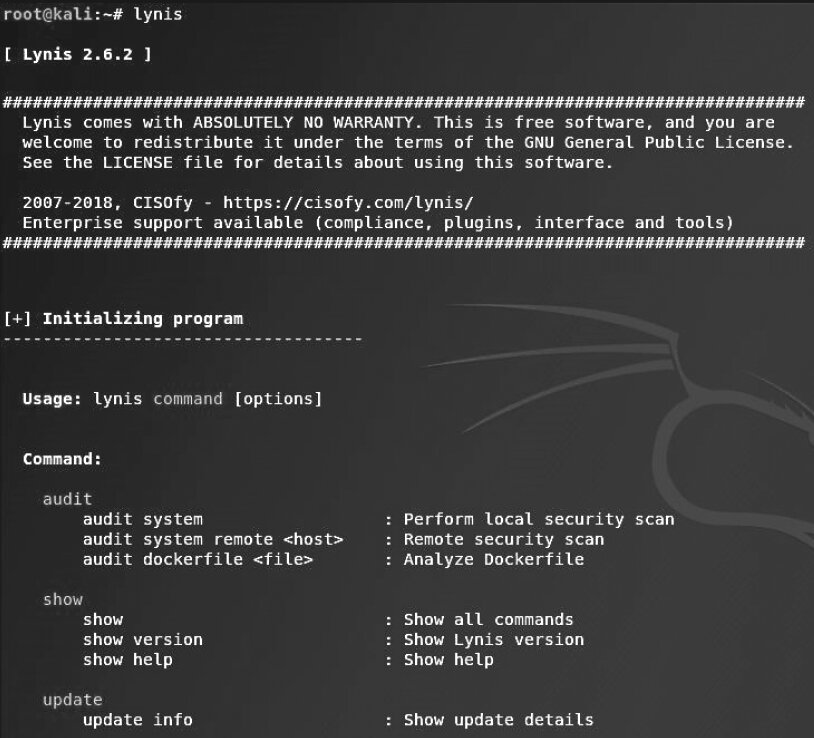
To launch Lynis in Kali, go to Applications → Vulnerability Analysis → Lynis. To start it from the command line, run lynis in a terminal. It will display the installed Lynis version (e.g., 2.6.2) and initialize the program. You’ll also see a list of all command options (see Figure 6.25).
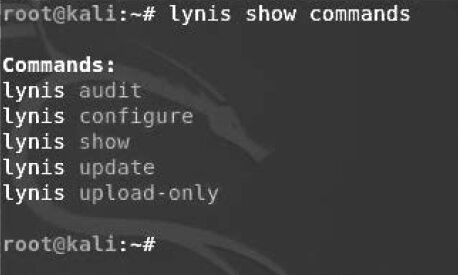
If you’ve forgotten the command you need, run lynis show commands (see Fig. 6.26).
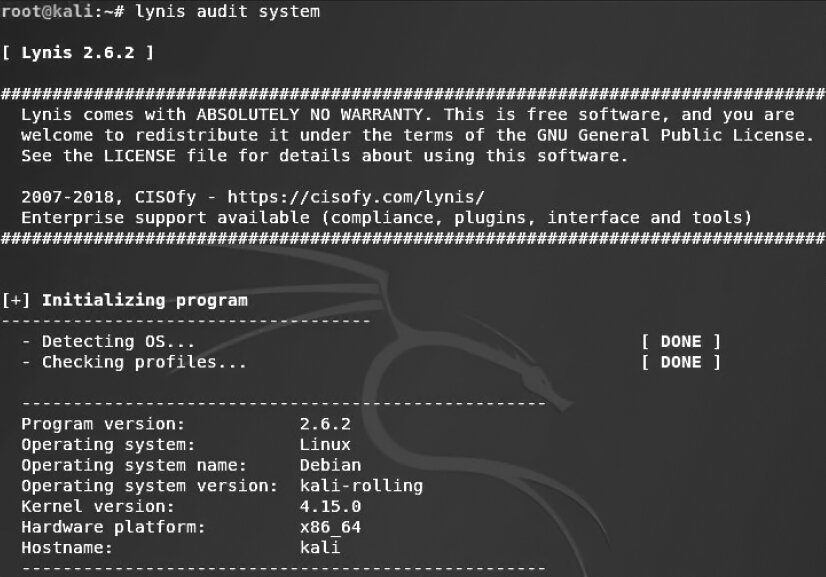
Lynis is a fully automated security auditing tool with a minimal command set. To audit your Kali Linux machine, simply run: lynis audit system. The duration depends on your system’s specs; it typically takes 15 to 30 minutes. The audit results are shown in Figure 6.27.
The results of the check include the following details:
- Debian release information
- Boot process and services
- Kernel
- Memory and CPU
- Users, groups, and authentication
- Shell
- File system
- USB devices
- Networking and firewalls
- Ports and printers
- Kernel reliability
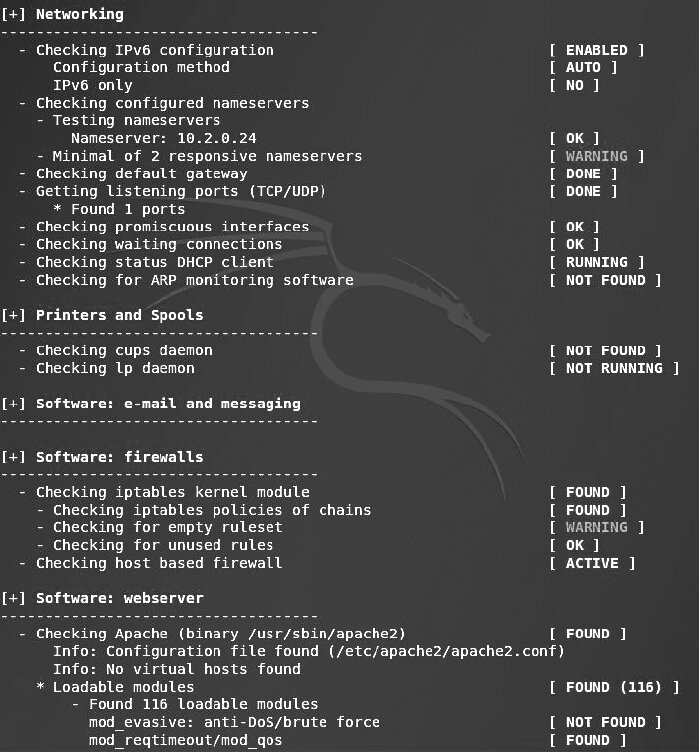
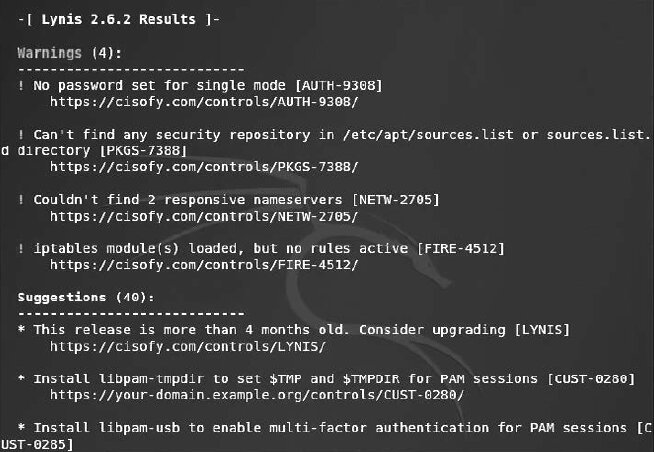
Figure 6.29 shows an excerpt of the Lynis scan results with four warnings and 40 suggestions.
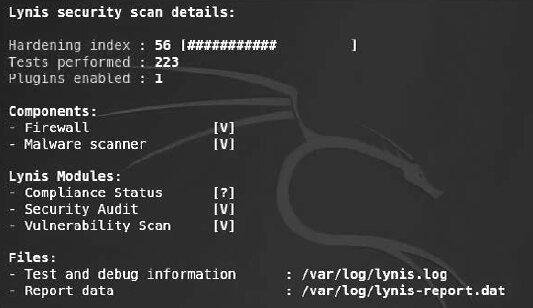
At the bottom of the test results, you’ll find an overall summary of the scan (see Figure 6.30).
Vulnerability Scanning and Enumeration with SPARTA
SPARTA is a GUI-based network penetration testing tool. It was developed by Antonio Quina and Leonidas Stavliotis of SECFORCE. SPARTA ships with Kali Linux. It automates scanning, enumeration, and vulnerability assessment within a single interface. In addition to scanning and enumeration, SPARTA also includes a built-in brute-force password cracker.
www
You can get the latest version of SPARTA from GitHub and clone it to your local machine. To do this, simply run the command git .
To launch SPARTA on Kali Linux 2018, go to Applications → Vulnerability Analysis → SPARTA. To add a target host or a group of targets to the scan scope in the SPARTA 1.0.3 GUI, click in the left pane. Then enter the range of IP addresses in the IP Range field (see Fig. 6.31).
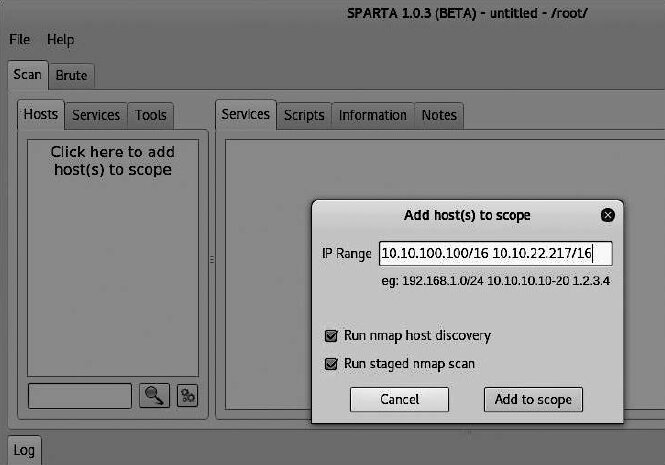
After adding the hosts’ IP addresses, click the Add to scope button. A phased scan of the targets will begin (see Fig. 6.32).

After the network scan completes, the main SPARTA window will display the following tabs: Services, Scripts, Information, Notes, Nikto, and Screenshots, where you’ll find a lot of useful information.
By default, the Services tab opens first, showing the list of open ports and services (see Fig. 6.33).
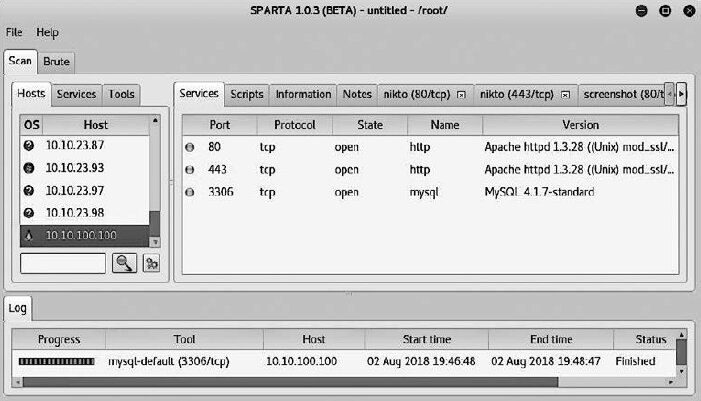
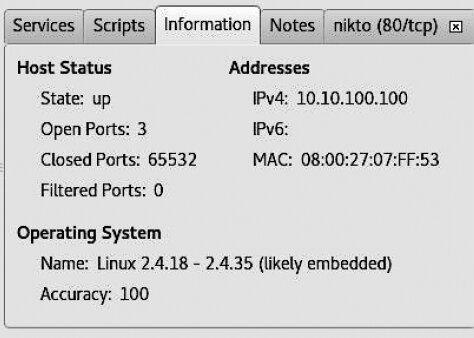
If you open the Information tab, you’ll see the collected details about the target host: its IP address; the number of open, closed, and filtered ports (if any); the detected operating system and version; and the detection accuracy score (see Fig. 6.34).
Since our target in this case was a Linux server, we used the Nikto scanner. To view the list of discovered vulnerabilities, open the nikto (80/tcp) tab (Fig. 6.35).
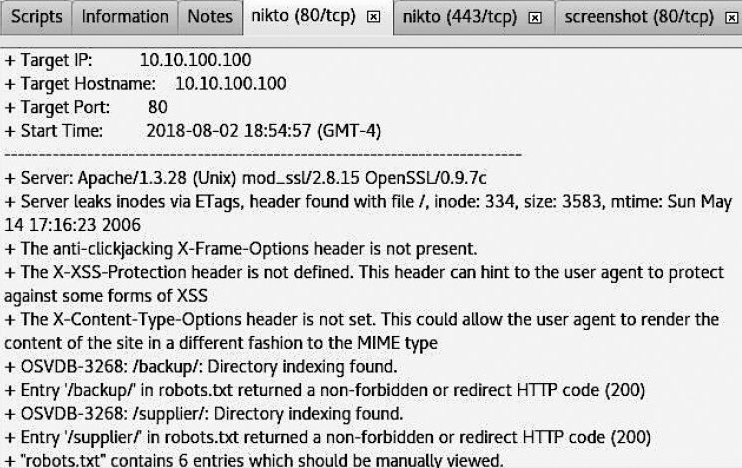
Many of the vulnerabilities discovered carry the OSVDB prefix, indicating that details about them can be found in the Common Vulnerabilities and Exposures (CVE) and the Open Source Vulnerabilities Database (OSVDB).
To get more detailed information, a penetration tester can simply Google the vulnerability name—say, OSVDB-3268—that was identified during the previous scan. The discovered vulnerabilities can then be exploited using tools like Metasploit. We’ll cover that in later chapters.
Now let’s look at another scanned machine running Windows. In the Hosts pane on the left, find the IP address 10.10.22.217 and click it. Then open the Services tab (fig. 6.36). Here you’ll see the list of open ports.
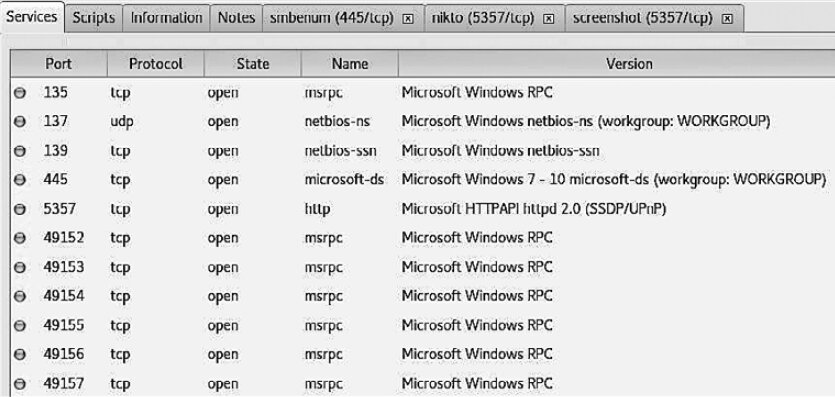
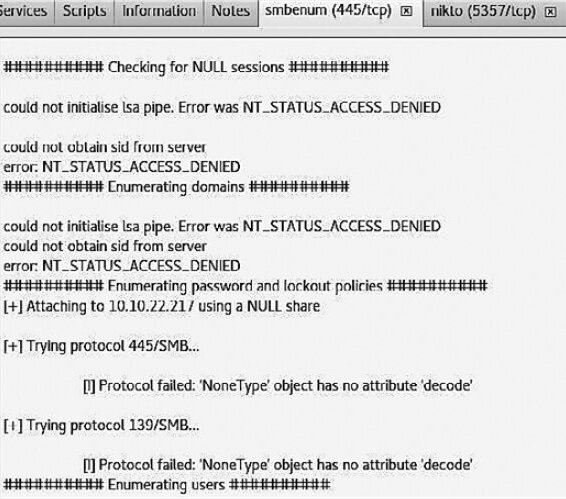
This information shows that the target machine is running Windows. To inspect its ports in SPARTA, we launched the smbenum tool. Using it, we checked for null sessions and enumerated the host. During this process, we specifically looked for information on users and shared resources (see Fig. 6.37).
SPARTA performs scanning, enumeration, and vulnerability assessment, enabling a tester to carry out various network penetration testing tasks. To do this, go to the Services tab, right-click any open port, and select the desired action from the context menu.
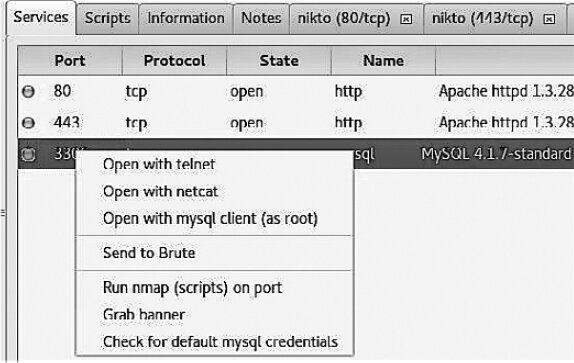
In Figure 6.38 you can see the context menu that appears after right-clicking the “open port 3306” entry. Using the options in this menu, you can try to connect to the port via Telnet, Netcat, or the MySQL client. The MySQL client requires root privileges. You can also attempt to brute-force the passwords.
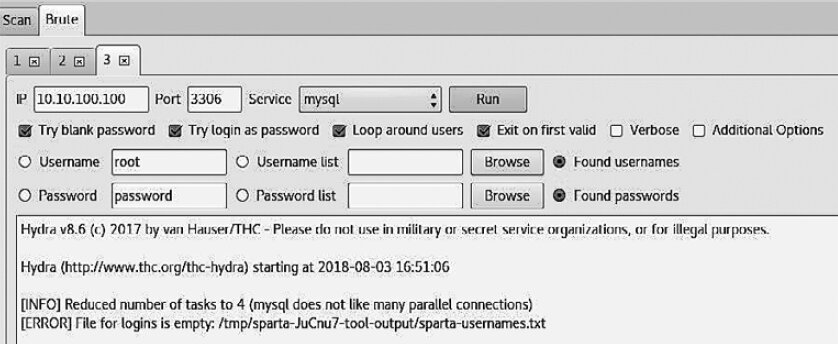
If you choose Send to Brute from the context menu, the tool will attempt an attack over the selected port using the THC Hydra password-cracking utility. In addition to other methods for gathering the required data, you can supply username and password wordlists. After configuring the necessary parameters, click Run to start the attack.
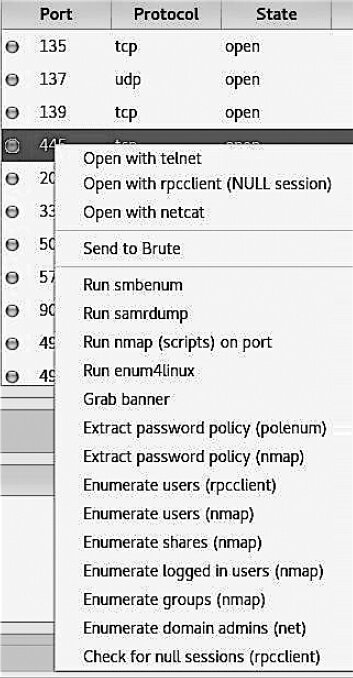
These are far from the only tools available in SPARTA. For example, if you right-click the open port 445 on a Windows host, you’ll see a long list of tools (see Figure 6.40).
Summary
In this chapter, we covered how to use several Kali Linux tools to identify and analyze critical security vulnerabilities. We also examined the three primary classes of vulnerabilities—design, implementation, and operational—and how they map to two broad types: local and remote. Finally, we discussed several vulnerability taxonomies useful in security testing and grouped them by recurring patterns.
Next, we introduced several tools you can use to automatically scan a system and identify existing vulnerabilities: Nessus, OpenVAS, Lynis, and SPARTA.
In the next chapter, we’ll explore the art of deception—social engineering—and discuss how to exploit human weaknesses to achieve your objective. In many cases, you can avoid using it altogether. But when you lack the information needed to leverage the target’s infrastructure, these techniques can be very effective.
Questions
- What is the relationship between a vulnerability and an exploit?
- Which class of vulnerabilities is considered the most dangerous?
- How is a remote vulnerability defined?
- Which tool can perform internal and external PCI DSS scanning?
- Which tool was created specifically for auditing Linux systems?
- Which tool is integrated into SPARTA for website scanning?
