
Getting Ready to Start
I’ll assume you’re already familiar with programming—you know a high-level language like C, PHP, Java, JavaScript, or similar, you’ve worked with hexadecimal numbers in those languages, and you know how to use the command line in Windows, Linux, or macOS.
Which Assembly Language is Best to Learn for Different Processor Architectures?
Do you know what an 8088 is? It’s the grandfather of all computer processors! And not just any grandfather—it’s a living one. I’d even say it’s immortal and unchanging. If you were to strip away all the advancements and features added to your modern processors, whether it’s a Ryzen, Core i9, or any other, you’d be left with the good old 8088.
SGX enclaves, MMX, 512-bit SIMD registers, and other innovations come and go. But the good old 8088 remains constant. Start by getting to know it, and after that, you’ll be able to handle any feature your processor throws at you.
Moreover, when you start from scratch—meaning you first learn the classic 8088 instruction set and then gradually explore modern features—you eventually begin to see unconventional ways to use those very features. Take a look, for example, at what I’ve done with SGX enclaves and SIMD registers in related studies.
What the Processor Does After You Launch a Program
Once you launch the software and the OS loads it into the RAM, the processor targets the first byte of your program. It extracts an instruction from there and executes it, then moves on to the next one, repeating this process until the program finishes.
Some instructions occupy one byte of memory, while others take up two, three, or more. They typically look something like this:
90
B0 77
B8 AA 77
C7 06 66 55 AA 77
Or rather, like this:
90 B0 77 B8 AA 77 C7 06 66 55 AA 77
Hold on! Only a machine can understand that level of complexity. That’s why many years ago, programmers developed a more user-friendly way to communicate with computers: they created an assembler.
Thanks to assembler, you no longer have to struggle with hexadecimal numbers; you can write the same instructions using mnemonics instead:
nop
mov al, 0x77
mov ax, 0x77AA
mov word [0x5566], 0x77AA
Agreed, this is much easier to read. However, on the other hand, if you’re seeing assembly code for the first time, this mnemonic is probably still confusing to you. But we’ll fix that right now.
Processor Registers: Their Purpose and How to Use Them
What does the mov instruction do? It assigns the number specified on the right to the variable specified on the left.
A variable is either one of the processor’s registers or a cell in the system’s RAM. The processor works faster with registers than with memory because registers are located internally. However, the processor has a limited number of registers, so inevitably some data has to be stored in memory.
When programming in assembly language, you have the flexibility to decide which variables to store in memory and which to keep in registers. In high-level languages, this task is handled by the compiler.
The 8088 processor has eight 16-bit registers (typical uses for each register are indicated in parentheses):
- AX — general-purpose (accumulator);
- BX — general-purpose (address);
- CX — general-purpose (counter);
-
DX — general-purpose (extends
AXto 32 bits); - SI — general-purpose (source address);
- DI — general-purpose (destination address);
- BP — base pointer (typically addresses variables stored on the stack);
- SP — stack pointer.
Although each register has a typical use, you can utilize them as you see fit. The first four registers—AX, BX, CX, and DX—can be used in halves if desired, with 8-bit segments (higher H and lower L): AH, BH, CH, DH and AL, BL, CL, DL. For example, if you store the number 0x77AA in AX (mov ), AH will hold 0x77 and AL will hold 0xAA.
We’ve covered the theory for now. Let’s set up our working environment and write a “Hello, world!” program to see how this theory applies in practice.
Setting Up Your Workspace
Download the NASM assembler from www.nasm.us. Note that it works on all modern operating systems: Windows 10, Linux, and macOS.
Extract NASM to a folder of your choice. It’s more convenient if the folder is close to the root directory. For example, on my Windows system, I use
c:\. If you’re on Linux or macOS, you can create a folder namednasm nasmin your home directory.You need a way to edit the source code. You can use any text editor you prefer: Emacs, Vim, Notepad, Notepad++, or any other. Personally, I like the editor built into Far Manager, along with the Colorer plugin.
To run programs written for the 8088 and check their functionality on modern operating systems, you’ll need DOSBox or VirtualBox.
Writing, Compiling, and Running a “Hello, World!” Program
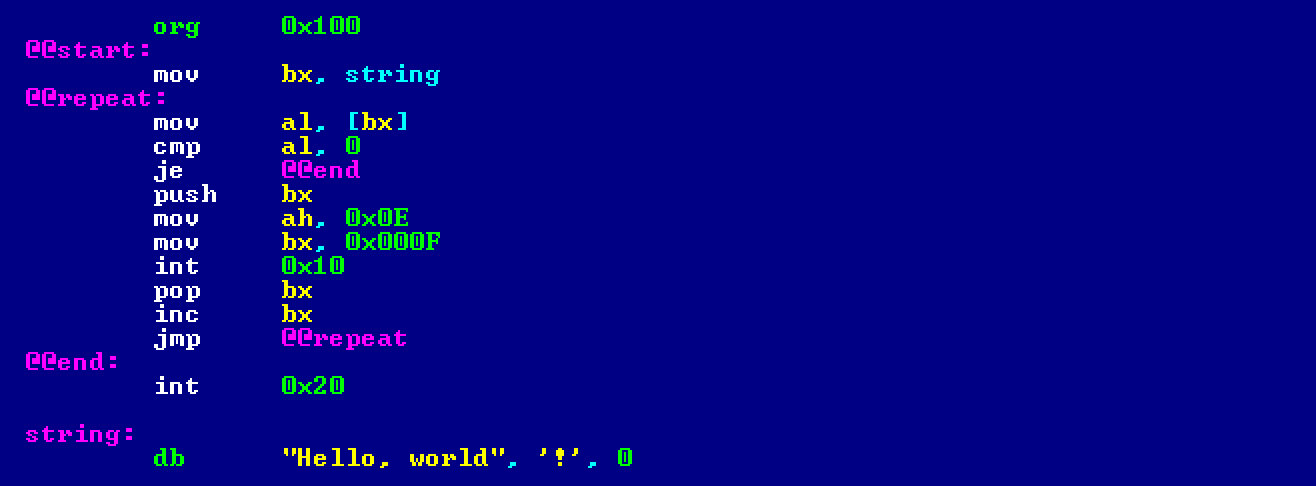
You’re about to write your first program in assembly language. Name it whatever you like (for example, first.) and copy it into the folder where nasm is installed.
If you’re having trouble understanding what’s written here, don’t worry. For now, just try to get used to the assembly code, feel it out. I’ll explain everything a bit further down. Plus, there’s an old student wisdom that says: “Don’t get something? Read and rewrite it several times. At first, the confusing will become familiar, and then the familiar will become clear.”
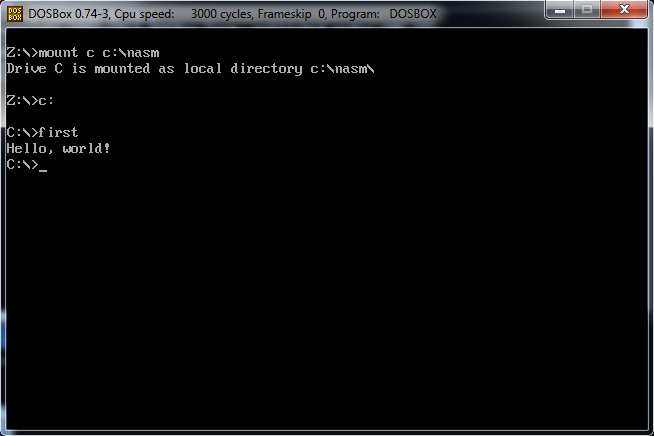
Now, open the command prompt, which is cmd.exe in Windows. Then, navigate to the nasm directory and compile the program using the following command:
nasm -f bin first.asm -o first.com
If you’ve done everything correctly, the program should compile without errors, and there won’t be any messages in the command line. NASM will simply create the first. file and terminate.
To run this file on a modern operating system, open DOSBox and enter the following three commands:
mount c c:\nasm
c:
first
Of course, instead of c:\, you should enter the directory where you copied the compiler. If everything is set up correctly, you should see the message “Hello, world!” in the console.
Instructions and Directives
Our program consists of just three components: instructions, directives, and labels.
Instructions. You are already familiar with instructions (as we’ve discussed them earlier) and know that they represent mnemonics which the compiler translates into machine code.
Directives (in our program, there are two: org and db) are instructions you provide to the compiler. Each individual directive tells the compiler what specific action to take during the assembly stage. Directives are not translated into machine code, but they do influence how the machine code is generated.
The org directive instructs the compiler to place all subsequent instructions not at the start of the code segment, but offset by a certain number of bytes (in our case, 0x0100).
The db directive instructs the compiler to include a sequence of bytes in the code. We list what to insert, separated by commas. This can be a string (in quotes), a character (in single quotes), or simply a number.
In our case: db .
Note that I’ve separated the exclamation mark from the rest of the line just to demonstrate that in the db directive, you can manipulate individual characters. However, it’s generally better to write it like this:
db "Hello, world!", 0
Labels, Conditional and Unconditional Jumps
Labels serve two purposes: assigning names to variables stored in memory (in our program, there is only one such label: string), and marking sections in the code that can be jumped to from other parts of the program (in our program, there are three such labels, which begin with two “@” symbols).
What does “jumping from other parts of the program” mean? Normally, a processor executes instructions sequentially, one after another. However, if you need to implement branching (a condition or a loop), you can use a jump instruction. You can jump either forward from the current instruction or backward.
You have one unconditional jump instruction (jmp) and around twenty conditional jump instructions at your disposal.
Our program utilizes two jump instructions: je and jmp. The first, je (Jump if Equal), performs a conditional jump, while the second, jmp, executes an unconditional jump. We use these to organize a loop.
Note: Labels must start with either a letter, an underscore, or the at sign (@). Numbers can be used as well, but not at the beginning. A colon must be placed at the end of the label.
Comments, Algorithm, Register Selection
So, our program consists of only three things: instructions, directives, and labels. However, there could be another important component: comments. Comments make reading the source code much easier.
How to add comments? Just use a semicolon, and anything you write after it (up to the end of the line) will be a comment. Let’s add comments to our program.
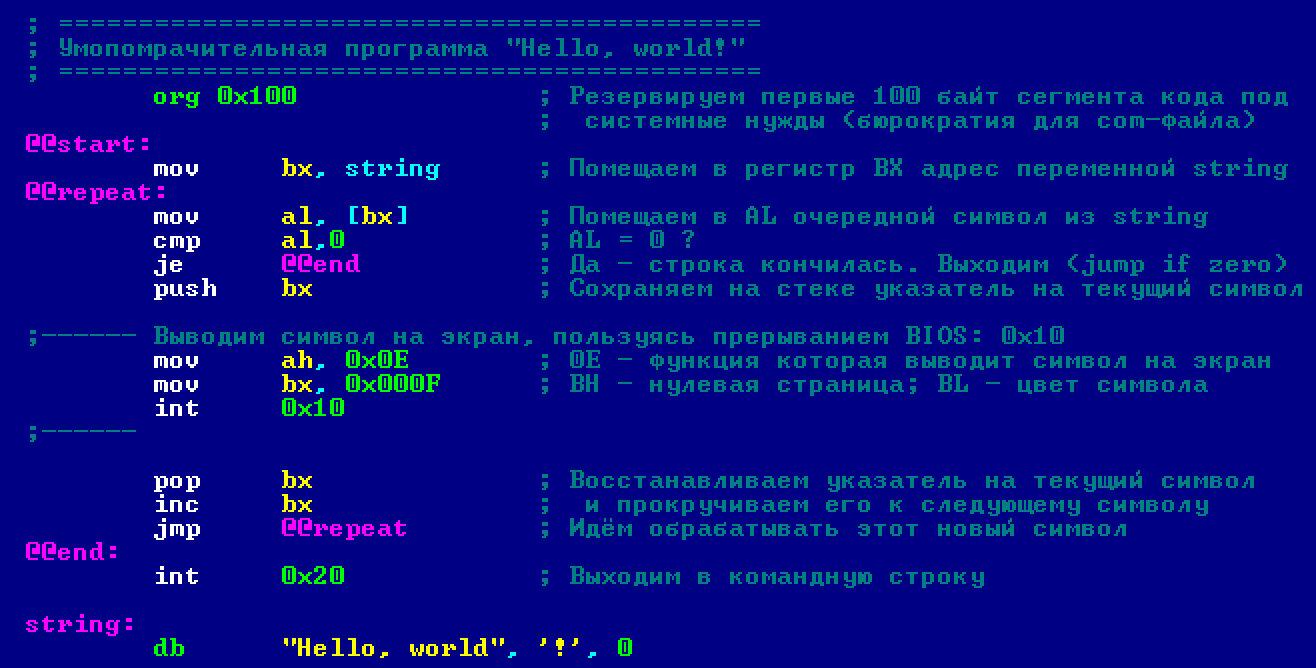
Now that you’ve understood each part of the program individually, try to grasp how all these components come together to serve the algorithm that powers our program.
- Store the address of the string in
BX. - Place the next character from the string into
AL. - If the character is 0, exit the program — proceed to step 6.
- Display the character on the screen.
- Repeat from step 2.
- End.
Note that we cannot use AX to store an address because there are no instructions that read memory using AX as the source register.
Reading Input from the Keyboard
Programs that can’t interact with users aren’t very useful. So, take a look at how you can read data from the keyboard. Save this code as second..
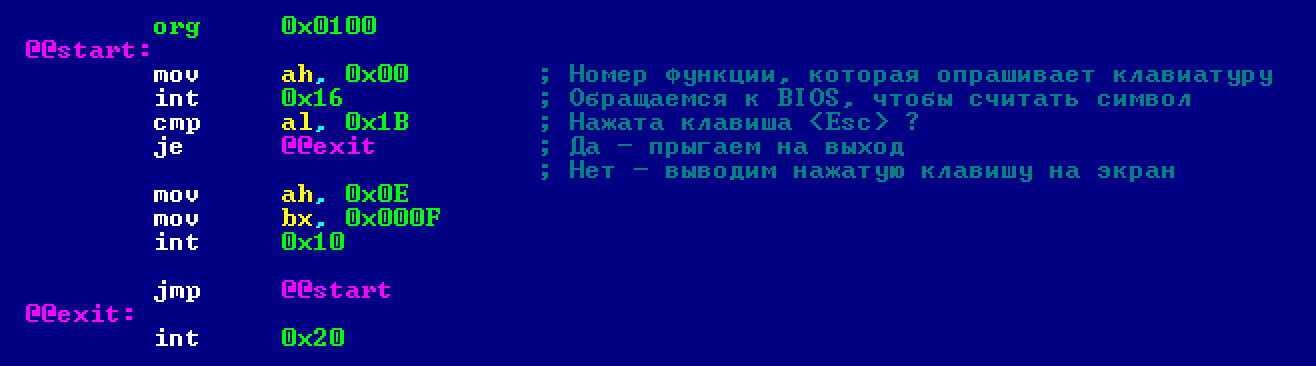
Then, go to the command line and compile it using NASM:
nasm -f bin second.asm -o second.com
Next, run the compiled program in DOSBox:
second
How does the program work? The two lines following the @@start label call a BIOS function that reads characters from the keyboard. It waits for the user to press any key and then stores the ASCII code of the pressed key in the AL register. For instance, if you press the uppercase A, 0x41 will be placed in AL, and if you press the lowercase a, 0x61 will be stored.
Next, we check: if the key with the code 0x1B (the ESC key) is pressed, we exit the program. If a key other than ESC is pressed, we call the same function as in the previous program to display the character on the screen. After displaying it, we jump back to the beginning (jmp): start.
Note that the cmp instruction (short for compare) performs a comparison, and the je instruction (Jump if Equal) directs a jump to the end of the program.
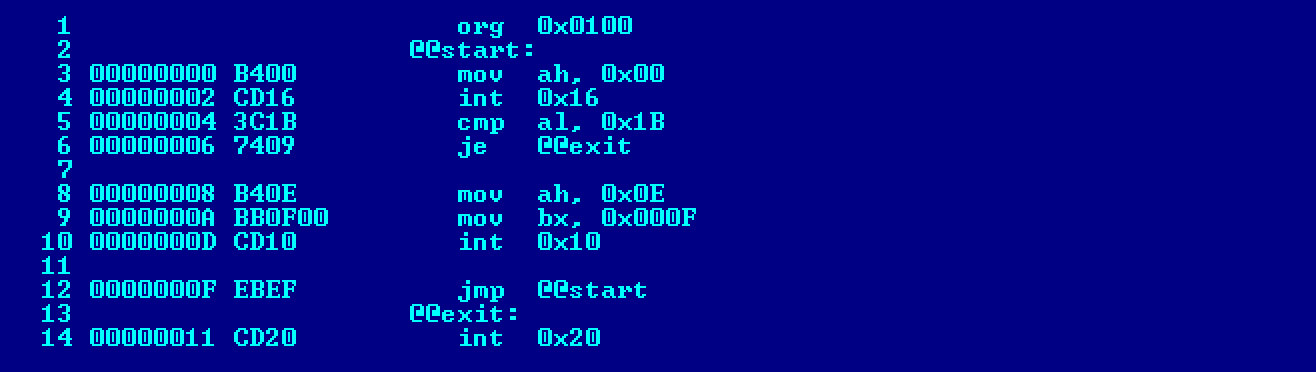
Handy Tips: Viewing Machine Code and Automating Compilation
If you’re curious to see what machine code the program’s instructions are converted into, compile the source code using the following option: -l.
nasm -f bin second.asm -l second.lst -o second.com
In this case, NASM will generate not only the executable file but also a listing: second.. The listing will look something like this.
You’re probably tired of typing out the same long sequence of characters each time you compile. If you’re using Windows, you can create a batch file (for example, m.) and insert the following text into it.

Now you can compile your program like this:
m first
Of course, you can replace first with any file name you prefer.
Conclusion
So, now you know how to write a basic assembly program, how to compile it, and what tools you need for it. Of course, just by reading one article, you won’t become an experienced assembly programmer. To create and write something worthwhile—like “Floppy Bird” or “MicroB,” which I wrote—you still have a long way to go. But you’ve already taken the first step in that direction.