
What’s on the Airwaves
First, you need to understand what’s out there in the radio spectrum and where to find it. The range is vast—from weather satellite imagery to command-and-control traffic for nuclear submarines.
info
You can pick up a USB wideband SDR receiver on eBay for about $30 with free shipping. Search for “RTL-SDR V3.” It can receive and record nearly any radio signal from 24 to 1700 MHz, which is more than enough for most experiments.
As far back as World War I, it was understood that radio transmissions can be intercepted by anyone. That’s why anything truly sensitive is sent encrypted—you can’t just switch on a receiver and hear the Pentagon’s secrets. Still, there’s interesting stuff to be found.
Let’s go over the frequencies.
- Very low frequencies up to 30 kHz: submarine communications. Radio waves this low penetrate deep into the ocean, which militaries naturally exploit. The Zeus system operates at 82 Hz, while the American Seafarer system runs at 76 Hz. The wavelength is on the order of Earth’s radius, and antenna efficiency is measured in thousandths of a percent—you may need to feed in nearly a megawatt to get a watt of radiated power. Slightly higher, around 14 kHz, you can find signals from the Alpha navigation system. Anyone can receive them with a rooftop antenna or by getting away from urban interference. Enthusiast demos are on YouTube.
- At 77 kHz you’ll find Germany’s time-signal transmitter. The DCF77 system, very popular in Europe, lets tabletop clocks and even some wristwatches sync automatically. If your watch says Atomic Clock or Radio Controlled, it can likely receive it.
- Longwave, around 400 kHz, carries NDBs (non-directional beacons). Every aircraft has an ADF (automatic direction finder) that can point to a selected airport beacon.
- On medium and shortwave (roughly 2–20 MHz) you’ll hear maritime weather forecasts and weather fax, various device telemetry; military STANAG modems, over-the-horizon radars, and more. A good shortwave receiver can pick up much of this.
- In the 27 MHz CB (Citizen Band) range you’ll hear taxi drivers and long-haul truckers.
- In the 30–40 MHz range, early cordless home phones used to operate—those big handsets with the long antenna you see in old movies. Users rarely realized anyone could listen in: these sets had no encryption.
- 88–108 MHz is the familiar FM broadcast band. RF engineers call it WFM (wideband FM, as opposed to the narrowband FM used by handheld radios). Slightly below that was the old Soviet OIRT FM band, now largely shut down.
- 118–137 MHz is the airband. Pilot–controller and air-to-air comms (for example, during air shows) are transmitted openly and unencrypted.
- At 137 MHz, NOAA weather satellites transmit. You can receive their signal and decode Earth imagery yourself—you just need the pass time overhead. Enthusiasts have posted how-tos on YouTube.
- In the 140–200 MHz and 400–500 MHz ranges you’ll find various public and private services: traffic police, fire, EMS, elevator techs, day labor crews, and more. 433 MHz is set aside for license-free handhelds you may have seen for sale. Nearby, many low-power gadgets operate too—we’ll come back to those.
- Pagers used to run around 165 MHz, transmitting subscriber messages in the clear and easy to decode. In Russia they’re essentially gone; in Europe and the U.S. they’re still used by firefighters, medical staff, and other services.
- Around 255 MHz operate U.S. SATCOM satellites. They’re noteworthy because some are old, analog birds with no authentication—anyone with the right gear and a directional antenna can, in principle, use them; some Brazilian and Mexican farmers reportedly have, as a free radiophone. It’s weak over Russia.
- 865 MHz and 2.4 GHz are ISM bands (Industrial, Scientific, Medical). You’ll find radio modems, IoT gear, and assorted devices there. If you want to send data from your Arduino wirelessly, grab a module for one of these bands.
- 900 and 1800 MHz are used by cellular networks.
- 1090 MHz carries ADS-B—aircraft transponder signals that power sites like Flightradar24. You can receive and decode these yourself.
- 1575 MHz is the GPS L1 signal, which your phone and car navigation rely on.
- Higher still (10 GHz and up) are satellites and microwave relay links.
That detour turned out longer than planned, but it was necessary. Now it’s time to talk about what we need to receive and transmit radio signals.
Hardware
In RF work, as in many other areas, your budget sets the limits. For about $30, you can get an RTL-SDR V3 receiver that can pick up radio signals from roughly 24 to 1700 MHz.

The kit includes an antenna and a mini tripod. Watch out for fakes, and skip the rock-bottom $10 AliExpress specials. Yes—some Chinese vendors even counterfeit their own gear.
With this receiver you can pick up airband signals, FM broadcast radio, handheld radios, ADS-B, and certain modem signals. However, an RTL-SDR cannot transmit.
If you want to both receive and transmit radio signals, the LimeSDR or LimeSDR Mini is a solid choice. The former is more capable and more expensive; the latter is cheaper. For roughly 400, you get a device that can transmit and receive across a 10 MHz to 3.8 GHz frequency range.

The device is sold through the crowdfunding site crowdsupply and isn’t always in stock, so grab it while you can. By the way, the creators have sold about two million dollars’ worth of these LimeSDRs. Good electronics know‑how can make you not just smart, but rich!
A quick note on the HackRF One: it can transmit and receive across the 1 MHz to 6 GHz range.

The device is decent overall, but it’s dated by today’s standards: it only has an 8‑bit DAC and ADC and can’t transmit and receive at the same time, which sometimes matters. So despite the hacker-y branding, I wouldn’t recommend buying it—at $300–400 you can get something more modern. There are also cheap Chinese clones around, but I haven’t tested them and can’t comment.
There are other devices (USRP, BladeRF, Airspy), but the ones described above are enough for our purposes. So go ahead and order whichever you prefer from an online store, and while it’s on the way, you can use the time to brush up on the theory.
Software
In this section, we’ll cover receiving radio signals and decoding them. As a simple, low-cost example that many people have at home, we’ll use a wireless light switch.

The nice thing about it is that the signal is simple and easy to read—you can analyze it with nothing more than MS Paint. All we need is a receiver (an RTL-SDR will do) and the free SDR# software.
Modulation Schemes
First, let’s look at how signals are transmitted over radio. There are several ways to do this.
Amplitude modulation (AM — Amplitude Modulation). Here, the carrier’s amplitude is modulated by the information signal. It’s the same principle you likely saw in school physics with a classic crystal (detector) radio. The main advantage is its simplicity, which is why it’s still used in simple devices. In the spectrum, it’s easy to spot by its characteristic symmetry around the center frequency.
Frequency modulation (FM — Frequency Modulation). Here it’s the frequency, not the amplitude, that is modulated. It’s used in handheld radios, baby monitors, and similar devices.
Phase modulation, QAM, OFDM—used in modems and digital communications to carry voice or data. If you see a wideband signal in the spectrum, that’s probably it.
In our case, it’s simple: cheap Chinese remotes use amplitude modulation in its most basic digital form, OOK (On-Off Keying).
Recording
First, take a close look at the remote. In my case, the back of the remote said “Made in China” and “Frequency 433.92 MHz.” That makes things easier. Even if it weren’t printed, the frequency is easy to find—the RTL-SDR has a 2 MHz bandwidth, and signals like this are clearly visible in SDR#.
In my case, the actual frequency turned out to be 434 MHz—apparently, for Chinese hardware, being off by ±100 kHz barely counts as an error. The signal should be clearly visible if you hold the remote close to the antenna and press a button.

Now we just need to record it. Launch SDR#, tune to the target frequency, select AM modulation, start recording, hold the remote close to the receiver’s antenna, and press all the buttons on it one by one. You should end up with a WAV file, which we’ll analyze.
Analysis
On-Off Keying is a very simple binary modulation, so you don’t need any specialized tools to work with it. Just open the file in any audio editor—I used Cool Edit.
For some reason, SDR# saves WAV files in stereo, even though AM isn’t stereo. In Cool Edit, I converted the audio to mono.

You can get by without Cool Edit—whether you don’t have it or you’re opposed to using pirated software. You can write out a WAV file using Python and the scientific computing and visualization libraries NumPy, SciPy, and Matplotlib.
To get the code working, install Python 3 or 2.7 along with the Matplotlib, NumPy, and SciPy libraries, then run the following command:
- on Windows:
> C:\Python3\Scripts\pip.exe install numpy scipy matplotlib- On Linux:
$ sudo pip install numpy scipy matplotlib
The program’s source code:
import scipy.io.wavfileimport numpy as npimport matplotlib.pyplot as pltrate, data = scipy.io.wavfile.read('recording.wav')data_left = data[:, -1]plt.figure(1)time = np.linspace(0, len(data_left)/rate, num=len(data_left))plt.plot(time, data_left)plt.tight_layout()plt.show()When you run the program in the console, you’ll see something like this.

Let’s move on and figure out what we’re looking at. My remote has ten buttons; the ten large blocks are my ten presses. Zoom into the first block and you’ll see it’s made up of identical fragments repeating every 0.08 s (80 ms). Simple: 0.08 s is the length of a single packet, and as long as you hold the button down, that packet keeps looping.

Now zoom in on the block even further and inspect each sequence. As an example, we’ll take segments from the sequences for the first and second buttons and place them side by side in Paint.
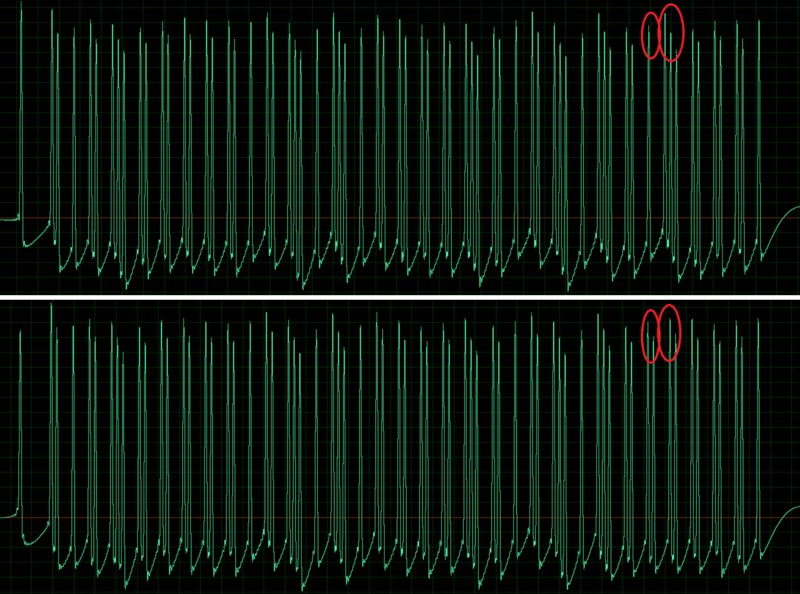
This is plain binary. A pulse is a one; no pulse is a zero. It’s easy to see that the two buttons differ by two bits. In other words, the remote sends a long binary sequence corresponding to the button you press. You can verify this by pressing other buttons and watching the sequences change.
The sequence length is determined by the diversity and number of devices. It’s made long enough to keep the probability of code collisions low.
A lot of devices work on this principle—wireless remotes, weather stations, tire-pressure sensors. It’s cheap and simple: the device barely needs power; a weather-station sensor, for example, can run for a year on two batteries. The downside is obvious: there’s no security at all—everything is sent in the clear. Often that’s fine, but I still wouldn’t use a remote like that for a garage door.
When using cheap wireless remotes, keep in mind their traffic is just plain binary and offers no protection against eavesdropping or replay/injection. If security matters, opt for higher-end gear, such as devices based on Z-Wave or Philips Hue.
You probably don’t feel like counting bits in a waveform screenshot to figure out which button was pressed—and you’re not alone. Smart folks have already built a 433 MHz signal analysis tool for RTL-SDR called rtl_433. You can get it on GitHub or find a prebuilt .exe online. It ships with a large database of devices, so when you run it you’ll see clear, human-readable output.
Run the program from the command line with rtl_433. to get the readings from all nearby sensors.

That’s how I pulled air temperature and humidity from a Nexus unit, and wind speed and direction from a Wind Sensor. The software supports a wide range of sensors, is cross‑platform, and runs on Windows, OS X, Linux, and even Raspberry Pi.
If the idea of going wireless appeals to you, you can pick up an inexpensive radio module for Arduino on eBay or AliExpress. It’s easy to find—search for “Arduino 433MHz”; they’re about a dollar apiece.
When you use this kind of modem, keep in mind that airtime must not exceed 1% of the total time (the so-called duty cycle). The frequency band is shared by everyone, so you need to leave room for other devices to transmit their data.
Today we focused on receiving and analyzing radio signals. I’ll cover how to transmit data and control devices with an SDR transmitter another time. I hope I’ve made you see radio in a new light!