Imagine you’ve already got an infrastructure with hypervisors and VMs. The task is to put one group of VMs in one broadcast domain, another group in a different one, and the hypervisor itself in a third—i.e., place them on separate networks.
This situation can arise for a variety of reasons. Here are a few examples.
- Roles in the organization are strictly segregated.
- There is an Active Directory (AD) domain administrator, and a separate administrator for other servers that provide the organization’s network services (DNS server, mail server, web server, database server, etc.).
- The AD server administrator wants his virtual server on the same network as the clients, while the security officer insists the hypervisor itself must be on a separate server network (a separate broadcast domain).
- You need to provide external access to the virtual machine. How can you enable that access while blocking access to any other host?
The simplest way to implement this setup is to connect one network interface to one network, the other to the other network, and set up the bridges accordingly. You can’t say this approach is 100% right or wrong, but it works—and that makes it a valid option. But what if you only have a single network interface? In any case, the most correct method—if you have a Layer 2 (L2) switch—is to split the network into logical segments. In other words, build the network using VLANs.
VLANs: What You Need to Know
A VLAN is a virtual network that operates at OSI Layer 2 and is implemented using Layer 2 switches. Put simply, it’s a set of switch ports divided into logical network segments. Each segment is identified by a tag (the VLAN ID; on a port this is the PVID). Ports in a VLAN know which group they belong to based on these tags.
There are two kinds of switch ports: access and trunk. End devices connect to access ports; trunk ports are used only to connect to other trunk ports. When a frame from a computer hits an access port, it’s assigned the port’s VLAN (PVID). The switch then forwards it only to ports with the same VLAN ID or to a trunk port. When delivering a frame to an end host, the VLAN tag is stripped, so hosts have no idea they’re in a VLAN.
When a frame arrives on a trunk port, it’s forwarded as-is; the VLAN tag isn’t removed. As a result, a trunk carries frames tagged for multiple VLANs.
It’s worth noting that you can configure an access port to keep the VLAN tag on egress; in that case, the endpoint must know which VLAN it’s connected to in order to accept the frame. Not all network adapters and/or operating systems support VLANs out of the box—this typically depends on the NIC driver.
Getting started with the setup
As a reminder, in one of the previous articles we covered building a virtualization stack on Ubuntu/Debian with KVM. We’ll assume the system is installed and configured, there are two physical network interfaces, one is attached to a virtual bridge and used by the virtual machines. The second interface is not configured.
Let’s get back to our VLANs. For this to work, we need to connect the first physical NIC of our machine to a switch trunk port, and make sure the VMs’ traffic is pre-segmented—more precisely, tagged—into separate VLANs.
The most basic, bare-bones way to do this is to create virtual NICs, configure each one for a specific VLAN, and bring up a separate virtual bridge for each NIC, then connect the required VM through that bridge. This works, but it has a few drawbacks:
- ifconfig produces very messy output.
- No way to add or remove VLANs on the fly. In other words, for every new VLAN you have to create a virtual interface, attach it to the VLAN, add it to the bridge, shut down the VM, and reconnect its network through that bridge.
- This is time-consuming.
But if we’re using virtual machines, why not spin up a Layer‑2 virtual switch and plug all the virtual cables into that? It’s a much better approach and gives you far more flexibility when configuring the system. Plus, you can use that switch just like a regular one.
A quick Google search turned up three popular options. One is built into Hyper-V; it’s paid and doesn’t support OpenFlow. The second is MikroTik, which lets you not only create a virtual switch but also migrate its configuration to physical hardware. The downside is that it runs on a full-fledged operating system—RouterOS—which isn’t quite what we want. And finally, meet Open vSwitch.
Open vSwitch
Open vSwitch is an open-source, software-based multilayer switch designed to integrate with hypervisors. It has been supported on Linux since version 2.6.15. Key capabilities include:
- Traffic accounting, including traffic between virtual machines via SPAN/RSPAN, sFlow, and NetFlow;
- VLAN (IEEE 802.1Q) support;
- Pinning to specific physical interfaces and egress load balancing based on source MAC addresses;
- Kernel-space operation; compatible with the Linux Bridge software switch;
- OpenFlow support for controlling switching logic;
- With lower performance than kernel mode, Open vSwitch can also run as a regular user-space application.
Open vSwitch is used in XenServer, Xen Cloud Platform, KVM, VirtualBox, QEMU, and Proxmox (starting with version 2.3).
As a concrete example, we’ll be migrating a Kerio 9.1.4 server into a VM. First, here’s the current pre-migration layout. The physical Kerio box is acting as a second virtualization host and ties together several of the organization’s network segments: client networks net1, net2, net3, and net4, plus the server network net5. Each network segment is connected to its own dedicated NIC on the physical Kerio server.
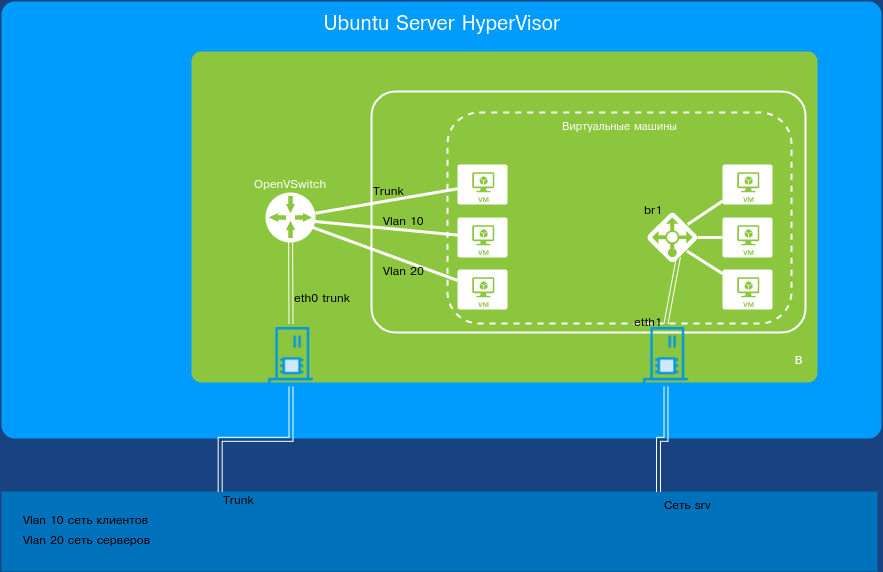
As a reminder, we’re assuming the virtualization host is already installed and configured. The bridge-utils package is installed and the br0 network bridge is set up. The system already has several virtual machines connected through this bridge.
Installation and initial setup
In fact, installing Open vSwitch boils down to installing a single package:
$ sudo apt-get install openvswitch-switch
After installation, nothing changes except that the OVS service starts. Let’s create a switch:
$ sudo ovs-vsctl add-br br1
Let’s see what’s connected to it:
$ sudo ovs-vsctl show.
  0b58d70f-e503-4ed2-833c-e24503f2e45f
  Bridge "br1"
      Port "br1"
          Interface "br1"
              type: internal
    ovs_version: "2.5.2"
We can see that a switch named br1 has been created with the interface br1 attached. If needed, you can configure this port—for example, assign it to a specific VLAN or make it a trunk limited to certain VLANs. Next, we’ll connect a free network interface from the OS to our switch.
$ sudo ovs-vsctl add-port br1 eth0
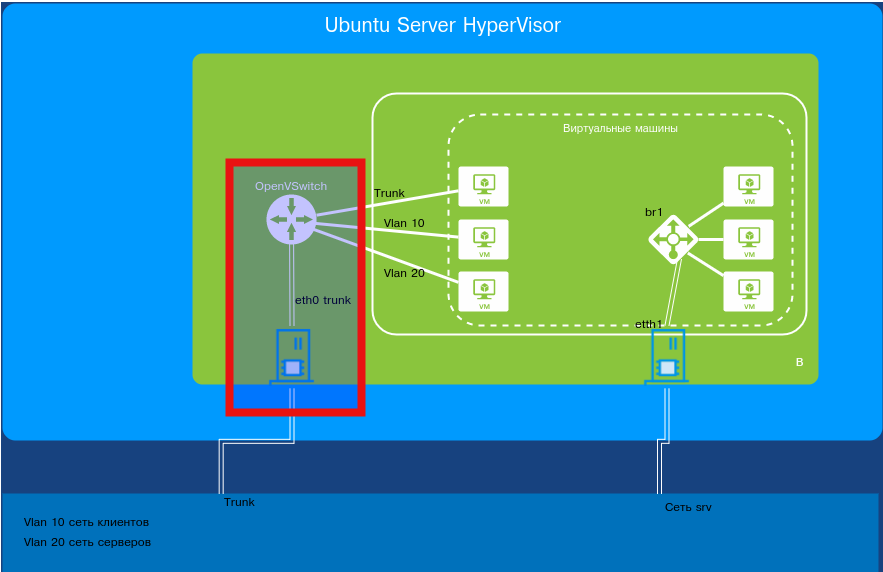
By default, this port comes up as a hybrid (access + trunk) and forwards all VLANs. You can then configure it as a trunk for specific VLAN IDs. Or you can leave it as is—in that case, the port will pass all VLAN IDs. Our environment is large and changes daily, so we’ll leave it as is.
Next, clear the eth0 interface configuration and detach it from the operating system’s TCP/IP stack:
$ sudo ifconfig eth0 0
Next, instead of eth0, we hook the switch’s internal interface br1 into the OS TCP/IP stack. Good news: Open vSwitch (OVS) automatically applies and persists its configuration, so there’s not much to do. The OVS interface is managed like any regular OS network interface, so open /etc/network/interfaces and make the necessary changes—replace eth0 with br1, and set eth0 to manual:
auto eth0
iface eth0 inet manual
auto br1
iface br1 inet static
    address 192.168.*.160
    netmask 255.255.255.0
    gateway 192.168.*.1
    dns-nameservers 192.168.*.2
That’s it! No extra bridge configuration like you would with a traditional bridge.
Connect our interface to a switch port configured as follows: a trunk for all VLANs, with VLAN ID 1 untagged. In other words, the port carries all VLAN IDs as a trunk and also passes completely untagged traffic. Bring the network up with the command ifup ; after that, we’re on the network. In some cases this may not work due to edits to the network configuration file. In that case, try bringing up the interface like this:
$ sudo ifconfig br1 up
Verify reachability using ping.
Let’s see what has changed on our virtual switch:
$ sudo ovs-vsctl show
0b58d70f-e503-4ed2-833c-e24503f2e45f
Bridge "br1"
    Port "eth0"
        Interface "eth0"
    Port "br1"
        Interface "br1"
            type: internal
ovs_version: "2.5.2"
As we can see, the switch already has two interfaces attached: the switch’s physical interface eth0 and the OS-level interface br1.
Now let’s move on to virtual machines.
Configuring KVM Address Groups
So how do we connect virtual machines to this switch? There are two standard ways. The first one is already familiar: add a port to the switch with the ovs-vsctl command, then attach that port to the virtual machine.
The second approach is more flexible. It involves creating KVM port groups for Open vSwitch (OVS). Each group will be associated with a specific VLAN ID. Unfortunately, configuring such groups via Archipel or virt-manager isn’t supported yet. So you’ll need to manually prepare an XML file describing the required groups and then apply it with virsh.
<network> <name>ovs-lan</name> <forward mode='bridge'/> <bridge name='br1'/> <virtualport type='openvswitch'/> <portgroup name='vlan-10'> <vlan> <tag id='10'/> </vlan> </portgroup> <portgroup name='vlan-20'> <vlan> <tag id='20'/> </vlan> </portgroup> <portgroup name='vlan-30'> <vlan> <tag id='30'/> </vlan> </portgroup> <portgroup name='vlan-40'> <vlan> <tag id='40'/> </vlan> </portgroup> <portgroup name='vlan-50'> <vlan> <tag id='50'/> </vlan> </portgroup> <portgroup name='vlan-90'> <vlan> <tag id='90'/> </vlan> </portgroup> <portgroup name='trunk-allvlan'> <vlan trunk='yes'> </vlan> </portgroup> <portgroup name='trunk'> <vlan trunk='yes'> <tag id='30'/> <tag id='40'/> <tag id='50'/> </vlan> </portgroup></network>Applying the configuration:
$ sudo virsh net-define /path_to/file.xml
Next, start the network:
$ sudo virsh net-start ovs-lan
And set it to start automatically:
$ sudo virsh net-autostart ovs-lan
To remove unnecessary networks, you can use Archipel (NETWORK section), virt-manager, or run commands.
$ virsh net-destroy ovs-network
$ virsh net-autostart --disable ovs-network
$ virsh net-undefine ovs-network
Next, create VMs with virt-manager or open an existing powered-off virtual machine.
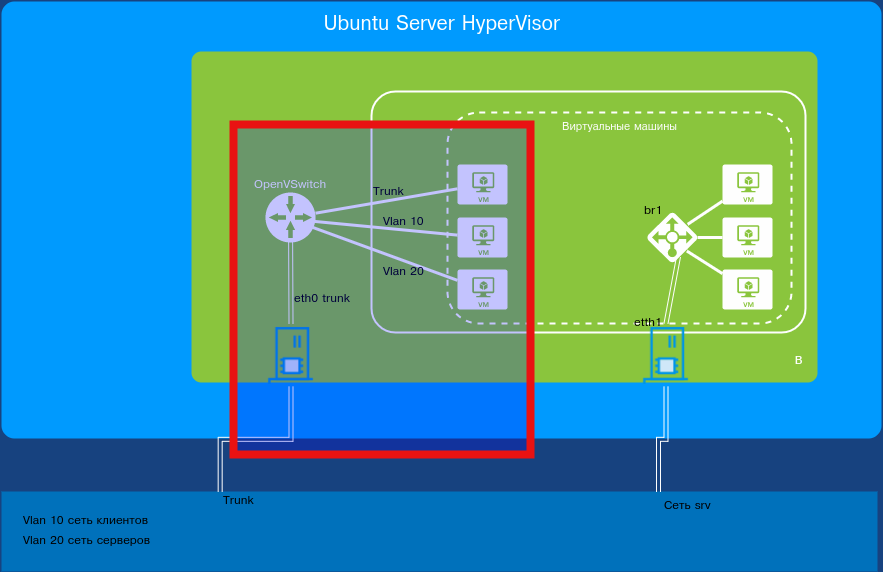
Connecting Virtual Machines to the Network
Open the target virtual machine by double-clicking it. Click “Show Virtual Hardware.” Select the NIC.
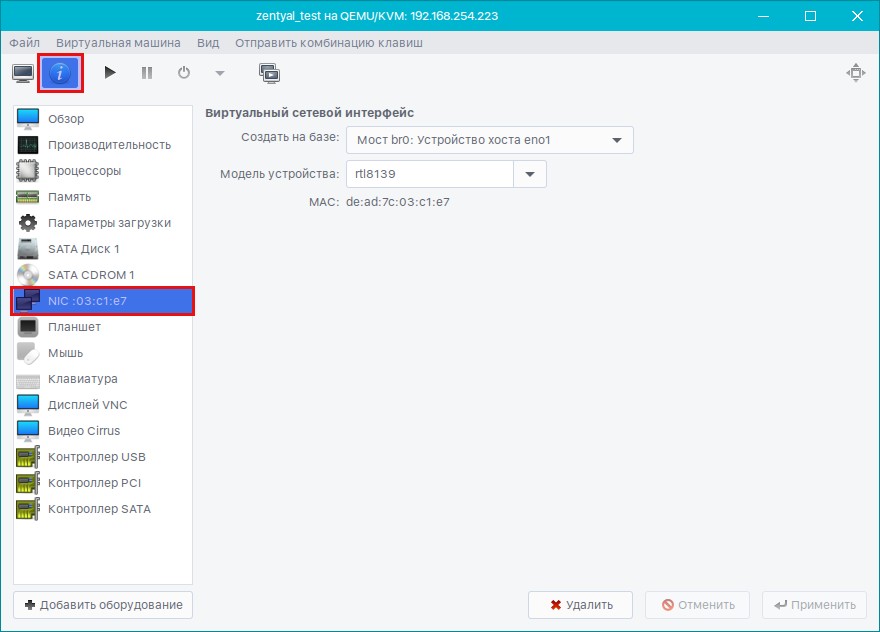
Next, select “Create based on” and choose our network ovs-lan. A port group will appear. You can leave everything unset—in that case, you’ll get a standard trunk port carrying traffic for all VLAN IDs plus untagged (non-VLAN) traffic. Alternatively, you can bind it to a single VLAN to expose just one network. It all depends on your use case.
We want to configure Kerio, but only for specific VLAN IDs. There are a few ways to do this. You can create multiple network interfaces with different VLAN IDs, or you can set up a trunk port and define the VLANs inside Kerio. The latter is preferable because it allows more flexible changes without shutting down or rebooting the virtual machine to apply settings.
Once everything is set up successfully, start the virtual machine and check what has changed on our switch:
d3ff1e72-0828-4e38-b5bf-3f5f02d04c70
Bridge "br1"
    Port "eth0"
      Interface "eth0"
  Port "br1"
      Interface "br1"
          type: internal
  Port "vnet5"
      trunks: [10, 20, 30, 40, 50, 60, 70, 80, 90]
      Interface "vnet5"
We can see that the virtual machine has automatically attached to the vnet50 port.
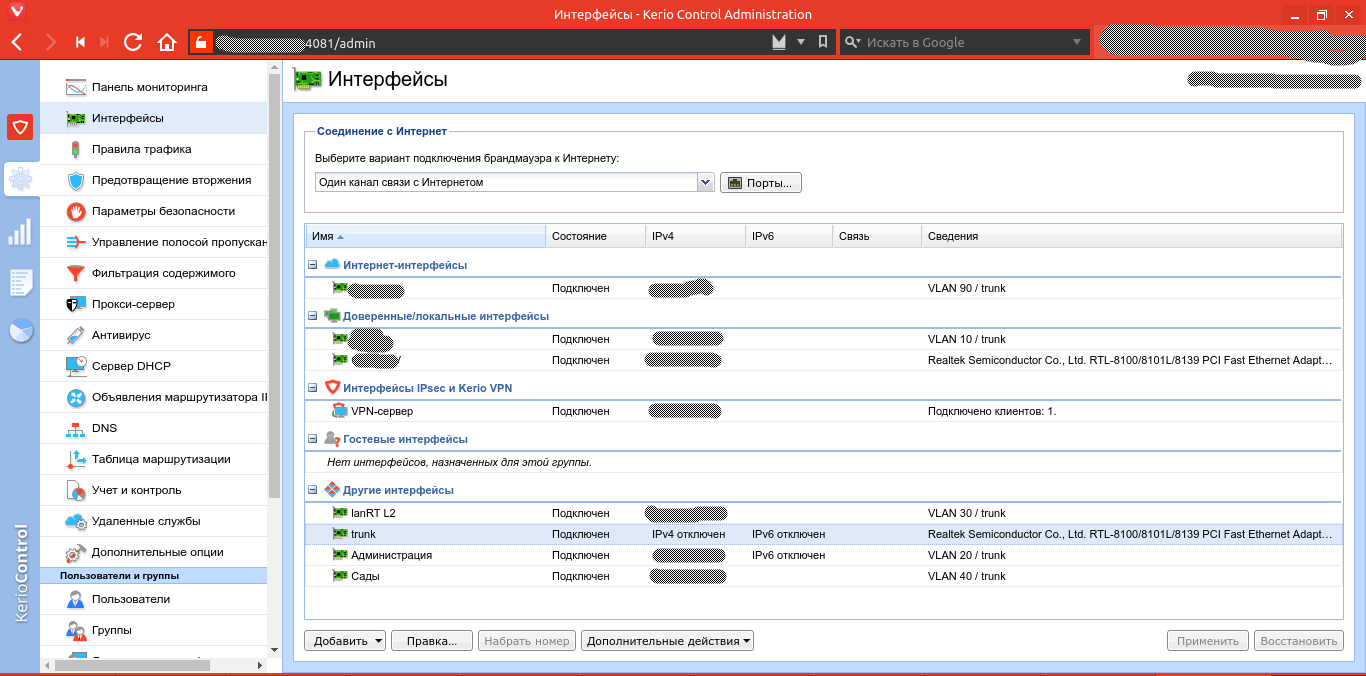
Go to the Kerio management interface. Open Interfaces, then select the interface you connected to the VLAN. Double-click it, go to the Virtual LANs → Add or remove virtual LANs tab, and add the required VLANs. Click OK, and the corresponding virtual interfaces will appear. Configure them as you would regular physical interfaces directly connected to the appropriate switches.
Conclusion
The configuration described in the article gives you a fast, flexible way to add any number of network interfaces in virtually any layout. You can likewise move virtual servers into customer networks while keeping the hypervisor itself off-site. As you can see, the setup is no more complex than a standard network bridge, yet it offers much more functionality.
