Firmware of popular routers often contains errors identified by security researchers on a regular basis. However, it is not enough just to find a bug – it must be neutralized. Today, I will explain how to protect your network against known and yet-unknown vulnerabilities in RouterOS.
Updates
To the credit of MikroTik engineers, they promptly issue patches fixing newly-discovered bugs. Many bugs are patched even before the public release of a new OS version, while others, within a day or two after it. Therefore, the first thing you should pay attention to is the RouterOS version installed on your device. The OS is not updated automatically; so, you have to check for new releases on a regular basis. Actual versions of the operation system and individual packages are available on the official MikroTik website in the Software Section. To update your system, go to: System → Packages → Check For Updates → Download and Install.
Alternatively, you can type in the router console: /system package update install.
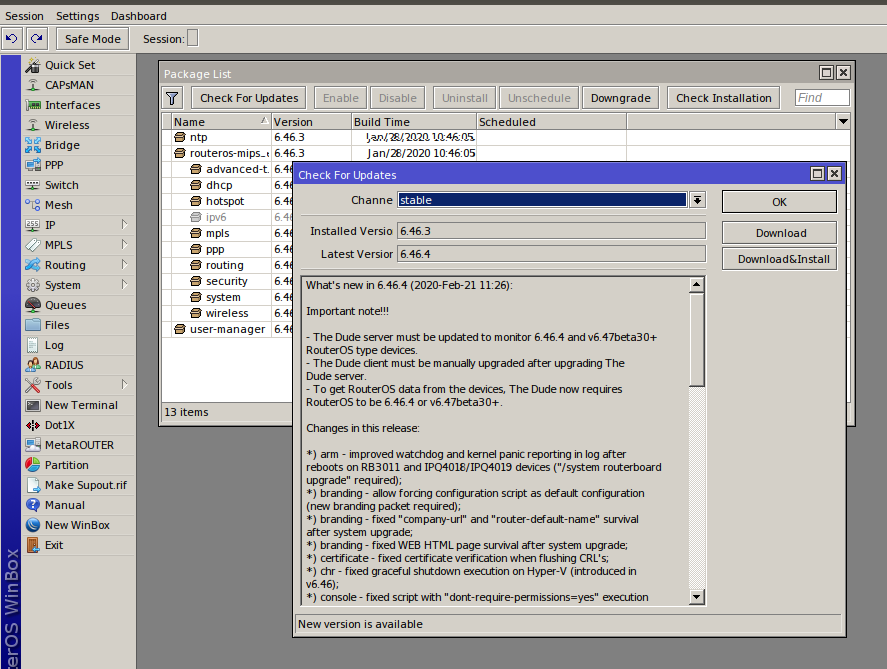
Four software development branches are available for download: Long-term, Stable, Testing, and Development. I strongly recommend installing the Long-term version to critically important systems. Devices that can be allowed to freeze for a few minutes during the update deserve the Stable version. Other branches can be used only for experiments on your home router. Thoroughly review the Changelog prior to the installation: sometimes, entire parts of the OS are replaced; as a result, it cannot work with old settings anymore (as it was with bridge in version 6.41).
If you have several MikroTik routers, keep in mind that it is impossible to upgrade them at once using the standard means. However, you may try to use The Dude or handmade scripts for that purpose.
Packages
Next, disable unnecessary functions. If you don’t use IPv6, disable it; if you don’t need Wi-Fi, disable the entire module using the same menu: System → Packages. Note that only the additional packages (i.e. those not included in routeros-platformname) can be completely removed from the system.
Services
Potential vulnerabilities in MikroTik devices pose real threats only if the admin hasn’t taken the basic precautions. If the configuration of your services and firewall is correct, the router can work for years without updates. Disable unnecessary services in the menu IP → Services. I recommend opening only SSH and Winbox from certain addresses and disabling everything else. The same effect can be achieved using the command /ip service disable ftp.
[xakepcut]

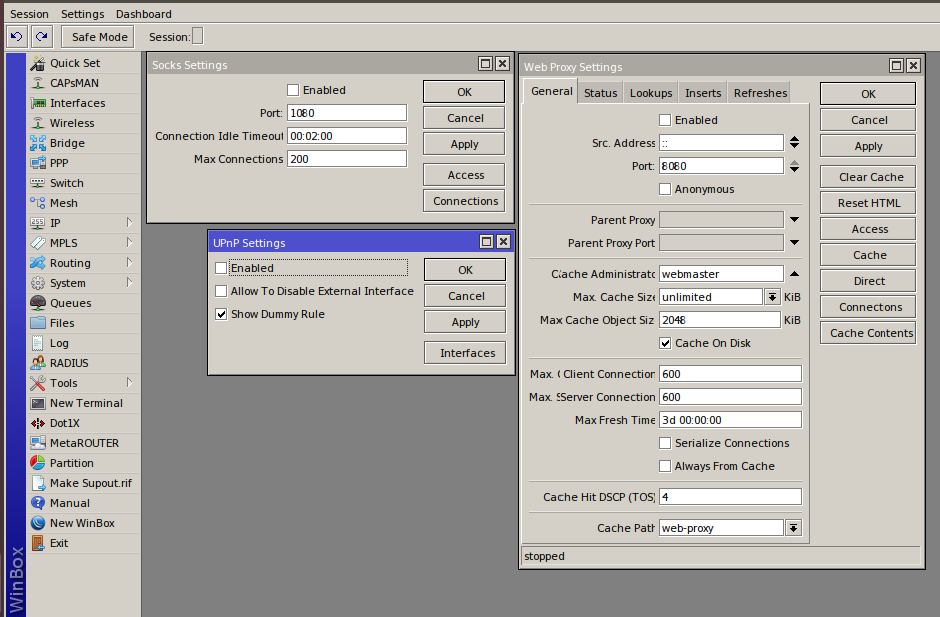
Also check whether the IP services (Web Proxy, IP → UPnP, and IP → Socks) are enabled. If they have been turned on without your knowledge, I have some bad news for you. Below are commands disabling these services in the console: /ip proxy, /ip upnp, and /ip socks.
RouterOS has an MNDP-based mechanism allowing your router to discover neighbors. Of course, it is great to know neighbors in your network; but transmitting the model of your router and its software version into the outer space is definitely not good from the security perspective.
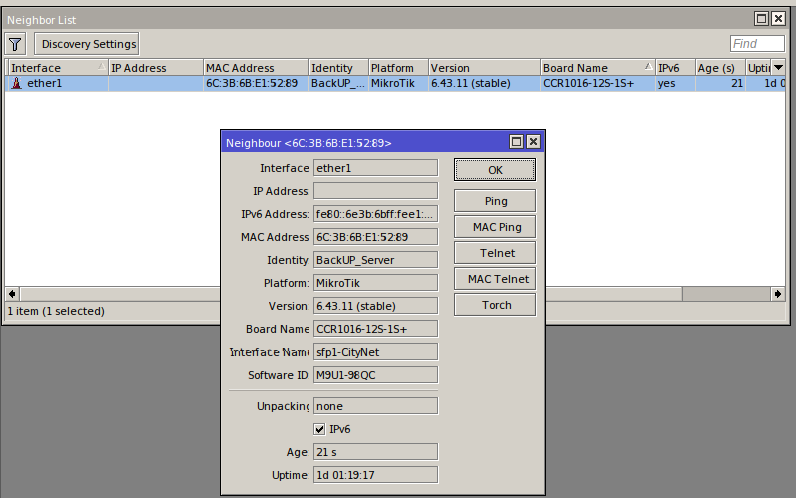
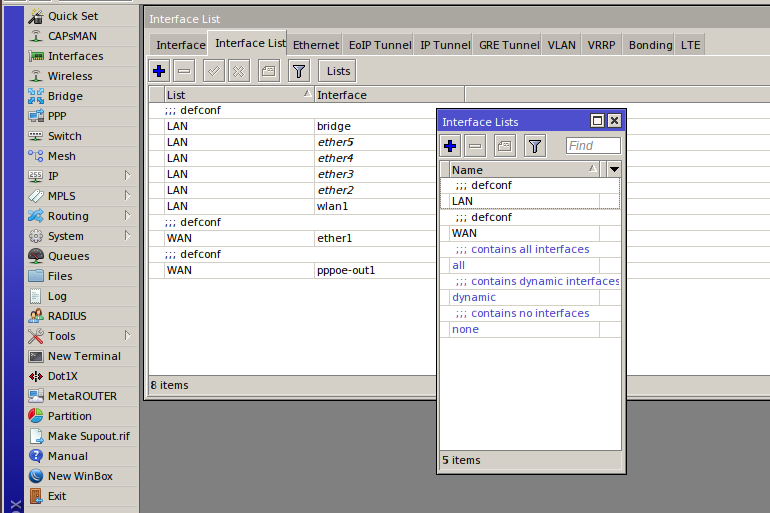
Similar to many other RouterOS features, the neighbor discovery function uses interface lists. The default configuration includes the following lists: LAN, WAN, dynamic, all, and none; but you can also create more sophisticated lists. Nested lists (include) and exceptions (exclude) are permitted as well. Use the menu Interface → Interface Lists to configure them. First, create a list (the Lists button) and then add interfaces to it in the main menu. The command for interaction with the lists is as follows: /interface list.
[panel template=info]
The dynamic list includes dynamic interfaces, such as VPN interfaces and PPPoE. In the default configuration for ‘home’ routers, the WAN list includes ether1; while LAN includes interfaces from ether2 to ether5, all Wireless interfaces, and bridge.
[/panel]
As you know, it is possible to connect to RouterOS not only via the IP address, but via the MAC address, too. These services can be configured in the menu Tools → MAC Server. The MAC Server settings also use interface lists. I recommend to allocate a separate group of interfaces for router management: only this group should be permitted to discover neighbors and the MAC Server.
Never disable MAC Winbox and MAC Telnet: at some point, you might become unable to connect via Winbox. In this situation, you will have no choice but to connect via the MAC address. Therefore, I recommend to keep this ‘backdoor’ open. In addition, MAC Telnet is useful when a new device, that does not have an IP address yet, is added to your network. The most convenient way is to configure it in the console of a neighboring router.
[panel template=www]
The manufacturer’s website provides a complete list of available services. Check with it to find out whether any unnecessary services are running in your system.
[/panel]
The default RouterOS config, combined with the tweaks described above, will ensure the basic security level for your router. It must be admitted that the developers made the Default Configuration pretty universal and took care of many security aspects. In the next chapter, I will explain how to harden RouterOS further.
Users and groups
If the IT department of your company is large enough, it likely implements a division of roles and duties. For instance, a technical support officer does not need the right to create VPN connections or view Wi-Fi passwords, while networking officers must have access to these functions. RouterOS includes a flexible permission distribution system. The permissions are assigned to groups, and then users are added to these groups. The group management is performed in the System → Users menu and using the /user group command.
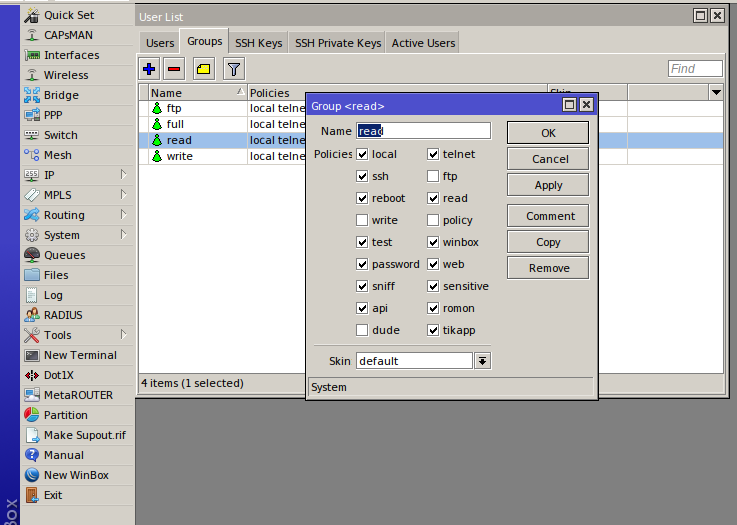
Let’s examine the group permissions in more detail:
- telnet, ssh, ftp, winbox, web, api, romon, dude, and tikapp – these policies allow users to connect using the respective protocols;
- local – the policy opens access to the router via the console. If disabled, it revokes the right to open a terminal inside Winbox;
- reboot – the policy allows rebooting the router;
- read, write – the policies grants read/write access to the router’s configuration;
- sniff – the policy grants the right to run the embedded tcpdump analogue (tools → sniffer);
- test – the policy grants the right to run troubleshooting commands (ping, traceroute, bandwidth-test, wireless scan, and snooper);
- password – the policy grants the right to change your own password;
- policy – the policy grants the right to manage accounts and groups.
Sensitive data
Certain data are defined in RouterOS as sensitive, including Wi-Fi, IPSec, and SNMP keys, passwords to VPN interfaces and servers, passwords to routing protocols, and other data affecting the security.
The Hide Sensitive flag can be set in the Settings section of the Winbox main menu. When this flag is enabled, the sensitive information is displayed as stars (and cannot be viewed in the terminal). Such a protection against password disclosure… When the Sensitive option is disabled in the group settings, the respective checkbox is not removed in the main menu; i.e. the Sensitive permission allows the user to see the entered passwords.
Port Knocking
Earlier in this article, I had mentioned the need to restrict the access to the router’s managing services to certain addresses. This is very important: the Winbox protocol is far from perfection and the discovery of new ‘holes’ in it is more than likely. But sometimes you may need to connect to the router from a hotel or cafe – i.e. from an unknown address not included in your whitelist.
In such situations, administrators use the Pork Knocking technique. Initially, the port is closed for everybody. But as soon as you perform a certain sequence of actions, all management ports become open to your current IP address. This sequence of actions may be pretty sophisticated so that nobody can guess it. For instance:
- initially, all management ports are closed for all addresses except for the whitelisted ones; and
- if a TCP segment comes to port 1234 of the router, then two segments come to port 4321, and one segment comes to port 5678, the sender’s address becomes whitelisted for 24 hours.
The following script implements the above sequence of actions:
/ip firewall filter
add action=accept chain=input dst-port=22,8291 protocol=tcp
    src-address-list=mgmt_allow
add action=drop chain=input dst-port=22,8291 protocol=tcp
add action=add-src-to-address-list address-list=mgmt_stage1
    address-list-timeout=1m chain=input connection-state=new
    dst-port=1234 protocol=tcp
add action=add-src-to-address-list address-list=mgmt_stage2
    address-list-timeout=1m chain=input connection-state=new
    dst-port=4321 protocol=tcp src-address-list=mgmt_stage1
add action=add-src-to-address-list address-list=mgmt_stage3
    address-list-timeout=1m chain=input connection-state=new
    dst-port=4321 protocol=tcp src-address-list=mgmt_stage2
add action=add-src-to-address-list address-list=mgmt_allow
    address-list-timeout=1d chain=input connection-state=new
    dst-port=5678 protocol=tcp src-address-list=mgmt_stage3
Rules 3-6 (action=add-src-to-address-list) implement the described-above logic. The first rule grants access to the router management only to the addresses included in the mgmt_allow list that is compiled at stages 3-6. The second rule prohibits access for everybody. The first two rules are put in the beginning to avoid the unnecessary traffic management during the implementation of the four rules containing the logic and reduce the CPU load.
Too bad, it is not that easy to perform such an operation in Windows: for some reason, Telnet was excluded from the standard set of programs, while third-party software is not always available. However, any OS allows to change the ICMP packet size during pinging. Let’s exploit this possibility and change the above conditions as follows:
- initially, all management ports are closed for all addresses except for the whitelisted ones; and
- if the router receives an ICMP request 345 bytes in size, then two requests 543 bytes in size, and then one request 678 bytes in size, the sender’s address becomes whitelisted for 24 hours.
To do so, I have to make the following changes in the rules:
- Change the protocol to ICMP; and
- Specify the required packet sizes on the Advanced tab.
[panel template=info]
Note that the packet size specified in the ping command is different from the size of the packet received by the router. In Linux, 28 bytes containing the header are added to the size of an ICMP packet; in other words, to send a packet 345 bytes in size, you have to set its size to 317 bytes in the ping command. For Windows, this figure is different (Windows counts the header size in its own way).
[/panel]
Wireless
RouterOS supports Wi-Fi white- and blacklists via its Wireless Access List. To blacklist a device prohibited from connecting to the network, add it to Wireless Access List and then remove the Authentication and Forwarding flags. Alternatively, you can use the command /interface wireless access-list add.
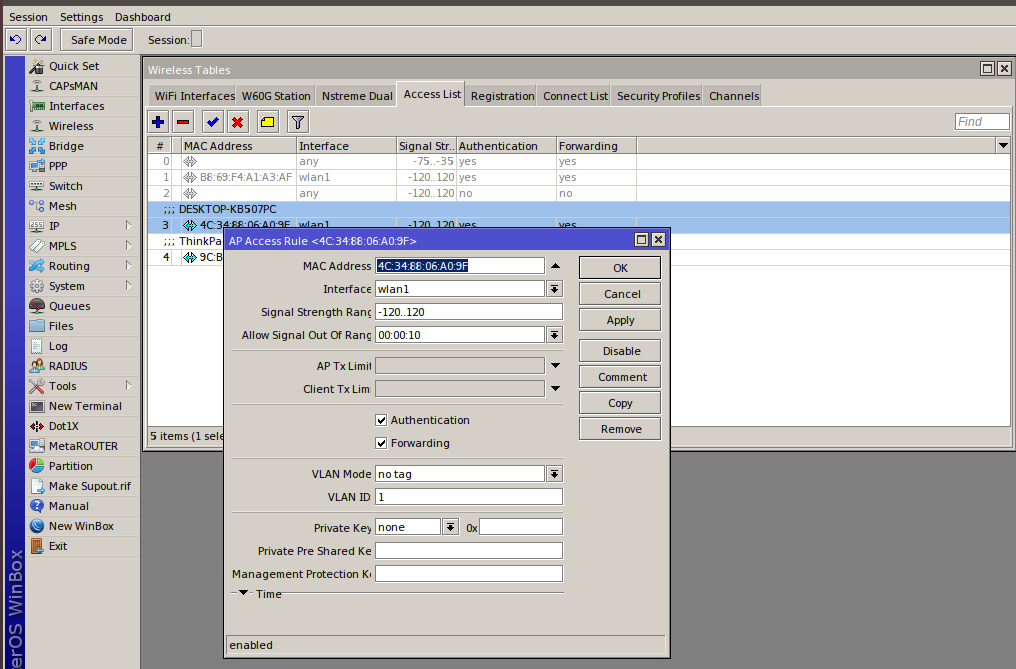
To transform a blacklist into a whitelist, set the above-mentioned flags and change the type of the Wireless interface with the command /interface wireless set 0 default-authentication=no.
The Authentication flag is responsible for client authentication. If it is set for a certain interface, then all devices can authenticate except for those included in the access list without this flag. If the flag is not set for an interface, then only devices included in the access list with this flag can connect to the network.
The Forwarding option is responsible for data exchange between clients within the same subnetwork (i.e. on the same Mikrotik wireless interface). In most situations, it is better to leave it alone; however, if you are creating, for instance, a hotspot network whose clients will connect only to external networks (i.e. they don’t need to communicate with each other), then I recommend disabling the Forwarding option: this will improve the communication quality.
Wireless Access List allows to implement sophisticated logic for various clients, including the signal level, time of day, speed restrictions, and automatic assignment of certain clients to a certain VLAN. I strongly recommend to spend some time and effort on mastering this flexible tool.
[panel template=info]
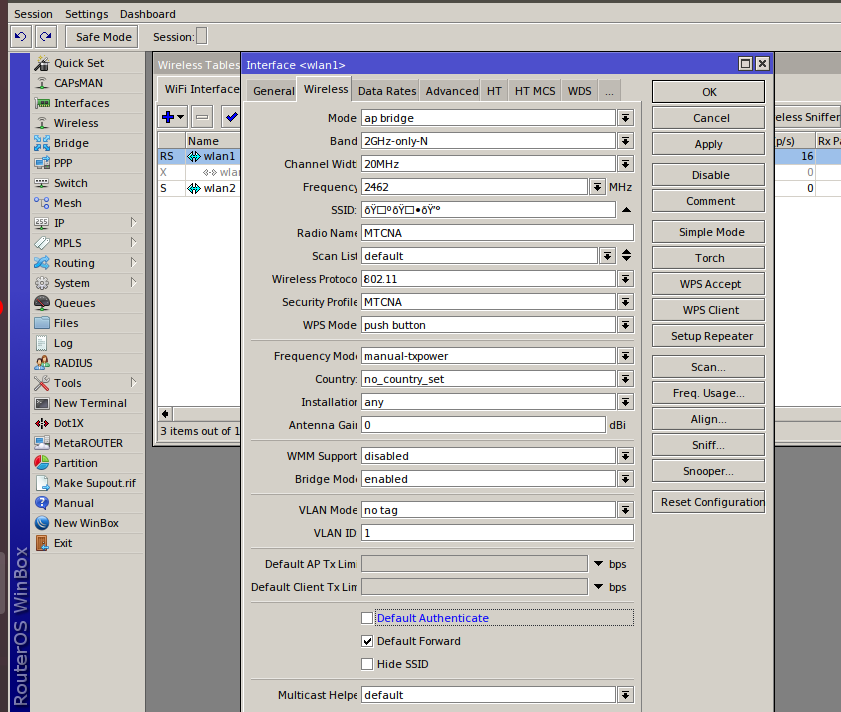
MikroTik can even present Service Set Identifiers (SSID) as emojis (e.g. ???). To do so, you have to convert the symbols into the Unicode format using this tool and paste the resultant string into the SSID.
[/panel]
Conclusions
This article describes just a minimum set of actions required to enhance the security of your router. However, RouterOS has tons of other features and functions that can be exploited by malefactors. Keep this in mind and never rest on the laurels. Good luck!