How a Wi‑Fi jammer works
Unlike true jammers, which overpower a radio transmitter’s signal with a stronger one, a deauthentication tool works at the protocol/software level. It performs a denial-of-service attack by sending the access point spoofed deauthentication frames as if they were coming from clients on the network. Since these frames aren’t encrypted, the attacker only needs to learn the devices’ MAC addresses by sniffing the network traffic.
Deauthentication is usually part of a broader attack on a network. It’s used to set up an evil twin access point or to capture the handshake, which can then be used to crack the Wi‑Fi password. However, a deauth jammer can also be useful on its own.
warning
Use the techniques covered strictly for educational purposes. Blocking data transmission or using the described tools may be punishable by law. You must obtain explicit written authorization from the client before conducting any penetration testing. Remember that deauthentication events are recorded in the router logs.
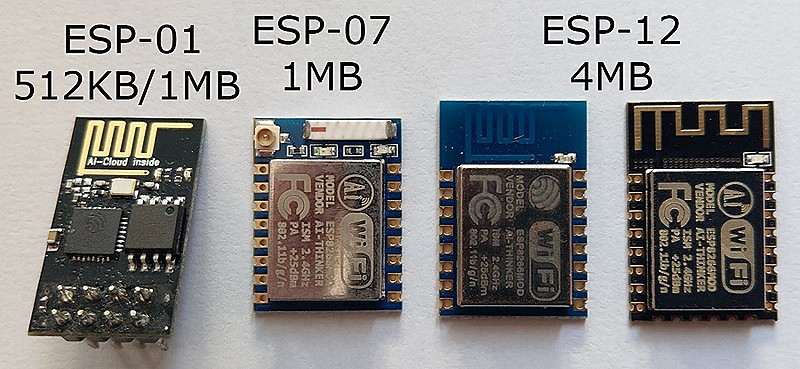
Recently, inexpensive, compact boards that support the NodeMCU software platform have become very popular. They’re built around the ESP8266 module, which provides Wi‑Fi connectivity using the 802.11b/g/n standards in the 2.4 GHz band. Today, these boards typically come in two variants: ones with the CP2102 chip from the U.S. company Silicon Labs, or with the Chinese CH340.
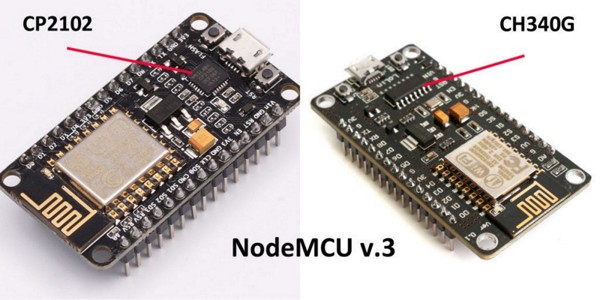
These boards are marketed as prototyping platforms: makers use them to build Wi‑Fi‑controlled automation. Fascinating as that is, our focus here is different—the possibility of using NodeMCU to carry out attacks.
Because of its technical limitations, the ESP8266 isn’t suitable for full-fledged monitoring or packet injection, but it can be used as a deauthentication tool—which is why dedicated firmware started to appear. Last year, a good soul going by the handle Spacehuhn released the first one, and since then other versions with additional capabilities have emerged. That said, before we get to the software, let’s sort out the hardware.
I’ll demonstrate the process using a board from the Chinese manufacturer Dstike. It’s based on an ESP8266 and supports operating as a client (P2P) or as an access point (soft AP). You can control the board from a smartphone or any other Wi‑Fi device.
Note that the software’s functionality doesn’t depend on the chip or the board—you can pick whatever configuration you prefer. Dstike alone offers several variants in different form factors for different scenarios. What they all have in common is the ability to jam networks.
DSTIKE device lineup
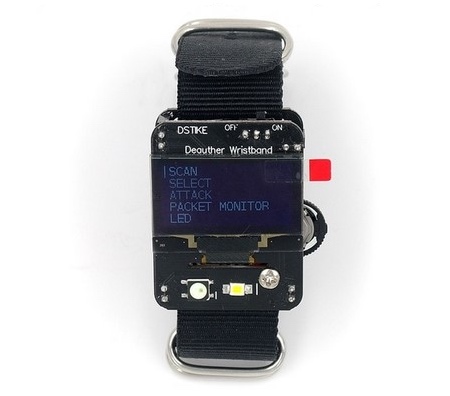
Deauther Wristband — a wristband with a built-in display, battery, and power switch. A convenient device for quick access to the control interface.
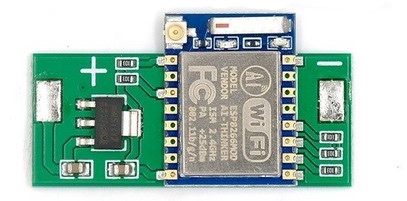
Deauther Power Bank — features a modified charging controller, with control via a dedicated panel. The controller has a port for connecting an external antenna. Batteries are not included. It’s a discreet device that can be easily left in place and operated remotely.

Deauther OLED V3.5 — this version adds a connector for an external antenna and a holder for a 18650 battery. It’s controlled via buttons and a toggle switch, with output shown on the display, so you can use it without any additional gear.

The main advantage of these gadgets is the ability to target a specific network—or all networks—within the device’s range. Just to note, you won’t need the Wi‑Fi password to carry out the attacks! 🙂
Installing Deauther 2.0
Let’s start with Deauther 2.0—the firmware created by Spacehuhn. In his GitHub repository, you can select a version for your specific board.
Files with the .bin extension are compiled sketches. You need to flash them to the board using a dedicated bootloader. If you prefer, the source archives also include libraries and sketches that you can install via the Arduino IDE.
Flashing the .bin file
If you chose the prebuilt binary option, start by launching the NodeMCU Flasher program. You can download it from the NodeMCU repository.
Install drivers for CP2102 or CH340. Then connect the board to your computer, launch NodeMCU Flasher, and select the COM port in Device Manager under “Ports (COM & LPT).” Next, switch to the Config tab, click the gear icon, and choose the downloaded .bin file.
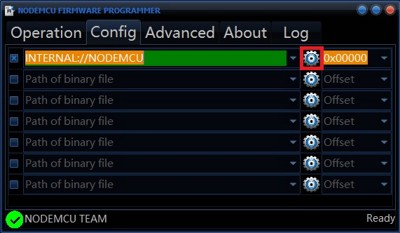
After you add the file, its path will appear in the left pane. Go to the Operation tab and click Flash—the firmware will then be uploaded to the board.
Flashing with the Arduino IDE
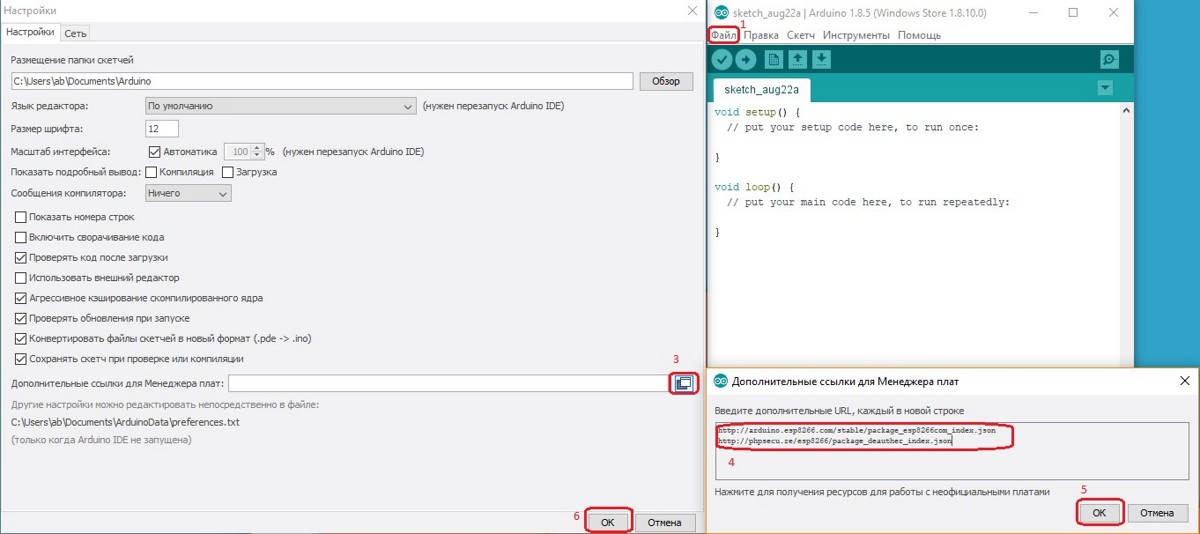
If it’s more convenient to install via the Arduino IDE, the process is slightly different. First, download the drivers (CP2102, CH340). Then open the Arduino IDE, go to “File” → “Preferences,” click on “Additional Boards Manager URLs,” and paste the following two URLs:
- http://arduino.esp8266.com/stable/package_esp8266com_index.json
- http://phpsecu.re/esp8266/package_deauther_index.json
Save everything.
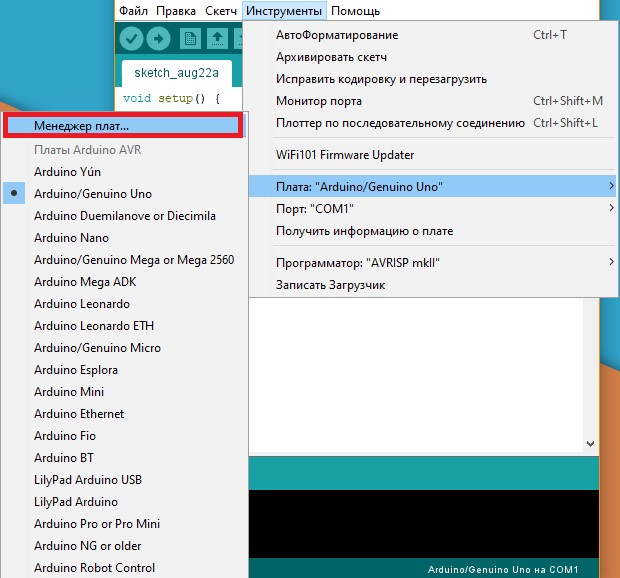
Open the Tools menu and select Boards Manager from the Board: … submenu.
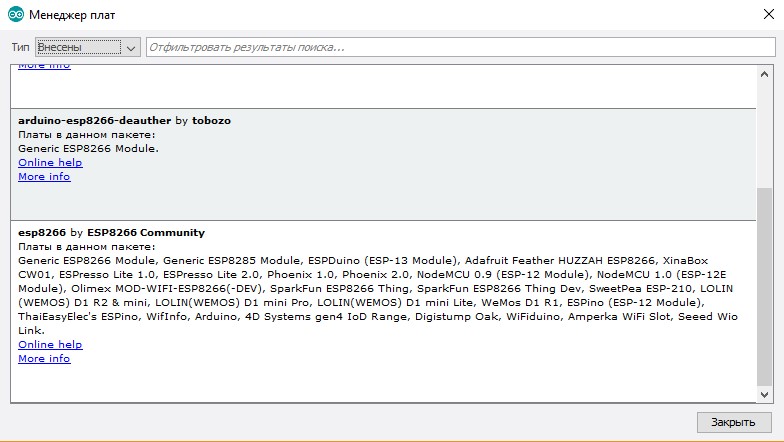
Select “Contributed” and install arduino-esp-8266-deauther and esp8266.
Open the folder containing the sketch and libraries, then go to Tools. Set the options to match what you see in my screenshot.
In the Board dropdown, select ESP8266 Deauther Modules.
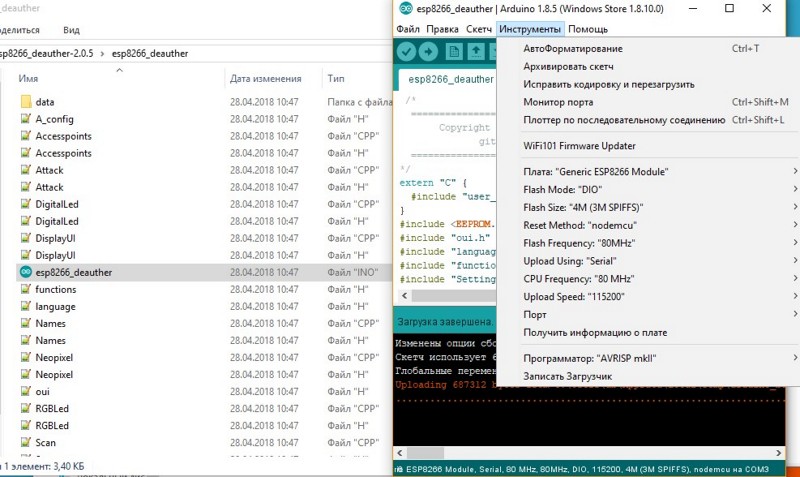
In the Flash size field, select your module. Set the firmware and memory size as shown in the image below.
Next, upload the firmware.
Once powered on, the board will create a Wi‑Fi access point. Connect to it and browse to 192.168.4.1 or deauth.me. You’ll be taken to the configurator and shown a warning.

In the configuration section, set LANG to ru to enable the Russian language in the web interface. Click Save and reboot the device for the changes to take effect. It’s now ready to use—time to make life difficult for your neighbors.
Feature overview and setup
Let’s take a quick tour of the app and see what our board can do now.

If you connect the jammer via the serial port, you can control it with commands. You can disable this feature in the settings by clearing the SERIAL checkbox.
Serial Port Control Commands
-
scan [<all/ aps/ stations>] [ -t < time>] [ -c < continue-time>] [ -ch < channel> ] -
show [selected] [< all/ aps/ stations/ names/ ssids> ] -
select [<all/ aps/ stations/ names>] [< id> ] -
deselect [<all/ aps/ stations/ names>] [< id> ] -
addssid < ssid> [ -wpa2] [ -cl < clones> ] -
addssid -ap < id> [ -cl < clones>] [ -f] -
addssid -s [ -f] -
addname < name> [ -ap < id>] [ -s] -
addname < name> [ -st < id>] [ -s] -
addname < name> [ -m < mac>] [ -ch < channel>] [ -b < bssid>] [ -s] -
setname < id> < newname> -
enablerandom < interval> -
disablerandom -
load [<all/ ssids/ names/ settings>] [< file> ] -
save [<all/ ssids/ names/ settings>] [< file> ] -
remove <ap/ station/ name/ ssid> < id> -
remove <ap/ station/ names/ ssids> [ all] -
attack [beacon] [ deauth] [ deauthall] [ probe] [ nooutput] [ -t < timeout> ] -
attackstatus [< on/ off> ] -
stop <all/ scan/ attack> -
sysinfo -
clear -
format -
print <file> [< lines> ] -
delete <file> [< lineFrom>] [< lineTo> ] -
replace <file> < line> < new-content> -
copy <file> < newfile> -
rename <file> < newfile> -
run <file> -
write <file> < commands> -
get <setting> -
set <setting> < value> -
reset -
chicken -
reboot -
info -
// <comments> -
senddeauth < apMac> < stMac> < rason> < channel> -
sendbeacon < mac> < ssid> < ch> [ wpa2] -
sendprobe < mac> < ssid> < ch> -
led <r> < g> < b> [< brightness> ] -
led <#rrggbb> [< brightness> ] -
led <enable/ disable> -
draw -
screen <on/ off> -
screenmode < menu/ packetmonitor/ buttontest/ loading>
The attacks will automatically stop 600 seconds after they start. If you don’t want that, you can manually adjust the timeout in the ATTACKTIMEOUT menu: set it to 0 and the attacks will no longer shut off automatically.
In the scanning section, press Scan APs and the tool will enumerate all Wi‑Fi access points. Select one or more networks, then switch to the Attacks section. The Deauth mode disconnects all clients from the selected network. The Beacon mode lets you create up to 60 fake access points at once.
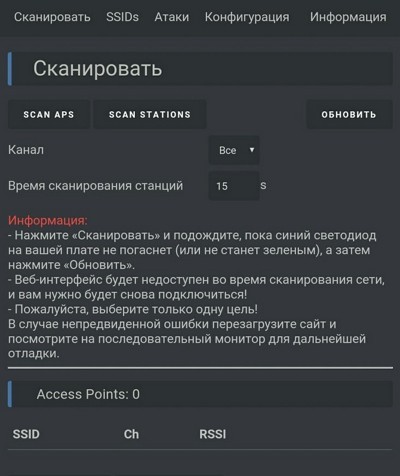 |
 |
| Scanning and attack types | |
In the SSIDs section, you create the access points used for the Beacon attack.

The firmware includes display support for the variant that ships with one. If you prefer, you can solder a screen and buttons onto the board yourself and add battery power to turn it into a self-contained device.
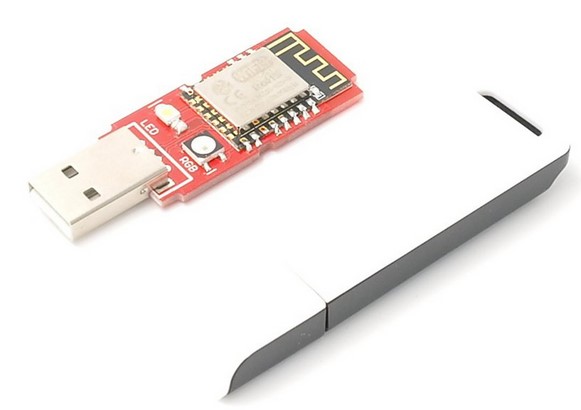
In addition to the jammer itself, the firmware developers also sell a device that can detect it.
The developers regularly update the firmware and add new features—so keep an eye out for updates!
Wi-PWN
Let’s look at a similar firmware, Wi-PWN, developed by Sam Denty (samdenty99). He built on Spacehuhn’s work, adding a deauthentication detector and a companion Android app. As a result, Wi-PWN is more convenient to use than Deauther 2.0.
After downloading and extracting the archive, you’ll need to flash the board and install the app on your phone. In the folder, you’ll find the ESP8266Flasher utility. Launch it, select the COM port, and in the Config tab choose the firmware (it’s located at *\). Then go to the Operation tab and click Flash.
Use your phone to connect to the board over Wi‑Fi.

Open the downloaded app, accept the terms, and enter the network name (SSID) and password. After setup, connect to the new Wi‑Fi.
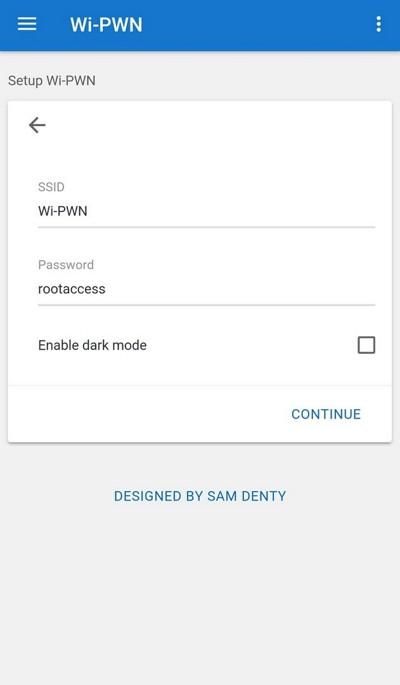 |
 |
| Настройка точки доступа и завершение установки | |
The app has several tabs with self-explanatory names:
- Scan — section for scanning and selecting multiple access points.
- Users — scans a specific Wi‑Fi network for connected clients and lets you create your own “user” entries.
- Attack — same attacks as in the Spacehuhn version, but when cloning networks the maximum number of “users” is 48 instead of 60 (as it was in early Deauther builds).
- Detector — scans channels to detect jammers.
- Settings — configure the Wi‑Fi AP/server (network name and password). You can also enable Wi‑Fi client mode and adjust scan and attack parameters here.
warning
For stable operation, I recommend attaching a heatsink to the part of the device that gets hot. Otherwise, the jammer may overheat and shut down.
A few words on defense
NodeMCU is a cheap, versatile, powerful, and compact platform for deauthentication. You can replicate the whole project quickly with minimal effort. And since anyone can do it, it’s worth thinking about defense, too.
Most popular routers use IEEE 802.11b/g/n, which are vulnerable to deauthentication/disassociation attacks. If you want to eliminate that risk, look for a router with 802.11w (Protected Management Frames) support, which provides robust protection against this attack.
Some routers include spam protection, but it only applies to devices that are connected to the network, and a Wi‑Fi jammer never connects. If your router has spam protection that also covers unassociated devices, I recommend enabling it.
