This article is by no means a universal guide applicable to any network: all networks have unique features, and some tuning is required in all cases. I will use Cisco equipment for demonstration, but it doesn’t differ fundamentally from hardware offered by other manufacturers. The concept of security mechanisms is universal, and differences are only in syntax of settings and some implementation nuances.
The RouterOS system used by MikroTik equipment stands a bit apart. It lacks one of the key, in my opinion, security mechanisms: Dynamic ARP Inspection. Instead, the manufacturer actually suggests to maintain only a static ARP table; however, the scope of modern corporate networks makes this approach unfeasible. Also, RouterOS lacks RA Guard that prevents attacks on DHCPv6 servers.
Again: this material isn’t a comprehensive antispoofing manual since the range of potential attacks is limited only by attacker’s imagination. Let’s just examine the most common ones.
DHCP Snooping
DHCP Snooping is a switch-level network security technology. It protects network segments from the following attacks targeting the DHCP server:
- DHCP Exhaustion – causes address space exhaustion on a legitimate DHCP server by sending false DHCPDISCOVER messages from different MAC addresses of the source. The DHCP server responds to these messages and issues addresses. After such an attack, your DHCP server won’t be able to serve new hosts. Typically, this attack is used either to deliver destructive impact or implement a DHCP Spoofing attack; and
- DHCP Spoofing – involves the creation of a rogue DHCP server that starts servicing network clients. The danger of DHCP Spoofing is that the attacker can set its address as the default gateway address, thus, implementing a MITM attack since traffic from all hosts will go in its direction.
In fact, configuring DHCP Snooping comes down to setting trusted and untrusted ports. All DHCP messages on untrusted ports will be monitored. The goal is to check whether they were actually generated by the DHCP server. Needless to say: if you see messages like DHCPLEASEQUERY, DHCPOFFER, or DHCPACK in the user segment, this is definitely an anomaly, and there is a DHCP server on the user network.

On trusted ports, all DHCP messages are considered legitimate. Connections between switches and routers are usually set as trusted ports; while ports connected to end stations (e.g. computers, printers, access points, and VoIP), as untrusted ones.
Moving on to configuration. Imagine that you are dealing with a Cisco switch. Its g0/2 port faces the router, which means that this port must be set as trusted for DHCP Snooping since this is an intermediate device sending legitimate DHCP messages. The DHCP server can be located on the router itself or even behind the router (in this case, DHCP Relay is used). By contrast, ports f0/1-24 are connected to end stations, and they must be set as untrusted since user connections pose the main risk in terms of attacks on DHCP. Note that DHCP Snooping is enabled on specific VLAN segments. Also, you have to specify the address of the authorized DHCP server that is accessible via a trusted port on the switch.
By default, all ports are untrusted; so, you have to explicitly specify which ports should be trusted and then enable DHCP Snooping globally and run the Snooping process for a specific VLAN segment.
NightmareSwitch(config)# interface g0/2NightmareSwitch(config-if)# ip dhcp snooping trustNightmareSwitch(config)# ip dhcp-server <IP ADDRESS>NightmareSwitch(config)# ip dhcp snoopingNightmareSwitch(config)# ip dhcp snooping vlan <VLAN ID>The switch will start populating the DHCP Snooping table by entering into it the MAC, IP, and VLAN ID of each client who receives addresses over DHCP.
If necessary, you can create a static entry in the DHCP Snooping database:
NightmareSwitch(config)# ip dhcp snooping binding <MAC> vlan <VLAN ID> <IP ADDRESS> interface <INTERFACE ID> expiry <SECONDS>Commands used to debug DHCP and check DHCP status:
NightmareSwitch(config)# show ip dhcp snoopingNightmareSwitch(config)# show ip dhcp snooping statisticsNightmareSwitch(config)# show ip dhcp snooping bindingTo be on a safe side, the contents of the DHCP Snooping table must be written in the switch memory; otherwise, if the switch suddenly reboots, the DHCP Snooping table would be lost. If such an accident occurs simultaneously with Dynamic ARP Inspection, your network would be paralyzed.
NightmareSwitch(config)# ip dhcp snooping database flash:/snooping.dbBy the way, the Snooping database can be stored not only in the switch memory, but can also be transmitted using FTP, HTTP, RCP, SCP, and TFTP services.
NightmareSwitch(config)# ip dhcp snooping database ?  flash:
  ftp:
  https:
  rcp:
  scp:
  tftp:
  timeout:
  write-delay
DAI & IPSG
Normally, Dynamic ARP Inspection (DAI) is configured together with DHCP Snooping; so, this is basically a continuation of the previous chapter.
DAI monitors all ARP traffic to prevent ARP spoofing inside your network. Important: DAI operation directly depends on DHCP Snooping. Based on the DHCP Snooping table, DAI checks the validity of ARP responses (i.e. checks whether a given combination of MAC address and IP address actually exists on the network). If not, DAI immediately blocks such traffic.
However, to integrate DAI in production, you have to make sure that the DHCP Snooping table is fully populated. In other words, it must contain absolutely all hosts on the network. Otherwise, traffic of legitimate hosts not recorded in the table would be blocked, thus, disrupting business processes.
warning
DAI is always configured after DHCP Snooping, and it takes time for all hosts to be recorded in the DHCP Snooping table; otherwise, you’ll get a nonoperational network, and DAI will block incoming traffic from all hosts.
DAI configuring is based on the same concept of trusted and untrusted ports. Similar to DHCP Snooping, all switch ports are untrusted by default. The main principle is the same: trusted ports are ports between switches and routers; while untrusted ports are user ports. IP Source Guard (IPSG) should be enabled on untrusted ports to check the source of requests.
NightmareSwitch(config)# int g0/2NightmareSwitch(config-if)# ip arp inspection trustNightmareSwitch(config)# interface range f0/1-24NightmareSwitch(config-if-range)# ip verify sourceIf necessary, an ACL can be created to avoid checking devices with static IPs (if your network includes hosts with static addresses).
NightmareSwitch(config-if)# arp access-list DAINightmareSwitch(config-arp-nacl)# permit ip host <IP> mac host <MAC>By the way, you can also create static ARP table entries for IPSG inside the switch, but this doesn’t require an ACL.
NightmareSwitch(config)# ip source binding <MAC> vlan <VLAN ID> <IP ADDRESS> interface <INTERFACE ID>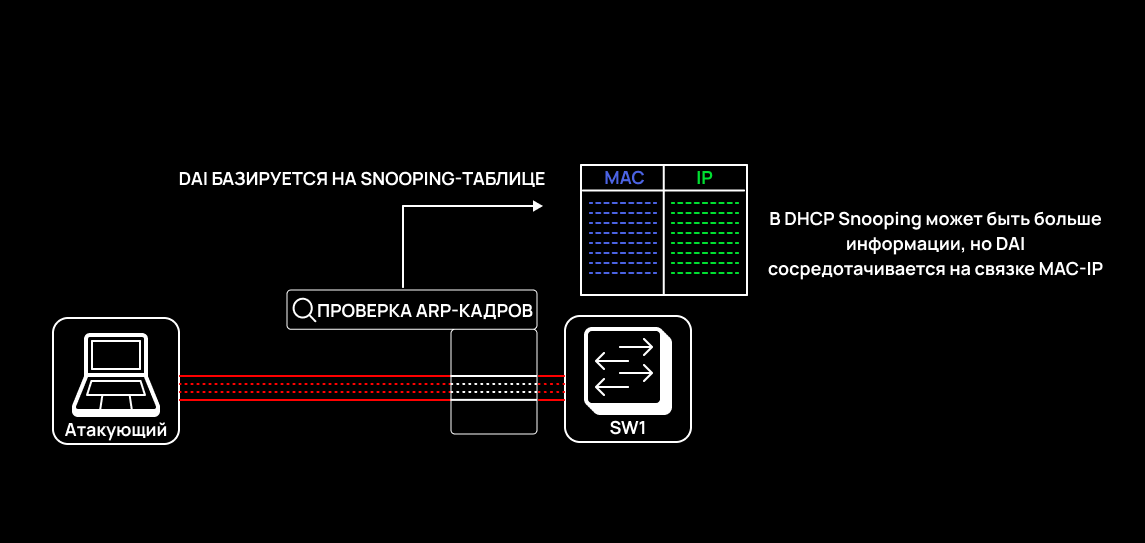
After finishing with the setup, make sure that the required static addresses have been bound and the DHCP Snooping table is fully populated. Then you can enable DAI. Similar to DHCP Snooping, DAI is enabled on specific VLAN segments.
NightmareSwitch(config)# ip arp inspection vlan <VLAN ID>Detecting and blocking Responder
Responder is a pentesting tool making it possible to intercept credentials inside a network infrastructure; primarily, it’s used in environments with Windows hosts. However, preventive measures against Responder are usually limited do disabling MCAST protocols such as LLMNR, NBNS, and MDNS.
In this article, I will try to make the most of the network switch and protect Windows hosts from attacks targeting the above protocols without disabling them. Responder also makes it possible to deliver nonstandard downgrade-based attacks, but they are beyond the scope of the material. Let’s examine the basic blocking techniques.
Responder consists of two components:
- Sniffer responds to data transfer over LLMNR, NBNS, and MDNS protocols. In other words, Responder actively listens to traffic and waits for them to appear; and
- Poisoner responds to name resolution requests transmitted over the above-listed protocols, and Responder impersonates the requested resources. As a result, a MITM (man in the middle) scenario occurs. The attacker intercepts encrypted credentials (e.g. NetNTLMv2-SSP), and receives the hash using a rogue SMB server deployed using Responder.
Analyzing the poisoning process
To detect poisoning, you have to analyze traffic used by Responder to poison LLMNR, NBNS, and MDNS requests. In the screenshots below, 10.10.100.128 is the attacker; while 10.10.100.129 is the Windows client.


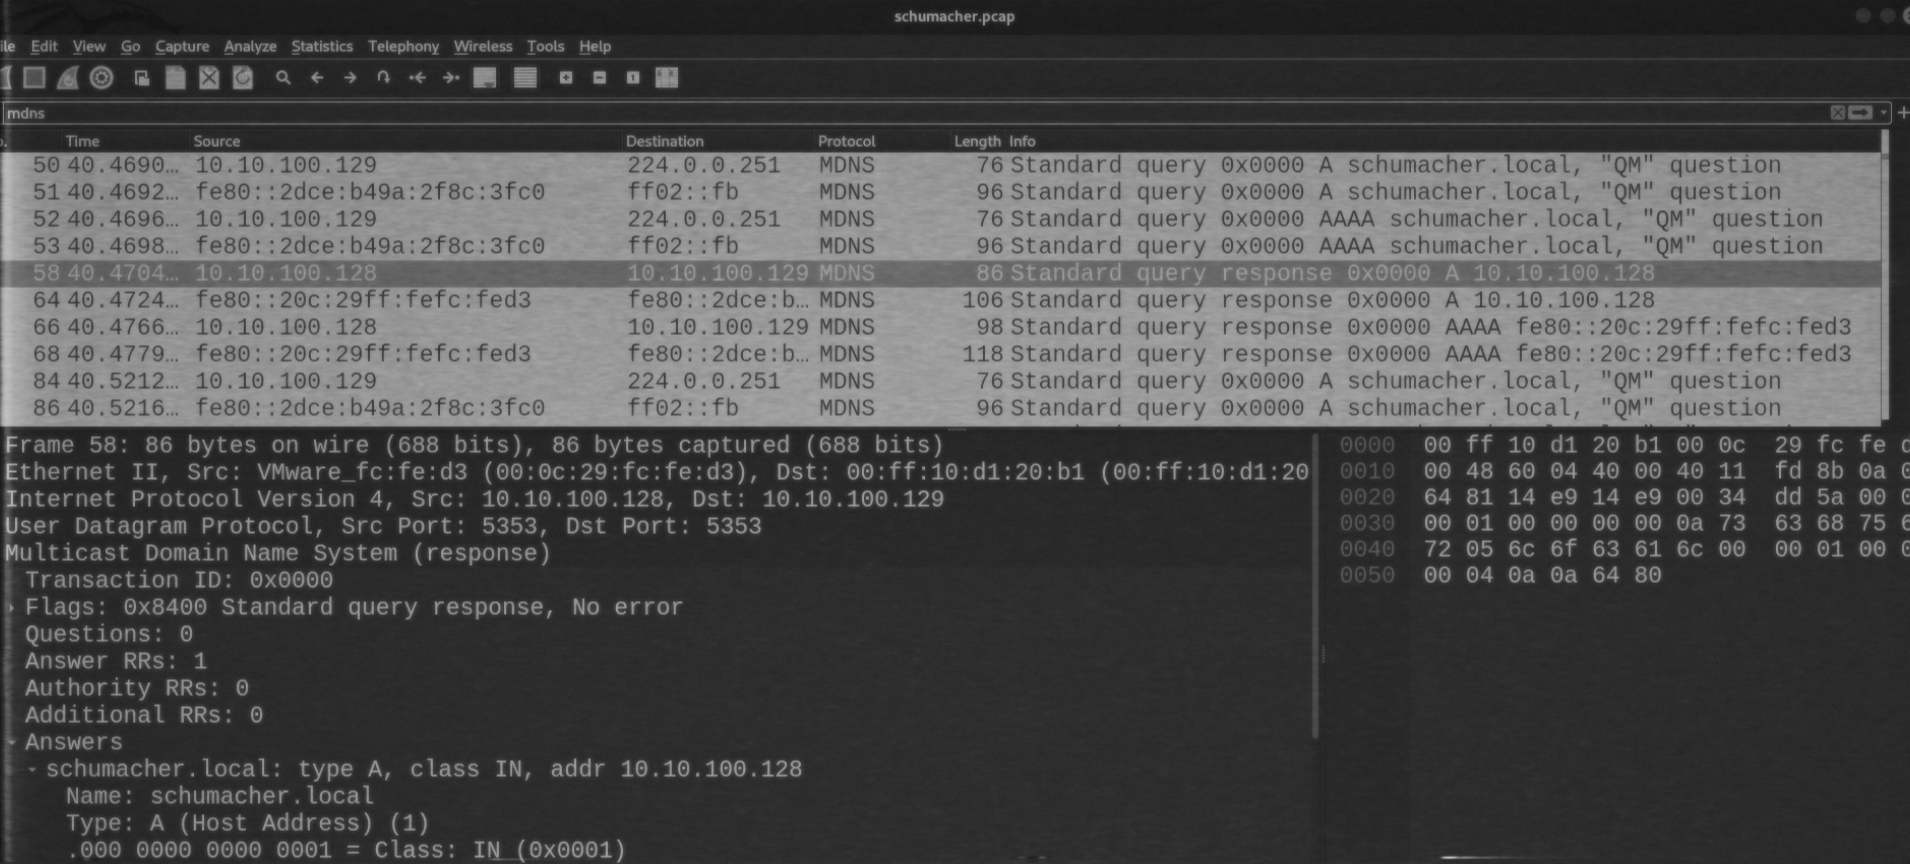
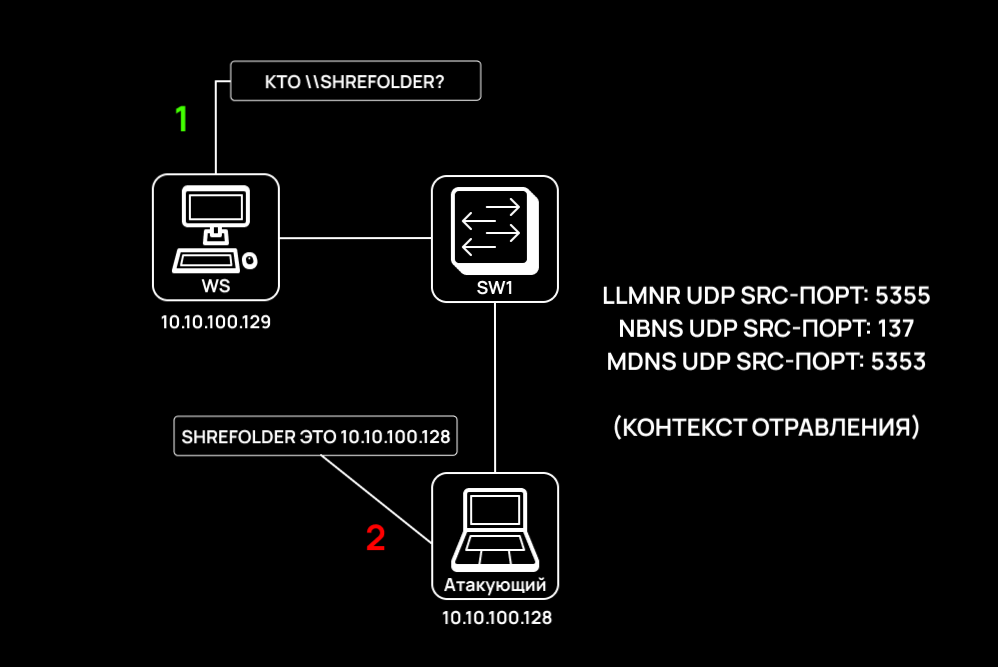
As you can see, Responder uses the following ports for poisoning:
- LLMNR – UDP/5355;
- NBNS – UDP/137; and
- MDNS – UDP/5353.
ACL
ACL (Access Control List) is a traffic filtering mechanism frequently used in computer networks. In simple terms, ACL is a set of conditions stipulating what traffic is expected and what should be the behavior of a switch or router when this traffic type appears. ACL application examples:
- traffic management. The network engineer decides what traffic should go to the VPN tunnel, what traffic should be broadcasted (NAT), etc.;
- restricting network protocol traffic. The network engineer can use ACLs, for instance, to restrict Smart Install so that only previously trusted subnets can access SMI. The same applies to dynamic routing protocols (e.g. OSPF and EIGRP) and even to gateway redundancy protocols (HSRP, VRRP, GLBP, CARP, and ESRP); and
- VTY security. VTY terminal lines are used for remote management of network devices. ACLs enable you to configure restrictions so that only trusted subnets can connect to VTY.
There are two ACL types:
- Standard ACL – traffic is filtered by source and destination IP addresses; and
- Extended ACL – makes it possible to filter traffic not only by IP addresses, but also by source and destination ports. In addition, traffic can be filtered by protocol type (ICMP, TFTP, GRE, etc.).
It’s not that Standard ACL is better than Extended ACL. The choice between them depends on specific conditions. However, ACL configuring isn’t limited to its creation: ACLs should be bound to interfaces.
VACL and VMAP
VACL (VLAN Access List) is an ACL type that controls traffic within a VLAN segment. This is exactly what you need. Creating an ACL every time and binding it to all switch ports would be too time-consuming, and scalability could suffer. Instead, you create a single VACL process, and it controls all traffic within a VLAN segment.
VACL operation is based on two aspects:
- condition (configured ACLs with conditions specified for ports used by LLMNR and NBNS); and
- VACL map (filtering map for a specific VLAN consisting of rules and sequence numbers).
Here is a sample configuration that will block UDP/5355 and UDP/137, thus, preventing Responder-based attacks.
First, two ACL lists should be created:
- extended IPv4 ACL to limit Responder traffic over IPv4; and
- IPv6 ACL to limit Responder traffic over IPv6 (yes, Responder can use IPv6).
NightmareSwitch(config)# ip access-list extended ResponderIPv4NightmareSwitch(config-ext-acl)# permit udp any eq 5355 anyNightmareSwitch(config-ext-acl)# permit udp any eq 137 anyNightmareSwitch(config)# ipv6 access-list ResponderLLMNRIPv6NightmareSwitch(config-ext-acl)# permit udp any eq 5355 any
warning
I didn’t block UDP/5353 since it’s used for MDNS traffic. MDNS is responsible for the correct operation of printers, Chromcast, and macOS devices, and its blocking can disrupt their work. On the other hand, my approach to VMAP is quite aggressive. Perhaps the best solution is to monitor MDNS at the IDS level or try to disable it using Windows configs (e.g. registry).
I configured conditions to filter specifically the source port. Using the construct permit , I just create a condition. If traffic matching this condition arrives, it will be filtered (i.e. I will either allow this traffic or block it). By the way, NBNS doesn’t support IPv6; so, its port isn’t on the IPv6 ACL.
Next, I create a VACL map with respective seq numbers: 10 and 20.
NightmareSwitch(config)# vlan access-map BLOCKRESPONDER seq 10NightmareSwitch(config-vlan-map)# match address ResponderIPv4NightmareSwitch(config-vlan-map)# match ipv6 address ResponderLLMNRIPv6NightmareSwitch(config-vlan-map)# action drop logNightmareSwitch(config)# vlan access-map BLOCKRESPONDER seq 20NightmareSwitch(config-vlan-map)# action forwardFor seq , I create a sequence that will drop traffic matching the ACLs, and this will be reflected in the switch logs (action ).
For seq , I allow the rest of the traffic to flow to avoid causing an unintentional DoS (action ).
The last step is to enable VACL. You have to specify a VLAN to apply the VACL to it.
Nightmare(config)# vlan filter BLOCKRESPONDER vlan-list <VLAN ID>Signature for Suricata
For Suricata, I wrote, just for fun, the following signature that will help to detect LLMNR poisoning:
alert udp any 5355 -> any any (msg:"△ LLMNR POISONING DETECTED △"; flow:stateless; content:"|80 00 00 01 00 01 00 00 00 00|"; sid:1337; rev:1; classtype:attack-feature;)Blocking the mitm6 tool
Mitm6 is one of the most popular pentesting tools. It sends out fake DHCPv6 messages to fool legitimate Windows hosts; as a result, they believe that the attacker host is a DNS server at the IPv6 level.
The main security issue is that the IPv6 priority in Windows is much higher compared to IPv4, and when Windows accesses domain names, the IPv6 address of the DNS server is used. If IPv6 is active, Windows OS generates from time to time DHCPv6 requests that trigger mitm6.
This results in a MITM attack enabling the attacker to intercept user credentials and deliver a series of Relay attacks. Let’s see how this occurs at the traffic level. You goal is to identify static data that will be used as the basis for blocking.
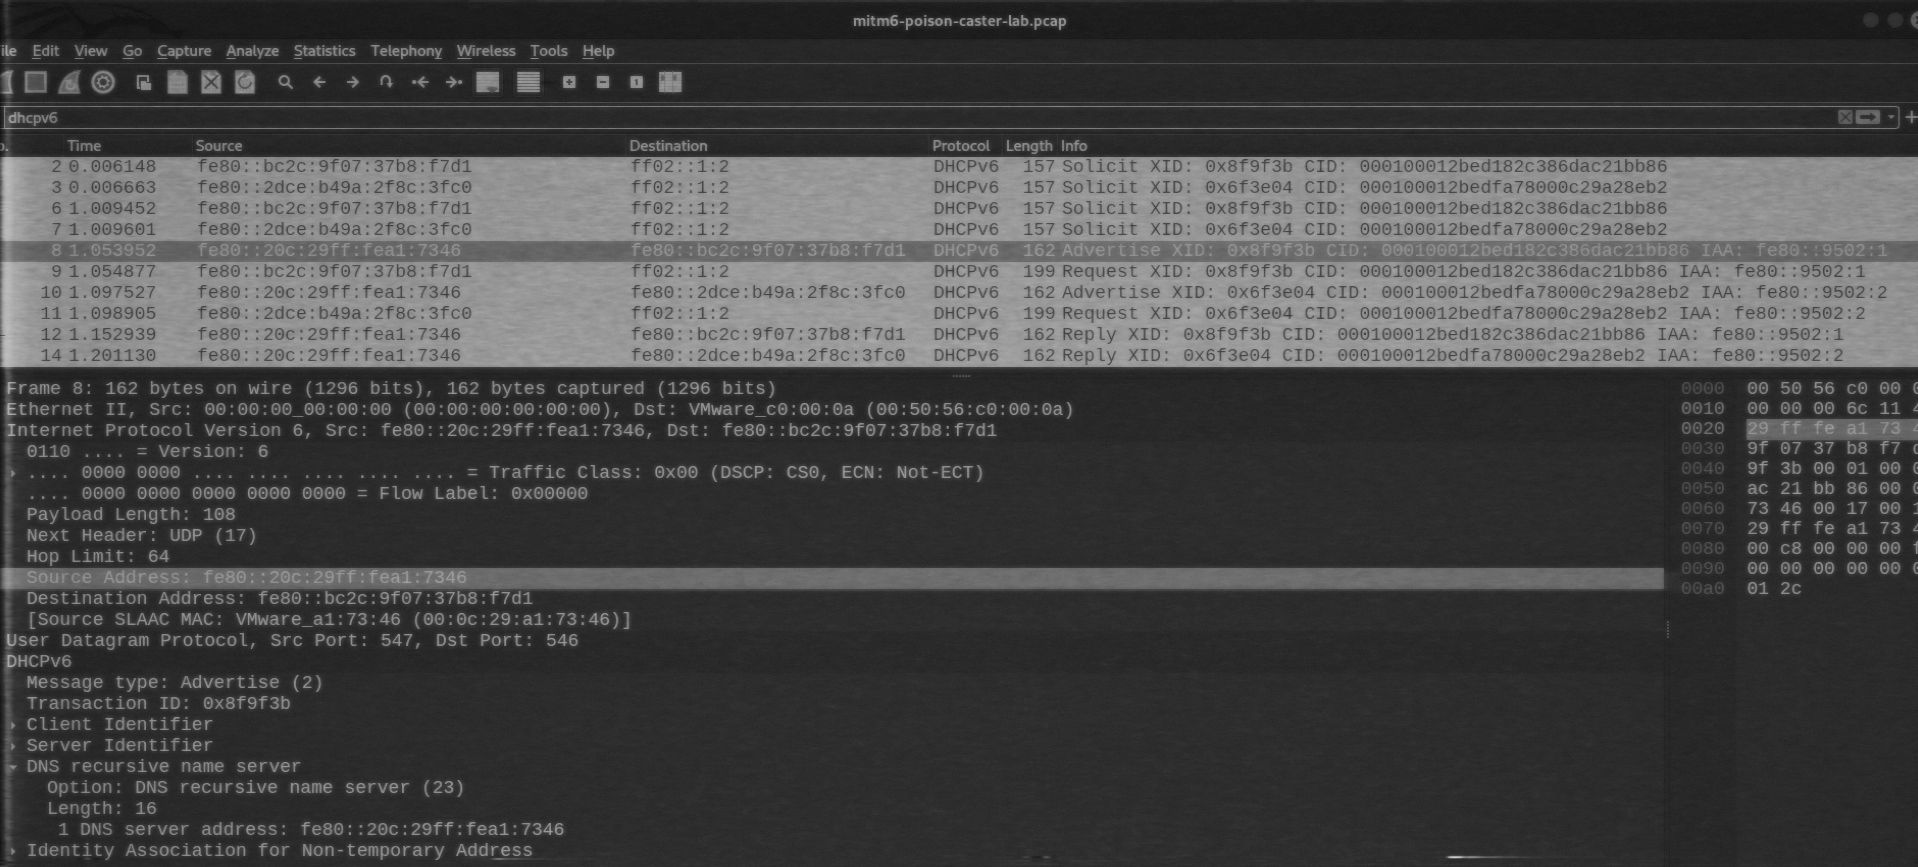
In this scenario, fe80:: is the attacker; while fe80:: is a Windows host.
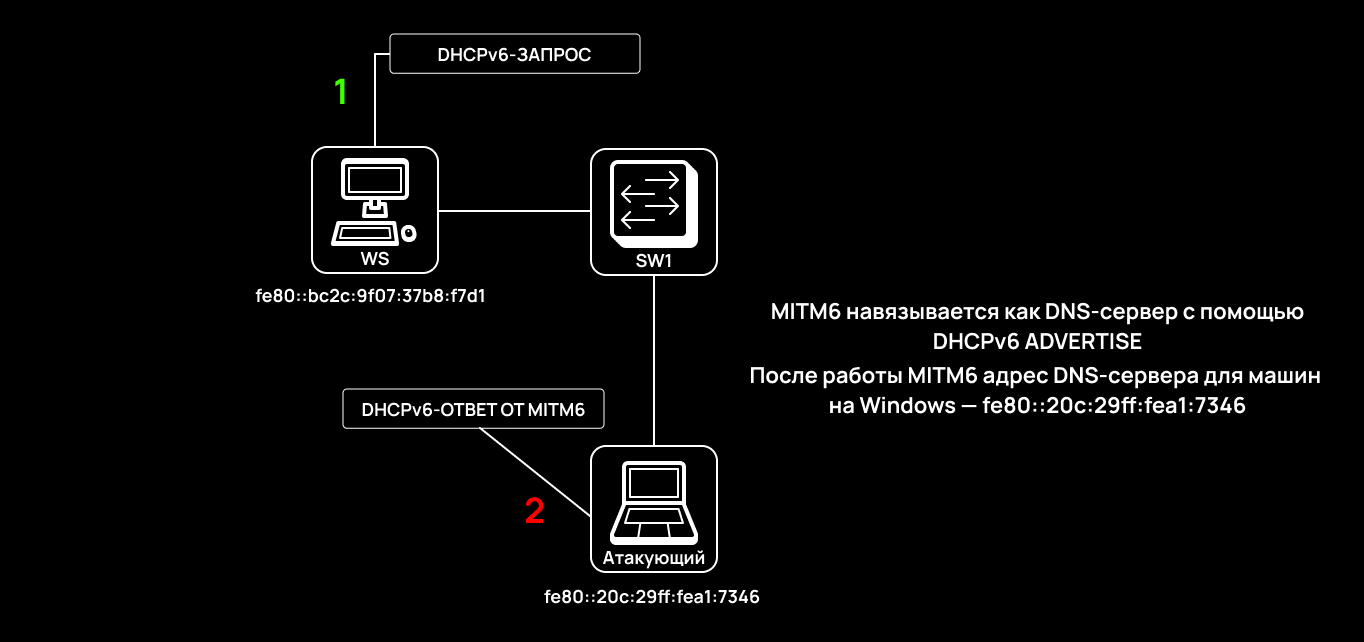
Mitm6 generates a DHCPv6 ADVERTISE message that contains DNS server data, including the attacker’s IPv6 address. This is the main source of exploitation.
Note that port 547 (that is strictly reserved for DHCPv6 responses from the server) is used at the UDP transport level. Obviously, if a UDP datagram with source port 547 appears inside a segment, this indicates an anomaly and the presence of a DHCPv6 server in the user network. There is a way to block mitm6, but it’s too aggressive; so, I simply block this port.
VMAP-based blocking
This is exactly the same situation as with blocking Responder, and the same concept involving ACL and VMAP maps is used. A number of settings should be tweaked to block the UDP/547 port.
NightmareSwitch(config)# ipv6 access-list MITM6DHCPV6UDPSRCNightmareSwitch(config-ext-acl)# permit udp any eq 547 anySimilar to the situation with Responder, the UDP port of the source is filtered using the permit construct.
VACL map with two Sequence numbers:
NightmareSwitch(config)# vlan access-map BLOCKMITM6 seq 10NightmareSwitch(config-vlan-map)# match ipv6 address MITM6DHCPV6UDPSRCNightmareSwitch(config-vlan-map)# action drop logNightmareSwitch(config)# vlan access-map BLOCKMITM6 seq 20NightmareSwitch(config-vlan-map)# action forwardBelow is the final construct that enables VACL for a specific VLAN segment:
NightmareSwitch(config)# vlan filter BLOCKMITM6 vlan-list <VLAN ID>Now the switch will filter DHCPv6 messages and won’t allow mitm6 traffic in the UDP/547 context. This prevents an attacker from impersonating a DNS server at the IPv6 level.
STP Tree security
STP (Spanning Tree Protocol) is an L2 protocol that protects a computer network from broadcast storms by blocking redundant physical connections. The problem is that Ethernet frames don’t have a TTL field, and the broadcasted traffic would infinitely flow along channel connections if a switching loop occurs. This protocol operates exclusively at the data link layer, and 802.3 BPDU frames are used for communication. By default, STP is usually enabled on managed switches.
However, an attacker can send a BPDU frame with the lowest priority value towards the STP switch in an attempt to seize the role of the root switch. This leads either to a partial MITM attack or a DoS attack.
From the security perspective, it’s much better to enable the BPDU Guard function: the switch will logically block the destination port the BPDU frame has arrived to. BPDU Guard should be configured on user ports connected to end equipment.
NightmareSwitch(config)# interface range f0/1-24NightmareSwitch(config-if-range)# spanning-tree bpduguard enable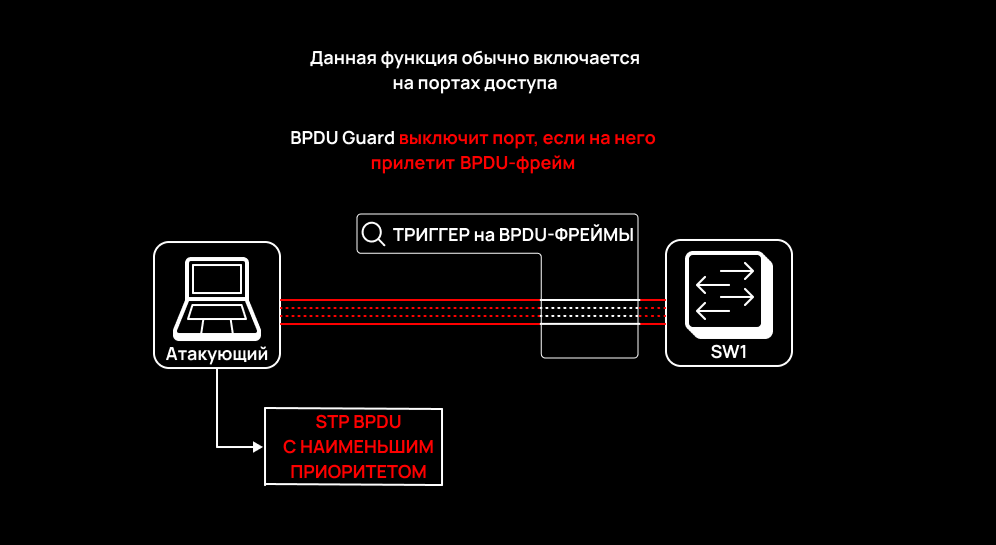
FHRP hot standby security
FHRP (First Hop Redundancy Protocol) is a family of network protocols that allow multiple physical routers to operate as a single logical router with a virtual IP address. This virtual address is assigned as the default gateway address for end hosts. This technique enhances fault tolerance of the network, and it is required for a hot standby system. The most widespread protocols of the FHRP class are HSRP and VRRP.
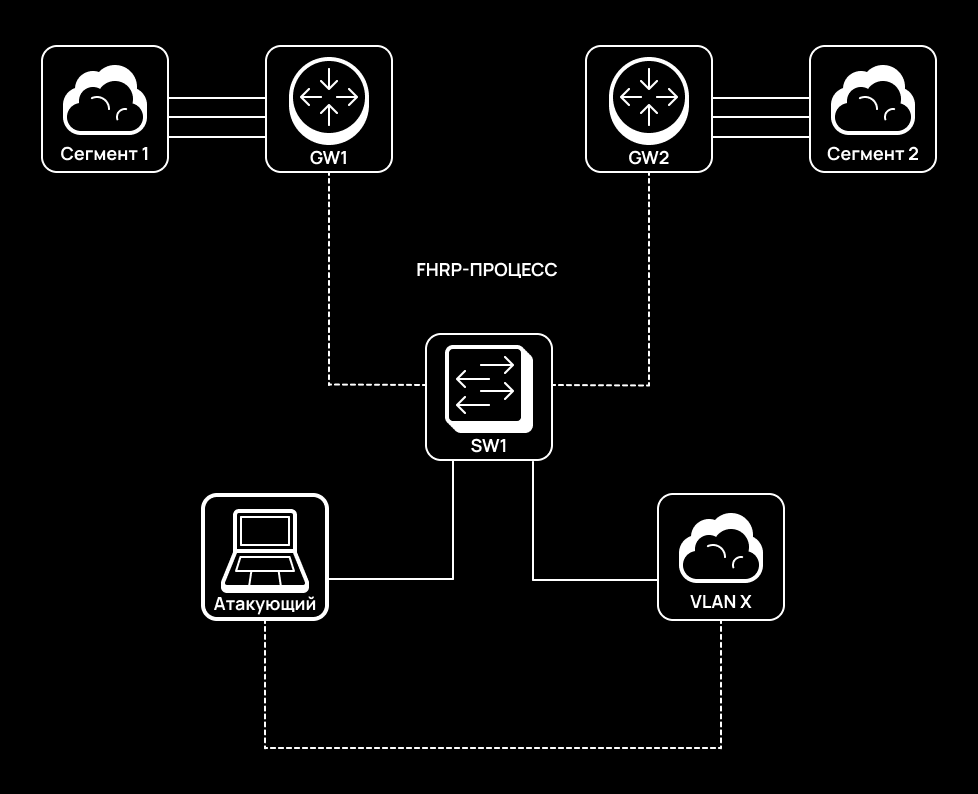
The FHRP fault domain can be attacked. This becomes possible when the Active (in HSRP) or Master (in VRRP) routers don’t have the highest priority in their configurations or cryptographic authentication is disabled.
An attacker who manages to spoof the Active/Master role can deliver a MITM attack and intercept all traffic within the respective segment. In addition, a Black hole can be created, thus, making normal operation of the segment impossible. Another nuance is that FHRP protocols use MCAST messages that are broadcasted throughout the entire network segment, and even ordinary users can detect FHRP packets.
Authentication
Authentication prevents ‘rogue’ routers from joining the fault tolerance process. If an engineer intends to protect FHRP this way, a strong password phrase is required.
Below is an example of MD5 authentication for HSRP:
NightmareRouter1(config-if)# standby X authentication md5 key-string <KEYSTRING>An example of MD5 authentication for VRRP:
NightmareRouter1(config-if)# vrrp X authentication md5 key-string <KEYSTRING>Maximum priority
For security reasons, it’s recommended to assign the maximum priority to the Master/Active router. In this case, if an attacker sends a malicious packet with priority 255, they won’t be able to become the ‘boss’ since it already exists. However, this won’t work for VRRP because its maximum priority that can be set is 254. Therefore, it’s better to use authentication or even ACL-based filtering.
Setting the maximum priority for HSRP:
NightmareRouter(config)# int g0/0NightmareRouter(config-if)# standby 1 priority 255Protecting dynamic routing
Dynamic Routing Protocols (DRP) are used in all large corporate networks; they enable routers within an AS to exchange routing information automatically. However, sometimes DRP configuring is neglected (I encountered such situations). Some dangerous dynamic routing misconfigurations (e.g. absence of passive interfaces or lack of authentication) open possibilities for attacks on the dynamic routing domain.
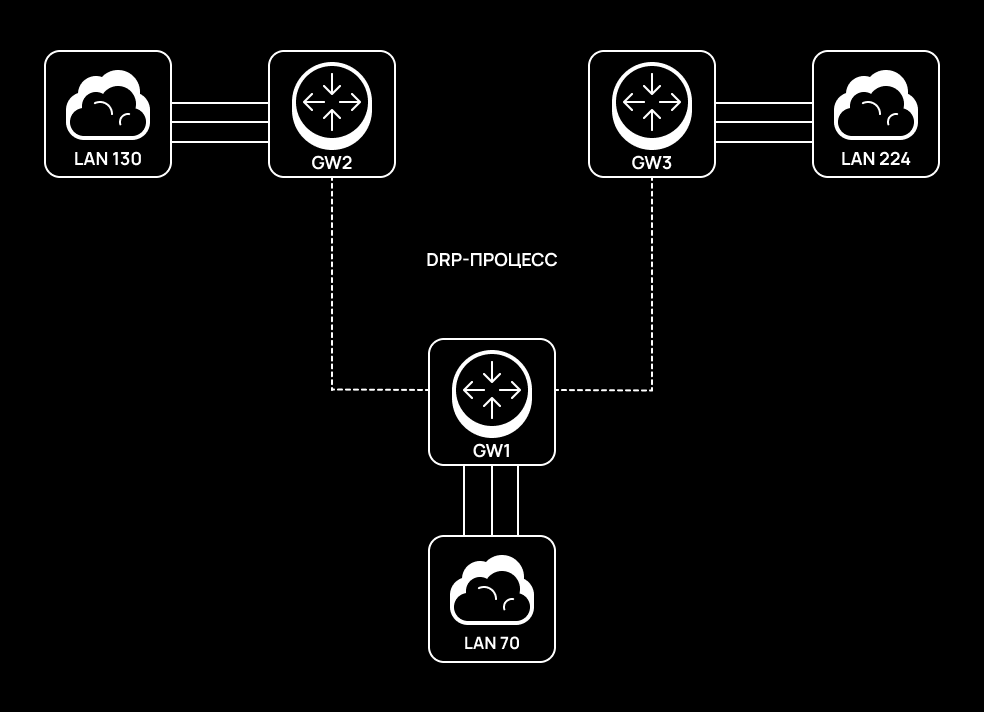
Similar to FHRP, DRP packets are multicast and can be analyzed on the user network side (i.e. on the network announced to the outside). A potential malefactor can deliver an attack by deploying a virtual router on the attacker’s side and connecting to the routing domain. This can cause the following consequences:
- information listing – the attacker gains information about some networks announced over DRP;
- black hole – the attacker can wrap traffic of a specific host into a ‘black hole’, thus, causing DoS; or
- fake LSU or EIGRP updates that can overflow the routing table resulting in a DoS attack (in that case, the attacker must seize the Master role).
Passive Interfaces
Configuring passive interfaces in the dynamic routing context enables the router to prohibit sending advertisements via some interfaces. By default, if passive interfaces aren’t configured, it sends advertisements to all interfaces, which exposes the routing domain to great risk.
An example of passive interfaces for OSPF:
NightmareRouter(config)# router ospf XNightmareRouter(config-if)# passive-interface GigabitEthernet X/XAn example of passive interfaces for EIGRP:
NightmareRouter(config)# router eigrp XNightmareRouter(config-if)# passive-interface GigabitEthernet X/XAuthentication
The application of authentication in routing domains ensures that only authorized legitimate routers can log on. However, authentication is configured using passwords. If you want to protect your routing domain using authentication, make sure that your passwords are strong enough. They are hashed using cryptographic hash functions, and an attacker can read their hash values from a traffic dump and brute-force the passwords. After cracking a password, an attacker can easily connect to the routing domain.
An example of OSPF authentication:
NightmareRouter(config)# interface GigabitEthernet X/XNightmareRouter(config-if)# ip ospf authentication message-digestNightmareRouter(config-if)# ip ospf message-digest-key <KEY ID> md5 <KEYSTRING>An example of EIGRP authentication:
NightmareRouter(config)# key chain EIGRPWITHKEYCHAINSNightmareRouter(config-keychain)# key 1NightmareRouter(config-keychain-key)# key-string <KEYSTRING>NightmareRouter(config-keychain)# key 2NightmareRouter(config-keychain-key)# key-string <KEYSTRING>NightmareRouter(config)# interface GigabitEthernet X/XNightmareRouter(config-if)# ip authentication mode eigrp <ASN> md5NightmareRouter(config-if)# ip authentication key-chain eigrp <ASN> EIGRPWITHKEYCHAINSIn addition, you can use Keychain authentication. This authentication style employs multiple keys, thus, making the attacker’s job more difficult: the malefactor must not only brute-force the keys, but also guess their order.
Conclusions
Now you are aware of the basic concepts used to protect networks from spoofing attacks. In my opinion, the power of functions supported by network equipment is severely underestimated. Using them in a skilful way, you can significantly boost the security of your network. Remember: wise approach and understanding of internal network processes are the main prerequisites for success.
Good luck!
