Samsung smartphones run TouchWiz, a heavily customized version of Android. As a result, the ways to modify it differ somewhat from techniques used with other ROMs, but overall the process will feel familiar.
As with other custom ROMs, you’ll need root access. Gaining root privileges carries some risk, so we should play it safe and make a backup. To do that, you’ll need to install the TWRP custom recovery on your smartphone.
Install TWRP
If you’re using the international variant of the device, there’s no need to unlock the bootloader. Just follow the instructions step by step. Also make sure the device is at least 50% charged.
- Install the USB drivers for Windows. You can find them on Samsung’s official developer site: http://developer.samsung.com/galaxy/others/android-usb-driver-for-windows
- Restart your computer after installing the drivers.
- Download Odin (http://dl.sammobile.com/Odin3-v3.11.1.zip) and extract it to any folder.
- Go to https://twrp.me/ and download the custom recovery for your device. The TWRP build must match your exact device model.
- Launch Odin and put your phone into Download Mode. To do this, power it off, then press and hold Volume Down + Home + Power. When prompted, confirm by pressing Volume Up.
- Connect the phone to the computer with a USB cable and wait for Odin to respond. On the left side you should see “Added” — that means the device is detected. If nothing happens within five to ten minutes, repeat steps 5 and 6.
- Click the AP button and select the TWRP file you downloaded earlier.
- Click Start.
In a few seconds, the flashing process will complete and the device will reboot automatically.
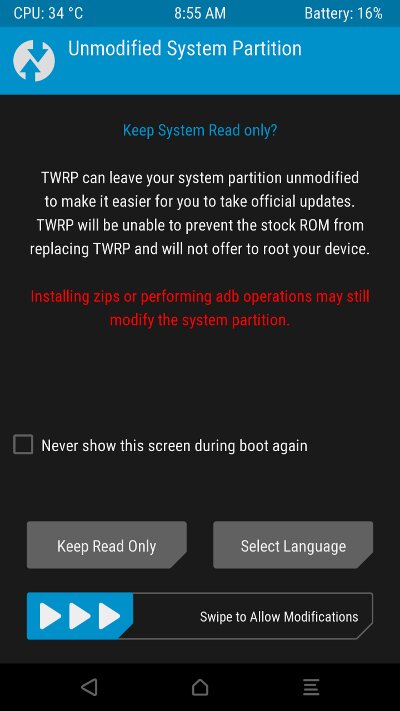 |
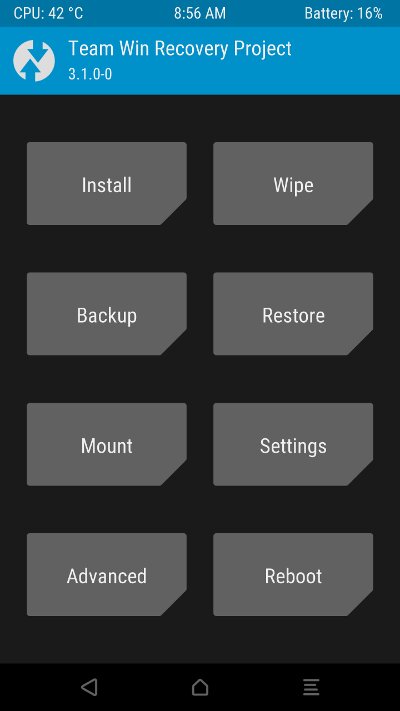 |
| Granting access to system partitions and the TWRP main screen | |
Back up your data
- Boot the phone into recovery mode: power it off, then press and hold Volume Up + Home + Power for a few seconds.
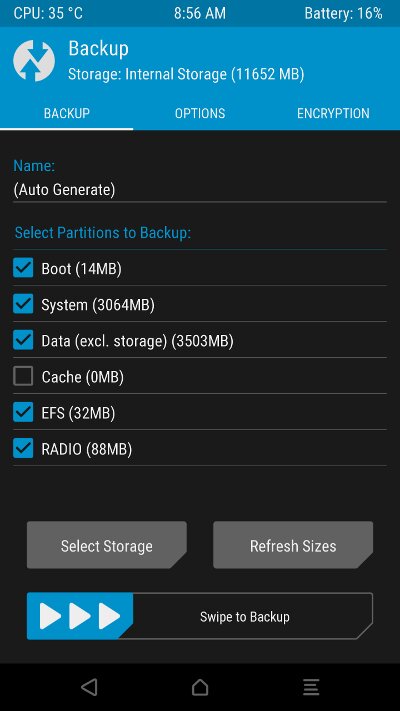
- On the main screen, open Backup and select all partitions except Cache.
- Choose where to save the backup by tapping Select Storage. If possible, use the SD card.
- Swipe the slider at the bottom from left to right to start the backup.
Note: the backup size can exceed 6 GB! It’s stored in the TWRP folder.
 |
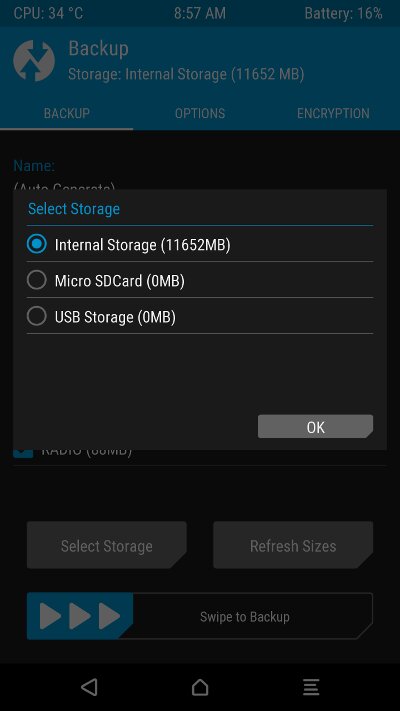 |
| Backup creation menu and storage location selection | |
Gaining root access
There are several ways to get root access. The most common are installing SuperSU or Magisk Manager via TWRP. Since SuperSU can sometimes cause bootloops and other issues on Samsung devices, we’ll use Magisk instead.
- Install Magisk Manager: https://play.google.com/store/apps/details?id=com.topjohnwu.magisk&hl=ru
- Open Magisk Manager, tap Download, grant storage access, and wait for the ZIP archive to finish downloading to your phone.
- Reboot into TWRP.
- In TWRP’s main screen, go to Install, navigate to the MagiskManager folder on internal storage, and select the ZIP.
- Swipe the slider at the bottom to flash it, then tap Reboot System.
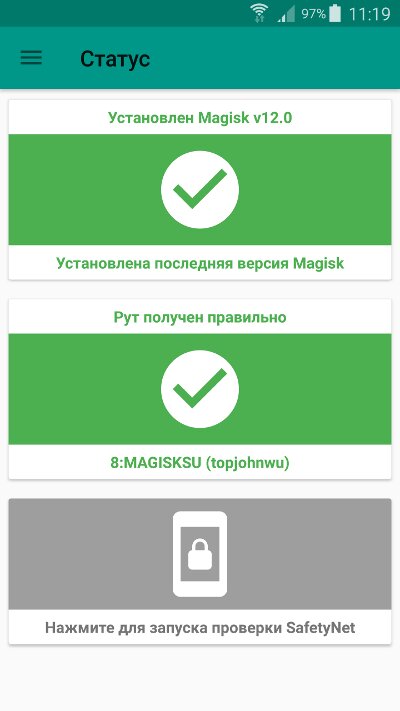
- After the phone restarts, open the Magisk Manager app and confirm root is active: the Status tab should say “Properly rooted.”
 |
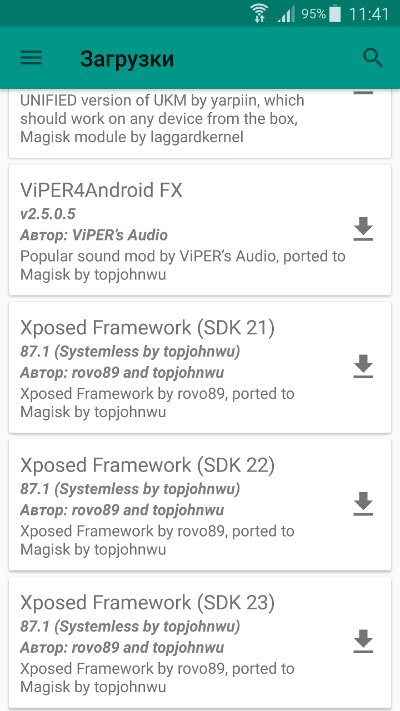 |
| Magisk Manager home screen and a list of downloadable modules | |
Installing the Xposed Framework
Xposed Framework is a runtime platform for tweaks that extend Android’s capabilities. The official Xposed build won’t work on devices running TouchWiz, but there’s an unofficial fork that does work correctly.
There are two variants of Xposed: ARM and ARM64. The former is for older devices with a 32-bit CPU architecture, such as the Galaxy S5 and Galaxy Note 4; the latter is for 64-bit models like the Galaxy S6, S7, Note 5, and so on. Download the latest version of Xposed that matches your Android version and CPU architecture.
As a precaution, download the uninstaller, which lets you remove Xposed if something goes wrong. Copy both files to your SD card, reboot, and install Xposed. If the next boot ends in a bootloop, launch TWRP again and flash the uninstaller to remove Xposed.
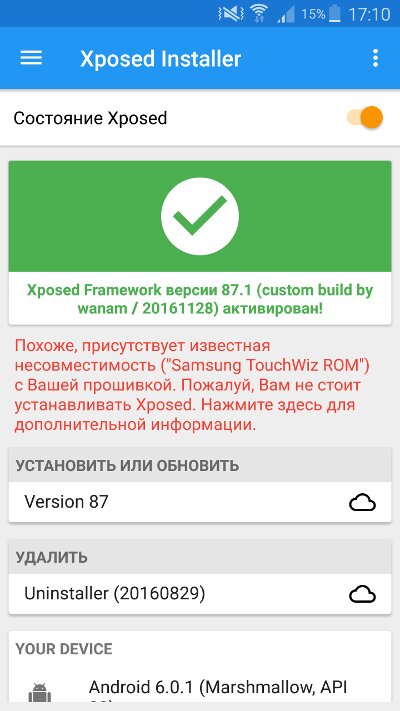
Next, download and install Xposed Installer. It acts as a module (tweak) manager that lets you install and uninstall them.
 |
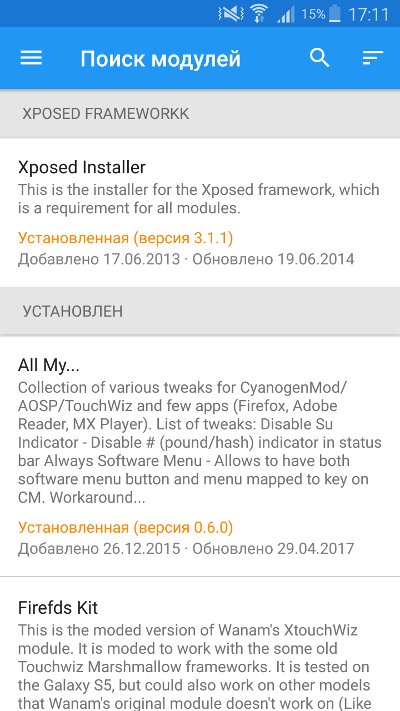 |
| Xposed Installer home screen and list of available modules | |
Xposed Modules
You can use the Xposed Installer itself to install modules. Open the side menu and go to the “Module Search” section. Enter the module name in the search field and tap it, then switch to the “Versions” tab and tap “Install.” Once the download completes, go to “Installed modules,” enable the module, and reboot your phone.
Note: most modules in the repository are incompatible with TouchWiz, so installing them may cause a bootloop. In that case, you’ll need to reboot into TWRP and flash the uninstaller again.
XtouchWiz / Firefds Kit
XtouchWiz is a module for tweaking TouchWiz firmware on devices newer than the Galaxy S5 and Note 4. Firefds Kit is a modified version of XtouchWiz that works with older smartphones and tablets (tested on the Galaxy S5 and Note 4).
Key features of XtouchWiz / Firefds Kit:
- Modify system status (Fake System Status — lets you hide root)
- Disable the high-volume warning
- Skip tracks with the volume rocker
- Disable the camera shutter sound
- Enable the advanced reboot menu
- Disable scrolling cache in apps
- Enable the camera during calls
- Enable multi-window mode for all apps
- Remap hardware buttons
- Add a call recording button (auto-record)
- Change the transition animation in the stock launcher
 |
 |
| Call recording button | |
All my…
All my… — a set of tweaks for both stock Android and TouchWiz. Key features:
- Hide unnecessary dialogs and pop-ups
- Hide the “Do Not Disturb” notification
- Enable/disable Reading mode (Adaptive Display only)
- Enable more pleasant haptic feedback
- Disable the password prompt after reboot when fingerprint unlock is enabled
- Switch to sRGB during video playback
- Automatically enable MTP (Media Transfer Protocol) access
- More detailed battery usage stats
- Control music playback with the volume keys
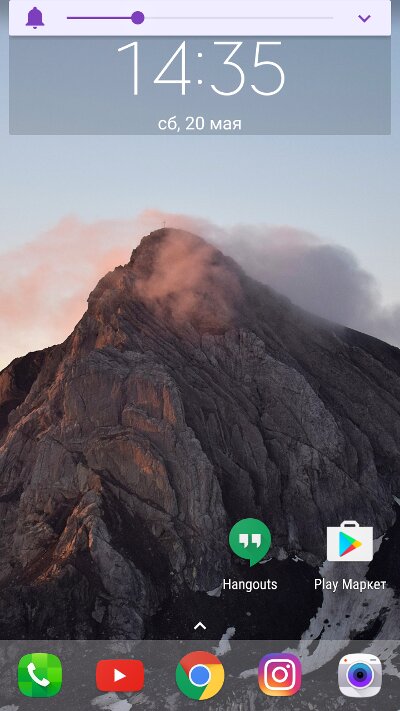
- Enable a more compact volume panel
- Move the text cursor with the volume rocker
- Disable the “device connected to a computer” notification
There are additional options in the Copycats section where you can tweak haptic feedback, set the minimum brightness, disable the high-volume warning, and so on.
 |
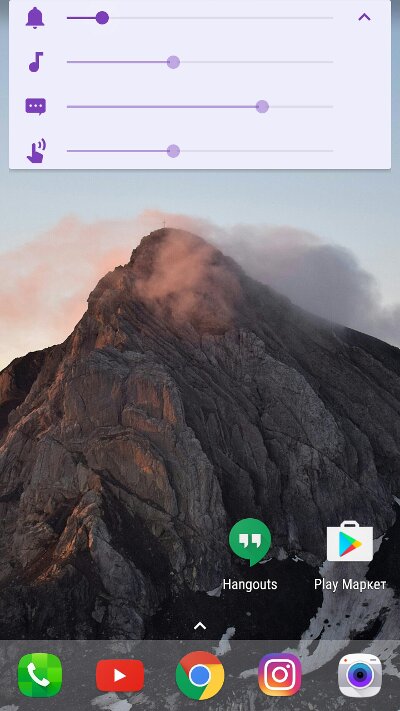 |
| Compact and expanded volume panel | |
Xposed Edge
Xposed Edge is a module that lets you remap all hardware buttons, enable on-screen navigation buttons, use gestures, and more. Verified to work on Samsung Galaxy devices.
Key features of Xposed Edge:
- Remapping physical buttons
- Side PIE navigation menu
- Gesture-based navigation
- Swipe controls for functions (brightness, screen filter, volume)
- Freezing apps
- Side panels
- Drawn gestures
- An extensive set of settings
Removing system apps
Samsung smartphones, like Android devices from other manufacturers, come with a large number of apps that you can’t uninstall—and in some cases can’t even disable. Many of them sit in RAM continuously, eating up memory while providing little to no value.
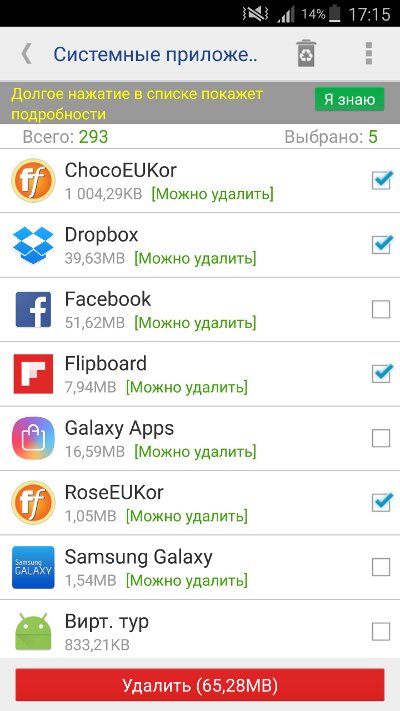
You can remove such apps with a root-enabled file manager (just find the app under / or /). But there’s an easier way: use App Manager. When you launch it, it will list all system apps and even indicate which ones are safe to remove.
 |
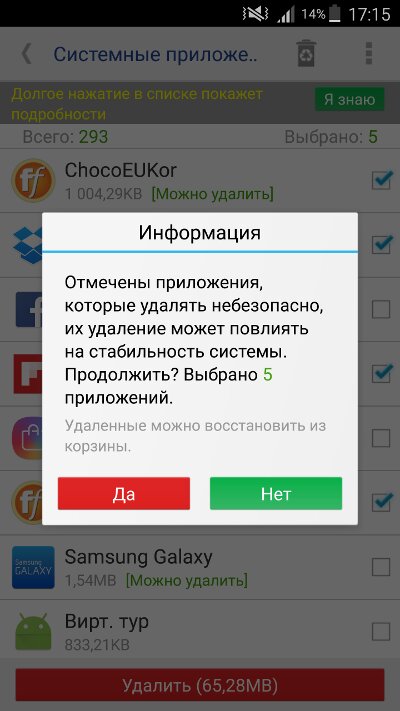 |
| Removing system apps | |
Detailed list of applications you can remove:
- Flipboard (Upday) and Briefing — news aggregators with panels integrated into the launcher;
- Dropbox — client app for the Dropbox cloud storage;
- Hancom Office Viewer — default document viewer;
- Microsoft Office — office suite;
- Peel Smart Remote — remote control for TVs and other devices via the IR blaster;
- PEN.UP — app for sharing your own drawings;
- Gear VR — services required for the Gear VR headset to function;
- Samsung Print Service Plugin — lets you print over a wireless network;
- ANT+ Services — enable wireless sports accessories such as heart-rate monitors;
- S Health — Samsung’s fitness app;
- S Planner — built-in calendar;
- S Voice — Samsung’s voice assistant;
- Samsung Link Platform — lets you share media over the internet;
- AllShare FileShare Service — service that powers Samsung Link;
- Google Text-to-speech — used by apps like e-book readers;
- E-Mail — stock email client;
- Internet — Samsung’s proprietary browser;
- Samsung Text-to-speech Engine — Samsung’s counterpart to Google’s TTS;
- My Files — file manager;
- Music — audio player;
- Weather — stock weather widget;
- Knox services — system security components; they can interfere with SuperSU/root;
- S Finder (Finder) — device-wide search;
- Quick Connect — connect to nearby devices via Bluetooth and Wi‑Fi;
- SecurityLogAgent — system security log/scanner; with root access, Smart Manager will flag it;
- ChocoEUKor, RoseEUKor, CoolEUKor, SamsungSans — preinstalled fonts;
- Beaming Service — barcode transmission feature;
- Galaxy Apps — Samsung’s app store;
- Game Tuner — fine-tune in-game performance settings;
- Game Tools — record gameplay, take screenshots, and mute notifications while gaming;
- Game Launcher — hub/manager for installed games;
- Samsung Account — links the device to your Samsung account;
- Yahoo! Edge — Edge panel by Yahoo!;
- Voice Recorder — records audio via the built-in mic;
- S Note (Samsung Notes) — note-taking app;
- Launcher — the stock TouchWiz launcher (ensure a third-party launcher is installed before removing it).
CSC Tweaks
These tweaks are available on all Samsung Galaxy devices. Essentially, they’re hidden features that you can only access with root access.
To enable them, I recommend using the CSC Tweaks for Samsung app, which handles everything quickly and without hassle. The only downside is that it’s not free. That said, unlocking hidden features via CSC tweaks is a complex and potentially risky process, so CSC Tweaks for Samsung is worth the price.
Key features of CSC Tweaks for Samsung:
- Enable call recording
- Disable the camera shutter sound
- Show mobile data usage in the Quick Settings panel
- Additional symbols on the default keyboard
- Enable VoLTE support
- Toggle showing the NFC icon in the status bar on/off
If you want to restore the default functionality, there’s an option in the app’s menu that does exactly that.
 |
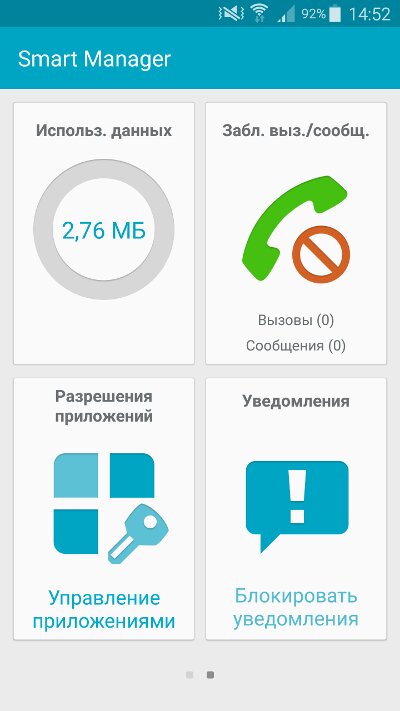 |
| Additional keyboard symbols and an extra panel in Smart Manager | |
Editing build.prop
The / file contains low-level Android configuration, including settings for the network stack, media codecs, modem, camera, the device’s DPI, and more.
To edit build.prop, I recommend using the free BuildProp Editor app. As soon as you launch it, you’ll see a list of all system properties. If you don’t know what a property does, it’s best not to touch it (or Google that specific property to find out what it controls).
To change a setting, tap it and enter a new value. Then tap Save and reboot your smartphone for the changes to take effect. Be careful—one wrong move can land you in a bootloop or leave the system unstable.
What can be improved:
-
debug.— improves touch responsiveness.performance. tuning=1 -
debug.— makes the UI more responsive at the expense of battery life.composition. type=gpu -
ro.— can reduce power consumption by disabling Fast Dormancy (many Russian mobile operators don’t support it).ril. fast. dormancy. rule=0 -
ro.— reduces the delay before the phone starts ringing.telephony. call_ring. delay=0 -
wifi.— improves battery life by increasing the interval between Wi‑Fi scans.supplicant_scan_interval=180 -
ro.— improves battery life.config. hw_power_saving=true -
ro.— use this if you have to re-enter your Wi‑Fi password after every reboot.securestorage. support=false
You shouldn’t change the ro. parameter, as many system apps—like Phone and Camera—don’t properly support it.
Custom ROMs
I’ve used every custom ROM available for my Galaxy Note 4 phablet. Many of them include most of the features you’d get from Xposed, CSC tweaks, and enhancements via build..
I also want to mention the Nemesis custom ROM, which is available for the Galaxy Note 4, Galaxy Note 5, Galaxy S6, and S7. It lets you fine-tune both the interface and functionality. SimplRom is also quite good: it’s already debloated, has call recording enabled by default, adds extra characters to the keyboard, and includes plenty of other improvements.
Good Lock
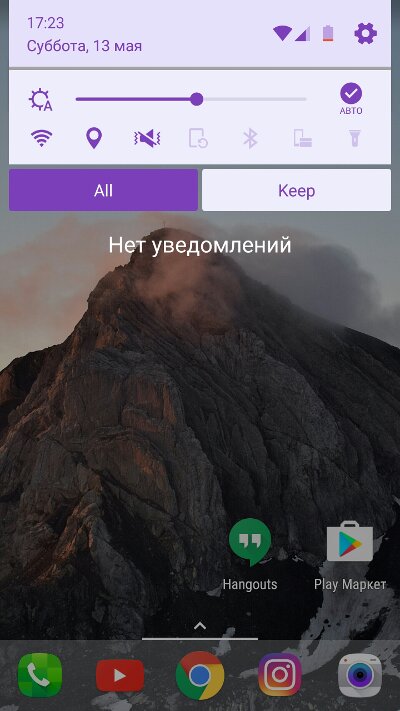
Surprisingly, you can tweak the TouchWiz interface using an official Samsung tool. The Good Lock app dramatically reshapes the UI, completely overhauling the lock screen and notification shade. The system feels much lighter and closer to stock Android than Samsung’s usual firmware—plus you get a ton of customization options.
Good Lock is distributed as a regular app through the Galaxy Apps store (it’s also available on APKMirror). However, there’s a catch: on some devices (for example, the Galaxy Note 4), the fingerprint screen unlock stops working.
 |
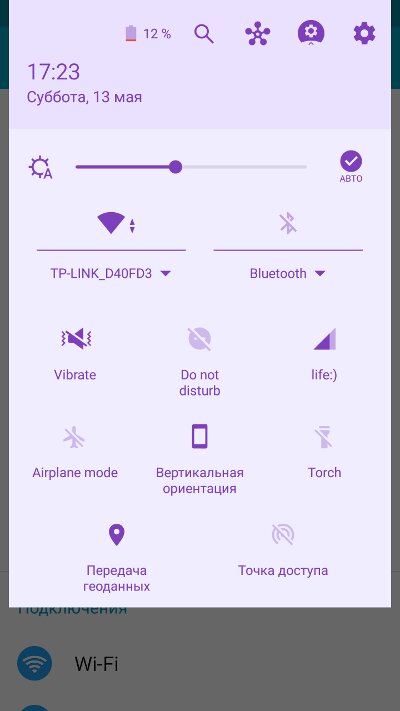 |
| Notification panel after installing Good Lock | |
Conclusion
As you can see, you can significantly extend the capabilities of even the stock firmware. Yes, you’ll need root access for that, but getting it today is much easier than it used to be. I remember having to type a dozen commands in the command line, where a single mistake could lead to disastrous results.
