The commands described in the article can be executed directly on the device by downloading a terminal emulator from the market, but it is more convenient to do this, of course, from a computer via adb.
[/panel]Basics of working with ADB
To start working with ADB, you should activate it on your device and install the adb utility and drivers on your computer. The first task is accomplished by enabling USB debugging in the Developer options settings (if this option is hidden, tap the build number seven times in the About phone menu).
To install ADB on your computer, download Adb Kit and unzip it into any folder (I recommend using folder names without Russian characters). We also download and install ADB drivers.
You need to work with adb from the command line. Press Win + R and enter cmd, then go to the folder where adb is located. For my folder the command will be:
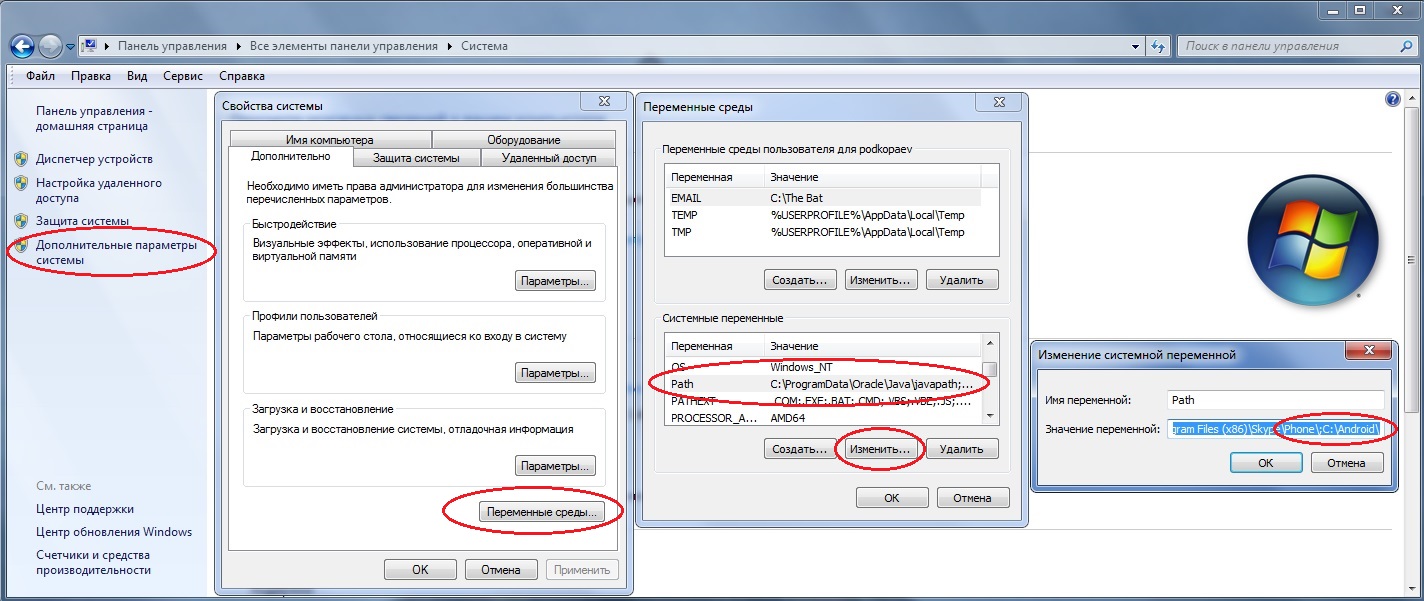
cd \androidTo avoid doing all these manipulations every time, you can add the required folder to the Path variable. To do this, go to “Control Panel → System → Advanced system settings → Environment variables”, find the Path variable and add the path to the folder with adb to the end of the line, separated by a semicolon. Now, after launching the console, you can immediately enter the necessary commands.
Let’s check our connection to the phone using the following command (it should list the connected devices):
adb devicesADB can be used over Wi-Fi. This requires root permissions and the [WiFi ADB] app(https://play.google.com/store/apps/details?id=com.ttxapps.wifiadb). We launch the application, press the switch and connect to the smartphone using the connect command and the IP address shown by the application:
adb connect ip-addressFurther work with ADB is no different.
[panel template=info]You can copy the console output after selecting it with the mouse, and also paste the copied command or file name into the console by right-clicking. Enabled in console properties.
[/panel]Installing programs
ADB can be used to install apps without having to copy them to your smartphone. It is enough to execute the following command:
adb install d:/downloads/file_name.apkYou can also add additional keys to the command. Useful options are –-е — reinstall the application while preserving data and -d — install a version lower than the current one.
Programs can be deleted, but to do this you need to know the name of the package (I’ll tell you how to find out a little later). Using the Angry Birds Seasons game as an example, the command would look like this:
adb uninstall com.rovio.angrybirdsseasonsBackup applications
Android has built-in backup features that can also be launched from the command line. To do this, use the adb backup command and a set of options:
adb backup [options] <applications>- -f specifies the name of the file to be created and its location on the computer. If the key is missing, the backup.ab file will be created in the current directory;
- -apk|-noapk specifies whether to include only the application data in the backup or the .apk itself as well (default is not included);
- -obb|-noobb specifies whether to include .obb extensions for applications in the backup (default is not included);
- -shared|-noshared specifies whether to include the contents of the application on the SD card in the backup (default is not included);
- -all indicates the need to back up all installed applications;
- -system|-nosystem specifies whether to include system applications in the backup (default is included);
-
— list of packages for backup.
If we want to create a backup of all non-system programs, including the .apk files themselves, to a specific location, the command will look like this:
adb backup -f c:\android\backup.ab -apk -all -nosystemAfter entering, you must confirm the start of the backup on the device itself. To restore the received backup, you need to run the appropriate command:
adb restore c:\android\backup.ab
Console in console
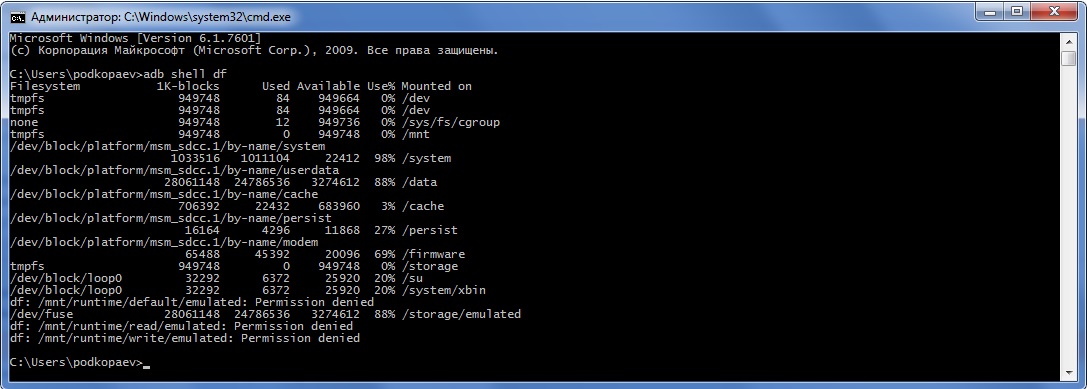
Along with the mentioned console, which is a DOS console under Windows, Android also has its own. It is called via adb shell and is essentially a standard Linux console, but with an incomplete set of commands, which can be expanded by installing BusyBox from the market. There are two ways to use this console. In interactive mode, it is launched with the command
adb shellThe $ sign appears in the console (further in the text this sign will indicate the need to enter the preliminary adb shell command), and after that you can enter a series of commands, receiving a response after each. The second way is if you need to enter only one command, you can write it one after another in adb shell.
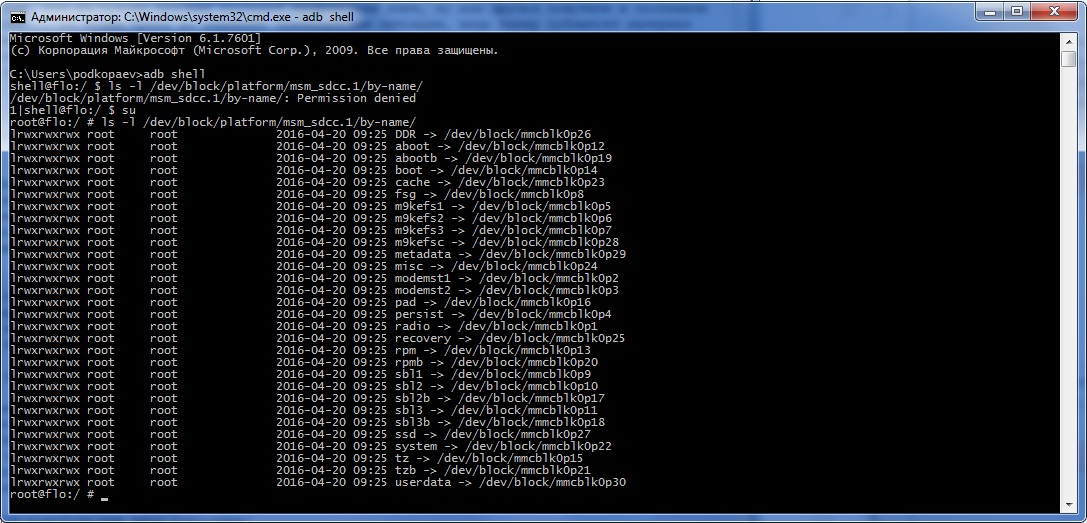
The shell supports standard commands for copying, moving and deleting files: cp, mv and rm. You can change directories (cd) and view their contents ( ls ). In addition to the standard Linux commands, which you can learn about from any reference book, Android has several of its own specialized tools, but to use some of them, you will have to get root rights on your smartphone, and after launching the console, run the su command:
adb shellsuYou need to do this if in response to any command you see a line similar to “access denied” or “are you root?”. If successful, the $ sign will change to #.
Taking a screenshot
It is done in one line:
adb shell screencap /sdcard/screen.pngAfter this, the image needs to be pulled from the device using the adb pull command:
adb pull /sdcard/screen.pngIn recovery, you can take a screenshot with the following command:
adb pull /dev/graphics/fb0Then you need to convert the fb0 file into a normal image using FFmpeg, which you need to download and put in the folder with adb. The extension must be installed on your device:
ffmpeg -f rawvideo -pix_fmt rgb32 -s 1080x1920 -i fb0 fb0.pngRecording video of what is happening on the device screen
adb shell screenrecord --size 1280x720 --bit-rate 6000000 --time-limit 20 --verbose /sdcard/video.mp4This command will start recording video with a resolution of 1280 x 720 (if not specified, the device’s native screen resolution will be used), with a bitrate of 6 Mbps, a length of 20 s (if not specified, the maximum value of 180 s will be set), with logs displayed in the console. The recorded video will be located in /sdcard (video.mp4 file).
[panel template=info]All processes launched from the console and in the adb shell that take some time to execute can be interrupted using the Ctrl + C combination. Exit the shell and return to executing regular adb commands – Ctrl + D.
[/panel]Application Management
To manage applications, two commands are used: pm (package manager) and am (activity manager). These commands have quite a few keys, which can be viewed on the developer portal. Let’s dwell on some of them.
First, we get a list of applications installed on the device in the form of package names, which will be useful later:
$ pm list packagesAdding -s to the end will show only system applications, -3 will show only third-party applications, -f will show package installation paths, and -d will show disabled applications. Next, knowing the names of the packages, you can perform various violent actions on them :). For example, disable an unnecessary calendar:
$ pm disable com.google.android.calendarClear data:
$ pm clear com.dropbox.androidWell, you can completely delete it like this:
$ pm uninstall com.dropbox.androidUsing the activity manager will require a deeper knowledge of the Android framework and an understanding of what Avtivity and Intent are. This will allow you to launch various applications, such as the browser or settings:
$ am start -n com.android.browser/.BrowserActivity$ am start -n com.android.settings/.SettingsYou can terminate the application with the opposite command:
$ am kill com.android.browserWell, and to kill all running applications, use this command:
$ am kill-allThe same activity manager will help you make a call to the desired phone number:
$ am start -a android.intent.action.CALL tel:123And this is how you can open the page in a browser:
$ am start -a android.intent.action.VIEW 'http:/xakep.ru'
And using a variation of the previous command, you can send an SMS:
$ am start -a android.intent.action.SENDTO -d sms:PHONE_NUMBER --es sms_body "SMS_TEXT" --ez exit_on_sent true$ input keyevent 22$ input keyevent 66In this command, input keyevent emulates a key press and can be used for both hardware and in-app buttons. In our example, 22 corresponds to moving focus to the right (joystick to the right – dpad right), and 66 – Enter.
Using the input command, you can, for example, unlock your phone. To do this, you need to enter:
$ input keyevent 82The keyevent 26 screen will turn off, which corresponds to pressing the Power button. You can also experiment with the numbers 3 – Home, 4 – Back, 24 – Volume Up, 25 – Volume Down, 27 – physical Camera button. The last button can also be transmitted via broadcast messages (you can find the full list of broadcast messages here):
$ am broadcast -a android.intent.action.CAMERA_BUTTONAnother broadcast message will put the phone into airplane mode:
$ am broadcast -a android.intent.action.AIRPLANE_MODE --ez state trueBut this command will not work on the latest versions of Android. The svc utility is used there to manage power and wireless communications. For example, you can enable data transfer via a mobile network or control Wi-Fi using commands.
$ svc data enable$ svc wifi disableYou can also force your smartphone to stay on when connected to a USB port/charger/Wi-Fi network or always:
$ svc power stayon usb$ svc power stayon ac$ svc power stayon wireless$ svc power stayon trueReturning to the input command, it is worth highlighting another command for inserting text into the current field. Some people may find this a more attractive way to type on a computer than pressing buttons on a small area of the screen. $ input text “Text to insert”
Besides the text option, the *input* command has others.The full form of the command is: $ input [
The source can be trackball, joystick, touchnavigation, mouse, keyboard, gamepad, touchpad, dpad, stylus, touchscreen.The commands will be: * text
- keyevent [–longpress]
… (Default: keyboard) - tap
(Default: touchscreen) - tap
(Default: touchscreen) - swipe
duration(ms) - press (Default: trackball)
- roll
(Default: trackball)
As you can see from the commands, it is possible, although with difficulty, to control the device via the input touch and input swipe commands with a broken screen if the mouse does not support USB-OTG. For example, you can pull out the notification curtain like this (coordinates are counted from the upper left corner):
$ input swipe 10 10 10 1000And this is how you can find out the screen resolution:
$ dumpsys window | \sed -n '/mUnrestrictedScreen/ s/^.*) \([0-9][0-9]*\)x\([0-9][0-9]*\)/\1 \2/p'For Nexus 5 the resolution will be 1080 x 1920. Then you can press the “Applications Menu” button of the standard Google launcher, which is located above the “Home” button, like this:
$ input touchscreen tap 500 1775
[panel]
Scripts
The execution of all the series of commands described in the article can be automated. To do this, paste them into a text file (lines following adb shell), which has the line #!/system/bin/sh at the beginning, save with the sh extension and upload to the device. After this, you can run the script through the same adb:
adb shell sh /sdcard/file_name.sh
[/panel]
System utilities
I will briefly dwell on several useful commands (the functionality of some, however, may depend on the firmware version and phone model).
Change DPI. Does not require root and works on Android 5.0+. The default value for Nexus 5 is 480. With a value of 420, the stock launcher desktop will fit five icons in a row instead of four:
$ wm density 420 && adb rebootConnecting /system in write mode. For some commands that change system files, you must first remount the /system partition as writable. This is also necessary when removing system applications. Remounting is performed with the following command:
$ su# mount -o rw,remount /systemSoft Reset:
$ setprop ctl.restart zygoteSwitching your smartphone to Doze power saving mode (Android M+):
$ dumpsys battery unplug$ dumpsys deviceidle step…repeat the steps until we see idle.
Battery percentage (Android 4.4+):
$ content insert --uri content://settings/system --bind name:s:status_bar_show_battery_percent --bind value:i:1Extracting logs
Very often, when a user turns to a device forum to solve a problem, they are asked to send logs of the phone or application. There are two utilities responsible for this: logcat and dmesg. The first one allows you to see system messages in real time, and the second one will show the kernel operation after the fact, including I/O error messages, loading drivers, connecting USB devices, and so on. The full log can be output directly to a file using the following command:
adb logcat > logcat.txtAll events will be recorded continuously as the device operates. You can stop recording with the standard combination Ctrl + C. However, all information is included in the log, which makes it very difficult to find what you need. Therefore, for work, a set of keys and filters is usually used that are suitable for a specific situation. There are seven message priorities in ascending order: V — Verbose, D — Debug, I — Info, W — Warning, E — Error, F — Fatal, S — Silent. For example, to display all messages with priority Е and higher, enter:
adb logcat *:EAfter this, you can run the problematic application and see what exactly is causing the error. Output of information from alternative buffers is also supported. This way you can see what applications are doing in the background and, for example, what events occur after the screen is turned on:
adb logcat -b events
Advanced level
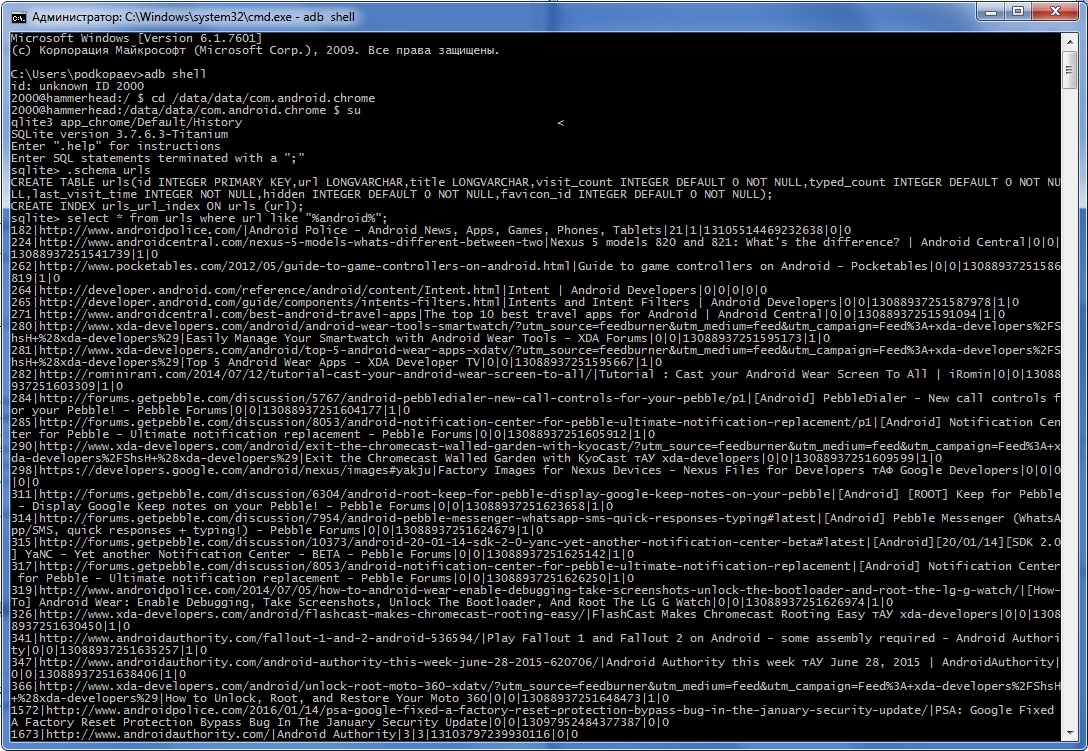
In one of my articles I showed how you can extract information from databases of various applications. Well, now let’s see how to do this directly from the console, without downloading databases to your computer or installing database viewers on your device. The sqlite3 command is used for this. Let’s display the Chrome browser history:
$ cd /data/data/com.android.chrome$ su# sqlite3 app_chrome/Default/History> .schema urls> select * from urls where url like "%android%";To read the database, you need to unload the browser from running applications. You can interrupt the execution of the sqlite script by pressing Ctrl + Z, and exit with the .quit command. If in response to the command you receive the error /system/bin/sh: sqlite3: not found, then there is no sqlite3 on the smartphone and you will have to download it, put it in /system/bin and give the file all rights. I use sqlite3 which I pulled out from Titanium Backup some time ago.
You can also use sqlite3 to extract all contacts from your phone. To do this, the console on the computer must use the Lucida Console font and before starting to execute commands, the encoding must be switched to UTF-8. Otherwise, instead of Russian letters, incomprehensible symbols will be displayed. The commands themselves look like this:
chcp 65001adb shell$ su# cd /data/data/com.android.providers.contacts/databases# sqlite3 contacts2.db> select t1.raw_contact_id,t1.normalized_number,t2.display_name from phone_lookup as t1, raw_contacts as t2 where t1.raw_contact_id=t2._id Order by display_name;If everything is done correctly, then in the console you will see a table with the serial number of the record, the phone number and contacts sorted by name. For contacts with more than one number, there will be several entries in a row.
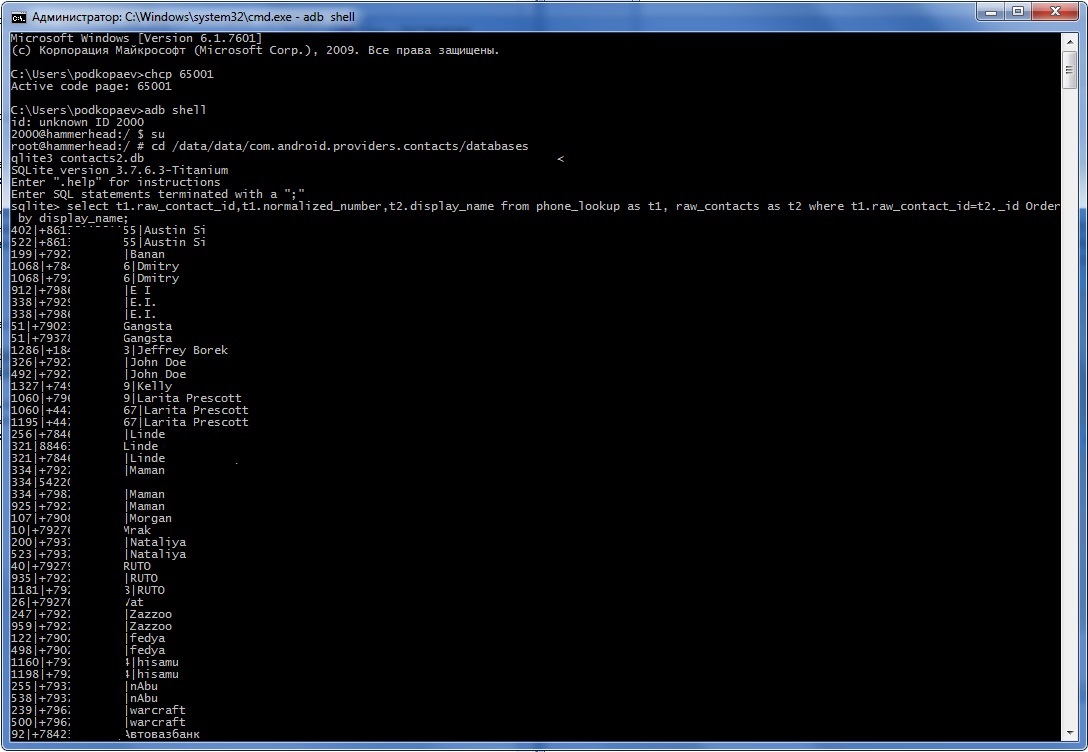
You can output data not to the screen, but directly to a text file. To do this, the commands need to be changed:
adb shell$ su# cd /data/data/com.android.providers.contacts/databases# sqlite3 contacts2.db "select t1.raw_contact_id,t1.normalized_number,t2.display_name from phone_lookup as t1, raw_contacts as t2 where t1.raw_contact_id=t2._id;" > /sdcard/contacts.txtAn alternative way to output contacts to a file is a command that requires BusyBox to be installed:
content query --uri content://contacts/phones --projection number:name --sort "name ASC"| awk -F= '{gsub(/[-() name]/,"",$2);print $2" "$3}'| sed 's/,//g' >/sdcard/contacts.txtRemoving graphic key, PIN, facelock
Let’s say you forgot your PIN or set up a graphic key when you were not quite sober, or your friends joked and set up facial recognition… So, if the device is blocked for some reason, the blocking can be removed (provided that USB debugging is enabled) through the same console:
adb shell$ su# cd /data/system# rm *.keyThe command will remove all passwords and patterns. The files themselves, depending on the firmware and device model, can be: gesture.key, password.key, cm_gesture.key, personalpattern.key, personalbackuppin.key. The files locksettings.db, locksettings.db-shm, locksettings.db-wal are also responsible for blocking.
After this, it is enough to reboot the device and enter any key or password. If this does not help, you can try the following:
adb shell$ cd /data/data/com.android.providers.settings/databases$ sqlite3 settings.db> update system set value=0 where name=’lock_pattern_autolock';> update system set value=0 where name=’lockscreen.lockedoutpermanently';Conclusions
As you can see, you can do a lot of interesting things with ADB. And the more you use the console, the faster you can perform some actions without installing additional software on the device. I hope this article helped you understand ADB and encouraged you to read the documentation and find new useful commands.
