Why Snort?
Snort is an open-source intrusion detection system, an IDS. It can run as a sniffer or a logger, but here we’re focused on NIDS (Network Intrusion Detection System). In this mode, Snort inspects incoming packets for signs of known types of network attacks (DDoS, port scanning, brute-force login attempts, and so on).
Here’s the analogy: store owners install cameras to protect themselves from theft. Cameras won’t keep someone from picking the locks, but they will record what the thieves do and help catch them. Intrusion detection systems work much the same way. They can be standalone products or part of Internet Security suites. They can’t stop an attack, but they will alert you and help with incident investigation.
I won’t spend much time describing this product, because you can find plenty of information about it in the magazine. For example, Snort is discussed as part of an open-source SIEM in an article by Daniil Svetlov. I’ll just explain why I chose Snort. Three factors influenced this choice:
- Easy to write custom rules;
- Good support and an informative mailing list;
- Frequent updates.
On top of that, the company was acquired long ago by industry giant Cisco—and those people know networking, to say the least.
Installing Snort
Installing Snort the straightforward way isn’t particularly difficult. You can follow the documentation on the site. We, however, aren’t afraid of a bit of complexity and will install it with additional enhancements that extend the core product’s capabilities.
In addition to Snort itself, we’ll need:
- Barnyard2;
- PulledPork;
- Basic Analysis and Security Engine (BASE).
Let’s get to work!
I’ll be installing the October release of Snort 2.9.12, since Snort 3 is only available as a beta. I’ll be using Ubuntu 16.04.1; the steps are the same for Ubuntu 16 and 18. Installation on Ubuntu 14 differs, but that’s outside the scope of this article.
First, configure the network interface.
info
Important note for Ubuntu users. Starting with version 15.10, network interfaces no longer follow the ethX naming convention. So make sure you use the correct interface name. This is where most config issues come from.
Select the network interface that Snort will monitor, and add two lines at the end of the interfaces configuration to disable Large Receive Offload (LRO) and Generic Receive Offload (GRO). This is recommended to reduce CPU load:
post-up ethtool -K eth0 gro off
post-up ethtool -K eth0 lro off
Restart the configured network interface:
sudo ifconfig enp0s3 down && sudo ifconfig enp0s3 up
Next, as usual — run update && upgrade and install the required components:
sudo apt-get install -y build-essential libpcap-dev libpcre3-dev libdumbnet-dev bison flex zlib1g-dev liblzma-dev openssl libssl-dev libnghttp2-dev.
Next, create a working directory where we’ll mix the sources and tweak them as needed. Download the DAQ (Data Acquisition) system into it. This library provides an abstraction layer that replaces direct libpcap calls, making it easier to work across different hardware and software interfaces without modifying Snort itself.
mkdir snort
cd snort
wget https://snort.org/downloads/snort/daq-2.0.6.tar.gz
tar -xvzf daq-2.0.6.tar.gz
cd daq-2.0.6
./configure
make
sudo make install
Now we can install Snort itself.
cd ~/snort_src
wget https://www.snort.org/downloads/snort/snort-2.9.12.tar.gz
tar -xvzf snort-2.9.12.tar.gz
cd snort-2.9.12
./configure --enable-sourcefire --disable-open-appid
make
sudo make install
sudo ldconfig
sudo ln -s /usr/local/bin/snort /usr/sbin/snort
Let’s print the Snort version to make sure everything is up and running.
/usr/sbin/snort –V
The output should look as shown in the screenshot.
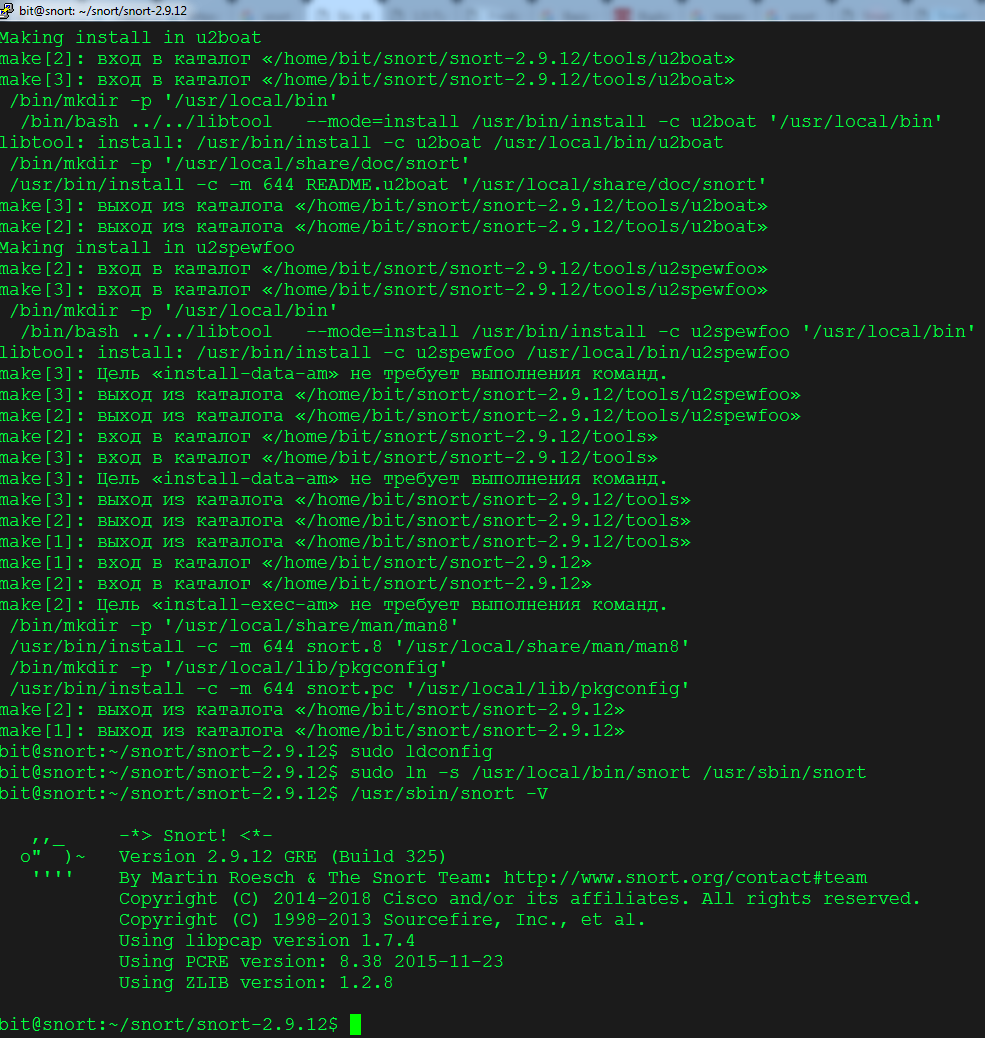
Installation complete—let’s proceed.
Configuring IDS Mode
You should always keep security in mind, but we’re not at the keyboard 24/7. So let’s create a dedicated user for Snort.
sudo groupadd snort
sudo useradd snort -r -s /sbin/nologin -c SNORT_IDS -g snort
Now create the required directories and set the permissions:
sudo mkdir /etc/snort
sudo mkdir /etc/snort/rules
sudo mkdir /etc/snort/rules/iplists
sudo mkdir /etc/snort/preproc_rules
sudo mkdir /usr/local/lib/snort_dynamicrules
sudo mkdir /etc/snort/so_rules
sudo touch /etc/snort/rules/iplists/black_list.rules
sudo touch /etc/snort/rules/iplists/white_list.rules
sudo touch /etc/snort/rules/local.rules
sudo touch /etc/snort/sid-msg.map
sudo mkdir /var/log/snort
sudo mkdir /var/log/snort/archived_logs
sudo chmod -R 5775 /etc/snort
sudo chmod -R 5775 /var/log/snort
sudo chmod -R 5775 /var/log/snort/archived_logs
sudo chmod -R 5775 /etc/snort/so_rules
sudo chmod -R 5775 /usr/local/lib/snort_dynamicrules
sudo chown -R snort:snort /etc/snort
sudo chown -R snort:snort /var/log/snort
sudo chown -R snort:snort /usr/local/lib/snort_dynamicrules
Let’s place the configuration and settings files into the appropriate directories:
cd ~/snort/snort-2.9.12/etc/
sudo cp *.conf* /etc/snort
sudo cp *.map /etc/snort
sudo cp *.dtd /etc/snort
cd ~/snort/snort-2.9.12/src/dynamic-preprocessors/build/usr/local/lib/snort_dynamicpreprocessor/
sudo cp * /usr/local/lib/snort_dynamicpreprocessor/
In the end, you should end up with the following folder and file structure.
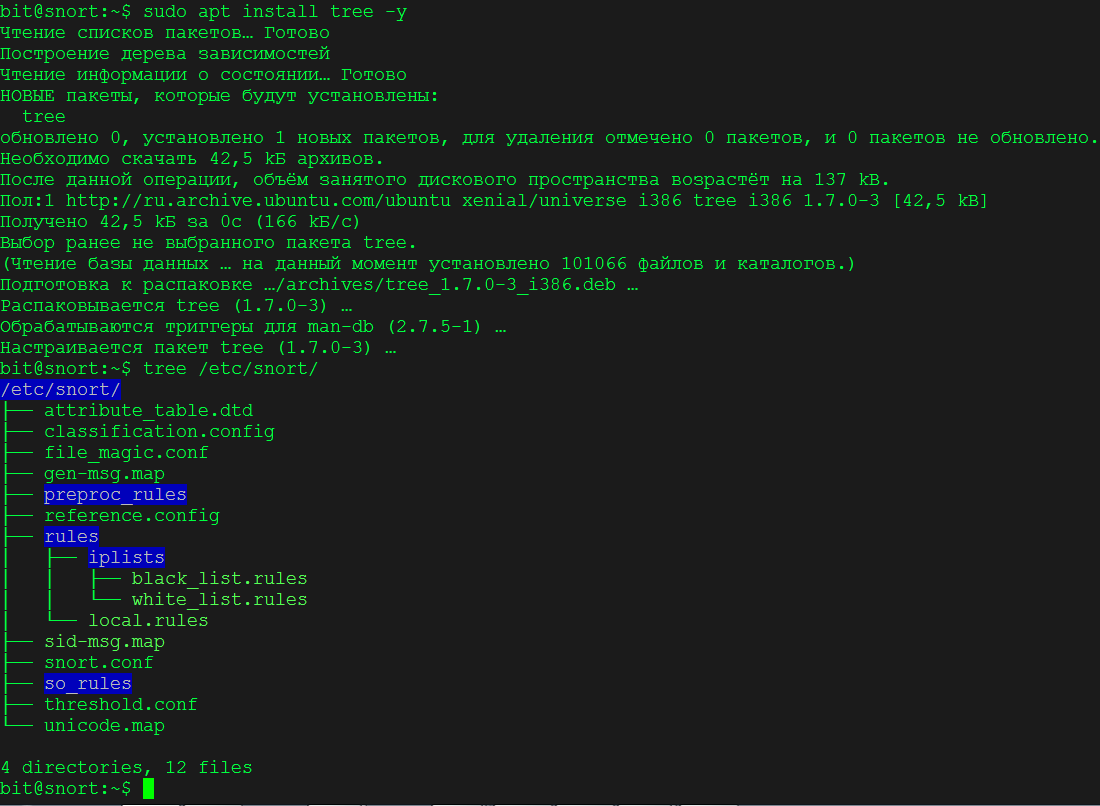
Comment out lines 457 through 651 in /etc/snort/snort.conf. This prevents Snort from downloading rules at startup, since we’ll be using PulledPork to manage the rules instead.
sudo sed -i 's/include \$RULE\_PATH/#include \$RULE\_PATH/' /etc/snort/snort.conf
Make a few manual edits to this same configuration file:
- Line 45: define your network.
- Line 104: change to
var.RULE_PATH / etc/ snort/ rules - Line 105: change to
var.SO_RULE_PATH / etc/ snort/ so_rules - Line 106: change to
var.PREPROC_RULE_PATH / etc/ snort/ preproc_rules - Line 113: change to
var.WHITE_LIST_PATH / etc/ snort/ rules/ iplists - Line 114: change to
var.BLACK_LIST_PATH / etc/ snort/ rules/ iplists - Line 546: uncomment
includeto enable using your own rules.$RULE_PATH/ local. rules - Line 521: directly below it, add the line
output.unified2: filename snort. u2, limit 128 - Line 548: add the line
include.$RULE_PATH/ snort. rules
There are lots of edits to make, and it’s easy to make mistakes. Fortunately, Snort can validate its configuration file. I recommend running a check after every change you make to the config.
sudo snort -T -c /etc/snort/snort.conf -i enp0s3
If you see the magic words Snort , you’re good—nothing’s broken (for now).
Installing Barnyard2
Barnyard2 is a spooler that helps reduce server load. To install it, start by installing the required dependencies:
sudo apt-get install -y mysql-server libmysqlclient-dev mysql-client autoconf libtool
Note that during the installation, MySQL will prompt you to set a password for root. So don’t step away from your computer for too long.
Next, install Barnyard2 itself:
cd ~/snort_src
wget https://github.com/firnsy/barnyard2/archive/master.tar.gz -O barnyard2-Master.tar.gz
tar zxvf barnyard2-Master.tar.gz
cd barnyard2-master
autoreconf -fvi -I ./m4
sudo ln -s /usr/include/dumbnet.h /usr/include/dnet.h
sudo ldconfig
./configure --with-mysql --with-mysql-libraries=/usr/lib/i386-linux-gnu
make
sudo make install
Let’s see if luck is still on our side:
/usr/local/bin/barnyard2 -V
Once again, copy the files from the source package, create the files, and set the permissions:
sudo cp ~/snort/barnyard2-master/etc/barnyard2.conf /etc/snort/
sudo mkdir /var/log/barnyard2
sudo chown snort.snort /var/log/barnyard2
sudo touch /var/log/snort/barnyard2.waldo
sudo chown snort.snort /var/log/snort/barnyard2.waldo
Now we’ll need to work with MySQL:
mysql -u root -pmysql> create database snort;mysql> use snort;mysql> source ~/snort/barnyard2-master/schemas/create_mysqlmysql> CREATE USER 'snort'@'localhost' IDENTIFIED BY 'snortpass';mysql> grant create, insert, select, delete, update on snort.* to 'snort'@'localhost';mysql> exitAppend the following line to the end of /:output
And once again, adjust the permissions:
sudo chmod o-r /etc/snort/barnyard2.conf
Now let’s verify everything we’ve done so far. Add the following line to the / file.
alert icmp any any -> $HOME_NET any (msg:"ICMP test detected"; GID:1; sid:10000001; rev:001; classtype:icmp-event;)
This will be our rule for detecting pings (ICMP packets). Add the following two lines to the / file:
`#v2`
1 || 10000001 || 001 || icmp-event || 0 || ICMP Test detected || url,tools.ietf.org/html/rfc792
See the Barnyard release notes for more details on what changed and how it works.
We’ll run Snort in daemon mode (that’s how it will run from now on).
sudo /usr/local/bin/snort -q -u snort -g snort -c /etc/snort/snort.conf -i enp0s3 –D
Next, launch Barnyard2:
sudo barnyard2 -c /etc/snort/barnyard2.conf -d /var/log/snort -f snort.u2 -w /var/log/snort/barnyard2.waldo -g snort -u snort
Ping our Snort server and, if everything is set up correctly, you should see alerts.
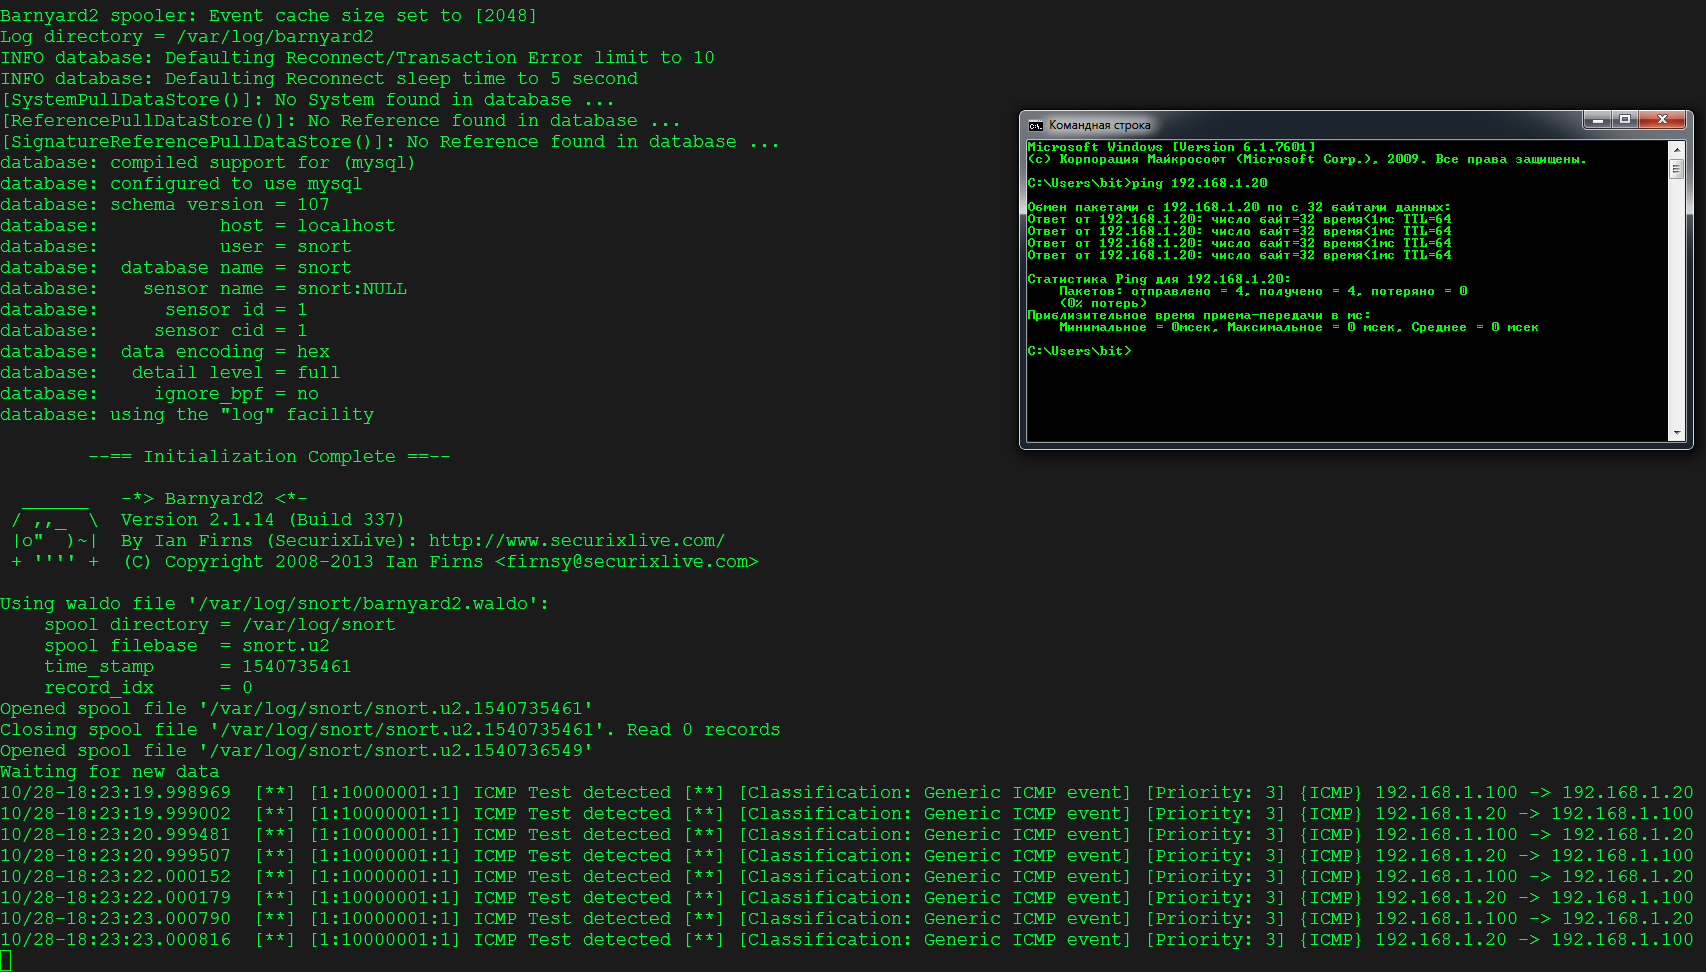
Installing PulledPork
It’s time to fetch the Snort rules. The PulledPork script will take care of that. Let’s install it.
sudo apt-get install -y libcrypt-ssleay-perl liblwp-useragent-determined-perl
cd ~/snort
wget https://github.com/shirkdog/pulledpork/archive/master.tar.gz -O pulledpork-master.tar.gz
tar xzvf pulledpork-master.tar.gz
cd pulledpork-master/
sudo cp pulledpork.pl /usr/local/bin
sudo chmod +x /usr/local/bin/pulledpork.pl
sudo cp etc/*.conf /etc/snort
Next, go to the Snort website. Create an account and then find your oinkcode in your profile.
Next, let’s configure PulledPork. In the file /, make the following changes:
- Line 19: enter your Oinkcode (
rule_url=https://).www. snort. org/ reg-rules/ |snortrules-snapshot. tar. gz - Line 29: uncomment
rule_url=https://.rules. emergingthreats. net/ |emerging. rules. tar. gz|open-nogpl - Line 74: change the rules path to
rule_path=/.etc/ snort/ rules/ snort. rules - Line 89: change the path to your local rules to
local_rules=/.etc/ snort/ rules/ local. rules - Line 92: set it to
sid_msg=/.etc/ snort/ sid-msg. ma - Line 96: set the second version (
sid_msg_version=2). - Line 119: specify the Snort config path (
config_path=/).etc/ snort/ snort. conf - Line 133: specify the distribution (
distro=Ubuntu-16-04). - Line 141: change the
black_listpath to/.etc/ snort/ rules/ iplists/ black_list. rules - Line 150: set it to
IPRVersion=/.etc/ snort/ rules/ iplists
Running PulledPork:
sudo /usr/local/bin/pulledpork.pl -c /etc/snort/pulledpork.conf –l
Watch the rules download. Then test how our Snort instance behaves after the config change.
sudo snort -T -c /etc/snort/snort.conf -i enp0s3
PulledPork will automatically check for updates and download the rules. You only need to add a command to run it in the scheduler:
sudo crontab -e
03 02 * * * /usr/local/bin/pulledpork.pl -c /etc/snort/pulledpork.conf -l
Note that the Snort development team asks you to randomize the time your downloader checks for updates to spread the bandwidth load.
Installing the Basic Analysis and Security Engine (BASE)
Just one small step left—install the graphical visualizer to see what’s happening on the network in a human-friendly way. Let’s get started.
sudo add-apt-repository ppa:ondrej/php
sudo apt-get update
sudo apt-get install -y apache2 libapache2-mod-php5.6 php5.6-mysql php5.6-cli php5.6 php5.6-common php5.6-gd php5.6-cli php-pear php5.6-xml
sudo pear install -f --alldeps Image_Graph
Loading the ADODB library:
cd ~/snort
wget https://sourceforge.net/projects/adodb/files/adodb-php5-only/adodb-520-for-php5/adodb-5.20.8.tar.gz
tar -xvzf adodb-5.20.8.tar.gz
sudo mv adodb5 /var/adodb
sudo chmod -R 755 /var/adodb
Loading BASE:
cd ~/snort
wget http://sourceforge.net/projects/secureideas/files/BASE/base-1.4.5/base-1.4.5.tar.gz
tar xzvf base-1.4.5.tar.gz
sudo mv base-1.4.5 /var/www/html/base/
Copy the configuration file:
cd /var/www/html/base
sudo cp base_conf.php.dist base_conf.php
And adjust a few lines in / to match the examples:`
$BASE_urlpath   = '/base';
$DBlib_path     = '/var/adodb/';
$alert_dbname   = 'snort';
$alert_host     = 'localhost';
$alert_port     = '';
$alert_user     = 'snort';
$alert_password = 'snortpass';
Naturally, you need to change the permissions so no one can see the password in the file:
sudo chown -R www-data:www-data /var/www/html/base
sudo chown -R www-data:www-data /var/www/html/base
Restart Apache. Open your browser and go to (use your own IP) http://. Click the Create BASE AG button in the top-right corner. If successful, it will create the initial tables, roles, and everything needed for further work.
Creating systemd services
The cherry on top is creating system services for Snort and Barnyard2 and enabling them to start at boot. For Snort, create the file / with the following contents:
[Unit]Description=Snort NIDS DaemonAfter=syslog.target network.target[Service]Type=simpleExecStart=/usr/local/bin/snort -q -u snort -g snort -c /etc/snort/snort.conf -i enp0s3[Install]WantedBy=multi-user.targetTell the system to start the service at boot:
sudo systemctl enable snort
Now start the service:
sudo systemctl start snort
Run the command to check the service status:
systemctl status snort
For the second service, create the file / and add the following lines to it:
[Unit]Description=Barnyard2 DaemonAfter=syslog.target network.target[Service]Type=simpleExecStart=/usr/local/bin/barnyard2 -c /etc/snort/barnyard2.conf -d /var/log/snort -f snort.u2 -q -w /var/log/snort/barnyard2.waldo -g snort -u snort -D -a /var/log/snort/archived_logs[Install]WantedBy=multi-user.targetNext, repeat the commands:
sudo systemctl enable barnyard2
sudo systemctl start barnyard2
systemctl status barnyard2
Reboot the system and verify that everything is up and running.
Tracking Network Activity
To verify that everything works, I picked a slightly unconventional task to showcase a bit more of Snort’s capabilities. For example, suppose we need to track when some user (anyone on the local network) visits a specific website. To do this, we need to create a rule that detects that action. It would look like this:
alert tcp any any -> any any (content: "www.xakep.ru"; msg: "Someone is visiting site now"; sid:1000008; rev:1)
We’ll add it to / and restart monitoring. Since Snort is only watching my server, I visited the site from the server using Links.
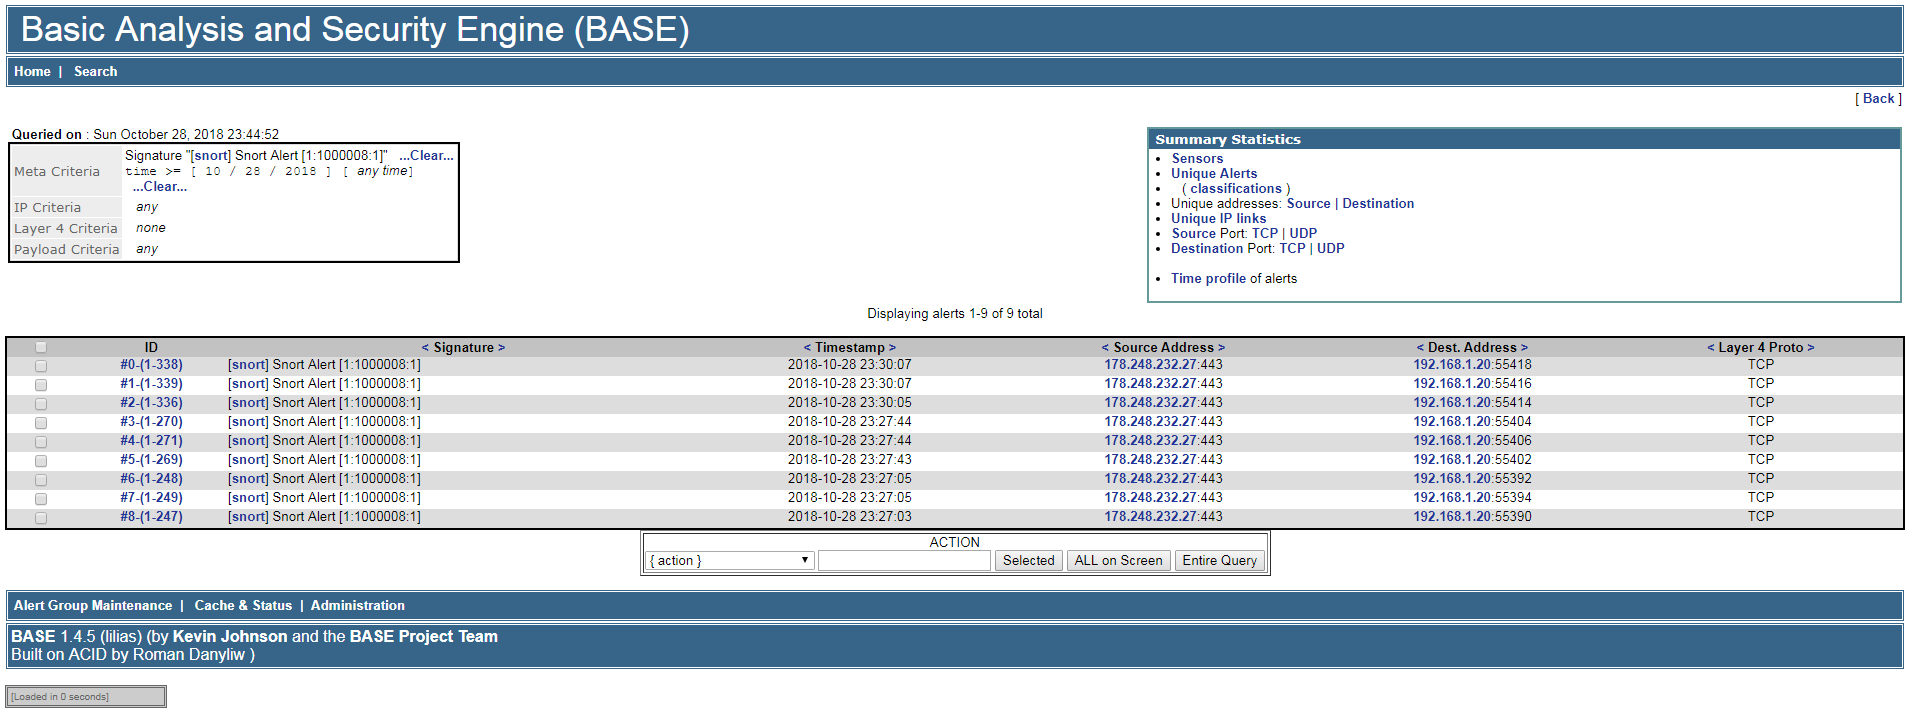
As a result, we saw multiple alerts—one for each time I connected to that domain. If the rule is written incorrectly, Snort won’t start; it will return an error along with an explanation of why it can’t launch.

Testing Snort and Writing Custom Rules
Installing it and confirming it runs isn’t enough—you also need to monitor it. So let’s see what this IDS can do with its default rule set. We’ve got SSH, Apache, and FTP, so the minimum rules we need are for detecting port scans, brute‑force login attacks, DoS, and SQL injection.
Let’s say a hacker shows up at this stage. He does his thing and vanishes, but the logs immediately light up with suspicious activity from a single IP address. I’m seeing 3,964 events spanning five different actions. A closer look paints a bleak picture.
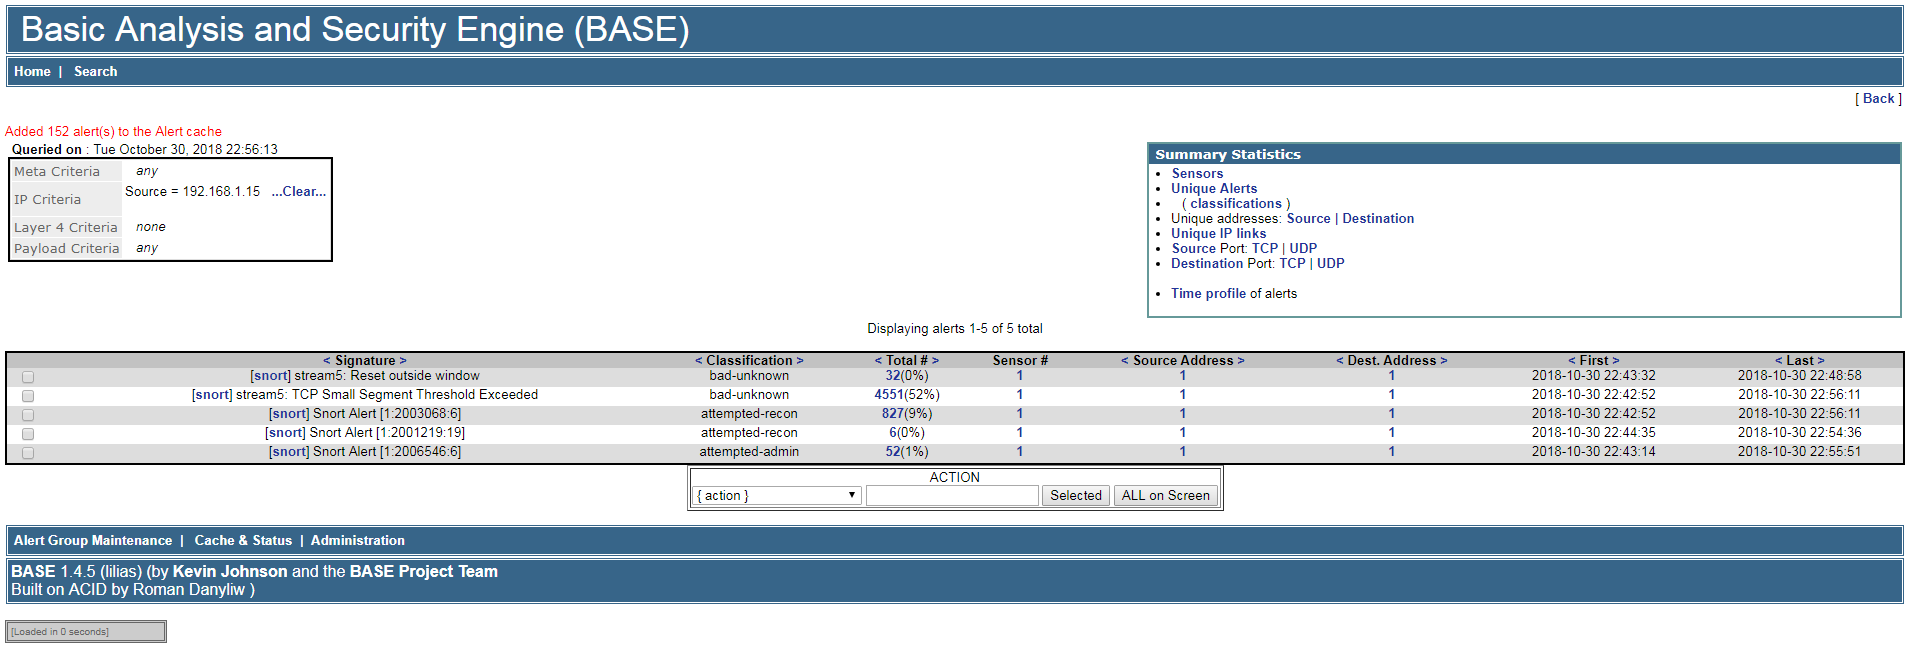
Port scanning is obvious to the naked eye—or, as the developers put it, “reconnaissance activity.” Let’s move on.

Brute-force attempts against the SSH service on port 22 were observed. The same was true for the FTP port (21).
From there, we proceed with the investigation: review the OS logs, identify the weak link in the defenses, trace the source, and so on. The key point is that the alerts fired, and we’ve confirmed this IP’s involvement in malicious activity.
Let’s take it a step further. Spin up a Kali Linux instance and try a DoS attack against our Apache server. Since BASE runs over HTTP, the easiest way to knock it over, in my opinion, is a Slowloris attack. So we download the corresponding script to our Kali box and launch the attack.
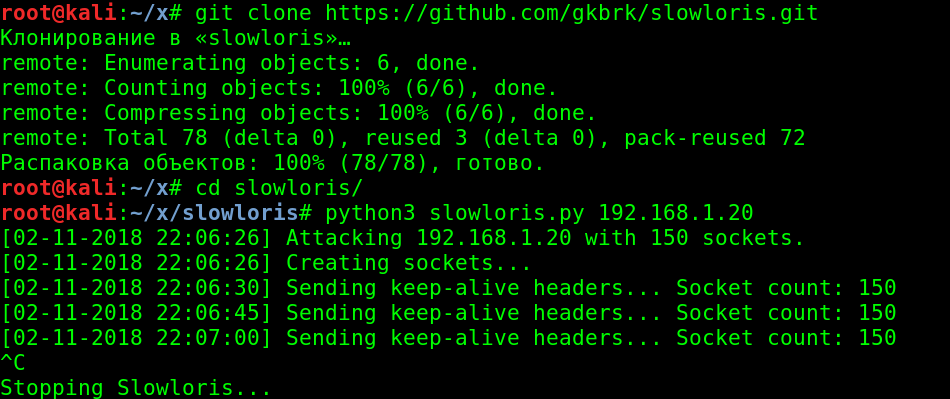
Within 15–30 seconds, our BASE instance stops responding. Even after the attack stops, we had to restart the web server—it doesn’t recover on its own in a short time. Only BASE goes down. Snort, of course, keeps running and continues writing alerts to the database.

Here’s what our log looks like after the attack. Next, I tried flooding my Snort server with SYN packets. I did this using the hping3 tool.
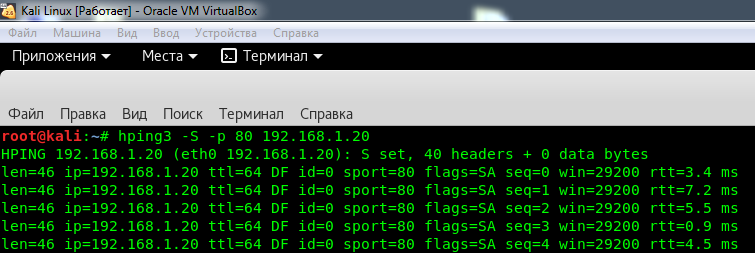
Unfortunately, with the current configuration Snort couldn’t detect this type of attack and didn’t log anything. I had to use tcpdump to check whether any packets were reaching the server at all.
As the next step, I ran sqlmap against BASE with the request http://192.168.1.20/base/base_stat_alerts.php?sensor=1. Unfortunately, that didn’t yield any results either: Snort’s default rule set doesn’t include suitable rules for detecting database attacks. So we need to write a rule ourselves. In our example, it looks like this:
alert tcp any any -> any any (msg: "SQL Injection"; content: "GET"; http_method; uricontent: "and 1=1"; nocase; sid:3000001; rev:1;)
Now let’s open the web interface from the attacker’s machine and try to leverage this technique by appending and to the end of the request. The log displays an alert with the rule ID.

Conclusion
From my perspective, NIDS is essential in an enterprise environment. I’ve seen large companies that didn’t bother deploying this layer of defense. When I asked, “How would you detect a hacker?” I got vague answers like, “DLP will tell me…”
Snort is just a network intrusion detection system. In the hands of a careless administrator, it’s practically useless. Out of the box, Snort starts up untuned with a large number of rules enabled, which leads to a flood of false positives. And a proper installation isn’t exactly straightforward either. You need to tailor and tune it to your specific environment and use cases.
The upside is that once you fine-tune it and add your own rules, it becomes a powerful tool.