Standardizing your configuration
If you operate a large network with multiple branches and each site has two routers for high availability, you should design your rules so they’re easy to deploy on any hardware, regardless of port count, port names, or uplink type. For a PPPoE connection, for example, the WAN interface will be pppoe-out1, while for DHCP it’s ether1. If you try to export a firewall config from one router and import it to another, it won’t work because the second box simply doesn’t have an interface named pppoe-out1. Or imagine one branch has its LAN on ether9, but another site uses a five‑port router—there is no port 9, so that part of the config won’t load and will error out.
So we’ll configure the router in a way that lets you migrate the configuration to any other router without hassle. It makes the initial setup a bit more involved, but it will save a lot of time down the road.
We’ve already covered interface lists—a feature that lets you treat multiple interfaces as a single entity. Create WAN and LAN lists and add the required interfaces to them. Then attach your firewall rules to the interface lists rather than to individual interfaces. Before exporting the rules to another router, just create the same lists there, and the config will import/apply without errors.
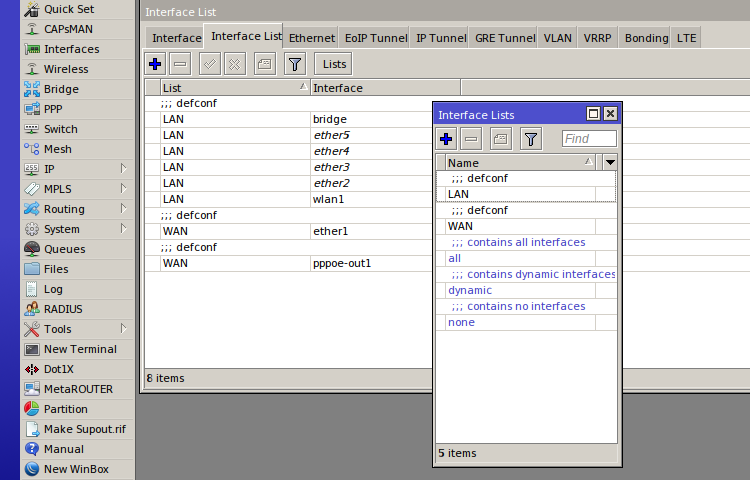
Note that the firewall needs Layer 3 (L3) interfaces—i.e., interfaces that have IP addresses. If your Internet connection is via PPPoE, add the PPPoE interface to the WAN list. If the LAN IP is configured on a bridge or a VLAN, add that to the LAN list instead of the physical interfaces. If you include both the logical and the physical interface, it shouldn’t break anything, but you’ll need to account for that in your configuration.
But that’s not all. Each branch will have its own LAN subnet—say 192.168.10.0/24 in one location and 192.168.11.0/24 in another. To avoid confusion and keep from editing the config when migrating between routers, we’ll work with address lists instead of hardcoded addresses and subnets. On every router, create a LAN address list and reference that everywhere.
Last time, we created an MGMT address list that only allowed router management from specific source addresses. Earlier, we also looked at a Port Knocking setup that grants management access only after the client performs a secret sequence. For access from the trusted LAN, the address-list approach works well; for external access, Port Knocking is a better fit. It would be ideal to combine both in our configuration. It’s also convenient to split the input chain into two parts: one for internet-facing input and one for LAN-facing input. That way, we can apply different filtering policies to different network segments. Custom user-defined chains will help us achieve this.
Send everything arriving from the outside to the new chain WAN_INPUT. Anything coming from the inside goes to LAN_INPUT:
/ip firewall filter
add action=jump chain=input in-interface-list=WAN jump-target=WAN_INPUT
add action=jump chain=input in-interface-list=LAN jump-target=LAN_INPUT
Now the filtering policies will differ based on the traffic source. For external traffic, we’ll use the WAN_INPUT chain with stricter restrictions; for internal traffic, we’ll use the LAN_INPUT chain with simpler rules. We no longer need the input chain—everything will be handled in the new chains. This also means you don’t have to specify interfaces or interface lists in the rules anymore. That said, this approach scales to more complex setups—for example, when you have two ISPs with different filtering policies or a LAN segmented into multiple VLANs. But we’ll get to that later.
In an article on secure router setup, we configured Port Knocking for administrative access. Restricting access from inside the LAN this way is overkill. So we’ll change the chain in the rules from input to WAN_INPUT. From inside the network, we’ll allow WinBox access only from specific addresses (we already covered this in a firewall basics article). In that rule, leave only the WinBox port — TCP . For SSH, allow connections from the entire LAN, but block brute-force attempts (yes, SSH brute-forcing can happen inside the network too, since you can’t guarantee it’s free of malware).
add action=drop chain=LAN_INPUT comment="drop ssh brute forcers" src-address-list=ssh_blacklist
add action=add-src-to-address-list address-list=ssh_blacklist address-list-timeout=1w3d chain=LAN_INPUT connection-state=new dst-port=22 protocol=tcp src-address-list=ssh_stage3
add action=add-src-to-address-list address-list=ssh_stage3 address-list-timeout=1m chain=LAN_INPUT connection-state=new dst-port=22 protocol=tcp src-address-list=ssh_stage2
add action=add-src-to-address-list address-list=ssh_stage2 address-list-timeout=1m chain=LAN_INPUT connection-state=new dst-port=22 protocol=tcp src-address-list=ssh_stage1
add action=add-src-to-address-list address-list=ssh_stage1 address-list-timeout=1m chain=LAN_INPUT connection-state=new dst-port=22 protocol=tcp src-address-list=!ssh_open
add action=accept chain=LAN_INPUT dst-port=22 protocol=tcp
Here we use dynamic address lists with timeouts. We covered them in the article “Securing MikroTik: Tips for hardening your router.” On the first connection attempt, the packet is handled by rule 5 and the attacker’s address is added to the ssh_stage1 address list. The second attempt is handled by rule 4 and adds the brute‑forcer to ssh_stage2. And so on, up to ssh_blacklist, where the address is kept for ten days, and all traffic from addresses in this list is dropped.
In the previous article, we created rules that allow connections in the ESTABLISHED and RELATED states and drop INVALID ones. Let’s duplicate those rules, move them into the new chains, and remove them from the input chain. You’ll end up with four rules instead of two. This won’t affect traffic flow, but it will let you see traffic statistics from different directions.
In the rule matching ESTABLISHED and RELATED, check the untracked box—I’ll explain why shortly. Adapting the remaining rules to the new logic should be straightforward. At the end of each chain, don’t forget to add a drop rule.
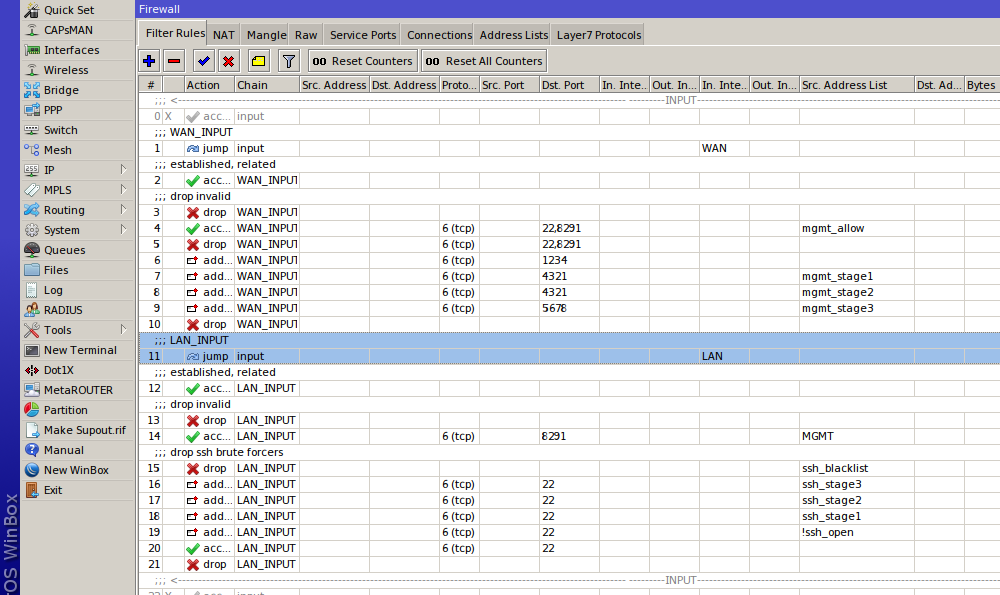
Two separate chains let us cut down the number of rule traversals per packet, which in turn slightly reduces CPU load. Having counters in different chains also gives us more granular traffic stats. Even though there are more rules overall, they aren’t applied to all traffic: after the first jump, the packet is handled by the new chain and will never hit the other one. This approach also simplifies maintenance, since the chain name immediately tells you what kind of traffic it is and where it came from. You can create dedicated chains for different traffic types—for example, a separate chain for management traffic. The action that returns processing to the parent chain is action return.
Defending Against Attacks
So far, we’ve looked at firewall rules that handle traffic based on simple criteria: interface, address, and port. But a firewall is a much more flexible tool; it lets you build complex logic to counter different types of attacks.
Some address ranges are reserved and not used on the public Internet. These are known as bogon addresses. We’ll drop packets originating from those ranges:
/ip firewall address-list
add address=0.0.0.0/8 comment="Self-Identification [RFC 3330]" list=Bogon
add address=10.0.0.0/8 comment="Private[RFC 1918] - CLASS A" list=Bogon
add address=127.0.0.0/16 comment="Loopback [RFC 3330]" list=Bogon
add address=169.254.0.0/16 comment="Link Local [RFC 3330]" list=Bogon
add address=172.16.0.0/12 comment="Private[RFC 1918] - CLASS B" list=Bogon
add address=192.168.0.0/16 comment="Private[RFC 1918] - CLASS C" list=Bogon
add address=192.0.2.0/24 comment="Reserved - IANA - TestNet1" list=Bogon
add address=192.88.99.0/24 comment="6to4 Relay Anycast [RFC 3068]" list=Bogon
add address=198.18.0.0/15 comment="NIDB Testing" list=Bogon
add address=198.51.100.0/24 comment="Reserved - IANA - TestNet2" list=Bogon
add address=203.0.113.0/24 comment="Reserved - IANA - TestNet3" list=Bogon
add address=224.0.0.0/4 comment="MC, Class D, IANA" list=Bogon
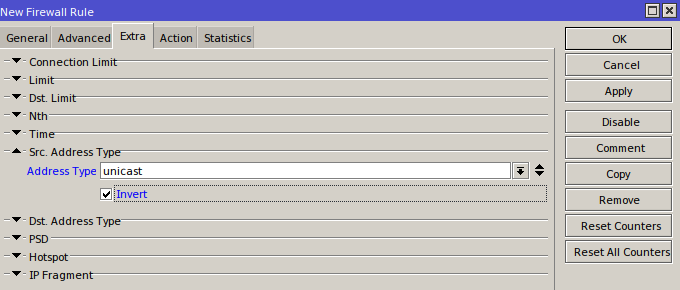
We only expect packets from unicast addresses, so we’ll block/drop everything else.
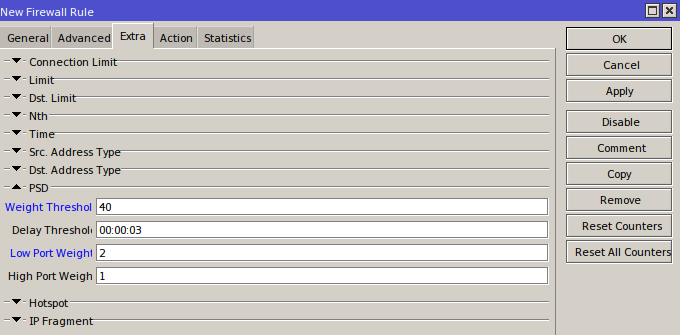
Port Scan Detect is a feature that identifies port scanners. It works by assigning a weight to destination ports. Lower-numbered (system) ports up to 1024 carry a higher weight (Low ports), while higher-numbered ports get a lower weight (High ports). If, within the Delay Threshold window, packets from a single host hit ports whose total weight exceeds the Weight Threshold, the sender’s address is added to the blocklist. For example, if one host sends ten packets to ports ≤1024 (total weight 10 * 2 = 20) and twenty packets to ports >1024 (20 * 1 = 20) within three seconds, the combined weight is 40. Note that Port Scan Detect only applies to TCP or UDP traffic.
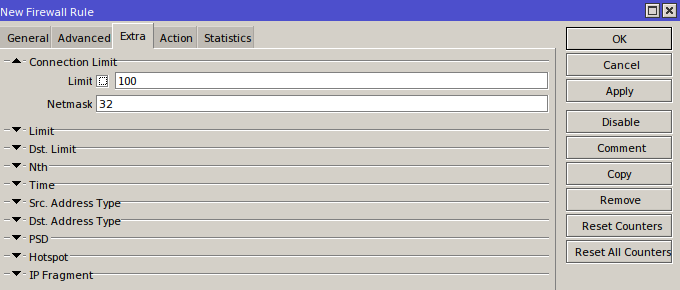
One of the most common attacks is a distributed denial-of-service (DDoS). Defending against it on your own is virtually impossible, but a simple rule can weed out the most trivial attempts. Identify any host that has opened more than 100 connections to you and put it on a blocklist. In this rule, you should use the connection-state=new parameter. Since we’ve already allowed established, related, and untracked traffic and dropped invalid, only new packets will reach this rule. Whether you keep that flag is up to you. Note that the same technique can also help you spot BitTorrent users on your network.
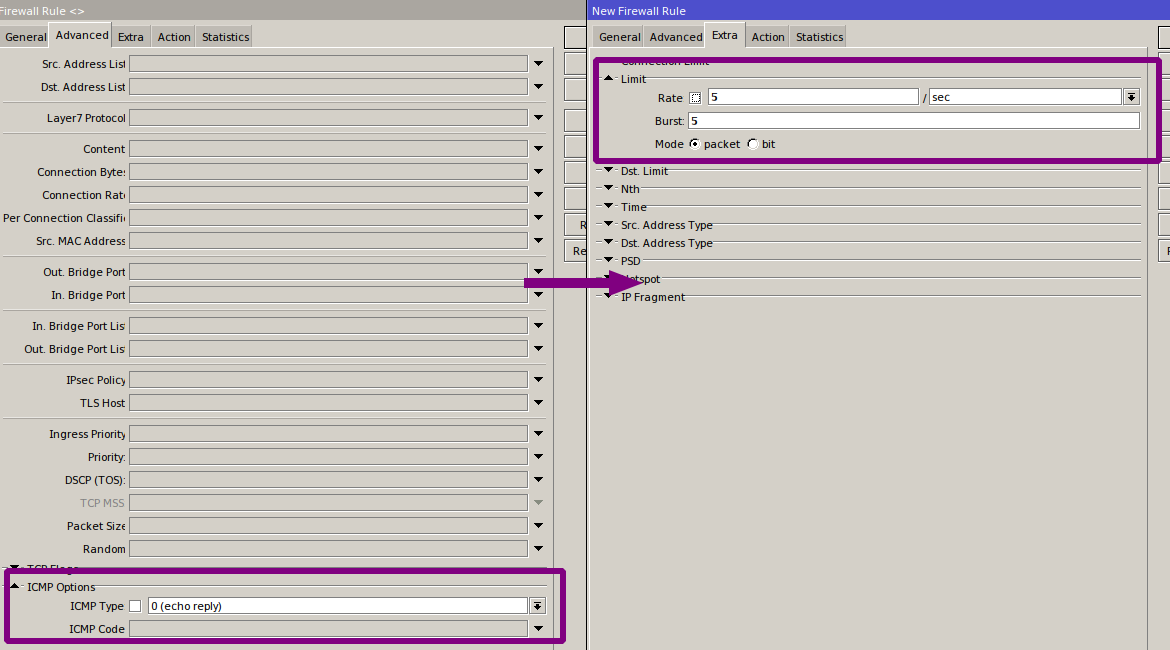
ICMP is a core protocol in any network. Many admins are tempted to block it outright, but that’s a bad practice. ICMP underpins traceroute, signals when UDP ports are unreachable, and carries various control messages. If you drop it wholesale, you’re likely to run into all sorts of bugs. Each ICMP message type exists for a reason, and that makes it straightforward to decide which types to allow from inside the network and from the outside. For example:
- ICMP Echo Request — the standard ping request, Type 8, Code 0;
- ICMP Echo Reply — the ping response, Type 0, Code 0;
- Destination Unreachable — Type 3, with Codes 0–15 depending on the reason:
- 0 — Network Unreachable;
- 1 — Host Unreachable;
- 2 — Protocol Unreachable;
- 3 — Port Unreachable;
- 4 — Fragmentation needed but DF (Don’t Fragment) is set.
The rest is easy to find online—better yet, read RFC 792.
Let’s create an ICMP chain and send all ICMP traffic to it (you can create two chains—one for LAN and one for WAN—and configure different policies). Allow only the required message types and limit processing to five packets per second:
/ip firewall filter
add action=jump chain=WAN_INPUT jump-target=ICMP protocol=icmp
add action=jump chain=LAN_INPUT jump-target=ICMP protocol=icmp
add action=accept chain=ICMP comment="Allow Echo Reply (0:0-255), Limit 5pps" icmp-options=0:0-255 limit=5,5:packet protocol=icmp
add action=accept chain=ICMP comment="ICMP - Allow Destination Unreachable (3:0-255), Limit 5pps" icmp-options=3:0-255 limit=5,5:packet protocol=icmp
add action=accept chain=ICMP comment="ICMP - Allow Source Quench (4:0), Limit 5pps" icmp-options=4:0-255 limit=5,5:packet protocol=icmp
add action=accept chain=ICMP comment="ICMP - Allow Echo Request (8:0), Limit 5pps" icmp-options=8:0-255 limit=5,5:packet protocol=icmp
add action=accept chain=ICMP comment="ICMP - Allow Time Exceeded (11:0), Limit 5pps" icmp-options=11:0-255 limit=5,5:packet protocol=icmp
add action=accept chain=ICMP comment="ICMP - Allow Parameter Bar (12:0), Limit 5pps" icmp-options=12:0-255 limit=5,5:packet protocol=icmp
add action=drop chain=ICMP comment="ICMP - Drop All Others" protocol=icmp
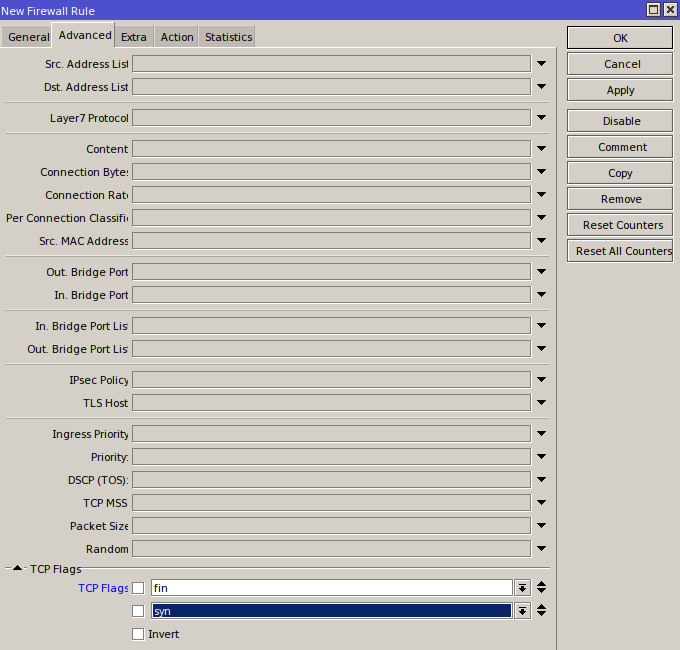
TCP also supports a bunch of flags, some of which can’t appear together in a single packet. Port scanners often use combinations of these flags to punch through poorly configured defenses. We’ll create a separate chain for TCP and drop such “suspicious” packets:
/ip firewall filter
add action=jump chain=WAN_INPUT comment="Invalid TCP" jump-target=invalid_tcp protocol=tcp
add action=jump chain=LAN_INPUT comment="Invalid TCP" jump-target=invalid_tcp protocol=tcp
add action=jump chain=forward comment="Invalid TCP" jump-target=invalid_tcp protocol=tcp
add action=drop chain=invalid_tcp comment="Invalid TCP - !(FIN/SYN/RST/ACK)" protocol=tcp tcp-flags=!fin,!syn,!rst,!ack
add action=drop chain=invalid_tcp comment="Invalid TCP - FIN/SYN" protocol=tcp tcp-flags=fin,syn
add action=drop chain=invalid_tcp comment="Invalid TCP - FIN/RST" protocol=tcp tcp-flags=fin,rst
add action=drop chain=invalid_tcp comment="Invalid TCP - FIN/!ACK" protocol=tcp tcp-flags=fin,!ack
add action=drop chain=invalid_tcp comment="Invalid TCP - FIN/URG" protocol=tcp tcp-flags=fin,urg
add action=drop chain=invalid_tcp comment="Invalid TCP - SYN/RST" protocol=tcp tcp-flags=syn,rst
add action=drop chain=invalid_tcp comment="Invalid TCP - RST/URG" protocol=tcp tcp-flags=rst,urg
add action=drop chain=invalid_tcp comment="Invalid TCP - Source Port 0" protocol=tcp src-port=0
add action=drop chain=invalid_tcp comment="Invalid TCP - Destination Port 0" dst-port=0 protocol=tcp
The same applies to UDP:
add action=drop chain=invalid_udp comment="Invalid UDP - Source Port 0" protocol=udp src-port=0
add action=drop chain=invalid_udp comment="Invalid UDP - Destination Port 0" dst-port=0 protocol=udp
The Forward Chain
Up to now we’ve mostly been looking at traffic that lands in the INPUT chain and, based on certain criteria, redirecting it into various other chains. But all of that traffic was destined for the router itself. The OUTPUT chain is used less often, but you can filter, for example, ICMP replies from the router or IPsec traffic there. Naturally, most traffic will hit FORWARD — that’s what a router does: it forwards packets from one network (the LAN) to another (the Internet or a second VLAN on the LAN). And it’s in this chain that we’ll manage user traffic.
I’m not going to go into detail about what to allow or block—there are already plenty of articles on the basics of configuration and loads of examples online. Instead, let’s look at a more interesting case: network reputation.
There are online services that maintain lists of spammers, DDoSers, and distributors of illegal content. If a spam-sending trojan gets onto machines in your network, you’ll end up on those lists too. Before long, emails from any client inside your network will start landing in recipients’ spam folders; then you’ll be added to public blacklists and your users will lose access to many services—including partner networks whose admins use these lists to block potential abusers. Imagine what that will do to your bonus when your boss’s email about a multi-million-dollar contract lands in the counterparty’s Spam folder.
Let’s make sure we keep our payout. To do that, we need to understand what could get us put on a list. There are several reasons for this:
- we’re part of a DDoS or other botnet;
- we’re sending spam;
- our IPs are being used to brute-force other services;
- we’re violating copyright (seeding torrents).
Some readers of this piece may well have taken part in a DDoS botnet without even realizing it. UDP amplification attacks exploit misconfigured services that will query other servers on anyone’s behalf. For example, we might receive a DNS query with the victim’s IP spoofed as the source; we perform the lookup and send the (often much larger) response to the victim. And there are millions of misconfigured servers like us. When the victim gets hit with a million packets per second, they won’t be happy, while we’ll see our CPU pegged at 100%, awful lag, and eventually end up on a blacklist. The same pattern applies to other UDP services, such as NTP. The takeaway is simple: block external access to these services. But that’s still about INPUT.
It’s not just the router that can end up in such a botnet—the machines inside the network can as well. To detect those hosts, we’ll use the familiar connection feature.
/ip firewall filter
add action=add-src-to-address-list address-list=dns-flood address-list-timeout=none-dynamic chain=forward comment="DNS Flood" connection-limit=100,32 dst-port=53 in-interface-list=LAN protocol=udp
add action=add-src-to-address-list address-list=smb-flood address-list-timeout=none-dynamic chain=forward comment="SMB Flood" connection-limit=100,32 dst-port=445 in-interface-list=LAN protocol=tcp
add action=add-src-to-address-list address-list=telnet-flood address-list-timeout=none-dynamic chain=forward comment="Telnet Flood" connection-limit=20,32 dst-port=23 in-interface-list=LAN protocol=tcp
add action=add-src-to-address-list address-list=ssh-flood address-list-timeout=none-dynamic chain=forward comment="SSH Flood" connection-limit=20,32 dst-port=22 in-interface-list=LAN protocol=tcp
add action=add-src-to-address-list address-list=snpp-flood address-list-timeout=none-dynamic chain=forward comment="SNPP Flood" connection-limit=20,32 dst-port=444 in-interface-list=LAN protocol=tcp
add action=add-src-to-address-list address-list=msf-indication address-list-timeout=none-dynamic chain=forward comment="Metasploit Indication" connection-limit=20,32 dst-port=4444 in-interface-list=LAN protocol=tcp
Overly “fat” traffic flows can also look suspicious. Let’s log them:
add action=log chain=forward comment="Abnormal Traffic" connection-bytes=80000000 in-interface-list=LAN log-prefix=Abnormal-Traffic
By looking at the destination port, you can tell which service internal hosts are trying to reach. If it’s a well-known port—for example, a database (DBMS)—and all our databases live inside the perimeter, it’s reasonable to assume that hundreds of packets per second to that port on the internet from the accountant’s workstation aren’t a simple mistake or personal curiosity. We drop the suspicious packets and return to the parent chain (final rule):
add action=jump chain=forward comment="Jump to Virus Chain" disabled=no jump-target=Virus
add action=drop chain=Virus comment="Drop Blaster Worm" disabled=no dst-port=135-139 protocol=tcp
add action=drop chain=Virus comment="Drop Blaster Worm" disabled=no dst-port=445 protocol=tcp
add action=drop chain=Virus comment="Drop Blaster Worm" disabled=no dst-port=445 protocol=udp
add action=drop chain=Virus comment="Drop Messenger Worm" disabled=no dst-port=135-139 protocol=udp
add action=drop chain=Virus comment=Conficker disabled=no dst-port=593 protocol=tcp
add action=drop chain=Virus comment=Worm disabled=no dst-port=1024-1030 protocol=tcp
add action=drop chain=Virus comment="ndm requester" disabled=no dst-port=1363 protocol=tcp
add action=drop chain=Virus comment="ndm server" disabled=no dst-port=1364 protocol=tcp
add action=drop chain=Virus comment="screen cast" disabled=no dst-port=1368 protocol=tcp
add action=drop chain=Virus comment=hromgrafx disabled=no dst-port=1373 protocol=tcp
add action=drop chain=Virus comment="Drop MyDoom" disabled=no dst-port=1080 protocol=tcp
add action=drop chain=Virus comment=cichlid disabled=no dst-port=1377 protocol=tcp
add action=drop chain=Virus comment=Worm disabled=no dst-port=1433-1434 protocol=tcp
add action=drop chain=Virus comment="Drop Dumaru.Y" disabled=no dst-port=2283 protocol=tcp
add action=drop chain=Virus comment="Drop Beagle" disabled=no dst-port=2535 protocol=tcp
add action=drop chain=Virus comment="Drop Beagle.C-K" disabled=no dst-port=2745 protocol=tcp
add action=drop chain=Virus comment="Drop MyDoom" disabled=no dst-port=3127-3128 protocol=tcp
add action=drop chain=Virus comment="Drop Backdoor OptixPro" disabled=no dst-port=3410 protocol=tcp
add action=drop chain=Virus comment="Drop Sasser" disabled=no dst-port=5554 protocol=tcp
add action=drop chain=Virus comment=Worm disabled=no dst-port=4444 protocol=tcp
add action=drop chain=Virus comment=Worm disabled=no dst-port=4444 protocol=udp
add action=drop chain=Virus comment="Drop Beagle.B" disabled=no dst-port=8866 protocol=tcp
add action=drop chain=Virus comment="Drop Dabber.A-B" disabled=no dst-port=9898 protocol=tcp
add action=drop chain=Virus comment="Drop Dumaru.Y" disabled=no dst-port=10000 protocol=tcp
add action=drop chain=Virus comment="Drop MyDoom.B" disabled=no dst-port=10080 protocol=tcp
add action=drop chain=Virus comment="Drop NetBus" disabled=no dst-port=12345 protocol=tcp
add action=drop chain=Virus comment="Drop Kuang2" disabled=no dst-port=17300 protocol=tcp
add action=drop chain=Virus comment="Drop SubSeven" disabled=no dst-port=27374 protocol=tcp
add action=drop chain=Virus comment="Drop PhatBot, Agobot, Gaobot" disabled=no dst-port=65506 protocol=tcp
add action=drop chain=Virus comment="Drop MemCached flood" disabled=no dst-port=11211 protocol=udp
add action=return chain=Virus comment="Return From Virus Chain" disabled=no
Conclusion
We’ve reviewed more advanced approaches to firewall configuration. This article isn’t meant to be a step-by-step guide—every network has its own specifics and services. Routers vary, too: some will happily handle thousands of non-optimized firewall rules, while others will struggle with even a hundred. So approach firewall configuration thoughtfully.
You can’t fit everything into two articles, and we still haven’t covered several big topics: the NAT and RAW tables, the IPv6 firewall, the bridge firewall, content filtering, identifying traffic types by inspecting payloads (for example, when we change the HTTP port and the firewall still recognizes HTTP), and traffic proxying.
All these topics are covered in MikroTik’s official training course, MikroTik Certified Traffic Control Engineer. However, to enroll, you must first complete the MikroTik Certified Network Associate course, which covers general router configuration principles and the fundamentals of TCP/IP.
