
The firewall in RouterOS, like much else in the system, comes from Linux and is essentially an enhanced version of iptables. Because of that, many iptables configuration guides can be readily adapted to RouterOS. The firewall consists of the following tables:
- Filter — handles traffic filtering: decides whether to let a packet through or drop it. We’ll be focusing on this table only.
- NAT — Network Address Translation. Rewrites packets in transit; changing the source address or the destination port is exactly what this table does. It’s mainly used to provide internet access for a LAN (and return traffic). Sometimes NAT is unavoidable in poorly designed networks, and it’s also used as a workaround.
- Mangle — classifies and tags traffic and can modify certain header fields (TTL, ToS/DSCP, DF). Used to build complex traffic paths and policies (for example, with dual ISPs or different paths for RDP vs. VoIP).
- Raw — processes packets before they reach connection tracking. Useful for DoS mitigation or when dealing with very high traffic volumes.
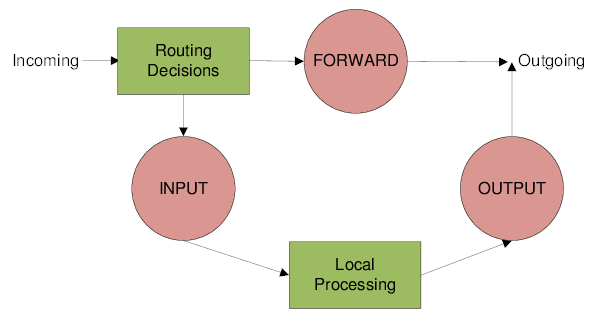
Tables are made up of chains. The chains can differ from one table to another—you’ll see why shortly. In our Filter table, there are three chains:
input — traffic destined to the router itself. To hit the input chain, the packet’s destination must be one of the router’s own addresses, the subnet’s broadcast address, or a broadcast address used by a service running on the router. This includes WinBox, SSH, WebFig, ping, VPN, and other traffic intended for the router. You can find the full list in the wiki: https://wiki.mikrotik.com/wiki/Manual:IP/Services. This is the chain where we protect the router itself.
output — traffic sent by the router. These are replies to packets that arrived via input or new connections originated by the router (ping, VPN, an SSH session initiated from the router, etc.). This chain is used less often because the router is typically treated as a trusted node and its own packets are assumed legitimate by default. Still, history shows that monitoring egress from the router can help catch compromises early.
forward — transit traffic passing through the router (a packet comes in on one interface and leaves via another—or even the same one). This covers LAN-to-Internet, Internet-to-LAN, and inter-VLAN traffic within the LAN.
user chains — custom chains. The admin can create chains as needed, which helps break down large configurations. For example, you can send all traffic to ports 80 and 443 to a separate chain called WEB and put dozens of filtering rules there—this simplifies the config visually without changing how traffic is actually processed.
Two important points to keep in mind.
First point. Forwarded traffic always has both an ingress and an egress interface: it enters via input, is processed by the routing engine, and must exit via output. Pure input traffic has no egress interface—it’s handled inside the router and doesn’t go any further. Likewise, pure output traffic has no ingress interface—it’s generated by the router itself (either brand-new traffic, or a response the router creates to traffic that arrived on input).
Point two. There’s no such thing as “external” or “internal” interfaces for traffic. The router doesn’t care what you call external—it only sees the interface the traffic came in on and the interface it will leave from.
Rules are organized into chains. Each rule belongs to exactly one chain. By default, all chains use an allow-all policy (ACCEPT). Within a table, rules are evaluated in order: a packet is checked against the first rule, then the second, and so on. As a best practice, keep rules in each table grouped by chain: start with INPUT, then FORWARD, and finish with OUTPUT.
Traffic is evaluated only within its own chain. Even if you place INPUT, then FORWARD, then INPUT again, packets that belong to INPUT will never reach FORWARD; that rule order won’t affect traffic flow and will only confuse the admin. Within a single table, a packet won’t jump from one chain to another unless you explicitly direct it to.

Connection Tracking
Another key concept for understanding how the firewall works is connection state tracking—Connection Tracking (or simply ConnTrack). RouterOS maintains a dedicated table that stores the state of connections. This is what enables NAT to function, along with many other parts of the firewall.
ConnTrack mechanisms check whether a packet arriving at the router belongs to an existing flow, so they can apply per-flow policies or organize packets within one or more flows (for example, for traffic shaping or rate limiting).

ConnTrack defines four packet states:
- new — a packet that doesn’t belong to any known flow/connection. For example, the first packet of an RDP connection, the first packet of a WinBox session, or a DNS query. The system records the Source IP, Source Port, Destination IP, Destination Port, and some other fields into a table. The next packet with the same parameters will be treated as part of that recorded flow.
- established — a packet that belongs to an existing flow. In other words, its Source IP, Source Port, Destination IP, and Destination Port match an entry in the conntrack table (or it’s the return packet in the opposite direction).
- related — a packet spawned by another connection. Some protocols (FTP, SIP, PPTP) use multiple flows. For example, FTP control traffic uses TCP port 21, while data is transferred over TCP port 20. When you start a transfer over FTP, the server tells the client over the control channel on port 21: “I’m opening port 20; fetch the data there,” and the client sends a packet to the server’s port 20. That packet is considered related because it was created by the control connection.
- invalid — anything that doesn’t fit the states above. Example: a session is closed cleanly, but due to routing issues some packets from the middle of the session take a different path. When they arrive, the session is already closed and the router has no state for them. They’re not new and don’t belong to any existing connection, so they’re treated as invalid.
A flow’s state isn’t tied to TCP flags like SYN, ACK, or FIN. The conntrack table also assigns states to UDP and other stateless protocols.

ConnTrack consumes CPU, and at high traffic volumes it can put a serious load on the processor. But you don’t need ConnTrack everywhere, and you can turn it off. For example, at an ISP’s upstream edge, routers may be pushing tens of gigabits of traffic. Those routers typically don’t do NAT (they just route), and traffic is filtered at a lower layer to avoid adding load to an already busy border router. In that scenario, there’s no point in checking every packet for connection/flow state.
By clicking the Tracking button, you can disable ConnTrack or tweak its timers. In most cases you won’t need to touch these settings, but you should know they’re there. ConnTrack has three modes: yes and no are self-explanatory; in auto mode, ConnTrack stays off until at least one packet matches an existing rule in the NAT or Filter table.
warning
Disabling ConnTrack breaks NAT and any firewall features that rely on connection tracking: connection-bytes, connection-mark, connection-type, connection-state, connection-limit, connection-rate, layer7-protocol, new-connection-mark, tarpit.
Configuration guidelines
Let’s move on to the practical setup. In this article, I’ll cover the filter table—the one responsible for traffic filtering. As we established above, the INPUT chain handles traffic destined for the router itself, while FORWARD handles traffic passing through the router. Let’s focus on hardening the router itself.
The first and most important rule of working on a firewall was set down in the “lost chapter” of The Tale of Igor’s Campaign: “configure a firewall remotely, and a long trip awaits.” Respect your forebears—heed their wisdom and use Safe Mode.
Here’s how it works: you press the Safe Mode button in the interface and it stays engaged. You can then make whatever changes you want; they’ll only be committed when you click the button again. If those changes break the connection between the router and the WinBox configuration tool (for example, if you filtered out your own packets or disabled an interface), the router will roll back to the state it was in before you entered Safe Mode.
It only keeps the last 100 actions, which is enough for most cases. No reboot is required—the rollback is instant. In the console, press Ctrl+X to enable this mode.

There are two approaches to configuring a firewall:
- Anything not prohibited is permitted;
- Anything not permitted is prohibited.
Neither of them is unequivocally right. I favor the second approach, but on unfamiliar networks I use the first.
To allow only the traffic you need, you first have to define what that traffic is. For input, that’s fairly straightforward. Here’s what a router requires to operate correctly.
- Management: WinBox, SSH, and in some cases WebFig (for example, to view load graphs).
- If your ISP assigns an address via DHCP, allow this protocol on the external/WAN interface.
- If the router is a DHCP server, allow this protocol on the internal/LAN interfaces.
- Same for DNS.
- If you plan to bring up tunnels, allow them.
- OSPF.
- ICMP.
- NTP.
- Neighbor Discovery.
- SNMP.
- Other services: https://wiki.mikrotik.com/wiki/Manual:IP/Services
Have you decided? Open what you need and close everything else.
A firewall follows an “if [condition], then [action]” model. If the criteria set on the General, Advanced, and Extra tabs match, the packet gets whatever is specified on the Action tab. For our purposes today, the relevant match fields are source/destination address, protocol, source/destination port, inbound/outbound interface, and connection state. Their meaning should be self-explanatory; if not, brush up on TCP/IP fundamentals. The most common actions are: accept — allow; drop — deny (silently discard the packet); reject — deny but notify the sender, with the reason defined by reject-with.
Each rule a packet traverses consumes CPU cycles. In small networks that’s usually not a concern, but under heavy traffic you need to account for it. Let’s look at an example.
/ip firewall filter
add action=accept chain=input dst-port=8291 protocol=tcp src-address=10.0.0.0/24
add action=accept chain=input dst-port=8291 protocol=tcp src-address=10.10.0.0/24
add action=accept chain=input dst-port=8291 protocol=tcp src-address=10.11.0.0/24
add action=accept chain=input dst-port=22 protocol=tcp src-address=10.0.0.0/24
add action=accept chain=input dst-port=22 protocol=tcp src-address=10.10.0.0/24
add action=accept chain=input dst-port=22 protocol=tcp src-address=10.11.0.0/24
add action=drop chain=input
In this scenario, when you try to SSH to the router from 10.11.0.11, the firewall will hit the CPU six times to decide whether to let the traffic through. It goes roughly like this: “8291 — not our port — move on. 10.0.0.0/24 — not our subnet — move on. Same for 10.10.0.0/24, and only the sixth rule matches.” On the sixth step, the firewall concludes the traffic is legitimate and allows it.
FTP packets and any other unauthorized traffic will hit the CPU seven times—once for each of the first six rules and then again for the final drop. And that’s in a toy example with seven rules. In real life, you’re dealing with an order of magnitude or two more.
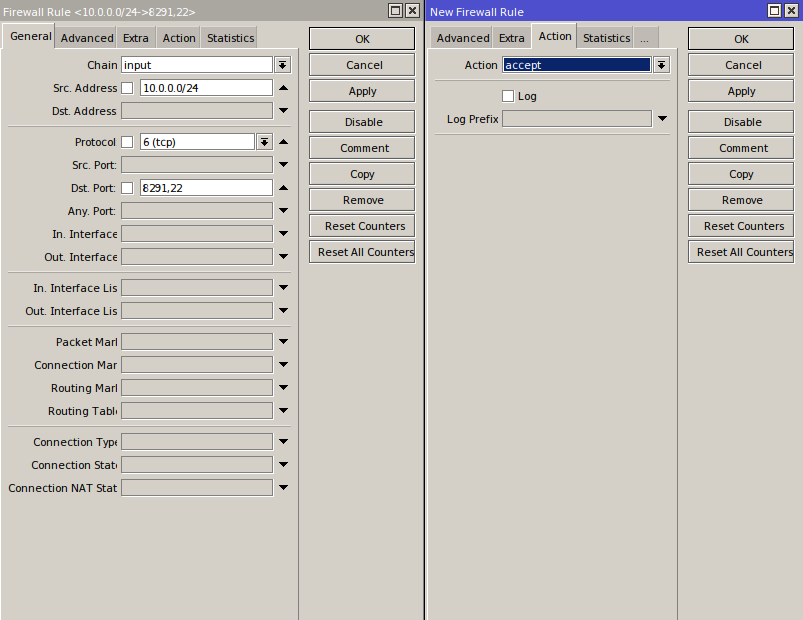
The first thing we can do is combine the two ports into a single rule:
/ip firewall filter
add action=accept chain=input dst-port=8291,22 protocol=tcp src-address=10.0.0.0/24
add action=accept chain=input dst-port=8291,22 protocol=tcp src-address=10.10.0.0/24
add action=accept chain=input dst-port=8291,22 protocol=tcp src-address=10.11.0.0/24
add action=drop chain=input
We’ve reduced the load a bit, but there are still three identical rules that differ only in their addresses. By using an Address List, we can consolidate them into a single rule.
info
Address List is a RouterOS feature that lets you group IP addresses, subnets, and DNS names into a single entry.
Create three entries in a single Address List.

/ip firewall address-list
add address=10.0.0.0/24 list=MGMT
add address=10.10.0.0/24 list=MGMT
add address=10.11.0.0/24 list=MGMT
And apply it to our rule.

/ip firewall filter
add action=accept chain=input dst-port=8291,22 protocol=tcp src-address-list=MGMT
add action=drop chain=input
So we cut seven rules down to two and got rid of unnecessary overhead. Interface lists work the same way as address lists (I covered them in a previous article — “Protecting MikroTik”): combine interfaces from different ISPs into a single interface list and attach rules to the lists rather than to individual interfaces. That not only reduces load, but also makes the admin’s life easier: the fewer rules you have, the easier the system is to maintain.
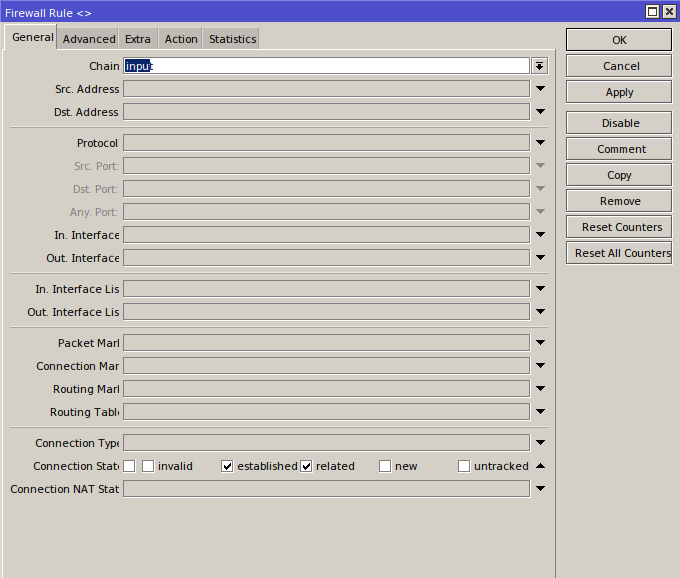
Another way to lighten the firewall’s workload is to use connection tracking (conntrack). In practice, there are far more established packets than new, related, and invalid combined. Once you’ve allowed the first packet of a flow, the rest of the packets in that flow can be treated as legitimate. So add an “allow established” rule and place it at the very top.
Select the protocols and ports you need, and create the appropriate address and interface lists. Allow everything required, then add a final “drop all” rule. With that, the basic configuration of the input chain is complete.
By the way, the firewall comes with a solid default configuration—more than enough to keep networks of almost any size running smoothly. That said, there are always nuances, and any config can be refined to suit your environment.
For a configuration example, you can use my template.
Troubleshooting
When a firewall isn’t working, or isn’t behaving as intended, that’s on the admin—there’s no magic. The first thing to check during troubleshooting is the packet counters. If a counter isn’t incrementing, traffic isn’t hitting that rule. And if traffic isn’t hitting it, either that traffic doesn’t exist or it was handled by a higher-priority rule.

Remember, firewall rules follow a “first match wins” model. Once a packet matches a rule, processing stops, so you need to look higher in the list. Copy your rule, set the action to accept (for troubleshooting, don’t use drop—you could lock yourself out or disrupt the network), and move it upward step by step until you see the first increment in that rule’s counters. If the rule has already seen traffic, the counters will be nonzero and you could miss the packets you’re trying to catch—just reset the counters on that rule (or all rules) using Reset Counters.

/ip firewall filter reset-counters-all
or
/ip firewall filter reset-counters numbers=<rule number>
Suppose we’ve found a rule that our traffic matches, even though it shouldn’t. We need to figure out why. The Log option will help with that. On the Action tab, enable Log (you can set a rule prefix to make it easier to spot in the logs) and then review the logs, which list all the characteristics of packets that hit the rule. These include: chain, incoming and outgoing interfaces, source and destination addresses and ports, protocol, flags, packet size, and NAT actions.

If even a rule placed at the very top isn’t incrementing its counters, strip the match conditions from that rule one by one. Start with interface matches—admins often get confused about where the traffic is coming from or going to (e.g., when connecting to an ISP via PPPoE, through inter-branch tunnels, or with complex routing). Do the counters start incrementing? Turn on logging and inspect the interfaces and other parameters.
If that still doesn’t help, it’s time to bring out the heavy artillery. Go to Tools → Torch and inspect the traffic on the router. Maybe the traffic you expect isn’t there at all. Another great tool—the tcpdump equivalent—is Tools → Packet Sniffer. A full walkthrough of these tools deserves its own article (if you’re interested, let me know in the comments).
To simplify troubleshooting, use the commenting feature. If comments make the window too large and it’s hard to view the rules, switch to inline comments. This puts the comment on the same line as the rule, so more rules fit in the window.

I also recommend ordering your rules according to a clear, consistent logic. Try to keep the same convention across all routers.
Summary
This article covers only the basics of firewall configuration and the main diagnostic methods. Beyond RouterOS, these principles also apply to Linux. In the next article, we’ll dive into more advanced rules that help defend against more sophisticated attacks, examine the Forward chain, and create custom chains.