
The high fidelity positioning, data density and such other intricacies characteristic of modern HDD can be the subject matter for a great many articles, but we are not going to explore the disk mechanics or process physics profoundly, let’s focus on the most interesting component for us — electronics, instead.
Patient
So, here you can see a platter that belongs to a typical Western Digital WD5000AAKX HDD with a 500 GB capacity (Drawing 1). What we have here is listed below:
- DRAM chip. It is of no particular interest to us, the manual can be easily found in the web. The memory of these chips ranges from 8 to 64 MB and conforms to the HDD cache size.
- Spindle driver controller. It is responsible for controlling mechanics and regulating the power, it has some analogous/digital channels. There are no manuals for Smooth L7251 3.1 chip, but you can try to look for identical chips.
- Flash drive. Some Winchester Disk Drives have no microchip, however the Flash drive is imbedded into the disk controller chip. Usually, its size varies from 64 to 256 KB. It is used for the storage of program needed for the HDD controller to boot up. And, this is the most interesting thing for us — HDD controller. They are manufactured by Marvell, ST, LSI and other companies. Some companies who manufacture Winchester Disk Drives produce their own controllers, Samsung and Western Digital are among them.
The HDD controller is designed to control operations related to the data transformation and transmission from the reading/recording heads to the storage interface. Much to our regret, Marvell does not want to make any of the documents for its products publicly available. Having said that, let’s try to sort out things ourselves.
Let’s get a deeper insight
Our foreign counterpart Jeroen “Sprite_tm” Domburg has found an exciting way out of this situation — he used the JTAG interface for the purpose of making research into the controller. (JTAG — Joint Test Action Group). This interface is designed for the PC-board to be tested and adjusted. It means that with the employment of JTAG we can log on to the device we are interested in that is compatible with the IEEE 1149 standard. A TAP (Test Access Port) that is made up of four or five pinouts is integrated into the chip: TDI, TDO, TMS, TCK and, possibly, TRST. The location of these pinouts for the Marvell controller has been found by a certain dex, who has been kind enough to share his findings with us at: HDDGURU. Jeroen has established that the Western Digital controllers have an ARM-kernel accessible through the JTAG port. And also a sequential port, which is normally not used, but it can be useful for our purposes. For the purpose of making research into the HDD controller, we used the FT2232H platter, which can be ordered through the Internet for EUR 30. It is compatible with JTAG, communication is maintained through a sequential port, and also SPI. In dealing with it, we used the software program OpenOCD. As a result of our efforts, it turned out that the microchip has three kernels. Two of them are Feroceon, they are pretty strong and similar to ARM9 kernels, while the third one is Cortex-M3, which is a little bit weaker. All of the kernels have different designation.
- Feroceon 1 is responsible for processing physical reading/recording data on the HDD;
- Feroceon 2 is responsible for processing SATA interface, cache and transforming LBA into CHS;
- Cortex-M3 — designation unknown. It can be simply halted, but the HDD will continue to function.
Welcome All or No Entry to Unauthorized Personnel
As we face the task of using the HDD for our own devious purposes, it is just the right time for us to think of its firmware upgrade. The easiest and, perhaps, most difficult to detect way is to alter the data spontaneously. In order to do so, you have to locate the suitable kernel — the one that has access to the data travelling between the disk and SATA-cable. To get access to the kernel, you can use the DMA (Direct Memory Access) mode. Under this mode, the data exchange occurs directly from the reading head into the memory, without any active involvement of the processor. The same applies to the SATA port: the processor needs only to be advised where the data are available, and the DMA logic will take care of reading the information directly from the memory. The information source in such case can be the cache memory of the Winchester Disk Drive, as it is very conveniently located: the data read from the disk will be available in the cache, so it can be immediately copied from there. The option is fairly complicated — it is not very rational to log on through JTAG each time and mess around with the cache while the HDD is in operation. Instead, with a view to retaining access without the need of connecting an additional platter, you can re-upgrade firmware of the flash memory chip by unsoldering and connecting it to the programmer. However, it might be difficult to upgrade the code because the compression algorithm is unknown, instead, you can simply change the performance address and add a special module that will be read ahead of others. This will make things a bit easier. As a result of his research, Jeroen has created fwtool, which can throw off various blocks in the flash drive and translate the code into a text file. Then, you can modify, remove or add a module and then put everything together in a single file of firmware upgrade which can be easily uploaded into the flash drive.
We are making a firmware upgrade
Such manipulations with the HDD require serious efforts, and no one is likely to give away their storage drive voluntarily, for the purpose of being hacked. For this reason, it would be good if you could find a way for the Winchester Disk Drive firmware to be replaced without using any extraneous devices or removing a chip. Western Digital has its special software utilities intended for dealing with the HDD — they are tools that are compatible with DOS, and they can upload the firmware upgrade for the controller, flash memory chip or service section. The tools employ the so-called Vendor Specific Commands (VSC), however, we will deal with them later on. There is also a tool kit entitled idle3-tools, which can be used for the purpose of modifying the firmware upgrade of the HDD. It can also use the VSC, through the employment of Linux SCSI PassThrough IOCTLs. Jeroen took the code, modified it and got it integrated into fwtool. After that modification, fwtool learned to read and write onto the flash memory chip. Now, if a hacker wishes to make use of fwtool in some way remotely, then he will be provided with an opportunity to discard the flash drive memory of the disk, modify it and renew the firmware upgrade. However, eventually, the owner will know about the hacking attack, and in all probability will reinstall the system, but the violator can insert something that will be in place even after the re-installation. For instance, you can wait until the machine reads from the file /etc/shadow/ where all passwords are stored in the UNIX/Linus systems, and change the content. After that, you can enter under your own password. BTW, the method described above can be useful not only for the purpose of underground experiments, but also for the security purposes. For example, you can create a non-clonable HDD that will maintain normal operation if the standard for accessing the sectors is accidental, as usual. If the Winchester Disk Drive is available only sequentially, then the data will be distorted, and the clone will be different from the original.
Termination node of the HDD
When working under the terminal mode, the use can interact with the HDD through diagnostic commands. This method is used for the purpose of diagnostics and repair of the Seagate and Toshiba storage drives, however, Western Digital storage drives have no such possibility because of the problematic connectivity. The terminal mode de facto offers an entire root — control over mechanics and logics of the device. With its assistance, you can also renew or replace the Winchester firmware upgrade. The list of commands applicable to the majority of storage drives can be viewed in the Internet. The HDD platter has a special plug connection for connecting through a sequential port.
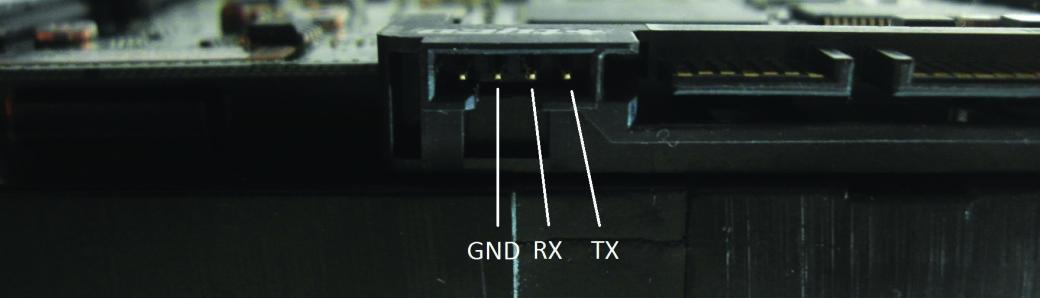
Drawing 2. Plug connection for connecting through a sequential port. One secret less
To gain access to the terminal mode, you will need an adapter required for the transformation of the RS-232 signal levels into TTL levels (such adapters are on sale, but you can also assemble them yourself — all the necessary plans are freely available, and you can take some Arduino models as a basic reference). We are going to take up a manufactured FTDI chip that transforms USB into a sequential interface for the Atmega micro-controller. You need to connect GND and RESET and use the RX and TX contacts for connection.
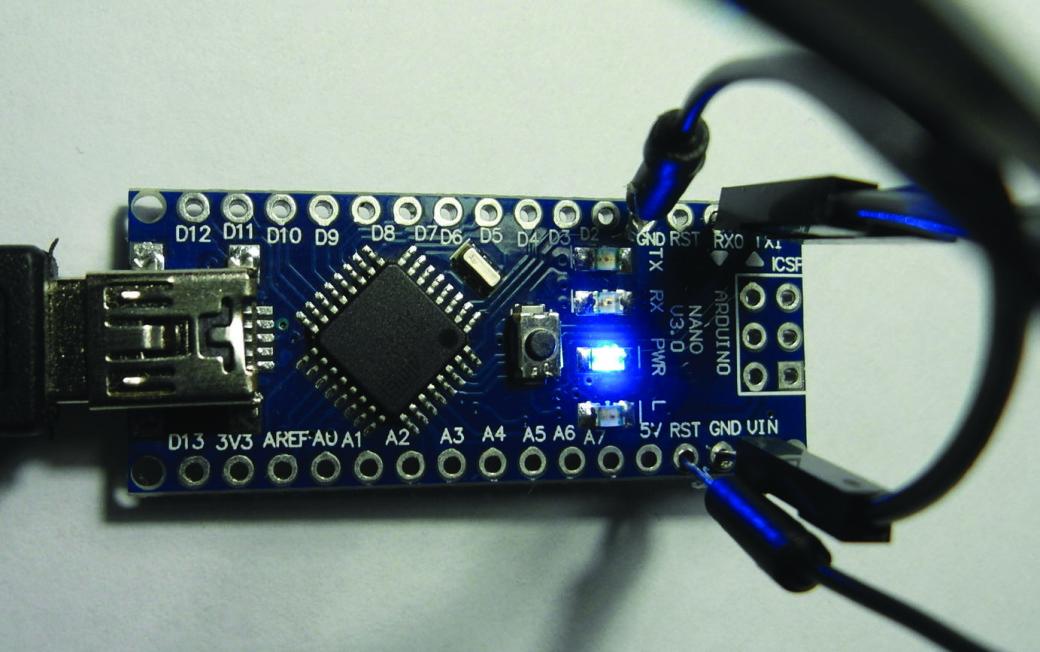
Drawing 3. Arduino Nano as an adapter
To deal with the COM-port, you can use any program you like — for example, PuTTY or Hiperterminal. You select the connection type, enter the COM-port number and other settings.
Speed : 9600
Data Bits :    8
Stop Bits :    1
Parity : None
Flow Control : None
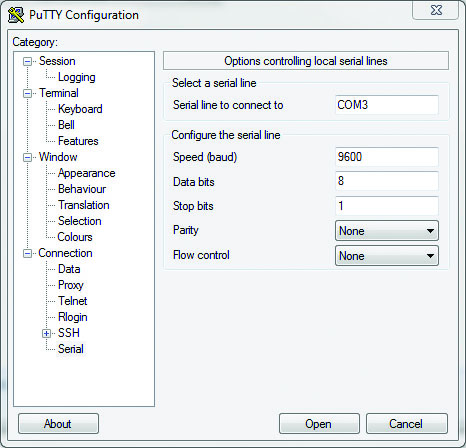
Drawing 4. Control box PuTTY
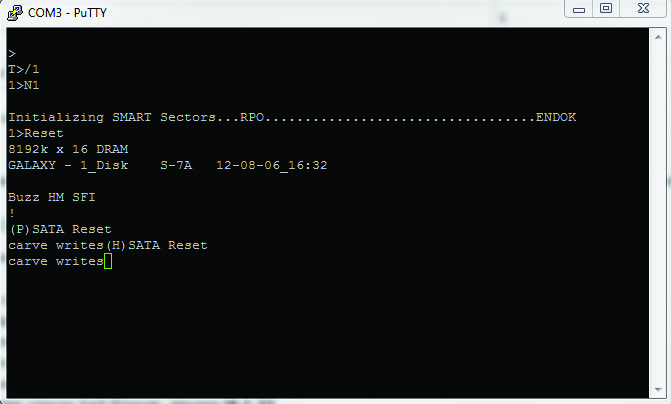
To test the operability of the arrangement, you need to close RX and TX. Ultimately, all the characters set will be presented in the double amount. This occurs because the entered data will be transmitted via TX, and then they will be returned via RX. It is done in the manner as follows: switch off the SATA cable, connect the TX output of the disk with the RX input of the adapter, and vice versa — RX of the adapter with TX of the disc. Connect the power supply. After pressing the <Ctrl + Z> buttons, you get an invitation Т> (or F> in case of malfunctioning HDD) and you need to enter the commands. To get a list of commands, enter /C, and then Q.
Drawing 5. S.M.A.R.T. zeroing
As there is a host of commands, Seagate engineers have broken down their structure into levels. Such commands as read, record, search, log mistakes are accessible immediately at different levels. To switch over the HDD to another level of operation, you need to used the /x command. Apart from the nine levels, there are two additional groups of commands. Network and general commands. The primary mission of network commands is to reflect changes in the current status of the system. General commands are used to access the registers, DSB (Digital Storage Buffer) and data. By and large, the terminal mode allows to take advantage of many exciting possibilities. For example, the low-level formatting command can remove all the data completely, allowing no possibility to restore them, moreover, if the power supply is switched off by someone during formatting, the Winchester Disk Drive will be able to do the remaining formatting job by itself, when the power supply is resumed. Overall, it is a topic that deserves a separate article. Meanwhile, we have to move ahead.
Recording data into the HDD service sections
Any HDD has service sections. They are intended to store the Winchester service programs, such as S.M.A.R.T., modules for early detection of mistakes, self-diagnostics modules, etc. Fortunately, all the data do not occupy the allotted space completely, so, if you use the right approach, you can use the bonus space. Service sections should not be confused with DCO or HPA, which can be easily detected and accessible through standard ATA-commands. In contrast to other techniques of concealing information, a record in the service section leaves no trace and cannot be detected by special search programs used by the law enforcement agencies. In short, this spot is perfectly well suited for the storage of text files with addresses, passwords, meeting venues, etc. To access the data in the service sections, you cannot use the standard ATA-commands, instead, for the recording and reading purposes, VSC (Vendor Specific Commands) are used. Normally, manufacturers do not disclose these commands, but sometimes, they produce utilities to work with service sections — for example, wdidle3.exe program developed by Western Digital and its open source analogue — idle3-tools. Another example for WD — HDDHackr program, which modifies records in the HD system sections. The scope of the service section depends on the Winchester Disk Drive model. To illustrate, the WD2500KS-00MJB0 disk of the Hawk family with a capacity of 250 GB (firmware upgrade 02AEC) provides for two copies of files to be recorded in the service section, about 6 MB each. The zone size on each surface is around 23 MB (64 tracks, 720 sectors each). As this disk has six surfaces (heads ranging from 0 to 5), the modules of service sections are located on a space that is aligned with heads 0 and 1, whereas the space intended for heads 2–5 is reserved, but not utilized. Thus, the reserved section has a capacity of 141 MB, of which about 12 MB is in use. For reference: The WD10EACS-00ZJB0 model with a capacity of one terabyte, with eight surfaces, has 450 MB of reserved space, of which 52 MB is occupied. Ariel Berkman of Recover Information Technologies LTD wrote and article on how to work with the HDD service sections, and he posted PoC-code for recording 94 MB of information in the service section of the Western Digital 250GB Hawk disk. It is done in the following manner:
- Get to know your SATA IO adress by using
lspci -v. - For compilation purposes, use the
gcc -Wall -O -g -o SA-cover-poc SA-cover-poc.ccommand. - Create a random file (94 MB in size) and calculate its MD5-hash.
- Record the file in the service section.
- Clean up the Winchester Disk Drive with the
dd-ing /dev/zerocommand that should be applied to the entire HDD (or to a particular segment, having previously blocked access to the remainder). It is sufficient to run this code once to destroy all data irretrievably. Read the service section content, calculate its hash and make sure that the data are intact.root@Shafan1:~/SA# dd if=/dev/urandom count=184320 > random-file ; md5sum random-file root@Shafan1:~/SA# ./SA-cover-poc -p 0x0170 -w ./random-file root@Shafan1:~# dd if=/dev/zero of=/dev/sdb bs=1M root@Shafan1:~/SA# ./SA-cover-poc -p 0x0170 -r after-dding-dev-zero root@Shafan1:~/SA# md5sum after-dding-dev-zero
The author warns you that his code can lead to the loss of data and incapacitation of the HDD, so you can only use this method at your own risk and peril.
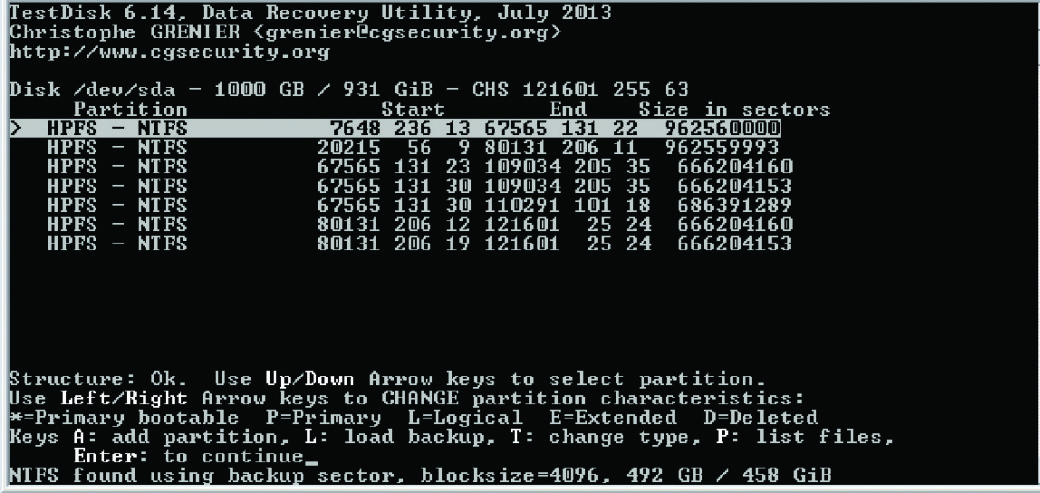
Drawing 6. We are restoring the damaged sections with the help of TestDisk
Conclusion.
Meanwhile, it is time to wind up. In this article, I tried to reveal the untapped resources and capabilities of the HDD. Without getting too deep into the code, we have analyzed a way of gathering data from the storage drive. Even if we slightly open this curtain, we can see there is much room for imagination. You can, for instance, replace the firmware upgrade of the controller, in order to conceal a section that contains sensitive information from others. Or damage the data if you try to clone the HDD, in this way you will be on the safe side without resorting to any criminal utilities. In short, there are many options how to use the HDD — it is up to you to make your choice.
The SA-cover-poc.c has been removed from its original server, and the bitly address too.
Can you post a copy of the file?
I think your page needs some fresh content. Writing manually takes a lot of time,
but there is tool for this time consuming task, search for; ssundee advices unlimited content for
your blog
A little late to the game, but this might be useful to someone in the future.
Here’s a copy of SA-cover-poc.c as of Jan 18, 2015:
archive.org: https://web.archive.org/web/20150118074608/http://www.recover.co.il/SA-cover/SA-cover-poc.c
pastebin: https://pastebin.com/QAKhuzXj
Cheers.