
If I started the article with describing all the advantages of cloud storage of data, you would think that I had been just thawed after twenty years of anabiosis, or that I use overdoses of hypnotics :). Therefore, I will put it briefly, in a programmer-like fashion: when I was faced with the task of making a program that could operate without being bound to the API of a particular service, enabling work with files located in a number of storage spaces (its purpose was backup), it turned out that it was not that simple. I decided to tell you about all the intricacies and pitfalls of that work in this article.
WebDAV
WebDAV (Web Distributed Authoring and Versioning) is a protocol for data transmission and work with the data built on HTTP 1.1. It should be noted that both protected and unprotected transmission can be used. The protocol as such has no protection, but it is possible to add it after the implementation of the authentication on the web server and SSL encryption, so in this case HTTPS rather than HTTP will be used.
Originally developed for collective creation and editing of web pages, DAV later came to be used as a distributed file network system which is efficient for the operation in heavy-duty environment and can work with unstable connection. Thus, DAV is suitable for managing files on a web server, in other words, it can implement cloud storage, and that is where it found its application. You can use it to perform basic operations on the files contained on the server, perform extended operations, such as: blocking, obtaining metadata, versioning, etc. This protocol has substituted the good old FTP, whose days are over.
WebDAV provides seven commands:
- PROPFIND — getting properties of the object on the server in XML format;
- PROPPATCH — changes to the properties of the object;
- MKCOL — create a folder on the server;
- COPY — copy on the server side;
- MOVE — move on the server side;
- LOCK — lock object;
- UNLOCK — unlock the object.
Thus, WebDAV allows you to change the properties of the objects stored on the server, perform a search based on the properties, block an object (a file, in our case) to provide access to its editing by a single user in a distributed environment where access to the file is provided to many users, manage file versions (by legacy commands check -in, -out), as well as perform advanced control over access to files based on lists.
Besides, WebDAV supports legacy commands: GET — to download the file, PUT — to put the file on the server, and DELETE — to delete an object. We will not cover all the commands here; in my case, only four of them were enough for the implementation of the functions of the utility.
These days, the development of this protocol is carried out with the participation of Microsoft, Mozilla, Novell, IBM, and other companies. So don’t be surprised to find WebDAV support in many Microsoft products (including Internet Explorer, Windows Explorer, IIS Web server, etc.), Mozilla Firefox browser, the products released by Novell and IBM. Also, by installing some plug-ins you can make the protocol compatible with Total Commander and FAR.
As I already mentioned, in Windows WebDAV remote storage can be presented in the file explorer as an additional drive. You can do a similar thing in OS X by organizing the connection to WebDAV-server as an additional directory in Finder explorer.
Possible solutions
My task was to connect to two file repositories and organize work with the data there: Yandex.Disk and Dropbox. Both services support work under WebDAV protocol. By registering a Yandex mailbox, you automatically get access to 10 GB of a cloud storage, which you can connect to not only through the standard client, but also with the help of some third party tools (for example, your program) with the use of WebDAV protocol. When you register on Dropbox, you get 5 GB of disk space, which can be used through a standard client. However, in order to access the repository under WebDAV, you have to get additional registration. Actually, it turned out that this type of access is not free, but after the registration you have free access for two weeks. The storage space can be expanded: you can either pay a fee or participate in various special programs organized by the services, for example, look for bugs and report them to the developers.
When I had to write a program to work on WebDAV-protocol, the first thing I did was looking into Win32 API to see if there was a function for this, like those available for the work with FTP. Looking ahead, I can say that the deadlines were tight, so I was not going to use the functions of API level. As you’d expected, API is present in Win32, starting from the version for Windows Vista WebDAV API. It includes one listing, three structures and a set of functions. I thought it was a good sign, because there are certainly some higher-level solutions based on a standard API, and I would not have to struggle with the functions of API-interface.
Then I happened to see Delphi XE3, and I decided to check what tools it had for the work with WebDAV protocol. It turned out that there is an IdWebDav component (in Indy Clients tab of the Component Palette). I already thought that my work had been over… but this component was found to be unable to connect to Yandex (Yandex.Disk was the priority service for me, so I did all the tests on it first).
Then I decided to use Synapse for Delphi, the old but time-tested network library. In addition, there is a wonderful website in RuNet that contains several articles devoted to this lib, [www.webdelphi.ru] (www.webdelphi.ru). At first, the work was going well and I was able to implement several protocol functions: creating folders, downloading files, obtaining the properties of objects. But it was not possible to implement the most important function, i.e., file upload from the local computer. I was sad to find out that there was no useful information online about this protocol. Bing found a few paid sets of components for the work with network, one of which I decided to use just to find out whether it can upload a file to Yandex.Disk. This lib was Clever Internet Suite. When I created a component of clWebDav class, one line of code was enough to upload a file on the server:
clWebDav.Put('https://webdav.yandex.ru/1.jpg', stream);
where stream is the stream file that you had created for reading.
It’s all fine, but what I did not like was the price of the lib: of over USD 500, which isn’t good for us. If you want to use this method, pay attention to the version of the library: only version 7.0 and higher could connect to Yandex, and if we use version 6.0, which is more common in the web, data cannot be uploaded on the server. I had enough of tinkering with Delphi then and decided to go for dotNET and C#.
We connect to Yandex.disk + and create a collection
As WebDAV works over HTTP/S, I decided to use the HttpWebRequest and the HttpWebResponse classes, which are included in the .NET Framework starting from version 2.0. In this case, we will use the .NET Framework 4.0, and I’m going to explain the reasons for that a bit later. Briefly, the first of these classes is an HTTP-request, and the second is an HTTP-response. Our task is to make the right request which could be understood by WebDAV-server. To learn how to write queries to a WebDAV-server properly, let’s consult the Yandex documentation for the use of WebDAV protocol.
The next step will be to write a small program that can perform four operations: create a folder on the remote host, upload object, download object and remove object. These operations are enough for most applications required to deal with production tasks. For the sake of simplicity, we’ll create a WinForms-application. I’ll tell you a couple of words about my program. It is a console application ran by a .bat file according to a schedule. Its main action is the file upload to the remote host, and its tasks include correct handling of the mask for the selection of files and processing of the paths of their location, plus the correct creation of a hierarchy of folders in the cloud, like the one on the local drive. Moreover, as the program works in automatic mode, it creates a file with logs. In our today’s program, we omit these steps (it is obvious that they do not belong to the subject of the discussion) and focus on the WebDAV protocol.
Please note: when you create a draft project, it is better to base it on .NET Framework 4.0. Although WebDAV support appeared as early as in the second version, our tests showed that the same program recompiled with .NET 4 is twice as fast, and this is true for the speed of the work with files and their transportation.
After creating a draft of your application, make four buttons in its form. The first step we are going to take is to create a folder (or collection). It is the simplest of all. It must be mentioned that, although Yandex.Disk operates via a secure HTTPS protocol, you can create a folder over HTTP. We also need to include four input fields in the form: to set the address of the remote host (at the moment we want to access Yandex.Disk: https://webdav.yandex.ru/), to enter a user name, password (for authentication on Yandex) and enter the name of the folder that we want to create in the cloud (Fig. 1). Please note: the server address must be entered along with the protocol type, in this case, https://.
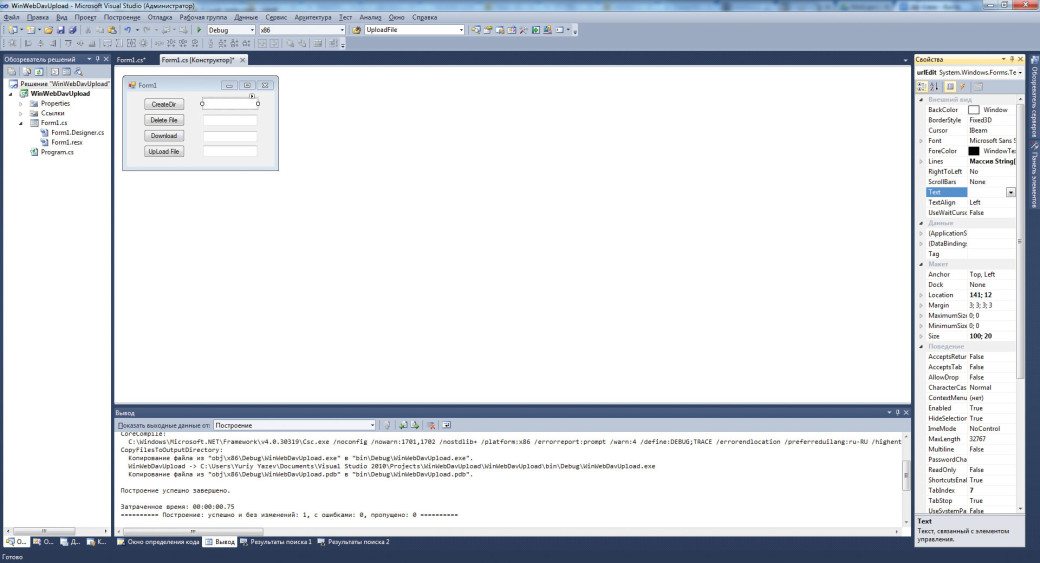
The first step in the code is to include the namespaces: using System.Net; – for using the network, and using System.IO; – for input and output of files. Then create the event handler for the click on CreateDir button. This should include the following code:
String folder = folderEdit.Text;
String url = urlEdit.Text;
String userName = nameEdit.Text;
String password = passwordEdit.Text;
url += folder;
url = url.TrimEnd();
HttpWebRequest request = HttpWebRequest.Create(url) as HttpWebRequest;
request.Credentials = new NetworkCredential(userName, password);
request.Method = WebRequestMethods.Http.MkCol;
HttpWebResponse response = (HttpWebResponse)request.GetResponse();
HttpStatusCode code = response.StatusCode;
Let us discuss the code briefly. At the beginning, for the sake of convenience, we put the data from entry fields into the variables: folder name, host address, user name and password. Next, we form the URL-address: we add the name of the folder we created to the address of the host. As well as HTTP, WebDAV has its standard port number, which is 443, so you do not have to specify that. Now, based on the URL, we can create an object of HTTP-request, which is done in the next line. When it has been created, you need to fill in some of its properties. That is, you should specify the data to be transmitted to a server in the request header. Now we’ll have a look at the Yandex documentation (the link is given above). The compulsory parameters include the authentication data. Yandex accepts the data in two forms: Basic – login and password, QAuth — token under QAuth protocol. We’ll use the first option. However, in this case, the data needs to be encoded. It is implemented by a NetworkCredential class object, whose constructor is given a name and password in the form of strings. The created object of this class is assigned to the property Credentials of the object of the request. We use the next line to specify what command we want to execute — MKCOL. In this case, no data have to be transmitted or received, and immediately after that we send our request. Then we will be able to see what kind of response the server sent us, and if we are successful, the response will be the line “Created”. HttpWebRequest class has many responses, which are intended for the whole situation in the communication between the client and the server.
WebDAV-protocol does not allow to create multiple nested folders with a single request, for example, /folder1/folder2/; you can create only one folder: /folder1/. If the directory exists, and the request sent is attempting to create a directory with the same name, the server will generate an exception, which has to be intercepted by try/catch structure. In the above example there is no exception handling, so do not forget to add it if you use this code in your application. If you want to find out whether there is such a directory or not, you can use the query of PROPFIND, and then receive and parse the response from the server, which contains information in XML format on the objects available on the server. But it’ll take too long, and, in my opinion, it is better to use MKCOL query, and if there actually is a folder with the same name, handle the exception. Therefore, I’ll create a folder hierarchy in my console utility. In addition, if the directory with such name already exists, the program enters such directory.
Deleting an object
Deleting files and/or directories under WebDAV protocol is as simple as the creation of a collection. To solve this task, we’ll use the code above, in which it is necessary to replace the line that specifies the method used by the server by the following line:
request.Method = "DELETE";
As you see, the class of WebRequestMethods.Http has no Delete method, but we can set the preferred method as a string. It will be sent to the server, so the main thing is that the server is able to process and execute this method, and, as we know, WebDAV-server can do it.
In this case, you also should use the try/catch structure to catch exceptions that may occur due to the absence of the object that is to be deleted.
File Download
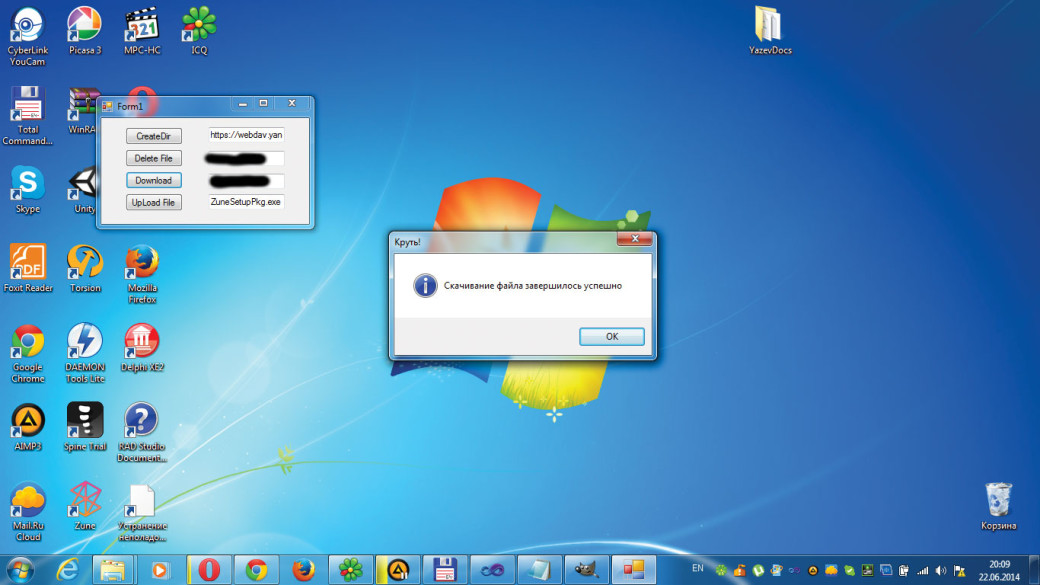
To download a file from the cloud storage with WebDAV protocol, you just need to introduce a couple of changes to the existing code. But to begin with, send any file to the cloud by standard means (through a web interface or desktop Yandex-client). It is supposed that to download a file we need to enter its name in the fourth (bottom) field. We give the same name to a file on the local computer. You should be aware of the fact that we can specify /Software/file.txt at the server, and this will give us access the files in the Software folder, but no such folder will be created in the local file system automatically, so it is necessary to create it at the very beginning. To put it short, we will download ZuneSetupPkg.exe (an indispensable tool for working with Windows Phone, which I often have to install on other people’s computers, so I always have this file handy, in the cloud) from the root of Yandex.Disk to the directory with the .exe file.
In the handler of on the Download button click, after the initialization of variables, creation of request object and assignment of authority (Credentials), specify the type of the method: GET (see the source in the supplementary materials to this issue). Then, having received the response from the server (HttpWebResponse class object), we declare variables for reading the data:
int byteTransferRate = 8192;// Buffer Size
byte[] bytes = new byte[byteTransferRate];// Buffer
int bytesRead = 0;
long totalBytesRead = 0;
long contentLength = long.Parse(response.GetResponseHeader("Content-Length"));
In the last line of the code we read the file size from the header of the response from the server and save it as a variable. Then we create a file stream to write the file on the disk:
FileStream fs = new FileStream(fileToDownload, FileMode.Create, FileAccess.Write);
Then we receive a stream from the server:
Stream s = response.GetResponseStream();
We read portions of data from it and write these to the file until there is nothing else left to write:
do {
          bytesRead = s.Read(bytes, 0, bytes.Length);
            if (bytesRead > 0) {
                totalBytesRead += bytesRead;
                fs.Write(bytes, 0, bytesRead);
            }
    } while (bytesRead > 0);
Once all the data are recorded in the file, we close both flows and the response of the server. While reading the data we increased the variable totalBytesRead by the number of bytes read. In this case, in the absence of errors, the size of this variable will be equal to the size that we calculated from the title, and if this is so, the file is downloaded correctly and we display the message about this (Fig. 2), and the difference in sizes means it was a failure, and we also inform the user about that.
This code is not without exceptions that should be caught, including the following: (404) file not found (on the server), a file cannot be saved in the specified location, etc.
Uploading a file to the server
The last operation, without which our tool will be incomplete, is to download the file to the remote host. This is the trickiest operation here. The steps discussed above did not cause any trouble at all, but this one turned out to be tricky! I have already said that the implementation of file download was more difficult when other development tools were used. And not everything was smooth in case of C#. At first we’ll have a look in the documentation to find out which request for file upload Yandex expects (Fig. 3).
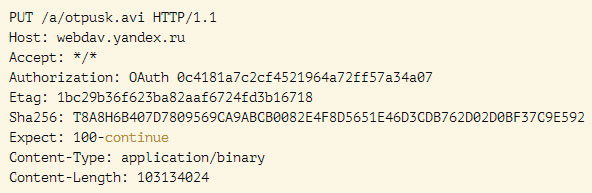
In a full-fledged program we need to be able to download multiple files (at the discretion of the user), file selection according to the mask, creation of a directory hierarchy, and, finally, error handling. We do not need to plough the sand, so we’ll omit all that and focus on one of the specified files, without creating folders or error handling. I will leave all that to you as your homework. So, in the program I made the handler of the button click calls UpdateFile, and it receives the host name and the name of the file to be loaded, which are taken from the corresponding input fields. The beginning of the method is similar to those discussed above, but now in the request header we send PUT command to be performed by the server, i.e., demonstrate our desire to download the file. In the previous requests we did not really rely on the documentation, but this time it is very useful for us: we’ll include into the request in the header all fields recommended by Yandex, as well as some additional ones. So, let’s consider the header code, and then discuss the troubles:
request.ContentLength = fileLength;
request.KeepAlive = false;
request.ReadWriteTimeout = -1;
request.Timeout = -1;
request.AllowWriteStreamBuffering = false;
request.PreAuthenticate = true;
request.SendChunked = false;
request.ContentType = "application/binary";
request.ProtocolVersion = HttpVersion.Version11;
request.ServicePoint.ConnectionLimit = 1;
request.AllowAutoRedirect = false;
//request.Expect = "100-continue";
request.ServicePoint.Expect100Continue = true;
request.Accept = "*/*";
The values of some parameters are derived by the rule of thumb. Some of the properties are dependent on the others. For instance, it is better to disable continuous connection (second line), since in this case an exception is generated that makes it impossible to read and write in the stream simultaneously.
The following two properties set the timeout for reading and writing to the network flow. The value of 1 means infinity. The size of the file to be downloaded can be infinitely large, so we cannot know how long it will take to download it. The property of AllowWriteStreamBuffering is a very interesting thing that enables or disables buffering data before sending. When it is turned on, the file is first loaded into memory and only when it is uploaded to the server. The strange thing about this property is that on some hosts you can easily unload a file if you disable buffering, but on other hosts an exception will emerge in respect of the need to buffer. Perhaps this is due to some registry or communication settings; I also do not rule out the differences between the services. If buffering is enabled on the server and a large file is sent to it, there may not be enough resources for it (the SystemOutOfMemory exception). In your program you can add a check box to enable or disable buffering. If buffering is disabled, then it is necessary to include the PreAuthenticate flag (the next property), which is used to send the authentication data together with the heading. The next parameter, SendChunked (only for Yandex.Disk), allows you to upload files of unknown size to a remote host in advance, something to which Dropbox reacts with the corresponding exception. Next, specify the type of data being transmitted and the version of the protocol used (11 stands for 1.1), and the number of possible HTTP-connections: we do not need more than one. Then we disable automatic redirection. To set the following recommended field: “Expect: 100-continue,” which includes waiting for a response for the download request, we cannot use the property that was commented. It is necessary to use the code line provided below: request.ServicePoint.Expect100Continue = true;. The latter property of the HTTP-header activates the mask for received objects, in our case, any files can be received: with a random name and extension.
When the query is formed, it is necessary to obtain the network flow in which we will record the data sent to the server. We also open the local file for reading. We allocate a byte buffer for temporarily storage of the data read from the file; then, in the cycle, we begin to read and send, writing data into the stream. After that, close the file and network flows; in general, all that is done in the usual way. After receiving the response from the server, we check if the HTTP-status is equal to the flag Created and compare the file size with the number of bytes transferred; if both conditions are met, then the transfer was successful, otherwise, there has been a problem.

To sum up
So, the development of our utility comes to its end. In this utility we have implemented all the intended functionality, that is, the four most required commands that no file manager which works with a remote host can do without. We did not become attached to any given hosting service by using its API: instead, we developed a universal application that communicates with the server via a standard WebDAV protocol. This allowed our program to connect to multiple servers (I tested Yandex.disk and Dropbox) by using just one code. However, as we have seen, different services have different ways of interpreting and supporting protocols.
You can develop the program further on your own, and in this article I mentioned the possible improvements: these include downloading several files, creating a hierarchy of folders, parallelization of downloads, and many more. If you dig deeper into the WebDAV protocol, you can implement other commands to control the content on the server.
And now I wish you all good luck, and spend more time outdoors :). Hope you read us again soon ][!
Hello,
Thanks for the article! Very helpful! Could you give me a sample c # project? I dont understand the file upload to yandex disk?
Thank you.